HomeMatic HM-Sec-TIS Montageanleitung Und Bedienungsanleitung
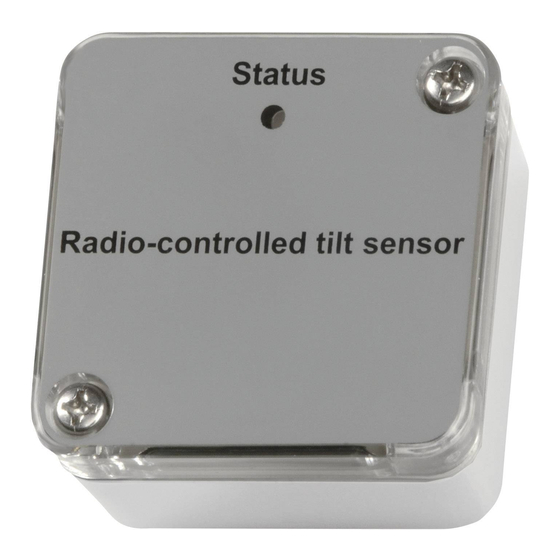
Funk-neigungssensor
Vorschau ausblenden
Andere Handbücher für HM-Sec-TIS:
- Montageanleitung und bedienungsanleitung (31 Seiten)

Verwandte Anleitungen für HomeMatic HM-Sec-TIS


Inhaltszusammenfassung für HomeMatic HM-Sec-TIS
- Seite 1 Montage- und Bedienungsanleitung Funk-Neigungssensor HM-Sec-TiS Seite 4 - 17 Mounting instruction and operating manual Wireless inclination sensor HM-Sec-TiS Seite 18 - 31...
- Seite 2 1. Ausgabe Deutsch 01/2010 Dokumentation © 2008 eQ-3 AG, Deutschland 1. English edition 10/2010 Alle Rechte vorbehalten. Ohne schriftliche Zustim- Documentation © 2008 eQ-3 AG, Germany mung des Herausgebers darf dieses Handbuch auch All rights reserved. This manual may not be repro- nicht auszugsweise in irgendeiner Form reproduziert duced in any format, either in whole or in part, nor may werden oder unter Verwendung elektronischer, mecha-...
-
Seite 3: Inhaltsverzeichnis
Funktion ......6 Bewahren Sie die Anleitung zum späteren Nachschla- Allgemeine Systeminformation zu HomeMatic. . 7 gen auf! Allgemeine Hinweise zum Funkbetrieb . -
Seite 4: Funktion
Dieses Gerät ist Teil des HomeMatic-Haussteuersy- chung aus der Waagerechten einen Kontakt öffnet. stems und arbeitet mit dem bidirektionalen BidCoS® Eine Auswerteschaltung wandelt den detektierten Funkprotokoll. Zustand in HomeMatic-Funkbefehle um. Das Gerät ist Alle Geräte werden mit einer Standardkonfiguration batteriebetrieben und ist so flexibel und ortsunabhän- ausgeliefert. Darüber hinaus ist die Funktion des gig einsetzbar. -
Seite 5: Allgemeine Hinweise Zum Funkbetrieb
Funk-Neigungsschalter bei einer Kippbewegung Hiermit erklärt die eQ-3 AG, dass sich dieses Gerät in von ca. 15° einen Funkbefehl auslöst. Sollte der Übereinstimmung mit den grundlegenden Anforde- Funk-Neigungssensor HM-Sec-TiS zu empfind- rungen und den anderen relevanten Vorschriften der lich gegen Erschütterungen, Richtlinie 1999/5/EG befindet. z. B. durch Wind, reagieren, kann der Lagesen- Die vollständige Konformitätserklärung finden Sie... -
Seite 6: Montage, Batterie Einlegen
6.2 Montage, Batterie einlegen Neigungssensor entsprechend Kapitel 6.1. Setzen Sie den Gehäusedeckel so auf das Gerät Öffnen Sie das Gerät durch Lösen der beiden auf, dass die Druck-Aussparung für die Geräte- Deckelschrauben und nehmen Sie den Deckel ab. LED oben liegt und diese durch die Aussparung Befestigen Sie das Gerät am Montageort ent- zusehen ist. -
Seite 7: Verhalten Nach Dem Einlegen Der Batterie
Mit dem Funk-Neigungssensor HM-Sec-TiS können HomeMatic Aktoren, wie z.B. der Funk-Schalter gesteuert werden. Dazu ist vorher ein Anlernprozess durchzuführen. Alle HomeMatic-Geräte verfügen dazu über eine Anlerntaste und eine Geräte-LED. Soll nun der Funk-Neigungssensor HM-Sec-TiS z.B. an einen Funk-Schalter angelernt werden, ist folgende... -
Seite 8: Zurücksetzen In Den Auslieferungszustand
Zurücksetzen in den Prozedur durchzuführen: Anlerntaste am Funk-Schalter drücken, bis die Auslieferungszustand LED anfängt, rot zu blinken. Dies dauert ca. 4 Sekunden. Halten Sie die Anlerntaste für mindestens 5 Sekunden Anlerntaste am Funk-Neigungssensor gedrückt. Die Geräte-LED beginnt, langsam rot zu Sec-TiS kurz drücken. -
Seite 9: Wartung Und Reinigung
Technische Daten aktiv. Um den Sensor zurückzusetzen, müssen sie die Konfigurationssoftware der Zentrale zum Zurückset- zen benutzen! Der Vorgang ist in der Anleitung zur Funkfrequenz: 868,3 MHz Zentralen-Software beschrieben. Typ. Freifeldreichweite: 100 m Stromversorgung: 1 x Lithium-Knopfzelle CR2032 Wartung und Reinigung Batterielebensdauer: bis zu 3 Jahre Schutzart: IP65 Das Produkt ist für Sie bis auf einen eventuell erforder-... - Seite 17 Bevollmächtigter des Herstellers: Manufacturer’s authorised representative: eQ-3 AG Maiburger Straße 29 26789 Leer / GERMANY www.eQ-3.de...