BFT VISTA SEL Bedienungsanleitung
Konfigurierbare funktionen
Quicklinks
ITALIANO
Modalità di funzionamento VISTA SEL:
Modalità libera (predefinito)
Ponticello inserito (fig. 10A).
La pressione dei tasti modifica il funzionamento dell'automazione.
Modalità protetta (con chiave)
Togliere la scheda dal supporto plastico (Fig. 9) e disinserire il ponticello
come indicato in fig. 10B. Rimontare la scheda.
Ora per modificare il funzionamento dell'automazione è necessario
avvicinare la chiave in prossimità della parte superiore del VISTA SEL e
attendere il beep. Per i 10 secondi successivi, la pressione dei tasti modi-
fica il funzionamento dell'automazione.
Collegamenti Vista SL: Fig. 7.
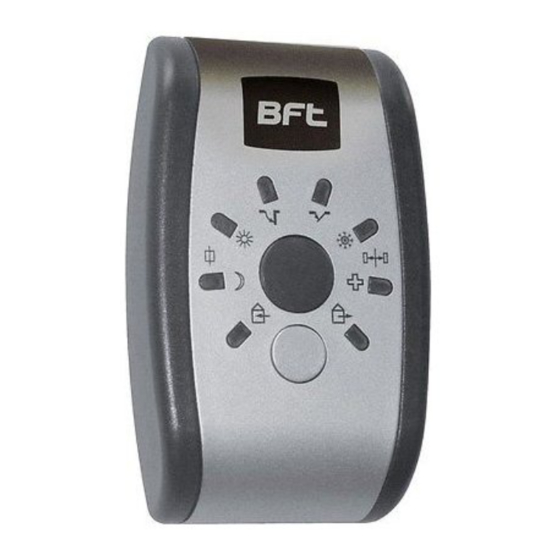
Significato dei led e dei pulsanti (Fig. 8):
(riferirsi alle istruzioni dell'automazione per i particolari di funzionamento)
T1:
ogni pressione di questo tasto comporta la selezione in successione di
una modalità di funzionamento dell'automazione (indicata dai led F1..F6)
T2:
ogni pressione di questo tasto comporta la selezione in succes-
sione di una modalità di funzionamento dei radar dell'automazione
(indicata dai led R1...R2)
R1:
led acceso: radar interno abilitato
led spento: radar interno disabilitato
R2:
led acceso: radar esterno abilitato
led spento: radar esterno disabilitato
F1:
led acceso: funzione "chiusa di notte" attiva
F2:
led acceso: funzione "chiusa di giorno" attiva
F3:
led acceso: funzione "aperta totale" attiva
F4:
led acceso: funzione "aperta parziale" attiva
F5:
led acceso: funzione "apre parziale" attiva
F6:
led acceso: funzione "apre farmacia" attiva
NOTA:
Nel funzionamento a porta singola si ha la sola accensione dei led rossi.
Nel funzionamento "bussola" i led rossi indicano le impostazioni per la porta
esterna, mentre i led verdi indicano le impostazioni per la porta interna.
I
SELETTORE FuNzIONI
GB
FuNcTION SELEcTOR
F
SELEcTEuR DES FONcTIONS
D
kONFIGuRIERBARE FuNkTIONEN
E
SELEcTOR DE FuNcIONES
P
SELEcTOR DE FuNçòNES
DATI TECNICI - TECHNICAL SPECIFICATIOS -
CARACTÉRISTIQUES TECHNISCHE -
DATEN TECHNIQUES - DATOS TECNICOS -
DADOS TÉCNICOS
Alimentazione,
Alimentation, Stromversorgung,
Alimentación, Alimentação:.................................24V
Trasmissione
Transmission
Transmission,
mod:..........................................................VISTA SEL
Grado IP,
Protection,
Portèe contact, Schutzgrad,
Grado de protección, Grau de
ENGLISH
VISTA SEL operating mode:
Free mode (default)
Jumper inserted (fig. 10A).
The keys can be pressed to change the automated system's operation.
Protected mode (with key)
Remove the card from the plastic support (Fig. 9) and disconnect the
jumper as illustrated in fig. 10B. Refit the card. To change the automated
system's operation, it is now necessary to hold the key up to the top of the
VISTA SEL unit and wait for the beep. For the next 10 seconds, the keys
can be pressed to change the automated system's operation.
Vista SL wiring: Fig. 7.
Meaning of LEDs and buttons (Fig. 8):
(refer to the automated system's instructions for operating details)
T1:
every time this key is pressed, one of the automated system's ope-
rating modes is selected in sequence (indicated by LEDs F1...F6)
T2:
every time this key is pressed, one of the automated system radars'
operating modes is selected in sequence (indicated by LEDs R1...
R2)
R1:
LED lit: internal radar enabled
LED unlit: internal radar disabled
R2:
LED lit: external radar enabled
LED unlit: external radar disabled
F1:
LED lit: "closed by night" mode on
F2:
LED lit: "closed by day" mode on
F3:
LED lit: "total open" mode on
F4:
LED lit: "partial open" mode on
F5:
LED lit: "partial open" mode on
F6:
LED lit: "chemist's open" mode on
NOTE:
In single door mode, only the red LEDs are lit
In "cage" mode, the red LEDS indicate the settings for the external door,
while the green LEDs indicate the settings for the internal door.
D811592_01 23-07-08
VISTA SEL
Power supply
,
, Transmission,
, Übertragung,
Transmissão:..............................RS485
proteção:............IP 4X
~

Verwandte Anleitungen für BFT VISTA SEL


Inhaltszusammenfassung für BFT VISTA SEL
- Seite 1 VISTA SEL e VISTA SEL unit and wait for the beep. For the next 10 seconds, the keys attendere il beep. Per i 10 secondi successivi, la pressione dei tasti modi- can be pressed to change the automated system’s operation.
- Seite 2 VISTA SEL y esperar hasta mar a chave para perto da parte superior do VISTA SEL e aguardar o beep. escuchar un pitido. Durante los 10 segundos siguientes, si se pulsan los Pelos 10 segundos sucessivos, a pressão das teclas modifica o funciona-...
- Seite 3 Ø 20 mm Fig. 5 32 mm Fig. 7 Fig. 6 VISTA SL 1 2 3 4 5 6 7 8 9 10 11 12 13 14 15 16 17 18 19 20 2122 23 VISTA SEL VISTA SEL - Ver. 01...
- Seite 4 Fig. 8 Fig. 9 Fig. 10 10 sec Fig. 5 - VISTA SEL - Ver. 01...