Z-EDGE Z3D Bedienungsanleitung
Inhaltsverzeichnis
Verfügbare Sprachen
Verfügbare Sprachen
Kapitel
Inhaltsverzeichnis

Verwandte Anleitungen für Z-EDGE Z3D


Inhaltszusammenfassung für Z-EDGE Z3D
- Seite 1 USER GUIDE BEDIENUNGSANLEITUNG...
- Seite 2 CONTENTS / INHALTSVERZEICHNIS English Deutsch...
- Seite 24 Inhaltsverzeichnis 1 EINLEITUNG ............................23 1.1 Eigenschaften ..........................23 1.2 Lieferumfang ..........................23 1.3 Produkt Übersicht ........................24 2 ANFANG ............................. 25 2.1 Speicherkarte einsetzen ......................25 2.2 Installation ............................. 26 2.3 Einstellen der Position des Geräts ..................27 2.4 An die Stromversorgung anschließen ................28 2.5 Datum &...
-
Seite 25: Einleitung
1 EINLEITUNG Vielen Dank, dass Sie sich für unsere Z-Edge Z3D Autokamera entschieden haben. Schützen Sie sich und Ihr Fahrzeug mit Echtzeit-Videoaufnahmen und Audioaufnahmen während der Fahrt. Bitte lesen Sie diese Bedienungsanleitung aufmerksam durch und bewaren Sie diese zum nachschlagen in der Zukunft auf. -
Seite 26: Produkt Übersicht
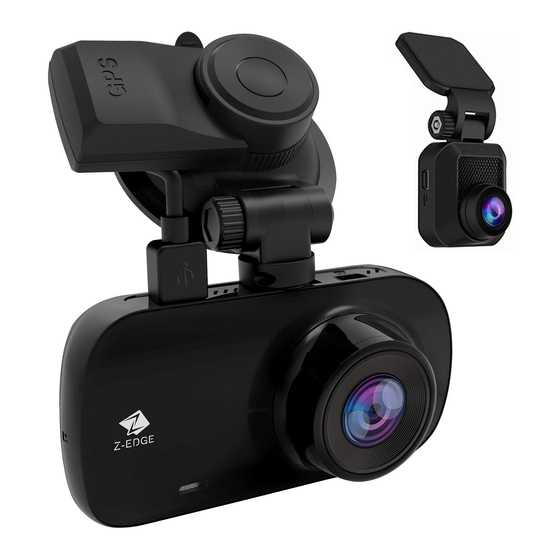
1.3 Produkt Übersicht Einschalttaste Lautsprecher TF/Micro SD Kartenschlitz Front Objektiv Zurück/Menü-Taste Mikrofon Aufwärts-Taste USB Kabel der Saugnapfhalterung Abwärts-Taste Saugnapfhalterung OK/Aufnahme-Taste USB Anschluss der Micro USB Anschluss Saugnapfhalterung Saugnapfhalterung Anschluss Mini USB Anschluss der Heckkamera Mini USB Anschluss( zur Heckkamera anschließen) Heckkamera Objektiv -24-... -
Seite 27: Anfang
2 ANFANG 2.1 Speicherkarte einsetzen Setzen Sie die Speicherkarte mit den Goldkontakten zur Rückseite des Geräts ein. Schieben Sie die Speicherkarte soweit in den Schlitz, bis sie einrastet. Speicherkarte entnehmen Drücken Sie vorsichtig auf die Speicherkarte, die Karte wird freigegeben und kann herausgezogen werden. -
Seite 28: Installation
2.2 Installation Bitte befolgen Sie die folgenden Schritte zur Befestigung des Geräts an der Windschutzscheibe Ihres Fahrzeugs: 1. Bringen Sie die Halterung am Gerät an. Schieben Sie ihn in dem Anschluss, bis diese einrastet. 2. Ziehen Sie die Schutzfolie vom Saugnapf ab. 3. -
Seite 29: Einstellen Der Position Des Geräts
2.3 Einstellen der Position des Geräts 1. Lösen Sie die Kunststoffmutter, um das Gerät zu schwenken. Wenn die Position fixiert werden soll, muss die Mutter einfach wieder festgeschraubt werden. 2. Schwenken das Gerät horizontal für eine klare Sicht. -27-... -
Seite 30: An Die Stromversorgung Anschließen
2.4 An die Stromversorgung anschließen Verwenden Sie nur das mitgelieferte Autoladegerät, um die Kamera mit Strom zu versorgen und den eingebauten Akku aufzuladen. 1. Verbinden Sie die Micro USB Schnittstelle des Ladekabels mit dem USB Anschluss(14) an der Saugnapfhalterung. 2. Verbinden Sie die Micro USB Schnittstelle des USB Kabels(12) mit dem Micro USB Anschluss(7) an der Kamera. -
Seite 31: Datum & Uhrzeit Einstellen
2.5 Datum & Uhrzeit einstellen Bevor Sie dieses Gerät verwenden, empfehlen wir Ihnen, das richtige Datum und dierichtige Uhrzeit einzustellen: 1. Wenn das Gerät aufnimmt, drücken Sie kurz die OK/Aufnahme-Taste(6), um die Aufnahme zu stoppen und den Standby-Modus aufzurufen. 2. Drücken Sie die Zurück/Menu-Taste(3), um das Einstellungen Menü aufzurufen. 3. -
Seite 32: Installation Der Heckkamera
Installation der Heckkamera 1. Verbinden Sie die Frontkamera und die Heckkamera durch das 8 Meter lang Kabel. 2. Schalten Sie die Kamera ein. Die Rückansicht wird automatisch auf dem Bildschirm im Dual (PiP)-Format angezeigt. TIPP: Um den Vollbildmodus anzuzeigen, drücken Sie die Zurück/Menü- Taste(3), um das Einstellung Menü... -
Seite 33: Kamerabetrieb
3 Kamerabetrieb 3.1 Videoaufnahmen Wenn eine TF/MicroSD-Karte eingelegt hat und das Gerät an die Stromversorgung angeschlossen ist, schaltet sich das Gerät beim Einschalten des Automotors automatisch ein und beginnt mit der Videoaufnahme. Wenn der Automotor ausgeschaltet wird, speichert das Gerät automatisch die Videos und schaltet sich innerhalb von 10 Sekunden aus. -
Seite 34: Einstellungen Anpassen
Item Description Es zeigt an, ob das Mikrofon ein- oder Audioaufnahme ausgeschaltet ist. Wenn das Gerät aufnimmt, drücken Sie die Aufnahme/ OK/Aufnahme-Taste(6) zum Starten / Stoppen Stoppen der Aufnahme. Drücken Sie die Zurück/Menü-Taste(3), um das Menü Menü aufzurufen. Drücken Sie die Abwärts-Taste (5), um eine Vorschau Vorschau des Videos / Fotos anzuzeigen. -
Seite 35: Notfall-Video Schützen
3.5 Notfall-Video Schützen Wenn G-Sensor aktiviert ist und ungewöhnliche Vibration oder Kollisionen erkennt, schützt die Kamera die aktuell aufgezeichnete Videodatei automatisch davor, überschrieben zu werden. Ein Warnung-Symbol erscheint oben links auf dem Bildschirm, um zu signalisieren, dass die Datei erfolgreich geschützt wurde. -
Seite 36: Fotoaufnahme
3.9 Fotoaufnahme 1. Wenn das Gerät aufnimmt, drücken Sie kurz die OK/Aufnahme-Taste(6), um die Aufnahme zu stoppen und den Standby-Modus aufzurufen. 2. Drücken Sie kurz die Aufwärts-Taste(4), um den Fotoaufnahme Modus aufzurufen. 3. Drücken Sie die Aufwärts-Taste(4), um ein Foto aufzunehmen. 3.10 Videowiedergabe &... -
Seite 37: Gps
3.12 GPS In der Saugnapfhalterung ist ein GPS-Empfänger integriert, der die Position Ihrer Autokamera überall auf der Erde bestimmen kann. Die Videos mit GPS-Tracking-Daten, die erfasst Ort, Geschwindigkeit, Zeit und andere Variablen, die auf einem GPS-Multimedia-Player angezeigt werden können. 1. Stellen Sie sicher, dass das USB-Kabel der Saugnapfhalterung an den Micro USB-Anschluss der Kamera angeschlossen ist, um GPS-Tracking zu aktivieren. -
Seite 38: Einstellungen Übersicht
4 Einstellungen Übersicht Menü Funktion Beschreibung Verfügbare Option Frontkamera und Heckkamera angeschlossen: 1920x1080P 30FPS + 1920x1080P 30FPS Die Auflösung der Video Nur Frontkamera aufzuzeichnenden Auflösung 2560x1440P 30FPS Videos einstellen 2304x1296P 30FPS 1920x1080P 60FPS 1920x1080P 30FPS 1280x720P 120FPS 1280x720P 60FPS 1280x720P 30FPS Bildschirm Frontkamera/Heckkamera/ Anzeige einstellen... -
Seite 39: Menü Funktion
Menü Funktion Beschreibung Verfügbare Option Die Zeitverzögerung für die Autokamera auswählen, um Automatisch Aus 1 Min./3 Min./5 Min./Aus sich nach der Ausschaltung Ihres Fahrzeugs automatisch auszuschalten. Set the duration for LCD LCD Auto Off 1 Min./3 Min./Aus Auto Off Einstell- WDR an / aus An/Aus ungen... -
Seite 40: Faqs
5 FAQs Wo soll ich den dash cam platzieren? • Wir empfehlen, die Kamera so nahe wie möglich an der Mitte der Windschutzscheibe zu montieren. Dies sollte weder den Fahrer ablenken noch das Sichtfeld des Fahrers blockieren (Siehe 2.4). Warum stoppt die Kamera nach einiger Zeit die Aufnahme? •... -
Seite 41: Kundendienst
Markt gebracht werden. Außerdem können Sie einen speziellen Rabatt oder Gutschein für unsere Produkte erhalten. Ihre Meinung ist wichtig Z-Edge ist bestrebt, unsere Produkte zu verbessern, um Ihnen die beste Benutzererfahrung anzubieten. Wir schätzen Ihr Feedback und wir hoffen, dass Sie Ihre Erfahrungen mit anderen Käufern teilen könnten. -
Seite 42: Spezifikationen
8 Spezifikationen Name Beschreibung Bildsensor CMOS-Sensor Auflösung 2560x1440P Speichermedium Unterstützt Micro SDXC bis zu 128 GB, Klasse 10 oder höher Bildschirm 2,7 Zoll LCD TFT Objektiv Weitwinkel, F2.0 Fokusbereich 1,5 Meter bis unendlich Frontkamera und Heckkamera angeschlossen: 1920x1080P 30FPS + 1920x1080P 30FPS Nur Frontkamera: Video 2560x1440P 30FPS... -
Seite 43: Fcc-Erklärung
Name Beschreibung Betriebstemperatur -10 bis 60°C / 14 bis 140°F Lagertemperatur -20 bis 70°C / -4 bis 158°F Abmessungen Frontkamera: 97 x 50 x 32,5 mm Heckkamera: 54,5x40x32 mm Gewicht Frontkamera: 85g | Heckkamera: 40g Autoladegerät Eingang: DC 12-24V, Ausgang: DC 5V/2,4A GPS-Empfänger Integriert FCC-ERKLÄRUNG... - Seite 44 Z3DZ18UM-01...