Z-EDGE R1 Bedienungsanleitung
Inhaltsverzeichnis
Verfügbare Sprachen
Verfügbare Sprachen
Quicklinks
Kapitel
Inhaltsverzeichnis

Verwandte Anleitungen für Z-EDGE R1


Inhaltszusammenfassung für Z-EDGE R1
- Seite 1 USER GUIDE BEDIENUNGSANLEITUNG...
- Seite 2 CONTENTS / INHALTSVERZEICHNIS English Deutsch...
- Seite 25 Inhaltsverzeichnis 1 EINLEITUNG 1.1 Eigenschaften 1.2 Lieferumfang 1.3 Produkt Übersicht 2 ANFANG 2.1 Speicherkarte einsetzen 2.2 Installation 2.3 Einstellen der Position des Geräts 2.4 An die Stromversorgung anschließen 2.5 Datum & Uhrzeit einstellen 2.6 Sprache 2.7 Standardeinstellungen 2.8 Werkseinstellungen zurücksetzen 3 Kamerabetrieb 3.1 Videoaufnahmen 3.2 Aufnahmebildschirm...
-
Seite 26: Einleitung
1 Einleitung Vielen Dank, dass Sie sich für unsere Z-Edge R1 Dashcam entschieden haben. Schützen Sie sich und Ihr Fahrzeug mit Echtzeit Videoaufnahmen und Audioaufnahmen während der Fahrt. Bitte lesen Sie diese Bedienungsanleitung aufmerksam durch und bewaren Sie diese zum nachschlagen in der Zukunft auf. -
Seite 27: Produkt Übersicht
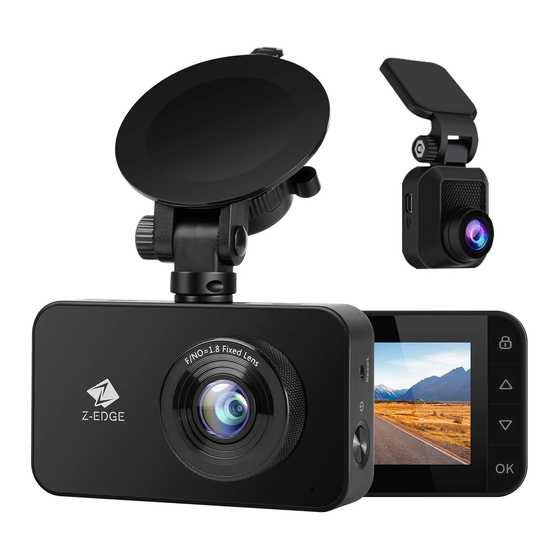
1.3 Produkt Übersicht Reset Taste Aufwärts-Taste Einschalttaste Abwärts-Taste TF/Micro SD Kartenschlitz OK-Taste Mini USB Anschluss Lautsprecher (zur Heckkamera anschließen) Mikrofon Saugnapfhalterung Anschluss Heckkamera Frontlinse Hecklinse Strom- / Datenanschluss Heckkamera Anschluss (Micro-USB) (Mini-USB) Menü Taste -25-... -
Seite 28: Anfang
2 Anfang 2.1 Speicherkarte einsetzen Setzen Sie die Speicherkarte mit den Goldkontakten zur Rückseite des Geräts ein. Schieben Sie die Speicherkarte soweit in den Schlitz, bis sie einrastet. Speicherkapazität Video-Aufnahmezeit 16GB 2.5 Stunden 32GB 5 Stunden 64GB 10 Stunden 128GB 20 Stunden 256GB 40 Stunden... -
Seite 29: Installation
2.2 Installation Bitte befolgen Sie die folgenden Schritte zur Befestigung des Geräts an der Windschutzscheibe Ihres Fahrzeugs: Installation der Frontkamera 1. Bringen Sie die Halterung am Gerät an. Schieben Sie ihn in dem Anschluss, bis diese einrastet. 2. Schließen Sie die Dashcam an die Stromversorgung Ihres Autos an. (Siehe 2.4) 3. -
Seite 30: Installation Der Heckkamera
7. Verfolgen Sie das Kabel an der Seite des Türrahmens bis zum Boden des Fahrzeugs. Heben Sie dann den Teppich im beifahrerseitigen Fußraum an und verfolgen Sie das Kabel darunter. 8. Alternativ können Sie das Netzkabel entlang des Türrahmens verlegen und hinter / unter das Handschuhfach stecken. -
Seite 31: Einstellen Der Position Des Geräts
Anmerkung: Consult your vehicle's technical manual or consult a professional if you are not sure how to remove interior panels. WARNUNG: Installieren Sie das Gerät nicht an einer getönten Windschutzscheibe. Dadurch könnte die Tönungsfolie beschädigt werden. 2.3 Einstellen der Position des Geräts 1. -
Seite 32: Datum & Uhrzeit Einstellen
Manuelles Ein/Aus • Um die Kamera manuell einzuschalten, drücken und halten Sie die Einschalttaste(2) für bis zu 3 Sekunden. • Um die Kamera manuell auszuschalten, halten Sie die Einschalttaste(2) 3 Sekunden lang gedrückt. WARNUNG: Wenn die Kabinentemperatur 115 Grad Fahrenheit oder höher erreicht, stoppt das Autoladegerät möglicherweise, den Akku der Kamera aufzuladen. -
Seite 33: Standardeinstellungen
2.7 Standardeinstellungen Menü Optionen Standard Fahren Szenisch Parken 1080P+1080P, 1296P+1080P Auflösung 1296P+1080P 1296P+1080P 1296P+1080P 1296P+1080P An/Aus Audioaufnahme 1/3/5 Min. Loop Aufnahme 3 Min. 3 Min. 5 Min. 1 Min. An/Aus Datumsstempel Automatisch Aus, 1/3/5 Min. 1 Min. 1 Min. 1 Min. 1 Min. -
Seite 34: Kamerabetrieb
3 Kamerabetrieb 3.1 Videoaufnahmen Wenn eine Speicherkarte eingelegt hat und das Gerät an die Stromversorgung angeschlossen ist, schaltet sich das Gerät beim Einschalten des Fahrzeugmotors automatisch ein und beginnt mit der Videoaufnahme. Wenn der Fahrzeugmotor ausgeschaltet ist, speichert das Gerät automatisch die Videos und schaltet sich innerhalb von 10 Sekunden aus. -
Seite 35: Einstellungen Anpassen
Während sich die Dashcam im Standby-Modus befindet Pause 1080P 2020/04/20 11:53:00 1. Pause 8. Einstellungen 2. Auflösung 9. Schnappschuss 3. WDR 10. Wiedergabe 4. Parkmodus 11. Aufnahme starten 5. Bewegungserkennung 12. Datum & Uhrzeit 6. Audio Aufnahme Status 13. Batterie Kapazität 7. -
Seite 36: Aufnahmeauflösung Anpassen
3.4 Aufnahmeauflösung anpassen Die Auflösungen können in den allgemeinen Einstellungen angepasst werden. Die R1-Dashcam unterstützt die Auflösungen von 1296P und 1080P für die Frontkamera und Auflösung von 1080P für die Heckkamera. Die Auflösung der Heckkamera wird nur angezeigt, wenn die Heckkamera an die Frontkamera angeschlossen ist. -
Seite 37: Vibrationserkennung
3.8 Vibrationserkennung Der eingebaute G-Sensor überwacht und erkennt ungewöhnliche Erschütterung oder Vibrationen. Sie löst automatisch die Notfall-Video-Schutz Funktion aus. Stellen Sie die Empfindlichkeit ein, dass diese Funktion automatisch mit kleineren oder größeren Vibrationen ausgelöst werden (Funktion kann auch ausgeschaltet werden) Die G-Sensor Empfindlichkeit einstellen: Einstellungen>Empfindlichkeit>... -
Seite 38: Fotoaufnahme
3.12 Fotoaufnahme Um einen Schnappschuss zu machen, drücken Sie die Aufwärts-Taste(9), wenn die Dashcam eingeschaltet ist und aufzeichnet oder sich im Standby-Modus befindet. 3.13 Audioaufnahme Wenn die Dashcam aufzeichnet, kann die Audioaufnahme Funktion durch Drücken der Aufwärts-Taste(9) aktiviert oder deaktiviert werden. 3.14 Video &... -
Seite 39: Stempel
(Siehe 3.16). 3. Öffnen Sie die WLAN-Einstellungen auf Ihrem Smart-Gerät und wählen Sie die Z-EDGE R1 aus. Der Name lautet Z-EDGE-R1, gefolgt von 4 Zeichen. Zum Beispiel: Z-EDGE-R149AA. Geben Sie das Passwort ein, wenn Sie dazu aufgefordert werden. Passwort: 12345678 4. -
Seite 40: App Funktionen
4.1 App Funktionen Name Beschreibung Zurück Zurück zum vorherigen Menü Mikrofon Audioaufnahme Ein / Aus Videokamera-Symbol Ein 10-Sekunden Videoclip aufnehmen Kompass Karte nach Norden ausrichten Verbindung Die App von der Dashcam trennen Öffnen Sie das Einstellungsmenü und passen Sie die Einstellungen Einstellungen der Dashcam an. -
Seite 41: Menü Übersicht
5 Menü Übersicht Menü Funktion Beschreibung Verfügbare Option Ein QR-Code zum Herunterladen Herunterladen von App Szenen Modus Wählen Sie einen der Standard/Fahren/ voreingestellten Modi Szenisch/Parken für verschiedene Fahrszenarien. Auflösung Die Auflösung einstellen Nur Frontkamera: 1296P/1080P Front- & Heckkamera: 1296P+1080P 1080P+1080P Loop-Aufnahme Die Dauer Zeit jedes 1 Min./3 Min./5 Min. - Seite 42 Menü Funktion Beschreibung Verfügbare Option Fahrsicherheit Ermüdungsalarm und Ermüdungsalarm: Scheinwerfer-Erinnerung Aus/1 Std./2 Std./4 Std. Scheinwerfer-Erinnerung: An/Aus Bewegungser- Bewegungserkennung An/Aus und Parkmodus kennung aktivieren / deaktivieren Einschaltton Einschaltton An/Aus An/Aus Wi-Fi Wi-Fi An/Aus An/Aus Einstell- Automat. Die Zeitverzögerung für die Aus/1 Min./3 Min. ungen Dashcam auswählen, um sich Ausschalten...
-
Seite 43: Faqs
6 FAQs Wo soll ich den dash cam platzieren? • Wir empfehlen, die Kamera so nahe wie möglich an der Mitte der Windschutzschei be zu montieren. Dies sollte weder den Fahrer ablenken noch das Sichtfeld des Fahrers blockieren (Siehe 2.2). Warum stoppt die Kamera nach einiger Zeit die Aufnahme? •... -
Seite 44: Kundendienst
Follow us to get the latest news, discounts and giveaways. 8 Garanti Vielen Dank, dass Sie sich für Z-EDGE entschieden haben. Ihre Zufriedenheit steht bei uns immer an erster Stelle. Alle Z-Edge-Kunden haben eine 30-tägige Geld-zurück-Garantie, um sicherzustellen, dass Ihr Einkaufserlebnis sorgenfrei ist. -
Seite 45: Spezifikationen
9 Spezifikationen Spezifikation Beschreibung Bildsensor CMOS-Sensor IMX307+GC2053 Auflösung 1296x1080P 30fps Speichermedium Unterstützt Micro SDXC bis zu 256 GB, Klasse 10 oder höher Bildschirm 2,7 Zoll LCD TFT 960*240 Front: 140°, F1.8; Heck: 110°, F2.1 Objektiv Weitwinkel Standfoto 2M, JPEG Automatisch Weißabgleich Automatisch Mikrofon... -
Seite 46: Fcc Erklärung
FCC-ERKLÄRUNG Das vorliegende Gerät erfüllt die Grenzwertbestimmungen für digitale Geräte der Klasse B nach Teil 15 der FCC-Regeln zur Funkentstörung. Ziel dieser Bestimmun- gen ist es, beim Betrieb des Gerätes innerhalb einer Wohnumgebung einen angemessenen Schutz gegen störende Interferenzen zu gewährleisten. Dieses Gerät erzeugt und nutzt Hochfrequenzenergie und kann diese auch ausstrahlen. - Seite 48 R1Z21UMENDE-02...