Herunterladen Inhalt Inhalt Diese Seite drucken
Panasonic AG-DV2500E Bedienungsanleitung

Panasonic AG-DV2500E Bedienungsanleitung

Digital-videokassettenrekorder
Inhaltsverzeichnis

Werbung

Verfügbare Sprachen
  • DE

Verfügbare Sprachen

  • DEUTSCH, seite 69
POWER
AG-DV2500
MIC
REMOTE
OFF
9PIN
WIRELESS
Before operating this product, please read the instructions carefully and save this
manual for future use.
Printed in Thailand
VQT0C55
Digital Video Cassette Recorder
A.DUB
REC
PLAY
DVCAM
NTSC
PAL
REC INH.
1 / 3
INPUT
CH
REW
LINE
2 / 4
STOP
AUDIO
DV
S-VIDEO
Model AG
-
EJECT
MENU
PAUSE
SET
FF
PAL
E
LLT0030-001A

Werbung

Inhaltsverzeichnis
loading

Inhaltszusammenfassung für Panasonic AG-DV2500E

  • Seite 1 Digital Video Cassette Recorder Model AG POWER EJECT MENU A.DUB PLAY PAUSE DVCAM NTSC REC INH. AG-DV2500 1 / 3 REMOTE INPUT LINE 2 / 4 STOP AUDIO 9PIN WIRELESS S-VIDEO Before operating this product, please read the instructions carefully and save this manual for future use.
  • Seite 2: Safety Precautions

    Supplement This equipment is in conformity with the provisions and protection requirements of the corresponding European Directives. This equipment is designed for professional video appliances and can be used in the following environments: 5 Residential (including both of the location type class 1 and 2 found in IEC 1000-2-5) 5 Commercial and light industrial (including, for example, theatres) 5 Urban outdoors (based on the definition of location type class 6 in IEC 1000-2-5) This apparatus is designed for rack mounting or is used close to other apparatus.
  • Seite 3: Caution For Ac Mains Lead

    A replacement fuse cover can be purchased from your ter L or coloured RED. local Panasonic Dealer. IF THE FITTED MOULDED PLUG IS UNSUITABLE How to replace the fuse FOR THE SOCKET OUTLET IN YOUR HOME THEN 1.
  • Seite 4: Main Features

    Thank you for purchasing our Digital MAIN FEATURES Video Cassette Recorder AG-DV2500E. ● DV format High picture and sound quality by digital tech- nology. ● Compatible mechanisms for standard/mini DV cassettes It records on and plays back DV cassettes of the standard and mini size.
  • Seite 5: Inhaltsverzeichnis

    TABLE OF CONTENTS INTRODUCTION EDIT Precautions ............ 6 Using the unit in an editing system ....48 Daily maintenance and regular inspection ..7 Precautions on the use of cleaning tape ..8 MENU SCREEN Cassette tape ..........8 Structure of the menu ........51 Condensation ..........
  • Seite 6: Introduction

    INTRODUCTION Precautions Place of storage and use Maintaining the unit (Please turn off the Please avoid storing or using this VTR in the fol- power before performing maintenance lowing places: work.) ● Extremely hot or cold places beyond the al- Please wipe the unit with a soft cloth.
  • Seite 7: Daily Maintenance And Regular Inspection

    For details, please refer to page 65, “Checking the hour meter”. Maintenance consultation : For details on the maintenance plan and fee, please consult with your nearest PANASONIC-authorized service agent. Head cleaning ● Recording or playing back with a stained head ●...
  • Seite 8: Precautions On The Use Of Cleaning Tape

    INTRODUCTION Precautions on the use of cleaning tape Please use cleaning tape produced by PANASONIC. Memo: 1. Under low humidity conditions, (10% RH to 30% Please follow the instructions below when using the RH), please perform head cleaning at intervals cleaning tape.
  • Seite 9: For Recording And Storing Videotapes In The Best Condition

    When transporting the AG-DV2500E from a cold Head drum to a warmer place abruptly, first take out the cas- sette. Then place the AG-DV2500E in a plastic bag and seal it before transporting the unit. Leave the AG-DV2500E in the sealed plastic bag until the unit has the same temperature as the surroundings.
  • Seite 10: Names And Functions Of Various Parts

    NAMES AND FUNCTIONS OF VARIOUS PARTS – Front panel – POWER EJECT MENU A.DUB PLAY PAUSE DVCAM NTSC REC INH. AG-DV2500 1 / 3 REMOTE INPUT LINE 2 / 4 STOP AUDIO 9PIN WIRELESS S-VIDEO [POWER] Power button/LED [A. DUB] Audio dubbing button/LED ●...
  • Seite 11 POWER EJECT MENU A.DUB PLAY PAUSE DVCAM NTSC REC INH. AG-DV2500 1 / 3 REMOTE INPUT LINE 2 / 4 STOP AUDIO 9PIN WIRELESS S-VIDEO [REMOTE] Remote select switch [MIC] Microphone input terminal Use this switch to select the remote controller This is the mini jack for monaural microphone type.
  • Seite 12 NAMES AND FUNCTIONS OF VARIOUS PARTS – Front panel – (continued) POWER EJECT MENU A.DUB PLAY PAUSE DVCAM NTSC REC INH. AG-DV2500 1 / 3 REMOTE INPUT LINE 2 / 4 STOP AUDIO 9PIN WIRELESS S-VIDEO [REC] Record button/LED [FF] Fast forward button/LED ●...
  • Seite 13 POWER EJECT MENU A.DUB PLAY PAUSE DVCAM NTSC REC INH. AG-DV2500 1 / 3 REMOTE INPUT LINE 2 / 4 STOP AUDIO 9PIN WIRELESS S-VIDEO Indicator Audio indicator : When a cassette is loaded, the LED This is an indicator for determining the pres- lights up green.
  • Seite 14: Rear Panel

    NAMES AND FUNCTIONS OF VARIOUS PARTS – Rear panel – WARNING : SHOCK HAZARD - DO NOT OPEN. AVIS : RISQUE DE CHOC ELECTRIQUE - NE PAS OUVRIR. DV IN/OUT AUDIO VIDEO 9PIN REMOTE NTSC CH 1/3 CH 2/4 LINE S -VIDEO DC power input terminal (2P) This is used for DC12V input.
  • Seite 15 WARNING : SHOCK HAZARD - DO NOT OPEN. AVIS : RISQUE DE CHOC ELECTRIQUE - NE PAS OUVRIR. DV IN/OUT AUDIO VIDEO 9PIN REMOTE NTSC CH 1/3 CH 2/4 LINE S -VIDEO [S-VIDEO IN] S-VIDEO input [AUDIO IN] Audio input terminal terminal (4P) (PHONO 2) This is the input terminal for YC separate video sig-...
  • Seite 16: Wireless Remote Controller

    NAMES AND FUNCTIONS OF VARIOUS PARTS – Wireless remote controller – [STILL MODE] button Use this button to select images in the STILL mode. When the unit is in the STILL mode, press this POWER DISPLAY button to toggle images in the following se- STILL quence.
  • Seite 17: Operation Buttons

    [F. ADV] button [SEARCH–] / button • During playback, STILL mode or variable Each time this button is pressed in the STILL speed playback in the forward direction, mode, the image is advanced one frame. When press this button to slow down the playback holding down this button, the image is advanced speed.
  • Seite 18: On-Screen Display

    ON-SCREEN DISPLAY – Regarding on-screen display – Besides E-E images and playback images, the monitor connected to the VIDEO LINE OUT terminal and S- VIDEO OUT terminal provides the following on-screen information. Wireless remote controller DISPLAY menu – – – D I S P L A Y – – – Set at ON D I S P L A Y C O U N T E R P O S I .
  • Seite 19: Status Display

    ON-SCREEN DISPLAY – Status display – Status display: It displays the current settings and operating status. 3 2 K C H – 1 / 2 m i n S T A N D B Y - O F F 1 0 / 1 0 / 0 2 1 2 : 0 0 : 0 0 T C R 0 2 : 0 0 : 0 0 : 0 0 Item...
  • Seite 20 ON-SCREEN DISPLAY – Status display – (continued) 3 2 K C H – 1 / 2 m i n S T A N D B Y - O F F 1 0 / 1 0 / 0 2 1 2 : 0 0 : 0 0 T C R 0 2 : 0 0 : 0 0 : 0 0 Item Content...
  • Seite 21: Event Display

    ON-SCREEN DISPLAY – Event display – Event display : When a specific function is in activation or when the operation status is changed with the remote controller, etc, the events will be displayed at the positions shown below. Display at position B ...Display for about 3 seconds 3 2 K C H –...
  • Seite 22: Alarm Display

    ON-SCREEN DISPLAY – Alarm display – Alarm display : Alarm messages are displayed as shown below, when an operation error has occurred or when the unit is in a poor condition for operation. E.g., dirty head. 3 2 K C H – 1 / 2 m i n H E A D C L E A N I N G R E Q U I R E D ! I N V A L I D T A P E !
  • Seite 23 Display Contents COPY INHIBIT The user attempts to record signals protected with the copy guard. REC INHIBIT The user attempts to record on a write protected cassette tape. (The rear slide is pushed to “SAVE”.) A. DUB INHIBIT The user attempts to perform audio dubbing on a write protected cassette tape. (REC TAB) (The rear slide is pushed to “SAVE”.) A.
  • Seite 24: Preparation

    PREPARATION – Provided wireless remote controller – Loading the batteries Before using the wireless remote controller, please load 2 batteries (AA) in. Lift up the cover Load in 2 batteries Close the cover. of the battery (AA). • Please insert the · pole compartment.
  • Seite 25 Using the wireless remote controller POWER EJECT MENU Before using the wireless remote controller, A.DUB PLAY PAUSE please set the REMOTE switch to “WIRELESS”. DVCAM NTSC REC INH. AG-DV2500 1 / 3 REMOTE INPUT LINE 2 / 4 STOP AUDIO 9PIN WIRELESS S-VIDEO...
  • Seite 26: Power

    PREPARATION – Power – Connecting to the AC adapter Connect the provided AC adapter to the main unit. WARNING : SHOCK HAZARD - DO NOT OPEN. AVIS : Screw RISQUE DE CHOC ELECTRIQUE - NE PAS OUVRIR. DV IN/OUT Provided AC adapter Clamp AUDIO VIDEO...
  • Seite 27: Turning Off The Power

    Switching on the power POWER indicator When the unit is in the POWER OFF mode (the POWER indicator lights up POWER red), press the POWER button on the unit or the remote controller. A.DUB PLAY DVCAM NTSC REC INH. • The power is turned on and the POWER indi- AG-DV2500 1 / 3 cator lights up green.
  • Seite 28: Selecting The Ntsc/Pal Signal System

    PREPARATION – Selecting the NTSC/PAL signal system – This unit supports both the NTSC and PAL signal system. Before inputting analogue signals (composite or YC separate video signals), please select the signal system. POWER NTSC NTSC/PAL switch button indicator indicator POWER OCK HAZARD - DO NOT OPEN.
  • Seite 29: Loading/Ejecting Cassettes

    PREPARATION – Loading/ejecting cassettes – Please use standard DV cassettes or mini DV cassettes. Guide POWER POWER EJECT EJECT MENU MENU A.DUB PLAY PAUSE A.DUB PLAY PAUSE DVCAM NTSC REC INH. DVCAM NTSC REC INH. AG-DV2500 AG-DV2500 1 / 3 1 / 3 REMOTE INPUT...
  • Seite 30: Setting/Displaying Date And Time

    PREPARATION – Setting/displaying date and time – This function sets up the date and time data of the built-in clock. With the built-in chargeable battery, the configured date and time data is maintained even after the main power is turned off.
  • Seite 31 button PLAY button EJECT EJECT button POWER SET button DISPLAY MENU MENU STILL BARS BLANK MODE button PLAY PAUSE AUDIO DVCAM NTSC REC INH. PAUSE button MUTING MENU SEARCH+ 1 / 3 OUT SEL. 2 / 4 STOP button button AUDIO FF button SEARCH–...
  • Seite 32 PREPARATION – Setting/displaying date and time – (continued) Selecting date/time display The date and time information is displayed on the monitor screen connected to the VIDEO LINE OUT or the S-VIDEO terminal. To set whether to display the date and time information and the display style, use the DISPLAY menu screen.
  • Seite 33: Recording

    RECORDING – Connection and setting – This chapter explains the connection, setting and operation methods required to use this unit as a recorder. This unit cannot be used as an editing system recorder. Connection When connected to a video device equipped with a DV terminal Images can be recorded with almost no deterioration of image quality.
  • Seite 34 RECORDING – Connection and setting – Setting NTSC indicator PAL indicator Rear panel POWER NG : SHOCK HAZARD - DO NOT OPEN. EJECT ISQUE DE CHOC ELECTRIQUE - NE PAS OUVRIR. N/OUT MENU A.DUB PLAY PAUSE VIDEO DVCAM NTSC REC INH. AG-DV2500 1 / 3 9PIN REMOTE...
  • Seite 35: Setting Time Codes

    RECORDING – Setting time codes – Time code recording This unit has a built-in time code reader/ generator. During recording, time codes are re- corded. During recording of data from the built-in time code generator , the user-bits are not recorded.
  • Seite 36 RECORDING – Setting time codes – Display the top MENU. Top MENU – – – M E N U – – – Remote controller Main unit S Y S T E M . . R E MO T E . . Press the EJECT and STOP A U D I O / V I D E O .
  • Seite 37: Recording Method

    RECORDING – Recording method – Main unit Remote controller PLAY button button PAUSE button REC button POWER EJECT A.DUB PAUSE F.REV F.ADV MENU PLAY PLAY A.DUB PLAY PAUSE button DVCAM NTSC REC INH. PAUSE AG-DV2500 STOP 1 / 3 STOP INDEX INDEX button...
  • Seite 38: Series Recording Function

    RECORDING – Series recording function – By linking this unit to other DV devices, this unit can perform continuous, long-hour recording. This unit can be set as a backup unit connected to a DV camcorder. When the recording tape of the source unit ends, this unit can start recording. This enables long-hour recording. Backup unit: the main unit DV Camcorder POWER...
  • Seite 39: Audio Dubbing

    RECORDING – Audio dubbing – For tapes recorded in the 32kHz audio mode, audio dubbing can be performed on the CH3 and CH4 channel after the recording. (After-recording) Notes • For tapes recorded in the 48kHz audio mode, audio dubbing cannot be performed. •...
  • Seite 40 RECORDING – Audio dubbing – Memo Connection • During audio dubbing, if the tape comes to a part Audio dubbing sounds are input from the AUDIO IN recorded in a non dubbing-feasible mode (such terminal on the rear panel or the MIC terminal on as LP mode or 48kHz audio mode), the VTR will the front panel.
  • Seite 41: Playback

    PLAYBACK – Connection/setting – This section explains the required connection, setting and operation method for using this unit as a player. Connection Using this unit as a standalone device Monitor WARNING : SHOCK HAZARD - DO NOT OPEN. AVIS : RISQUE DE CHOC ELECTRIQUE - NE PAS OUVRIR.
  • Seite 42 PLAYBACK – Connection/setting – Setting REMOTE switch on the front panel POWER To use the wireless remote controller, set the switch to “WIRELESS”. Memo A.DUB DVCAM NTSC AG-DV2500 To control the unit with the 9 PIN REMOTE terminal, set the switch 1 / 3 REMOTE INPUT...
  • Seite 43: Basic Playback Method

    PLAYBACK – Basic playback method – PAUSE button DVCAM indicator PLAY button PLAY button A.DUB PAUSE POWER EJECT F.REV F.ADV PLAY MENU A.DUB PLAY PAUSE STOP button button DVCAM NTSC REC INH. INDEX INDEX PAUSE – AG-DV2500 1 / 3 button REMOTE INPUT...
  • Seite 44: Special Playback Function

    PLAYBACK – Special playback function – Frame advance (reverse) playback Use the remote controller. Setting POWER The STILL MODE item of the SYSTEM menu DISPLAY STILL Select the amount of frame advance playback and still image. BARS BLANK MODE FIELD : Image is advanced field by field.
  • Seite 45 Variable speed playback Use the remote controller. Set the unit to the search mode. SEARCH +/( ) button button button The main unit button can also be used to set the unit to the search mode. Set the unit to the PLAYBACK or the STILL mode. POWER DISPLAY Press the FF button to execute fast-forward playback.
  • Seite 46: Locate Function

    PLAYBACK – Locate function – Index search This function locates and advances/rewinds to the position where the index signal is recorded. Use the remote controller. To locate an index in the forward direction vis-a-vis the A.DUB PAUSE current tape position: F.REV F.ADV PLAY...
  • Seite 47: Selecting Playback Audio Output

    PLAYBACK – Selecting playback audio output – The output mode for audio playback can be selected with the remote controller. To turn the audio muting function ON/ OFF or to mute the EE audio, press the AUDIO MUTING button. POWER DISPLAY To resume the audio output, press the button STILL...
  • Seite 48: Edit

    Remote controller Memo If editing precision is critical, please input the composite signals of the VIDEO LINE OUT of AG-DV2500E as standard synchronization sig- nals into the editing remote controller. Use the S-VIDEO OUT terminal for video signals. AG-A850 Setting the main unit Set the REMOTE switch of the front panel to “9 PIN”.
  • Seite 49 • For certain controllers, the LEARN function will not work normally: Enabling the LEARN function: Insert the tape with time code recorded till 23:59:00:00-00:01:00:00 into the AG-DV2500E before activating the LEARN function. E-49...
  • Seite 50: Using The Unit In A Non-Linear System

    EDIT – Using the unit in an editing system – (continued) Using the unit in a non-linear system This is a system that captures the content of the source tape on a non-linear editing system and records the non-linear edited contents onto the main unit. Connection Connecting using DV 1394 terminal DV Terminal...
  • Seite 51: Menu Screen

    MENU SCREEN – Structure of the menu – Hierarchical menus are displayed on the monitor. Top MENU Menu SYSTEM M E N U – – – S Y S T E M – – – S Y S T E M . . S T I L L MO D E F I E L D R E MO T E .
  • Seite 52: Setting The Menu

    MENU SCREEN – Setting the menu – The various functions of this unit can be set from the menu. The configured settings are saved in the unit's memory and are maintained even after the power is turned off. PLAY button button EJECT EJECT button...
  • Seite 53 button PLAY button EJECT EJECT button POWER DISPLAY SET button MENU STILL BARS BLANK MODE PLAY PAUSE AUDIO DVCAM NTSC REC INH. PAUSE button MENU SEARCH+ MUTING MENU button 1 / 3 OUT SEL. 2 / 4 STOP button button AUDIO FF button SEARCH–...
  • Seite 54: Contents Of The Menus

    MENU SCREEN – Contents of the menus – In the menu descriptions below, settings with marks are factory settings. Top MENU Items Setting Contents SYSTEM Displays the menus related to the operation system of this unit. REMOTE Displays the menus related to the remote controller. AUDIO/VIDEO Displays the menus related to the audio and video.
  • Seite 55: System Menu

    SYSTEM menu SYSTEM menu Items Setting Contents STILL MODE FIELD Use this item to select the still image type during the STILL mode or frame advance playback: FIELD : Displays field image. During frame advance playback, 1st and FRAME 2nd field images are displayed alternately. : displays the 1st field image.
  • Seite 56: Remote Menu

    When remote control is executed via the RS-422A interface, use this TYPE2 menu item to set the type of controller connected: TYPE3 TYPE1 : Remote controller not of PANASONIC TYPE4 TYPE2 : Remote controller not of PANASONIC TYPE5 TYPE3 : AG-A850, AJ-A95...
  • Seite 57 AUDIO/VIDEO menu Items Setting Contents AUDIO MODE Select the audio sampling frequency for recording: : Records at 48kHz. It records in the 2-channel stereo mode. No audio dubbing. : Records at 32kHz. It records in the 4-channel mode. To perform audio dubbing on CH3 and CH4 later, use this set- ting.
  • Seite 58: Time Code Menu

    MENU SCREEN – Contents of the menus – (continued) TIME CODE menu Items Setting Contents Presets the time code: For details, please refer to Page 35 "Setting Time Codes". CLEAR CANCEL Use this menu item to choose whether to clear the time code values: EXECUTE CANCEL : Do not clear.
  • Seite 59: Display Menu

    DISPLAY menu DISPLAY menu Items Setting Contents DISPLAY Use this menu item to choose whether to have the characters of the status screen displayed on the monitor connected to VIDEO AUTO LINE OUT or S-VIDEO OUT terminal: : No on-screen display. Video display only. : Always provide on-screen display.
  • Seite 60 MENU SCREEN – Contents of the menus – (continued) DISPLAY menu (continued) Items Setting Contents AUDIO INFO. Use this setting to turn on/off the display of audio channel or sam- pling frequency on the monitor: OFF : No display : Display DATE STYLE Y/M/D Select the date format:...
  • Seite 61: Others

    OTHERS – Placing the unit in an upright position – With the use of the provided stand, the main unit can be placed in an upright position as shown in the following diagram. The left side should be at the bottom. Stand Notes •...
  • Seite 62: Warning Display

    OTHERS – Warning display – When an anomaly occurs, this unit automatically identifies the cause and displays an error- coded warning message on the monitor. If the unit is in a state needing rectification, or if an operation error has occurred, an alarm display will be shown on the monitor.
  • Seite 63 This error can be resolved by restarting LOADING FAILURE the unit. However, doing so may damage the tape in some cases. Please consult WARNING 3300 Unable to eject tape. your PANASONIC authorized dealer. UNLOADING FAILURE WARNING 4100 Eject error. CASSETTE EJECT FAILURE DEFECTIVE TAPE! Tape is cut.
  • Seite 64: Troubleshooting

    OTHERS – Troubleshooting – Symptom Action The power does not come on. Is the AC adapter correctly connected? The cassette cannot be loaded. Is the cassette indicator lighted? If so, a cassette is already loaded. Please unload the cassette first. Push the centre of the cassette and make sure that the cassette enters levelly.
  • Seite 65: Checking The Hour Meter

    OTHERS – Checking the hour meter – This unit displays the drum usage time on the DRUM HOUR METER item of the top MENU. ☞ Please use it as a guide for regular maintenance. ( Page 7) POWER EJECT POWER DISPLAY EJECT STILL...
  • Seite 66: Specification

    OTHERS – Specification – General Audio Recording system : DV system (SP mode only) Recording format : 16 bit, 48kHz, 2 channels Signal system : NTSC/PAL PCM audio/12 bit, 32kHz, Cassette : Standard/ mini DV cassette 4-channel PCM audio Tape width : 6.35mm Number of track : 2 (16 bit,4 8kHz) / Tape speed...
  • Seite 67 Diagram of external dimension (Unit: mm) POWER EJECT MENU A.DUB PLAY PAUSE DVCAM NTSC REC INH. AG-DV2500 1 / 3 REMOTE INPUT LINE 2 / 4 STOP AUDIO 9PIN WIRELESS S-VIDEO E-67...
  • Seite 69 Bedienungs- anleitung NTSC Digital-Videokassettenrekorder Modell AG POWER EJECT MENU A.DUB PLAY PAUSE DVCAM NTSC REC INH. AG-DV2500 1 / 3 REMOTE INPUT LINE 2 / 4 STOP AUDIO 9PIN WIRELESS S-VIDEO Vor Inbetriebnahme dieses Produkts sollten die Hinweise gut durchgelesen werden. Bitte bewahren Sie diese Anleitung zwecks zukünftiger Bezugsnahme auf.
  • Seite 70: Anschluss

    Beilage Dieses Gerät entspricht den geltenden europäischen Sicherheits- und Betriebsbestimmungen. Es dient zur Aufzeichnung von Bild- und Tonsignalen für den professionellen Einsatz und darf in den folgenden Umgebungen betrieben werden: 5 Wohngebiete (in Wohnräumen) (einschließlich von Orten der Klasse 1 und 2, IEC 1000-2-5) 5 Gewerbe- und Leichtindustriegebiete (wie z.B.
  • Seite 71 Cómo reemplazar el fusible Einen Ersatz für die Sicherungsabdeckung können 1. Das Sicherungsabteil mit einem Schraubenzieher Sie bei Ihrem Panasonic-Fachhändler kaufen. öffnen. FALLS DER FORMSTECKER SICH NICHT FÜR DIE NETZSTECKDOSE IN IHREM HAUS EIGNET, DANN SOLLTE DIE SICHERUNG DARAUS ENTFERNT UND DER STECKER ABGESCHNITTEN UND RICH- TIG BESEITIGT WERDEN.
  • Seite 72: Haupteigenschaften

    Wir bedanken uns für den Kauf des DV Haupteigenschaften Videokkassettenrekorders AG-DV2500E. ● DV-Format Auf Digitaltechnik beruhende hohe Bild- und Ton- qualität. ● Mit Standard/Mini-DV-Kassetten kompatibler Me- chanismus Aufnahmen und Wiedergaben sind auf DV-Kassetten im Standard- und Mini-Format möglich (nur SP- Dieser Videorekorder arbeitet mit dem DV-For- Modus).
  • Seite 73 INHALT EINLEITUNG SCHNITTBETRIEB Benutzungshinweise ........6 Videoschnittsystem ........48 Pflege und Wartung ........7 Verwendung einer Reinigungskassette ..8 MENÜS Videokassette ..........8 Menüstruktur ..........51 Konensationsniederschlag ......9 Menüeinstellungen ........52 Menüinhalt ............ 54 TEILBEZEICHNUNGEN UND FUNKTIONEN Vorderseite ........... 10 SONSTIGES Rückseite ............
  • Seite 74: Einleitung

    EINLEITUNG Benutzungshinweise Aufbewahrung und Betrieb Reinigung (Vor der Reinigung des Ge- häuses ist das Gerät vom Strom zu tren- Bei Betrieb und Aufbewahrung sind folgende Orte nen.) zu vermeiden: ● Orte mit höherer oder niedriger Temperatur Zum Säubern einen weichen Lappen benutzen als 5˚C bis 35˚C.
  • Seite 75: Pflege Und Wartung

    Betriebsstunden : Die Betriebsstundenanzeige gibt die aktuelle Betriebsdauer an. Für weitere Angaben dazu siehe Seite 65 “Betriebsstundenanzeige”. Wartungsinformationen : Zusätzliche Angaben sind aus der separaten PANASONIC Service- center-Broschüre ersichtlich. Kopfreinigung ● Bei Aufnahme und/oder Wiedergabe mit ver- ● Falls die Tonköpfe verschmutzt sind, wird wäh- schmutzten Köpfen treten Bild- und Tonsignalein-...
  • Seite 76: Verwendung Einer Reinigungskassette

    DV-Kassetten besitzen einen rückseitigen Lösch- wiedergegeben werden (nur SP Modus). schutz-Schieber, um unbeabsichtigte Aufnahme- Die folgenden Kassetten mit dem oder löschungen zu vermeiden. -Zeichen von PANASONIC verwenden. ● Schieber in Position “SAVE”: Löschschutz- ● Standard DV-Kassetten ● MiniDV-Kassetten status. AY-DV276 AY-DVM63 ●...
  • Seite 77: Aufzeichnung Und Aufbewahrung Von Videokassetten

    Aufzeichnung und Aufbewahrung von Videokassetten Bei der Aufbewahrung von Videokassetten ist folgendes zu beachten. ● Bei der Aufzeichnung und Aufbewahrung von Videokassetten ist jeweils auf die Umgebungsbedingun- gen zu achten. Es wird empfohlen, dass Videokassetten unter den untenstehenden Umgebungsbedingungen aufge- zeichnet bzw.
  • Seite 78: Teilbezeichnungen Und Funktionen

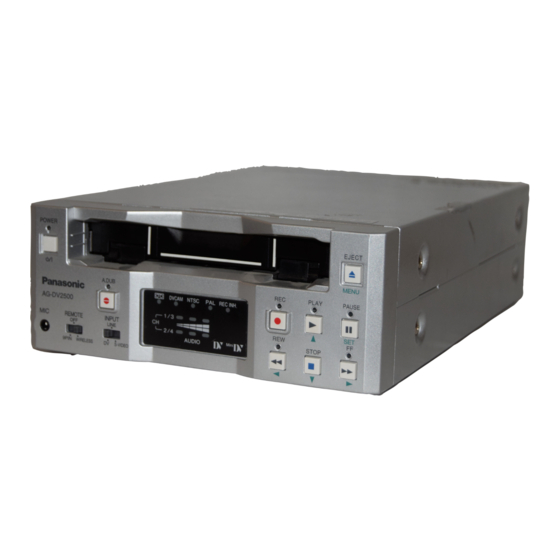
    TEILBEZEICHNUNGEN UND FUNKTIONEN – Vorderseite – POWER EJECT MENU A.DUB PLAY PAUSE DVCAM NTSC REC INH. AG-DV2500 1 / 3 REMOTE INPUT LINE 2 / 4 STOP AUDIO 9PIN WIRELESS S-VIDEO [POWER] Spannungsschalter/LED [A.DUB] Nachvertonungstaste/LED ● Dieser Schalter schaltet die Spannung ein. Bei ●...
  • Seite 79 POWER EJECT MENU A.DUB PLAY PAUSE DVCAM NTSC REC INH. AG-DV2500 1 / 3 REMOTE INPUT LINE 2 / 4 STOP AUDIO 9PIN WIRELESS S-VIDEO [MIC] Mikrofonbuchse [REMOTE] Wahlschalter Dient der Wahl des Fernbedienungstyps auf Hier kann ein Mono-Mikrofon angeschlossen wer- den.
  • Seite 80 TEILBEZEICHNUNGEN UND FUNKTIONEN – Vorderseite – (fortgesetzt) POWER EJECT MENU A.DUB PLAY PAUSE DVCAM NTSC REC INH. AG-DV2500 1 / 3 REMOTE INPUT LINE 2 / 4 STOP AUDIO 9PIN WIRELESS S-VIDEO [REC]Aufnahmetaste/LED [FF]Vorspultaste/LED ● Im Stopmodus bewirkt das Drücken dieser Taste ●...
  • Seite 81: Fernbedienungssensor

    POWER EJECT MENU A.DUB PLAY PAUSE DVCAM NTSC REC INH. AG-DV2500 1 / 3 REMOTE INPUT LINE 2 / 4 STOP AUDIO 9PIN WIRELESS S-VIDEO Anzeige Audio-Anzeige : Leuchtet bei eingelegter Kassette Diese Anzeige zeigt das Vorhandensein eines grün. (Leuchtet auch bei ausge- Audiosignals an (Kanalaudio gewählt bei Menü- schaltetem Betriebsschalter PO- eintrag AUDIO OUT SEL im AUDIO/VIDEO-...
  • Seite 82: Rückseite

    TEILBEZEICHNUNGEN UND FUNKTIONEN – Rückseite – WARNING : SHOCK HAZARD - DO NOT OPEN. AVIS : RISQUE DE CHOC ELECTRIQUE - NE PAS OUVRIR. DV IN/OUT AUDIO VIDEO 9PIN REMOTE NTSC CH 1/3 CH 2/4 LINE S -VIDEO [DC IN] Gleichspannungseingang (2-pol.) Wird für Einstellungen in der Fabrik benutzt.
  • Seite 83 WARNING : SHOCK HAZARD - DO NOT OPEN. AVIS : RISQUE DE CHOC ELECTRIQUE - NE PAS OUVRIR. DV IN/OUT AUDIO VIDEO 9PIN REMOTE NTSC CH 1/3 CH 2/4 LINE S -VIDEO [S-VIDEO IN] S-VIDEO-Eingangs- [AUDIO IN] Audiosignal-Eingangs- buchse (4-pol.) buchse (PHONO 2) Hier kann ein Y/C-Videosignal angelegt werden.
  • Seite 84: Drahtlose Fernbedienung

    TEILBEZEICHNUNGEN UND FUNKTIONEN – Drahtlose Fernbedienung – [STILL MODE] Standbildmodustaste Dient der Wahl von Standbildern im “Standbildmodus”. Im Standbildmodus wechselt das Bild mit jeder Tastendrückung folgenderweise. POWER Einzelbild (erstes /zweites abwechselnd still) ¥ DISPLAY STILL 1. Einzelbild ¥ 2. Einzelbild ¥ Frame BARS BLANK MODE...
  • Seite 85: [Pause] Taste

    [REC] Aufnahmetaste [SEARCH–]/ Suchtaste • Bei der Wiedergabe in Vorwärtsrichtung, im ● Diese Taste gedrückt halten und die PLAY-Taste Standbildmodus sowie bei der Wiedergabe mit drücken, um die Aufnahme zu starten. variabler Geschwindigkeit verlangsamt das ● Das Drücken dieser Taste während der Aufnah- Drücken dieser Taste die Wiedergabe- me bewirkt die Aufzeichnung des Indexsignals auf geschwindigkeit.
  • Seite 86: Onscreen-Anzeige

    ONSCREEN-ANZEIGE – Onscreen-Anzeige – Auf dem an den VIDEO LINE OUT oder S-VIDEO OUT-Buchse angeschlossenen Bildschirm werden außer E-E und Wiedergabebild folgendende Informationen angezeigt. Fernbedienung (drahtlos) Anzeigemenü – – – D I S P L A Y – – – Auf ON oder D I S P L A Y POWER...
  • Seite 87: Statusanzeigen

    ONSCREEN-ANZEIGE – Statusanzeigen – Statusanzeigen: Zeigen die gegenwärtigen Einstellungen und den Betriebsstatus an. 3 2 K C H – 1 / 2 m i n S T A N D B Y - O F F 1 0 / 1 0 / 0 2 1 2 : 0 0 : 0 0 T C R 0 2 : 0 0 : 0 0 : 0 0 Funktion...
  • Seite 88: Beschreibung

    ONSCREEN-ANZEIGE – Statusanzeigen – (fortgesetzt) 3 2 K C H – 1 / 2 m i n S T A N D B Y - O F F 1 0 / 1 0 / 0 2 1 2 : 0 0 : 0 0 T C R 0 2 : 0 0 : 0 0 : 0 0 Funktion Beschreibung...
  • Seite 89: Ereignisanzeige

    ONSCREEN-ANZEIGE – Ereignisanzeige – Ereignisanzeige : Wenn eine besondere Funktionen aktiviert oder mit der drahtlosen Ferbedienung der Betriebsmodus geändert wurde, wird das an folgen- den Stellen angezeigt. Anzeige Pos. B...Anzeige für ca. 3 Sekunden 3 2 K C H – 1 / 2 m i n Anzeige Beschreibung...
  • Seite 90: Warnanzeigen

    ONSCREEN-ANZEIGE – Warnanzeigen – Warnanzeigen : Bei einem Bedienungsfehler, verschmutzten Tonköpfen etc. wird eine Warnmeldung angezeigt, wie folgt. 3 2 K C H – 1 / 2 m i n H E A D C L E A N I N G R E Q U I R E D ! I N V A L I D T A P E ! S T A N D B Y - O F F 1 0 / 1 0 / 0 2...
  • Seite 91 Anzeige Beschreibung COPY INHIBIT Es wird versucht ein mit Kopierschutz versehenenes Signal aufzuzeichnen. REC INHIBIT Es wird versucht mit einer Kassette, deren Löschschutzschieber (auf der Rückseite) auf “SAVE” gestellt ist, Aufnahmen zu machen. A. DUB INHIBIT Es wird versucht mit einer Kassette, deren Löschschutzschieber (auf der Rückseite) (REC TAB) auf “SAVE”...
  • Seite 92: Vorbereitung

    VORBEREITUNG – Drahtlose Fernbedienung (mitgeliefert) – Einsetzen der Batterien Bevor die Fernbedienung benutzt wird, sind 2 Trockenbatterien (AA) einzusetzen. Die Batterieab- 2 Trockenbatterien Die Abdeckung deckung abnehmen. (AA) einsetzen. anbringen. • Zuerst den · Pol einset- zen. Batterieabdeckung Anmerkungen Vorsichtsmaßnahmen Batteriegebrauch Austausch der Batterien Verkürzt sich die Distanz von der die Fern-...
  • Seite 93 Drahtlose Fernbedienung POWER EJECT MENU Vor Benutzung der Fernbedienung den REMOTE A.DUB PLAY PAUSE -Schalter auf WIRELESS stellen. DVCAM NTSC REC INH. AG-DV2500 1 / 3 REMOTE INPUT LINE 2 / 4 STOP AUDIO 9PIN WIRELESS S-VIDEO Sensor für drahtlose Fernbedienung Hinweis zur Benutzung der drahtlosen Fernbedienung Sollen 2 oder mehr Videorekorder am selben Ort separat bedient werden, ist für Funktionen die nicht...
  • Seite 94: Spannungsversorgung

    VORBEREITUNG – Spannungsversorgung – Netzadapter anschließen Den mitgelieferten Netzadapter am Videokassettenrekorder anschließen. WARNING : SHOCK HAZARD - DO NOT OPEN. AVIS : Schraube Netzadapter RISQUE DE CHOC ELECTRIQUE - NE PAS OUVRIR. DV IN/OUT (eingeschlossen) Klemme AUDIO VIDEO 9PIN REMOTE Netzspannungskabel NTSC (eingeschlossen)
  • Seite 95: Spannung Einschalten

    Spannung einschalten POWER-LED Im ausgeschalteten Zustand (POWER- LED leuchtet rot) die POWER-Taste am POWER Rekorder oder der Fernbedienung drü- cken. A.DUB PLAY DVCAM NTSC REC INH. • Sobald Versorgungsspannung da ist, leuchtet AG-DV2500 1 / 3 die POWER-LED grün auf und der Video- REMOTE INPUT LINE...
  • Seite 96: Wahl Des Ntsc/Pal-Signalformats

    VORBEREITUNG – Wahl des NTSC/PAL-Signalformats – Dieser Videorekorder arbeitet mit NTSC und PAL-Signalen. Wenn ein Analog-Signaleingang (Komposit-Video- oder Y/C-Video-Trennsignal) angelegt wird, zuerst das Signalformat wählen. POWER- NTSC- PAL- NTSC/PAL-Schalter Taste Anzeige Anzeige POWER OCK HAZARD - DO NOT OPEN. CHOC ELECTRIQUE - NE PAS OUVRIR. VIDEO A.DUB PLAY...
  • Seite 97: Einlegen/Entnehmen Einer Videokassette

    VORBEREITUNG – Einlegen/Entnehmen einer Videokassette – Nur Standard DV und MiniDV-Kassetten verwenden. Führung POWER POWER EJECT EJECT MENU MENU A.DUB PLAY PAUSE A.DUB PLAY PAUSE DVCAM NTSC REC INH. DVCAM NTSC REC INH. AG-DV2500 AG-DV2500 1 / 3 1 / 3 REMOTE INPUT REMOTE...
  • Seite 98: Datum/Uhrzeit-Anzeige Und Einstellung

    VORBEREITUNG – Datum/Uhrzeit-Anzeige und Einstellung – Datums-/Uhrzeiteinstellung der eingebauten Uhr. Das eingestellte Datum und die Uhrzeit bleibt nach dem Ausschalten des Geräts mittels auf- ladbarer Batterien gespeichert. Das Datum und die Uhrzeit werden über ein Menü eingestellt und auf dem Bildschirm angezeigt. Bei Aufnahmen werden Datum und Uhrzeit aufgezeichnet. Taste EJECT Auswurftaste...
  • Seite 99: Um Zum Anfangsmenü Zurück Zu Schalten, Nachdem Alles Beendet Ist

    Wiedergabetaste Taste EJECT Auswurftaste POWER DISPLAY Festlegungstaste Menütaste MENU STILL BARS BLANK MODE PLAY PAUSE AUDIO DVCAM NTSC REC INH. Pausentaste MUTING MENU SEARCH+ 1 / 3 OUT SEL. 2 / 4 STOP Taste Taste AUDIO Vorspultaste SEARCH– OUT LEV. Stoptaste Rückspultaste Taste...
  • Seite 100: Aktivierung Der Onscreen-Anzeige

    VORBEREITUNG – Datum/Uhrzeit-Anzeige und Einstellung – (fortgesetzt) Einstellung von Datum und Uhrzeit Die Datum- und Zeitinformationen werden auf dem Bildschirm angezeigt, der an den Aus- gangsbuchsen [VIDEO LINE OUT] bzw. [S-VIDEO] angeschlossenen ist. Ob Datum und Zeit angezeigt werden, sowie deren Anzeigeformat, wird im Anzeigemenü (DISPLAY) ausgewählt. ☞...
  • Seite 101: Aufnahme

    AUFNAHME – Anschlussverbindungen und Einstellungen – Hier werden die Anschlussverbindungen erläutert, die notwendig sind, wenn dieser Videore- korder als Aufnahmegerät verwendet wird. Dieses Gerät kann nicht als Aufnahmegerät eines Schnittsystems verwendet werden. Anschlüsse Ist an der Digitalvideobuchse DV ein Videogerät Angeschlossen, dann können Aufnahmen mit äußerst geringfügiger Qualitätseinbuße angefertigt wer- den.
  • Seite 102: Anschlussverbindungen Und Einstellungen

    AUFNAHME – Anschlussverbindungen und Einstellungen – (fortgesetzt) Einstellung NTSC-Anzeige PAL-Anzeige Rückseite NG : POWER SHOCK HAZARD - DO NOT OPEN. EJECT ISQUE DE CHOC ELECTRIQUE - NE PAS OUVRIR. N/OUT MENU VIDEO A.DUB PLAY PAUSE DVCAM NTSC REC INH. AG-DV2500 9PIN REMOTE 1 / 3 NTSC...
  • Seite 103: Zeitcodeeinstellung

    AUFNAHME – Zeitcodeeinstellung – Zeitcodeaufzeichnung Dieses Gerät hat einen eingebauten Zeitcodeleser/ -generator. Während der Aufnahme wird der Zeitcode aufgezeichnet. Es werden die Daten des eingebauten Zeitcodegenerators, je- doch nicht die Benutzerbit aufgezeichnet. Den Aufnahmebedingungen entsprechend werden Zeitcodes wie folgt aufgezeichnet: Die Zeitcodes werden im REC RUN-Modus aufgezeichnet.
  • Seite 104: Aufzeichnung Des Zeitcodes Eines Dv-Eingangsignals

    AUFNAHME – Zeitcodeeinstellung – (fortgesetzt) Anfangsmenü-Anzeige Anfangsmenü Videorekorder Fernbedienung – – – M E N U – – – S Y S T E M . . R E MO T E . . Die MENU-Taste drücken. Die Auswurf- und Stoptaste A U D I O / V I D E O .
  • Seite 105: Aufzeichnungsweise

    AUFNAHME – Aufzeichnungsweise – Videorekorder Fernbedienung Aufnahmetaste Wiedergabetaste Pausetaste Aufnahmetaste POWER EJECT A.DUB PAUSE F.REV F.ADV PLAY MENU Wiedergabetaste A.DUB PLAY PAUSE DVCAM NTSC REC INH. Pausetaste AG-DV2500 STOP Stoptaste INDEX INDEX 1 / 3 – REMOTE INPUT LINE 2 / 4 STOP AUDIO VEQ3533...
  • Seite 106: Reserve-Aufnahmefunktion

    AUFNAHME – Reserve-Aufnahmefunktion – Wenn mehrere DV-Rekorder in Reihe geschaltet werden, können Langzeitaufnahmen herge- stellt werden. Wenn dieser Rekorder mit dem Anschluss eines DV-Camcorders verbunden ist, kann die ver- fügbare Aufnahmezeit verlängert werden. Bevor im Hauptaufnahmegerät das Bandende er- reicht wird, übernimmt dieser Rekorder die Aufnahmefunktion als Reserveaufnahmegerät. Dies gestattet längere Aufnahmen.
  • Seite 107: Nachvertonung

    AUFNAHME – Nachvertonung – Im Audiomodus kann bei einem Band, das mit 32kHz aufgenommen wurde, im Nachhinein über Kanal 3 und 4 (CH3, CH4) eine Nachvertonung ausgeführt werden. Hinweise • Bei einem Band, das mit 48kHz aufgenommen wurde, ist keine Nachvertonung möglich. •...
  • Seite 108 AUFNAHME – Nachvertonung – (fortgesetzt) Anmerkungen Anschlüsse • Wird während der Nachvertonung ein Teil des aufgezeichneten Bandes auf einen Mo- Der Audioeingang zur Nachvertonung wird an der dus geschaltet, bei dem keine Nach- rückseitigen AUDIO IN-Buchse oder auf der Vor- vertonung möglich ist, wie z.B.
  • Seite 109: Wiedergabe

    WIEDERGABE – Anschlussverbindungen und Einstellungen – Erläuterung der Anschlüsse, Einstellungen und Bedienungen zur Wiedergabe. Anschlussverbindungen Verwendung als Einzelgerät Bildschirm WARNING : SHOCK HAZARD - DO NOT OPEN. AVIS : RISQUE DE CHOC ELECTRIQUE - NE PAS OUVRIR. DV IN/OUT AUDIO VIDEO 9PIN REMOTE NTSC...
  • Seite 110: Einstellungen

    WIEDERGABE – Anschlussverbindungen und Einstellungen – (fortgesetzt) Einstellungen Fernsteuerungswahlschalter auf Vorderseite REMOTE. POWER Bei Benutzung der drahtlosen Fernbedienung auf “WIRELESS” stel- len. A.DUB Anmerkungen DVCAM NTSC AG-DV2500 Zur Kabelfernsteuerung über die Buchse 9 PIN REMOTE muss 1 / 3 REMOTE INPUT LINE 2 / 4...
  • Seite 111: Grundbedienungen

    WIEDERGABE – Grundbedienungen – Pausetaste DVCAM-Anzeige Wiedergabetaste Wiedergabetaste A.DUB PAUSE POWER EJECT F.REV F.ADV PLAY MENU Rückspultaste Vorspultaste A.DUB PLAY PAUSE STOP DVCAM NTSC REC INH. INDEX INDEX Pause – AG-DV2500 1 / 3 taste REMOTE INPUT VEQ3533 LINE 2 / 4 STOP AUDIO Vorspul...
  • Seite 112: Sonderfunktionen

    WIEDERGABE – Sonderfunktionen – Wiedergabe von Einzelbildern Mit der Fernbedienungseinheit bedienen. Einstellungen POWER STILL MODE-Menüeintrag im Systemmenü. DISPLAY STILL Wahl der Einzelbildschritte. BARS BLANK MODE FIELD : Vorsetzen von Einzelbildern. (abwechselnd erstes/zwei- AUDIO MENU SEARCH+ MUTING tes Halbbild) 1st FIELD : 1. Halbbild vorsetzen, stoppt im 1. Feld. OUT SEL.
  • Seite 113: Variable Wiedergabegeschwindigkeit

    Variable Wiedergabegeschwindigkeit Mit der Fernbedienungseinheit bedienen. Auf Suchmodus schalten. Suchtaste +/( ) Taste Taste Der Suchmodus kann auch mit den Tasten am Rekorder eingstellt werden. Auf Wiedergabe oder Standbildmodus schalten. POWER DISPLAY Das Drücken der FF-Taste schaltet auf Vorspulen mit Band- STILL BARS BLANK...
  • Seite 114: Suchfunktion

    WIEDERGABE – Suchfunktion – Indexsuche Zugriff zu Stellen mit aufgezeichnetem Indexsignal. Mit Fernbedienung bedienen. Indexzugriff in Vorwärtsrichtung von gegenwärtiger A.DUB PAUSE Bandposition F.REV F.ADV PLAY • Die Taste INDEX+ drücken. Die Anzahl Tastendrückungen bestimmt die Zugriffsposition ei- nes Indexes. (Max. 99) STOP INDEX INDEX...
  • Seite 115: Wahl Des Wiedergabe-Audioausgangs

    WIEDERGABE – Wahl des Wiedergabe-Audioausgangs – Mit der Fernbedienung den Audioausgangsmodus für die Wiedergabe wählen. Die Stummschaltung ein-/ausschalten, bzw. die AUDIO MUTING-Taste drücken. POWER Nochmaliges Drücken dieser Taste schaltet den DISPLAY Audioausgang ein. STILL BARS BLANK MODE Wahl des Audioausgangskanals bei ei- AUDIO MUTING MENU SEARCH+...
  • Seite 116: Schnittbetrieb

    Dieser Videorekorder kann mit der am RS-422A-Anschluss angeschlossen Zuschnitt-Steuer- einheit AG-A850 als Zuspielgerät eines Schnittsystems verwendet werden. Geeignete Modelle Schnittsteuereinheit (Kabelfernbedienung) : AG-A850 Rekorder : DVC PRO ..AJ-D455 Anschlussbeispiel Rekorder (AJ-D455) Zuspielgerät (AG-DV2500E) Audio Video S-VIDEO OUT S-VIDEO IN TIME CODE ANALOG REMOTE...
  • Seite 117 • Bei Jogsteuerung per Schnittsteuereinheit den Jogregler langsam drehen. Andernfalls können Befehls- ausführungsverzögerungen beim Rekorder auftreten. • Mit einigen Steuereinheiten arbeitet die Lernfunktion nicht richtig: Aktiveren der Lernfunktion: Eine Kassette mit aufgezeichneten Zeitcodes von 23:59:00:00 bis 00:01:00:00 in den AG-DV2500E einschieben und die Lernfunktion aktivieren. G-49...
  • Seite 118: Rekordereinstellungen

    SCHNITTBETRIEB – Schnittsystem – (fortgesetzt) Non-linearer Schnittbetrieb Auf einer Videokassette enthaltenes Zuspielmaterial kann auf ein non-lineares Schnittsystem überspielt werden. Das bearbeitete non-lineare Schnittmaterial kann dann durch diesen Vide- orekorder aufgezeichnet werden. Anschl ü Anschlussverbindung mit DV 1394-Anschlussbuchse DV-Buchse WARNING : SHOCK HAZARD - DO NOT OPEN.
  • Seite 119: Menüs

    MENÜS – Menüstruktur – Die Menüs werden auf dem Bildschirm angezeigt. Sie sind in mehreren Ebenen angeordnet. Anfangsmenü Systemmenü M E N U – – – S Y S T E M – – – S Y S T E M . . S T I L L MO D E F I E L D R E MO T E .
  • Seite 120: Menüeinstellungen

    MENÜS – Menüeinstellungen – Die verschiedenen Funktionen des Videorekorders werden mit den Menüs eingestellt. Die Einstellungen werden im Speicher des Rekorders gespeichert und bleiben auch bei ausge- schalteter Spannung erhalten. Wiedergabetaste Taste EJECT Auswurftaste POWER DISPLAY MENU Festlegungstaste A.DUB PLAY PAUSE STILL BARS...
  • Seite 121: Menüeinstellung Ausführen

    Wiedergabetaste Taste EJECT Auswurftaste POWER DISPLAY Festlegungstaste MENU STILL BARS BLANK MODE PLAY PAUSE AUDIO DVCAM NTSC REC INH. Pausetaste MUTING MENU SEARCH+ Menütaste 1 / 3 OUT SEL. 2 / 4 Taste STOP Taste AUDIO Vorspultaste SEARCH– OUT LEV. Rückspultaste Stoptaste Taste...
  • Seite 122: Menüinhalt

    MENÜS – Menüinhalt – Im Erläutrungstext der Menüs stellt der mit bezeichnete Wert den Voreinstellwert dar. Anfangsmenü Gegenstand Einstellung Beschreibung SYSTEM Zeigt das mit dem Betrieb in Zusammenhang stehende System- menü an. REMOTE Zeigt das Fernsteuermenü an. AUDIO/VIDEO Zeigt das Audio-/Videomenü an. TIME CODE Zeigt das Einstellmenü...
  • Seite 123: Systemmenü

    Systemmenü Systemmenü Gegenstand Einstellung Beschreibung Das Standbild während der Standbild- oder Einzelbildwiedergabe STILL FIELD auswählen: MODE FIELD : Zeigt das Halbbild an. Bei Einzelbildwiedergabe wird das erste und zweite Halbbild abwechselnd gezeigt. : Das 1. Halbbild wird gezeigt. FRAME : Das 2. Halbbild wird gezeigt. FRAME : Das Vollbild (FRAME) wird angezeigt.
  • Seite 124: Remote-Menü (Fernsteuerungsmenü)

    CONTROLLER Wählt die Einstellung in Abhängigkeit von der am RS-422A-Interface TYPE1 angeschlossenen externen Steuereinheit: TYPE2 TYPE1 : Fernbedienungseinheit ist nicht von PANASONIC TYPE3 TYPE2 : Fernbedienungseinheit ist nicht von PANASONIC TYPE3 : AG-A850, AJ-A95 TYPE4 TYPE4 : Fernbedienungseinheit ist nicht von PANASONIC...
  • Seite 125 AUDIO/VIDEO-Menü Gegenstand Setting Beschreibung Die bei der Aufzeichnung verwendete Audio-Sampling-Frequenz einstel- AUDIO MODE len: : Aufzeichnung mit 48kHz im 2-Kanal-Stereomodus. Nach- vertonung kann nicht ausgeführt werden. : Aufzeichnung mit 32kHz im 4-Kanal-Stereomodus. Einstellen, wenn im Nachhinein eine Nachvertonung an den Kanälen 3 und 4 ausgeführt wird.
  • Seite 126 MENÜS – Menüinhalt – (fortgesetzt) TIME CODE-Menü (Zeitcodemenü) Gegenstand Einstellung Beschreibung Voreinstellung des Zeitcodes: Für Details siehe Seite 35, “Zeitcode-Voreinstellung”. CLEAR CANCEL Löschung des eingestellten Zeitcodewerts: EXECUTE CANCEL : Keine Löschung. EXECUTE : Wird gelöscht. NDF/DF NON DROP Framing-Modus des Zeitcodegenerators: (NTSC) DROP NON DROP : Schaltet auf NON DROP-Einzelbildmodus.
  • Seite 127 Anzeigemenü (DISPLAY) Anzeigemenü Gegenstand Einstellung Beschreibung DISPLAY Wählen, ob die Statusanzeige auf dem Bildschirm angezeigt wird, der an der VIDEO LINE OUT oder S-VIDEO OUT-Buchse ange- AUTO schlossen ist: : Keine Onscreen-Anzeige, nur Videoanzeige. : Wird normalerweise angezeigt. AUTO : Anzeige für ca. 4 Sekunden wührend der Betriebsmodus- umschaltung.
  • Seite 128: Anzeigemenü

    MENÜS – Menüinhalt – (forgesetzt) Gegenstand Einstellung Beschreibung Anzeigemenü (fortgesetzt) Anzeige des Audiokanals oder der Sampling-Frequenz: AUDIO INFO. OFF : Keine Anzeige. : Wird angezeigt. Anzeigetyp des Datums: DATE STYLE Y/M/D Y/M/D : Anzeige als Jahr / Monat / Tag. M/D/Y M/D/Y : Anzeige als Monat / Tag / Jahr.
  • Seite 129: Sonstiges

    SONSTIGES – Senkrechte Aufstellung – Das Gerät kann mittels des mitgelieferten Ständers senkrecht aufgestellt werden. Mit der linken Seite nach unten hinstellen. Ständer Hinweise • Zur senkrechten Aufstellung immer den mitgelieferten Ständer verwenden. Das senkrechte Aufstellen ohne den Ständer kann zum Umkippen führen und die Beschädigung des Geräts bzw.
  • Seite 130: Warnanzeigen

    SONSTIGES – Warnanzeigen – Der Videorekorder hat eine Selbstdiagnosefunktion, die Störungen erkennt und mit einem Fehler- code auf dem Bidlschirm anzeigt. Ist im Gerät eine Fehlfunktion aufgetreten oder wurde eine Fehldbedienung ausgeführt, wird dies auf dem Bildschirm mit einer Warnanzeige gemeldet. Warnmeldung Warnanzeige 3 2 K C H –...
  • Seite 131 Warnmeldungen (unabhängig vom Anzeigemodus) Erfolgt eine Warnmeldung, dann stoppt der Betrieb und es sind keine Tastenbedienungen mehr ausführbar. Bei TAPE DEFFECTIVE (5605 – 5609) kann nach dem Stoppen die EJECT- Taste betätigt werden. Warnanzeige Status Abhilfe CONDENSATION Kondensationsniederschlag auf der Trom- Die Spannung einschalten und warten bis ON DRUM mel.
  • Seite 132: Störungsbehebung

    SONSTIGES – Störungsbehebung – Symptom Abhilfe Ist der Netzadapter richtig angeschlossen? Keine Betriebsspannung. Leuchtet die Kassettenanzeige? Falls Ja, dann ist eine Kassette Kein Kassetteneinzug. eingelegt. Die eingelegte Kassette entnehmen. Die Kassette in der Mitte halten und gerade einschieben. Ist der Kassettenschieber auf “REC” gestellt? Auf “REC” stellen, Keine Aufzeichnung möglich.
  • Seite 133: Ablesen Des Betriebsstundenzählers

    SONSTIGES – Ablesen des Betriebsstundenzählers – Betriebsstunden : Die aktuelle Betriebsdauer wird im Anfangsmenü bei DRUM HOUR ME- TER angezeigt. Dient als Richtlinie für die periodischen Wartung. ☞ Siehe Seite 7) POWER EJECT POWER DISPLAY Auswurftaste STILL BARS BLANK MODE MENU A.DUB PLAY...
  • Seite 134: Technische Daten

    SONSTIGES – Technische Daten – Allgmeines Audio Aufzeichnungsformat : DV-Format (nur SP-Modus) Audioaufzeichnungsformat Signalformat : NTSC/PAL : 16-Bit, 48 kHz (2 Kanäle) Videokassetten : Standard-/MiniDV-Kassetten PCM-Audio/12-Bit, 32 kHz (PCM, 4 Bandbreite : 6,35mm Kanäle) Bandgeschwindgkeit : 18,812mm/s (NTSC) Spurzahl : 2 (16 Bit, 48 kHz)/ 18,831mm/s (PAL) 4 (12-Bit, 32 kHz) Aufnahme-/Wiedergabezeit : 276 Min.
  • Seite 135: Außendimensionen (Mm)

    Außendimensionen (mm) POWER EJECT MENU A.DUB PLAY PAUSE DVCAM NTSC REC INH. AG-DV2500 1 / 3 REMOTE INPUT LINE 2 / 4 STOP AUDIO 9PIN WIRELESS S-VIDEO G-67...
  • Seite 137 Mode d’emploi NTSC Enregistreur numérique de cassettes vidéo Modèle AG- POWER EJECT MENU A.DUB PLAY PAUSE DVCAM NTSC REC INH. AG-DV2500 1 / 3 REMOTE INPUT LINE 2 / 4 STOP AUDIO 9PIN WIRELESS S-VIDEO Avant d’utiliser ce produit, veuillez SVP lire attentivement les instructions et gardez ce manuel pour une utilisation ultérieure.
  • Seite 138: Precautions De Securite

    Supplément Ce matériel est en conformité avec les prescriptions et exigences relatives à la sécurité des directives européennes correspondantes. Il est conçu pour des applications vidéo profession- nelles et peut être utilisé dans les milieux suivants : 5 zone résidentielle (y compris les locaux de Classe 1 et 2 selon les normes IEC 1000-2-5) 5 commerce et industrie légère (y compris les théâtres par exemple) 5 extérieurs urbains (selon les termes de la norme IEC 1000-2-5, classe 6) Ce matériel est conçu pour le montage en baie et peut être utilisé...
  • Seite 139 Comment remplacer un fusible Vous pouvez acquérir un remplacement de la cou- 1. Ouvrir le compartiment de fusible en utilisant un verture de fusible chez un marchand Panasonic. tournevis. SI LA PRISE DE COURANT MOULÉE FOURNIE N’EST PAS COMPATIBLE AVEC LA SORTIE DE COURANT CHEZ VOUS, LE FUSIBLE DOIT ÊTRE...
  • Seite 140: Caractéristiques Principales

    Nous vous remercions pour l’achat de CARACTÉRISTIQUES PRINCIPALES cet enregistreur à cassette digital vi- ● Utilisation du format DV déo AG-DV2500E. Image et son de haute qualité grâce à la techno- logie numérique. ● Cassette standard DV/MiniDV compatible Enregistrement/lecture sur les cassettes standard DV et MiniDV.
  • Seite 141 SOMMAIRE INTRODUCTION MONTAGE Quelques précautions d’utilisation ....6 Utiliser comme lecteur du montage ....48 Entretien général et vérification périodique .... 7 Précautions d’utilisation des cassettes de MENU ECRAN nettoyage de têtes .......... 8 La composition du menu écran ....51 Cassettes utilisables ........
  • Seite 142: Introduction

    INTRODUCTION Quelques précautions d’utilisation Installation et stockage Entretien du châssis (Débranchez l’ap- Ne pas l’utiliser ni le ranger dans des endroits pareil du secteur.) sujets aux conditions suivantes : Essuyer l’appareil avec un chiffon doux. ● Chaleur ou froid extrêmes - température en N’utiliser ni dilluant ni benzole : cela risque d’en dehors de la plage permise (5°C à...
  • Seite 143: Entretien Général Et Vérification Périodique

    Consultation d’entretien : Pour tous renseignements sur le planning d’entretien et les coûts, consulter votre revendeur ou le service d’appareils professionnels du centre de service PANASONIC. Nettoyage des têtes ● Pendant la lecture ou l’enregistrement, du bruit ● Pendant la lecture lorsque les têtes sont encras- de bloc peut apparaître dans l’image et le son...
  • Seite 144: Précautions D'utilisation Des Cassettes De Nettoyage De Têtes

    Utiliser les cassettes marquées rière. PANASONIC comme suit : ● Pour éviter tout effacement accidentel de l’enre- ● Cassette standard DV ● Cassette MiniDV gistrement, faire glisser le taquet sur la position “SAVE”.
  • Seite 145: Condensation

    Pour que vos cassettes enregistrent et conservent leur précieux contenu dans de bonnes conditions Il est important de respecter les consignes suivantes : ● Respecter les conditions d’utilisation et de stockage des cassettes vidéo. Nous vous recommandons d’utiliser et conserver les cassettes vidéo dans les conditions suivantes : Conditions de stockage Conditions d’enregistrement Stockage de courte durée Stockage de longue durée (moins de 10 ans)
  • Seite 146: Noms Et Fonctions Des Pieces

    NOMS ET FONCTIONS DES PIECES – Panneau avant – POWER EJECT MENU A.DUB PLAY PAUSE DVCAM NTSC REC INH. AG-DV2500 1 / 3 REMOTE INPUT LINE 2 / 4 STOP AUDIO 9PIN WIRELESS S-VIDEO Touche de doublage audio [A. DUB]/ Touche [POWER]/LED ●...
  • Seite 147: Touche D'éjection [Eject]

    POWER EJECT MENU A.DUB PLAY PAUSE DVCAM NTSC REC INH. AG-DV2500 1 / 3 REMOTE INPUT LINE 2 / 4 STOP AUDIO 9PIN WIRELESS S-VIDEO Commutateur de commande à dis- Prise de microphone [MIC] tance [REMOTE] Connecteur mini-jack pour raccorder un micro monaural.Lorsqu’un micro est raccordé...
  • Seite 148 NOMS ET FONCTIONS DES PIECES – Panneau avant – (suite) POWER EJECT MENU A.DUB PLAY PAUSE DVCAM NTSC REC INH. AG-DV2500 1 / 3 REMOTE INPUT LINE 2 / 4 STOP AUDIO 9PIN WIRELESS S-VIDEO Touche d’avance rapide [FF]/LED Touche d’enregistrement [REC]/LED ●...
  • Seite 149: Récepteur De La Télécommande

    POWER EJECT MENU A.DUB PLAY PAUSE DVCAM NTSC REC INH. AG-DV2500 1 / 3 REMOTE INPUT LINE 2 / 4 STOP AUDIO 9PIN WIRELESS S-VIDEO Témoins Témoin audio : s’allume en vert losqu’une cassette Ceci est un indicateur pour reconnaître la pré- est chargée (même si l’appareil est sence des signaux audio (CH audio sélectionné...
  • Seite 150: Panneau Arrière

    NOMS ET FONCTIONS DES PIECES – Panneau arrière – WARNING : SHOCK HAZARD - DO NOT OPEN. AVIS : RISQUE DE CHOC ELECTRIQUE - NE PAS OUVRIR. DV IN/OUT AUDIO VIDEO 9PIN REMOTE NTSC CH 1/3 CH 2/4 LINE S -VIDEO Prise d’alimentation DC (2P) Entrée de la source DC 12 V.Raccorder le cordon Ce terminal est utilisé...
  • Seite 151 WARNING : SHOCK HAZARD - DO NOT OPEN. AVIS : RISQUE DE CHOC ELECTRIQUE - NE PAS OUVRIR. DV IN/OUT AUDIO VIDEO 9PIN REMOTE NTSC CH 1/3 CH 2/4 S -VIDEO LINE Connecteur [S-VIDEO IN] (4P) Connecteurs [AUDIO IN] (PHONO X 2) Entrée du signal vidéo Y/C séparé.
  • Seite 152: Télécommande

    NOMS ET FONCTIONS DES PIECES – Télécommande – Touche [STILL MODE] Sélectionne les images fixes. En mode d’arrêt sur image, à chaque appui sur cette touche, l’image sélectionnée change dans POWER DISPLAY l’ordre suivant : STILL BARS BLANK Field (2 trames alternées) ¥ 1ère trame ¥ MODE 2ème trame ¥...
  • Seite 153: Touche [Pause]

    Touche [F. ADV] Touche [SEARCH – ]/ • Pendant lecture/arrêt sur image/lecture à En mode d’arrêt sur image, appuyer sur cette vitesse variable avant, appuyer sur cette touche pour lecture image par image touche pour ralentir la lecture. avant.Maintenir la touche enfoncée pour la lec- •...
  • Seite 154: Affichage Sur Écran

    AFFICHAGE SUR ÉCRAN – Affichage sur écran – Sur le moniteur raccordé au connecteur VIDEO LINE OUT ou S-VIDEO OUT, les informations suivantes s’affichent hormis les images par le mode E-E ou en lecture. Télécommande Menu écran DISPLAY – – –...
  • Seite 155 AFFICHAGE SUR ÉCRAN – Affichage d’état – Affichage d’état: affiche l’état actuel de réglage et de fonctionnement. 3 2 K C H – 1 / 2 m i n S T A N D B Y - O F F 1 0 / 1 0 / 0 2 1 2 : 0 0 : 0 0 T C R 0 2 : 0 0 : 0 0 : 0 0...
  • Seite 156 AFFICHAGE SUR ÉCRAN – Affichage d’état – (suite) 3 2 K C H – 1 / 2 m i n S T A N D B Y - O F F 1 0 / 1 0 / 0 2 1 2 : 0 0 : 0 0 T C R 0 2 : 0 0 : 0 0 : 0 0 Elément Désignation...
  • Seite 157: Affichage D'évènement

    AFFICHAGE SUR ÉCRAN – Affichage d’évènement – Affichage d’évènement : Pendant l’opération spécifique ou lorsque le mode de fonction- nement est modifié par la télécommande, il s’affiche à l’endroit indiqué ci-dessous. Position B : 3 2 K C H – 1 / 2 m i n s’affiche pendant environ 3 secondes Affichage...
  • Seite 158: Affichage D'alerte

    AFFICHAGE SUR ÉCRAN – Affichage d’alerte – Affichage d’alerte : s’affiche en cas d’anomalie telle que la mauvaise manipulation de l’appareil ou l’encrassement de têtes. – Position A : les messages indiquent l’état du magnétoscope et restent affichés jusqu’à ce qu’il soit débloqué.
  • Seite 159 Affichage Désignation COPY INHIBIT S’affiche lorsque vous tentez d’enregistrer sur une bande qui contient des signaux de protection contre la copie. REC INHIBIT S’affiche lorsque vous tentez d’enregistrer sur une cassette protégée contre l’écriture (le taquet à l’arrière de la cassette est positionné sur “SAVE”). A.
  • Seite 160: Preparatifs

    PREPARATIFS – Télécommande fournie – Mise en place des piles Avant d’utiliser la télécomamnde, insérer les deux piles (AA/R6). Retirer le couvercle Introduire les deux Remettre le couver- du logement des pi- piles (AA/R6). cle du logement les. despiles en place. •...
  • Seite 161: Utilisation De La Télécommande

    Utilisation de la télécommande POWER EJECT En cas d’utilisation d’une télécommande, régler MENU A.DUB PLAY PAUSE le commutateur REMOTE sur “WIRELESS”. DVCAM NTSC REC INH. AG-DV2500 1 / 3 REMOTE INPUT LINE 2 / 4 STOP AUDIO 9PIN WIRELESS S-VIDEO Précautions pour l’utilisation de la télécommande Précautions pour l’utilisation de la télécommande...
  • Seite 162: Alimentation

    PREPARATIFS – Alimentation – Brancher l’adaptaeur AC Brancher l’adaptateur AC fourni sur le magnétoscope. WARNING : SHOCK HAZARD - DO NOT OPEN. AVIS : RISQUE DE CHOC ELECTRIQUE - NE PAS OUVRIR. Adaptateur AC DV IN/OUT fourni Serre-câble AUDIO VIDEO Cordon 9PIN REMOTE NTSC...
  • Seite 163: Mise Sous Tension

    Mise sous tension Témoin POWER En mode POWER OFF (le témoin POWER POWER s’allume en rouge), appuyer sur la tou- che POWER du magnétoscope ou de la télécommande. A.DUB DVCAM NTSC • Le magnétoscope est mis sous tension et le AG-DV2500 1 / 3 témoin POWER s’allume en vert.
  • Seite 164: Réglage Ntsc/Pal

    PREPARATIFS – Réglage NTSC/PAL – Ce magnétoscope supporte les formats NTSC et PAL. Pour entrer les signaux analogiques (vidéo composite ou Y/C), sélectionner d’abord le mode d’entre du signal. Touche Commutateur NTSC/PAL POWER Témoins NTSC Témoins PAL POWER OCK HAZARD - DO NOT OPEN. CHOC ELECTRIQUE - NE PAS OUVRIR.
  • Seite 165: Chargement/Déchargement De La Cassette

    PREPARATIFS – Chargement/déchargement de la cassette – Utiliser les cassettes standard DV ou MiniDV. Guide POWER POWER EJECT EJECT MENU MENU A.DUB PLAY PAUSE A.DUB PLAY PAUSE DVCAM NTSC REC INH. DVCAM NTSC REC INH. AG-DV2500 AG-DV2500 1 / 3 1 / 3 REMOTE INPUT...
  • Seite 166: Réglage/Affichage De La Date Et De L'heure

    PREPARATIFS – Réglage/affichage de la date et de l’heure – Régler la date et l’heure de l’horloge interne. Les réglages de la date et de l’heure seront sauve- gardés par une batterie rechargeable même si le magnétoscope est mis hors tension. La date et l’heure s’affichent sur l’écran du moniteur selon le réglage effectué...
  • Seite 167 Touche PLAY Touche EJECT Touche EJECT POWER Touche DISPLAY Touche SET MENU STILL MENU PLAY PAUSE BARS BLANK MODE DVCAM NTSC REC INH. Touche PAUSE AUDIO MUTING MENU SEARCH+ 1 / 3 2 / 4 STOP OUT SEL. AUDIO Touche FF Touche Touche SEARCH–...
  • Seite 168 PREPARATIFS – Réglage/affichage de la date et de l’heure – (suite) Sélection d’affichage de la date et de l’heure La date et l’heure sont affichées sur l’écran connecté à VIDEO LINE OUT ou le terminal S- VIDEO. Utiliser l’écran du menu DISPLAY pour afficher ou ne pas afficher la date et l’heure ☞...
  • Seite 169: Enregistrement Raccordement/Réglage

    ENREGISTREMENT – Raccordement/réglage – Ce chapitre explique comment raccorder, régler et manipuler ce magnétoscope pour l’utiliser comme enregistreur. Cet appareil, relié à un système de montage, ne peut pas être utilisé comme enregistreur. Raccordement Raccordement à un appareil vidéo doté d’un connecteur DV. Vous pouvez enregistrer les images avec le moins de dégradation possible.
  • Seite 170 ENREGISTREMENT – Raccordement/réglage – (suite) Réglage Panneau arrière Témoins NTSC Témoins PAL NG : SHOCK HAZARD - DO NOT OPEN. ISQUE DE CHOC ELECTRIQUE - NE PAS OUVRIR. POWER EJECT N/OUT MENU VIDEO A.DUB PLAY PAUSE DVCAM NTSC REC INH. 9PIN REMOTE AG-DV2500 NTSC...
  • Seite 171: Réglage Du Code Temporel

    ENREGISTREMENT – Réglage du code temporel – Enregistrement du code temporel Ce magnétoscope est doté d’un lecteur/générateur de code temporel incorporé. Pendant l’en- registrement, les codes temporels sont enregistrés. Pendant l’enregistrement de données à partir du générateur de code temporel incorporé, les bits utilisateur ne sont pas affichés. En fonction des conditions d’enregistrement, les codes temporels sont enregistrés comme suit: Les codes temporels sont enregistrés en mode REC RUN.
  • Seite 172 ENREGISTREMENT – Réglage du code temporel – (suite) Afficher le menu top MENU. Ecran top MENU Magnétoscope Télécommande – – – M E N U – – – S Y S T E M . . R E MO T E . . Appuyer sur le bouton PAUSE Appuyer sur la touche MENU.
  • Seite 173: Comment Enregistrer

    ENREGISTREMENT – Comment enregistrer – Télécommande Magnétoscope Touche Touche PLAY Touche PAUSE Touche REC POWER EJECT A.DUB PAUSE Touche F.REV F.ADV PLAY MENU PLAY A.DUB PLAY PAUSE Touche DVCAM NTSC REC INH. Touche STOP AG-DV2500 STOP INDEX INDEX 1 / 3 –...
  • Seite 174: Fonction Enregistrement De Série

    ENREGISTREMENT – Fonction enregistrement de série – En raccordant ce magnétoscope à un appareil DV, vous pouvez effectuer un enregistrement consécutif de longue durée. Lorsque vous utilisez ce magnétoscope comme enregistreur au départ d’un camescope DV, via le connecteur DV, vous pouvez réaliser un enregistrement de longue durée en commençant l’enregistrement sur cet appareil au moment où...
  • Seite 175: Doublage Audio

    ENREGISTREMENT – Doublage audio – Sur la bande dont les signaux audio sont enregistrés en mode 32 kHz, vous pouvez ajouter de nouveaux sons sur les canaux CH3 et CH4 (postsonorisation). Notes • Sur la bande dont les signaux audio sont enregistrés en mode 48 kHz, vous ne pouvez pas effec- tuer le doublage audio.
  • Seite 176 ENREGISTREMENT – Doublage audio – (suite) Remarque Raccordement • Pendant le doublage audio, si la bande contient Pour entrer le son à ajouter, raccorder le câble au des pistes enregistrées d’un mode incompatible connecteur AUDIO IN du panneau arrière ou MIC avec le doublage audio, tel que le mode LP ou le du panneau avant.
  • Seite 177: Lecture

    LECTURE – Raccordement/réglage – Dans ce chapitre, vous trouverez les explications sur le raccordement, les réglages et les opérations requis pour utiliser ce magnétoscope comme lecteur. Raccordement Utilisation seule Moniteur WARNING : SHOCK HAZARD - DO NOT OPEN. AVIS : RISQUE DE CHOC ELECTRIQUE - NE PAS OUVRIR.
  • Seite 178 LECTURE – Raccordement/réglage – (suite) Réglage Commutateur REMOTE du panneau avant POWER En cas d’utilisation d’une télécommande, régler sur “WIRELESS”. Remarque A.DUB Pour contrôler l’appareil avec la borne 9 broches REMOTE, DVCAM NTSC AG-DV2500 régler le commutateur sur 9PIN. 1 / 3 REMOTE INPUT LINE...
  • Seite 179: Lecture Avec Fonctions De Base

    LECTURE – Lecture avec fonctions de base – Témoin DV CAM Touche PLAY Touche PAUSE Touche PLAY POWER EJECT A.DUB PAUSE F.REV F.ADV PLAY MENU Touche A.DUB PLAY PAUSE Touche FF DVCAM NTSC REC INH. STOP Touche AG-DV2500 INDEX INDEX –...
  • Seite 180: Lecture Avec Fonctions Spéciales

    LECTURE – Lecture avec fonctions spéciales – Lecture image par image Manipuler avec la télécommande. Réglage POWER STILL MODE dans le menu écran SYSTEM. DISPLAY STILL Sélectionner la quantité de trames à avancer et les images fixes à BARS BLANK MODE lire.
  • Seite 181: Lecture À Vitesse Variable

    Lecture à vitesse variable Manipuler avec la télécommande. Passer l’appareil en mode de recherche. Touches Touches Touches SEARCH +/( ) Le mode de recherche peut s’effectuer à l’aide d’une touche d’opé- ration du magnétoscope. Passer l’appareil en mode de lecture ou d’arrêt sur image. POWER DISPLAY Appuyer sur la touche FF pour l’avance rapide.
  • Seite 182: Repérage Du Début D'enregistrement

    LECTURE – Repérage du début d’enregistrement – Recherche d’index Repère des séquences enregistrées marquées d’un signal d’index. Manipuler avec la télécommande. A partir de la position de bande actuelle, pour effectuer A.DUB PAUSE le repérage d’index vers l’avant : F.REV F.ADV PLAY •...
  • Seite 183: Sélection De La Sortie Audio En Lecture

    LECTURE – Sélection de la sortie audio en lecture – Vous pouvez sélectionner le mode de sortie audio en lecture avec la télécommande. Activation/désactivation (ON/OFF) de la sourdine, pour mettre le son de la lec- ture ou le son EE, appuyer sur la touche POWER AUDIO MUTING.
  • Seite 184: Réglage Du Magnétoscope

    Pour optimiser la précision du montage, trans- mettre à la télécommande de montage, le si- gnal composite émis par le connecteur VIDEO LINE OUT de AG-DV2500E comme signal de synchronisation de référence. Dans ce cas, uti- liser le connecteur S-VIDEO OUT pour le signal vidéo.
  • Seite 185 • vec certains contrôleurs, LEARN ne fonctionne pas correctement. Enabling the LEARN function: Pour activer la fonction LEARN, insérer la cassette ayant le code temporel enregistré de 23:59:00:00 à 00:01:00:00, dans AG-DV2500E puis activer LEARN. F-49 F-49...
  • Seite 186: Montage

    MONTAGE – Utiliser comme lecteur du montage – (suite) Utilisation avec le système de montage non linéaire Une bande enregistrée sur ce magnétoscope peut être capturée (saisie) sur un système de montage non- linéaire. Par la suite, son contenu peut être réenregistré sur le magnétoscope. Raccordement Connexion utilisant le terminal DV 1394 Connecteur [DV]...
  • Seite 187: Menu Ecran

    MENU ECRAN – La composition du menu écran – Le menu écran s’affiche sur le moniteur. Il est constitué de plusieurs niveaux de menus écran. Ecran top MENU Ecran SYSTEM M E N U – – – S Y S T E M –...
  • Seite 188: Configuration Des Menus Écran

    MENU ECRAN – Configuration des menus écran – Les diverses fonctions de ce magnétoscope peuvent être configurées dans les menus écran. Tous les réglages sont enregistrés dans la mémoire interne du magnétoscope. Le contenu de cette mémoire est sauvegardé même si le magnétoscope est éteint. Touche PLAY Touche EJECT...
  • Seite 189 Touche PLAY Touche EJECT Touche EJECT Touche SET POWER DISPLAY MENU STILL BARS BLANK MODE PLAY PAUSE DVCAM NTSC REC INH. Touche AUDIO Touche PAUSE MUTING MENU SEARCH+ 1 / 3 MENU 2 / 4 STOP OUT SEL. AUDIO Touche Touche Touche FF SEARCH–...
  • Seite 190: Composition Du Menu Écran

    MENU ECRAN – Composition du menu écran – Dans les tableaux suivants, les valeurs indiquées correspondent aux réglages d’usine par défaut. Top MENU Elément Valeur de réglage Désignation Affiche le menu écran de réglage du fonctionnement du système SYSTEM du magnétoscope. Affiche le menu écran concernant le pilotage.
  • Seite 191 Menu écran SYSTEM Menu écran SYSTEM Elément Valeur de réglage Désignation Sélectionner le mode de trame en arrêt sur image et lecture image par image: STILL MODE FIELD FIELD : Mode Field. Affiche alternativement la 1ère trame et la 2ème trame pendant “lecture image par image”.
  • Seite 192 TYPE1 Lorsque l’appareil est piloté avec une interface RS-422A, sélectionner TYPE2 la valeur en fonction du type de contrôleur: TYPE3 TYPE1 : La télécommande n’est pas de PANASONIC TYPE4 TYPE2 : La télécommande n’est pas de PANASONIC TYPE5 TYPE3 : AG-A850, AJ-A95...
  • Seite 193 Menu écran AUDIO/VIDEO Elément Valeur de réglage Désignation AUDIO MODE Sélectionner le taux de fréquence d’échantillonnage pendant l’enregistre- ment: : Enregistrer en mode 48 kHz. Enregistrer en mode 2 ca- naux stéréo. Le doublage audio est inutilisable. : Enregistrer en mode 32 kHz. Enregistrer en mode 4 canaux. Sélectionner cette valeur pour effectuer ultérieurement un doublage audio sur CH3 et CH4.
  • Seite 194 MENU ECRAN – Composition du menu écran – (suite) Menu écran TIME CODE Elément Valeur de réglage Désignation Préréglage du code temporel: Pour plus de détails, se reporter à “Réglage du code temporel” page 35. CANCEL Remise à zéro du code temporel réglé: CLEAR EXECUTE CANCEL...
  • Seite 195 Menu écran DISPLAY Menu écran DISPLAY Elément Valeur de réglage Désignation Activation/désactivation de l’affichage d’icônes sur l’écran de sta- DISPLAY tut sur le moniteur raccordé au connecteur VIDEO LINE OUT ou S-VIDEO OUT: AUTO : Absence d’affichage sur écran. : Affichage permanent sur écran. AUTO : Affichage pendant 4 secondes lors du changement de mode.
  • Seite 196 MENU ECRAN – Composition du menu écran – (suite) Menu écran DISPLAY (suite) Elément Valeur de réglage Désignation L’affichage des canaux audio ou de la fréquence d’échantillonnage AUDIO INFO. sur le moniteur: OFF : Affichage désactivé. : Affichage activé. Sélectionner le mode d’affichage de la date: DATE STYLE Y/M/D Y/M/D : Année/mois/date.
  • Seite 197: Divers

    DIVERS – Pose verticale – Pour poser l’appareil à la verticale, utiliser le socle fourni comme indiqué ci-dessous. Le poser sur le côté gauche. Socle Notes • Pour poser le magnétoscope à la verticale, l’installer sur le socle fourni. Dans le cas contraire, le magnétoscope risque de tomber pouvant causer blessures ou dommages corporels.
  • Seite 198: Affichage D'avertissement

    DIVERS – Affichage d’avertissement – Lorsqu’une anomalie est détectée, le magnétoscope analyse la source des problèmes et le résultat est affiché sur le moniteur avec un code d’erreurs. En cas d’instabilité ou de mauvaise manipulation de l’appareil, le message d’alerte s’affiche sur le moniteur.
  • Seite 199 Toute- WARNING 3300 La cassette ne se décharge pas. fois ceci pouvant endommager la UNLOADING FAILURE bande, consulter votre revendeur ou le centre de service PANASONIC. WARNING 4100 Erreur de fonctionnement Eject. CASSETTE EJECT FAILURE DEFECTIVE TAPE! Bande défectueuse.
  • Seite 200: En Cas De Difficultés

    DIVERS – En cas de difficultés – Symptômes Solutions possibles Le magnétoscope ne s’allume L’adaptateur AC est-il raccordé correctement au magnétos- pas. cope? Impossible d’insérer la cassette. L’indicateur de cassette est-il allumé? S’il est allumé, une cassette est insérée dans l’appareil. La retirer.
  • Seite 201: Vérifier Le Compteur Horaire

    DIVERS – Vérifier le compteur horaire – Ce magnétoscope affiche le compteur horaire - le temps d’utilisation du tambour de tête - à DRUM HOUR METER dans le menu top MENU. ☞ Il est utile de le consulter pour l’entretien périodique. ( Page 7) POWER EJECT...
  • Seite 202: Fiche Technique

    DIVERS – Fiche Technique – Généralités Audio Format d’enregistrement : format DV Format d’enregistrement : 16-bit, 48k Hz pour 2 cannaux (en mode SP uniquement) audio PCM/12-bit, 32 kHz, Format du signal : NTSC/PAL 4 cannaux audio PCM Bande utilisée : cassette standard/MiniDV Quantification : 2 (16-bit, 48 kHz)/...
  • Seite 203 Dimensions extérieures (Unité: mm) POWER EJECT MENU A.DUB PLAY PAUSE DVCAM NTSC REC INH. AG-DV2500 1 / 3 REMOTE INPUT LINE 2 / 4 STOP AUDIO 9PIN WIRELESS S-VIDEO F-67 F-67...
  • Seite 205 Instrucciones de Funcionamiento NTSC Grabador de cintas de vídeo digital Modelo AG- POWER EJECT MENU A.DUB PLAY PAUSE DVCAM NTSC REC INH. AG-DV2500 1 / 3 REMOTE INPUT LINE 2 / 4 STOP AUDIO 9PIN WIRELESS S-VIDEO Antes de manejar este producto, lea con detenimiento las instrucciones y guarde este manual porque le puede hacer falta en el futuro.
  • Seite 206: Instrucciones De Seguridad

    Suplemento Este equipo se ajusta a las estipulaciones y normas de protección establecidas por las corres- pondientes Directivas Europeas. El equipo está diseñado para aparatos de vídeo profesional y se puede utilizar en los siguientes ámbitos: 5 Doméstico (incluyendo los tipos de ubicación de clase 1 y 2 descritos por la norma IEC 1000-2-5) 5 Sector comercial y de ocio (incluyendo, por ejemplo, cines) 5 Exteriores urbanos (según la definición del tipo de ubicación de clase 6 descrita por la...
  • Seite 207 • El cable coloreado en AZUL debe conectarse Puede comprar un tapón de fusible de recambio a su al terminal en el enchufe que está marcado con distribuidor Panasonic local. SI EL ENCHUFE MOLDEADO NO ES ADECUADO la letra N o coloreado en ROJO.
  • Seite 208: Características Principales

    Gracias por comprar la unidad graba- CARACTERÍSTICAS PRINCIPALES dora de vídeo DV AG-DV2500E. ● Formato DV Alta calidad de imagen y sonido mediante tec- nología digital. ● Mecanismos compatibles con cintas DV estándar/pequeñas Graba y reproduce cintas DV de tamaño estándar y pequeñas (sólo en modo SP).
  • Seite 209 ÍNDICE INTRODUCCIÓN EDICIÓN Precauciones ..........6 Utilización de la unidad como un sistema Mantenimiento diario y revisiones periódicas ..7 de edición ............. 48 Precauciones sobre el uso de la cinta limpiadora ............8 PANTALLA DE MENÚ Cinta ............... 8 Estructura del menú...
  • Seite 210: Introducción

    INTRODUCCIÓN Precauciones Lugares de almacenamiento y uso Mantenimiento de la unidad (desconec- te la alimentación del aparato antes de Por favor no almacene o use este VTR en los realizar cualquier operación de mante- siguientes lugares: nimiento) ● Lugares en los que la temperatura sobrepa- Limpie la unidad con un paño suave.
  • Seite 211: Mantenimiento Diario Y Revisiones Periódicas

    65 “Comprobación del contador horario”. Consultas de mantenimiento : Para obtener más detalles sobre los costes y planes de mantenimien- to, consulte a su distribuidor autorizado PANASONIC más cercano. Limpieza de cabezales ● La grabación o reproducción con cabezales su- ●...
  • Seite 212: Precauciones Sobre El Uso De La Cinta Limpiadora

    DV pequeñas (sólo para modo La cintas DV tienen una pestaña de seguridad en la SP). Utilice las cintas PANASONIC con el logo parte posterior para evitar su borrado por accidente. ● Para evitar el borrado accidental de grabacio- ●...
  • Seite 213: Condensación

    ● Prevención de la condensación • Cuando se utiliza en un lugar con humedad elevada. Cuando vaya a someter el AG-DV2500E a un Cabezal de la bobina cambio de temperatura brusco, asegúrese de que no hay ninguna cinta introducida. A conti- nuación, meta el AG-DV2500E en una bolsa de...
  • Seite 214: Nombres Y Funciones De Las Partes

    NOMBRES Y FUNCIONES DE LAS DISTINTAS PARTES – Panel frontal – POWER EJECT MENU A.DUB PLAY PAUSE DVCAM NTSC REC INH. AG-DV2500 1 / 3 REMOTE INPUT LINE 2 / 4 STOP AUDIO 9PIN WIRELESS S-VIDEO [POWER] Botón/LED Power [A. DUB] Botón/LED de mezcla de audio ●...
  • Seite 215 POWER EJECT MENU A.DUB PLAY PAUSE DVCAM NTSC REC INH. AG-DV2500 1 / 3 REMOTE INPUT LINE 2 / 4 STOP AUDIO 9PIN WIRELESS S-VIDEO [REMOTE] Interruptor de selección [MIC] Terminal de entrada de micrófo- del mando a distancia Este es el mini jack para la entrada del micrófo- Utilice este interruptor para seleccionar el tipo no monoauricular.
  • Seite 216 NOMBRES Y FUNCIONES DE LAS DISTINTAS PARTES – Panel frontal – (continuación) POWER EJECT MENU A.DUB PLAY PAUSE DVCAM NTSC REC INH. AG-DV2500 1 / 3 REMOTE INPUT LINE 2 / 4 STOP AUDIO 9PIN WIRELESS S-VIDEO [REC] Botón/LED de grabación [FF] Botón/LED de avance rápido ●...
  • Seite 217 POWER EJECT MENU A.DUB PLAY PAUSE DVCAM NTSC REC INH. AG-DV2500 1 / 3 REMOTE INPUT LINE 2 / 4 STOP AUDIO 9PIN WIRELESS S-VIDEO INDICADOR Indicador de audio : Cuando haya una cinta introducida, Este indicador determina la presencia de se- el LED se iluminará...
  • Seite 218: Panel Posterior

    NOMBRES Y FUNCIONES DE LAS DISTINTAS PARTES – Panel posterior – WARNING : SHOCK HAZARD - DO NOT OPEN. AVIS : RISQUE DE CHOC ELECTRIQUE - NE PAS OUVRIR. DV IN/OUT AUDIO VIDEO 9PIN REMOTE NTSC CH 1/3 CH 2/4 LINE S -VIDEO Terminal de entrada de la alimen-...
  • Seite 219 WARNING : SHOCK HAZARD - DO NOT OPEN. AVIS : RISQUE DE CHOC ELECTRIQUE - NE PAS OUVRIR. DV IN/OUT AUDIO VIDEO 9PIN REMOTE NTSC CH 1/3 CH 2/4 LINE S -VIDEO [S-VIDEO IN] Terminal (4P) de en- [AUDIO IN] Terminal (PHONO 2) de trada de vídeo Y/C entrada de audio Este es el terminal de entrada para señales de...
  • Seite 220: Mando A Distancia Inalámbrico

    NOMBRES Y FUNCIONES DE LAS DISTINTAS PARTES – Mando a distancia inalámbrico – Botón [STILL MODE] Utilice este botón para seleccionar las imáge- nes en el modo STILL. Cuando la unidad esté en modo STILL, pulse este botón para cambiar las imágenes en el POWER DISPLAY siguiente orden.
  • Seite 221: Botón [Pause]

    Botón / [SEARCH-] Botón [F.ADV] • Cuando la unidad esté en modo de repro- Cada vez que se pulse este botón con la uni- ducción, en modo STILL o en modo repro- dad en modo STILL, la imagen avanzará un ducción de velocidad variable hacia ade- fotograma.
  • Seite 222: Visualización En Pantalla

    VISUALIZACIÓN EN PANTALLA – A propósito de la visualización en pantalla – Además de las imágenes E-E y las imágenes de reproducción, el monitor conectado al terminal VIDEO LINE OUT y al terminal S-VIDEO OUT mostrará la siguiente información en pantalla. Mando a distancia inalámbrico Pantalla del menú...
  • Seite 223 VISUALIZACIÓN EN PANTALLA – Visualización de estado – Visualización de estado: Muestra la configuración actual y el estado de funcionamiento. 3 2 K C H – 1 / 2 m i n S T A N D B Y - O F F 1 0 / 1 0 / 0 2 1 2 : 0 0 : 0 0 T C R 0 2 : 0 0 : 0 0 : 0 0...
  • Seite 224 VISUALIZACIÓN EN PANTALLA – Visualización de estado – (continuación) 3 2 K C H – 1 / 2 m i n S T A N D B Y - O F F 1 0 / 1 0 / 0 2 1 2 : 0 0 : 0 0 T C R 0 2 : 0 0 : 0 0 : 0 0 Elemento...
  • Seite 225: Visualización De Acciones

    VISUALIZACIÓN EN PANTALLA – Visualización de acciones – Visualización de acciones : Cuando esté activada una función específica o cuando se cambie el estado de funcionamiento desde el mando a distancia, etc. las acciones se visualizarán siguiendo las posiciones indicadas a continuación. Visualización en posición B 3 2 K C H –...
  • Seite 226: Visualización De Avisos

    VISUALIZACIÓN EN PANTALLA – Visualización de avisos – Visualización de avisos : Los mensajes de aviso se visualizan tal y como se muestra más adelante, cuando se produce un error de funcionamiento o cuando el nivel de funcionamiento de la unidad es insuficiente. Ej: cabezal sucio.
  • Seite 227: Dub Inhibit (Lp)

    Visualización Contenido COPY INHIBIT Se pretende grabar señales protegidas con la protección de copia. REC INHIBIT Se pretende realizar una grabación en una cinta protegida contra escritura (la pestaña de la parte trasera está en la posición “SAVE”). A. DUB INHIBIT Se pretende realizar una mezcla de audio en una cinta protegida contra escritura (REC TAB) (la pestaña de la parte trasera está...
  • Seite 228: Preparación

    PREPARACIÓN – Mando a distancia inalámbrico proporcionado – Introducción de las pilas Antes de utilizar el mando a distancia inalámbrico, asegúrese de haberle puesto 2 pilas (AA). Abra el receptáculo Introduzca 2 pilas. Cierre el recep- • Inserte el polo · en pri- de las pilas.
  • Seite 229 Utilización del mando a distancia inalámbrico POWER EJECT MENU Antes de utilizar el mando a distancia A.DUB PLAY PAUSE inalámbrico, coloque el interruptor REMOTE DVCAM NTSC REC INH. AG-DV2500 en la posición “WIRELESS”. 1 / 3 REMOTE INPUT LINE 2 / 4 STOP AUDIO 9PIN...
  • Seite 230: Alimentación

    PREPARACIÓN – Alimentación – Conexión del adaptador CA Conecte el adaptador CA suministrado a la unidad. WARNING : SHOCK HAZARD - DO NOT OPEN. AVIS : Tornillo RISQUE DE CHOC ELECTRIQUE - NE PAS OUVRIR. Adaptador CA DV IN/OUT suministrado Abrazadera AUDIO VIDEO...
  • Seite 231: Conexión De La Alimentación

    Conexión de la alimentación Indicador POWER Cuando la unidad esté en modo POWER OFF (el indicador POWER se POWER iluminará en rojo), pulse el botón POWER de la unidad o del mando a A.DUB PLAY distancia. DVCAM NTSC REC INH. AG-DV2500 1 / 3 •...
  • Seite 232: Ntsc/Pal

    PREPARACIÓN – Selección de la señal de sistema NTSC/PAL – Esta unidad es compatible con las señales de sistema NTSC y PAL. Antes del envío de señales analógicas (señales de vídeo separadas Y/C o compuesto), se- leccione la señal de sistema. Botón Indicador Indicador...
  • Seite 233: Introducción/Expulsión De Cintas

    PREPARACIÓN – Introducción/expulsión de cintas – Utilice cintas DV estándar o cintas DV pequeñas. Guía POWER POWER EJECT EJECT MENU MENU A.DUB PLAY PAUSE A.DUB PLAY PAUSE DVCAM NTSC REC INH. DVCAM NTSC REC INH. AG-DV2500 AG-DV2500 1 / 3 1 / 3 REMOTE INPUT...
  • Seite 234: Configuración/Visualización De Fecha Y Hora

    PREPARACIÓN – Configuración/visualización de fecha y hora – Mediante esta función se configura la fecha y la hora del reloj integrado. Gracias a la batería integrada recargable, la configuración de la fecha y la hora se mantiene aún cuando se corta la alimentación de la unidad.
  • Seite 235 Botón Botón PLAY EJECT POWER MENU Botón SET Botón EJECT DISPLAY Botón MENU STILL BARS BLANK MODE PLAY PAUSE AUDIO DVCAM NTSC REC INH. MENU SEARCH+ MUTING Botón PAUSE 1 / 3 OUT SEL. Botón 2 / 4 STOP Botón AUDIO Botón FF SEARCH–...
  • Seite 236 PREPARACIÓN – Configuración/visualización de fecha y hora – (continuación) Seleccón de la visualizaión de fecha y hora La información relativa a la fecha y la hora se visualiza en la pantalla del monitor conectado a la SALIDA DE LINEA DE VIDEO o al terminal S-VIDEO. Para activar/desactivar la opción de visualizar la información relativa a la fecha y la hora, así...
  • Seite 237: Grabación

    GRABACIÓN – Conexión y configuración – En este capítulo se explican los métodos de conexión, configuración y operación necesarios para utilizar esta unidad como grabadora. Esta unidad no puede utilizarse como grabadora de sistema de edición. Conexión Cuando se conecta a un aparato de vídeo equipado con un terminal DV Las imágenes se pueden grabar casi sin deterioro de la calidad de imagen.
  • Seite 238: Configuración

    GRABACIÓN – Conexión y configuración – (continuación) Configuración Indicador NTSC Indicador PAL Panel posterior POWER NG : SHOCK HAZARD - DO NOT OPEN. EJECT ISQUE DE CHOC ELECTRIQUE - NE PAS OUVRIR. N/OUT MENU A.DUB PLAY PAUSE VIDEO DVCAM NTSC REC INH.
  • Seite 239: Configuración De Códigos De Tiempo

    GRABACIÓN – Configuración de códigos de tiempo – Grabación con código de tiempo Esta unidad incluye un generador/lector interno de código de tiempo. Durante la grabación se graban códigos de tiempo. Durante la grabación de los datos del gene- rador interno de código de tiempo, no se graban los bits del usuario. Dependiendo de las condiciones de grabación, los códigos de tiempo se graban como sigue: Los códigos de tiempo se graban en el modo REC RUN.
  • Seite 240 GRABACIÓN – Configuración de códigos de tiempo – Visualizar MENÚ PRINCIPAL. MENÚ PRINCIPAL – – – M E N U – – – Desde la unidad principal Desde el mando a distancia S Y S T E M . . R E MO T E .
  • Seite 241: Métodos De Grabación

    GRABACIÓN – Métodos de grabación – Desde el mando a distancia Desde la unidad principal Botón Botón PLAY Botón PAUSE Botón REC POWER A.DUB PAUSE EJECT Botón F.ADV F.ADV PLAY PLAY MENU A.DUB PLAY PAUSE Botón DVCAM NTSC REC INH. STOP Botón AG-DV2500...
  • Seite 242: Función De Grabación En Serie

    GRABACIÓN – Función de grabación en serie – Al conectar esta unidad a otros aparatos DV, ésta podrá realizar grabaciones continuas y más largas. Esta unidad puede fijarse como una unidad conectada a una videocámara. Cuando se acaba la grabación en la cinta de la unidad de origen, esta unidad puede comenzar a grabar, lo que permite mayor número de horas de grabación.
  • Seite 243: Mezcla De Audio

    GRABACIÓN – Mezcla de audio – Con cintas grabadas en modo audio de 32kHz, la mezcla de audio puede realizarse en los canales CH3 y CH4 después de la grabación. Dependiendo de las condiciones de grabación, los códigos de tiempo se graban como sigue: Los códigos de tiempo se graban en el modo REC RUN.
  • Seite 244: De Audio (Ntsc O Pal)

    GRABACIÓN – Mezcla de audio – Recuerde Conexión • Durante la mezcla de audio, si la cinta llega a una parte grabada en un modo que no permite Los sonidos de mezcla de audio se reciben desde la mezcla (como modo LP o modo audio de el terminal AUDIO IN en el panel posterior o el ter- 48kHz), el VTR pasará...
  • Seite 245: Reproducción

    REPRODUCCIÓN – Conexión/Configuración – Esta sección explica el método de operación, la configuración y la conexión necesarios para utilizar esta unidad como reproductor. Conexión Utilice esta unidad como aparato autónomo Monitor WARNING : SHOCK HAZARD - DO NOT OPEN. AVIS : RISQUE DE CHOC ELECTRIQUE - NE PAS OUVRIR.
  • Seite 246 REPRODUCCIÓN – Conexión/Configuración – Configuración Interruptor REMOTE del panel frontal Para utilizar el mando a distancia inalámbrico, ponga el interruptor POWER en “WIRELESS”. Recuerde A.DUB Para controlar la unidad con el terminal 9 PIN REMOTE (re- DVCAM NTSC AG-DV2500 moto de 9 clavijas), seleccione “9PIN” (9clav.) en el conmuta- 1 / 3 REMOTE INPUT...
  • Seite 247: Método De Reproducción Básico

    REPRODUCCIÓN – Método de reproducción básico – Botón PAUSE Indicador DV CAM Botón PLAY Botón PLAY A.DUB PAUSE POWER EJECT F.ADV F.ADV PLAY MENU Botón Botón A.DUB PLAY PAUSE STOP DVCAM NTSC REC INH. INDEX INDEX Botón – AG-DV2500 1 / 3 PAUSE REMOTE INPUT...
  • Seite 248: Función De Reproducción Especial

    REPRODUCCIÓN – Función de reproducción especial – Reproducción de fotogramas avanzada (marcha atrás) Utilice el mando a distancia. Configuración POWER La opción STILL MODE del menú SYSTEM DISPLAY Seleccione la cantidad de reproducción avanzada de fotogramas e STILL BARS BLANK MODE imagen fija.
  • Seite 249 Reproducción a velocidad variable Utilice el mando a distancia. Configure la unidad en modo de búsqueda. Botón Botón Botón El botón de la unidad principal también puede utilizarse para SEARCH +/( ) fijar la unidad en modo de búsqueda. Ponga la unidad en modo PLAYBACK o STILL. POWER DISPLAY Pulse el botón FF para ejecutar la reproducción rápi-...
  • Seite 250: Función De Localización

    REPRODUCCIÓN – Función de localización – Búsqueda de índice Esta función localiza y avanza/rebobina hasta la posición donde haya grabada una señal de índice. Utilice el mando a distancia. Para localizar un índice en dirección hacia delante con respecto a la posición actual de la cinta: F.REV F.ADV PLAY...
  • Seite 251 REPRODUCCIÓN – Selección de la salida para reproducción de audio – El modo de salida para la reproducción de audio puede seleccionarse con el mando a distan- cia. Para conectar/desconectar la función de audio de silencio o para silenciar el audio EE, pulse el botón AUDIO MUTING.
  • Seite 252: Audio

    Recuerde Si la precisión de edición es fundamental, intro- duzca las señales de vídeo compuesto del VI- DEO LINE OUT del AG-DV2500E como seña- les de sincronización estándar en el mando a distancia. Utilice el terminal S-VIDEO OUT para señales de vídeo.
  • Seite 253 De lo contrario, el VTR no podrá continuar. • Con ciertos controladores, la opción LEARN no funcionará con normalidad. Activación de la función LEARN: Inserte la cinta con el código de tiempo grabado hasta 23:59:00:00 - 00:01:00:00 en el AG-DV2500E antes de activar la función LEARN. S-49...
  • Seite 254 EDICIÓN – Utilización de la unidad como sistema de edición – (continuación) Utilización de la unidad en un sistema no lineal Este es un sistema que captura el contenido de la cinta de origen en un sistema de edición no lineal que graba en la unidad principal los contenidos no lineales editados. Conexión Conexión utilizando el terminal DV 1394.
  • Seite 255: Pantalla De Menú

    PANTALLA DE MENÚ – Estructura del menú – La jerarquía de menús se visualiza en el monitor. MENú PRINCIPAL Menú SYSTEM – – – – – – Menú REMOTE Pantalla habitual 3 2 K C H – 1 / 2 m i n 1 0 / 1 0 / 0 2 S T A N D B Y - O F F...
  • Seite 256: Configuración Del Menú

    PANTALLA DEL MEN Ú – Configuración del menú – Las distintas funciones de esta unidad pueden configurarse desde el menú. Los ajustes configurados se graban en la memoria de la unidad y se mantienen incluso después de haber apagado la alimentación. Botón PLAY Botón Botón...
  • Seite 257 Botón Botón PLAY Botón EJECT EJECT POWER DISPLAY Botón SET MENU STILL BARS BLANK MODE PLAY PAUSE Botón AUDIO DVCAM NTSC REC INH. Botón PAUSE MUTING MENU SEARCH+ MENU 1 / 3 OUT SEL. 2 / 4 STOP Botón Botón AUDIO Botón FF SEARCH–...
  • Seite 258: Contenidos De Los Menús

    PANTALLA DE MENÚ – Contenidos de los menús – En las descripciones del menú mostrado a continuación, las configuraciones con las marcas son ajustes de fábrica. MENÚ PRINCIPAL Elementos Ajuste Contenidos SYSTEM Muestra los menús relacionados con el sistema de funcionamien- to de esta unidad.
  • Seite 259: Menú System

    Menú SYSTEM Menús SYSTEM Elementos Ajuste Contenidos STILL MODE FIELD Utilice este elemento para seleccionar el tipo de imagen cuando la unidad esté en modo STILL o reproducción avanzada de fotogramas: FIELD : Muestra la imagen de campo. Durante la reproducción FRAME avanzada de fotogramas las 1 imágenes de campo...
  • Seite 260 CONTROLLER 422A, utilice este menú para establecer el tipo de mando a distancia TYPE2 que se ha conectado: TYPE3 TYPE1 : Mando a distancia no de PANASONIC TYPE4 TYPE2 : Mando a distancia no de PANASONIC TYPE5 TYPE3 : AG-A850, AJ-A95...
  • Seite 261 Menú AUDIO/VIDEO Elementos Ajuste Contenidos AUDIO MODE Seleccione la frecuencia de muestreo para la grabación: 48K : La grabación se realiza a 48K. Se utiliza el canal 2 modo estéreo. 32K : La grabación se realiza a 32K. Se utiliza el canal modo 4. Para realizar una mezcla de audio en los canales CH3 y CH4 más tarde, utilice este ajuste.
  • Seite 262: Menú Time Code

    PANTALLA DE MENÚ – Contenidos de los menús – (continuación) Menú TIME CODE Elementos Ajuste Contenidos Preestablece el código de tiempo. Para obtener más detalles, consulte la Página 35 “Preestablecimiento de los códigos de tiempo”. CLEAR CANCEL Utilice este elemento del menú para elegir si desea borrar los valores EXECUTE del código de tiempo: CANCEL : No borrar.
  • Seite 263 Menú DISPLAY Menú DISPLAY Elementos Ajuste Contenidos DISPLAY Utilice este elemento del menú para seleccionar si desea que se visualicen los caracteres de la pantalla de estado en el monitor AUTO conectado al terminal VIDEO LINE OUT o al terminal S-VIDEO: OFF : Ninguna visualización en pantalla.
  • Seite 264 PANTALLA DE MENÚ – Contenidos de los menús – (continuación) Menú DISPLAY (continuación) Elementos Ajuste Contenidos AUDIO INFO Utilice este ajuste para activar/desactivar la visualización del ca- nal de audio o la frecuencia de muestreo en el monitor: OFF : No visible. ON : Visible.
  • Seite 265: Otros

    OTROS – Colocación de la unidad en posición vertical – La siguiente ilustración muestra cómo se puede colocar la unidad en posición vertical utilizan- do el soporte que se proporciona. El lado izquierdo debe estar encarado al suelo. Soporte Notas •...
  • Seite 266: Visualización De Advertencia

    OTROS – Visualización de advertencia – Cuando se produce algún fallo, la unidad identifica automáticamente la causa y muestra en el monitor un mensaje de advertencia con su correspondiente código. Mensaje de advertencia Mensaje de aviso 3 2 K C H – 1 / 2 3 2 K C H –...
  • Seite 267 LOADING FAILURE la unidad. Sin embargo, en algunos casos esta acción puede dañar la cinta. Consul- WARNING 3300 No se puede expulsar la cinta. te a su distribuidor PANASONIC autoriza- UNLOADING FAILURE WARNING 4100 Error de expulsión de cinta. CASSETTE...
  • Seite 268: Solución De Problemas

    OTROS – Solución de problemas – Síntoma Acción correctiva La unidad no se enciende. ¿Está el adaptador CA conectado correctamente? La cinta no se puede introducir. ¿Está encendido el indicador de cinta? Si así es, ya hay una cinta introducida. Saque esta cinta. Empuje la cinta desde el centro y asegúrese de que entra de forma nivelada.
  • Seite 269: Comprobación De Contador Horario

    OTROS – Comprobación de contador horario – Esta unidad muestra el tiempo de uso de la bobina en el elemento DRUM HOUR METER del MENÚ PRINCIPAL. Utilícelo como referencia para llevar a cabo el mantenimiento periódico. (☞ Página 7) POWER EJECT POWER DISPLAY...
  • Seite 270: Especificaciones

    OTROS – Especificaciones – General Audio Sistema de grabación : Sistema DV (sólo modo SP) Formato de grabación : 16 bit, 48kHz, 2 canales Señal de sistema : NTSC/PAL audio PCM /12 bit, 32kHz Cintas : Cintas DV estándar y Audio PCM de 4 canales pequeñas Número de pista...
  • Seite 271 Diagrama de las dimensiones externas (Unidad: mm) POWER EJECT MENU A.DUB PLAY PAUSE DVCAM NTSC REC INH. AG-DV2500 1 / 3 REMOTE INPUT LINE 2 / 4 STOP AUDIO 9PIN WIRELESS S-VIDEO S-67...
  • Seite 273 Istruzioni Per I’Uso NTSC Registratore Digitale di Video-Cassette Modello AG POWER EJECT MENU A.DUB PLAY PAUSE DVCAM NTSC REC INH. AG-DV2500 1 / 3 REMOTE INPUT LINE 2 / 4 STOP AUDIO 9PIN WIRELESS S-VIDEO Prima di utilizzare questo prodotto, leggere attentamente le istruzioni e conservare questo manuale per il suo uso in futuro.
  • Seite 274: Norme Di Sicurezza

    Supplemento Questa apparecchiatura è conforme ai provvedimenti e ai requisiti di protezione delle corri- spondenti Direttive Europee. L’unità è stata creata per apparecchiature video professionali e può essere usata nei seguenti ambienti: 5 Aree residenziali ( che comprende entrambi i tipi di locali di classe 1 e 2, dalla Norma IEC 1000-2-5) 5 Ambienti commerciali e industriali leggeri (ad esempio, teatri) 5 Esterni urbani (basato sulla definizione del tipo di locali di classe 6, dalla Norma IEC...
  • Seite 275 Il coperchio può essere acquistato presso il rivendi- Come sostituire il fusibile tore PANASONIC più vicino. SE LA PRESA STAMPATA NON E’ ADATTA ALLA 1. Aprire il vano fusibile con un cacciavite.
  • Seite 276: Caratteristiche Principali

    Grazie per aver acquistato questo CARATTERISTICHE PRINCIPALI DV-Videoregistratore AG-DV2500E. ● Funzione formato DV Immagini e suoni di alta qualità grazie alla tec- nologia digitale. ● Meccanismo compatibile cassette standard e Mini DV. Registrazione e riproduzione di cassette DV in formato standard e mini. (solo in modalità SP).
  • Seite 277 INDICE INTRODUZIONE EDITING E MONTAGGIO Precauzioni d’uso ........... 6 Utilizzo con il sistema di editing e Manutenzione quotidiana e periodica .... 7 montaggio ............ 48 Precauzioni per l’uso di cassette di pulizia delle testine ........8 MENU SCHERMO Cassette utilizzabili ......... 8 Composizione schermo menu ......
  • Seite 278: Introduzione

    INTRODUZIONE Precauzioni d’uso Custodia ed uso Pulizia dell’apparecchio (da effettuare dopo aver staccato la presa di alimenta- Per la custodia o l’uso evitare le seguenti condi- zione) zioni: Adoperare un panno morbido. Non usare benzi- ● Caldo o freddo estremi: evitare l’uso dell’ap- na o solventi per evitare che il telaio si fonda o si parecchio con temperature al di fuori del range appanni.
  • Seite 279: Manutenzione Quotidiana E Periodica

    (Vedi pag. 65 “Controllo del contaore”) Richiesta di manutenzione : per un programma e preventivo di manutenzione, rivolgersi al proprio rivenditore oppure ai Centri di Assistenza PANASONIC riportati nel- l’allegato “Sportelli per l’Assistenza tecnica”. ● In caso di testina sporca l’apparecchio indica Disturbi dell’Immagine...
  • Seite 280: Precauzioni Per L'uso Di Cassette Di Pulizia Delle Testine

    L’apparecchio registra e riproduce solo cassette DV standard o cassette Mini-DV. (solo modalità SP). Le cassette DV su un lato hanno una levetta per Si prega di usare le seguenti cassette PANASONIC prevenire cancellazioni accidentali ● Se non volete cancellare registrazioni impor- con il marchio tanti spostare la levetta su “SAVE”.
  • Seite 281: Condensa

    Per registrare e salvare le immagini in modo ottimale Seguendo i consigli sotto riportati, potrete registrare e conservare le immagini in modo ottimale. ● Ambiente consigliato per l’utilizzo e la conservazione delle video cassette. Si consiglia di rispettare le condizioni atmosferiche (temperatura e umidità) descritte in tabella. Ambiente per Ambiente per la conservazione la registrazione...
  • Seite 282: Comandi E Caratteristiche

    COMANDI E CARATTERISTICHE – Frontale – POWER EJECT MENU A.DUB PLAY PAUSE DVCAM NTSC REC INH. AG-DV2500 1 / 3 REMOTE INPUT LINE 2 / 4 STOP AUDIO 9PIN WIRELESS S-VIDEO [A. DUB] doppiaggio dell’audio il tasto [POWER] (LED) “Funzionamento” (LED) ●...
  • Seite 283 POWER EJECT MENU A.DUB PLAY PAUSE DVCAM NTSC REC INH. AG-DV2500 1 / 3 REMOTE INPUT LINE 2 / 4 STOP AUDIO 9PIN WIRELESS S-VIDEO [MIC] presa d’inserimento microfono [REMOTE] selezione telecomando Porta d’inserimento minijack per microfoni Seleziona il modo di telecomandare l’apparec- mono.
  • Seite 284 COMANDE E CARATTERISTICHE – Frontale – (continua) POWER EJECT MENU A.DUB PLAY PAUSE DVCAM NTSC REC INH. AG-DV2500 1 / 3 REMOTE INPUT LINE 2 / 4 STOP AUDIO 9PIN WIRELESS S-VIDEO [REC] tasto registrazione (LED) [FF] tasto di avanzamento (LED) ●...
  • Seite 285 POWER EJECT MENU A.DUB PLAY PAUSE DVCAM NTSC REC INH. AG-DV2500 1 / 3 REMOTE INPUT LINE 2 / 4 STOP AUDIO 9PIN WIRELESS S-VIDEO INDICATORI AUDIO Indicatori E’ un indicatore per verificare la presenza dei : Spia verde fissa: cassetta inserita (spia accesa anche se l’apparecchio segnali audio (canale audio selezionato dalla è...
  • Seite 286: Parte Posteriore

    COMANDI E CARATTERISTICHE – Parte Posteriore – WARNING : SHOCK HAZARD - DO NOT OPEN. AVIS : RISQUE DE CHOC ELECTRIQUE - NE PAS OUVRIR. DV IN/OUT AUDIO VIDEO 9PIN REMOTE NTSC CH 1/3 CH 2/4 LINE S -VIDEO Presa per immissione corrente DC (2P) Ingresso per corrente a 12V DC.
  • Seite 287 WARNING : SHOCK HAZARD - DO NOT OPEN. AVIS : RISQUE DE CHOC ELECTRIQUE - NE PAS OUVRIR. DV IN/OUT AUDIO VIDEO 9PIN REMOTE NTSC CH 1/3 CH 2/4 LINE S -VIDEO [S-VIDEO IN] presa d’ingresso S-VIDEO [AUDIO IN] presa d’ingresso audio (4P) (PHONO 2) È...
  • Seite 288 FUNZIONI E NOMI DELLE PARTI – Telecomande senza cavi (wireless) – Tasto [STILL MODE] Con questo tasto si selezionano le immagini durante il fermo-immagine. Premendolo consecutivamente quando si è in POWER modalità fermo-immagine cambia da “quadro” DISPLAY (fermo-immagine alternato 1°/2°) ¥ 1° quadro STILL BARS BLANK...
  • Seite 289: Tasto [Pause]

    Tasto [F. ADV] Tasto [SEARCH–] / • Si può aumentare la velocità premendo Premendo questo tasto quando si è in modali- questo tasto durante la riproduzione, il fer- tà fermo-immagine, si va avanti di un fotogram- mo-immagine, o la riproduzione a velocità ma.
  • Seite 290: Telecomando Senza Cavi (Wireless)

    INDICAZIONI SULLO SCHERMO – Visualizzazione delle indicazioni – Sul monitor collegato alle prese VIDEO LINE OUT e S-VIDEO, oltre alle immagini E-E e di riproduzione, si possono visualizzare le seguenti schermate informative. telecomando senza cavi Menu DISPLAY – – – –...
  • Seite 291: Indicazioni Di Stato

    INDICAZIONI SULLO SCHERMO Indicazioni di stato – – Indicazioni di stato: visualizzano le impostazioni e lo stato operativo attuale. 3 2 K C H – 1 / 2 m i n S T A N D B Y - O F F 1 0 / 1 0 / 0 2 1 2 : 0 0 : 0 0 T C R 0 2 : 0 0 : 0 0 : 0 0...
  • Seite 292 INDICAZIONI SULLO SCHERMO – Indicazioni di stato – (continua) 3 2 K C H – 1 / 2 m i n S T A N D B Y - O F F 1 0 / 1 0 / 0 2 1 2 : 0 0 : 0 0 T C R 0 2 : 0 0 : 0 0 : 0 0 Voce...
  • Seite 293: Indicazioni Evento

    INDICAZIONI SULLO SCHERMO – indicazioni evento – Indicazioni evento : quando è attiva una funzione particolare o si cambia modalità utilizzando il telecomando senza cavi , appaiono le indicazioni riportate di seguito. Indicazioni in posizione B: appaiono per circa 3 secondi 3 2 K C H –...
  • Seite 294: Messaggi D'avviso

    INDICAZIONI SULLO SCHERMO – Messaggi d’avviso – Messaggi d’avviso : quando vi sono malfunzionamenti dell’apparecchio come errori di operazione o testina sporca, appaiono degli avvisi nella posizione della schermata sotto indicata. – Visualizzazione in positione A : L’indicazione dello stato dell’apparecchio viene visualizzato continuamente in questa posizione fintanto che le condizioni non vengano modificate.
  • Seite 295 Indicazione Contenuto Si stanno registrando segnali protetti contro la copiatura. COPY INHIBIT Si sta registrando una cassetta non registrabile. REC INHIBIT (la linguetta sul dorso è impostata su “SAVE”) Si sta doppiando l’audio su una cassetta non registrabile. A. DUB INHIBIT (la linguetta sul dorso è...
  • Seite 296: Preparazione

    PREPARAZIONE – Telecomando senza cavi in dotazione – Inserire le batterie nel telecomando Prima dell’utilizzo del telecomando, inserire due batterie AA, R6 o equivalenti. Rimuovere il coper- Posizionare due Coperchio del chio del vano batte- batterie AA, R6 o vano batterie. rie.
  • Seite 297 Come usare il telecomando senza cavi POWER EJECT MENU Quando si utilizza il telecomando, impostare A.DUB PLAY PAUSE l’interruttore “REMOTE” lato DVCAM NTSC REC INH. AG-DV2500 “WIRELESS”. 1 / 3 REMOTE INPUT LINE 2 / 4 STOP AUDIO 9PIN WIRELESS S-VIDEO Sensore telecomando Precauzioni per l’uso del telecomando senza cavo...
  • Seite 298: Collegamento Del Cavo Di Alimentazione

    PREPARAZIONE – Alimentazione – Collegamento del cavo di alimentazione Collegare l’adattatore AC fornito in dotazione all’apparecchio. WARNING : SHOCK HAZARD - DO NOT OPEN. AVIS : RISQUE DE CHOC ELECTRIQUE - NE PAS OUVRIR. Vite DV IN/OUT Adattatore AC (in dotazione) Morsetto AUDIO VIDEO...
  • Seite 299 Accensione Indicatore POWER Quando è impostata la modalità POWER POWER OFF (l’indicatore POWER è acceso, luce rossa), premere il tasto POWER dell’ap- parecchio o del telecomando. A.DUB PLAY DVCAM NTSC REC INH. • L’apparecchio si accenderà, e l’indicatore AG-DV2500 1 / 3 POWER assumerà...
  • Seite 300: Selezione Del Sistema Di Segnali Ntsc/Pal

    PREPARAZIONE – Selezione del sistema di segnali NTSC/PAL– Questo apparecchio è compatibile sia con il segnale NTSC che con il segnale PAL. Selezionare preliminarmente il sistema di segnali, prima di collegare i segnali analogici (compositi o segnali d’immagine Y/C separati). Tasto Interruttore NTSC/PAL Indicatore PAL...
  • Seite 301: Inserimento/Espulsione Cassette

    PREPARAZIONE – Inserimento/espulsione cassette – Utilizzare solo la cassetta Standard DV o Mini DV. Guide POWER POWER EJECT EJECT MENU MENU A.DUB PLAY PAUSE A.DUB PLAY PAUSE DVCAM NTSC REC INH. DVCAM NTSC REC INH. AG-DV2500 AG-DV2500 1 / 3 1 / 3 REMOTE INPUT...
  • Seite 302: Impostazione Di Data E Ora

    PREPARAZIONE – Impostazione di data e ora – La data e l’ora vengono impostate sull’orologio interno dell’apparecchio. Questo orologio è alimentato tramite una batteria interna ricaricabile, quindi la data e l’ora impostate restano memorizzate anche dopo lo spegnimento dell’apparecchio. La data e l’ora possono essere visualizzate sullo schermo in base all’impostazione del menu. Durante la registrazione, vengono memorizzate anche la data e l’ora.
  • Seite 303 Tasto Tasto PLAY EJECT Tasto POWER Tasto EJECT DISPLAY Tasto SET MENU MENU STILL BARS BLANK MODE PLAY PAUSE AUDIO DVCAM NTSC REC INH. MUTING Tasto PAUSE MENU SEARCH+ 1 / 3 OUT SEL. 2 / 4 STOP Tasto Tasto AUDIO Tasto FF SEARCH–...
  • Seite 304 PREPARAZIONE – Impostazione di data e ora – (Continua) Opzioni per la visualizzazione di data e ora La data e l’ora vengono visualizzate sullo schermo collegato al terminale VIDEO LINE OUT o S-VIDEO. Per impostare se visualizzare o no la data e l’ora, e il formato della visualizzazione, utilizzare la schermata menu DISPLAY.
  • Seite 305: Registrazione

    REGISTRAZIONE – Collegamento/ impostazioni – In questo capitolo vengono illustrati i collegamenti, le impostazioni e le procedure necessari per la registrazione. Questo apparecchio non può essere impiegato per l’editing e il montaggio delle immagini. Collegamento Collegamento agli apparecchi dotati di ingresso DV La qualità...
  • Seite 306 REGISTRAZIONE – Collegamento/ impostazioni – (Continua) Impostazione Indicatore NTSC Indicatore PAL Retro dell’apparecchio POWER NG : SHOCK HAZARD - DO NOT OPEN. EJECT RISQUE DE CHOC ELECTRIQUE - NE PAS OUVRIR. IN/OUT MENU UDIO VIDEO A.DUB PLAY PAUSE DVCAM NTSC REC INH.
  • Seite 307: Impostazioni Contaore

    REGISTRAZIONE – Impostazioni contaore – Per la registrazione del contaore Questo apparecchio è dotato all’interno di un lettore/ generatore contaore. Durante la regi- strazione, il contaore viene registrato. Durante la registrazione dei dati del generatore contaore interno, i bit utente non verranno memorizzati. In base alla condizione della registrazione, il contaore verrà...
  • Seite 308 REGISTRAZIONE – Impostazioni contaore – (Continua) Sullo schermo visualizzare il top MENU Top MENU – – – M E N U – – – Apparecchio Telecomando S Y S T E M . . R E MO T E . . Premere il tasto MENU.
  • Seite 309: Procedura Di Registrazione

    REGISTRAZIONE – Procedura di registrazione – Apparecchio Telecomando Tasto Tasto PLAY Tasto PAUSE Tasto REC POWER A.DUB PAUSE EJECT Tasto F.REV F.ADV PLAY PLAY MENU A.DUB PLAY PAUSE Tasto STOP DVCAM NTSC REC INH. Tasto INDEX INDEX AG-DV2500 STOP – 1 / 3 PAUSE REMOTE...
  • Seite 310: Registrazione Continua

    REGISTRAZIONE – Registrazione continua – Questo apparecchio consente di effettuare una registrazione continua per un lungo tempo collegandolo agli altri apparecchi DV. Utilizzando l’apparecchio come registratore di back-up e collegandolo con un codificatore DV CAM, quando il nastro della parte trasmittente (codificatore CAM) arriva verso la fine, inizia la registrazione sull’apparecchio, in modo da consentire la continuazione della registrazione.
  • Seite 311: Doppiaggio Dell'audio

    REGISTRAZIONE – Doppiaggio dell’audio – Si può effettuare il doppiaggio audio sui canali 3 e 4, con il nastro registrato in modalità 32kHz di frequenza audio. Notes • Non si può effettuare il doppiaggio audio sul nastro registrato in modalità 48kHz di frequenza. •...
  • Seite 312 REGISTRAZIONE – Doppiaggio dell’audio – (Continua) Memo Collegamenti • Durante il doppiaggio audio, se il nastro arri- va in un punto registrato in modalità non abi- Trasmettere l’audio da duplicare tramite l’ingresso litata al doppiaggio (come quella di LP oppu- AUDIO IN presente sulla parte posteriore dell’ap- re quella di audio a 48 kHz) l’apparecchio entra parecchio o quello di MIC presente sul frontale.
  • Seite 313 RIPRODUZIONE – Collegamento/impostazione – In questo capitolo vengono illustrati i collegamenti e le impostazioni necessari per la riprodu- zione. Collegamento Uso singolo dell’apparecchio Monitor WARNING : SHOCK HAZARD - DO NOT OPEN. AVIS : RISQUE DE CHOC ELECTRIQUE - NE PAS OUVRIR. DV IN/OUT AUDIO VIDEO...
  • Seite 314: Riproduzione Collegamento/Impostazione

    RIPRODUZIONE – Collegamento/impostazione – (Continua) Impostazione Interruttore REMOTE presente sul frontale POWER Impostare su “WIRELESS” quando si utilizza con il telecomando senza cavo. Memo A.DUB DVCAM NTSC AG-DV2500 Per controllare l’apparecchio mediante i terminali 9 PIN RE- 1 / 3 REMOTE INPUT MOTE, l’interruttore va impostato su “9PIN”.
  • Seite 315: Riproduzione Di Base

    RIPRODUZIONE – Riproduzione di base – Tasto PAUSE Indicatore DVCAM Tasto PLAY Tasto PLAY A.DUB PAUSE POWER EJECT F.REV F.ADV PLAY Tasto MENU Tasto FF A.DUB PLAY PAUSE STOP DVCAM NTSC REC INH. INDEX INDEX Tasto PAUSE – AG-DV2500 1 / 3 REMOTE INPUT LINE...
  • Seite 316: Riproduzioni Particolari

    RIPRODUZIONE – Riproduzioni particolari – Riproduzione bidirezionale di fotogramma Si imposta con il telecomando. Impostazione Voce STILL MODE del menu SYSTEM POWER Seleziona la porzione di nastro da visualizzare fotogramma per fo- DISPLAY togramma o fermo-immagine. STILL BARS BLANK MODE E’...
  • Seite 317: Riproduzione A Velocità Variabile

    Riproduzione a velocità variabile Selezionare la modalità ricerca. Si imposta con il telecomando. Tasto SEARCH +/( ) L’entrata in modalità ricerca, si può effettuare anche tramite i tasti del- l’apparecchio Tasto Tasto Mettere in stato Riproduzione o Fermo Immagine. Premendo il tasto FF si riproduce a velocità superio- POWER DISPLAY STILL...
  • Seite 318: Funzione Di Ricerca Dei Segnali Indice

    RIPRODUZIONE – Funzione di ricerca dei segnali indice – Ricerca indice Ricerca dove sono registrati i segnali indice. Impostare con il telecomando. Per la ricerca del segnale indice in avanti rispetto all’ A.DUB PAUSE attuale posizione della cassetta: F.REV F.ADV PLAY •...
  • Seite 319: Selezione Dell'uscita Audio Nella Riproduzione

    RIPRODUZIONE – Selezione dell’uscita audio nella riproduzione – Si può selezionare con il telecomando la modalità dell’audio in uscita della riproduzione. Per l’attivazione/ disattivazione (ON/ OFF) della funzione Audio Muting o dei POWER suoni EE, premere il tasto AUDIO DISPLAY MUTING.
  • Seite 320: Editing E Montaggio

    Memo Per ottenere il risultato migliore, si consiglia di inserire, come segnali standard, i segnali compositi dal terminale VIDEO LINE OUT del modello AG-DV2500E, nel telecomando. In que- sto caso utilizzare l’uscita S-VIDEO OUT per i segnali video. AG-A850 Impostazione dell’apparecchio Si mette sul lato 9PIN l’interruttore RE-...
  • Seite 321 • Con alcuni tipi di telecomando, la funzione LEARN ne’ agisce correttamente: Per attivare la funzione LEARN: Inserire una cassetta in cui è stato registrato il contaore dalle 23:59:00:00 ~ 00:01:00:00 nell’appa- recchio AG-DV2500E, e poi attivare la funzione LEARN. I-49...
  • Seite 322 EDITING E MONTAGGIO – Utilizzo con il sistema di editing e montaggio – (continua) Uso del sistema di montaggio non lineare Si tratta di un sistema che permette di catturare le immagini provenienti dalle cassette registra- te con l’apparecchio nel sistema di montaggio non lineare, e di registrare sull’apparecchio il contenuto montato.
  • Seite 323: Menu Schermo

    MENU SCHERMO – Composizione schermo menu – La schermata menu a multilivello come appare sul display. Top MENU Menu SYSTEM M E N U – – – S Y S T E M – – – S Y S T E M . . S T I L L MO D E F I E L D R E MO T E .
  • Seite 324: Impostazione Schermo Menu

    MENU SCHERMO – Impostazione schermo menu – Le vari funzioni vengono impostate sulle schermate menu. I contenuti impostati vengono me- morizzati nella memoria dell’apparecchio e salvati anche dopo lo spegnimento dell’apparec- chio. Tasto PLAY Tasto EJECT Tasto EJECT POWER DISPLAY MENU Tasto SET STILL...
  • Seite 325 Tasto Tasto PLAY Tasto EJECT EJECT POWER DISPLAY Tasto SET MENU STILL BARS BLANK MODE PLAY PAUSE Tasto AUDIO DVCAM NTSC REC INH. Tasto PAUSE MENU SEARCH+ MUTING MENU 1 / 3 OUT SEL. 2 / 4 STOP Tasto Tasto AUDIO Tasto FF SEARCH–...
  • Seite 326: Contenuti Schermo Menu

    MENU SCHERMO – Contenuti schermo menu – Nella spiegazione della schermata menu il simbolo indica il valore prestabilito al momento della spedizione dalla fabbrica. Top MENU Voce Opzione Contenuto SYSTEM Compare la schermata menu delle varie funzioni di questo appa- recchio.
  • Seite 327: Menu System

    Menu SYSTEM Menu SYSTEM Voce Opzione Contenuto Seleziona il tipo di immagine per il fermo immagine e per la riproduzio- STILL MODE FIELD ne fotogramma per fotogramma: FIELD : Riproduce il quadro d’immagine. Per la riproduzione foto- gramma per fotogramma riproduce in sequenza il primo FRAME quadro e il secondo quadro..
  • Seite 328: Menu Remote

    PREROLL a più di 7 secondi. Permette la selezionedel tipo di controllo collegato tramite il tele- CONTROLLER TYPE1 comando dal connettore RS-422A: TYPE2 TYPE1 : Telecomando non PANASONIC TYPE3 TYPE2 : Telecomando non PANASONIC TYPE4 TYPE3 : AG-A850, AJ-A95...
  • Seite 329 Menu AUDIO/VIDEO Voce Opzione Contenuto Seleziona la frequenza standard di audio durante la registrazione: AUDIO MODE 48k : Registra alla frequenza di 48kHz e doppi canali in modalità stereo. Non e’ possibile il doppiaggio audio. 32k : Registra alla frequenza di 32kHz e canali quadrupli in mo- dalità...
  • Seite 330 MENU SCHERMO – Contenuti schermo menu – (Continua) La menu TIME CODE Voce Opzione Contenuto Preseleziona il contaore: ☞ Vedi pag. 35 “Impostazioni contaore“) CLEAR CANCEL Seleziona se cancellare o meno il contaore preselezionato: EXECUTE CANCEL : Non cancella il contaore. EXECUTE : Cancella il contaore.
  • Seite 331: Menu Display

    Menu DISPLAY Menu DISPLAY Voce Opzione Contenuto DISPLAY Seleziona e trasmette i caratteri della schermata status al monitor collegato con i terminali VIDEO LINE OUT e S-VIDEO OUT: AUTO : Non trasmette sullo schermo. Trasmette solo l’immagine. : Trasmette sempre sullo schermo. AUTO : Quando passa da una modalità...
  • Seite 332 MENU SCHERMO – Contenuti schermo menu – (Continua) Menu Display ( continua ) Voce Opzione Contenuto Seleziona se visualizzare o meno il canale audio o la frequenza di AUDIO INFO. campionamento: OFF : Non visualizza. : Visualizza. Seleziona il formato della data: DATE STYLE Y/M/D Y/M/D: Visualizza secondo l’...
  • Seite 333: Varie

    VARIE – Utilizzo in verticale – Per l’uso in posizione verticale appoggiare sulla base in dotazione come indicato nel disegno sotto. Posizionare sotto il lato sinistro. Base Notes • Per l’uso verticale appoggiare sempre sull’ apposita base in dotazione. L’uso senza la base in dotazione potrebbe causare guasti o incidenti. •...
  • Seite 334: Indicazioni D'allarme

    VARIE – Indicazioni d’allarme – Questo apparecchio è in grado di auto-diagnosticare la causa di un funzionamento anomalo avvertendo gli utenti con un “messaggio di avviso” con il codice numerico dell’ errore visualizzato sullo schermo. Inoltre, quando l’apparecchio non è in stato ottimale o se l’operazione effettuata è...
  • Seite 335 Si consiglia di ri- WARNING 3300 Non si può espellere la cassetta. volgersi al proprio rivenditore oppure UNLOADING contattare il centro di assistenza FAILURE PANASONIC più vicino. WARNING 4100 Anomalia nella funzione di espulsione. CASSETTE EJECT FAILURE DEFECTIVE Cassetta danneggiata.
  • Seite 336: Individuazione E Risoluzione Dei Problemi

    VARIE – Individuazione e risoluzione dei problemi – Stato Contromisure Non si accende. Controllare se l’adattatore AC e’ collegato correttamente. Non si può inserire la cassetta. Controllare se la spia indicatrice di cassetta indica la presenza di un’altra cassetta precedentemente inserita. In questo caso basta disinserire la prima.
  • Seite 337: Controllo Del Contaore

    VARIE – Controllo del contaore – Questo apparecchio ha la funzione “contatore di tempo” e “tempo d’uso dei tamburi”. È visualizzabile sulla voce DRUM HOUR METER della schermata MENU top. Può essere utile come valore indicativo per i controlli periodici . (☞ Vedi pag. 7) POWER EJECT POWER...
  • Seite 338: Caratteristiche Tecniche

    VARIE – Caratteristiche tecniche – Notizie generali Audio Sistema di registrazione : DV (solo SP) Formato registrazione: 16 bit, 48kHz, 2 Canali Sistema di segnali : NTSC/PAL PCM Audio/12 bit, 32kHz, Cassette utilizzabili : Standard/ mini DV cassette 4 Canali PCM Audio Larghezza nastro : 6.35mm Numeri track:...
  • Seite 339: Disegno Della Dimensione Esterna (In Mm)

    Disegno della dimensione esterna (in mm) POWER EJECT MENU A.DUB PLAY PAUSE DVCAM NTSC REC INH. AG-DV2500 1 / 3 REMOTE INPUT LINE 2 / 4 STOP AUDIO 9PIN WIRELESS S-VIDEO I-67...
  • Seite 340 Panasonic Broadcast Europe Panasonic Broadcast Europe Ltd West Forest Gate, Wellington Road, Wokingham, Berkshire RG40 2AQ U.K. Tel: 0118 902 9200 Panasonic Broadcast Europe GmbH Hagenauer Str. 43, 65203 Wiesbaden-Biebrich Deutschland Tel: 49-611-1816-0 Printed in Thailand VQT0C55...

Inhaltsverzeichnis