Inhaltsverzeichnis
Werbung
Verfügbare Sprachen
Verfügbare Sprachen
DIGITAL-THERMOMETER/
DIGITAL THERMOMETER/
THERMOMÈTRE NUMÉRIQUE
DIGITAL-THERMOMETER
Bedienungs- und
Sicherheitshinweise
DIGITAL THERMOMETER
Operation and Safety Notes
THERMOMÈTRE
NUMÉRIQUE
Instructions d'utilisation et
consignes de sécurité
DIGITALE
THERMOMETER
Bedienings- en
veiligheidsinstructies
IAN 315731_1904
TERMOMETR CYFROWY
Uwagi dotyczące obsługi i
bezpieczeństwa
DIGITÁLNÍ TEPLOMĚR
Pokyny pro obsluhu a
bezpečnostní pokyny
DIGITÁLNY TEPLOMER
Pokyny pre obsluhu a
bezpečnostné pokyny
Werbung
Kapitel
Inhaltsverzeichnis

Verwandte Anleitungen für Auriol HG05685


Inhaltszusammenfassung für Auriol HG05685
- Seite 1 DIGITAL-THERMOMETER/ DIGITAL THERMOMETER/ THERMOMÈTRE NUMÉRIQUE DIGITAL-THERMOMETER TERMOMETR CYFROWY Bedienungs- und Uwagi dotyczące obsługi i Sicherheitshinweise bezpieczeństwa DIGITAL THERMOMETER DIGITÁLNÍ TEPLOMĚR Operation and Safety Notes Pokyny pro obsluhu a bezpečnostní pokyny THERMOMÈTRE DIGITÁLNY TEPLOMER NUMÉRIQUE Pokyny pre obsluhu a Instructions d‘utilisation et bezpečnostné...
- Seite 2 DE / AT / CH Bedienungs- und Sicherheitshinweise Seite GB / IE Operation and Safety Notes Page FR / BE Instructions d‘utilisation et consignes de sécurité Page NL / BE Gebruik en veiligheidsrichtlijnen Pagina 77 Uwagi dotyczące obsługi i bezpieczeństwa Strona 101 Návod k použití...
- Seite 3 AA (UM-3) 1.5...
-
Seite 4: Inhaltsverzeichnis
Einleitung ............Seite Bestimmungsgemäßer Gebrauch ....Seite Lieferumfang ............ Seite Teilebeschreibung ..........Seite Technische Daten ..........Seite Sicherheitshinweise ........Seite 10 Sicherheitshinweise für Batterien / Akkus ..Seite 12 Vor der ersten Benutzung ......Seite 14 Montage ............Seite 15 Betrieb / Bedienung ........ -
Seite 5: Einleitung
DIGITAL-THERMOMETER P Einleitung Wir beglückwünschen Sie zum Kauf Ihres neuen Produkts. Sie haben sich damit für ein hochwertiges Produkt entschieden. Die Bedienungsanleitung ist Teil dieses Produkts. Sie enthält wichtige Hinweise für Sicherheit, Gebrauch und Entsorgung. Machen Sie sich vor der Benutzung des Produkts mit allen Bedien- und Sicherheitshinweisen vertraut. -
Seite 6: Lieferumfang
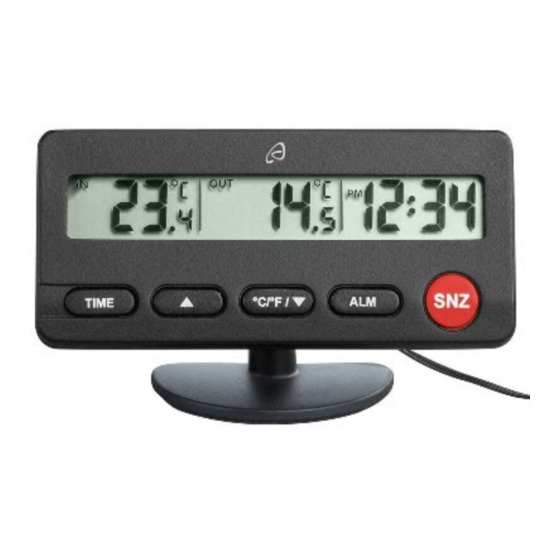
Lieferumfang 1 x Digital-Thermometer mit Außensensor und ca.1,9 m Kabel 1 x 1,5 V (Gleichstrom), AA-Batterie 1 x Bedienungsanleitung Teilebeschreibung Innentemperaturanzeige Eiswarnsymbol Außentemperaturanzeige Zeitanzeige Alarmsymbol Schlummern-Symbol SNZ-Taste ALM-Taste °C/°F/ -Taste -Taste TIME-Taste Digitales Thermometer DE/AT/CH 7... -
Seite 7: Displayanzeigen
Batteriefachabdeckung Batteriefach Reset-Taste Ständer Außensensor Displayanzeigen = Innentemperatur = Außentemperatur = gespeicherte Maximaltemperatur = gespeicherte Minimaltemperatur = Eiswarner Nachmittag (Uhrzeit im 12-Stunden-Modus) = Alarmfunktion = Schlummern-Funktion DE/AT/CH 8... -
Seite 8: Technische Daten
Technische Daten Betriebsspannung: 1,5 V (Gleichstrom) Batterietyp: 1,5 V (Gleichstrom), AA Temperaturmess- bereich innen: -10 °C bis +50 °C Temperaturmess- bereich außen: -50 °C bis +70 °C Toleranz: (-50 °C bis 0 °C) ±2 °C (0 °C bis +30 °C) ±1 °C (+30 °C bis +70 °C) ±2 °C Signalbereich Eiswarner:... -
Seite 9: Sicherheitshinweise
Sicherheitshinweise BITTE BEWAHREN SIE ALLE SICHERHEITSHINWEISE UND NUTZUNGSANWEISUNGEN ZUM KÜNFTIGEN NACHSCHLAGEN AUF! Dieses Produkt kann von Kindern ab 8 Jahren und darüber sowie von Personen mit verringerten physischen, sensorischen oder mentalen Fähigkeiten oder Mangel an Erfahrung und Wissen benutzt werden, wenn sie beaufsichtigt oder bezüglich des sicheren Gebrauchs des Produkts unterwiesen wurden und die daraus resultierenden Gefahren... - Seite 10 Bringen Sie das Produkt möglichst nicht im unmittelbaren Frontscheibenbereich des Fahrers an. Andernfalls können Sichtbehinderungen und Ablenkung die Folge sein. Lassen Sie sich nicht durch die Anzeigen von Ihrer Konzentration auf den Straßenverkehr ablenken. Kontrollieren Sie alle Teile auf ihre ...
-
Seite 11: Sicherheitshinweise Für Batterien / Akkus
Sie solche Geräte aus der Reichweite des Thermometers. Elektrostatische Ladung kann Funktionsstörungen hervorrufen. Falls das Produkt nicht funktioniert, drücken Sie zum Rücksetzen die RESET-Taste oder nehmen Sie die Batterie kurzzeitig heraus und setzen Sie ihn wieder ein. Sicherheitshinweise für Batterien / Akkus LEBENSGEFAHR! Halten Sie Batterien / ... -
Seite 12: Risiko Des Auslaufens Von Batterien / Akkus
Risiko des Auslaufens von Batterien / Akkus Vermeiden Sie extreme Bedingungen und Temperaturen, die auf Batterien / Akkus einwirken können z. B. auf Heizkörpern / direkte Sonneneinstrahlung. Vermeiden Sie den Kontakt mit Haut, Augen und Schleimhäuten! Spülen Sie bei Kontakt mit Batteriesäure die betroffenen Stellen sofort mit klarem Wasser und suchen Sie umgehend einen Arzt auf! -
Seite 13: Risiko Der Beschädigung Des Produkts
Risiko der Beschädigung des Produkts Verwenden Sie ausschließlich den angegebenen Batterietyp / Akkutyp! Setzen Sie Batterien / Akkus gemäß der Polaritätskennzeichnung (+) und (-) an Batterie / Akku und des Produkts ein. Reinigen Sie Kontakte an Batterie / Akku und ... -
Seite 14: Montage
P Montage Reinigen Sie die Montagefläche mit einem fettlösenden und nicht scheuernden bzw. chemischen Reinigungsmittel, bevor Sie das Digital-Thermometer montieren. Befestigen Sie den Außensensor Fensterrahmen außen oder hinter der Frontstoßstange Ihres Kraftfahrzeugs. Ziehen Sie die Schutzfolie der Klebepads ... - Seite 15 Rücksetzung „1d“ die -Taste oder °C/°F/ -Taste Hinweis: Tägliche Rücksetzung: Wenn diese Einstellung konfiguriert wird, werden die Minimal- und Maximaltemperaturen der vergangenen 24 Stunden gespeichert und täglich um Mitternacht gelöscht. Manuelle Rücksetzung: Diese Einstellung ermöglicht Ihnen die manuelle Löschung der bislang gespeicherten Temperaturen.
- Seite 16 der Zeitanzeige Wenn Sie die -Taste oder Hinweis: °C/°F/ -Taste gedrückt halten, beschleunigt sich der Vorgang und Sie erreichen den gewünschten Wert schneller. Anhand dieser schnelleren Methode können auch die folgenden Einstellungen vorgenommen werden. Falls Sie 20 Sekunden lang keine Tasten drücken, kehrt die Anzeige automatisch zur normalen Anzeige zurück.
-
Seite 17: Alarmzeit Einstellen
Alarmzeit einstellen Halten Sie die ALM-Taste etwa 2 Sekunden gedrückt. Falls zuvor eine Alarmzeit eingestellt Hinweis: wurde, erscheint die zuvor eingestellte Alarmzeit am Display. Falls nicht, zeigt das Display 7:00. Die Stundenanzeige blinkt. Drücken Sie zur Einstellung des gewünschten Wertes die -Taste oder die °C/°F/ -Taste... - Seite 18 Das Alarmsymbol erscheint am Hinweis: Display. Das Alarmsignal ertönt, sobald die eingestellte Alarmzeit erreicht ist. Das Alarmsignal verstummt nach 2 Minuten automatisch. Drücken Sie zum Abschalten des Alarmsignals vor automatischer Abschaltung eine beliebige Taste. Das Alarmsignal ertönt täglich zur Hinweis: eingestellten Zeit.
-
Seite 19: Celsius / Fahrenheit Auswählen
erneut. Das Alarmsignal verstummt nach 2 Minuten automatisch. Drücken Sie zum Abschalten des Alarmsignals vor automatischer Abschaltung eine beliebige Taste. Celsius / Fahrenheit auswählen Drücken Sie zum Wechseln zwischen Celsius (°C) und Fahrenheit (°F) die -Taste. Eiswarner aktivieren / deaktivieren Sie zeigen den Signalbereich +3.0 °C bis ... -
Seite 20: Temperaturspeicher Abrufen
In diesem Temperaturbereich kann die Gefahr entstehen, dass sich Straßenglätte bildet oder bereits gebildet hat. Seien Sie besonders aufmerksam und passen Sie Ihre Fahrweise entsprechend an. Drücken Sie eine beliebige Taste, um den Warnton auszuschalten. Temperaturspeicher abrufen Im normalen Anzeigemodus drücken Sie zum ... -
Seite 21: Batterie Wechseln
Im normalen Anzeigemodus drücken Sie zum Abrufen der gespeicherten Minimaltemperatur (MIN) die -Taste . Halten Sie zum Löschen gespeicherter Temperaturen etwa 2 Sekunden die -Taste gedrückt. Batterie wechseln Öffnen Sie das Batteriefach an der Rückseite des digitalen Thermometers Entfernen Sie die alte Batterie und legen Sie ... - Seite 22 Fehler Ursache / Beseitigung Displayanzeige Verbrauchte Batterie wird schwächer / oder verschmutzte falsche Batteriekontakte – Temperaturangabe Kontakte reinigen und Batterie, ggf. neue Batterie, einlegen. Anzeige schwarz Temperaturen außerhalb des Messbereichs oder Produkt zu lange direkter Sonneneinstrahlung ausgesetzt. Unregelmäßige Entnehmen Sie die Batterie Ziffernanzeige und setzen Sie sie erneut ins Batteriefach...
-
Seite 23: Reinigung Und Pflege
Fehler Ursache / Beseitigung Es ist möglich, Falls dem so ist, setzen dass die normalen Sie das Produkt einfach Funktionen des entsprechend den Produkts durch Anweisungen im Kapitel elektromagnetische „Temperaturspeicher / Störungen Zeitzone / Zeit / Datum beeinträchtigt manuell einstellen“ auf den werden. -
Seite 24: Entsorgung
ist nur gegen Regen von oben und Spritzwasser geschützt. P Entsorgung Die Verpackung besteht aus umweltfreundlichen Materialien, die Sie über die örtlichen Recyclingstellen entsorgen können. Beachten Sie die Kennzeichnung der Verpackungsmaterialien bei der Abfalltrennung, diese sind gekennzeichnet mit Abkürzungen (a) und Nummern (b) mit folgender Bedeutung: 1 - 7: Kunststoffe / 20 - 22: Papier und Pappe / 80 - 98:... - Seite 25 Werfen Sie Ihr Produkt, wenn es ausgedient hat, im Interesse des Umweltschutzes nicht in den Hausmüll, sondern führen Sie es einer fachgerechten Entsorgung zu. Über Sammelstellen und deren Öffnungszeiten können Sie sich bei Ihrer zuständigen Verwaltung informieren. Defekte oder verbrauchte Batterien / Akkus müssen gemäß...
-
Seite 26: Garantie Und Service
kommunalen Sammelstelle ab. P Garantie und Service Garantie Das Produkt wurde nach strengen Qualitätsrichtlinien sorgfältig produziert und vor Anlieferung gewissenhaft geprüft. Im Falle von Mängeln dieses Produkts stehen Ihnen gegen den Verkäufer des Produkts gesetzliche Rechte zu. Diese gesetzlichen Rechte werden durch unsere im Folgenden dargestellte Garantie nicht eingeschränkt. -
Seite 27: Abwicklung Im Garantiefall
Die Garantieleistung gilt für Material- oder Fabrikationsfehler. Diese Garantie erstreckt sich nicht auf Produktteile, die normaler Abnutzung ausgesetzt sind (z. B. Batterien) und daher als Verschleißteile angesehen werden können oder Beschädigungen an zerbrechlichen Teilen, z. B. Schalter, Akkus oder die aus Glas gefertigt sind. Abwicklung im Garantiefall Um eine schnelle Bearbeitung Ihres Anliegens zu gewährleisten, folgen Sie bitte den folgenden... -
Seite 28: Service
Ein als defekt erfasstes Produkt können Sie dann unter Beifügung des Kaufbelegs (Kassenbon) und der Angabe, worin der Mangel besteht und wann er aufgetreten ist, für Sie portofrei an die Ihnen mitgeteilte Service-Anschrift übersenden. Service Service Deutschland Tel.: 0800 5435 111 (kostenfrei aus dem dt. Festnetz / Mobilfunknetz) E-Mail: owim@lidl.de Service Österreich... - Seite 29 Introduction ..........Page Proper use ........... Page Supply scope ..........Page Description of parts ........Page Technical data..........Page Safety instructions ........Page Safety instructions for batteries / rechargeable batteries ....... Page Before initial use ........Page Mounting ............Page Operation ............
-
Seite 30: Introduction
DIGITAL THERMOMETER P Introduction We congratulate you on the purchase of your new product. You have chosen a high quality product. The instructions for use are part of the product. They contain important information concerning safety, use and disposal. Before using the product, please familiarise yourself with all of the safety information and instructions for use. -
Seite 31: Description Of Parts
Description of parts Inside temperature display Ice warning symbol Outdoor temperature display Time display Alarm symbol Snooze symbol SNZ button ALM button °C/°F/ button button TIME button Digital thermometer Battery compartment cover Battery compartment Reset button Stand Outside sensor GB/IE 32... -
Seite 32: Technical Data
Displays = Inside temperature OUT = Outside temperature MAX = Stored maximum temperature MIN = Stored minimum temperature = Ice warning = Afternoon (time in 12-hour mode) = Alarm function = Snooze function Technical data Operating voltage: 1.5 V (direct current) Type of battery: 1.5 V (direct current), AA... -
Seite 33: Safety Instructions
Tolerance: (-50 °C to 0 °C) ±2 °C (0 °C to +30 °C) ±1 °C (+30 °C to +70 °C) ±2 °C Ice warning signal range: -1 °C to +3 °C Outside sensor cable length: 1.9 m Outside sensor: IP44 (splash proof) Safety instructions PLEASE KEEP ALL SAFETY INSTRUCTIONS AND INSTRUCTIONS FOR USE FOR FUTURE... - Seite 34 allow children to play with the product. Cleaning and user maintenance should not be performed by children without supervision. The product is not a toy. Do not place the product WARNING! anywhere near an airbag, since this may result in injury if the airbag is activated. Do not place the product directly in the driver’s ...
-
Seite 35: Safety Instructions For Batteries /Rechargeable Batteries
near an object that transmits radio signals, it could cause interference. This could include, for example, cellular phones, walkie talkies, CB radios, remote controls and microwaves. If the display indicates a problem, move such objects away from it. Electrostatic charge can cause the product to fail. - Seite 36 Do not exert mechanical loads to batteries / rechargeable batteries. Risk of leakage of batteries / rechargeable batteries Avoid extreme environmental conditions and temperatures, which could affect batteries, e.g. radiators / direct sunlight. Avoid contact of leaked chemicals with skin, ...
-
Seite 37: Before Initial Use
Risk of damage of the product Only use the specified type of battery / rechargeable battery! Insert batteries / rechargeable batteries according to polarity marks (+) and (-) on the battery / rechargeable battery and the product. -
Seite 38: Mounting
P Mounting Clean the surface on which you wish to mount the digital thermometer with a degreasing and non-abrasive or chemical cleaning agent before mounting it. Attach the outside sensor on the window frame outside or behind the front bumper of your motor vehicle. - Seite 39 Note: Daily reset: When this setting is made, the minimum and maximum temperatures of the past 24 hours are stored and deleted every day at midnight. Manual reset: This setting enables you to manually delete the temperatures stored so far. 3.
-
Seite 40: Setting The Alarm Time
of 20 seconds no buttons are pressed, the display returns automatically to the normal display. 6. Press the button or the°C/°F/ button to set the desired value. 7. Press the TIME button to confirm your settings. 8. Repeat steps 6 and 7 to set the values for minute, year, month and date. - Seite 41 Press the button or °C/°F/ button to set the desired value. Press the ALM button to confirm your settings and return to the normal display. Switching the alarm on/off Press the ALM button to call up the set time. ...
-
Seite 42: Select Celsius / Fahrenheit
Using the snooze button Press the SNZ button while the alarm signal is sounding to activate the snooze function. The alarm signal is silenced and the snooze symbol flash. The alarm signal sounds again after approx. ... -
Seite 43: Call Up The Temperature Memory
As soon as the outside temperature reaches Note: the signal range, a 15-second warning signal is emitted at 5-minute intervals. In this temperature range, there is a risk of road surfaces becoming slippery, or they may already be slippery. Pay particular attention and drive according to the conditions. -
Seite 44: Replacing The Battery
In normal display mode, press the button to call up the stored minimum temperature (MIN). Press and hold down the button for about 2 seconds to delete the stored temperatures. Replacing the battery Open the battery compartment on the back ... - Seite 45 Error Cause / Remedy Display Discharged battery or dirty diminishes / battery contacts – clean incorrect the contacts and insert temperature is battery; replace the battery displayed if necessary. Display is black Temperatures are outside the measuring range or the product has been exposed to direct sunlight for a long time.
-
Seite 46: Cleaning And Care
P Cleaning and care Clean the exterior of the digital thermometer only with a soft, dry cloth. Clean the buttons of the digital thermometer with a brush. Do not under any circumstances use liquids or cleaning agents, as they will damage the instrument. - Seite 47 fibreboard / 80–98: composite materials. The product and packaging materials are recyclable, dispose of it separately for better waste treatment. The Triman logo is valid in France only. Contact your local refuse disposal authority for more details of how to dispose of your worn-out product.
-
Seite 48: Warranty And Service
Environmental damage through incorrect disposal of the batteries / rechargeable batteries! Batteries / rechargeable batteries may not be disposed of with the usual domestic waste. They may contain toxic heavy metals and are subject to hazardous waste treatment rules and regulations. The chemical symbols for heavy metals are as follows: Cd = cadmium, Hg = mercury, Pb = lead. -
Seite 49: Warranty Claim Procedure
from the date of purchase, we will repair or replace it – at our choice – free of charge to you. The warranty period begins on the date of purchase. Please keep the original sales receipt in a safe location. This document is required as your proof of purchase. -
Seite 50: Service
(bottom left), or as a sticker on the rear or bottom of the appliance. If functional or other defects occur, please contact the service department listed either by telephone or by e-mail. You can return a defective product to us free of charge to the service address that will be provided to you. - Seite 51 Introduction ............. Page 53 Utilisation appropriée ........Page 53 Contenu de l'emballage ........Page 54 Description des éléments......... Page 54 Données techniques ........Page 56 Instructions de sécurité ....... Page 57 Instructions de sécurité pour les piles / batteries rechargeables ........Page 59 Avant la première utilisation ....
-
Seite 52: Introduction
THERMOMÈTRE NUMÉRIQUE P Introduction Nous vous félicitons pour l'achat de votre nouveau produit. Vous avez opté pour un produit de grande qualité. Le mode d‘emploi fait partie intégrante de ce produit. Il contient des indications importantes pour la sécurité, l’utilisation et la mise au rebut. -
Seite 53: Contenu De L'emballage
Contenu de l'emballage 1x thermomètre numérique avec sonde extérieure et câble de 1,9 m 1x pile AA de 1,5 V (courant continu) 1x manuel d'utilisation Description des éléments Affichage de la température intérieure Symbole d'avertissement de glace Affichage de la température extérieure Affichage de l'heure Symbole d'alarme Symbole de répétition... - Seite 54 Couvercle du compartiment des piles Compartiment des piles Bouton de réinitialisation Socle Capteur extérieur Affichages = Température intérieure = Température extérieure = Température maximale stockée = Température minimale stockée = Avertissement de glace Après-midi (heure en mode 12 heures) = Fonction d'alarme = Fonction répétition FR/BE 55...
-
Seite 55: Données Techniques
Données techniques Tension de 1,5 V fonctionnement : (courant continu) Type de pile : 1,5 V AA (courant continu) Plage de mesure de la température intérieure : -10 °C à +50 °C Plage de mesure de la température extérieure : -50 °C à +70 °C Tolérance : (-50 °C à... -
Seite 56: Instructions De Sécurité
Instructions de sécurité VEUILLEZ CONSERVER LES INSTRUCTIONS DE SÉCURITÉ ET LES INSTRUCTIONS D'UTILISATION POUR RÉFÉRENCE ULTÉRIEURE ! Ce produit peut être utilisé par des enfants âgés de 8 ans et plus, ainsi que par des personnes présentant des capacités physiques, sensorielles ou mentales réduites ou manquant d'expérience et / ou de connaissances, pour autant qu'elles soient surveillées ou... - Seite 57 Ne placez pas le produit directement dans la zone du pare-brise devant le conducteur. Cela peut réduire la visibilité et distraire le conducteur. Ne vous laissez pas distraire de la circulation par les écrans d'affichage. Vérifiez toutes les pièces pour vous assurer ...
-
Seite 58: Instructions De Sécurité Pour Les Piles / Batteries Rechargeables
l'appareil. Une décharge électrostatique peut provoquer une défaillance du produit. En cas de panne du produit, appuyez sur le bouton RÉINITIALISER pour réinitialiser le produit ou retirez la pile pendant quelques secondes, puis remettez-la. Instructions de sécurité pour les piles / batteries rechargeables Maintenez les piles DANGER DE MORT ! - Seite 59 N’exercez pas de charges mécaniques sur les piles / batteries rechargeables. Risque de fuite des piles / batteries rechargeables Évitez les conditions environnementales et les températures extrêmes, qui pourraient affecter les piles, telles que les radiateurs/la lumière directe du soleil. Évitez tout contact des produits chimiques ...
-
Seite 60: Avant La Première Utilisation
Retirez les piles / batteries rechargeables si le produit ne va pas être utilisé pendant une durée prolongée. Risque de dommages du produit Utilisez uniquement le type de piles / batteries rechargeables spécifié ! Insérez les piles / batteries rechargeables ... -
Seite 61: Montage
La température intérieure et extérieure et l'heure sont affichées. P Montage Nettoyez la surface sur laquelle vous souhaitez monter le thermomètre numérique avec un produit de nettoyage dégraissant et non abrasif ou chimique avant de le monter. Fixez le capteur extérieur sur le cadre de la ... - Seite 62 intérieure 2. Appuyez sur le bouton ou sur le bouton °C/°F/ pour commuter entre la réinitialisation manuelle "- -" et la réinitialisation quotidienne "1d". Remarque : Réinitialisation quotidienne : Lorsque ce réglage est utilisé, les températures minimale et maximale des 24 dernières heures sont enregistrées et effacées chaque jour à...
-
Seite 63: Réglage De L'heure De L'alarme
5. Appuyez sur le bouton HEURE pour confirmer vos réglages. L'heure clignote sur l'affichage de l'heure Si vous maintenez le bouton Remarque : ou le bouton °C/°F/ enfoncé, vous accélérez le processus et atteignez la valeur souhaitée plus rapidement. Cette méthode plus rapide peut également être utilisée pour effectuer les réglages suivants. - Seite 64 Si une heure d'alarme a déjà été Remarque : réglée, l'heure d'alarme précédemment réglée s'affiche à l'écran. Autrement, l'écran affiche 7:00. L'affichage des heures clignote ensuite. Appuyez sur le bouton ou sur le bouton °C/°F/ pour régler la valeur désirée. Appuyez sur le bouton ALM pour confirmer ...
- Seite 65 Appuyez sur n'importe quel bouton pour désactiver l'alarme avant qu'elle ne s'éteigne automatiquement. L'alarme sonne tous les jours à Remarque : l'heure réglée. Appuyez à nouveau sur le bouton ALM pour rappeler l'heure réglée. Appuyez sur le bouton ou sur le bouton ...
-
Seite 66: Sélection Entre Celsius / Fahrenheit
Sélection entre Celsius / Fahrenheit Appuyez sur le bouton °C/°F/ pour changer entre Celsius (°C) et Fahrenheit (°F). Activation / désactivation de l'avertissement de glace Ils indiquent la plage de signal de +3°C à -1°C. Appuyez sur le bouton °C/°F/ ... -
Seite 67: Rappel De La Mémoire De Température
Appuyez sur n'importe quel bouton pour désactiver le signal d'avertissement de glace. Rappeler la mémoire de température En mode d'affichage normal, appuyez sur le bouton pour rappeler la température maximale enregistrée dans la mémoire (MAX). Appuyer à nouveau sur le bouton pour ... -
Seite 68: Remplacement De La Pile
Appuyez sur le bouton et maintenez-le enfoncé pendant environ 2 secondes pour effacer la mémoire de température. Replacement de la pile Ouvrez le compartiment de la pile à l'arrière du thermomètre numérique Retirez la pile usagée et insérez la pile fournie ... - Seite 69 Erreur Cause / Solution L'affichage diminue / Pile déchargée ou la température contacts de pile sales affichée est - nettoyez les contacts incorrecte et remettez la pile ; remplacez la pile si nécessaire. L'affichage est tout Les températures se noir situent en dehors de la plage de mesure ou le produit a été...
-
Seite 70: Nettoyage Et Entretien
Erreur Cause / Solution Le fonctionnement Si c'est le cas, réinitialisez normal du produit simplement le produit peut être perturbé pour qu'il retourne à son par des interférences fonctionnement normal électromagnétiques. comme décrit dans le chapitre "Réglage manuel de la mémoire de température / fuseau horaire / heure / date", ou appuyez sur le bouton... - Seite 71 Nettoyez le capteur extérieur avec un chiffon légèrement humide. Le capteur extérieur n'est protégé que contre la pluie et les éclaboussures d'eau. P Disposal L’emballage se compose de matières recyclables pouvant être mises au rebut dans les déchetteries locales. Veuillez respecter l‘identification des matériaux d‘emballage pour le tri sélectif, ils sont identifiés avec des...
-
Seite 72: Mise Au Rebut
Votre mairie ou votre municipalité vous renseigneront sur les possibilités de mise au rebut des produits usagés. Afin de contribuer à la protection de l’environnement, veuillez ne pas jeter votre produit usagé dans les ordures ménagères, mais éliminez-le de manière appropriée. -
Seite 73: Garantie Et Service
Elles peuvent contenir des métaux lourds toxiques et doivent être considérées comme des déchets spéciaux. Les symboles chimiques des métaux lourds sont les suivants : Cd = cadmium, Hg = mercure, Pb = plomb. Pour cette raison, veuillez toujours déposer les piles / piles rechargeables usagées dans les conteneurs de recyclage communaux. -
Seite 74: Faire Valoir Sa Garantie
ce produit, nous assurons à notre discrétion la réparation ou le remplacement du produit sans frais supplémentaires. La garantie prend fin si le produit est endommagé suite à une utilisation inappropriée ou à un entretien défaillant. La garantie couvre les vices matériels et de fabrication. -
Seite 75: Service Après-Vente
de titre de votre manuel (en bas à gauche) ou sur un autocollant apposé sur la face arrière ou inférieure du produit. En cas de dysfonctionnement du produit, ou de tout autre défaut, contactez en premier lieu le service après-vente par téléphone ou par e-mail aux coordonnées indiquées ci-dessous. - Seite 76 Inleiding ............Pagina 78 Correct gebruik ..........Pagina 78 Leveromvang ..........Pagina 79 Beschrijving van de onderdelen ....Pagina 79 Technische gegevens ........Pagina 81 Veiligheidsinstructies ........ Pagina 82 Veiligheidsrichtlijnen voor batterijen/ oplaadbare accu's ........Pagina 84 Voor het eerste gebruik ......Pagina 86 Bevestiging ...........
-
Seite 77: Inleiding
DIGITALE THERMOMETER P Inleiding Hartelijk gefeliciteerd met de aankoop van uw nieuwe product. U heeft voor een hoogwaardig product gekozen. De gebruiksaanwijzing is een deel van het product. Deze bevat belangrijke aanwijzingen voor veiligheid, gebruik en verwijdering. Maakt U zich voor de ingebruikname van het product met alle bedienings- en veiligheidsvoorschriften vertrouwd. -
Seite 78: Leveromvang
Leveromvang 1 x digitale thermometer met buitensensor en 1,9 m kabel 1 x 1,5 V (gelijkstroom) AA-batterij 1 x handleiding Beschrijving van de onderdelen Weergave binnentemperatuur Symbool ijswaarschuwing Weergave buitentemperatuur Tijdweergave Alarmsymbool Sluimersymbool Knop SNZ Knop ALM Knop °C/°F/ Knop Knop TIJD Digitale thermometer NL/BE 79... - Seite 79 Deksel batterijvak Batterijvak Knop Reset Voet Buitensensor Displays = Binnentemperatuur = Buitentemperatuur Opgeslagen maximum temperatuur = Opgeslagen minimum temperatuur = IJswaarschuwing = Middag (tijd in 12-uur weergave) = Alarmfunctie = Sluimerfunctie NL/BE 80...
-
Seite 80: Technische Gegevens
Technische gegevens Voedingsspanning: 1,5 V (gelijkstroom) Soort batterij: 1,5 V (gelijkstroom), AA Meetbereik binnentemperatuur: -10 °C tot +50 °C Meetbereik buitentemperatuur: -50 °C tot +70 °C Tolerantie: (-50 °C tot 0 °C) ±2 °C (0 °C tot +30 °C) ±1 °C (+30 °C tot +70 °C) ±2 °C Signaalbereik ijswaarschuwing:... -
Seite 81: Veiligheidsinstructies
Veiligheidsinstructies BEWAAR ALLE VEILIGHEIDSINSTRUCTIES EN INSTRUCTIES VOOR LATERE REFERENTIE!! Dit product mag worden gebruikt door kinderen van 8 jaar of ouder en door personen met beperkte fysieke of geestelijke capaciteiten of zonder ervaring en/of kennis, zolang ze onder toezicht staan of instructie krijgen in het veilige gebruik van het product en de bijbehorende risico's begrijpen. - Seite 82 Laat uzelf niet door de schermen afleiden van uw concentratie op het verkeer. Controleer of alle onderdelen intact zijn. Het monteren van beschadigde onderdelen kan letsel veroorzaken. Controleer of alle onderdelen correct zijn aangesloten. Een onjuiste montage kan lichamelijk letsel veroorzaken.
-
Seite 83: Veiligheidsrichtlijnen Voor Batterijen/Oplaadbare Accu's
even en plaats deze dan weer terug. Veiligheidsrichtlijnen voor batterijen/oplaadbare accu's Houd batterijen buiten LEVENSGEVAAR! het bereik van kinderen. Neem direct contact op met een arts als ze per ongeluk zijn ingeslikt. Probeer nooit EXPLOSIEGEVAAR! gewone batterijen te herladen. Kortsluit batterijen niet en/of open ze niet. - Seite 84 de huid, ogen en slijmvliezen. In geval van contact met accuzuur het aangetaste gebied grondig spoelen met voldoende schoon water en roep onmiddellijk medische hulp in. DRAAG BESCHERMENDE Lekkende of HANDSCHOENEN! beschadigde batterijen kunnen brandwonden veroorzaken bij contact met de huid. Draag altijd geschikte beschermende handschoenen als een dergelijk geval optreedt.
-
Seite 85: Voor Het Eerste Gebruik
oplaadbare accu's en in het batterijvak schoon voordat u deze plaatst! Verwijder lege batterijen/oplaadbare accu's onmiddellijk uit het product. P Voor het eerste gebruik Verwijder alle Opmerking: verpakkingsmaterialen van het product. Verwijder eerst de beschermende film van het scherm van het product. -
Seite 86: Gebruik
Trek de beschermende film van de hechtkussens (een onderop de voet en het andere onderop de buitensensor ). Bevestig het product vervolgens op het gewenste oppervlak. P Gebruik Het temperatuurgeheugen/ tijdzone/tijd/datum handmatig instellen 1. Houd de knop TIJD gedurende 2 seconden ingedrukt. - Seite 87 3. Druk op de knop TIJD om de instellingen te bevestigen; "24H" knippert op de tijdweergave 4. Druk op de knop of op de knop °C/°F/ om te wisselen tussen 12-uur en 24-uur modus. Als de modus 24 hr is gekozen, Opmerking: verschijnt "0:00"...
-
Seite 88: De Alarmtijd Instellen
7. Druk op de knop TIJD om de instellingen te bevestigen. 8. Herhaal de stappen 6 en 7 om de waarden in te stellen voor minuut, jaar, maand en datum. 9. Daarna keert het scherm terug naar de normale weergave. De alarmtijd instellen Houd de knop ALM gedurende 2... - Seite 89 Het alarm in-/uitschakelen Druk op de knop ALM om de ingestelde tijd op te roepen. Druk eenmaal op de knop of °C/°F/ om het alarm te activeren. Het alarmsymbool verschijnt op Opmerking: het display. Het alarmsignaal klinkt zodra de ingestelde ...
-
Seite 90: Celsius Of Fahrenheit Selecteren
Het alarmsignaal zwijgt en het sluimersymbool knippert. Het alarmsignaal klinkt opnieuw na ca. 10 minuten. Het alarmsignaal houdt automatisch op na 2 minuten. Druk op een willekeurige knop om het alarmsignaal uit te schakelen voordat het vanzelf uitgaat. Celsius of Fahrenheit selecteren Druk op de knop °C/°F/ om te... -
Seite 91: Het Temperatuurgeheugen Oproepen
Zodra de buitentemperatuur het Opmerking: signaalbereik bereikt, wordt met intervallen van 5 minuten een waarschuwingssignaal van 15 seconden weergegeven. Binnen dit temperatuurbereik bestaat het risico dat wegoppervlakken glad worden of reeds zijn. Let goed op en rijd overeenkomstig de omstandigheden. Druk op een willekeurige knop om het waarschuwingssignaal uit te schakelen. -
Seite 92: Het Temperatuurgeheugen Wissen
Het temperatuurgeheugen wissen Druk in normale weergave op de knop om de opgeslagen maximumtemperatuur (MAX) op te roepen. Houd de knop gedurende 2 seconden ingedrukt om de opgeslagen temperaturen te wissen. Druk in normale weergavemodus op de knop om de opgeslagen minimumtemperatuur (MIN) op te roepen. -
Seite 93: Problemen Oplossen
P Problemen oplossen Fout Oorzaak/remedie Onjuiste De meting wordt verstoord, temperatuur bijvoorbeeld door rechtstreeks zonlicht, airco of een ventilator - verwijder de digitale thermometer en de buitensensor uit het storingsgebied. Weergave neemt Lege batterij of vuile af/onjuiste batterijcontacten - reinig temperatuur wordt de contacten en plaats weergeven. -
Seite 94: Schoonmaken En Verzorging
Fout Oorzaak/remedie De normale Reset het product in dat werking van geval voor het hervatten het product van de normale werking kan worden zoals beschreven verstoord door in het hoofdstuk elektromagnetische "Temperatuurgeheugen/ interferentie. tijdzone/tijd/datum handmatig instellen", of druk op de RESET-knop om het product te resetten. -
Seite 95: Afvoer
P Afvoer De verpakking bestaat uit milieuvriendelijke grondstoffen die u via de plaatselijke recyclingcontainers kunt afvoeren. Neem de aanduiding van de verpakkingsmaterialen voor de afvalscheiding in acht. Deze zijn gemarkeerd met de afkortingen (a) en een cijfers (b) met de volgende betekenis: 1–7: kunststoffen / 20–22: papier en vezelplaten / 80–98: composietmaterialen. - Seite 96 Gooi het afgedankte product omwille van het milieu niet weg via het huisvuil, maar geef het af bij het daarvoor bestemde depot of het gemeentelijke milieupark. Over afgifteplaatsen en hun openingstijden kunt u zich bij uw aangewezen instantie informeren. Defecte of verbruikte batterijen / accu‘s moeten volgens de richtlijn 2006/66/EG en veranderingen daarop worden gerecycled.
-
Seite 97: Garantie En Service
P Garantie en service Garantie Het product wordt volgens strenge kwaliteitsrichtlijnen zorgvuldig geproduceerd en voor levering grondig getest. In geval van schade aan het product kunt u rechtmatig beroep doen op de verkoper van het product. Deze wettelijke rechten worden door onze hierna vermelde garantie niet beperkt. -
Seite 98: Afwikkeling In Geval Van Garantie
toepassing op productonderdelen, die onderhevig zijn aan normale slijtage en hierdoor als aan slijtage onderhevige onderdelen gelden (bijv. batterijen) of voor beschadigingen aan breekbare onderdelen, zoals bijv. schakelaars, accu’s of dergelijke onderdelen, die gemaakt zijn van glas. Afwikkeling in geval van garantie Om een snelle afhandeling van uw reclamatie te waarborgen dient u de volgende instructies in acht te nemen:... -
Seite 99: Service
vermelding van de concrete schade alsmede het tijdstip van optreden voor u franco aan het u meegedeelde servicepunt verzenden. Service Service Nederland Tel.: 0900 0400 223 (0,10 EUR/Min.) E-Mail: owim@lidl.nl Service Belgiё Tel.: 070 270 171 (0,15 EUR/Min.) E-Mail: owim@lidl.be NL/BE 100... - Seite 100 Wstęp ............Strona 102 Właściwe użytkowanie ......Strona 102 Zakres dostawy .........Strona 103 Opis części..........Strona 103 Dane techniczne ........Strona 105 Instrukcje bezpieczeństwa ....Strona 106 Instrukcje dotyczące bezpiecznego użytkowania baterii/akumulatorów ....Strona 108 Przed pierwszym użyciem ....Strona 110 Montaż ............Strona 111 Obsługa ............Strona 112 Ręczne ustawianie pamięci temperatury/ strefy czasowej/godziny/daty ....Strona 112 Ustawianie godziny alarmu ......Strona 114...
-
Seite 101: Wstęp
TERMOMETR CYFROWY P Wstęp Gratulujemy Państwu zakupu nowego produktu. Tym samym zdecydowali się Państwo na zakup produktu wysokiej jakości. Instrukcja obsługi jest częścią tego produktu. Zawiera ona ważne wskazówki dotyczące bezpieczeństwa, użytkowania i utylizacji. Przed pierwszym użyciem produktu należy zapoznać się ze wszystkimi wskazówkami dotyczącymi obsługi i bezpieczeństwa. -
Seite 102: Zakres Dostawy
Zakres dostawy 1x termometr cyfrowy z czujnikiem zewnętrznym i kablem 1,9 m 1x bateria AA 1,5 V (prąd stały) 1x instrukcja obsługi Opis części Wskazanie temperatury wewnątrz Symbol ostrzeżenia o oblodzeniu Wskazanie temperatury na zewnątrz Wskazanie godziny Symbol alarmu Symbol drzemki Przycisk SNZ Przycisk ALM Przycisk °C/°F/ Przycisk... - Seite 103 Wnęka na baterię Przycisk resetowania Podstawka Czujnik zewnętrzny Wskazania = Temperatura wewnątrz = Temperatura na zewnątrz MAX = Zapisana temperatura maksymalna = Zapisana temperatura minimalna = Ostrzeżenie o oblodzeniu Popołudnie (czas w trybie 12-godzinnym) = Funkcja alarmu = Funkcja drzemki PL 104...
-
Seite 104: Dane Techniczne
Dane techniczne Napięcie robocze: 1,5 V (prąd stały) Typ baterii: 1,5 V (prąd stały), AA Zakres pomiaru temperatury wewnątrz: od -10°C do +50°C Zakres pomiaru temperatury na zewnątrz: od -50°C do +70°C Tolerancja: (od -50°C do 0°C) ±2°C (od 0°C do +30°C) ±1°C (od +30°C do +70°C) ±2°C Zakres sygnału ostrzeżenia o... -
Seite 105: Instrukcje Bezpieczeństwa
Instrukcje bezpieczeństwa INSTRUKCJE BEZPIECZEŃSTWA ORAZ INSTRUKCJĘ OBSŁUGI NALEŻY ZACHOWAĆ NA PRZYSZŁOŚĆ!! Produkt ten może być używany przez dzieci w wieku co najmniej 8 lat, a także przez osoby o ograniczonej sprawności fizycznej, sensorycznej lub umysłowej albo nieposiadające odpowiedniego doświadczenia i/lub wiedzy, jeśli będą... - Seite 106 ponieważ jej uaktywnienie mogłoby wówczas doprowadzić do obrażeń. Produktu nie wolno umieszczać na przedniej szybkie w polu widzenia kierowcy. Mogłoby to ograniczyć widoczność i rozpraszać kierowcę. Kierowca musi pozostać skupiony na drodze. Nie może rozpraszać swojej uwagi odczytywaniem wskazań.
-
Seite 107: Instrukcje Dotyczące Bezpiecznego Użytkowania Baterii/Akumulatorów
być przyczyną zakłóceń. Dotyczy to m.in. telefonów komórkowych, krótkofalówek, CB radio, pilotów zdalnego sterowania i kuchenek mikrofalowych. W razie zauważenia błędów wyświetlacza należy odsunąć go od tego typu urządzeń. Ładunki elektrostatyczne mogą być przyczyną wadliwego działania produktu. Jeśli produkt przestanie działać, należy nacisnąć przycisk RESET w celu zresetowania lub wyjąć... - Seite 108 Nie należy nigdy wrzucać baterii do ognia ani wody. Baterii nie wolno poddawać obciążeniom mechanicznym. Baterii/akumulatorów nie wolno poddawać obciążeniom mechanicznym. Ryzyko wycieku z baterii/ akumulatorów Należy unikać ekstremalnych warunków środowiskowych i temperatur, które mogłyby mieć...
-
Seite 109: Przed Pierwszym Użyciem
W przypadku wycieku należy wyjąć od razu baterie/akumulatory z produktu, aby uniknąć uszkodzenia. Jeśli produkt nie będzie używany przez dłuższy czas, należy wyjąć z niego baterie/ akumulatory. Ryzyko uszkodzenia produktu Należy korzystać wyłącznie z określonego ... -
Seite 110: Montaż
Wyjmij plastikowy pasek wystający z wnęki na baterię Wyświetlona zostanie temperatura wewnątrz i na zewnątrz oraz godzina. P Montaż Przed montażem wyczyść powierzchnię, do której chcesz przymocować termometr cyfrowy za pomocą odtłuszczającego i nieszorującego chemicznego środka czyszczącego. -
Seite 111: Obsługa
P Obsługa Ręczne ustawianie pamięci temperatury/strefy czasowej/ godziny/daty 1. Naciśnij przycisk TIME i przytrzymaj go przez około 2 sekundy. Zacznie migać wskazanie temperatury wewnątrz „- -” 2. Naciśnij przycisk lub przycisk °C/°F/ w celu przełączenia między ręcznym „- -” a dziennym resetowaniem „1d”. Uwaga: Dzienne resetowanie: po wybraniu tego ustawienia minimalna i maksymalna temperatura zarejestrowana w ciągu ostatnich... - Seite 112 po wybraniu trybu 24-godzinnego Uwaga: pojawi się wskazanie godziny „0:00” Po wybraniu trybu 12-godzinnego pojawi się wskazanie godziny „12:00” 5. Naciśnij przycisk TIME w celu potwierdzenia ustawień. Zacznie migać wskazanie liczby godzin naciśnięcie i przytrzymanie przycisku Uwaga: lub °C/°F/ umożliwia przyspieszenie procesu i szybsze ustawienie żądanej wartości.
-
Seite 113: Ustawianie Godziny Alarmu
Ustawianie godziny alarmu Naciśnij przycisk ALM i przytrzymaj go przez około 2 sekundy. jeśli alarm został wcześniej ustawiony, Uwaga: na wyświetlaczu pojawi się uprzednio ustawiona godzina alarmu. Jeśli nie, pojawi się wskazanie 7:00. Zacznie migać wskazanie liczby godzin. ... - Seite 114 w celu uaktywnienia alarmu. na wyświetlaczu pojawi się symbol Uwaga: alarmu Gdy nadejdzie ustawiona godzina alarmu, rozlegnie się sygnał alarmu. Po upływie 2 minut sygnał alarmu wyłączy się automatycznie. Naciśnij dowolny przycisk, aby wyłączyć sygnał alarmu przed jego automatyczną dezaktywacją.
-
Seite 115: Wybór Stopni Celsjusza/Fahrenheita
Po upływie około 10 minut sygnał alarmu rozlegnie się ponownie. Po upływie 2 minut sygnał alarmu wyłączy się automatycznie. Naciśnij dowolny przycisk, aby wyłączyć sygnał alarmu przed jego automatyczną dezaktywacją. Wybór stopni Celsjusza/ Fahrenheita Naciśnij przycisk °C/°F/ w celu ... -
Seite 116: Wyświetlanie Temperatury Z Pamięci
gdy na zewnątrz panować będzie Uwaga: temperatura z zakresu sygnału, rozlegnie się 15-sekundowy sygnał ostrzeżenia w 5-minutowych odstępach. Przy tym zakresie temperatury powierzchnia dróg może stać się lub być śliska. Należy zachować ostrożność i dostosować jazdę do panujących warunków. Naciśnij dowolny przycisk, aby wyłączyć sygnał ostrzeżenia. -
Seite 117: Usuwanie Temperatury Z Pamięci
Usuwanie temperatury z pamięci W trybie normalnego widoku wyświetlacza naciśnij przycisk w celu wyświetlenia zapisanej temperatury maksymalnej (MAX). Naciśnij przycisk i przytrzymaj go przez około 2 sekundy, aby usunąć zapisane temperatury. W trybie normalnego widoku wyświetlacza naciśnij przycisk w celu wyświetlenia zapisanej temperatury minimalnej (MIN). -
Seite 118: Rozwiązywanie Problemów
P Rozwiązywanie problemów Błąd Przyczyna/ rozwiązanie Nieprawidłowa Pomiar został zakłócony temperatura np. przez bezpośrednie światło słoneczne, klimatyzację lub termowentylator — usuń termometr cyfrowy i czujnik zewnętrzny z obszaru zakłóceń. Wyświetlacz zanika/ Rozładowana bateria lub wskazywana jest zabrudzone styki baterii nieprawidłowa —... -
Seite 119: Czyszczenie I Konserwacja
Błąd Przyczyna/ rozwiązanie Nieodpowiednie Wyjmij baterię i włóż ją wyświetlanie liczb ponownie do wnęki na baterię Normalne działanie Jeśli tak się stanie, produktu może zresetuj produkt, zostać zaburzone aby przywrócić jego przez zakłócenia normalne działanie, elektromagnetyczne. zgodnie z opisem w rozdziale „Ręczne ustawianie pamięci temperatury/strefy... -
Seite 120: Utylizacja
Przyciski termometru cyfrowego należy czyścić szczoteczką. W żadnym wypadku nie wolno używać płynów lub środków czyszczących, ponieważ doszłoby do uszkodzenia produktu. Czujnik zewnętrzny należy czyścić lekko zwilżoną szmatką. Czujnik zewnętrzny jest zabezpieczony wyłącznie przed deszczem z góry i wodą... - Seite 121 Produkt i materiał opakowania nadają się do ponownego przetworzenia, należy je zutylizować osobno w celu lepszego przetworzenia odpadów. Logo Triman jest ważne tylko dla Francji. Informacji na temat możliwości utylizacji wyeksploatowanego produktu udziela urząd gminy lub miasta. Z uwagi na ochronę środowiska nie wyrzucać...
-
Seite 122: Gwarancja I Serwis
Baterii / akumulatorów nie należy wyrzucać razem z odpadami domowymi. Mogą one zawierać szkodliwe metale ciężkie i należy je traktować jak odpady specjalne. Symbole chemiczne metali ciężkich są następujące: Cd = kadm, Hg = rtęć, Pb = ołów. Dlatego też zużyte baterie / akumulatory należy przekazywać... -
Seite 123: Sposób Postępowania W Przypadku Naprawy Gwarancyjnej
W przypadku wystąpienia w ciągu 3 lat od daty zakupu wad materiałowych lub fabrycznych, dokonujemy – według własnej oceny – bezpłatnej naprawy lub wymiany produktu. Świadczenie gwarancyjne obejmuje wady materiałowe i fabryczne. Gwarancja nie obejmuje części produktu ulegających normalnemu zużyciu, uznawanych za części zużywalne (np. baterie) oraz uszkodzeń... -
Seite 124: Serwis
należy przygotować paragon i numer artykułu (np. IAN 123456_7890) jako dowód zakupu. Numery artykułów można znaleźć na tabliczce znamionowe, na grawerunku, na stronie tytułowej jego instrukcji (na dole po lewej stronie) lub jako naklejkę na stronie odwrotnej lub spodniej. W razie wystąpienia błędów w działaniu lub innych wad, należy skontaktować... - Seite 125 Úvod .............. Strana 127 Určené použití ..........Strana 127 Obsah dodávky .......... Strana 127 Popis částí............ Strana 128 Technické údaje .......... Strana 129 Bezpečnostní pokyny ......Strana 130 Bezpečnostní pokyny pro baterie/ nabíjecí baterie ........... Strana 132 Před prvním použitím ......Strana 134 Montáž...
-
Seite 126: Úvod
DIGITÁLNÍ TEPLOMĚR P Úvod Blahopřejeme Vám ke koupi nového výrobku. Rozhodli jste se pro kvalitní produkt. Návod k obsluze je součástí tohoto výrobku. Obsahuje důležité pokyny pro bezpečnost, použití a likvidaci. Před použitím výrobku se seznamte se všemi pokyny k obsluze a bezpečnostními pokyny. Používejte výrobek jen popsaným způsobem a na uvedených místech. -
Seite 127: Popis Částí
Popis částí Zobrazení vnitřní teploty Symbol varování před náledím Zobrazení vnější teploty Zobrazení času Symbol budíku Symbol připomenutí Tlačítko SNZ Tlačítko ALM Tlačítko °C/°F/ Tlačítko Tlačítko TIME Digitální teploměr Kryt přihrádky na baterii Přihrádka na baterii Resetovací tlačítko Stojánek Venkovní senzor CZ 128... -
Seite 128: Technické Údaje
Zobrazení = Vnitřní teplota = Venkovní teplota = Uložená maximální teplota = Uložená minimální teplota = Varování před náledím Odpoledne (12hodinový formát času) = Funkce budíku = Funkce připomenutí Technické údaje Provozní napětí: 1,5 V (stejnosměr.) Typ baterie: 1,5 V (stejnosměr.), AA Rozsah měření... -
Seite 129: Bezpečnostní Pokyny
Tolerance: (-50 °C až 0 °C) ±2 °C (0 °C až +30 °C) ±1 °C (+30 °C až +70 °C) ±2 °C Rozsah signálu varování před náledím: -1 °C až +3 °C Délka kabelu venkovního senzoru: 1,9 m Venkovní senzor: IP44 (odolnost proti stříkající... - Seite 130 produktu a chápou související rizika. Zabraňte dětem, aby si hrály s tímto produktem. Čištění a uživatelskou údržbu nesmí provádět děti bez dozoru. Tento produkt není na hraní. VAROVÁNÍ! Tento výrobek neumísťujte v blízkosti airbagu, protože v případě aktivace airbagu by mohl způsobit zranění. Tento výrobek neumísťujte přímo na čelní...
-
Seite 131: Bezpečnostní Pokyny Pro Baterie/Nabíjecí Baterie
Tento výrobek obsahuje citlivé elektronické součástky. Znamená to, že při umístění v blízkosti objektu, který vysílá rádiové signály, může dojít k rušení. Zdrojem rušení mohou být například mobilní telefony, přenosné přehrávače, CB vysílačky, dálkové ovladače a mikrovlnné trouby. Pokud displej signalizuje problém, přemístěte takové... - Seite 132 Baterie v žádném případě neházejte do ohně ani do vody. Nevystavujte baterie mechanickému tlaku. Nevystavujte baterie/nabíjecí baterie mechanickému tlaku. Nebezpečí vytečení baterií/nabíjecích baterií Zabraňte extrémním podmínkám prostředí a teplotám, které by mohly negativně ovlivnit baterie, například radiátory/přímé...
-
Seite 133: Před Prvním Použitím
Nebudete-li výrobek delší dobu používat, vyjměte baterie/nabíjecí baterie. Nebezpečí poškození produktu Používejte pouze určený typ baterie/nabíjecí baterie! Vložte baterie/nabíjecí baterie podle značek polarity (+) a (-) na baterii/nabíjecí baterii a na výrobku. Před vložením očistěte kontakty na baterii/ ... -
Seite 134: Montáž
P Montáž Povrch, na kterých chcete tento digitální teploměr připevnit, předem očistěte odmašťovacím a neabrazivním nebo chemickým čisticím prostředkem. Připevněte venkovní senzor na venkovní stranu rámu okna nebo za přední nárazník vašeho motorového vozidla. Sejměte ochrannou fólii z lepicích podložek ... - Seite 135 Poznámka: Denní nulování: Když použijete toto nastavení, budou uchovávány minimální a maximální teploty za posledních 24 hodin a každý den o půlnoci budou smazány. Ruční nulování: Toto nastavení umožňuje ručně odstranit dosud uložené teploty. 3. Stisknutím tlačítka TIME potvrďte nastavení. V zobrazení...
-
Seite 136: Nastavení Času Buzení
6. Stisknutím tlačítka nebo tlačítka °C/°F/ nastavte požadovanou hodnotu. 7. Stisknutím tlačítka TIME potvrďte nastavení. 8. Zopakujte kroky 6 a 7 a nastavte minuty, rok, měsíc a datum. 9. Poté se na displeji obnoví normální zobrazení. Nastavení času buzení Stiskněte a podržte tlačítko ALM přibližně... - Seite 137 Zapnutí/vypnutí budíku Stisknutím tlačítka ALM zobrazte nastavený čas. Jedním stisknutím tlačítka nebo tlačítka °C/°F/ zapněte budík. Na displeji se zobrazí symbol Poznámka: budíku V nastavený čas se spustí signál budíku. Po uplynutí 2 minut se signál budíku automaticky vypne.
-
Seite 138: Výběr Jednotek Celsia/Fahrenheita
Signál budíku se ztiší a začne blikat symbol připomenutí Signál budíku se znovu spustí přibližně za 10 minut. Po uplynutí 2 minut se signál budíku automaticky vypne. Než se signál budíku vypne automaticky, můžete jej vypnout stisknutím libovolného tlačítka. -
Seite 139: Vyvolání Paměti Teploty
Jakmile venkovní teplota dosáhne Poznámka: signální rozsah, bude v 5minutových intervalech znít 15sekundový varovný signál. V tomto rozsahu teplot existuje nebezpečí, že vozovka může klouzat nebo již klouže. Věnujte zvýšenou pozornost a přizpůsobte jízdu venkovním podmínkám. Varovný signál vypnete stisknutím libovolného tlačítka. -
Seite 140: Vymazání Paměti Teploty
Vymazání paměti teploty Stisknutím tlačítka v režimu normálního zobrazení zobrazíte uloženou maximální teplotu (MAX). Stisknutím a podržením tlačítka přibližně 2 sekundy odstraníte uložené teploty. Stisknutím tlačítka v režimu normálního zobrazení zobrazíte uloženou minimální teplotu (MIN). Stisknutím a podržením tlačítka přibližně... -
Seite 141: Odstraňování Potíží
P Odstraňování potíží Chyba Příčina/řešení Nesprávná Měření je rušeno, například teplota přímým slunečním zářením, klimatizací nebo topením – přemístěte digitální teploměr a venkovní senzor mimo vliv rušení. Zobrazení se Je vybitá baterie nebo jsou ztrácí/zobrazuje znečištěné kontakty baterie se nesprávná –... -
Seite 142: Čištění A Údržba
Chyba Příčina/řešení Normální V takovém případě resetujte fungování výrobek, aby se obnovilo výrobku může normální fungování, podle být omezeno pokynů v části „Ruční magnetickým nastavení paměti teploty/ rušením. časového pásma/ času/ data“ nebo resetujte výrobek stisknutím tlačítka RESET P Čištění a údržba Vnější... -
Seite 143: Zlikvidování
P Zlikvidování Obal se skládá z ekologických materiálů, které můžete zlikvidovat prostřednictvím místních sběren recyklovatelných materiálů. Při třídění odpadu se řiďte podle označení obalových materiálů zkratkami (a) a čísly (b), s následujícím významem: 1–7: umělé hmoty / 20–22: papír a lepenka / 80–98: složené... -
Seite 144: Záruka A Servis
Vadné nebo vybité baterie resp. akumulátory se musí, podle směrnice 2006/66/ES a jejích příslušných změn, recyklovat. Baterie, akumulátory i výrobek odevzdejte zpět do nabízených sběren. Ekologické škody v důsledku chybné likvidace baterií / akumulátorů! Baterie / akumulátory se nesmí zlikvidovat v domácím odpadu. - Seite 145 Vaše práva ze zákona nejsou omezena naší níže uvedenou zárukou. Na tento artikl platí 3 záruka od data zakoupení. Záruční lhůta začíná od data zakoupení. Uschovejte si dobře originál pokladní stvrzenky. Tuto stvrzenku budete potřebovat jako doklad o zakoupení. Pokud se do 3 let od data zakoupení tohoto výrobku vyskytne vada materiálu nebo výrobní...
-
Seite 146: Postup V Případě Uplatňování Záruky
Postup v případě uplatňování záruky Pro zajištění rychlého zpracování Vašeho případu se řiďte následujícími pokyny: Pro všechny požadavky si připravte pokladní stvrzenku a číslo artiklu (např. IAN 123456_7890) jako doklad o zakoupení. Číslo artiklu najdete na typovém štítku, gravuře, titulní stránce návodu (vlevo dole) nebo na nálepce na zadní... -
Seite 147: Servis
Servis Servis Česká republika Tel.: 800 143 873 E-Mail: owim@lidl.cz CZ 148... - Seite 148 Úvod .............. Strana 150 Správne použitie ......... Strana 150 Rozsah dodávky ......... Strana 151 Popis jednotlivých častí ....... Strana 151 Technické údaje .......... Strana 153 Bezpečnostné pokyny ......Strana 154 Bezpečnostné pokyny týkajúce sa batérií/ nabíjateľných batérií ........Strana 156 Pred prvým použitím ......
-
Seite 149: Úvod
DIGITÁLNY TEPLOMER P Úvod Blahoželáme Vám ku kúpe Vášho nového výrobku. Rozhodli ste sa pre veľmi kvalitný výrobok. Návod na obsluhu je súčasťou tohto výrobku. Obsahuje dôležité upozornenia týkajúce sa bezpečnosti, používania a likvidácie. Skôr ako začnete výrobok používať, oboznámte sa so všetkými pokynmi k obsluhe a bezpečnosti. -
Seite 150: Rozsah Dodávky
Rozsah dodávky 1 x Digitálny teplomer s vonkajším snímačom a 1,9 m káblom 1 x 1,5 V (jednosmerný prúd) batéria AA 1 x Návod na použitie Popis jednotlivých častí Zobrazenie vnútornej teploty Symbol výstrahy pred ľadom Zobrazenie vonkajšej teploty Zobrazenie času Symbol budíka Symbol posunutia času budíka Tlačidlo SNZ (Posunúť... - Seite 151 Kryt priestoru pre batérie Priestor pre batérie Tlačidlo Reset Stojan Vonkajší snímač Zobrazenia = Vnútorná teplota = Vonkajšia teplota = Uložená maximálna teplota = Uložená minimálna teplota = Výstraha pred ľadom Popoludnie (čas v 12-hodinovom režime) = Funkcia budíka = Funkcia posunutia času budíka SK 152...
-
Seite 152: Technické Údaje
Technické údaje Prevádzkové napätie: 1,5 V (jednosmerný prúd) Typ batérie: 1,5 V (jednosmerný prúd), Rozsah merania vnútornej teploty: -10 °C až +50 °C Rozsah merania vonkajšej teploty: -50 °C až +70 °C Prípustná (-50 °C až 0 °C) ±2 °C odchýlka: (0 °C až... -
Seite 153: Bezpečnostné Pokyny
Bezpečnostné pokyny ODLOŽTE SI VŠETKY BEZPEČNOSTNÉ POKYNY A NÁVOD NA POUŽÍVANIE NA BUDÚCE POUŽITIE!! Tento výrobok môžu používať deti vo veku 8 rokov a viac, ako aj osoby so zníženými fyzickými, zmyslovými alebo duševnými schopnosťami alebo nedostatkom skúseností a/alebo znalostí, pokiaľ je pre ne zabezpečený dozor alebo zaškolenie ohľadom používania výrobku bezpečným spôsobom a pokiaľ... - Seite 154 Výrobok neumiestňujte priamo do oblasti čelného skla vodiča. Môže to obmedzovať výhľad a odvádzať pozornosť vodiča. Nedovoľte, aby sa vaša pozornosť odvádzala od sústredenia sa na premávku kvôli zobrazovaným údajom. Skontrolujte všetky časti a uistite sa, že sú ...
-
Seite 155: Bezpečnostné Pokyny Týkajúce Sa Batérií/ Nabíjateľných Batérií
ďalej od neho. Elektrostatický náboj môže spôsobiť zlyhanie výrobku. V prípade, že výrobok nebude fungovať, stlačte tlačidlo RESET , čím výrobok resetujete, alebo na chvíľu vyberte batériu a potom ju vložte späť. Bezpečnostné pokyny týkajúce sa batérií/ nabíjateľných batérií Batérie uchovávajte OHROZENIE ŽIVOTA! ... - Seite 156 teplotám okolitého prostredia, ktoré by mohli mať vplyv na batérie, napr. radiátory/priame slnečné svetlo. Vyhýbajte sa kontaktu uniknutých chemikálií s pokožkou, očami a sliznicami. V prípade kontaktu s kyselinou batérie dôkladne opláchnite zasiahnutú oblasť množstvom čistej vody a ihneď vyhľadajte lekársku pomoc. POUŽÍVAJTE OCHRANNÉ...
-
Seite 157: Pred Prvým Použitím
Vložte batérie/nabíjateľné batérie podľa označenia polarity (+) a (-) na batérii/ nabíjateľnej batérii a na výrobku. Pred vložením batérií/nabíjateľných batérií vyčistite kontakty na batériách a v priestore pre batérie! Vybité batérie/nabíjateľné batérie ihneď vyberte z výrobku. P Pred prvým použitím Odstráňte všetky baliace materiály z Poznámka:... -
Seite 158: Používanie
chemickým čistiacim prostriedkom. Vonkajší snímač pripevnite zvonku na rám okna alebo za predný nárazník vášho motorového vozidla. Odstráňte ochranný film z lepiacich podložiek (jeden je na spodnej strane stojana a druhý je na spodnej strane vonkajšieho snímača Potom výrobok pripevnite na povrch, na ktorý... - Seite 159 teplota za posledných 24 hodín uložia a vymažú každý deň o polnoci. Manuálne resetovanie: Toto nastavenie umožňuje manuálne vymazať doteraz uložené teploty. 3. Stlačením tlačidla TIME (Čas) potvrdíte nastavenia, na displeji času bliká „24H“. 4. Stlačením tlačidla alebo tlačidla °C/°F/ prepnete medzi 12 a 24 hodinovým režimom.
-
Seite 160: Nastavenie Času Budíka
6. Požadovanú hodnotu nastavte stlačením tlačidla alebo tlačidla °C/°F/ 7. Nastavenia potvrďte stlačením tlačidla TIME (Čas) 8. Zopakovaním krokov 6 a 7 nastavte hodnoty pre minútu, rok, mesiac a dátum. 9. Potom sa displej vráti na normálne zobrazenie. Nastavenie času budíka Stlačte a podržte tlačidlo ALM (Budík) ... - Seite 161 Stlačením tlačidla ALM (Budík) potvrdíte nastavenia a vrátite sa na normálne zobrazenie. Vypnutie budíka Stlačením tlačidla ALM (Budík) vyvolajte nastavený čas. Budík zapnete jedným stlačením tlačidla alebo tlačidla °C/°F/ Na displeji sa zobrazí symbol budíka Poznámka: Signál budíka sa rozoznie hneď...
-
Seite 162: Výber Stupňov Celzia/Fahrenheita
Použitie tlačidla na posunutie času budíka Stlačením tlačidla SNZ (Posunúť čas budíka) pri znejúcom signáli budíka zapnete funkciu posunutia času budíka. Signál budíka sa stíši a začne blikať symbol posunutia času budíka Signál budíka sa rozoznie znova po približne ... -
Seite 163: Vyvolanie Teplotnej Pamäte
Opätovným stlačením a podržaním tlačidla °C/°F/ vypnete výstrahu pred ľadom. Symbol výstrahy pred ľadom „ “ zmizne. Hneď ako vonkajšia teplota Poznámka: dosiahne rozsah signálu, bude sa v 5 minútových intervaloch ozývať 15 sekundový výstražný signál. V tomto teplotnom rozsahu existuje riziko, že sa povrchy vozoviek stanú... -
Seite 164: Odstránenie Teplotnej Pamäte
Odstránenie teplotnej pamäte Uloženú maximálnu teplotu (MAX) vyvoláte v režime normálneho zobrazenia stlačením tlačidla . Stlačením a podržaním tlačidla na asi 2 sekundy odstránite uložené teploty. Uloženú minimálnu teplotu (MIN) vyvoláte v režime normálneho zobrazenia stlačením tlačidla . -
Seite 165: Riešenie Problémov
P Riešenie problémov Chyba Príčina/Náprava Nesprávna teplota Meranie je narušené, napr. priamym slnečným žiarením, klimatizáciou alebo ventilátorom kúrenia - odmontujte digitálny teplomer a vonkajší snímač z priestoru s rušením. Displej klesá/ Vybitá batéria alebo zobrazuje sa znečistené kontakty nesprávna teplota batérie - vyčistite kontakty a vložte batériu, v prípade potreby batériu vymeňte. -
Seite 166: Čistenie A Starostlivosť
Chyba Príčina/Náprava Normálne Ak je to tak, jednoducho fungovanie výrobku výrobok resetujte a môže byť rušené pokračujte v normálnej elektromagnetickým prevádzke, ako je rušením. popísané v kapitole „Manuálne nastavenie teplotnej pamäte/ časového pásma/času/ dátumu“, alebo výrobok resetujte stlačením tlačidla RESET P Čistenie a starostlivosť... -
Seite 167: Likvidácia
dažďu len v smere zhora a proti striekajúcej vode. P Likvidácia Obal pozostáva z ekologických materiálov, ktoré môžete odovzdať na miestnych recyklačných zberných miestach. Všímajte si prosím označenie obalových materiálov pre triedenie odpadu, sú označené skratkami (a) a číslami (b) s nasledujúcim významom: 1–7: Plasty / 20–22: Papier a kartón / 80–98: Spojené... - Seite 168 Ak výrobok doslúžil, v záujme ochrany životného prostredia ho neodhoďte do domového odpadu, ale odovzdajte na odbornú likvidáciu. Informácie o zberných miestach a ich otváracích hodinách získate na Vašej príslušnej správe.. Defektné alebo použité batérie / akumulátorové batérie musia byť odovzdané na recykláciu podľa smernice 2006/66/ES a jej zmien.
-
Seite 169: Záruka A Servis
P Záruka a servis Záruka Tento výrobok bol dôkladne vyrobený podľa prísnych akostných smerníc a pred dodaním svedomito testovaný. V prípade nedostatkov tohto výrobku Vám prináležia zákonné práva voči predajcovi produktu. Tieto zákonné práva nie sú našou nižšie uvedenou zárukou obmedzené. Na tento produkt poskytujeme 3-ročnú... -
Seite 170: Postup V Prípade Poškodenia V Záruke
časti produktu, ktoré sú vystavené normálnemu opotrebovaniu, a preto ich je možné považovať za opotrebovateľné diely (napr. batérie) alebo na poškodenia na rozbitných dieloch, napr. na spínači, akumulátorových batériach alebo častiach, ktoré sú zhotovené zo skla. Postup v prípade poškodenia v záruke Pre zaručenie rýchleho spracovania Vašej požiadavky dodržte prosím nasledujúce pokyny:... -
Seite 171: Servis
Produkt označený ako defektný potom môžete s priloženým dokladom o kúpe (pokladničný lístok) a uvedením, v čom spočíva nedostatok a kedy sa vyskytol, bezplatne odoslať na Vám oznámenú adresu servisného pracoviska. Servis Servis Slovensko Tel.: 0850 232001 E-pošta: owim@lidl.sk SK 172... - Seite 172 OWIM GmbH & Co. KG Stiftsbergstraße 1 74167 Neckarsulm GERMANY Model no.: HG05685 Version: 09/2019 IAN 315731_1904...