Nevadent NZAOT 600 A1 Bedienungsanleitung
Vorschau ausblenden
Andere Handbücher für NZAOT 600 A1:
- Bedienungsanleitung (90 Seiten) ,
- Bedienungsanleitung (55 Seiten) ,
- Bedienungsanleitung (54 Seiten)
Inhaltsverzeichnis
Werbung
Verfügbare Sprachen
Verfügbare Sprachen
HOYER Handel GmbH
Tasköprüstraße 3
DE-22761 Hamburg
GERMANY
Stand der Informationen · Status of information · Version des informations · Stand van de informatie
Stan informacji · Stav informací · Stav informácií:
07/2019
ID: NZAOT 600 A1_19_V1.3
IAN 321713_1901
AKKU-ZAHNBÜRSTE „PROFESSIONAL" NZAOT 600 A1
PREMIUM ELECTRIC TOOTHBRUSH NZAOT 600 A1
BROSSE À DENTS ÉLECTRIQUE « PROFESSIONAL » NZAOT 600 A1
DE
AT
CH
Bedienungsanleitung
AKKU-ZAHNBÜRSTE
„PROFESSIONAL"
FR
Mode d'emploi
BE
BROSSE À DENTS ÉLECTRIQUE
« PROFESSIONAL »
PL
Instrukcja obs ugi
AKUMULATOROWA SZCZOTECZ-
KA DO Z BÓW "PROFESSIONAL"
SK
Návod na obsluhu
AKU ZUBNÁ KEFKA
„PROFESSIONAL"
IAN 321713_1901
GB
IE
Operating instructions
PREMIUM ELECTRIC
TOOTHBRUSH
Gebruiksaanwijzing
NL
BE
ACCU-TANDENBORSTEL
"PROFESSIONAL"
CZ
Návod k obsluze
AKU ZUBNÍ KARTÁ EK
„PROFESSIONAL"
DE
NL
CZ
BE
PL
Werbung
Kapitel
Inhaltsverzeichnis

Verwandte Anleitungen für Nevadent NZAOT 600 A1


Inhaltszusammenfassung für Nevadent NZAOT 600 A1
- Seite 1 AKKU-ZAHNBÜRSTE „PROFESSIONAL“ NZAOT 600 A1 PREMIUM ELECTRIC TOOTHBRUSH NZAOT 600 A1 BROSSE À DENTS ÉLECTRIQUE « PROFESSIONAL » NZAOT 600 A1 Bedienungsanleitung Operating instructions AKKU-ZAHNBÜRSTE PREMIUM ELECTRIC HOYER Handel GmbH „PROFESSIONAL“ TOOTHBRUSH Tasköprüstraße 3 Mode d'emploi Gebruiksaanwijzing DE-22761 Hamburg BROSSE À DENTS ÉLECTRIQUE...
- Seite 2 Deutsch ..................2 English ................... 18 Français ................. 34 Nederlands ................56 Polski ..................74 Česky ..................92 Slovenčina ................108...
- Seite 3 Übersicht / Overview / Aperçu de l'appareil / Overzicht / Przegląd / Přehled / Prehľad...
-
Seite 4: Inhaltsverzeichnis
Inhalt 1. Übersicht ..................3 2. Bestimmungsgemäßer Gebrauch ............4 3. Sicherheitshinweise ................. 4 4. Lieferumfang ................... 7 5. Uhr mit Timer ................... 7 Batterien einlegen ................. 7 Uhrzeit stellen (Bild A) ................8 Uhr aufstellen ..................8 Wandmontage ..................8 Bluetooth-Verbindung ein-/ausschalten ............. -
Seite 5: Übersicht
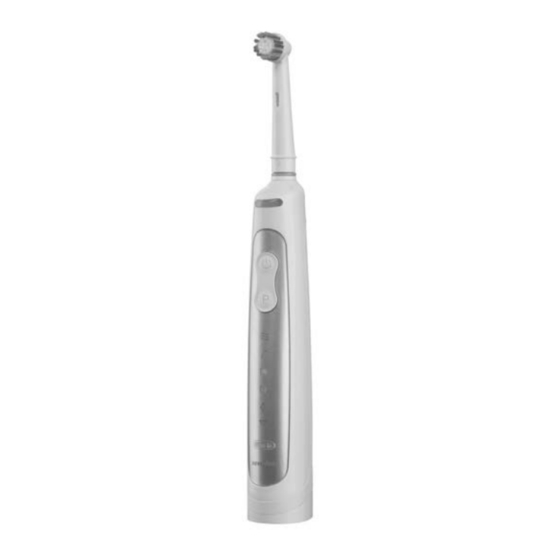
1. Übersicht Bürstenkopf Indikatorborsten Zahnbürsten-Aufsatz (austauschbar) Markierungsring Dorn der Zahnbürste LED: leuchtet weiß bei Bluetooth-Verbindung / leuchtet rot bei zu hohem Druck Ein-/Ausschalter + Transportsicherung ein- und ausschalten Funktionstaste Funktionsanzeigen (beleuchtet): Massage Sensitiv Normal Tiefenreinigung Aufhellen Zungenreinigung Ladekontrollleuchte Zahnbürste Schutzkappe für Ladestation Dorn für Zahnbürsten-Aufsatz Ständer für Zahnbürsten-Aufsätze Dorn der Ladestation... -
Seite 6: Bestimmungsgemäßer Gebrauch
Bild A Batteriefach 30 set Taste zum Uhrzeit einstellen: Umschalten auf Uhrzeitformat / Stunden / 10 Minuten-Intervalle / Minuten-Intervalle 31 h/min Taste zum Uhrzeit einstellen: Werte ändern Bild B doppelseitig klebender Ring Wandhalter Gehäuse Herzlichen Dank für Ihr 2. Bestimmungsgemäßer Vertrauen! Gebrauch Wir gratulieren Ihnen zu Ihrer neuen elektri- Die elektrische Zahnbürste ist ausschließlich... -
Seite 7: Anweisungen Für Den Sicheren Betrieb
Anweisungen für den sicheren Betrieb Dieses Gerät kann von Kindern und von Personen mit reduzierten physischen, sensorischen oder mentalen Fähigkeiten oder Mangel an Erfahrung und/oder Wissen benutzt werden, wenn sie beauf- sichtigt oder bezüglich des sicheren Gebrauchs des Gerätes unter- wiesen wurden und die daraus resultierenden Gefahren verstanden haben. -
Seite 8: Gefahr Durch Batterien
in diesem Fall nicht mehr, sondern las- Um Gefährdungen zu vermeiden, neh- sen Sie diese von einer Fachwerkstatt men Sie keine Veränderungen am Ge- überprüfen. rät vor. Lassen Sie Reparaturen nur von einer Fachwerkstatt bzw. im Service- GEFAHR durch Center durchführen. Stromschlag Bei Verwendung eines Verlängerungs- Der Einbau einer Fehlerstromschutzein-... -
Seite 9: Lieferumfang
4. Lieferumfang Setzen Sie Batterien keinen extremen Bedingungen aus, legen Sie sie nicht Zahnbürste 11 auf Heizkörpern ab und setzen Sie sie Zahnbürsten-Aufsätze 3 nicht direkter Sonneneinstrahlung aus. Ladestation 16 Es besteht ansonsten erhöhte Auslaufge- Schutzkappe für Ladestation 12 fahr. Reiseetui 18 Tauschen Sie immer alle Batterien zur Netzadapter 24 gleichen Zeit aus. -
Seite 10: Uhrzeit Stellen (Bild A)
5.2 Uhrzeit stellen (Bild A) 5.4 Wandmontage 1. Hebeln Sie den Batteriefachdeckel 28 1. Bild B: Drücken Sie die Uhr 26 in das der Uhr 26 an der Vertiefung auf und Gehäuse. heben ihn ab. 2. Entfernen Sie eine Schutzfolie vom 2. Halten Sie die Taste 30 ca. 4 Sekun- Ring 32 und kleben diesen auf den den gedrückt. -
Seite 11: Bluetooth Einschalten
6. Ladestation Bluetooth einschalten 1. Schalten Sie die Zahnbürste 11 mit aufstellen dem Ein-/Ausschalter 7 ein und gleich wieder aus. GEFAHR von Stromschlag 2. Halten Sie die Taste P 8 ca. 3 Sekun- durch Feuchtigkeit! den gedrückt und drücken Sie zusätz- Die Ladestation 16 wird an die Netz- lich kurz den Ein-/Ausschalter 7. -
Seite 12: Zahnbürsten-Aufsätze
8. Zahnbürsten- Reiseetui 1. Legen Sie die ausgeschaltete Zahnbürs- Aufsätze te 11 in das Reiseetui 18. 2. Stecken Sie dem Mikro-USB-Stecker 25 Im Lieferumfang sind 8 Zahnbürsten-Aufsät- des Netzadapters 24 in die Mikro-USB- ze 3 enthalten. Buchse 22 am Reiseetui 18. Über die verschiedenfarbigen Markierungs- 3. Stecken Sie den Netzadapter 24 in ringe 4 können Sie die Zahnbürsten-Aufsät- eine geeignete Steckdose. -
Seite 13: Bedienen
9. Bedienen Modus Massage pulsierendes Bürsten zur Massage des Zahnfleisches VORSICHT: In den ersten Tagen der Verwendung ei- Modus Aufhellen ner elektrischen Zahnbürste kann es bei pulsierendes Bürsten zum Aufhellen der manchen Anwendern zu leichtem Zahn- Zähne fleischbluten kommen. Falls das Bluten Modus Zungenreinigung mehrere Tage andauert, ist ein Zahn- zur Reinigung der Zunge... -
Seite 14: Transport Auf Reisen
7. Schalten Sie die Zahnbürste mit dem 10.2 Reiseetui Ein-/Ausschalter 7 aus. Nehmen Sie Das Reiseetui 18 bietet Platz für die Zahn- den Bürstenkopf 1 erst aus dem Mund, bürste 11 und 2 Bürstenköpfe 1. wenn die Zahnbürste 11 ausgeschaltet ist. • Öffnen Sie das Reiseetui 18 durch Druck auf den Druckverschluss 20. -
Seite 15: Lagern
• Bild D: Nehmen Sie bei Bedarf das In- Dieses Recycling-Symbol mar- nenteil 19 des Reiseetuis 18 heraus. kiert z. B. einen Gegenstand Sie können dieses Innenteil in der Spül- oder Materialteile als für die maschine reinigen. Nach dem Trocknen Rückgewinnung wertvoll. Recy- setzen Sie das Innenteil am Dorn 21 an cling hilft, den Verbrauch von und legen es in das Reiseetui 18. -
Seite 16: Problemlösungen
11 einge- schaltet wird. 16. Technische Daten • Die Ladestation 16 oder der Netzadap- ter 24 sind nicht mit Modell: NZAOT 600 A1 dem Netz verbun- Ladekontroll- Zahnbürste leuchte 10 den. Schutzart: IPX4 • Das Reiseetui 18 ist leuchtet nicht. -
Seite 17: Allgemein
Hinweise zur EU-Konformitäts- Ladestation erklärung Netzspannung: 100 - 240 V ~ 50/60 Hz Hiermit erklärt die HOYER Handel GmbH, Leistung: 1,4 W dass dieses Produkt den grundlegenden An- Stand-by: 0,4 W forderungen der RE-Richtlinie 2014/53/EU sowie der ROHS-Richtlinie 2011/65/EU Schutzklasse: entspricht. -
Seite 18: Garantie Der Hoyer Handel Gmbh
17. Garantie der Garantieumfang Das Gerät wurde nach strengen Qualitäts- HOYER Handel GmbH richtlinien sorgfältig produziert und vor Aus- Sehr geehrte Kundin, sehr geehrter Kunde, lieferung gewissenhaft geprüft. Sie erhalten auf dieses Gerät 3 Jahre Ga- Die Garantieleistung gilt für Material- oder rantie ab Kaufdatum. -
Seite 19: Service-Center
• Sollten Funktionsfehler oder sonstige Män- Service-Center gel auftreten, kontaktieren Sie zunächst das nachfolgend benannte Service-Center telefonisch oder per E-Mail. Service Deutschland • Ein als defekt erfasstes Produkt können Tel.: 0800 5435 111 Sie dann unter Beifügung des Kaufbe- (kostenfrei) legs (Kassenbon) und der Angabe, wor- E-Mail: hoyer@lidl.de in der Mangel besteht und wann er... - Seite 20 Contents 1. Overview ..................19 2. Intended purpose ................20 3. Safety information ................. 20 4. Items supplied ................23 5. Clock with timer ................23 Inserting the Batteries................23 Setting the time (Figure A) ..............23 Setting up the clock ................24 Wall mounting..................
-
Seite 21: Overview
1. Overview Brush head Indicator bristles Toothbrush head (replaceable) Marking ring Peg of the toothbrush LED: lit white during Bluetooth connection / lit red when pressure too high On/off switch + transport lock for on and off switch Function button Function displays (illuminated): Massage Sensitive... -
Seite 22: Intended Purpose
Figure A Battery compartment 30 set Button for setting the time: switch to time format / hours / 10-minutes intervals / minute intervals 31 h/min Button for setting the time: change values Figure B Double-sided adhesive ring Wall mount Housing Thank you for your trust! 2. -
Seite 23: Instructions For Safe Operation
Instructions for safe operation This device can be used by children and people with restricted physical, sensory or intellectual abilities or people without ade- quate experience and/or understanding, if they are supervised or instructed on how to use this device and if they are aware of the re- sulting hazards. -
Seite 24: Danger From Batteries
DANGER! Risk of electric When using an extension cable, this must correspond to the applicable safe- shock ty regulations. The installation of a residual current de- vice with a nominal trip current not ex- ceeding 30 mA in the building wiring DANGER from batteries offers additional protection. -
Seite 25: Items Supplied
5. Clock with timer If battery acid has leaked, avoid con- tact with the skin, eyes and mucous membranes. In case of contact with the 5.1 Inserting the Batteries acid, rinse the affected area at once with plenty of clean water and seek medical assistance immediately. -
Seite 26: Setting Up The Clock
6. Press the button 30. The tens digit of Switching off Bluetooth the minutes flashes in the display 27. Switch off the Bluetooth connection e.g. if 7. Repeatedly press the button 31 to set you are not using the clock 26 and you wish the time in 10 minute intervals. -
Seite 27: Setting Up The Battery Charger
6. Setting up the battery Travel case 1. Place the switched-off toothbrush 11 charger into the travel case 18. 2. Insert the Micro USB plug 25 of the power adapter 24 into the Micro USB DANGER! Risk of electric port 22 of the travel case 18. shock due to moisture! 3. -
Seite 28: Toothbrush Heads
8. Toothbrush heads 9.1 Modes The toothbrush 11 has 6 different modes. The items supplied include 8 toothbrush Depending on the desired mode, press the heads 3. function button P 8 repeatedly when The various marking rings 4 allow you to as- switched on or off, until the corresponding sign the toothbrush heads 3 to different fam- symbol is lit: ily members. -
Seite 29: Brushing Teeth
9.2 Brushing teeth NOTES: 1. Remove the toothbrush 11 from the bat- • We recommend that you replace the tery charger 16. toothbrush heads 3 every 3 months or 2. Switch on the toothbrush using the on/ after infections (see “Ordering tooth- off switch 7. -
Seite 30: Cleaning / Hygiene Requirements
11. Cleaning / Hygiene 12. Storage requirements • Disconnect the device from the mains and store it in a dry location. DANGER! Risk of electric shock! 13. Disposal Before cleaning the battery charg- er 16, pull the mains plug 17 out from This product is subject to the the mains socket. -
Seite 31: Packaging
Batteries must not be disposed Possible causes / Ac- Fault of in the household waste. tion Used batteries must be dis- posed of properly. For this pur- • The battery charg- er 16 or power pose, corresponding battery- adapter 24 is not disposal containers are available at battery- Charging indi- selling retail and wholesale stores, as well... -
Seite 32: Technical Specifications
16. Technical Output Micro USB plug, 5 V specifications 1 2 3 4 5 PIN5 - PIN1 + Protection IP44 Model: NZAOT 600 A1 class: (protected against water Toothbrush splashes) Protection IPX4 Clock class: (protected against water Batteries: 2x LR03 AAA 1.5 V... -
Seite 33: Symbols Used
17. Warranty of the Symbols used HOYER Handel GmbH Double insulation Dear Customer, your device is provided with a 3 year war- Certified Safety. Devices must ranty starting with the purchase date. In the comply with the generally ac- event of product defects, you are entitled to knowledged rules of technology statutory rights against the vendor. -
Seite 34: Handling In Case Of A Warranty Claim
The warranty applies to material or factory At www.lidl-service.com you can download defects. this and many other manuals, product vide- os and installation software. Excluded from the warranty are wear parts subject to normal wear and damages to fragile parts, e.g. switches, batteries, lamps or other parts manufactured from glass. - Seite 35 Supplier Please note that the following address is no service address. First contact the afore- mentioned Service Centre. HOYER Handel GmbH Tasköprüstraße 3 DE-22761 Hamburg GERMANY...
- Seite 36 Sommaire 1. Aperçu de l'appareil ..............35 2. Utilisation conforme ..............36 3. Consignes de sécurité ..............36 4. Éléments livrés ................39 5. Réveil avec minuterie ..............40 Insertion des piles ................40 Régler l'heure (Figure A) ..............40 Installation du réveil ................. 40 Montage mural ................
-
Seite 37: Aperçu De L'appareil
1. Aperçu de l'appareil Tête de brossage Poils de brosse indicateurs Embout de brosse à dents (remplaçable) Anneau de repère Broche de la brosse à dents DEL : s'allume en blanc quand le Bluetooth est connecté / s'allume en rouge quand la pression est trop forte Interrupteur Marche/Arrêt + mise en marche et arrêt de la sécurité... -
Seite 38: Utilisation Conforme
Figure A Compartiment à piles 30 set Bouton de réglage de l'heure : commutation sur le format d'heure / heure / intervalle de 10 minutes / intervalle de minute 31 h/min Bouton de réglage de l'heure : modifier les valeurs Figure B Anneau adhésif biface Support mural... -
Seite 39: Instructions Pour Une Utilisation En Toute Sécurité
Instructions pour une utilisation en toute sécurité Cet appareil ne peut être utilisé ni par des enfants ni par des per- sonnes ayant des capacités physiques, sensorielles ou mentales ré- duites ou un manque d'expérience et/ou de connaissance que lorsqu'ils sont surveillés ou qu'ils ont été informés de l'utilisation sûre de l'appareil et ont compris les risques qui en résultent. - Seite 40 DANGER ! Risque présente des dommages visibles ou si l'appareil a subi une chute. d'électrocution en raison Raccordez la fiche secteur et l'adaptateur de l'humidité réseau uniquement à une prise de courant La brosse à dents, l'étui de voyage, conforme et facilement accessible, dont la l'adaptateur réseau, la station de re- tension correspond aux indications figu- chargement, le câble de raccordement...
-
Seite 41: Éléments Livrés
DANGER ! Risque lié à la Si de l'acide des piles a coulé, évitez tout contact avec la peau, les yeux et batterie les muqueuses. En cas de contact avec Protégez la batterie des dommages mé- l'acide, rincez immédiatement les caniques. -
Seite 42: Réveil Avec Minuterie
5. Réveil avec minuterie 6. Appuyez sur le bouton 30. A l'écran 27, l'emplacement de di- zaine de l'affichage des minutes cli- 5.1 Insertion des piles gnote. 7. Appuyez de nouveau sur le bouton 31 pour régler l'heure en intervalles de AVERTISSEMENT : risque de dom- 10 minutes. -
Seite 43: Mise En Marche/Arrêt De La Connexion Bluetooth
5.5 Mise en marche/arrêt 5.6 Affichages pendant le de la connexion Blue- brossage des dents tooth • Quand la connexion Bluetooth est éta- blie, la minuterie démarre automatique- La brosse à dents 11 est connectée au ré- ment au début du brossage des dents. veil 26 via Bluetooth. -
Seite 44: Recharger La Batterie
7. Recharger la batterie Étui de voyage 1. Rangez la brosse à dents 11 débran- chée dans l'étui de voyage 18. REMARQUES : 2. Branchez le petit connecteur micro • Chargez complètement la batterie USB 25 de l'adaptateur réseau 24 avant la première utilisation. dans le port micro USB 22 sur l'étui de •... -
Seite 45: Embouts De Brosse À Dents
8. Embouts de brosse à 9. Utilisation dents ATTENTION : La brosse neuve est fournie avec 8 embouts Lors des premiers jours d'utilisation de brosse à dents 3. d'une brosse à dents électrique, des sai- Les anneaux de repère 4 de différentes cou- gnements des gencives peuvent surve- leurs vous permettront d'attribuer les em- nir chez certaines personnes. -
Seite 46: Brossage Des Dents
ces intervalles de temps par une brève interruption. REMARQUE : si vous n'avez pas l'habitu- de d'utiliser une brosse à dents électrique et avez des gencives plutôt sensibles, ce mode REMARQUE : si la pression de la tête de peut être utilisé pendant 1 à 2 semaines puis brossage 1 sur les dents est trop forte, la il est possible de passer au mode normal. -
Seite 47: Étui De Voyage
• Désactiver la sécurité de transport : • Afin de préserver la fonction hygiénique Maintenez l'interrupteur des embouts de brosse à dents 3, vous Marche/Arrêt 7 enfoncé jusqu'à ce devez les rincer soigneusement et les que la DEL 6 clignote trois fois en laisser sécher. -
Seite 48: Élimination
13. Élimination mis à disposition dans les magasins vendant des piles ainsi dans les points de collecte Ce produit est soumis aux exi- municipaux. gences de la directive Les piles et les batteries marquées des lettres 2012/19/UE. Le symbole de suivantes contiennent, entre autres, les subs- la poubelle sur roues barrée si- tances nocives suivantes : Cd (cadmium),... -
Seite 49: Dépannage
14. Dépannage 15. Commander des embouts de brosse à Si votre appareil ne fonctionne pas correcte- dents ment, procédez dans un premier temps aux tests de cette liste de contrôle. Il s'agit peut- Vous pouvez commander les embouts de être seulement d'un problème mineur que brosse à... -
Seite 50: Caractéristiques Techniques
Entrée : 100 - 240 V ~ 50/60 Hz techniques 0,3 A Sortie Connecteur micro USB, Modèle : NZAOT 600 A1 , 1 A 1 2 3 4 5 PIN1 + PIN5 - Brosse à dents Indice de pro- IP44... -
Seite 51: Symboles Utilisés
17. Garantie de Symboles utilisés HOYER Handel GmbH Isolation de protection valable pour la France Geprüfte Sicherheit (sécurité contrôlée). Les appareils doivent Chère cliente, cher client, satisfaire aux Règles techniques Vous obtenez pour cet appareil une garantie reconnues en vigueur et être de 3 ans à... - Seite 52 Il répond également des défauts de confor- Article 1648 1er alinéa du Code mité résultant de l‘emballage, des instruc- civil tions de montage ou de l‘installation lorsque L‘action résultant des vices rédhibitoires doit celle-ci a été mise à sa charge par le contrat être intentée par l‘acquéreur dans un délai ou a été...
-
Seite 53: Etendue De La Garantie
Etendue de la garantie • Envoyez ensuite gratuitement à l’adresse de service qu’on vous a donnée le pro- L’appareil a été fabriqué selon des prescrip- duit considéré comme défectueux en y tions de qualité rigoureuses et a été vérifié joignant la preuve d’achat (ticket de minutieusement avant livraison. -
Seite 54: Garantie De Hoyer Handel Gmbh Valable Pour La Belgique
18. Garantie de Fournisseur HOYER Handel GmbH Attention ! L’adresse suivante n’est pas valable pour la une adresse de service. Contactez Belgique d’abord le centre de service cité plus haut. HOYER Handel GmbH Chère cliente, cher client, Tasköprüstraße 3 Vous obtenez pour cet appareil une garantie DE-22761 Hamburg de 3 ans à... - Seite 55 Etendue de la garantie • Envoyez ensuite gratuitement à l’adresse de service qu’on vous a donnée le pro- L’appareil a été fabriqué selon des prescrip- duit considéré comme défectueux en y tions de qualité rigoureuses et a été vérifié joignant la preuve d’achat (ticket de minutieusement avant livraison.
- Seite 56 Fournisseur Attention ! L’adresse suivante n’est pas une adresse de service. Contactez d’abord le centre de service cité plus haut. HOYER Handel GmbH Tasköprüstraße 3 DE-22761 Hamburg ALLEMAGNE...
- Seite 58 Inhoud 1. Overzicht ..................57 2. Correct gebruik ................58 3. Veiligheidsinstructies ..............58 4. Leveringsomvang ................61 5. Klok met timer ................62 Batterijen plaatsen ................62 Tijd instellen (afbeelding A) ............... 62 Klok plaatsen................... 62 Wandmontage ................62 Bluetooth-verbinding in-/uitschakelen..........63 Weergaven tijdens het tandenpoetsen ..........63 6.
-
Seite 59: Overzicht
1. Overzicht Borstelkop Indicatorborstels Tandenborstelopzetstuk (vervangbaar) Markeringsring Doorn van de tandenborstel LED: brandt wit bij Bluetooth-verbinding/brandt rood bij te hoge druk In-/uitschakelknop + transportbeveiliging in- en uitschakelen Functietoets Functieweergaven (brandt): Massage Gevoelig Normaal Dieptereiniging Oplichten Tongreiniging Oplaadcontrolelampje Tandenborstel Beschermkapje voor laadstation Doorn voor tandenborstelopzetstuk Standaard voor tandenborstelopzetstukken Doorn van het laadstation... -
Seite 60: Correct Gebruik
Afbeelding A Batterijvak 30 set Toets voor het instellen van de tijd: overschakelen naar tijdsnotatie/uren/ 10 minuten-intervallen/minuten-intervallen 31 h/min Toets voor het instellen van de tijd: waarden wijzigen Afbeelding B Dubbelzijdig klevende ring Wandhouder Behuizing Hartelijk dank voor uw 2. Correct gebruik vertrouwen! De elektrische tandenborstel is uitsluitend Gefeliciteerd met uw nieuwe elektrische tan-... - Seite 61 Instructies voor een veilig gebruik Dit apparaat kan door kinderen en personen met verminderde fy- sieke, sensorische of mentale vaardigheden, of met een gebrek aan ervaring en/of kennis gebruikt worden, wanneer ze onder toezicht staan of instructies over het veilige gebruik van het appa- raat gekregen hebben en de daarmee gepaard gaande risico’s be- grepen hebben.
- Seite 62 GEVAAR van een eenkomt met de gegevens op het typepla- atje. Het stopcontact moet ook na het elektrische schok door aansluiten gemakkelijk toegankelijk blij- vocht ven. De tandenborstel, de reisetui, de Laad het handdeel van de tandenbor- stroomadapter, het laadstation, het ne- stel alleen op met het meegeleverde taansluitsnoer en de stekker mogen niet laadstation of in de reisetui.
-
Seite 63: Gevaar Door Batterijen
LET OP GEVAAR door batterijen In de eerste paar dagen van het ge- bruik van een elektrische tandenborstel Let bij het plaatsen van de batterijen op kan het tandvlees van sommige gebrui- de juiste polariteit. Vervang de batterij kers licht bloeden. Als het bloeden alleen door dezelfde batterij of door meerdere dagen aanhoudt, moet u een een gelijkwaardig type. -
Seite 64: Klok Met Timer
5. Klok met timer 6. Druk op de toets 30. Op het dis- play 27 knippert de minutenweergave met 10 minuten. 5.1 Batterijen plaatsen 7. Druk opnieuw op de toets 31 om de tijd in 10 minuten-intervallen in te stel- len. WAARSCHUWING voor materiële 8. -
Seite 65: Bluetooth-Verbinding In-/Uitschakelen
5.5 Bluetooth-verbinding 5.6 Weergaven tijdens het in-/uitschakelen tandenpoetsen De tandenborstel 11 is via Bluetooth ver- • Als de Bluetooth-verbinding is ingescha- keld, start de timer automatisch bij het bonden met de klok 26. Bij levering is deze begin van het tandenpoetsen. verbinding ingeschakeld. •... -
Seite 66: Accu Opladen
7. Accu opladen 4. Leg de uitgeschakelde tandenbor- stel 11 in de reisetui. Een segment van het oplaadcontrole- AANWIJZINGEN: lampje 10 knippert gedurende het vol- • Laad de accu vóór het eerste gebruik ledige oplaadproces wit. Brandende volledig op. segmenten van het oplaadcontrolelamp- •... -
Seite 67: Bedienen
• De indicatorborstels 2 van de borstel- 9.1 Modi kop 1 verliezen bij gebruik langzaam De tandenborstel 11 beschikt over 6 ver- hun kleur. Dit kleurverlies laat zien, schillende modi. Afhankelijk van de modus wanneer het tandenborstelopzetstuk 3 drukt u in de ingeschakelde of uitgeschakel- dient te worden vervangen. -
Seite 68: Tanden Poetsen
9.2 Tanden poetsen AANWIJZINGEN: 1. Pak de tandenborstel 11 van het laad- • Wij raden aan om de tandenborstelop- station 16. zetstukken 3 elke 3 maanden of na in- 2. Schakel de tandenborstel in met de in-/ fecties te vervangen (zie “Tandenborste- uitschakelknop 7. -
Seite 69: Reinigen/Hygiëne-Eisen
11. Reinigen/hygiëne- 12. Opbergen eisen • Onderbreek de stroomtoevoer naar het apparaat en berg het droog op. GEVAAR door een elektrische schok! 13. Weggooien Trek vóór elke schoonmaakbeurt van het laadstation 16 de stekker 17 uit het Dit product valt onder de Euro- stopcontact. -
Seite 70: Problemen Oplossen
Batterijen mogen niet bij het Mogelijke oorzaken / Storing huisvuil worden gegooid. Lege maatregelen batterijen moeten op de juiste • Het laadstation 16 of wijze worden afgevoerd. Voor de stroomadap- dat doel staan bij winkels die ter 24 zijn niet met batterijen verkopen en bij gemeentelijke in- Oplaadcontro- zamelpunten desbetreffende bakken om de... -
Seite 71: Technische Gegevens
16. Technische gegevens Beschermings- IP44 graad: (beschermd tegen spatwa- Model: NZAOT 600 A1 ter) Tandenborstel Klok Beschermings- IPX4 Batterijen: 2x LR03 AAA 1,5 V graad: (beschermd tegen spatwa- Bluetooth ter) Frequentiebe- Accu: 1x 3,7 V li-ion reik: 2402 - 2480 MHz... -
Seite 72: Gebruikte Symbolen
17.Garantie van Gebruikte symbolen HOYER Handel GmbH Randaarde Geachte klant, U heeft op dit apparaat 3 jaar garantie van- Geteste veiligheid. Apparaten af de koopdatum. Wanneer dit product on- moeten aan de algemeen erken- volkomenheden vertoont, heeft u wettelijke de regels van de techniek vol- rechten ten opzichte van de verkoper van doen en zijn conform de Wet het product. -
Seite 73: Omvang Van De Garantie
Omvang van de garantie • Wanneer zich functiestoringen of ande- re onvolkomenheden voordoen, neemt u Het apparaat werd zorgvuldig geproduceerd eerst telefonisch of per e-mail con- volgens strenge kwaliteitsrichtlijnen en nauw- tact op met het hierna genoemde ser- gezet gecontroleerd vóór levering. vicecenter. - Seite 74 Leverancier Let erop, dat het onderstaande adres geen serviceadres is. Neem eerst contact op met het bovengenoemde servicecenter. HOYER Handel GmbH Tasköprüstraße 3 DE-22761 Hamburg DUITSLAND...
- Seite 76 Spis treści 1. Przegląd..................75 2. Użytkowanie zgodne z przeznaczeniem.......... 76 3. Wskazówki bezpieczeństwa ............76 4. Zakres dostawy ................80 5. Zegar z wyłącznikiem czasowym ........... 80 Wkładanie baterii................80 Ustawianie godziny (rysunek A)............. 80 Umieszczanie zegara................81 Montaż na ścianie ................81 Włączanie/wyłączanie połączenia Bluetooth .........
-
Seite 77: Przegląd
1. Przegląd Główka szczoteczki Wskaźnik zużycia Końcówka do szczoteczki do zębów (wymienna) Kolorowy pierścień Trzpień szczoteczki do zębów Dioda LED: świeci się na biało w przypadku połączenia Bluetooth / świeci się na czerwono w przypadku zbyt wysokiego ciśnienia Włącznik/wyłącznik + włączanie i wyłączanie zabezpieczenia transporto- wego Przycisk funkcyjny Wskaźniki funkcyjne (podświetlane):... -
Seite 78: Użytkowanie Zgodne Z Przeznaczeniem
Rysunek A Komora na baterie 30 set Przycisk do ustawiania godziny: Przełączenie na format czasu / godziny / 10-minutowe odstępy czasowe / odstępy minutowe 31 h/min Przycisk do ustawiania godziny: zmiana wartości Rysunek B Dwustronny pierścień samoprzylepny Uchwyt ścienny Obudowa Dziękujemy za Państwa 2. - Seite 79 Wskazówki dotyczące bezpiecznego użytkowania Urządzenie może być używane przez dzieci i osoby o ograniczo- nej sprawności fizycznej, sensorycznej lub umysłowej bądź przez osoby nieposiadające wystarczającego doświadczenia lub wie- dzy, jeżeli są nadzorowane przez inne osoby lub zostaną poin- struowane w zakresie bezpiecznego używania urządzenia i zrozumieją...
- Seite 80 NIEBEZPIECZEŃSTWO Wtyczkę sieciową i zasilacz należy pod- łączyć do prawidłowo zainstalowanego, porażenia prądem łatwo dostępnego gniazdka, którego na- spowodowanego wilgocią pięcie jest zgodne z parametrami poda- Szczoteczki do zębów, etui podróżne- nymi na tabliczce znamionowej. go, zasilacza sieciowego, ładowarki, Gniazdko musi być łatwo dostępne rów- przewodu zasilającego i wtyczki nie nież...
- Seite 81 NIEBEZPIECZEŃSTWO ze Baterii nie należy narażać na ekstre- malne warunki, układać na grzejni- strony akumulatorów kach, narażać na bezpośrednie Akumulatory należy chronić przed działanie promieni słonecznych. Może uszkodzeniami mechanicznymi. to zwiększyć ryzyko wycieku z baterii. Niebezpieczeństwo wystąpie- Wszystkie baterie należy wymieniać nia pożaru! jednocześnie.
-
Seite 82: Zakres Dostawy
4. Zakres dostawy 2. Wymienić w razie potrzeby stare bate- rie na nowe. Należy zwrócić uwagę szczoteczka do zębów 11 na rysunek przedstawiający orientację końcówki do szczoteczki do zę- baterii na spodzie komory na bate- bów 3 rie 29. ładowarka 16 3. Nałożyć i docisnąć pokrywę komory osłona stacji ładującej 12 na baterię 28 zegara 26. -
Seite 83: Umieszczanie Zegara
5.3 Umieszczanie zegara Włączanie połączenia Bluetooth 1. Włączyć szczoteczkę do zębów 11 za 1. Rys. B: Wcisnąć zegar 26 do obudo- pomocą Włącznika/Wyłącznika 7 i w ten sam sposób wyłączyć. 2. Umieścić zegar 26 na poziomej po- 2. Nacisnąć i przytrzymać przycisk P 8 wierzchni. -
Seite 84: Ustawianie Ładowarki
6. Ustawianie W trakcie całej procedury ładowania kontrolka 10 miga w kolorze białym. ładowarki Podświetlane segmenty wskaźnika łado- wania sygnalizują postęp procesu łado- wania. Gdy bateria jest w pełni NIEBEZPIECZEŃSTWO pora- naładowana, najpierw zapalają się żenia prądem spowodowane wszystkie segmenty kontrolki ładowa- wilgocią! nia 10, a następnie wygasają. -
Seite 85: Końcówki Do Szczoteczki Do Zębów
9. Obsługa Kontrolka ładowania 10 miga w kolo- rze czerwonym: Akumulator jest słaby. Naładować akumulator. OSTROŻNIE: W ciągu pierwszych dni stosowania elektrycznej szczoteczki do zębów u 8. Końcówki do niektórych użytkowników może wystą- szczoteczki do pić lekkie krwawienie dziąseł. Jeżeli zębów krwawienie trwa wiele dni, należy udać... -
Seite 86: Mycie Zębów
9.2 Mycie zębów WSKAZÓWKA: Z tego trybu można ko- 1. Zdjąć szczoteczkę do zębów 11 z ła- rzystać w pierwszym tygodniu lub podczas dowarki 16. pierwszych dwóch tygodni w przypadku 2. Włączyć szczoteczkę do zębów za po- niestosowania nigdy wcześniej elektrycznej mocą Włącznika/Wyłącznika 7. -
Seite 87: Transport Podczas Podróży
10.2 Etui podróżne WSKAZÓWKI: Etui podróżne 18 zapewnia miejsce na • Zalecana jest wymiana końcówek do szczoteczkę do zębów 11 i 2 głowice szczoteczki do zębów 3 co 3 miesiące szczoteczki 1. lub po przebytych infekcjach (patrz „Zamawianie końcówek do szczoteczki • Otworzyć etui podróżne 18, dociska- do zębów”... -
Seite 88: Przechowywanie
• Rys. D: W razie potrzeby należy wy- punktu utylizacyjnego można uzyskać np. w jąć wewnętrzną część 19 etui podróż- urzędzie miasta lub na żółtych stronach. nego 18. Można myć tę wewnętrzną Użytego w urządzeniu akumu- część w zmywarce do naczyń. Po wy- latora nie wolno wyrzucać... -
Seite 89: Rozwiązywanie Problemów
14. Rozwi zywanie Mo liwe przyczyny/ Usterka problemów dzia ania • Po czenie Bluetooth Je eli urz dzenie nie b dzie prawid owo jest wy czone. Naci- dzia a , nale y sprawdzi poni sz list . i przytrzyma Mo e si okaza , e przyczyn jest niewiel- przycisk P 8 przez ki problem, który u ytkownik mo e rozwi - ok. -
Seite 90: Dane Techniczne
16. Dane techniczne Stopień ochro- IP44 (zabezpieczenie przed Model: NZAOT 600 A1 wodą natryskową) Szczoteczka do zębów Zegar Stopień ochro- IPX4 Baterie: 2x LR03 AAA 1,5 V (zabezpieczenie przed Bluetooth wodą natryskową) Zakres często- Akumulator: 1x 3,7 V litowo-jono- tliwości: 2402–2480 MHz... -
Seite 91: Gwarancja Firmy Hoyer Handel Gmbh
17. Gwarancja firmy U yte symbole HOYER Handel GmbH Izolacja ochronna Drogi Kliencie, Na niniejsze urz dzenie jest udzielana 3 -let- Geprüfte Sicherheit (Potwierdzo- nia gwarancja obowi zuj ca od dnia jego ne Bezpiecze stwo) Urz dzenia zakupu. W przypadku usterek niniejszego musz spe nia wymagania ogól- produktu kupuj cemu przys uguj wobec nych zasad techniki i ustawy o... -
Seite 92: Zakres Gwarancji
tychmiast po rozpakowaniu produktu. Postępowanie w przypadku Naprawy dokonywane po upływie okresu gwarancji obowiązywania gwarancji płatne. Aby zapewnić szybkie załatwienie zgłasza- nego przypadku, należy stosować się do Zakres gwarancji poniższych wskazówek: Urządzenie wyprodukowano zgodnie suro- • W przypadku wszystkich zapytań nale- wymi przepisami dotyczącymi jakości i do- ży mieć... -
Seite 93: Centrum Serwisowe
Pos uguj c si tym kodem QR mo na przej bezpo rednio do strony marki Lidl (www.lidl-service.com) i otworzy instrukcj obs ugi, wprowadzaj c numer artyku u (IAN) 321713_1901. Centrum Serwisowe Serwis Polska Tel.: 22 397 4996 E-Mail: hoyer@lidl.pl IAN: 321713_1901 Dostawca Nale y pami ta , e poni szy adres nie jest adresem serwisu. - Seite 94 Obsah 1. Přehled ..................93 2. Použití k určenému účelu ............... 94 3. Bezpečnostní pokyny ..............94 4. Rozsah dodávky ................97 5. Hodiny s časovačem ..............97 Vložení baterií ..................97 Nastavení času (obrázek A) ..............97 Postavení hodin .................. 98 Připevnění...
-
Seite 95: Přehled
1. Přehled Hlavice kartáčku Indikátorové štětiny Nástavec zubního kartáčku (vyměnitelný) Označující kroužek Trn zubního kartáčku LED: svítí bíle při spojení Bluetooth / svítí červeně při příliš vysokém tlaku Vypínač + zapnutí a vypnutí cestovní pojistky Funkční tlačítko Ukazatele funkcí (osvícené): Masáž... -
Seite 96: Děkujeme Za Vaši Důvěru
Obrázek A Přihrádka na baterie 30 set Tlačítko k nastavení času: Přepnutí na časový formát / hodiny / 10minutové intervaly / minutové intervaly 31 h/min Tlačítko k nastavení času: Změna hodnot Obrázek B Oboustranně lepicí kroužek Držák na stěnu Kryt Děkujeme za vaši důvěru! 2. - Seite 97 Pokyny pro bezpečný provoz Tento přístroj smí používat děti a osoby s omezenými fyzickými, senzorickými nebo duševními schopnostmi nebo osoby, které ne- mají dostatek zkušeností anebo znalostí, pouze pod dohledem nebo pokud byly poučeny, jak přístroj bezpečně používat, a po- chopily, jaké...
-
Seite 98: Elektrickým Proudem
NEBEZPEČÍ úrazu NEBEZPEČÍ v souvislosti s elektrickým proudem baterií Zabudování proudového chrániče se Chraňte baterii před mechanickým po- jmenovitým vybavovacím proudem ne škozením. Nebezpečí požáru! větším než 30 mA ve vnitřním rozvodu Nevystavujte přístroj přímému sluneční- poskytne dodatečnou ochranu. mu záření nebo vysokým teplotám. Obraťte se na vašeho elektroinstalaté- Okolní... -
Seite 99: Rozsah Dodávky
5. Hodiny s časovačem Baterie musí být po použití řádně zlikvi- dovány. POZOR 5.1 Vložení baterií V prvních dnech používání elektrického zubního kartáčku může dojít u někte- VÝSTRAHA před věcnými škodami! rých uživatelů ke krvácení dásní. V pří- Respektujte při vložení baterií správnou padě, že krvácení... -
Seite 100: Postavení Hodin
8. Stiskněte tlačítko 30. Na displeji 27 5.5 Zapnutí/vypnutí spojení bliká místo jednotek zobrazení minut. Bluetooth 9. Pro nastavení hodin v minutových inter- Zubní kartáček 11 je propojen s hodina- valech stiskněte opakovaně tlačítko 31. mi 26 pomocí Bluetooth. Při dodání je toto 10. Stiskněte tlačítko 30. Čas je nyní nasta- spojení... -
Seite 101: Postavení Nabíjecího Stojanu
6. Postavení nabíjecího Cestovní pouzdro 1. Vložte vypnutý zubní kartáček 11 do stojanu cestovního pouzdra 18. 2. Zasuňte micro USB konektor 25 síťové- ho adaptéru 24 do zdířky micro NEBEZPEČÍ úrazu elektrickým USB 22 na cestovním pouzdře 18. proudem kvůli vlhkosti! 3. Síťový adaptér 24 zasuňte do vhodné Nabíjecí... -
Seite 102: Nástavce Zubního Kartáčku
8. Nástavce zubního 9.1 Režim kartáčku Zubní kartáček 11 má 6 různých režimů. Podle požadovaného režimu stiskněte více- V rozsahu dodávky je obsaženo 8 nástavců krát funkční tlačítko P 8 v zapnutém nebo zubního kartáčku 3. vypnutém stavu, dokud nesvítí odpovídající Různobarevnými označujícími kroužky 4 symbol: můžete nástavce zubního kartáčku 3 rozlišit pro členy rodiny. -
Seite 103: Čištění Zubů
10. Přeprava na cestách 9.2 Čištění zubů 1. Vezměte zubní kartáček 11 z nabíjecí- 10.1 Cestovní pojistka ho stojanu 16. 2. Zubní kartáček zapněte vypínačem 7. Abyste zabránili bezděčnému zapnutí zub- 3. Stiskněte opakovaně funkční tlačítko ního kartáčku 11, aktivujte cestovní pojist- P 8, dokud nesvítí ukazatel funkcí 9 požadovaného režimu. -
Seite 104: Čištění / Požadavky Na Hygienu
11. Čištění / požadavky 12. Uskladnění na hygienu • Vytáhněte přístroj ze zásuvky a skladuj- te ho v suchu. NEBEZPEČÍ úrazu elektrickým proudem! 13. Likvidace Před každým čištěním nabíjecího stoja- nu 16 vytáhněte síťovou zástrčku 17 Tento výrobek podléhá evrop- ze zásuvky. ské... -
Seite 105: Řešení Problémů
účel jsou k dispozici odpovídající nádoby Možné p íčiny/opat- Chyba pro likvidaci baterií v obchodech s baterie- ení mi a v komunálních sběrných dvorech. Baterie a akumulátory, které jsou označeny • Spojení Bluetooth je vypnuté. Držte tlačít- těmito písmeny, obsahují mj. tyto škodliviny: ko P 8 cca Cd (kadmium), Hg (rtuť), Pb (olovo). -
Seite 106: Technické Parametry
16. Technické parametry Hodiny Baterie: 2x LR03, AAA, 1,5 V Model: NZAOT 600 A1 Zubní kartáček Bluetooth Stupeň ochra- IPX4 Frekvenční ob- (chráněna proti stříkající last: 2402–2480 MHz vodě) Přenos výkonu: - 3,4 dBm Akumulátor: 1x 3,7 V lithium-ion- Obecně... -
Seite 107: Záruka Společnosti Hoyer Handel Gmbh
17. Záruka spole nosti Použité symboly HOYER Handel GmbH Ochranná izolace Vážená zákaznice, vážený zákazníku, na tento přístroj jste získali 3 letou záruku Testovaná Bezpečnost. Přístroje od data nákupu. V případě vad tohoto vý- musí vyhovovat obecně uznáva- robku vám vůči prodávajícímu náleží zákon- ným normám techniky a souhlasit ná... - Seite 108 Ze záruky jsou vyloučeny díly pod- Na www.lidl-service.com si můžete stáhnout léhající rychlému opot ebení, které tento a mnoho dalších manuálů, produktová jsou vystaveny běžnému opot ebe- videa a instalační software. ní, a poškození k ehkých díl , nap . vypínač...
- Seite 110 Obsah 1. Prehľad ..................109 2. Účel použitia................. 110 3. Bezpečnostné pokyny ..............110 4. Rozsah dodávky................113 5. Hodiny s časovačom ..............113 Vloženie batérií ................113 Nastavenie času (obrázok A) ............. 113 Nastavenie hodín ................114 Nástenná montáž ................114 Zapnutie/vypnutie pripojenia Bluetooth ..........
-
Seite 111: Prehľad
1. Prehľad Kefková hlavica Štetiny indikátora Nadstavec zubnej kefky (vymeniteľná) Značkovací krúžok Tŕň zubnej kefky LED: svieti nabielo pri existujúcom pripojení Bluetooth/načerveno pri príliš vysokom tlaku Zapínač/vypínač + zapnutie a vypnutie prepravnej poistky Funkčné tlačidlo Funkčné indikátory (osvetlené): Masáž Citlivé Normálne Hĺbkové... -
Seite 112: Ďakujeme Vám Za Dôveru
Obrázok A Priečinok na batérie 30 set Tlačidlo na nastavenie času: Prepnutie na formát času/hodiny/10-minútové intervaly/minútové intervaly 31 h/min Tlačidlo na nastavenie času: Zmena hodnôt Obrázok B Obojstranne lepiaci krúžok Nástenný držiak Kryt Ďakujeme vám za dôveru! 2. Účel použitia Gratulujeme vám k novej elektrickej zubnej Elektrická... - Seite 113 Pokyny pre bezpečnú prevádzku Tento prístroj môžu používať deti a osoby s obmedzenými fyzický- mi, zmyslovými alebo mentálnymi schopnosťami alebo s nedostat- kom skúseností a/alebo vedomostí, ak sú pod dozorom alebo ak boli poučené o bezpečnom používaní prístroja a pochopili riziká, ktoré...
- Seite 114 NEBEZPEČENSTVO v NEBEZPEČENSTVO v dôsledku zásahu dôsledku akumulátorov elektrickým prúdom Akumulátor chráňte pred mechanickým poškodením. Nebezpečenstvo po- Montáž ochranného prúdového zaria- žiaru! denia s menovitým vypínacím prúdom Prístroj nikdy nevystavujte priamemu sl- max. 30 mA v domovej inštalácii ponú- nečnému žiareniu alebo horúčave. Tep- ka dodatočnú...
-
Seite 115: Rozsah Dodávky
5. Hodiny s časovačom Batérie sa musia po použití odborne zlikvidovať. POZOR 5.1 Vloženie batérií Počas prvých dní používania elektrickej zubnej kefky sa u niektorých používate- VÝSTRAHA pred vecnými škodami! ľov môže objaviť mierne krvácanie ďa- Pri vkladaní batérií dbajte na správnu sien. -
Seite 116: Nastavenie Hodín
7. Znovu stlačte tlačidlo 31, aby ste mohli 5.5 Zapnutie/vypnutie pri- nastaviť čas v 10-minútových interva- pojenia Bluetooth loch. Zubná kefka 11 je cez Bluetooth prepojená 8. Stlačte tlačidlo 30. Na displeji 27 bli- s hodinami 26. Pri dodaní je toto pripojenie ká miesto jednotiek zobrazenia minút. zapnuté. -
Seite 117: Umiestnenie Nabíjacej Stanice
• Na displeji 27 sa počas čistenia zubov ce segmenty kontrolky nabíjania zobrazuje symbol aktívneho režimu. zobrazujú pokrok nabíjania. Keď je • Po 2 minútach zobrazí displej 27 smaj- akumulátor plne nabitý, najskôr svietia líka. všetky segmenty kontrolky nabíjania 10 a potom zhasnú. Cestovné... -
Seite 118: Nadstavce Zubných Kefiek
8. Nadstavce zubných 9.1 Režimy kefiek Zubná kefka 11 disponuje 6 rôznymi reži- mami. Podľa toho, aký režim si želáte, stlač- Súčasťou dodávky sú 8 nadstavce zubných te viackrát funkčné tlačidlo P 8 na zapnutej kefiek 3. alebo vypnutej zubnej kefke, kým sa neroz- Na značkovacie krúžky 4 môžete umiestniť... -
Seite 119: Preprava Pri Cestovaní
10. Preprava pri 5. Navlhčte štetiny, naneste zubnú pastu a zubnú kefku 11 zapnite znovu až vtedy, cestovaní keď máte hlavicu kefky 1 v ústach. 6. Veďte hlavičku kefky 1 bez prílišného 10.1 Prepravná poistka tlaku pomaly od zubu k zubu. Dôklad- ne pritom očistite celý povrch zubov, Na zaistenie zubnej kefky 11 proti neúmy- vnútornú... -
Seite 120: Čistenie/Požiadavky Na Hygienu
11. Čistenie/požiadavky 12. Skladovanie na hygienu • Prístroj odpojte od siete a skladujte v su- chu. NEBEZPEČENSTVO v dôsledku zásahu elektrickým prúdom! 13. Likvidácia Pred každým čistením nabíjacej stani- ce 16 vytiahnite zástrčku 17 zo zásuv- Tento produkt podlieha európ- skej smernici Pred každým čistením cestovného 2012/19/EÚ. -
Seite 121: Riešenia Problémov
Batérie sa nesmú vyhadzovať Možné príčiny/opat- Chyba do komunálneho odpadu. Pou- renia žité batérie musia byť likvido- vané v súlade s príslušnými • Nabíjaciu stani- cu 16 alebo sieťový predpismi. Na to sú adaptér 24 nepripá- k dispozícii vhodné nádoby na likvidáciu Kontrolka nabí- batérií... -
Seite 122: Technické Údaje
16. Technické údaje Druh krytia: IP44 (ochrana proti striekajúcej Model: NZAOT 600 A1 vode) Zubná kefka Hodiny Druh krytia: IPX4 Batérie: 2x LR03 AAA 1,5 V (ochrana proti striekajúcej Bluetooth vode) Frekvenčný roz- Akumulátor: 1x 3,7 V lítiovo-ióno- sah: 2402 – 2480 MHz vý... -
Seite 123: Záruka Spoločnosti Hoyer Handel Gmbh
17. Záruka spolo nosti Použité symboly HOYER Handel GmbH Ochranná izolácia Vážená zákazníčka, vážený zákazník, na tento prístroj sa vzťahuje záruka 3 roky Overená bezpečnosť. Prístroje od dátumu kúpy. V prípade výskytu nedo- musia zodpovedať všeobecne statkov tohto výrobku máte voči predajcovi uznávaným pravidlám techniky a výrobku zákonom stanovené... -
Seite 124: Servisné Stredisko
Záruka sa nevzťahuje na namáhané Na www.lidl-service.com si môžete stiahnuť diely, ktoré sú vystavené normálne- túto a alšie príručky, produktové videá a in- mu opotrebeniu, na poškodenia štalačný softvér. krehkých dielov, napr. spínačov, ba- térií, osvet ovacích prostriedkov ale- bo iných dielov vyrobených zo skla. Táto záruka zaniká, ak bol výrobok poškode- ný... - Seite 125 ...