Nevadent NZAOD 600 A1 Bedienungsanleitung
Vorschau ausblenden
Andere Handbücher für NZAOD 600 A1:
- Bedienungsanleitung (89 Seiten) ,
- Bedienungsanleitung (53 Seiten) ,
- Bedienungsanleitung (65 Seiten)
Inhaltsverzeichnis
Werbung
Verfügbare Sprachen
Verfügbare Sprachen
Quicklinks
HOYER Handel GmbH
Tasköprüstraße 3
DE-22761 Hamburg
GERMANY
Versione delle informazioni · Status of information · Stand der Informationen:
11/2019
ID: NZAOD 600 A1_19_V1.2
IAN 332855_1907
CEPILLO DENTAL ELÉCTRICO NZAOD 600 A1
SPAZZOLINO ELETTRICO NZAOD 600 A1
IT
SPAZZOLINO ELETTRICO
Manuale di istruzioni per l'uso
GB
ELECTRIC TOOTHBRUSH
Operating instructions
DE
AT
CH
ELEKTRISCHE ZAHNBÜRSTE
Bedienungsanleitung
IAN 332855_1907
IT
IT
Werbung
Kapitel
Inhaltsverzeichnis

Verwandte Anleitungen für Nevadent NZAOD 600 A1


Inhaltszusammenfassung für Nevadent NZAOD 600 A1
- Seite 1 CEPILLO DENTAL ELÉCTRICO NZAOD 600 A1 SPAZZOLINO ELETTRICO NZAOD 600 A1 SPAZZOLINO ELETTRICO HOYER Handel GmbH Manuale di istruzioni per l'uso Tasköprüstraße 3 DE-22761 Hamburg GERMANY ELECTRIC TOOTHBRUSH Operating instructions Versione delle informazioni · Status of information · Stand der Informationen: ELEKTRISCHE ZAHNBÜRSTE...
- Seite 2 Italiano ..................2 English ................... 16 Deutsch .................. 30...
- Seite 3 Panoramica / Overview / Übersicht...
-
Seite 4: Inhaltsverzeichnis
Indice 1. Panoramica ...................3 2. Uso conforme ................4 3. Istruzioni per la sicurezza ..............4 4. Materiale in dotazione ..............6 5. Posizionamento della stazione di carica .........6 6. Caricamento della batteria .............7 7. Testine ...................7 8. Funzionamento ................8 Modalità ................... 8 Pulizia dei denti ................. -
Seite 5: Panoramica
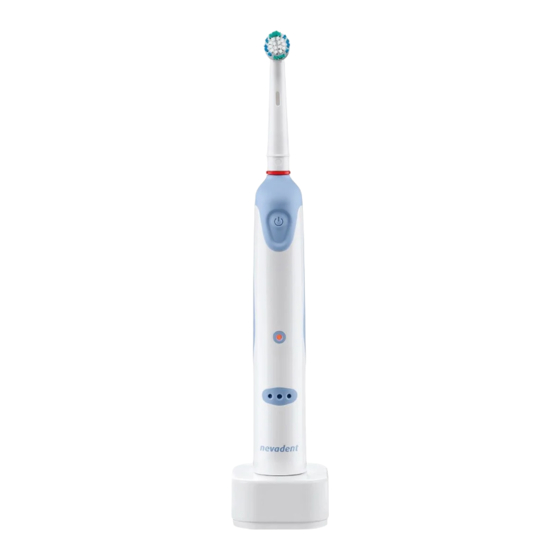
1. Panoramica Cappuccio protettivo per la testina Estremità con le setole Testina (sostituibile) Anello di marcatura Spinotto dello spazzolino Spazzolino Elementi di comando Spinotto della stazione di carica Stazione di carica Cavo di collegamento alla rete e spina Figura A: elementi di comando Interruttore on/off + attivazione e disattivazione sicura per il trasporto Spia di controllo carica LED rosso: modalità... -
Seite 6: Uso Conforme
Vi ringraziamo della vo- 2. Uso conforme stra fiducia! Lo spazzolino elettrico è destinato esclusiva- Congratulazioni per l'acquisto del vostro mente alla pulizia dei denti e all’igiene ora- nuovo spazzolino elettrico. le umana. Per un impiego sicuro dell'apparecchio e L'apparecchio è stato ideato per l'uso dome- per conoscerne tutto il ventaglio di presta- stico. - Seite 7 Istruzioni per un impiego sicuro Questo apparecchio può essere utilizzato da bambini e da perso- ne con ridotte capacità fisiche, sensoriali o mentali o con esperien- za e conoscenza inadeguate, solo se supervisionati o istruiti sull'utilizzo sicuro dell'apparecchio e se hanno compreso i rischi che ne derivano.
-
Seite 8: Materiale In Dotazione
Collegare la spina solo ad una presa di ATTENZIONE corrente correttamente installata e facil- Nei primi giorni di utilizzo di uno spaz- mente accessibile la cui tensione coincida zolino elettrico alcuni utilizzatori posso- con quella indicata sulla targhetta di omo- no sperimentare una leggera logazione. -
Seite 9: Caricamento Della Batteria
6. Caricamento della 7. Testine batteria Il materiale in dotazione comprende 4 testi- ne 3. Gli anelli di marcatura 4 di colore diverso NOTE: permettono di assegnare le testine 3 per • Caricare completamente la batteria pri- spazzolino da denti ai vari membri della fa- ma del primo utilizzo. -
Seite 10: Funzionamento
8. Funzionamento 8.2 Pulizia dei denti 1. Togliere lo spazzolino 6 dalla stazione di carica 9. ATTENZIONE: 2. Inumidire le setole, applicarvi dentifri- Nei primi giorni di utilizzo di uno spaz- cio e accendere lo spazzolino 6 solo zolino elettrico alcuni utilizzatori posso- quando l'estremità... -
Seite 11: Trasporto In Viaggio
9. Trasporto in viaggio 10. Pulizia / requisiti di igiene 9.1 Sicura per il trasporto Per impedire l’accensione involontaria dello PERICOLO di scossa elettrica! spazzolino 6, attivare la sicura per il tra- Prima di qualsiasi intervento di pulizia sporto. della stazione di carica 9, staccare la •... -
Seite 12: Smaltimento
12. Smaltimento 13. Risoluzione dei problemi Questo prodotto è soggetto alla Direttiva europea Qualora l'apparecchio non funzioni corret- 2012/19/UE. Il simbolo del tamente, scorrere il seguente elenco di con- bidone della spazzatura su trollo, poiché l'anomalia di funzionamento ruote barrato significa che potrebbe essere dovuta a un piccolo proble- all’interno dell’Unione Europea il prodotto ma che l'utente è... -
Seite 13: Ordinazione Di Testine
14. Ordinazione di 15. Dati tecnici testine Modello: NZAOD 600 A1 È possibile ordinare le testine 3 su internet: Tensione di rete: 100-240 V ~ 50/60 Hz Classe di prote- shop.hoyerhandel.com zione: Potenza: 1,4 W Stand-by: 0,4 W Batteria: 1x 3,7 V ioni di litio 600 mAh 2,22 Wh... -
Seite 14: Simboli Utilizzati
16.Garanzia della Simboli utilizzati HOYER Handel GmbH Isolamento di protezione Gentile cliente, questo apparecchio è dotato di una garan- Geprüfte Sicherheit (sicurezza zia di 3 anni a decorrere dalla data d'acqui- verificata). Gli apparecchi devo- sto. In caso di difetti del prodotto dispone di no soddisfare le regole tecniche diritti legali contro il venditore. -
Seite 15: Entità Della Garanzia
Entità della garanzia • Qualora si presentassero errori di fun- zionamento o altri difetti, si rivolga in- L'apparecchio è stato prodotto con cura ba- nanzitutto ai centri assistenza indicati di sandosi su severe direttive di qualità ed è seguito, telefonicamente o tramite stato controllato scrupolosamente prima del- e-mail. -
Seite 16: Centri Assistenza
Centri assistenza Assistenza Italia Tel.: 02 36003201 E-Mail: hoyer@lidl.it Assistenza Malta Tel.: 80062230 E-Mail: hoyer@lidl.com.mt IAN: 332855_1907 Fornitore Si tenga presente che il seguente indirizzo non è un indirizzo di assistenza. Rivolgersi innanzitutto ai centri assistenza ri- portati sopra. HOYER Handel GmbH Tasköprüstraße 3 DE-22761 Hamburg GERMANIA... - Seite 18 Contents 1. Overview ..................17 2. Intended purpose ................18 3. Safety information ................. 18 4. Items supplied ................20 5. Setting up the battery charger ............20 6. Charging the battery ..............21 7. Toothbrush heads ................21 8. Operation ..................22 Modes....................
-
Seite 19: Overview
1. Overview Protective cap for the toothbrush head Brush head Toothbrush head (replaceable) Marking ring Shaft of the toothbrush Toothbrush Control elements Peg of the battery charger Battery charger Mains power cable and mains plug Figure A: control elements On/off switch + transport lock for on and off switch Charging indicator light Red LED: normal mode Blue LED: sensitive mode... -
Seite 20: Intended Purpose
Thank you for your trust! 2. Intended purpose Congratulations on the purchase of your The electric toothbrush is intended solely for new electric toothbrush. tooth cleaning and oral hygiene in humans. For safe handling of the device and in order The device is designed for private, domestic to get to know the entire range of features: use. -
Seite 21: Instructions For Safe Operation
Instructions for safe operation This device can be used by children and people with restricted physical, sensory or intellectual abilities or people without ade- quate experience and/or understanding, if they are supervised or instructed on how to use this device and if they are aware of the re- sulting hazards. -
Seite 22: Danger From Batteries
The hand unit of the toothbrush must CAUTION only be charged using the battery Users could possibly experience mild charger supplied. bleeding of the gums during the first Ensure that the mains power cable can- days of electric toothbrush usage. not be caught or crushed, and that it Should the bleeding continue over sev- cannot be damaged by sharp edges or... -
Seite 23: Charging The Battery
6. Charging the battery 7. Toothbrush heads The items supplied include 4 toothbrush heads 3. NOTES: The various marking rings 4 allow you to as- • Fully charge the battery before using it for the first time. sign the toothbrush heads 3 to different fam- •... -
Seite 24: Operation
8. Operation 8.2 Brushing teeth 1. Remove the toothbrush 6 from the bat- tery charger 9. CAUTION: 2. Moisten the bristles, squeeze some Users could possibly experience mild toothpaste on and switch on the tooth- bleeding of the gums during the first brush 6 only when the brush head 2 is days of electric toothbrush usage. -
Seite 25: Transport When Travelling
9. Transport when 10. Cleaning / Hygiene travelling requirements 9.1 Transport lock DANGER! Risk of electric shock! To secure the toothbrush 6 against acciden- Before cleaning the battery charger 9, tally being switched on, activate the trans- pull the mains plug 10 out from the port lock. -
Seite 26: Disposal
12. Disposal 13. Trouble-shooting This product is subject to the If your device fails to function as required, provisions of European Direc- please try this checklist first. Perhaps there is tive 2012/19/EC. The symbol only a minor problem, and you can solve it showing a wheelie bin crossed yourself. -
Seite 27: Ordering Toothbrush Heads
14. Ordering toothbrush 15. Technical heads specifications You can order additional toothbrush Model: NZAOD 600 A1 heads 3 on the internet: Mains voltage: 100-240 V ~ 50/60 Hz shop.hoyerhandel.com Protection class: Power rating: 1.4 W standby: 0.4 W Battery: 1x 3.7 V Li ion 600 mAh 2.22 Wh... -
Seite 28: Symbols Used
16. Warranty of the Symbols used HOYER Handel GmbH Double insulation Dear Customer, your device is provided with a 3 year war- Geprüfte Sicherheit (certified ranty starting with the purchase date. In the safety). Devices must comply with event of product defects, you are entitled to the generally acknowledged statutory rights against the vendor. -
Seite 29: Handling In Case Of A Warranty Claim
The warranty applies to material or factory At www.lidl-service.com you can download defects. this and many other manuals, product vide- os and installation software. Excluded from the warranty are wear parts subject to normal wear and damages to fragile parts, e.g. switches, batteries, lamps or other parts manufactured from glass. - Seite 30 Supplier Please note that the following address is no service address. First contact the afore- mentioned Service Centre. HOYER Handel GmbH Tasköprüstraße 3 DE-22761 Hamburg GERMANY 28 GB...
- Seite 32 Inhalt 1. Übersicht ..................31 2. Bestimmungsgemäßer Gebrauch ............ 32 3. Sicherheitshinweise ............... 32 4. Lieferumfang ................. 34 5. Ladestation aufstellen ..............34 6. Akku laden ................... 35 7. Zahnbürsten-Aufsätze ..............35 8. Bedienung ..................36 Modi ....................36 Zähne putzen ..................36 9.
-
Seite 33: Übersicht
1. Übersicht Schutzkappe für den Zahnbürstenaufsatz Bürstenkopf Zahnbürsten-Aufsatz (austauschbar) Markierungsring Dorn der Zahnbürste Zahnbürste Bedienelemente Dorn der Ladestation Ladestation Netzanschlussleitung und Netzstecker Bild A: Bedienelemente Ein-/Ausschalter + Transportsicherung ein- und ausschalten Ladekontrollleuchte Rote LED: Modus normal Blaue LED: Modus sensitiv Grüne LED: Modus Massage Bild B: Bürstenkopf Indikatorborsten... -
Seite 34: Bestimmungsgemäßer Gebrauch
Herzlichen Dank für Ihr 2. Bestimmungsgemäßer Vertrauen! Gebrauch Wir gratulieren Ihnen zu Ihrer neuen elektri- Die elektrische Zahnbürste ist ausschließlich schen Zahnbürste. zur Zahnreinigung und Mundhygiene beim Für einen sicheren Umgang mit dem Gerät Menschen vorgesehen. und um den ganzen Leistungsumfang Das Gerät ist für den privaten Haushalt kon- kennenzulernen: zipiert. -
Seite 35: Anweisungen Für Den Sicheren Betrieb
Anweisungen für den sicheren Betrieb Dieses Gerät kann von Kindern und von Personen mit reduzierten physischen, sensorischen oder mentalen Fähigkeiten oder Mangel an Erfahrung und/oder Wissen benutzt werden, wenn sie beauf- sichtigt oder bezüglich des sicheren Gebrauchs des Gerätes unter- wiesen wurden und die daraus resultierenden Gefahren verstanden haben. -
Seite 36: Lieferumfang
den aufweist oder wenn das Gerät zuvor VORSICHT fallen gelassen wurde. In den ersten Tagen der Verwendung ei- Schließen Sie den Netzstecker nur an ner elektrischen Zahnbürste kann es bei eine ordnungsgemäß installierte, leicht manchen Anwendern zu leichtem Zahn- zugängliche Steckdose an, deren Span- fleischbluten kommen. -
Seite 37: Akku Laden
6. Akku laden 7. Zahnbürsten- Aufsätze HINWEISE: Im Lieferumfang sind 4 Zahnbürsten-Aufsät- • Laden Sie den Akku vor dem ersten Ge- ze 3 enthalten. brauch vollständig auf. Über die verschiedenfarbigen Markierungs- • Das vollständige Aufladen des Akkus ringe 4 können Sie die Zahnbürsten-Aufsät- dauert ca. -
Seite 38: Bedienung
8. Bedienung 8.2 Zähne putzen 1. Nehmen Sie die Zahnbürste 6 aus der Ladestation 9. VORSICHT: 2. Feuchten Sie die Borsten an, tragen Sie In den ersten Tagen der Verwendung ei- Zahncreme auf und schalten Sie die ner elektrischen Zahnbürste kann es bei Zahnbürste 6 erst ein, wenn sich der manchen Anwendern zu leichtem Zahn- Bürstenkopf 2 im Mund befindet. -
Seite 39: Transport Auf Reisen
9. Transport auf Reisen 10. Reinigen / Hygiene- anforderungen 9.1 Transportsicherung Um die Zahnbürste 6 gegen versehentliches GEFAHR durch Stromschlag! Einschalten zu sichern, aktivieren Sie die Ziehen Sie vor jeder Reinigung der La- Transportsicherung. destation 9 den Netzstecker 10 aus der • Transportsicherung einschalten: Netzsteckdose. -
Seite 40: Entsorgen
12. Entsorgen 13. Problemlösungen Dieses Produkt unterliegt der Sollte Ihr Gerät einmal nicht wie gewünscht europäischen Richtlinie funktionieren, gehen Sie bitte erst diese 2012/19/EU. Das Symbol Checkliste durch. Vielleicht ist es nur ein klei- der durchgestrichenen Abfall- nes Problem, das Sie selbst beheben kön- tonne auf Rädern bedeutet, nen. -
Seite 41: Zahnbürsten-Aufsätze Bestellen
14. Zahnbürsten- 15. Technische Daten Aufsätze bestellen Modell: NZAOD 600 A1 Sie können die Zahnbürsten-Aufsätze 3 per Netzspannung: 100 - 240 V ~ 50/60 Hz Internet nachbestellen: Schutzklasse: shop.hoyerhandel.com Leistung: 1,4 W Stand-by: 0,4 W Akku: 1x 3,7 V Li-lon 600 mAh 2,22 Wh... -
Seite 42: Verwendete Symbole
16. Garantie der Verwendete Symbole HOYER Handel GmbH Schutzisolierung Sehr geehrte Kundin, sehr geehrter Kunde, Sie erhalten auf dieses Gerät 3 Jahre Ga- Geprüfte Sicherheit. Geräte müs- rantie ab Kaufdatum. Im Falle von Mängeln sen den allgemein anerkannten dieses Produkts stehen Ihnen gegen den Ver- Regeln der Technik genügen und käufer des Produkts gesetzliche Rechte zu. -
Seite 43: Abwicklung Im Garantiefall
Garantieumfang • Sollten Funktionsfehler oder sonstige Män- gel auftreten, kontaktieren Sie zunächst Das Gerät wurde nach strengen Qualitäts- das nachfolgend benannte Service-Center richtlinien sorgfältig produziert und vor Aus- telefonisch oder per E-Mail. lieferung gewissenhaft geprüft. • Ein als defekt erfasstes Produkt können Die Garantieleistung gilt für Material- oder Sie dann unter Beifügung des Kaufbe- Fabrikationsfehler. -
Seite 44: Service-Center
Service-Center Service Deutschland Tel.: 0800 5435 111 (kostenfrei) E-Mail: hoyer@lidl.de Service Österreich Tel.: 0820 201 222 (0,15 EUR/Min.) E-Mail: hoyer@lidl.at Service Schweiz Tel.: 0842 665566 (0,08 CHF/Min., Mobilfunk max. 0,40 CHF/Min.) E-Mail: hoyer@lidl.ch IAN: 332855_1907 Lieferant Bitte beachten Sie, dass die folgende An- schrift keine Serviceanschrift ist.