Herunterladen Inhalt Inhalt Diese Seite drucken

Werbung

Verfügbare Sprachen
  • DE

Verfügbare Sprachen

  • DEUTSCH, seite 28
GeoMax Zenius5 Series
Quick Guide
Version 1.0
en
de
es
fr
it
pt

Werbung

Inhaltsverzeichnis
loading

Inhaltszusammenfassung für GeoMax Zenius5-Serie

  • Seite 1 GeoMax Zenius5 Series Quick Guide Version 1.0...
  • Seite 3 GeoMax Zenius5 Series Quick Guide Version 1.0 English...
  • Seite 4 Introduction Introduction Purchase Congratulations on the purchase of a GeoMax Zenius5. Read and follow the User Manual available on the GeoMax website before using the product. • This Quick Guide contains first use directions as well as initial, basic instructions for setting up the product and operating it.
  • Seite 5 Symbols The symbols used in this manual have the following meanings: Type Description Indicates an imminently hazardous situation which, if not DANGER avoided, will result in death or serious injury. WARNING Indicates a potentially hazardous situation or an unintended use which, if not avoided, could result in death or serious injury.
  • Seite 6 GeoMax has developed Guidelines on “How to carry GeoMax prod- ucts” and “How to ship GeoMax products” with Lithium batteries. Before any transportation of a GeoMax product, we ask you to consult these guidelines on our web page (http://www.geomax-posi- tioning.com/dgr) to ensure that you are in accordance with the IATA Dangerous Goods Regulations and that the GeoMax products can be transported correctly.
  • Seite 7 The product must not be disposed with household waste.  The battery must be charged before using it for the first time.  The following advice is only valid for batteries, power adapter or docking station. Memory device The instrument has a SD card slot fitted as standard. A SD card can be inserted and removed.
  • Seite 8: Instrument Components

    Zenius5 | 6 Instrument Components 1 Instrument Components Zenius5 package The Zenius5 package includes the following components: 0014001_001...
  • Seite 9 a) Zenius5 b) ZBA700 rechargeable battery c) Capacitive stylus d) Hand strap e) Switching power supply Mini USB cable g) USB OTG cable h) ZCH700 battery charger (optional) Quick guide Glass protection Front side of the Zenius5 a) Communication LED b) GPS LED c) Power LED d) Screen...
  • Seite 10 Zenius5 | 8 Instrument Components Back side of the Zenius5 a) Camera b) Speaker c) Holder for hand strap d) Release lever for battery compartment e) Compartment with slots for battery, SIM card and SD card Hand strap fixation 013762_001 Bottom panel of a) USB port the Zenius5...
  • Seite 11 Keypad a) Left softkey b) Send key c) Function key d) Camera key e) Power key Numeric keys and alter- native function keys g) Right softkey h) End key Backspace key Start key k) Enter key Collect key 013753_001 Functions of the Function keys Performs the command shown on the...
  • Seite 12 Zenius5 | 10 Instrument Components Function Switches the alterative functions of the numeric keys on or off. If the alternative functions are switched on, Function key the icon Fn appears in the navigation bar. Press to open camera app. If camera app is opened: Press to take a picture.
  • Seite 13 Function Press to backspace over one character in a text editable field. Backspace key Press to open the start menu. Windows key Press to confirm selections. Enter key Press to record data during measure- ments. Depending on 3rd party software Collect key implementation.
  • Seite 14 Zenius5 | 12 Instrument Components Turning on the Zenius5 step-by-step 0013770_001 Step Description Place the Zenius5 on a flat and stable surface or hold the device in your hand. Ensure that either the device is connected with the AC power adapter or the batteries are charged up.
  • Seite 15 Turning off the Step Description Zenius5 Press the Power key for at least 3 seconds to open the Power Off step-by-step menu. Within the menu, the following options are available: • OK: The operating system shuts down and the device is turned off.
  • Seite 16 Zenius5 | 14 Instrument Components Sleep mode acti- To activate the sleep mode of Zenius5 do the following: vation Step Description step-by-step  The Zenius5 must be switched on. Press and hold the Power key for 1 second. The Zenius5 enters the sleep mode. The LED power indicator turns to green.
  • Seite 17: Operation

    2 Operation 2.1 Inserting and Charging the Battery Inserting and charging step-by-step =OFF 0014003_001 100-240 V 100-2 0014003 001 Zenius5 | 15 Operation...
  • Seite 18 Zenius5 | 16 Operation Turn off the Zenius5 and place it on a stable surface, with the back side facing up. Lift the latch handle of the cover and turn it counterclockwise to the vertical unlock position and remove the cover of the battery compart- ment.
  • Seite 19 2.2 Inserting and Removing a SIM Card and SD Card  • Keep the card dry. • Use it only within the specified temperature range. • Do not bend the card. • Protect the card from direct impacts.  Failure to follow these instructions could result in data loss and/or permanent damage to the card.
  • Seite 20 Zenius5 | 18 Operation  Apply general practice for working with static-sensitive devices when you open the device, insert the SIM or SD card and closing the device: • Discharge any static charge before opening the device and working with the SIM or SD card.
  • Seite 21 Insert and remove a SIM Card or a =OFF SD Card step-by-step 0014004_001 Zenius5 | 19 Operation...
  • Seite 22 Zenius5 | 20 Operation Step Description  The slots for the SIM card and the SD card are inside the battery compartment of the Zenius5. Turn off the Zenius5 and place it on a stable surface, with the back side facing up. Lift the latch handle of the cover and turn it counterclockwise to the vertical unlock position.
  • Seite 23: Technical Data

    3 Technical Data Environmental Temperature specifications Operating temperature: -30°C to +60°C Storage temperature: -40°C to +80°C Protection against water, dust and sand IP65 (IEC60529) Dust tight Humidity Protection: 5 % to 95 % The effects of condensation are to be effectively counteracted by periodically drying out the device.
  • Seite 24 FCC Part 15, 22 and 24 (applicable in US) Conformity to national regula- • Hereby, GeoMax AG, declares that the product Zenius5 is in compliance with the essential requirements and other relevant provisions of Directive tions 1999/5/EC. The declaration of conformity is available from GeoMax AG.
  • Seite 26 GeoMax Zenius5 Series 853602-1.0.0en Original text © 2017 GeoMax AG, Widnau, Switzerland GeoMax AG www.geomax-positioning.com...
  • Seite 27 GeoMax Zenius5 Serie Quick Guide Version 1.0 Deutsch...
  • Seite 28 Einführung Einführung Erwerb Gratulation zum Erwerb Ihres GeoMax Zenius5. Lesen und befolgen Sie die Gebrauchsanweisung auf der GeoMax-Website, bevor Sie das Produkt verwenden. • Dieser Quick Guide enthält Hinweise zur ersten Verwendung sowie Anwei- sungen zur Einrichtung und zum Betrieb des Geräts.
  • Seite 29 Verwendungs- • Fernbedienung des Produkts. zweck • Datenübertragung mit externen Geräten. Symbole Die in dieser Gebrauchsanweisung verwendeten Symbole haben folgende Bedeutung: Beschreibung Unmittelbare Gebrauchsgefahr, die zwingend schwere GEFAHR Personenschäden oder den Tod zur Folge hat. WARNUNG Gebrauchsgefahr oder sachwidrige Verwendung, die schwere Personenschäden oder den Tod bewirken kann.
  • Seite 30 Zenius5 | 4 Einführung Das Gerät während des Betriebs zu nahe am Körper zu halten, kann gesund- VORSICHT heitsschädlich sein. Das Gerät wurde in typischen Nutzungsvarianten in der Nähe des menschli- chen Körpers getestet, zum Beispiel als Handgerät in einem Abstand von 10 mm vom Körper des Benutzers.
  • Seite 31 Gefahrgutvor- Die Produkte von GeoMax werden durch Lithiumakkus mit Energie versorgt. schriften Lithiumakkus können unter bestimmten Voraussetzungen gefährlich werden und ein Sicherheitsrisiko darstellen. Unter bestimmten Voraussetzungen können Lithiumakkus überhitzen und sich entzünden.  Wenn Ihr GeoMax Produkt mit Lithiumakkus an Bord eines Verkehrs- flugzeugs transportiert oder als Luftfracht versendet wird, muss dies in Übereinstimmung mit den IATA Gefahrgutvorschriften geschehen.
  • Seite 32 Zenius5 | 6 Einführung  Die Batterie muss vor der Erstverwendung geladen werden.  Der folgende Hinweis ist nur für Batterien, Stromadapter oder Dockingstation gültig. Speichermedium Das Instrument verfügt standardmäßig über einen SD-Kartenschacht. Eine SD-Karte kann eingelegt und wieder entfernt werden. Siehe Einsetzen und Entnehmen einer SIM- bzw.
  • Seite 33 1 Instrumentenkomponenten Zenius5 Paket Das Zenius5 Paket enthält folgende Komponenten: 0014001_001 Zenius5 | 7 Instrumentenkomponenten...
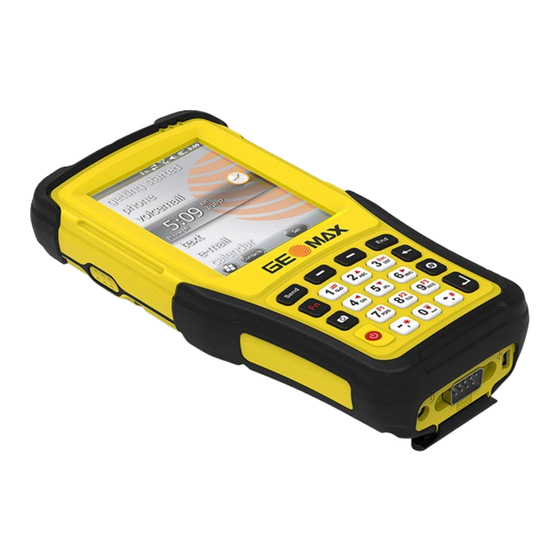
  • Seite 34 Zenius5 | 8 Instrumentenkomponenten a) Zenius5 b) ZBA700 Wiederaufladbare Batterie c) Eingabestift d) Handriemen e) Schaltnetzteil Mini-USB-Kabel g) USB-OTG-Kabel h) ZCH700 Batterieladegerät (optional) Quick Guide Displayschutz Vorderseite des Zenius5 a) Kommunikations-LED b) GPS-LED c) Strom-LED d) Bildschirm e) Tastenfeld Ein-/Aus-Taste g) Mikrofon 013752_001...
  • Seite 35 Rückseite des Zenius5 a) Kamera b) Lautsprecher c) Handriemenhalter d) Hebel zum Lösen des Batteriefachs e) Batterie-, SIM-Karten- und SD-Kartenfach Handriemenhalter 013762_001 Unterseite des a) USB-Anschluss Zenius5 b) Handriemenhalter c) Serieller Anschluss d) Stromanschluss 013764_001 LED-Indikatoren a b c a) Kommunikations-LED b) GPS-LED c) Strom-LED 013776_001...
  • Seite 36 Zenius5 | 10 Instrumentenkomponenten Tastenfeld a) Linker Softkey b) Send-Taste c) Funktionstaste d) Kamerataste e) Ein-/Aus-Taste Numerische Tasten und alternative Funktions- tasten g) Rechter Softkey h) End-Taste Zurück-Taste Start-Taste k) Eingabetaste 013753_001 Aufzeichnungstaste Tastenfunkti- Taste Funktion onen Führt den Befehl in der unteren linken Ecke des Bildschirms aus.
  • Seite 37 Taste Funktion Schaltet die alternativen Funktionen auf den numerischen Tasten ein oder aus. Wenn die alternativen Funkti- Funktionstaste onen eingeschaltet sind, erscheint das Symbol Fn in der Navigations- leiste. Öffnet die Kamera-App. Wenn die Kamera-App bereits geöffnet ist: Nimmt ein Bild auf. Kamerataste Schaltet den Zenius5 ein- oder aus.
  • Seite 38 Zenius5 | 12 Instrumentenkomponenten Taste Funktion Setzt ein Zeichen in einem editier- baren Textfeld zurück. Zurück-Taste Öffnet das Startmenü. Start-Taste (Windows-Taste) Bestätigt eine Auswahl. Eingabetaste Zeichnet während einer Messung Daten auf. Abhängig von der Implementierung Aufzeichnungstaste von Drittanbieter-Software.
  • Seite 39 Einschalten des Zenius5 Schritt für Schritt 0013770_001 Schrit Beschreibung Den Zenius5 auf eine flache und stabile Oberfläche legen oder das Gerät in der Hand halten. Sicherstellen, dass das Gerät entweder mit einem AC-Netzteil verbunden ist oder die Batterien geladen sind. Die Ein-/Aus-Taste gedrückt halten, bis die Strom-LED von rot auf grün wechselt.
  • Seite 40 Zenius5 | 14 Instrumentenkomponenten Ausschalten des Schrit Beschreibung Zenius5 Schritt für Schritt Die Ein-/Aus-Taste wenigstens 3 Sekunden lang gedrückt halten, um das Menü Power Off zu öffnen. Im Menü sind folgende Optionen verfügbar: • OK: Das Betriebssystem fährt herunter und das Gerät wird abge- schaltet.
  • Seite 41 Aktivierung des Den Schlafmodus des Zenius5 wie folgt aktivieren: Schlafmodus Schrit Beschreibung Schritt für Schritt  Der Zenius5 muss eingeschaltet werden. Die Ein-/Aus-Taste 1 Sekunde lang gedrückt halten. Der Zenius5 wechselt in den Schlafmodus. Die Strom-LED wird grün. Zum Weiterarbeiten die Ein-/Aus-Taste erneut drücken. ...
  • Seite 42: Bedienung

    Zenius5 | 16 Bedienung 2 Bedienung 2.1 Einsetzen und Laden der Batterie Einsetzen und Laden Schritt für Schritt =OFF 0014003_001 100-240 V 100-2 0014003 001...
  • Seite 43 Den Zenius5 ausschalten und mit der Rückseite nach oben auf eine stabile Oberfläche legen. Den Hebel zum Lösen des Batteriefachs anheben und gegen den Uhrzei- gersinn in die vertikale, entriegelte Stellung bringen und die Abdeckung des Batteriefachs abnehmen. Zum Einsetzen der Batterie in das Fach das untere Ende der Batterie im Winkel an das Fach anlegen und dann das obere Ende nach unten in den Anschluss einrasten lassen.
  • Seite 44: Einsetzen Und Entnehmen Einer Sim- Oder Sd-Karte

    Zenius5 | 18 Bedienung 2.2 Einsetzen und Entnehmen einer SIM- oder SD-Karte  • Karte vor Nässe schützen. • Karte nur im vorgeschriebenen Temperaturbereich verwenden. • Karte nicht verbiegen. • Karte vor direkten Stößen schützen.  Bei Nichtbeachtung dieser Hinweise können Datenverlust und/oder dauerhafte Schäden der Karte auftreten.
  • Seite 45  Für das Einsetzen der SIM- bzw. SD-Karte sowie das Wiederverschließen des Geräts müssen die üblichen Vorkehrungen für Arbeiten mit Geräten, die gegenüber statischen Entladungen empfindlich sind, beachtet werden: • Statische Ladungen müssen vor dem Öffnen des Geräts und dem Arbeiten mit der SIM- bzw.
  • Seite 46 Zenius5 | 20 Bedienung Einsetzen und Entnehmen einer SIM- bzw. SD- =OFF Karte Schritt für Schritt 0014004_001...
  • Seite 47 Schrit Beschreibung  Die Schächte für die SIM-Karte und die SD-Karte befinden sich im Batteriefach des Zenius5. Den Zenius5 ausschalten und mit der Rückseite nach oben auf eine stabile Oberfläche legen. Den Hebel zum Lösen des Batteriefachs anheben und gegen den Uhrzeigersinn in die vertikale, entriegelte Stellung bringen.
  • Seite 48: Technische Daten

    Zenius5 | 22 Technische Daten 3 Technische Daten Umweltspezifika- Temperatur tionen Betriebstemperatur: -30 °C bis +60 °C Lagertemperatur: -40 °C bis +80 °C Schutzart IP65 (IEC 60529) Staubdicht Luftfeuchte Schutz: 5 % bis 95 % Den Auswirkungen von Kondensation sollte durch regelmäßiges Austrocknen des Geräts entgegengewirkt werden.
  • Seite 49 Konformität zu • FCC Teil 15, 22 und 24 (gültig in USA) • Hiermit erklärt GeoMax AG, dass das Zenius5 die grundlegenden nationalen Anforderungen und sonstigen relevanten Vorschriften der Richtlinie Vorschriften 1999/5/EG erfüllt. Die Konformitätserklärung bekommen Sie von GeoMax AG.
  • Seite 50 GeoMax Zenius5 Serie 853602-1.0.0de Originaltext(853602-1.0.0en) © 2017 GeoMax AG, Widnau, Schweiz GeoMax AG www.geomax-positioning.com...
  • Seite 51 GeoMax Zenius5 Series Guía Rápida Versión 1.0 Español...
  • Seite 52 Zenius5 | 2 Introducción Introducción Compra Felicidades por la compra de un GeoMax Zenius5. Antes de utilizar el producto, lea y siga las instrucciones del Manual de uso disponible en la página web de GeoMax. • Esta Guía Rápida contiene las primeras indicaciones de uso así como las instrucciones iniciales básicas para configurar el producto y utilizarlo.
  • Seite 53 Uso procedente • Control remoto del producto. • Comunicación de datos con equipos externos. Símbolos Los símbolos empleados en este manual tienen los siguientes significados: Tipo Descripción PELIGRO Indica una situación de riesgo inminente que, en caso de no evitarse, puede ocasionar lesiones graves o incluso la muerte.
  • Seite 54 En ciertas condiciones, las baterías de litio pueden recalentarse y provocar un incendio.  Al llevar o enviar el GeoMax producto con baterías de litio a bordo de un avión comercial, debe hacerlo de acuerdo con los IATA Dangerous Goods Regulations.
  • Seite 55 GeoMaxha desarrollado Lineas guías sobre "como transportar- GeoMaxel producto" y "Como enviarGeoMaxel producto" con baterías de Litio Antes de cualquier transporte de un GeoMax producto, le pedimos que consulte estas guías en nuestra página web (http://www.geomax-positioning.com/dgr) para asegurarse de que se ajustan los IATA Dangerous Goods Regulations y que los GeoMax productos pueden ser transportados correctamente.
  • Seite 56: Componentes Del Instrumento

    Zenius5 | 6 Componentes del instrumento 1 Componentes del instrumento Zenius5 Paquete El paquete Zenius5 incluye los siguientes componentes: 0014001_001...
  • Seite 57 a) Zenius5 b) ZBA700 Batería recargable c) Puntero d) Correa de mano e) Fuente de alimentación Cable mini USB g) Cable USB OTG h) ZCH700 Cargador de baterías (opcional) Guía rápida Protección de cristal Parte frontal del Zenius5 a) LED de comunicación b) LED de GPS c) LED de energía d) Pantalla...
  • Seite 58 Zenius5 | 8 Componentes del instrumento a) Cámara Parte trasera del Zenius5 b) Altavoz c) Enganche para correa de mano d) Palanca de desbloqueo para compartimento de batería e) Compartimento con ranuras para batería, tarjeta SIM y tarjeta SD Fijación para correa de 013762_001 mano Panel inferior del...
  • Seite 59 Teclado a) Tecla de función izquierda b) Tecla Send c) Tecla de función d) Tecla de cámara e) Tecla de encendido Teclas numéricas y teclas de funciones alternativas g) Tecla de función derecha h) Tecla End Tecla de retroceso Tecla de inicio k) Tecla de introducción 013753_001 Tecla de recopilación...
  • Seite 60 Zenius5 | 10 Componentes del instrumento Tecla Función Marca o responde una llamada. Tecla Send Activa/desactiva las funciones alter- nativas de las teclas numéricas. Si las funciones alternativas están acti- Tecla de función vadas, el símbolo Fn se muestra en la barra de navegación.
  • Seite 61 Tecla Función Finaliza o rechaza una llamada. Regresa a la pantalla de inicio. Tecla End Pulse para retroceder y eliminar un carácter en un campo de texto edit- able. Tecla de retroceso Pulse para abrir el menú de inicio. Tecla de Windows Pulse para confirmar selecciones.
  • Seite 62 Zenius5 | 12 Componentes del instrumento Encender el Zenius5 , paso a paso 0013770_001 Paso Descripción Coloque el Zenius5 sobre una superficie estable y lisa o sostenga el dispositivo en sus manos. Asegúrese de que el dispositivo esté conectado al adaptador de alimentación CA o de que las baterías estén totalmente cargadas.
  • Seite 63 Apagar el Paso Descripción Zenius5 Pulse la tecla de encendido durante al menos 3 segundos para abrir , paso a paso el menú de apagado Power Off. Dentro del menú están disponibles las siguientes opciones: • OK: el sistema operativo se apaga, al igual que el dispositivo. •...
  • Seite 64 Zenius5 | 14 Componentes del instrumento Activación del Para activar el modo de ahorro del Zenius5: modo de ahorro, Paso Descripción paso a paso  El Zenius5 debe estar encendido. Pulse y mantenga pulsada la tecla de encendido durante 1 segundo. El Zenius5 pasa al modo de ahorro.
  • Seite 65 2 Funcionamiento 2.1 Inserción y carga de la batería Insertar y cargar la batería, paso a paso =OFF 0014003_001 100-240 V 100-2 0014003 001 Zenius5 | 15 Funcionamiento...
  • Seite 66 Zenius5 | 16 Funcionamiento Apague el Zenius5 y sitúelo sobre una superficie estable con la parte trasera apuntando hacia arriba. Levante la palanca de cierre de la tapa, gírela en sentido antihorario hasta la posición vertical de desbloqueo y retire la tapa del comparti- mento de la batería.
  • Seite 67 2.2 Introducir y retirar una tarjeta SIM y una tarjeta SD  • Conserve seca la tarjeta. • Utilícela únicamente en el rango de temperatura especificado. • No doble la tarjeta. • Proteja la tarjeta de golpes directos.  No respetar estas instrucciones puede derivar en pérdida de datos y/o en daños permanentes a la tarjeta.
  • Seite 68 Zenius5 | 18 Funcionamiento  Aplique las recomendaciones generales para trabajar con equipos estático- sensitivos al abrir el dispositivo, introducir la tarjeta SIM o SD y al cerrar el dispositivo: • Descargue cualquier carga estática antes de abrir el dispositivo y trabajar con la tarjeta SIM o SD.
  • Seite 69 Introducir y extraer una tarjeta SIM o SD, =OFF paso a paso 0014004_001 Zenius5 | 19 Funcionamiento...
  • Seite 70 Zenius5 | 20 Funcionamiento Paso Descripción  Las ranuras para la tarjeta SIM y SD se encuentran dentro del compartimento de la batería del Zenius5. Apague el Zenius5 y sitúelo sobre una superficie estable con la parte trasera apuntando hacia arriba. Levante la palanca de cierre de la tapa y gírela en sentido antihorario hasta la posición vertical de desbloqueo.
  • Seite 71: Datos Técnicos

    3 Datos técnicos Especificaciones Temperatura ambientales Temperatura de funcio- De -30 °C a +60 °C namiento: Temperatura de almace- De -40 °C a +80 °C namiento: Protección contra el agua, el polvo y la arena IP65 (IEC60529) Estanco al polvo Humedad Protección: 5 % al 95 %...
  • Seite 72 FCC Parte 15, 22 y 24 (aplicable en EE.UU) Conformidad con regulaciones • Por el presente, GeoMax AG, declara que el producto Zenius5 cumple con los requerimientos básicos y otras disposiciones importantes de nacionales las Directivas 1999/5/EC. La declaración de conformidad se puede consultar en GeoMax AG.
  • Seite 74 GeoMax Zenius5 Series 853602-1.0.0es Traducción de la versión original(853602-1.0.0en) © 2017 GeoMax AG, Widnau, Switzerland GeoMax AG www.geomax-positioning.com...
  • Seite 75 Série GeoMax Zenius5 Guide abrégé Version 1.0 Français...
  • Seite 76 Il fournit également un aperçu général du produit ainsi que des informa- tions techniques et des avis de sécurité. Consulter le site Internet GeoMax pour obtenir la documentation et les logiciels Zenius5.
  • Seite 77 Utilisation • Commande à distance du produit. conforme • Echange de données avec des appareils extérieurs. Symboles Les symboles utilisés dans ce manuel ont les significations suivantes : Type Description Indique l'imminence d'une situation périlleuse qui, si elle DANGER n'est pas évitée, entraînera de graves blessures voire la mort.
  • Seite 78 Zenius5 | 4 Introduction Type Description  Paragraphes importants auxquels il convient de se conformer en pratique car ils permettent au produit d'être utilisé de manière efficace et techniquement correcte. ATTENTION Il convient de se tenir hors de portée de l’appareil pendant son fonctionnement afin d’éviter tout risque de blessure.
  • Seite 79 Dans certaines conditions, les batteries au lithium peuvent surchauffer et s'enflammer.  Lors du transport ou de l'expédition du produit GeoMax avec des batte- ries au lithium à bord d'un avion civil, il faut également respecter les dispositions IATA sur les matières dangereuses.
  • Seite 80 Zenius5 | 6 Introduction Ne jetez pas le produit avec les ordures ménagères.  Veillez à charger la batterie avant la première utilisation.  Le conseil suivant s'applique seulement aux batteries, à l'adaptateur d'alimen- tation et à la station d'accueil. Périphérique L’instrument est équipé...
  • Seite 81: Composants De L'instrument

    1 Composants de l'instrument Zenius5 Pack Le pack Zenius5 inclut les composants suivants : 0014001_001 Zenius5 | 7 Composants de l'instrument...
  • Seite 82 Zenius5 | 8 Composants de l'instrument a) Zenius5 b) ZBA700 Batterie rechargeable c) Stylet capacitif d) Sangle e) Alimentation électrique variable Câble mini-USB g) Câble OTG USB h) ZCH700 Chargeur de batterie (en option) Guide abrégé Protection pour la vitre Face avant du Zenius5 a) LED de communication...
  • Seite 83 Face arrière du a) Appareil photo Zenius5 b) Haut-parleur c) Support pour sangle d) Fermoir du compartiment de batterie e) Compartiment avec emplacements pour batterie, carte SIM et carte SD Fixation de la sangle 013762_001 a) Port USB Panneau infé- rieur du Zenius5 b) Support de la sangle c) Connecteur série...
  • Seite 84 Zenius5 | 10 Composants de l'instrument a) Touche de fonction Clavier gauche b) Touche Send c) Touche de fonction d) Touche Appareil photo e) Touche Marche/Arrêt Touches numériques et touches de fonction alter- native g) Touche de fonction droite h) Touche End Touche Retour arrière Touche Démarrage 013753_001...
  • Seite 85 Touche Fonction Passer un appel ou répondre. Touche Send Active et désactive les fonctions alter- natives des touches numériques. Si les fonctions alternatives sont acti- Touche de fonction vées, l’icône Fn apparaît dans la barre de navigation. Appuyer pour ouvrir l’application Appareil photo.
  • Seite 86 Zenius5 | 12 Composants de l'instrument Touche Fonction Raccrocher ou rejeter un appel. Retourner à l’écran de démarrage. Touche End Appuyer sur la touche pour revenir en arrière d’un caractère dans un champ de texte éditable. Touche Retour arrière Appuyer pour ouvrir le menu de démarrage.
  • Seite 87 Procédure de mise en marche Zenius5 0013770_001 Étape Description Poser le Zenius5 sur une surface plane et ferme ou tenir l’appareil à la main. S’assurer que l’appareil est raccordé à l’aide de l’adaptateur CA ou que les batteries sont chargées. Maintenir la touche Marche/Arrêt enfoncée jusqu’à...
  • Seite 88 Zenius5 | 14 Composants de l'instrument Procédure d’arrêt Étape Description Appuyer sur la touche Marche/Arrêt pendant au moins 3 secondes Zenius5 pour ouvrir le menu Power Off. Dans le menu, sélectionner l’une des options suivantes : • OK : le système d’exploitation s’arrête et l’appareil s’éteint. •...
  • Seite 89 Procédure d’acti- Pour activer le mode veille du Zenius5, effectuer les opérations suivantes : vation Étape Description du mode veille  Le Zenius5 doit être allumé. Maintenir la touche Marche/Arrêt enfoncée pendant 1 seconde. Le Zenius5 passe en mode veille. La LED d’alimentation devient verte.
  • Seite 90: Insertion Et Charge De La Batterie

    Zenius5 | 16 Utilisation 2 Utilisation 2.1 Insertion et charge de la batterie Procédure d’insertion et de charge =OFF 0014003_001 100-240 V 100-2 0014003 001...
  • Seite 91 Éteindre le Zenius5 et le poser sur une surface stable, la face arrière étant tournée vers le haut. Soulever la patte de fixation du couvercle et la tourner dans le sens anti- horaire jusqu’à atteindre la position verticale déverrouillée, puis le retirer du compartiment de batterie.
  • Seite 92 Zenius5 | 18 Utilisation 2.2 Insertion et retrait d’une carte SIM et d’une carte SD  • Conservez la carte au sec. • Ne l'utilisez que dans les limites de la plage de température prescrite. • Ne faites pas subir de flexion à la carte. •...
  • Seite 93  Il convient de respecter les règles générales s’appliquant aux opérations effec- tuées sur un appareil sensible aux charges statiques lorsqu’on ouvre un tel appareil, que l’on insère la carte SIM ou SD et que l’on ferme l’appareil : • Décharger toute charge statique avant l’ouverture de l’appareil ou toute manipulation de la carte SIM ou SD.
  • Seite 94 Zenius5 | 20 Utilisation Procédure d’insertion et de retrait d’une =OFF carte SIM ou SD 0014004_001...
  • Seite 95 Étape Description  Les emplacements de la carte SIM et de la carte SD se trouvent à l’intérieur du compartiment de batterie du Zenius5. Éteindre le Zenius5 et le poser sur une surface stable, la face arrière étant tournée vers le haut. Soulever la patte de fixation du couvercle et la tourner dans le sens antihoraire jusqu’à...
  • Seite 96: Caractéristiques Techniques

    Zenius5 | 22 Caractéristiques techniques 3 Caractéristiques techniques Environnement Température Température -30 °C à +60 °C d’utilisation : Température de -40 °C à +80 °C stockage : Protection contre l’eau, la poussière et le sable IP65 (CEI60529) Étanche à la poussière Humidité...
  • Seite 97 Conformité avec • FCC parties 15, 22 et 24 (applicable aux Etats-Unis) • Par la présente, GeoMax AG déclare que le produit Zenius5 est les prescriptions conforme aux exigences fondamentales et autres dispositions appli- nationales cables de la directive 1999/5/CE. La déclaration de conformité est...
  • Seite 98 Série GeoMax Zenius5 853602-1.0.0fr Traduction de la version originale (853602-1.0.0en) © 2017 GeoMax AG, Widnau, Suisse GeoMax AG www.geomax-positioning.com...
  • Seite 99 Serie GeoMax Zenius5 Guida rapida Versione 1.0 Italiano...
  • Seite 100 Zenius5 | 2 Introduzione Introduzione Acquisto Congratulazioni per aver acquistato un'unità GeoMax Zenius5. Prima di utilizzare il prodotto, leggere e rispettare le indicazioni del Manuale d'uso disponibile sul sito GeoMax. • La presente guida rapida contiene le prime indicazioni per l'uso, oltre alle istruzioni iniziali di base per l'installazione e l'utilizzo del prodotto.
  • Seite 101 Uso conforme • Comando a distanza dello strumento. • Trasmissione dei dati con apparecchiature esterne. Simboli I simboli utilizzati in questo manuale hanno il seguente significato: Tipo Descrizione PERICOLO Indica un’imminente situazione di pericolo che, se non evitata, causerà morte o lesioni fisiche gravi. Indica una situazione potenzialmente pericolosa o un uso AVVER- involontario che, se non evitati, potrebbero causare...
  • Seite 102 In determinate condizioni, le batterie al litio possono surriscaldarsi e prendere fuoco.  Quando si trasporta o spedire il prodotto GeoMax con batterie al litio a bordo di un aereo commerciale, è necessario farlo in conformità con le IATA Dangerous Goods Regulations.
  • Seite 103  GeoMax ha sviluppato Linee guida su "Come portare prodotti GeoMax" e “Come spedire prodotti GeoMax“ con batterie al litio. Prima di ogni trasporto di un prodotto GeoMax, vi chiediamo di consultare queste linee guida sulla nostra pagina web (http://www.geomax-positio- ning.com/dgr) per garantire che siano in conformità...
  • Seite 104: Componenti Dello Strumento

    Zenius5 | 6 Componenti dello strumento 1 Componenti dello strumento Zenius5 - Confe- La confezione dello Zenius5 contiene i seguenti componenti: zione 0014001_001...
  • Seite 105 a) Zenius5 b) ZBA700 - Batteria ricaricabile c) Stilo capacitivo d) Cinturino e) Alimentatore esterno Cavo Mini USB g) Cavo USB OTG h) ZCH700 - Caricabatterie (opzionale) Guida rapida Protezione schermo Parte anteriore del Zenius5 a) LED di comunicazione b) LED GPS c) LED di alimentazione d) Schermo e) Tastiera...
  • Seite 106 Zenius5 | 8 Componenti dello strumento Parte posteriore del Zenius5 a) Fotocamera b) Altoparlante c) Supporto per cinturino d) Leva di rilascio del vano batteria e) Vano con slot per batteria, SIM card e scheda SD Fissaggio cinturino 013762_001 a) Porta USB Parte inferiore b) Supporto per cinturino del Zenius5...
  • Seite 107 Tastiera a) Pulsante sinistra b) Pulsante Send c) Pulsante funzione d) Pulsante fotocamera e) Pulsante di alimentazione Pulsante numerici e pulsanti funzione alterna- tivi g) Pulsante destra h) Pulsante End Pulsante backspace Pulsante di inizio k) Pulsante Invio 013753_001 Pulsante di acquisizione Funzioni dei Pulsante Funzione...
  • Seite 108 Zenius5 | 10 Componenti dello strumento Pulsante Funzione Attiva o disattiva le funzioni alterna- tive dei pulsanti numerici. Quando le funzioni alternative sono attive, nella Pulsante funzione barra di navigazione viene visualiz- zata l'icona Fn. Consente di aprire l'app della fotoca- mera.
  • Seite 109 Pulsante Funzione Consente di cancellare il carattere precedente in un campo di testo modificabile. Pulsante backspace Consente di accedere al menu iniziale. Pulsante Windows Consente di confermare la selezione. Pulsante Invio Consente di registrare i dati durante le misurazioni. Dipende dall'implementazione di Pulsante di acquisizione software esterno.
  • Seite 110 Zenius5 | 12 Componenti dello strumento Procedura detta- gliata di accen- sione dello Zenius5 0013770_001 Opera Descrizione zione Posizionare lo Zenius5 su una superficie piana e stabile oppure tenerlo in mano. Verificare che il dispositivo sia collegato all'alimentazione o che le batterie siano cariche.
  • Seite 111 Procedura detta- Opera Descrizione gliata di spegni- zione mento dello Tenere premuto il pulsante di alimentazione per almeno 3 secondi Zenius5 per accedere al menu Power Off. Nel menu sono disponibili le seguenti opzioni: • OK: il sistema operativo si chiude e lo strumento si spegne. •...
  • Seite 112 Zenius5 | 14 Componenti dello strumento Procedura detta- Per attivare la modalità di sospensione dello Zenius5, procedere come segue: gliata di attiva- Opera Descrizione zione della moda- zione lità di sospen-  sione del Lo Zenius5 deve essere acceso. Tenere premuto il pulsante di alimentazione per un secondo. Lo Zenius5 passa alla modalità...
  • Seite 113: Funzionamento

    2 Funzionamento 2.1 Inserimento e caricamento della batteria Procedura detta- gliata per l'inserimento =OFF e la carica 0014003_001 100-240 V 100-2 0014003 001 Zenius5 | 15 Funzionamento...
  • Seite 114 Zenius5 | 16 Funzionamento Spegnere lo Zenius5 e posizionarlo su una superficie stabile, con il lato posteriore rivolto verso l'alto. Sollevare l'anello di chiusura del coperchio e ruotarlo in senso antio- rario, fino alla posizione verticale di sblocco e rimuovere il coperchio del vano batteria.
  • Seite 115 2.2 Inserimento e rimozione della scheda SIM e della scheda SD  • Tenere asciutta la scheda. • Usarla solo a temperature comprese entro i limiti indicati. • Non piegare la scheda. • Proteggere la scheda dagli urti diretti.  Il mancato rispetto di queste istruzioni può...
  • Seite 116 Zenius5 | 18 Funzionamento  Durante l'apertura e la chiusura dello strumento, l'inserimento delle schede SIM o SD e la chiusura dello strumento, seguire le norme generali per i dispo- sitivi sensibili all'elettricità statica: • Scaricare l'eventuale elettricità statica prima di aprire il dispositivo e di manipolare la SIM card o la scheda SD.
  • Seite 117 Procedura detta- gliata per l'inse- rimento e la =OFF rimozione di una scheda SIM o SD 0014004_001 Zenius5 | 19 Funzionamento...
  • Seite 118 Zenius5 | 20 Funzionamento Opera Descrizione zione  Gli slot per la scheda SIM e la scheda SD si trovano all'interno del vano batteria dello Zenius5. Spegnere lo Zenius5 e posizionarlo su una superficie stabile, con il lato posteriore rivolto verso l'alto. Sollevare l'anello di chiusura del coperchio e ruotarlo in senso antio- rario, fino alla posizione verticale di sblocco.
  • Seite 119: Dati Tecnici

    3 Dati tecnici Specifiche Temperatura ambientali Temperatura di eser- Da -30 °C a +60 °C cizio: Temperatura di stoc- Da -40 °C a +80 °C caggio: Protezione dall'acqua, dalla polvere e dalla sabbia IP65 (IEC60529) Ermetico alla polvere Umidità Protezione: Da 5 % a 95 % Gli effetti della condensa si possono contrastare in modo efficace asciugando periodicamente il dispositivo.
  • Seite 120 FCC Part 15, 22 e 24 (applicabile in US) Conformità alle disposizioni • Con la presente, GeoMax AG, si dichara che il prodotto Zenius5 è conforme ai requisiti essenziali ed alle altre disposizioni pertinenti nazionali della Direttiva 1999/5/EC. La dichiarazione della conformità è dispo- nibile da GeoMax AG.
  • Seite 122 Serie GeoMax Zenius5 853602-1.0.0it Traduzione dal testo originale (853602-1.0.0en) © 2017 GeoMax AG, Widnau, Switzerland GeoMax AG www.geomax-positioning.com...
  • Seite 123 GeoMax Série Zenius5 Guia Rápido Versão 1.0 Português - Brasil...
  • Seite 124 Introdução Introdução Aquisição Parabéns pela compra de um GeoMax Zenius5. Leia e siga o Manual do Usuário disponível no site GeoMax antes de usar o produto. • Este Guia Rápido contém instruções para o primeiro uso, bem como instru- ções básicas iniciais para instalação e operação do produto.
  • Seite 125 • Controle remoto do produto. • Comunicação de dados com aplicações externas. Símbolos Os símbolos utilizados neste manual possuem o seguinte significado: Tipo Descrição Indicação de uma situação iminentemente perigosa que PERIGO se não for evitada, resultará em morte ou lesões corpo- rais graves.
  • Seite 126 Em determinadas condições, as baterias de Lítio podem superaquecer e pegar fogo.  Ao carregar ou despachar o seu produto GeoMax com bateria de Lítio a bordo de um avião comercial, você deve fazê-lo de acordo com os Regulamentações Sobre Mercadorias Perigosas IATA.
  • Seite 127 A GeoMax desenvolveu Guias de "Como carregar produtos GeoMax" e "Como despachar produtos GeoMax" com baterias de Lítio. Antes de qualquer transporte de um produto GeoMax, nós pedimos a você que consulte estas Guias na nossa página web (http://www.geomax-posi- tioning.com/dgr) para ter certeza de que você cumpre com as Regula- mentações Sobre Produtos Perigosos IATA e que o produto GeoMax...
  • Seite 128: Componentes Do Instrumento

    Zenius5 | 6 Componentes do instrumento 1 Componentes do instrumento Zenius5 emba- O pacote Zenius5 inclui os seguintes componentes: lagem 0014001_001...
  • Seite 129 a) Zenius5 b) ZBA700 bateria recarregável c) Caneta capacitiva d) Alça de mão e) Fonte de alimentação chaveada Cabo mini-USB g) Cabo USB OTG h) ZCH700 carregador da bateria (opcional) Guia rápido Proteção para o vidro Lado frontal do Zenius5 a) LED de Comunicação b) LED GPS c) Luz de energia...
  • Seite 130 Zenius5 | 8 Componentes do instrumento a) Câmera Lado traseiro do Zenius5 b) Autofalante c) Suporte para a alça de mão d) Levante a alavanca para o compartimento da bateria e) Compartimento com slots para bateria, cartão SIM e cartão SD Fixação da alça de mão 013762_001 Painel inferior da...
  • Seite 131 Teclado a) Tecla esquerda b) Tecla Enviar c) Tecla de função d) Tecla da câmera e) Tecla liga/desliga Teclas numéricas e teclas de função alternativas g) Tecla direita h) Tecla End (fim) Tecla retroceder Tecla iniciar k) Tela Enter 013753_001 Tecla registrar Funções das Tecla...
  • Seite 132 Zenius5 | 10 Componentes do instrumento Tecla Função Liga ou desliga as funções alterna- tivas das teclas numéricas. Se houver funções alternativas ligadas, o ícone Tecla de função Fn aparece na barra de navegação. Pressione para abrir o aplicativo da câmera.
  • Seite 133 Tecla Função Pressione para retroceder um carac- tere em uma campo de texto editável. Tecla retroceder Pressione para abrir o menu inicial. Tecla do Windows Aperte para confirmar as seleções. Tela Enter Aperte para registrar dados durante as medições. Dependendo da implementação do Tecla registrar software de terceiros.
  • Seite 134 Zenius5 | 12 Componentes do instrumento Passo a passo para Ligar o Zenius5 0013770_001 Passo Descrição Coloque o Zenius5 em uma superfície plana e estável ou segure o dispositivo na sua mão. Certifique-se de que o dispositivo está conectado com o adaptador de energia AC ou que as baterias estão carregadas.
  • Seite 135 Passo a passo Passo Descrição para Desligar o Pressione a tecla Liga/Desliga por pelo menos 3 segundos para abrir Zenius5 o menu Desligar. No menu, as seguintes opções estão disponíveis: • OK: O sistema operacional fecha e o dispositivo é desligado. •...
  • Seite 136 Zenius5 | 14 Componentes do instrumento Passo a passo Para Ativar o Modo de espero do Zenius5 faça o seguinte: ativar o Modo de Passo Descrição espera  O Zenius5 deve ser ligado. Aperte e mantenha pressionada a tecla Ligar/Desligar por 1 segundo. O Zenius5 entra no modo de espera.
  • Seite 137 2 Operação 2.1 Inserir e carregar a bateria Passo a passo para Inserir e carregar =OFF 0014003_001 100-240 V 100-2 0014003 001 Zenius5 | 15 Operação...
  • Seite 138 Zenius5 | 16 Operação Desligue o Zenius5 e coloque-o em uma superfície estável, com o lado de trás voltado para cima. Levante a alavanca da trava da tampa e gire-a no sentido anti-horário para a posição de destravamento vertical e retire a tampa do compar- timento da bateria.
  • Seite 139 2.2 Inserindo e Removendo o Cartão SIM e Cartão SD  • Mantenha o cartão seco. • Use somente dentro da temperatura especificada. • Não dobre o cartão. • Proteja o cartão de impactos diretos.  O não cumprimento destas instruções pode resultar em perda de dados e/ou danos permanentes ao cartão.
  • Seite 140 Zenius5 | 18 Operação  Aplique prática padrão para trabalhar com dispositivos sensíveis à estática quando você abrir o dispositivo, insira o cartão SIM ou SD e feche o disposi- tivo: • Descarregue qualquer carga estática antes de abrir o dispositivo e traba- lhar com o cartão SIM ou cartão SD.
  • Seite 141 Passo-a-passo para Inserir e Remover um =OFF Cartão SIM ou SD 0014004_001 Zenius5 | 19 Operação...
  • Seite 142 Zenius5 | 20 Operação Passo Descrição  Os slots para cartão SIM e o cartão SD estão dentro do comparti- mento da bateria do Zenius5. Desligue o Zenius5 e coloque-o em uma superfície estável, com o lado de trás voltado para cima. Levante a alavanca da trava da tampa e gire-a no sentido anti- horário para a posição de destravamento vertical.
  • Seite 143: Dados Técnicos

    3 Dados Técnicos Especificações Temperatura ambientais Temperatura de -30°C a +60°C operação: Temperatura de armaze- -40°C a +80°C namento: Proteção contra água, poeira e areia IP65 (IEC60529) À prova de poeiras Umidade Proteção: 5 % a 95 % Os efeitos da condensação devem ser eliminados de forma eficiente através da secagem periódica do dispositivo.
  • Seite 144 FCC Parte 15, 22 e 24 (aplicável nos EUA) Conformidade com regula- • Pela presente, GeoMax AG declara que o produto Zenius5 está em conformidade com os requerimentos essenciais e outras provisões mentos nacionais relevantes da Diretiva 1999/5/EC. A declaração de conformidade está...
  • Seite 146 GeoMax Série Zenius5 853602-1.0.0pt-br Traduzido do texto original(853602-1.0.0en) © 2017 GeoMax AG, Widnau, Suíça GeoMax AG www.geomax-positioning.com...
  • Seite 148 GeoMax Zenius5 Series 853602-1.0.0en (original text) /de/es/fr/it/pt-br © 2017 GeoMax AG, Widnau, Switzerland GeoMax AG www.geomax-positioning.com...

Inhaltsverzeichnis