Inhaltsverzeichnis
Werbung
Verfügbare Sprachen
Verfügbare Sprachen
Quicklinks
5
KOMPERNASS GMBH · BURGSTRASSE 21 · D-44867 BOCHUM
www.kompernass.com
ID-Nr.: KH1191-06/08-V1
PRENSA ELÉCTRICA PARA GALLETAS
PRESSA ELETTRICA PER BISCOTTI
KH 1191
PRENSA ELÉCTRICA PARA GALLETAS
Instrucciones de uso
PRESSA ELETTRICA PER BISCOTTI
Istruzioni per l'uso
ELECTRIC PASTRY PRESS
Operating instructions
ELEKTRISCHE GEBÄCKPRESSE
Bedienungsanleitung
Werbung
Kapitel
Inhaltsverzeichnis

Verwandte Anleitungen für Bifinett KH 1191


Inhaltszusammenfassung für Bifinett KH 1191
- Seite 1 PRENSA ELÉCTRICA PARA GALLETAS PRESSA ELETTRICA PER BISCOTTI KH 1191 PRENSA ELÉCTRICA PARA GALLETAS Instrucciones de uso PRESSA ELETTRICA PER BISCOTTI Istruzioni per l'uso ELECTRIC PASTRY PRESS Operating instructions ELEKTRISCHE GEBÄCKPRESSE Bedienungsanleitung KOMPERNASS GMBH · BURGSTRASSE 21 · D-44867 BOCHUM www.kompernass.com...
- Seite 2 KH 1191...
-
Seite 3: Inhaltsverzeichnis
ÍNDICE PÁGINA Indicaciones de seguridad Uso conforme a lo previsto Volumen de suministro Datos técnicos Descripción de aparatos Antes de usarlo por primera vez Montaje de la pistola repostera Llenado del depósito Formación de las galletas Creación de adornos decorativos Rellenado de masa para galletas o crema para decoración Desmontaje de la pistola repostera Consejos... -
Seite 4: Indicaciones De Seguridad
La pistola repostera KH 1191 se ha diseñado para dar forma a galletas y decorar tartas y similares. Su Para evitar que se genere riesgo de propósito se restringe exclusivamente al ámbito parti-... -
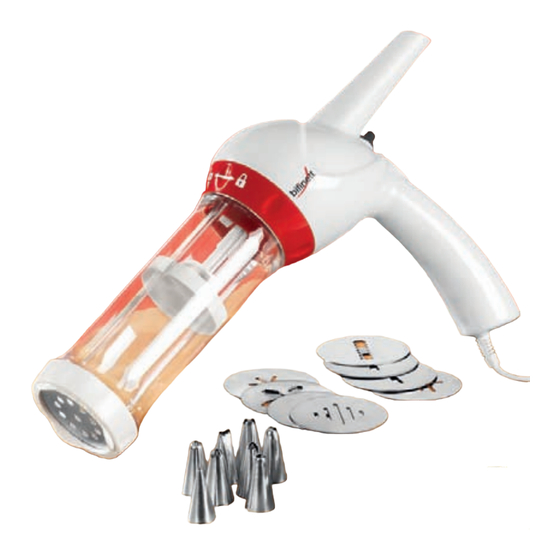
Seite 5: Descripción De Aparatos
Montaje de la pistola repostera Periodo KB Con el periodo KB (funcionamiento por un corto periodo de tiempo) se indica durante cuánto tiem- ADVERTENCIA: po puede funcionar un aparato sin que el motor se sobrecaliente ni se dañe. Tras el periodo KB indica- Desenchufe el aparato antes de montar los do deberá... -
Seite 6: Llenado Del Depósito
Montaje de las plantillas 3. Haga un rollo con la masa de galletas / crema Cuando el disco y el depósito estén para decorar. De esta forma es más fácil llenar montados: el depósito. Llene el depósito con el rollo de 1. -
Seite 7: Creación De Adornos Decorativos
ADVERTENCIA: 4. Suelte el botón de conexión y sostenga la pistola repostera en otro lugar. Si el disco se bloquea durante el uso de la pistola, El tiempo que debe tener pulsado el botón puede deberse a que la crema o la masa sea demasia- depende también del grosor y la forma que quiera do dura. -
Seite 8: Desmontaje De La Pistola Repostera
4. Si es preciso, limpie las piezas sucias de masa y • Si la masa es demasiado espesa para la pistola, séquelas bien. (ver sección "Limpieza y añádale una yema de huevo o un poco de cuidados") líquido. 5. Vuelva a introducir la masa de galletas o la crema •... -
Seite 9: Evacuación
Garantía y servicio Para limpiar el aparado no utilice objetos puntiagu- dos ni cortantes. No utilice productos de limpieza agresivos ni de acción química. Con este aparato recibe usted 3 años de garantía desde la fecha de compra. El aparato ha sido fabri- Desmonte por completo la pistola repostera. -
Seite 10: Recetas
Recetas Galletas 2 Puede utilizar las masas preparadas que encontrará Ingredientes: en los mercados con la pistola repostera. 125 g de mantequilla 125 g de azúcar fino Galletas 1 1 sobrecito de vainilla azucarada 1 huevo Ingredientes: 1 clara de huevo 150 g de mantequilla 250 g de harina 100 g azúcar fino... - Seite 11 INDICE PAGINA Avvertenze di sicurezza Uso conforme Fornitura Dati tecnici Descrizione dell'apparecchio Prima del primo impiego Montaggio della siringa elettrica per pasticceria Riempimento del contenitore Produzione dei pasticcini Applicazione delle decorazioni Aggiunta di impasto o pasta per decorazioni Smontaggio della siringa elettrica per pasticceria Consigli Pulizia e cura Smaltimento...
-
Seite 12: Avvertenze Di Sicurezza
Uso conforme durante l'utilizzo. Per evitare il pericolo di incendio La siringa elettrica per pasticceria KH 1191 è stata e lesioni: progettata per creare pasticcini e decorare torte e • Questo apparecchio non è indicato per l'uso simili. -
Seite 13: Descrizione Dell'apparecchio
Inserire l'asta filettata con il disco Tempo di funzionamento abbreviato pressore Il tempo di funzionamento abbreviato indica il tempo di funzionamento dell'apparecchio senza pericolo 1. Inserire l'estremità dell'asta filettata nell'unità di surriscaldamento e di guasti al motore. Dopo l'uso motore . -
Seite 14: Riempimento Del Contenitore
Suggerimento: Montaggio dei beccucci Dopo aver montato il disco pressore e il conteni- riempire il contenitore non oltre la marcatura tore MAX. Elaborare subito l'impasto inserito. 1. Collocare l'adattatore per i beccucci nell'anello di chiusura . La filettatura dev'essere rivolta 4. -
Seite 15: Applicazione Delle Decorazioni
Aggiunta di impasto o pasta Suggerimento: per decorazioni se l'impasto risultasse troppo appiccicoso, tenerlo per 15 minuti in frigorifero. 1. Impostare il commutatore di direzione sulla freccia verso il basso Applicazione delle decorazioni 2. Premere il tasto di avvio fino a quando il disco pressore sarà... -
Seite 16: Smontaggio Della Siringa Elettrica Per Pasticceria
Smontaggio della siringa elettrica • Se l'impasto contiene ingredienti finemente maci- per pasticceria nati (ad es. noci o mandorle), selezionare un disco di decorazione con aperture più grandi. 1. Impostare il commutatore di direzione sulla • Con certi impasti e dischi di decorazione, è ne- freccia verso l'alto cessario lavorare rapidamente, mentre con altri 2. -
Seite 17: Smaltimento
Smaltimento Importatore Non smaltire per alcun motivo l'appa- KOMPERNASS GMBH recchio insieme ai normali rifiuti dome- BURGSTRASSE 21 stici. Il presente prodotto è conforme 44867 BOCHUM, GERMANY alla direttiva europea 2002/96/CE. www.kompernass.com Smaltire l'apparecchio presso un'azienda autorizzata o presso l'ente comunale di smaltimento. Rispettare le prescrizioni attualmente in vigore. -
Seite 18: Ricette
Ricette Biscotti di pasta frolla 2 Con la siringa elettrica per pasticceria è possibile Ingredienti: lavorare impasti pronti reperibili in commercio. 125 g di burro 125 g zucchero a velo Biscotti di pasta frolla 1 1 pacchetto di zucchero vanigliato 150 g di burro 1 uovo 100 g zucchero a velo... - Seite 19 CONTENT PAGE Safety instructions Intended usage Package contents Technical data Appliance description Before the first use Assembling the Biscuit Shaper Filling the container Shaping biscuits Adding decorations Refilling with pastry or decorative mixture Disassembly of the Biscuit Shaper Tips Cleaning and care Disposal Warranty &...
-
Seite 20: Safety Instructions
To avoid the risks of fire or injuries: The Biscuit Shaper KH 1191 is intended for the • This appliance is not intended for use by persons shaping of biscuits and for decorating cakes etc. It is... -
Seite 21: Appliance Description
Inserting the threaded rod with pusher CO Time The CO Time (Continuous Operation Time) details 1. Place the end of the threaded rod in the how long an appliance can be operated without motor unit . Ensure that the pins inside the the motor overheat-ing and becoming damaged. -
Seite 22: Filling The Container
Note: Assembling the nozzles Fill the container at the most to the MAX When the pusher and container marking. Process the pastry straight away. assembled: 1. Place the nozzle adaptor into the lock ring 4. Place the container onto the motor unit . -
Seite 23: Adding Decorations
Adding decorations Refilling with pastry or decorative mixture Tips: 1. Place the direction switch onto the arrow • Use the nozzles exclusively for shaping pointing downwards fluid-like substances, such as whipped cream. 2. Press and hold the start button until the •... -
Seite 24: Disassembly Of The Biscuit Shaper
Disassembly of the Biscuit • With some pastries and motif discs it is better to Shaper work quickly, with others, better to work slowly. • Simply use trial and error until you can produce 1. Place the direction switch onto the arrow biscuits that match your expectations. -
Seite 25: Disposal
Disposal DES Ltd Units 14-15 Do not dispose of the appliance in your Bilston Industrial Estate normal domestic waste. This product is Oxford Street subject to the European guideline Bilston 2002/96/EC. WV14 7EG Tel.: 0870/787-6177 Dispose of the appliance through an approved dis- Fax: 0870/787-6168 posal centre or at your community waste facility. -
Seite 26: Recipes
Recipes Biscuits 2 You can process commercially available ready- Ingredients: made pastry with the Biscuit Shaper. 125 g butter 125 g powdered sugar Biscuits 1 1 Pkt vanilla sugar Ingredients: 1 egg 150 g butter 1 egg white 100 g powdered sugar 250 g plain flour (Type 405) 1 Pkt vanilla sugar 1 pinch salt... - Seite 27 INHALTSVERZEICHNIS SEITE Sicherheitshinweise Bestimmungsgemäßer Gebrauch Lieferumfang Technische Daten Gerätebeschreibung Vor dem ersten Gebrauch Gebäckpresse zusammensetzen Behälter füllen Gebäck formen Verzierungen anbringen Teig oder Verzierungsmasse nachfüllen Gebäckpresse zerlegen Tipps Reinigen und Pflegen Entsorgen Garantie und Service Importeur Rezepte Lesen Sie die Bedienungsanleitung vor der ersten Verwendung aufmerksam durch und heben Sie diese für den späteren Gebrauch auf.
-
Seite 28: Sicherheitshinweise
Umgebung. Achten Sie darauf, dass das Gebrauch Gerätekabel während des Betriebs niemals nass oder feucht wird. Die Gebäckpresse KH 1191 ist zum Formen von Um Brandgefahr und Verletzungen Gebäck und zum Verzieren von Torten o.ä. zu vermeiden: konzipiert. Sie ist ausschließlich für den privaten •... -
Seite 29: Gerätebeschreibung
Gewindestab mit Schieber einsetzen KB-Zeit Die KB-Zeit (Kurzzeitbetrieb) gibt an, wie lange 1. Setzen Sie das Ende des Gewindestabes man ein Gerät betreiben kann, ohne dass der Mo- die Motoreinheit . Achten Sie darauf, dass die tor überhitzt und Schaden nimmt. Nach der ange- Stifte im Inneren der Motoreinheit in die Füh- gebenen KB-Zeit muss das Gerät solange ausge-... -
Seite 30: Tüllen Montieren
Hinweis: Tüllen montieren Wenn Schieber und Behälter montiert sind: Füllen Sie den Behälter höchstens bis zur MAX- 1. Legen Sie den Tüllenadapter in den Ver- Markierung. Verarbeiten Sie den eingefüllten Teig schlussring . Das Gewinde muss nach sofort. außen zeigen. 2. -
Seite 31: Verzierungen Anbringen
Teig oder Verzierungsmasse 5. Wiederholen Sie die Schritte solange, bis Sie nachfüllen ausreichend Plätzchen geformt haben. Hinweis: 1. Stellen Sie den Richtungsschalter auf den Sollte der Teig zu klebrig sein, stellen Sie ihn für Pfeil nach unten 15 Minuten in den Kühlschrank. 2. -
Seite 32: Gebäckpresse Zerlegen
Gebäckpresse zerlegen • Wenn der Plätzchenteig fein gemahlene Zutaten (z.B. Nüsse oder Mandeln) enthält, wählen Sie 1. Stellen Sie den Richtungsschalter auf den eine Motivscheibe mit großen Öffnungen. Pfeil nach oben • Bei manchen Teigen und Motivscheiben ist es 2. Drücken Sie die Starttaste so lange, bis der besser, wenn man schnell arbeitet, bei anderen, Gewindestab... -
Seite 33: Entsorgen
Entsorgen Garantie und Service Werfen Sie das Gerät keinesfalls in den Sie erhalten auf dieses Gerät 3 Jahre Garantie ab normalen Hausmüll. Dieses Produkt Kaufdatum. Das Gerät wurde sorgfältig produziert unterliegt der europäischen Richtlinie und vor Anlieferung gewissenhaft geprüft. Bitte be- 2002/96/EG. -
Seite 34: Importeur
Importeur Spritzgebäck 2 KOMPERNASS GMBH Zutaten: BURGSTRASSE 21 125 g Butter 44867 BOCHUM, GERMANY 125 g feinster Zucker 1 Pck. Vanillezucker www.kompernass.com 1 Ei 1 Eiweiß 250 g Mehl (Type 405) Rezepte 1 Prise Salz Sie können handelsüblichen Fertigteig mit der •...