Herunterladen Inhalt Inhalt Diese Seite drucken
Inhaltsverzeichnis

Werbung

Verfügbare Sprachen

Verfügbare Sprachen

OPERATION MANUAL • BRUKSANVISNING
BEDIENUNGSANWEISUNG • DESCRIPTIO D'UTILISE

Werbung

Inhaltsverzeichnis
loading

Inhaltszusammenfassung für Star sea data

  • Seite 1 OPERATION MANUAL • BRUKSANVISNING BEDIENUNGSANWEISUNG • DESCRIPTIO D’UTILISE...
  • Seite 2: Inhaltsverzeichnis

    CONTENTS English 1 Introduction ..................................2 1.1 Specifications..................................2 1.2 Part specifications................................. 2 2 Installation .................................... 3 2.1 Installing the instrument................................ 4 2.2 Installing transducer................................4 2.3 Electrical installation ................................5 3 Function overview ................................6 3.1 How to use the push buttons ..............................6 3.1.1 Mode / Light button ................................
  • Seite 3: Introduction

    Thank you for choosing Star SEA Data. SEA Data is a digital instrument which will display all necessary data from the SEA. SEA Data is as standard, a log instrument, providing you information about speed, trip distance, total distance and water temperature.
  • Seite 4: Installation

    2 INSTALLATION English Installation • The installation includes 6 major steps: 1. Read the installation and operation manual. 2. Plan where to install the transducer and instrument. 3. Install the transducer, then the instrument. 4. Run the cables. 5. Take a brake and admire your installation. 6.
  • Seite 5: Installing The Instrument

    2 INSTALLATION English Installing the instrument • Place the adhesive drill template in the desired position for the instrument. Drill the four screw holes using a 2.8 mm ( ”) drill. Use a 63 mm (2 ”) hole saw to cut the clearance hole for the instrument connection socket.
  • Seite 6: Electrical Installation

    2 INSTALLATION English 2.3 Electrical installation On the back of the instrument there are eight pins; Four for the screw connector for the log transducer and four for the depth transducer. The connector is colour coded with green, yellow white and ground sign. Connect the four wires from the log transducer according to the colours to the connector for LOG, the blank wire is ground.
  • Seite 7: Function Overview

    English Function overview The SEA Data instrument can work as a log instrument, a depth instrument or as a combined log/depth instrument. You simply select the type of instrument you want, during calibration. 3.1 How to use the push buttons 3.1.1.
  • Seite 8: Log Functions

    3 LOG FUNCTIONS English 3.2. Log functions 3.2.1. Boat speed The main functions displays the boat speed. The unit (Knots or Miles/h) is selectable during calibration, see 4.2.4. 3.2.2. Water temperature To view water temperature press UP or DOWN until the text TMP is displayed.
  • Seite 9: Depth Functions (Optional)

    3 DEPTH FUNCTIONS English 3.4. Depth functions (optional) To change between Log and Depth information press MODE. This function will display depth in metres, feet or fathoms. To change unit see 4.2.6. A depth sounder measures the time it takes for a sound pulse transmitted from the transducer, to bounce on the bottom and be received by the transducer again.
  • Seite 10: Calibration

    4.2.3. C12 Instrument type (Type LOG) The Star SEA Data instrument can either be operating as a log instrument (LOG), a depth instrument (DPT) or as a combined log/depth instrument (ALL). There is also a demonstration mode built into the instrument (DEM). If LOG is selected, only log functions will be displayed.
  • Seite 11: C13 Unit For Speed (Unit Kts)

    4 CALIBRATION English In demonstration mode (DEM) all values are simulated without any transducers connected. Note! Trip and total distance will not be stored in the permanent memory after power off in demonstration mode. 4.2.4. C13 Unit for speed (Unit KTS) The unit for speed is selectable between knots (KTS), kilometres/hour (K/h) Miles /hour (M/h).
  • Seite 12: C16 Adjusting Depth (0.00 Adj)

    4 CALIBRATION English 4.2.7. C16 Adjusting depth (0.00 ADJ) It is possible to adjust the depth reading plus/minus 99.9 m. This feature makes it possible to get the reading from either the keel or the water surface. Example: Your boat has a draft of two metres and the transducer is mounted one half metre below the water surface.
  • Seite 13: Warranty

    WARRANTY English WARRANTY GENERAL All our products are designed and built to comply to the highest class industry standards. If the products are correctly installed, maintained and operated, as described in the installation and operation manual, they will provide long and reliable service. Our international network of distributors can provide you with the information and assistance you may require virtually anywhere in the world.
  • Seite 14 INNEHÅLL Svenska 1 Introduktion 1.1 Specifikationer 1.2 Förpackningen innehåll 2 Installation 2.1 Installera instrumentet 2.2 Installation av givare 2.3 Elektrisk installation 3 Funktions översikt 3.1 De fyra tryckknapparna 3.1.1 Mode / Ljus knapp 3.1.2 Ner knappen 3.1.3 Upp knappen 3.1.4 Nyckel knappen 3.1.5 Nollställ 3.2 Loggfunktioner 3.2.1 Båtfart...
  • Seite 15: Introduktion

    Tack för att du valde Star SEA Data. Star SEA Data är som standard ett logg instrument med alla nödvändiga funktioner så som fart tripp, total distans och vattentemperatur. Som extra tillbehör kan en lodgivare ansluts. Då får man funktioner som djup, grund och djuplarm.
  • Seite 16: Installation

    2: INSTALLATION Svenska Installation • Installationen omfattar sex steg: 1. Läs noga instruktionsboken. 2. Planera var instrument och givare skall monteras. 3. Installera givarna, därefter instrumentet. 4. Drag kablarna. 5. Ta en rast och beundra ditt arbete! 6. Lär dig funktionerna och kalibrera instrumentet. •...
  • Seite 17: Installera Instrumentet

    2: INSTALLATION Svenska 2.1. Installera instrumentet Placera den självhäftande borrmallen på önskad plats av instrumentet. Borra de fyra monteringshålen med en 2,8 mm borr. Använd en 63 mm hålsåg för att ta upp hålet till skruvplinttornet. OBS! Borra aldrig igenom instrumentets monteringshål, då packningen kan bli skadad med läckage som följd.
  • Seite 18: Elektrisk Installation

    2: INSTALLATION Svenska 2.3. Elektrisk installation På baksidan av instrumentet sitter åtta kontaktstift, fyra för loggivaren och fyra för lodgivaren. Kontakterna är färgkodade för enkel installation: Grön, gul, vit och blankledare. Anslut de fyra ledarna från loggivaren till skruvplinten märkt log, följ färgkodningen. blankledaren är jord. Om lodgivare skall anslutas, använd den andra skruvplinten.
  • Seite 19: Funktions Översikt

    3: FUNKTION ÖVERSIKT Svenska Funktions översikt Star SEA Data instrumentet kan arbeta som logginstrument, lodinstrument eller ett kombinerat logg/lod instrument enkelt instrumenttyp själv i inställningar. Se 4.2.3. 3.1. De fyra tryckknapparna 3.1.1. Mode / Ljus knapp Denna knapp används för att skifta mellan logg och lod läge. Ett kort tryck på denna knapp byter mellan logg och lod läge.
  • Seite 20: Loggfunktioner

    3: LOGGFUNKTIONER Svenska 3.2. Loggfunktioner 3.2.1. Båtfart Huvudfunktionen visar båtfart, valbart i knop(KT), Miles/t(Mh) eller km/t (Kh). Enheten väljs i inställningar. Se 4.2.4 3.2.2. Vattentemperatur För att visa vattentemperatur tryck UPP eller NER tills texten TMP visas. Vattentemperaturen kan visas i Celsius eller Farenheit. Enheten väljs i inställningar.
  • Seite 21: Djupfunktioner (Tillbehör)

    3: DJUPFUNKTIONER Svenska 3.4. Djupfunktioner (tillbehör) För att växla mellan log och djup funktionerna tryck MODE. Denna funktion visar djupet i meter (M), fot (FT) eller famnar (FA). För att ändra enhet se 4.2.6. Ett ekolod mäter den tid det tar för en ljudpuls att färdas från givaren, studsa i botten och tillbaka till givaren.
  • Seite 22: Inställningar

    4.3.3. C12 Instrument typ (Type LOG) Star SEA Data instrumentet kan antingen arbeta som logg (LOG), lod (DPT) eller kombinerat logg/lod instrument (ALL). Instrumentet har också ett inbyggt demonstations läge (DEM). Om logg är valt visas endast logg funktioner, om lod är valt visas endast lod funktioner.
  • Seite 23: C13 Enhet För Fart ( Unit Kts)

    4: INSTÄLLNINGAR Svenska 4.3.4. C13 Enhet för fart ( Unit KTS) Enheten för fart är valbar mellan knop (KTS), mile/timma (M/h) eller kilometer/timma (K/h). För att ändra enhet tryck NYCKEL, stega med UPP eller NER till önskad enhet ock bekräfta med NYCKEL. 4.3.5.
  • Seite 24: C17 Enhet För Vattentemperatur (Unit °C)

    4: INSTÄLLNINGAR Svenska OBS ! Om enheten för djup är vald som fot eller famnar skall justeringen vara i fot eller famnar. För att ställa in nytt kalibreringsvärde, tryck NYCKEL, öka/minska med UPP/NER, flytta till nästa siffra med MODE och lås igen med NYCKEL. 4.3.8.
  • Seite 25: Felsökning

    5: FELSÖKNING Svenska Felsökning Fel i elektroninsk utrustning beror mestadels på felaktiga anslutningar. Kontrollera därför först anslutningarna. Kontrollera också • att batterispänningen är korrekt, • att kablarna inte är skadade, • att det inte är kontaktfel i anslutningarna, • att säkringen inte är bränd och att rätt typ av säkring använts, •...
  • Seite 26 INHALTSVERVERZEICHNIS Deutsch 1 Einleitung ................................. 2 1.1 Spezifikationen............................... 2 1.2 Lieferumfang ................................2 2 Installation ................................. 3 2.1 Anbau des Anzeigegerätes............................ 4 2.2 Installation des Gebers ............................4 2.3 Elektrische Installation ............................6 3 Funktionsübersicht..............................7 3.1 Die Benutzung der Tasten ............................. 7 3.1.1 <Pfeil>...
  • Seite 27: Einleitung

    1 EINLEITUNG Deutsch Einleitung Das Star SEA Data ist ein Grundgerät, daß Sie als Log mit Informationen über Geschwindigkeit, Trip- Distanz, Gesamt-Distanz und Wassertemperatur versorgt. Wenn Sie zusätzlich einen Echolotgeber anschließen, erhalten Sie Informationen über die Tiefe, Flachwasser-Alarm und Tiefen-Alarm.
  • Seite 28: Installation

    2 INSTALLATION Deutsch 2 Installation • Die Installation erfolgt in 6 Schritten: 1. Lesen Sie diese Gebrauchsanweisung 2. Überlegen Sie sich, wo Sie den Geber und das Anzeigegerät einbauen wollen 3. Bauen Sie zuerst den Geber und erst danach das Anzeigegerät ein 4.
  • Seite 29: Anbau Des Anzeigegerätes

    2 INSTALLATION Deutsch Anbau des Anzeigegerätes • Kleben Sie die selbstklebende Bohrschablone an die Stelle, an der Sie das Anzeigegerät anbringen möchten. Bohren Sie zuerst die vier Löcher für die Befestigungsschrauben mittels eines Bohrers mit 2,8 mm Durchmesser. Sägen Sie dann mit einer Lochsäge mit einem Durchmesser von 63 mm das Loch für den rückwärtigen Teil des Anzeige-Gerätes.
  • Seite 30 2 INSTALLATION Deutsch Der Log- und der Echolot-Geber haben einen baugleichen Borddurchlaß. Entscheiden Sie, wo Sie den Geber einbauen wollen und sägen Sie mit einer Lochsäge (Durchmesser =43 mm) ein Loch. Glätten Sie die Ränder mit Schleifpapier. Säubern Sie den Rumpf um das Loch herum innen und außen. Entfernen Sie den Geber durch vorsichtiges Drehen aus dem Borddurchlaß.
  • Seite 31: Elektrische Installation

    Klemme des Log- oder Echolot-Gebers an, das schwarze Minus-Kabel an der Klemme mit dem Erdungssymbol. Grün Gelb Schwarz Weiß Blank Log-Geber und Stromversorgung Log- und Echolot-Geber und Stromversorgung Installieren Sie zwischen der Bordbatterie und Ihrem Star SEA Data in der roten Plus-Leitung unbedingt eine flinke Sicherung mit 5 Ampere.
  • Seite 32: Funktionsübersicht

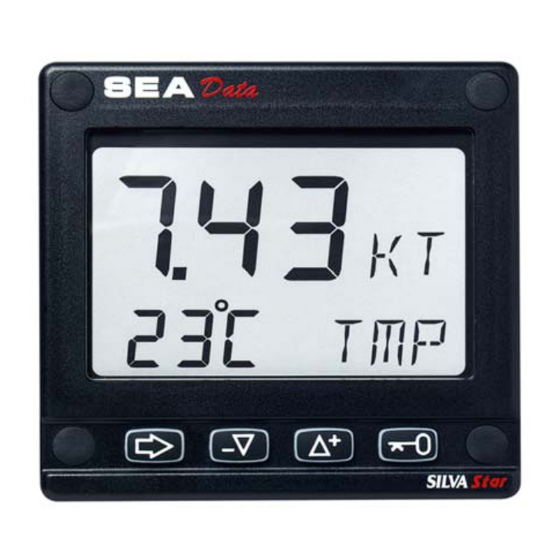
    Deutsch 3 Funktionsübersicht Das Star SEA Data Instrument kann sowohl als Log, als Echolot oder als kombiniertes Log/Echolot verwendet werden. Der Typ des Gerätes wird während der Geräteeinstellung bestimmt. In dieser Gebrauchsanweisung werden die Tasten in spitzen Klammern <Taste> und Anzeigen in FETT dargestellt.
  • Seite 33: Log - Funktionen

    3 LOG - FUNKTIONEN Deutsch 3.2 Log - Funktionen Die obere Anzeige zeigt die Geschwindigkeit, die untere weitere Informationen an. 3.2.1 Bootsgeschwindigkeit Die Hauptfunktion zeigt die Bootsgeschwindigkeit. Die Maßeinheit (Knoten, Kilometer per Stunde oder englische Meilen per Stunde) wird beim Einstellen des Gerätes festgelegt, siehe Kapitel 4.2.4.
  • Seite 34: Echolot - Funktionen (Nur Mit Zusätzlichem Echolot-Geber)

    3 ECHOLOT - FUNKTIONEN Deutsch 3.4 Echolot - Funktionen (nur mit zusätzlichem Echolot-Geber) Um zwischen der Log- und Echolot-Anzeige zu wechseln, drücken Sie <Pfeil>. Die Echolot-Anzeige zeigt die Tiefe in Metern, englischen Fuß oder Faden an. Die Maßeinheit wird beim Einstellen des Gerätes ausgewählt, siehe Kapitel 4.2.6. Der Echolot-Geber mißt die Zeit, die ein ausgesandter Impuls vom Geber bis zum Grund und zurück zum Geber benötigt.
  • Seite 35: Alarm - Bestätigung

    3 ECHOLOT - FUNKTIONEN Deutsch 3.4.4 Alarm - Bestätigung Wenn die eingestellte Flachwasser-Alarm-Tiefe unterschritten oder die Tiefen- Alarm-Tiefe überschritten wird, wird die aktuelle Tiefe in der oberen Zeile und die eingestellte Alarm-Tiefe in der unteren Zeile angezeigt. Außerdem blinken die Anzeigen und der Alarm ertönt. Um den Alarm zu bestätigen, drücken Sie eine beliebige Taste oder steuern das Boot in tieferes bzw.
  • Seite 36: Geräteeinstellungen

    4 EINSTELLUNGEN 4 GERÄTEEINSTELLUNGEN Deutsch Deutsch 4 Geräteeinstellungen Nach dem Einbau ist es notwendig, das Gerät zu programmieren und ggf. zu justieren. Hierzu stehen neun Programmpunkte C10 bis C18 zur Verfügung. Selbstverständlich können die Eingaben zu einem späteren Zeitpunkt verändert werden. Programmpunkte die sich auf das Log beziehen, haben in der Anzeige hinter der Ziffer ein ST, Programmpunkte, die sich auf das Lot beziehen ein DT.
  • Seite 37: Einstellungen

    4 EINSTELLUNGEN Deutsch <Ab> können Sie Ihre Einstellung vornehmen. Haben Sie nur ein Log, wählen Sie LOG. Haben Sie nur ein Echolot, wählen Sie LOT, haben Sie Log und Echolot, wählen Sie ALL. Wollen Sie eine Gerätedemonstration wählen Sie DEM. Durch Drücken von <Schlüssel>...
  • Seite 38: C15 : Tiefen - Maßeinheit

    Wenn auf der Meßstrecke Strömung herrscht, fahren Sie die Strecke mit und gegen den Strom und teilen die Trip - Distanz durch 2. Um den neuen Faktor einzugeben, drücken Sie <Schlüssel>. Die erste Stelle hinter dem Punkt beginnt zu blinken. Durch Drücken von <Auf> oder <Ab> können Sie diesen Wert verändern.
  • Seite 39: C17 : Temperatur - Maßeinheit

    4 EINSTELLUNGEN 5 FELLERSUCHE - 6 WARTUNG - 7 GARANTIE Deutsch Deutsch 4.2.8 C17 : Temperatur - Maßeinheit Wenn C17 in der Anzeige erscheint, können Sie die Maßeinheit für die Temperaturanzeige einstellen. Die aktuelle Einstellung steht in der unteren Zeile hinter Unit. Nach Drücken von <Schlüssel> beginnt dieser Wert zu blinken.
  • Seite 40: Fehlersuche

    Normalerweise erscheint nach dem Einschalten des Gerätes auf der Anzeige die Funktion, die beim Ausschalten angezeigt wurde. Wenn Sie jedoch nach dem Einschalten eine bestimmte Kombination angezeigt haben wollen, wechseln Sie in diese Funktion. Drücken Sie <Schlüssel> und <Pfeil> gleichzeitig. Die Anzeige blinkt. Bestätigen Sie mit <Schlüssel>. 5 Fehlersuche Fehler bei elektronischen Geräten beruhen häufig auf fehlerhaften elektrischen Anschlüssen.
  • Seite 41: Garantie

    7 GARANTIE Deutsch GARANTIE Allgemeines Alle unsere Produkte sind entsprechend dem höchstem Industriestandard konstruiert und hergestellt. Wenn die Geräte gemäß der Gebrauchsanweisung korrekt installiert sind, ordnungsgemäß gewartet und richtig bedient werden, werden sie lange und zuverlässig arbeiten. Unser internationales Netzwerk von SILVA-Vertretungen steht Ihnen in allen Wassersportrevieren auf der Welt mit Informationen und Hilfe zur Verfügung, wenn Sie es wünschen.
  • Seite 42 TABLE DES MATIÈRES Français 1 Introduction ..............................43 1.1 Caractéristiques............................43 1.2 Liste détaillée des pièces ..........................43 2 Installation ................................44 2.1 Installation de l'instrument..........................45 2.2 Installation du capteur ..........................45 2.3 Branchement de l'alimentation........................46 3 Généralité sur les fonctions..........................47 3.1 Utilisation des touches..........................47 3.1.1 Touche Fleche/Eclairage...........................47 3.1.2 Touche BAS...............................47 3.1.3 Touche HAUT ............................47...
  • Seite 43: Introduction

    Merci d'avoir porté votre choix sur le SEA Data Star. Le SEA Data est un instrument digital qui présente toute les informations dont vous aurez besoin en mer. Dans sa version standard, le SEA Data est un loch donnant les informations de vitesse, distance partielle, distance totale et température de l'eau.
  • Seite 44: Installation

    2 INSTALLATION Français Installation • L'installation comporte 6 étapes majeures: 1. Lecture du guide d'installation et du mode d'emploi. 2. Repérage des emplacements capteur et instrument. 3. Installation du capteur, puis de l'instrument. 4. Cheminement des câbles. 5. Pause. 6. Lecture des fonctions et calibrage de votre instrument. •...
  • Seite 45: Installation De L'instrument

    2 INSTALLATION Français Installation de l'instrument • Placer le gabarit de perçage adhésif sur l'emplacement choisi. Percer les 4 trous de 2,8 mm. Utiliser une scie à cloche de 63 mm pour évider l'emplacement destiné à recevoir la prise de l'instrument. Nota: ne jamais percer les trous en utilisant l'instrument comme gabarit.
  • Seite 46: Branchement De L'alimentation

    2 INSTALLATION Français Branchement de l'alimentation L'arrière de l'instrument est équipé de huit broches; Quatre pour le capteur loch (LOG) et quatre pour la sonde (DEPTH). Le connecteur possède un code de couleurs, vert, jaune, blanc ainsi que le symbole de la masse.
  • Seite 47: Généralité Sur Les Fonctions

    3 OPERATION Français Généralité sur les fonctions L'instrument SEA Data peut faire office de loch, de sondeur, ou peut combiner ces deux fonctions à la fois. Le choix du type d'instrument se fait pendant le calibrage. Utilisation des touches 8.4.1...
  • Seite 48: Fonctions Loch

    3 FONCTIONS LOCH Français Fonctions Loch 8.5.1 Vitesse du bateau La fonction principale indique la vitesse du bateau sur l'eau. Les unités (Noeuds , Miles/h Km/h:) sont sélectionnées pendant le calibrage, voir 4.2.4. 8.5.2 Température de l'eau Pour accéder à cette sous-fonction, appuyer sur HAUT ou BAS jusqu'à visualiser TMP.
  • Seite 49: Fonctions Sondeur (Option)

    3 FONCTIONS SONDEUR Français Fonctions sondeur (Option) La touche FLECHE est utilisée pour passer de la fonction Loch à la fonction Sondeur et inversement. Cette fonction présente la profondeur en mètres, pieds ou brasses. Pour changer d'unités voir 4.2.6. Le principe de fonctionnement du sondeur est basé...
  • Seite 50: Calibrage

    à jour de l'affichage. 8.9.3 C12 Type d'instrument (Type LOG) L'instrument SEA Data peut faire office de loch (LOG), de sondeur(DPT), ou peut combiner ces deux fonctions à la fois(ALL). L'instrument comprend également un mode démonstration intégré (DEM). Si DPT est affiché, seule la fonction profondeur sera présentée.
  • Seite 51: C13 Unités De Vitesse (Units Kts)

    3 CALIBRAGE Français 8.9.4 C13 Unités de vitesse (Units KTS) Il est possible de choisir l'unité de vitesse en noeuds (KTS), kilomètres/heure (K/h), ou Miles/heure (M/h). Pour changer d'unité appuyer sur CLE et sélectionner l'unité avec HAUT ou BAS. Confirmer votre choix par un appui sur CLE. 8.9.5 C14 Calibrage de la vitesse (1.20 CAL) Les coques étant toutes de formes différentes, un...
  • Seite 52: C16 Réglage De La Profondeur (0.00Adj)

    3 CALIBRAGE Français 8.9.7 C16 Réglage de la profondeur (0.00ADJ) La profondeur peut être décalée d'une valeur de plus ou moins 99,9 m. Cette fonction permet de mesurer la profondeur à partir de la quille ou de la surface de l'eau.
  • Seite 53: Garantie

    GARANTIE Français GARANTIE GÉNÉRALITÉS Tous nos produits ont été conçus et élaborés pour répondre aux exigences des standards industriels les plus élevés. Si ceux-ci sont correctement installés, entretenus et utilisés, comme prescrit dans le guide d'installation et le mode d'emploi; ils vous donneront toujours satisfaction.

Inhaltsverzeichnis