FLORABEST Ampelschirm Bedienungsanleitung
Verfügbare Sprachen
Verfügbare Sprachen
Quicklinks
Cantilever Parasol
Introduction
Q
Before using the product for the first time, take time to familiarise
yourself with the product first. Read the following assembly instruc-
tions and safety instructions carefully. Only use the product as
described and for the designated areas of application. Please keep these
instructions in a safe place. If you hand this product on to a third party, you
must also pass on all documents relating to the product.
Intended Use
Q
This article is intended for providing protection from the sun in outdoor
domestic environments only. Any use other than previously mentioned or any
product modification is prohibited and can lead to injuries and / or product
damage. The manufacturer is not liable for any damages caused by any use
other than for the intended purpose. The product is not intended for commer-
cial use.
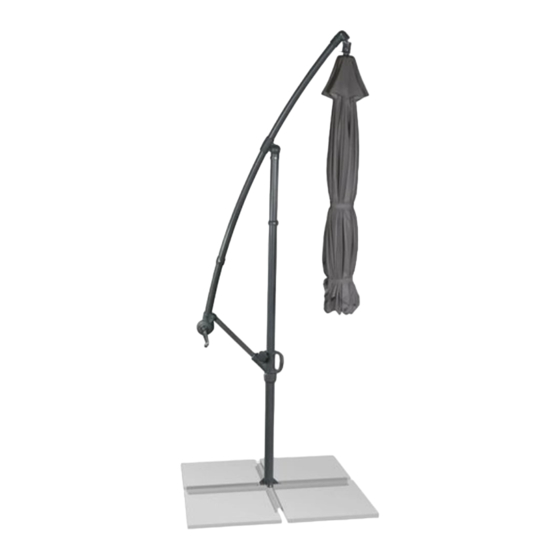
Description of parts
Q
Cross member for paving stand 1
1
Cross member for paving stand 2
2
Bottom pole section
3
Bolt (approx. M8 x 20 mm)
4
Plain washer (approx. ø 8 mm)
5
Top pole with attachments
6
Arm
7
Umbrella top
8
Top pole section
9
Stopper (top pole section)
10
Locking knob
11
Handle
12
Union nut
13
Crank
14
Crankcase
15
Support rod
16
Plastic sleeve
17
Stopper (arm)
18
Included in delivery
Q
Please check immediately on unpacking that the delivery is complete and
that the product and all parts are in perfect condition. Do not under any
circumstances assemble the product if the delivery is incomplete.
1 x Cross member for paving stand 1
1 x Cross member for paving stand 2
1 x Bottom pole section
4 x Bolt (approx. M8 x 20 mm)
4 x Plain washer (approx. ø 8 mm)
1 x Top pole with attachments
1 x Assembly instructions manual
Technical data
Q
Dimensions
Hanging umbrella:
Approx. 300 x 258 cm (ø x H)
Paving stand:
Approx. 100 x 100 cm (L x W)
®
61151_flo_Ampelschirm_Content_LB4.indd 3
Safety advice
PLEASE READ THE ASSEMBLY INSTRUCTIONS BEFORE USE! PLEASE
KEEP THE ASSEMBLY INSTRUCTIONS IN A SAFE PLACE!
J
WarnIng!
DangEr TO LIFE anD rISK OF
aCCIDEnTS TO InFanTS anD CHILDrEn! Never leave
children alone and unsupervised with packaging material and
the product. The packaging material constitutes a risk to life through suffoca-
tion and strangulation. Children often underestimate the risks. Always
keep children away from the product. The product is not a toy.
m CaUTIOn! rISK OF InJUrY! Ensure that all parts are undamaged
and have been assembled appropriately. Risk of injury exists if assembled
incorrectly. Damaged parts can effect safety and function.
m CaUTIOn! Do not leave children unattended. The product is not a
climbing frame or toy. Make sure that nobody climbs or leans on the
product, particularly children. The product could become imbalanced
and tip up. This may result in injury and / or damage.
m CaUTIOn! DangEr OF TIPPIng OvEr! Ensure that the product
stands in stable equilibrium on a firm surface. The hanging umbrella must
always be used in conjunction with 4 pieces of approx. 50 x 50 cm
paving slabs (not included). Otherwise the hanging umbrella could tip
over and result in injury and damage to property.
J
N ever move the hanging umbrella in the open state. Always fully close
the umbrella top
first and pull in the arm
8
the load on the product could become unbalanced and cause it to
overturn, resulting in injury and / or damage.
h CaUTIOn! FIrE HaZarD! Never place the product near an open fire
and / or radiant heaters.
J
M ake sure that this product is standing on a solid, level surface.
J
M ake sure the product is stable before use!
m CaUTIOn! rISK OF InJUrY! Before opening and closing the
product, make sure that there are no people standing too near to it.
m CaUTIOn! rISK OF CrUSHIng! Watch your fingers when opening
and closing the product. If you are careless, you risk injuring your fingers
by crushing them!
J
E nsure that the top pole with attachments
lower pole section
on the paving stand. Unless this is done, it is not
3
safe to use the hanging umbrella.
J
Close the hanging umbrella if the wind shows signs of increas-
ing in speed or on the approach of squally showers.
J
N ever use the product as protection against bad weather.
J
N ever leave an open hanging umbrella unattended. Damage could
occur if strong winds arise unexpectedly.
J
C lose the hanging umbrella in the event of wind, snow or rain.
J
D o not hang any objects (e.g. clothing) from the product.
assembly / disassembly
Q
note: For assembly you will need a working space at least 16 m
and 4 m in diameter.
note: If possible have a second person help you with the assembly.
note: Keep 4 pieces of approx. 50 x 50 cm paving slabs close at hand for
the paving stand. Place the paving slabs evenly on the cross members of the
paving stand.
assembling the paving stand
Q
j
F it the cross member for paving stand 2
for paving stand 1
(see Figure B).
1
j
B olt the bottom pole section
3
the bolts (approx. M8 x 20 mm)
(approx. ø 8 mm)
(see Figure C).
5
j
I nsert the top pole with attachments
attached to the paving stand and screw the two poles together with the
union nut
(see Figure D, step
13
completely. Otherwise
7
is attached firmly to the
6
2
in area
on top of the cross member
2
to the assembled cross members. Use
with the plain washers
4
into the bottom pole section
6
).
1
GB
08.12.10 10:56
3
3

Verwandte Anleitungen für FLORABEST Ampelschirm


Inhaltszusammenfassung für FLORABEST Ampelschirm
- Seite 13 Das Produkt ist nicht für den gewerblichen Einsatz bestimmt. Verletzungen und / oder Beschädigungen können die Folgen sein. m vOrSICHT! KIPPgEFaHr! Sorgen Sie immer für einen festen Stand des Produkts. Verwenden Sie den Ampelschirm ausschließlich mit 4 Wege- Teilebeschreibung Q platten à...
- Seite 14 Schraubsicherung . Drehen Sie dazu die Schraubsicherung im Uhrzeigersinn fest (siehe Abbil- dung H, Schritt Schirmdach schließen, ampelschirm bewegen Q j D rehen Sie die Kurbel gegen den Uhrzeigersinn, bis das Schirmdach vollständig geschlossen ist (siehe Abbildung I, Schritt j S chieben Sie die Kunststoffhülse...
- Seite 15 You need · Potrzebujecie · Szüksége van Potrebujete · Potřebujete · Budete potrebovať Sie benötigen: (M8 x 20 mm) (ø 8 mm) ® 61151_flo_Ampelschirm_Content_LB4.indd 17 08.12.10 10:57...
- Seite 16 ® 61151_flo_Ampelschirm_Content_LB4.indd 18 08.12.10 10:57...
- Seite 17 ® 61151_flo_Ampelschirm_Content_LB4.indd 19 08.12.10 10:57...