Herunterladen Inhalt Inhalt Diese Seite drucken
Inhaltsverzeichnis

Werbung

Verfügbare Sprachen

Verfügbare Sprachen

HOCHAUFLÖSENDE
FARBKAMERA
HIGH-RESOLUTION COLOUR CAMERA
TVCCD-187HCOL
Best.-Nr. 18.2480
BEDIENUNGSANLEITUNG
INSTRUCTION MANUAL
MODE D'EMPLOI
ISTRUZIONI PER L'USO

Werbung

Inhaltsverzeichnis
loading

Inhaltszusammenfassung für Monacor SECURITY TVCCD-187HCOL

  • Seite 1 HOCHAUFLÖSENDE FARBKAMERA HIGH-RESOLUTION COLOUR CAMERA TVCCD-187HCOL Best.-Nr. 18.2480 BEDIENUNGSANLEITUNG INSTRUCTION MANUAL MODE D’EMPLOI ISTRUZIONI PER L’USO...
  • Seite 2 Der deutsche Text beginnt auf Seite 4. Prior to the installation … We hope you will enjoy using your new MONACOR unit. Please read these operating instructions carefully prior to operating the unit. Thus, you will get to know all functions of the unit, operating errors will be prevented, and the unit will be protected against any damage caused by improper use.
  • Seite 4: Inhaltsverzeichnis

    Auf der ausklappbaren Seite 3 finden Sie alle beschriebenen Bedien elemente und Anschlüsse. Inhalt Übersicht der Bedienelemente und Anschlüsse ... . 5 Wichtige Hinweise für den Gebrauch ....5 Einsatzmöglichkeiten .
  • Seite 5: Übersicht Der Bedienelemente Und Anschlüsse

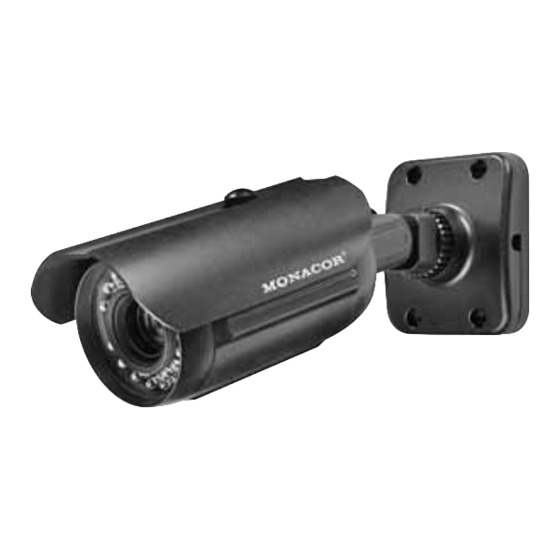
    1 Übersicht der Bedienelemente und Anschlüsse 1 Montagerahmen zur Befestigung an Wand oder Decke 2 Kamerahalter zur Befestigung am Montagerahmen (1) 3 Feststellschrauben des Kamerahalters (2): zum Drehen, Schwen- ken oder Neigen der Kamera die entsprechende Schraube lösen und nach dem Ausrichten der Kamera wieder festziehen 4 Befestigungsschraube für das Sonnendach (5) 5 Sonnendach 6 Schraubdeckel der Anschlussbuchse für die Fernbedienung (9)
  • Seite 6: Einsatzmöglichkeiten

    Das Kameragehäuse ist wetterfest, jedoch nicht ab solut wasser- dicht. Tauchen Sie darum die Ka mera nicht in Wasser ein. Das Objektiv muss vor direkter Sonneneinstrahlung geschützt sein, da sonst der Bildabtaster beschädigt werden kann. Verwenden Sie zum Reinigen keine aggressiven Reinigungsmittel oder Chemikalien.
  • Seite 7: Inbetriebnahme

    nung in der Wand/Decke oder durch einen der beiden Kabeldurch- lässe am Sockel des Halters ( Abbildung, Seite 3) führen. Bei einer Außenmontage an einer Wand muss der verwendete Kabel- durchlass nach unten zeigen und der andere abgedichtet werden, damit kein Niederschlag in die Halterung ge langen kann. Bitte beachten: Die Anschlüsse (10) –...
  • Seite 8: Kamera Ausrichten Und Objektiv Einstellen

    zweipoligen Stecker (12) verbinden. Sobald die Betriebsspan nung anliegt, ist die Kamera eingeschaltet. VORSICHT Bei Dunkelheit schalten die Infrarot-LEDs ein. Bli- cken Sie nie aus der Nähe direkt in die eingeschalte- ten LEDs. Obwohl das Infrarotlicht unsichtbar ist, kann es Augen schäden verursachen. 5.2 Kamera ausrichten und Objektiv einstellen Den Monitor, auf dem die Einstellungen überprüft werden sollen, ein- schalten und die Kamera auf den Überwachungsbereich ausrichten:...
  • Seite 9: Lens - Objektiv

    Menüpunkt oder einer Einstelloption, kann für weitere Einstellungen mit der Taste SET (a) in ein Untermenü gewechselt werden. Zum Verlas- sen eines Untermenüs die Taste SET drücken. Zum Verlassen des Bildschirmmenüs die Zeile EXIT anwählen und mit der Taste SET bestätigen. Das Menü blendet sich auch automa- tisch aus, wenn für ca.
  • Seite 10: White Bal. - Weißabgleich

    reich ⁄ ⁄ Sekunde wählbar; die längste Ver- 120 000 schlusszeit kann um den Faktor ×2 ... ×128 erhöht werden: ausgehend von der Einstellung ⁄ Sekunde die Taste so oft drücken bis der gewünschte Faktor gewählt ist – mit höherem Faktor verringert sich allerdings auch die Bildabtastrate entsprechend 6.3 WHITE BAL.
  • Seite 11: Blc - Gegenlichtkompensation

    6.4 BLC – Gegenlichtkompensation Die Gegenlichtkompensation (BLC = backlight compensation) dient dazu, Objekte aufzuhellen, die im Gegenlicht überwacht werden sollen und durch die Helligkeitsregelung zu dunkel und kontrastarm darge- stellt würden. BLC ausgeschaltet HIGH starke Gegenlichtkompensation (bis zu 42 dB Verstärkung) mittlere Gegenlichtkompensation (bis zu 30 dB Verstärkung) MIDDLE leichte Gegenlichtkompensation (bis zu 18 dB Verstärkung)
  • Seite 12: Sens-Up - Erhöhung Der Lichtempfindlichkeit

    6.7 SENS-UP – Erhöhung der Lichtempfindlichkeit Die Funktion SENS-UP dient zur Erhöhung der Lichtempfindlichkeit bei schwachen Lichtverhältnissen. Die Kamera stellt bei schlechter Ausleuchtung automatisch eine längere Belichtungszeit ein. Funktion ausgeschaltet Funktion eingeschaltet; AUTO↵ im Untermenü kann der max. Faktor (×2 ... ×128) für die Erhöhung der Belichtungszeit eingestellt werden;...
  • Seite 13: Camera Title - Kameranamen Einblenden

    6.8.1 CAMERA TITLE – Kameranamen einblenden keine Einblendung des Kameranamens Einblendung des Kameranamens ON↵ 1) Ist die Einstellung ON↵ gewählt, mit der Taste SET in das folgende Untermenü CAMERA TITLE wechseln: In der untersten Zeile befinden sich CAMERA TITLE 15 Felder zur Eingabe von Zeichen ABCDEFGHIJKLM aus dem darüber liegenden Zeichen - NOPQRSTUVWXYZ...
  • Seite 14: Day/ Night - Umschaltung Tagbetrieb / Nachtbetrieb

    6.8.2 DAY/ NIGHT – Umschaltung Tagbetrieb / Nachtbetrieb COLOR immer Farbmodus, IR-Sperrfilter ist aktiviert immer Schwarzweiß-Modus, IR-Sperrfilter ist deaktiviert automatische Umschaltung zwischen Tagbetrieb (Farb modus) AUTO und Nachtbetrieb (Schwarzweiß-Modus) in Abhängigkeit von der Helligkeit der Umgebung: Bei eintretender Dunkelheit wechselt die Kamera auf S/W-Wiedergabe und das IR-Sperr- filter wird motorisch weggeschwenkt, bei ausreichender Hel- ligkeit bewegt sich das IR-Sperrfilter wieder vor den CCD-Chip und die Kamera wechselt zurück auf Farbwiedergabe.
  • Seite 15: Privacy - Privatzonenabschattung

    ID NUM der Kamera eine Identifikationsnummer (0 – 255) zuweisen, damit sie in der Überwachungsanlage adressiert werden kann, und in der Zeile BAUDRATE die Übertragungsrate (9600 bps, 19 200 bps oder 38 400 bps) einstellen, mit der das Steuergerät arbeitet. 6.8.5 PRIVACY –...
  • Seite 16: Mirror - Bildspiegelung

    2) Den gewählten Bereich in der Zeile AREA STATE aktivieren (ON) oder deaktivieren (OFF). 3) Die Größe und Lage des gewählten Bereichs durch Verschieben der Ränder bestimmen (TOP = oberer Rand, DOWN = unterer Rand, LEFT = linker Rand, RIGHT = rechter Rand). 6.8.6 MIRROR –...
  • Seite 17: Technische Daten

    Abmessungen, Gewicht: . . ∅ 82 mm × 145 mm, 1,1 kg Anschlusskabel: ..1,2 m Änderungen vorbehalten. Diese Bedienungsanleitung ist urheberrechtlich für MONACOR INTERNATIONAL ® GmbH & Co. KG geschützt. Eine Reproduktion für eigene kommerzielle Zwecke – auch...
  • Seite 18 All operating elements and connections described can be found on the fold-out page 3. Contents Operating Elements and Connections ....19 Important Notes ........19 Applications .
  • Seite 19: Operating Elements And Connections

    1 Operating Elements and Connections 1 Mounting frame for installing the camera on ceilings or walls 2 Camera bracket for fixing the camera to the mounting frame (1) 3 Locking screws of the camera bracket (2): for turning, panning or tilting the camera, release the corresponding screw and tighten it again after aligning the camera 4 Locking screw for the sunshield (5)
  • Seite 20: Applications

    The camera housing is weatherproof; however, it is not completely watertight. Therefore, do not immerse the camera in water. Protect the lens against direct sunlight; otherwise the CCD chip may be damaged. Never use aggressive detergents or chemicals for cleaning the hous- ing.
  • Seite 21: Operation

    3) Fasten the camera bracket (2) to the mounting frame by means of the four hexagon socket screws. Guide the connection cable through an opening in the wall/ceiling or through one of the two lat- eral cable inlets in the base of the bracket ( figure, page 3).
  • Seite 22: Aligning The Camera And Adjusting The Lens

    adapter provided (13) to the two-pole plug (12). Once the operating voltage has been applied, the camera will be switched on. CAUTION When darkness falls, the infrared LEDs will be switched on. Never look directly into the lit LEDs at a close range.
  • Seite 23: Lens

    tion means that further settings will be available in a submenu when the button SET (a) is pressed. To exit a submenu, press the button SET. To exit the OSD menu, select the line EXIT and press the button SET to confirm. The menu will also disappear automatically after ap- proximately one minute if no button is pressed.
  • Seite 24: White Bal

    crease the longest shutter time by factor ×2 ... ×128: starting from the setting ⁄ second, press the button repeatedly until the desired factor is selected – however, a higher factor will reduce the sampling rate accordingly 6.3 WHITE BAL. The white balance is used to adapt the camera to the colour tempera- ture of different light sources.
  • Seite 25: Blc

    6.4 BLC The backlight compensation (BLC) is used to illuminate objects which are to be monitored in the backlight and which would appear too dark or low in contrast with the brightness control. BLC deactivated high backlight compensation (amplification up to 42 dB) HIGH MIDDLE average backlight compensation (amplification up to 30 dB)
  • Seite 26: Sens-Up

    6.7 SENS-UP The function SENS-UP is used to increase the sensitivity to light in poor lighting conditions. With a low lighting level, the camera will auto- matically increase the exposure time. function deactivated function activated; AUTO↵ in the submenu, the maximum factor (×2 ... ×128) for in- creasing the exposure time is adjustable;...
  • Seite 27: Camera Title

    6.8.1 CAMERA ID no camera name inserted ON↵ camera name inserted 1) With ON↵ selected, press the button SET to go to the next submenu CAMERA TITLE: In the lower line, you will find 15 CAMERA TITLE fields to enter characters from the ABCDEFGHIJKLM character set above it.
  • Seite 28: Day /Night

    6.8.2 DAY/ NIGHT COLOR permanent colour mode, IR suppression filter activated permanent black-and-white mode, IR suppression filter deacti- vated AUTO automatic switchover between day mode (colour mode) and night mode (B / W mode) depending on the ambient light: When darkness falls, the camera will switch over to B / W reproduction and the IR suppression filter will be removed mechanically;...
  • Seite 29: Privacy

    and in the line BAUDRATE, adjust the transmission rate (9600 bps, 19 200 bps or 38 400 bps) of the controller. 6.8.5 PRIVACY privacy masking deactivated ON↵ privacy masking activated When the privacy masking is activated, four rectangular masking areas (AREA1 to AREA4), adjustable separately, will be available to mask image areas not to be monitored: When ON↵...
  • Seite 30: Mirror

    6.8.6 MIRROR no image inversion vertical image inversion vertical and horizontal image inversion horizontal image inversion 6.8.7 DZOOM When the 10-fold magnification via the optical zoom is reached and the image is zoomed in further, the digital zoom will be activated. Select the magnification factor of the digital zoom between ×2, ×4 and ×8.
  • Seite 31: Specifications

    Dimensions, weight: ..∅ 82 × 145 mm, 1.1 kg Connection cable: ..1.2 m Subject to technical modification. All rights reserved by MONACOR INTERNATIONAL GmbH & Co. KG. No part of this ®...
  • Seite 32 Vous trouverez sur la page 3, dépliable, les éléments et branche- ments décrits. Table des matières Eléments et branchements ......33 Conseils importants dʼutilisation .
  • Seite 33: Eléments Et Branchements

    1 Eléments et branchements 1 Etrier de montage pour fixation au mur ou au plafond 2 Support de caméra pour fixation sur lʼétrier de montage (1) 3 Vis de réglage du support de caméra (2) ; desserrez la vis corres- pondante pour orienter, incliner ou tourner la caméra, une fois le réglage effectué, revissez la vis 4 Vis de fixation pour le pare soleil (5)
  • Seite 34: Possibilités Dʼutilisation

    Le boîtier de la caméra est résistant aux intempéries mais nʼest pas complètement étanche. Ne plongez jamais la caméra dans lʼeau. Lʼobjectif doit être protégé du rayonnement direct du soleil sinon la puce pourrait être endommagée. Pour le nettoyage, nʼutilisez pas de produits détergents abrasifs ou de produits chimiques.
  • Seite 35: Fonctionnement

    3) Fixez le support de caméra (2) à lʼétrier de montage avec 4 vis hexa- gonales. Faites passer le câble de branchement via une ouverture dans le mur / plafond ou via un des deux passages de câble sur le socle du support ( schéma, page 3).
  • Seite 36: Orientation De La Caméra Et Réglage De Lʼobjectif

    tion via lʼadaptateur livré (13) à la fiche deux pôles (12). Dès que la tension de fonctionnement est présente, la caméra est allumée. ATTENTION Les LEDs infrarouges sʼallument en cas de pénom- bre. Ne regardez jamais directement à proximités des LEDs allumées.
  • Seite 37: Lens - Objectif

    rière un point du menu ou une option de réglage, on peut accéder à un sous-menu pour dʼautres réglages avec la touche SET (a) enfoncée. Pour quitter un sous-menu, appuyez sur la touche SET. Pour quitter le menu écran, sélectionnez la ligne EXIT, confirmez avec la touche SET.
  • Seite 38: White Bal. - Compensation Du Blanc

    MANUAL↵ durée dʼobturation réglable Dans le sous-menu, différentes durées dʼobturation dans la plage ⁄ à ⁄ secondes sont sélectionnables : la durée 120 000 dʼobturation la plus grande peut augmenter du facteur ×2 ... ×128 : en partant du réglage ⁄...
  • Seite 39: Blc - Compensation Du Contre-Jour

    MANUAL↵ compensation manuelle du blanc : dans le sous-menu, la part de rouge (RED) et bleu (BLUE) est réglable séparément. 6.4 BLC – compensation du contre-jour La compensation du contre-jour (BLC = backlight compensation) per- met dʼéclaircir des objets devant être surveillés en contre-jour et qui apparaîtraient trop sombres ou pauvres en contraste par le réglage de luminosité.
  • Seite 40: Sens-Up - Augmentation De La Sensibilité À La Lumière

    6.7 SENS-UP – augmentation de la sensibilité à la lumière La fonction SENS-UP permet dʼaugmenter la sensibilité à la lumière en cas de conditions dʼéclairage faibles. La caméra augmente automati- quement la durée dʼexposition en cas de mauvais éclairage. fonction désactivée fonction activée : AUTO↵...
  • Seite 41: Camera Tittle - Affichage Du Nom De La Caméra

    6.8.1 CAMERA TITTLE – affichage du nom de la caméra aucun affichage du nom de la caméra affichage du nom de la caméra ON↵ 1) Si le réglage ON↵ est sélectionné, passez au sous-menu suivant CAMERA TITLE avec la touche SET : Dans la dernière ligne, il y a 15 champs CAMERA TITLE pour saisir des caractères parmi le...
  • Seite 42: Day Night - Commutation Fonctionnement Jour / Nuit

    6.8.2 DAY NIGHT – commutation fonctionnement jour / nuit COLOR mode couleur permanent, filtre suppresseur IR activé mode noir et blanc permanent, filtre suppresseur IR désactivé AUTO commutation automatique entre fonctionnement jour (mode couleur) et fonctionnement nuit (mode noir et blanc) selon la luminosité...
  • Seite 43: Privacy - Masquage Des Zones Privées

    ID NUM, attribuez un numéro dʼidentification (0 – 255) pour quʼelle ait une adresse dans lʼinstallation de surveillance et dans la ligne BAUDRATE, réglez le taux dʼéchantillonnage (9600 bps, 19 200 bps ou 38 400 bps) du contrôleur. 6.8.5 PRIVACY – masquage des zones privées masquage désactivé...
  • Seite 44: Mirror - Fonction Miroir

    3) Déterminez la dimension et la position de la zone sélectionnée en déplaçant les bords (TOP = bord supérieur, DOWN = bord inférieur, LEFT = bord gauche, RIGHT = bord droit). 6.8.6 MIRROR – fonction miroir pas de fonction miroir fonction miroir verticale fonction miroir horizontale et verticale fonction miroir horizontale...
  • Seite 45: Caractéristiques Techniques

    Dimensions, poids : ..∅ 82 mm × 145 mm, 1,1 kg Câble de branchement : . . 1,2 m Tout droit de modification réservé. Notice dʼutilisation protégée par le copyright de MONACOR INTERNATIONAL ® GmbH & Co. KG. Toute reproduction même partielle à des fins commerciales est...
  • Seite 46 A pagina 3, se aperta completamente, vedrete sempre gli elementi di comando e i collegamenti descritti. Indice Elementi di comando e collegamenti ....47 Avvertenze importanti per lʼuso .
  • Seite 47: Elementi Di Comando E Collegamenti

    1 Elementi di comando e collegamenti 1 Telaio di montaggio per il fissaggio alla parete o al soffitto 2 Supporto della telecamera per il fissaggio al telaio di montaggio (1) 3 Viti di bloccaggio del supporto della telecamera (2): per girare, orientare o inclinare la telecamera allentare la relativa vite e al ter- mine stringerla di nuovo 4 Vite di fissaggio per il parasole (5)
  • Seite 48: Possibilità Dʼimpiego

    Il contenitore della telecamera è resistente alle intemperie ma non è a tenuta stagna totale. Non immergere la telecamera nellʼacqua. Lʼobiettivo deve essere protetto dai raggi diretti del sole per non dan- neggiare il sensore ottico. Per la pulizia non usare detersivi aggressivi o prodotti chimici. Nel caso dʼuso improprio, dʼinstallazione sbagliata, dʼimpiego scorretto o di riparazione non a regola dʼarte della telecamera, non si assume nessuna responsabilità...
  • Seite 49: Messa In Funzione

    3) Fissare il supporto della telecamera (2) al telaio di montaggio per mezzo delle 4 viti a brugola. Far passare il cavo di collegamento at- traverso lʼapertura nella parete o nel soffitto oppure attraverso uno dei due passacavi nello zoccolo del supporto ( illustrazione a pa- gina 3).
  • Seite 50: Orientare La Telecamera E Impostare Lʼobiettivo

    800 mA max. con 12 V e di 460 mA max. con 24 V~. Collegare la sorgente della corrente con il connettore a 2 poli (12) servendosi dellʼadattatore in dotazione (13). Non appena è presente la tensione dʼesercizio, la telecamera è accesa. ATTENZIONE Con lʼoscurità...
  • Seite 51: Lens - Obiettivo

    Con il tasto (b) scegliere la voce del menù. Con il tasto (c) modificare unʼimpostazione. Se dietro una voce del menù o unʼop- zione dʼimpostazione si trova una freccia ↵ , con il tasto SET (a) si può passare in un sottomenù per fare ulteriori impostazioni. Per uscire dal sottomenù...
  • Seite 52: White Bal. - Bilanciamento Del Bianco

    MANUAL↵ tempo dʼesposizione fisso regolabile; nel sottomenù si possono scegliere vari tempi dʼesposi- zione fra ⁄ ⁄ di secondo; il tempo più lungo dʼespo- 120 000 sizione può essere aumentato del fattore ×2 ... ×128: par- tendo dallʼimpostazione ⁄ di secondo, premere il tasto tante volte finché...
  • Seite 53: Blc - Compensazione Del Controluce

    6.4 BLC – Compensazione del controluce La compensazione del controluce (BLC = backlight compensation) serve a schiarire gli oggetti da sorvegliare in controluce che sarebbero rappresentati troppo scuri e poco contrastati per via della regolazione della luminosità. BLC disattivata compensazione forte (guadagno fino a 42 dB) HIGH compensazione media (guadagno fino a 30 dB) MIDDLE...
  • Seite 54: Sens-Up - Aumento Della Sensibilità Alla Luce

    6.7 SENS-UP – Aumento della sensibilità alla luce La funzione SENS-UP serve per aumentare la sensibilità alla luce in caso di scarsa luminosità. In questo caso, la telecamera imposta auto- maticamente un tempo più lungo dʼesposizione. funzione disattivata AUTO↵ funzione attivata; nel sottomenù...
  • Seite 55: Camera Title - Visualizzare Il Nome Della Telecamera

    6.8.1 CAMERA TITLE – Visualizzare il nome della telecamera nessuna visualizzazione del nome della telecamera visualizzazione del nome della telecamera ON↵ 1) Se è stata scelta lʼimpostazione ON↵, con il tasto SET passare al sottomenù seguente CAMERA TITLE: Nella riga più bassa si trovano CAMERA TITLE 15 campi per digitare dei simboli fra il ABCDEFGHIJKLM...
  • Seite 56: Day/ Night - Commutazione Funzionamento Giorno/Notte

    6.8.2 DAY/ NIGHT – Commutazione funzionamento giorno / notte COLOR sempre modo colore, il filtro di blocco IR è attivato sempre modo bianco/nero, il filtro di blocco IR è disattivato commutazione automatica fra funzionamento di giorno (modo AUTO colore) e funzionamento di notte (modo b / n) a seconda della luminosità...
  • Seite 57: Cam. Id - Comandi Tramite Interfaccia Rs-485

    6.8.4 CAM. ID – Comandi tramite interfaccia RS-485 Se le impostazioni dello zoom e del fuoco devono essere telecoman- date per mezzo dellʼinterfaccia RS-485 (collegamento Capitolo 5.1), eseguire le impostazioni necessarie nel sottomenù CAMERA ID: nella riga ID NUM assegnare alla telecamera un numero identificativo (0 –...
  • Seite 58: Mirror - Specchiamento Dellʼimmagine

    Nella riga AREA TONE scegliere in comune per tutti e quattro i settori dʼoscuramento il valore tonale desiderato: da 1 (nero) fino a 100 (gri- gio chiaro). Quindi impostare ogni settore separatamente: 1) Nella riga AREA SEL scegliere il settore dʼoscuramento da impo- stare.
  • Seite 59: Dati Tecnici

    Dimensioni, peso: ..∅ 82 mm × 145 mm, 1,1 kg Cavo di collegamento: . . . 1,2 m Con riserva di modifiche tecniche. La MONACOR ® INTERNATIONAL GmbH & Co. KG si riserva ogni diritto di elabora- zione in qualsiasi forma delle presenti istruzioni per lʼuso.
  • Seite 60 ® Copyright by MONACOR INTERNATIONAL GmbH & Co. KG, Bremen, Germany. © All rights reserved. A-1026.99.01.11.2009...

Inhaltsverzeichnis