Herunterladen Diese Seite drucken

Werbung

Verfügbare Sprachen

Verfügbare Sprachen

Thermalright
Macho 120 Rev.A

Werbung

loading

Inhaltszusammenfassung für Thermalright Macho 120 Rev.A

  • Seite 1 Thermalright Macho 120 Rev.A...
  • Seite 3 Assembly Package Macho 120 Rev.A × 4 × 4 × 4 × 1 × 7 × 4 × 4 × 5 × 1 × 1 Chill Factor × 1 × 2 × 1 × 1...
  • Seite 4: Exploded View

    Macho 120 Rev.A Intel 775/1150/1151/1155/1156/1366 Exploded View Important! Before proceeding with installation, please check for the most up-to-date instructions at www.thermalright.com Heatsink Body 120mm Fan Clip 120mm Fan Anti-Vibration Pads M3 L6 Screw Anchoring Mount Mounting Plate Screw Nut Backplate cap...
  • Seite 5 M3 L10 Screw ×5 M3 L6 Screw ×7 Intel Washer (small) ×4 AMD Washer (big) ×4 Anti-Vibration Pad ×4 120mm Fan Clip ×2 Backplate Cap ×1 Mylar Film ×1 Thermal paste ×1 Screw driver ×1 120mm Fan ×1 The Ultimate Cooling Solutions! www.thermalright.com...
  • Seite 6: Installation Instructions

    Installation Instructions: Step 1: Step 1 : Take out Macho cooler from the paper box. Remove the 120mm Fan from the cooler by pulling the Fan Clips upwards in order to give room for ease of installation. And leave the Fan Clips on the Heatsink Body. Do not remove them.Apply Anti-Vibration Padding to 4 corners on the Heatsink Body.
  • Seite 7 Plug in the fan connector to the CPU PWM Fan Body. And then secure it with the 120mm Fan socket on the motherboard. Installation complete. Clips, by pulling the Fan Clips to place the four ends at the four holes on the 120mm Fan. The Ultimate Cooling Solutions! www.thermalright.com...
  • Seite 8 Macho 120 Rev.A Intel 2011/2011-3/2066 Exploded View Important! Before proceeding with installation, please check for the most up-to-date instructions at www.thermalright.com 120mm Fan Clip Heatsink Body 120mm Fan Anti-Vibration Pads M3 L6 Screw Mounting Plate Anchoring Mount LGA2011 Type B...
  • Seite 9 M3 L10 Screw ×5 M3 L6 Screw ×7 Intel Washer (small) ×4 AMD Washer (big) ×4 Anti-Vibration Pad ×4 120mm Fan Clip ×2 Backplate Cap ×1 Mylar Film ×1 Thermal paste ×1 Screw driver ×1 120mm Fan ×1 The Ultimate Cooling Solutions! www.thermalright.com...
  • Seite 10 Installation Instructions: Step 1: Step 1 : Take out Macho cooler from the paper box. Remove the 120mm Fan from the cooler by pulling the Fan Clips upwards in order to give room for ease of installation. And leave the Fan Clips on the Heatsink Body. Do not remove them.Apply Anti-Vibration Padding to 4 corners on the Heatsink Body.
  • Seite 11 Macho 120 Rev.A Step 4: Step 4 : Applying Thermal Paste Apply the Thermal Paste to the base of the Heatsink and the surface of the CPU evenly. Step 5: Step 6: Step 6: Easy Access Step 5: Mounting Plate Installation Pass the supplied Screw Place the Heatsink Body on top of the CPU.
  • Seite 12 Macho 120 Rev.A AM2/AM2+/AM3/AM3+/AM4/FM1/FM2/FM2+ Exploded View Important! Before proceeding with installation, please check for the most up-to-date instructions at www.thermalright.com Heatsink Body 120mm Fan Clip 120mm Fan Anti-Vibration Pads M3 L6 Screw Mounting Plate Anchoring Mount Screw Nut Backplate cap...
  • Seite 13 M3 L10 Screw ×5 M3 L6 Screw ×7 Intel Washer (small) ×4 AMD Washer (big) ×4 Anti-Vibration Pad ×4 120mm Fan Clip ×2 Backplate Cap ×1 Mylar Film ×1 Thermal paste ×1 Screw driver ×1 120mm Fan ×1 The Ultimate Cooling Solutions! www.thermalright.com...
  • Seite 14 Installation Instructions: Step 1: Step 1 : Take out Macho cooler from the paper box. Remove the 120mm Fan from the cooler by pulling the Fan Clips upwards in order to give room for ease of installation. And leave the Fan Clips on the Heatsink Body. Do not remove them.Apply Anti-Vibration Padding to 4 corners on the Heatsink Body.
  • Seite 15 Plug in the fan connector to the CPU PWM Fan Body. And then secure it with the 120mm Fan socket on the motherboard. Installation complete. Clips, by pulling the Fan Clips to place the four ends at the four holes on the 120mm Fan. The Ultimate Cooling Solutions! www.thermalright.com...
  • Seite 16: Explosionszeichnung

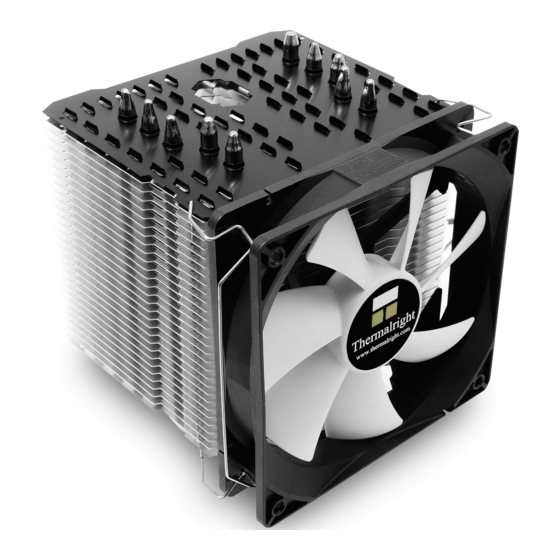
    Macho 120 Rev.A Intel 775/1150/1151/1155/1156/1366 Explosionszeichnung Wichtig! Bitte prüfen Sie vor der Montage ob für Ihren Kühler aktualisierte Montagehinweise auf der Webseite www.thermalright.com verfügbar sind. Macho Kühlkörper 120 mm Lüfterklammer 120 mm Lüfter M3 L6 Schraube Anti-Vibrationpad Montagerahmen Befestigungsplatte Rändelschraube...
  • Seite 17 Intel Unterlegescheibe M3 L10 Schraube ×5 M3 L6 Schraube ×7 (klein) ×4 AMD Unterlegscheibe 120 mm Anti-Vibrationspad ×4 (groß) ×4 Lüfterklammer ×2 Backplate Einsatz ×1 Leitschutzfolie ×1 Wärmeleitpaste ×1 Schraubendreher ×1 120 mm Lüfter ×1 The Ultimate Cooling Solutions! www.thermalright.com...
  • Seite 18 Installationsanleitung: Schritt 1: Nachdem Sie den Macho Kühler aus der Verpackung genommen haben demontieren Sie zunächst den 120 mm Lüfter, um die Installation zu vereinfachen. Belassen Sie hierbei die Lüfterklammern am Kühlkörper - entfernen Sie diese nicht. Bringen Sie die vier selbstklebenden Anti-Vibrationspads an den Ecken des Kühlkörpers an.
  • Seite 19 Die Installation ist nun abgeschlossen. mit den 120 mm Lüfterklammern, indem Sie Bitte prüfen Sie die ordnungsgemäße Funktion diese über den Lüfterrahmen klappen und die vor Inbetriebnahme Ihres PC. spitzwinkeligen Ecken in den Montagelöchern des Lüfters einrasten lassen. The Ultimate Cooling Solutions! www.thermalright.com...
  • Seite 20 Macho 120 Rev.A Intel 2011/2011-3/2066 Explosionszeichnung Wichtig! Bitte prüfen Sie vor der Montage ob für Ihren Kühler aktualisierte Montagehinweise auf der Webseite www.thermalright.com verfügbar sind. 120 mm Macho Kühlkörper Lüfterklammer 120 mm Lüfter Anti-Vibrationpad M3 L6 Schraube Montagerahmen Befestigungsplatte LGA2011 Type B...
  • Seite 21 Intel Unterlegescheibe M3 L10 Schraube ×5 M3 L6 Schraube ×7 (klein) ×4 AMD Unterlegscheibe 120 mm Anti-Vibrationspad ×4 (groß) ×4 Lüfterklammer ×2 Backplate Einsatz ×1 Leitschutzfolie ×1 Wärmeleitpaste ×1 Schraubendreher ×1 120 mm Lüfter ×1 The Ultimate Cooling Solutions! www.thermalright.com...
  • Seite 22 Installationsanleitung: Schritt 1: Nachdem Sie den Macho Kühler aus der Verpackung genommen haben demontieren Sie zunächst den 120 mm Lüfter, um die Installation zu vereinfachen. Belassen Sie hierbei die Lüfterklammern am Kühlkörper - entfernen Sie diese nicht. Bringen Sie die vier selbstklebenden Anti-Vibrationspads an den Ecken des Kühlkörpers an.
  • Seite 23 Macho 120 Rev.A Schritt 4: Tragen Sie eine hauchdünne Schicht Wärmeleitpaste auf der Oberfläche der CPU und auf der Unterseite des Kühlers auf. Schritt 5: Schritt 6: Führen Sie den mitgelieferten Platzieren Sie nun den Kühlkörper auf die CPU. Schraubendreher durch das Führen Sie anschließend die Befestigungsplatte...
  • Seite 24 Macho 120 Rev.A AM2/AM2+/AM3/AM3+/AM4/FM1/FM2/FM2+ Explosionszeichnung Wichtig! Bitte prüfen Sie vor der Montage ob für Ihren Kühler aktualisierte Montagehinweise auf der Webseite www.thermalright.com verfügbar sind. Macho Kühlkörper 120 mm Lüfterklammer 120 mm Lüfter Anti-Vibrationpad M3 L6 Schraube Befestigungsplatte Montagerahmen Rändelschraube Backplate Einsatz...
  • Seite 25 Intel Unterlegescheibe M3 L10 Schraube ×5 M3 L6 Schraube ×7 (klein) ×4 AMD Unterlegscheibe 120 mm Anti-Vibrationspad ×4 (groß) ×4 Lüfterklammer ×2 Backplate Einsatz ×1 Leitschutzfolie ×1 Wärmeleitpaste ×1 Schraubendreher ×1 120 mm Lüfter ×1 The Ultimate Cooling Solutions! www.thermalright.com...
  • Seite 26 Installationsanleitung: Schritt 1: Nachdem Sie den Macho Kühler aus der Verpackung genommen haben demontieren Sie zunächst den 120 mm Lüfter, um die Installation zu vereinfachen. Belassen Sie hierbei die Lüfterklammern am Kühlkörper - entfernen Sie diese nicht. Bringen Sie die vier selbstklebenden Anti-Vibrationspads an den Ecken des Kühlkörpers an.
  • Seite 27 Sie den Lüfter mit den 120 mm Lüfterklammern, Bitte prüfen Sie die ordnungsgemäße Funktion indem Sie diese über den Lüfterrahmen vor Inbetriebnahme Ihres PC. klappen und die spitzwinkeligen Ecken in den Montagelöchern des Lüfters einrasten lassen. The Ultimate Cooling Solutions! www.thermalright.com...
  • Seite 28 Macho 120 Rev.A Intel 775/1150/1151/1155/1156/1366 爆炸圖 請至 Thermalright 網站該產品的 Support 頁面檢查是否有更新版本的使用說明。 www.thermalright.com 風扇避震墊 散熱器主體 12 公分線扣 12 公分風扇 壓板 M3L6 螺絲 多孔扣具 手轉螺絲 主機板 775/AMD 背蓋 塑膠絕緣片 Intel 墊片 ( 小 ) 鐵背板 M3L10 螺絲...
  • Seite 29 Intel 墊片 ( 小 ) ×4 AMD 墊片 ( 大 ) ×4 風扇避震墊 x 4 12 公分線扣 x 2 775/AMD 背蓋 ×1 塑膠絕緣片 ×1 CF1 導熱膏 x 1 長頸螺絲起子 x 1 12 公分風扇 x 1 The Ultimate Cooling Solutions! www.thermalright.com...
  • Seite 30 安裝步驟: 步驟一 : 步驟一 : 將散熱器本體自包裝取出後。請先將 12 公分線扣裝置於散熱器本體上,並將四片 風扇避震墊黏貼於散熱器本體的四個角落。 步驟二 : 1150 1366 1151 1155 1156 步驟二 : 依照您的處理器類型 (775/1150/1151/1155/1156/1366) 選擇對應於背板的孔位,將四根 M3L10 螺絲穿過背板及塑膠絕緣片後套上 Intel 墊圈 ( 小 )。 步驟三 : 步驟四 : 步驟三 : 注意 ! 當您安裝於 775 主機板時,請先將 步驟四 : 將 M3L10 螺絲穿過 Intel 墊片 ( 小 ),再 775 背蓋安裝於背板上。...
  • Seite 31 M3L6 螺絲轉上多孔扣具的對應孔位。 理器銅蓋上。 步驟七 : 步驟八 : 步驟七 : 將散熱器主體置放於中央處理器上, 步驟八 : 用附贈的長頸 讓銅底完全覆蓋中央處理器,再將壓板放置 螺絲起子穿過散熱器中間 散熱器鋁蓋上,最後將 M3L6 螺絲鎖上壓板 的孔可以更方便使 M3L6 兩端。 螺絲安裝置壓板上。 步驟九 : 步驟十 : 步驟九 : 將風扇平貼於散熱器上,並將風扇 步驟十 : 最後將風扇接頭插入主板上的 線扣扣置風扇螺絲固定孔。 CPU FAN 插槽,安裝完成。 The Ultimate Cooling Solutions! www.thermalright.com...
  • Seite 32 Macho 120 Rev.A Intel 2011/2011-3/2066 爆炸圖 請至 Thermalright 網站該產品的 Support 頁面檢查是否有更新版本的使用說明。 www.thermalright.com 風扇避震墊 12 公分線扣 散熱器主體 12 公分風扇 壓板 M3L6 螺絲 多孔扣具 LGA2011 手轉螺絲 主機板...
  • Seite 33 Intel 墊片 ( 小 ) ×4 AMD 墊片 ( 大 ) ×4 風扇避震墊 x 4 12 公分線扣 x 2 775/AMD 背蓋 ×1 塑膠絕緣片 ×1 CF1 導熱膏 x 1 長頸螺絲起子 x 1 12 公分風扇 x 1 The Ultimate Cooling Solutions! www.thermalright.com...
  • Seite 34 安裝步驟: 步驟一 : 步驟一 : 將散熱器本體自包裝取出後。請先將 12 公分線扣裝置於散熱器本體上,並將四片 風扇避震墊黏貼於散熱器本體的四個角落。 步驟二 : 步驟二 : 將 M3L10 螺絲穿過 AMD 墊片 ( 大 ),再穿過主板中央處理器周圍的四個螺絲孔位,然後 將手轉螺絲套上穿過主板的 M3L10 螺絲,以對角線交叉方式進行 ( 左圖 )。 步驟三 : 步驟三 : 將多孔扣具置於手轉螺絲上,再將 M3L6 螺絲轉上多孔扣具的對應孔位。...
  • Seite 35 Macho 120 Rev.A 步驟四 : 步驟四 : 將多孔扣具置於手轉螺絲上,再將 M3L6 螺絲轉上多孔扣具的對應孔位。 步驟五 : 步驟六 : 步驟五 : 將散熱器主體置放於中央處理器上, 步驟六 : 用附贈的長頸 讓銅底完全覆蓋中央處理器,再將壓板放置 螺絲起子穿過散熱器中間 散熱器鋁蓋上,最後將 M3L6 螺絲鎖上壓板 的孔可以更方便使 M3L6 兩端。 螺絲安裝置壓板上。 步驟七 : 步驟八 : 步驟七 : 將風扇平貼於散熱器上,並將風扇 步驟八 : 最後將風扇接頭插入主板上的 線扣扣置風扇螺絲固定孔。...
  • Seite 36 Macho 120 Rev.A AM2/AM2+/AM3/AM3+/AM4/FM1/FM2/FM2+ 爆炸圖 請至 Thermalright 網站該產品的 Support 頁面檢查是否有更新版本的使用說明。 www.thermalright.com 風扇避震墊 散熱器主體 12 公分線扣 12 公分風扇 壓板 M3L6 螺絲 多孔扣具 手轉螺絲 主機板 775/AMD 背蓋 塑膠絕緣片 AMD 墊片 ( 大 ) 鐵背板 M3L10 螺絲...
  • Seite 37 Intel 墊片 ( 小 ) ×4 AMD 墊片 ( 大 ) ×4 風扇避震墊 x 4 12 公分線扣 x 2 775/AMD 背蓋 ×1 塑膠絕緣片 ×1 CF1 導熱膏 x 1 長頸螺絲起子 x 1 12 公分風扇 x 1 The Ultimate Cooling Solutions! www.thermalright.com...
  • Seite 38 安裝步驟: 步驟一 : 步驟一 : 將散熱器本體自包裝取出後。請先將 12 公分線扣裝置於散熱器本體上,並將四片 風扇避震墊黏貼於散熱器本體的四個角落。 步驟二 : 步驟二 : 依照您的處理器類型選擇對應於背板的孔位,將四根 M3L10 螺絲穿過背板及塑膠絕緣片後套 上 AMD 墊圈 ( 大 )。 步驟三 : 步驟四 : 步驟三 : 注意 ! 當您安裝於 AMD 主機板時,請先 步驟四 : 將 M3L10 螺絲穿過 AMD 墊片 ( 大 ),再 將...
  • Seite 39 M3L6 螺絲轉上多孔扣具的對應孔位。 理器銅蓋上。 步驟七 : 步驟八 : 步驟七 : 將散熱器主體置放於中央處理器上, 步驟八 : 用附贈的長頸 讓銅底完全覆蓋中央處理器,再將壓板放置 螺絲起子穿過散熱器中間 散熱器鋁蓋上,最後將 M3L6 螺絲鎖上壓板 的孔可以更方便使 M3L6 兩端。 螺絲安裝置壓板上。 步驟九 : 步驟十 : 步驟九 : 將風扇平貼於散熱器上,並將風扇 步驟十 : 最後將風扇接頭插入主板上的 線扣扣置風扇螺絲固定孔。 CPU FAN 插槽,安裝完成。 The Ultimate Cooling Solutions! www.thermalright.com...
  • Seite 40 Macho 120 Rev.A Technical Spec Heatsink Specifications: Dimension: 120mm x Width 102mm x Height 150mm Weight: 580g (Heatsink only) Heatpipe: 6mm heatpipe*5 units Copper Base: C1100 Pure copper nickel plated Fan Specification: Dimension: L120mm x H120mm x W25mm Weight: 100g Fan speed: 600~1300RPM (PWM controlled) Fan noise: 25.4dBA MAX (Test distance 1.0M)
  • Seite 41: Technische Spezifikationen

    Macho 120 Rev.A Technische Spezifikationen Kühlkörper Spezifikationen: Maße (in mm): Länge 120 x Breite 102 x Höhe 150 Gewicht: 580 g (nur Kühlkörper) Heatpipe: 6 mm Heatpipe*5 Stück Kupfergrundplatte: C1100 Reines Kupfer vernickelt Lüfter Spezifikationen: Maße (in mm): L120 x B120 x H25...
  • Seite 42 Macho 120 Rev.A 散熱器規格 散熱器規格書 : 尺寸 : 長 120mm x 102mm x 150mm 重量 :580 克 ( 本體重量 ) 熱導管 :6mm 熱導管 *5 支 銅底 :C1100 純銅底座鍍鎳處理 風扇規格書 : 尺寸 : 長 120mm x 寬 120mm x 高 25mm 重量...
  • Seite 43 Macho 120 Rev.A 51.85 The Ultimate Cooling Solutions! www.thermalright.com...
  • Seite 44 Macho 120 Rev.A Awards...
  • Seite 46 The Ultimate Cooling Solutions! Thermalright Produkte werden in www.thermalright.com Europa importiert und vertrieben durch die: TEL: +866-2-2915-5005 PC-Cooling GmbH FAX: +886-2-2915-5123 Eichenallee 3 EMAIL: sales@thermalright.com 24589 Nortorf 170612...