Becker SWC545A-II Montageanleitung Und Bedienungsanleitung
Centronic sunwindcontrol
Inhaltsverzeichnis
Verfügbare Sprachen
Verfügbare Sprachen
Quicklinks
Centronic
SunWindControl SWC545A-II
Montage- und Betriebsanleitung
de
Sonnen-Wind-Steuergerät
im Handsender mit Display
Wichtige Informationen für:
• den Monteur / • die Elektrofachkraft / • den Benutzer
Bitte entsprechend weiterleiten!
Diese Anleitung ist vom Benutzer aufzubewahren.
Assembly and Operating Instructions
en
Sun and wind controller
in handheld transmitter with display
Important information for:
• Fitters / • Electricians / • Users
Please forward accordingly!
These instructions must be kept for future reference.
Becker-Antriebe GmbH
35764 Sinn/Germany
www.becker-antriebe.com
Inhaltsverzeichnis

Verwandte Anleitungen für Becker SWC545A-II


Inhaltszusammenfassung für Becker SWC545A-II
- Seite 1 Centronic SunWindControl SWC545A-II Montage- und Betriebsanleitung Sonnen-Wind-Steuergerät im Handsender mit Display Wichtige Informationen für: • den Monteur / • die Elektrofachkraft / • den Benutzer Bitte entsprechend weiterleiten! Diese Anleitung ist vom Benutzer aufzubewahren. Assembly and Operating Instructions Sun and wind controller...
-
Seite 2: Inhaltsverzeichnis
Inhaltsverzeichnis Allgemeines ....................4 Gewährleistung ..................4 Sicherheitshinweise .................. 4 Bestimmungsgemäße Verwendung ............5 Anzeigen- und Tastenerklärung ..............6 Erklärungen ....................8 Inbetriebnahme ..................13 Werkseinstellung ..................13 Einlernen des Funks .................14 Programmierung ..................15 Montage Wandhalterung ................. 24 Batteriewechsel ..................24 Reinigung ....................25 Technische Daten ................... - Seite 3 Contents General ....................28 Warranty ....................28 Safety Information ................... 28 Intended use ..................29 Explanation of displays and buttons ............30 Explanations ................... 32 Initial operation ..................37 Factory settings ..................37 Programming the radio ................38 Programming ..................39 Installing the wall mount ................48 Changing the battery ................
-
Seite 4: Allgemeines
Die vom Werk mit aktuellem Datum und Uhrzeit (MEZ) ausgelieferte SWC545A- II steuert Ihren Sonnenschutz automatisch in Abhängigkeit von Sonnenein- strahlung und Windwert. Eine manuelle Bedienung der SWC545A-II ist jederzeit möglich. Gewährleistung Bauliche Veränderungen und unsachgemäße Installationen entgegen dieser Anleitung und unseren sonstigen Hinweisen können zu ernsthaften Verletzun- gen von Körper und Gesundheit der Benutzer, z.B. -
Seite 5: Bestimmungsgemäße Verwendung
Bestimmungsgemäße Verwendung Die SWC545A-II darf nur für die Ansteuerung von Sonnenschutzanlagen ver- wendet werden. • Bitte beachten Sie, dass Funkanlagen nicht in Bereichen mit erhöhtem Stö- rungsrisiko betrieben werden dürfen (z.B. Krankenhäuser, Flughäfen). • Die Fernsteuerung ist nur für Geräte und Anlagen zulässig, bei denen eine Funktionsstörung im Handsender oder Empfänger keine Gefahr für Perso-... -
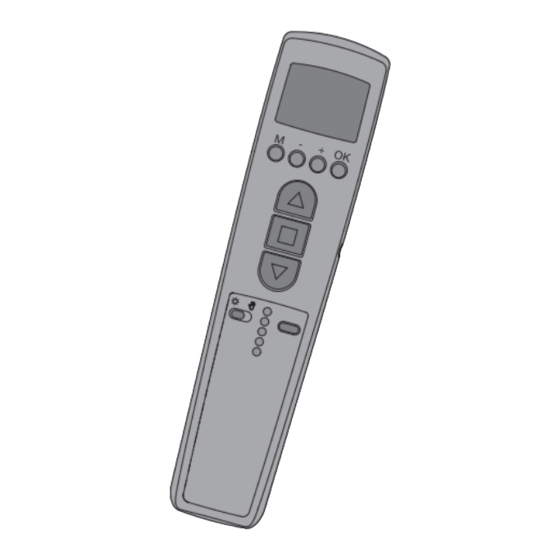
Seite 6: Anzeigen- Und Tastenerklärung
Montage- und Betriebsanleitung Anzeigen- und Tastenerklärung Display Hand- / Automatik- Schiebeschalter Menü-Tastenblock Einlerntaste EINFAHR-Taste Batteriefach STOPP-Taste Beschriftungsfeld AUSFAHR-Taste RESET-Taste (hinter dem Beschriftungsfeld) Kanalwahltaste Typenschild Kanalkontrollleuchten... - Seite 7 Displaysymbolik Einfahrt Uhr/Datum Ausfahrt Programm Wochentage (Mo.-So.) Einstellung Ziffernanzeige Funktion Textzeile...
-
Seite 8: Erklärungen
Montage- und Betriebsanleitung Erklärungen Hand/Auto Schiebeschalter In der Schiebeschalterstellung „“ werden nur manuelle Fahrbefehle und Not- signale ausgeführt (z.B.: EINFAHRT, STOPP, AUSFAHRT per Tastendruck und Windalarm). In der Schiebeschalterstellung „“ werden automatische Fahrbefehle ausge- führt (z.B. Sonnenautomatik, ...). Wird im Automatikbetrieb ein manueller Fahrbefehl ausgeführt, werden die automatischen Sonnenschutz-Funktionen unterbrochen. - Seite 9 Betriebsmodus. Es erfolgt keine Speicherung des aktuell angezeigten Wertes. RESETTaste Durch Drücken der RESETTaste (mit einem Kugelschreiber oder Ähnlichem) wird die SWC545A-II in die Werkseinstellung zurückgesetzt. Ausnahme: Menüpunkt Funktion und Sprachauswahl Menü Uhrzeit/Datum UHR/DAT In diesem Menü stellen Sie die Uhrzeit und das Datum ein.
-
Seite 10: Menü Programm
Montage- und Betriebsanleitung Menü Programm PROGRAMM Im Menü FUNKTION haben Sie die Möglichkeit zwischen Schalt/und Sperr- zeiten zu wählen. Im Menü PROGRAMM können Sie diese einstellen. SCHALTZEIT Programmierbare Aus und Einfahrzeiten für Sonnenschutzanlage. SPERRZEIT Verhindert ein zu frühes Aus oder ein zu spätes Einfahren der Sonnenschutz- anlage. - Seite 11 SONNE t / SONNE s Der Schwellenwert ist bei SONNE t auf 04 und bei SONNE s auf 03 vorein- gestellt. Bei dem Wert – ist die Sonnenschutzfunktion ausgeschaltet. Der Helligkeitswert lässt sich von 01 (stark bewölkt) bis 15 (direkte Sonneneinstrahlung) einstellen. Im Display wird der eingestellte Sonnenwert angezeigt. Der einzustellende Wert blinkt.
-
Seite 12: Menü Funktion
Hier können Sie Ihre Landessprache auswählen. SO/WI SO/WI bezeichnet die automatische Sommer/Winterzeitumschaltung. Werks- einstellung ist ON; die SWC545A-II passt sich automatisch an. Menü Funktion Dieser Modus ist nur für ausgebildetes Fachpersonal bestimmt. Im Menü FUNKTION haben Sie die Möglichkeit, folgende Funktionen einzustel- len: ... -
Seite 13: Inbetriebnahme
Inbetriebnahme Mit dem ersten Tastendruck „wecken“ Sie die SWC545A-II auf. Sie können nun mit den +/ Tasten die Sprache wählen und diese mit der OK Taste übernehmen. Die SWC545A-II befindet sich im Automatikmodus. Werkseinstellung UHR/DAT: aktuelle MEZ und aktuelles Datum... -
Seite 14: Einlernen Des Funks
Montage- und Betriebsanleitung Einlernen des Funks 1) Mastersender einlernen a) Empfänger in Lernbereitschaft bringen Hinweis Beachten Sie die Bedienungsanleitung des Empfängers. • Schalten Sie die Spannungsversorgung des Empfängers aus und nach 5 Se- kunden wieder ein. oder • Betätigen Sie die Lerntaste bzw. den Funkschalter des Empfängers. Der Empfänger befindet sich nun für 3 Minuten in Lernbereitschaft. b) Mastersender einlernen Drücken Sie die Einlerntaste innerhalb der Lernbereitschaft, bis der Empfänger das erfolgreiche Einlernen quittiert. -
Seite 15: Programmierung
Programmierung Hinweis Alle nun folgenden Programmiermöglichkeiten sind für alle 5 Kanäle gleich wirksam. Menüübersicht Betriebsmodus UHR/DAT PROGRAMM EINSTELLUNG FUNKTION 1. Drücken Sie die MENUETaste UHR/DAT erscheint. 2. Um weitere Menüs auszuwählen, drücken Sie die +/ Tasten. 3. Drücken Sie die MENUETaste, um in den Betriebsmodus zu gelangen. UHR/DAT (Uhrzeit und Datum einstellen) UHR/DAT UHRZEIT... - Seite 16 Montage- und Betriebsanleitung PROGRAMM (Schaltzeit oder Sperrzeit 1. Drücken Sie die MENUETaste. 2. Um das Menü PROGAMM auszuwählen, drücken Sie die + Taste bis PRO- GAMM erscheint. Hinweis Im Menü FUNKTION können Sie zwischen Schaltzeiten oder Sperrzei- ten wählen. Bei der Displayanzeige --:-- (zwischen der Uhrzeit 23:59 und 00:00) wird die Schaltzeit nicht ausgeführt.
- Seite 17 EINSTELLUNG SONNE (VERZÖGERUNG) 1. Drücken Sie die MENUETaste. 2. Um das Menü EINSTELLUNG auszuwählen, drücken Sie die + Taste bis EINSTELLUNG erscheint. 3. Bestätigen Sie mit OK 4. SONNE t erscheint. 5. Mit der +/ Taste können sie den Sonnenwert verstellen. Hinweis Die im Dialogfenster angezeigte VERZOEGERUNG und VERZOEGE-...
- Seite 18 Montage- und Betriebsanleitung EINSTELLUNG ZWISCHENPOSITION, TUCHSPANNUNG/WENDUNG, WINTER OFF/ON ZWISCHEN� TUCHSPANNUNG WINTER POSITION (WENDUNG) OFF/ON 1. Sie haben die Menüpunkte SONNE (VERZÖGERUNG ) bestätigt. ZWI- SCHENPOSITION erscheint. 2. Mit der +/ Taste können Sie die Fahrzeit zur ZWISCHENPOSITION einstellen. Die Angabe der Fahrzeit erfolgt in Sekunden oder Sie fahren die ZWISCHEN- POSITION mit der AUSFAHR/EINFAHRTaste aus der oberen Endlage an.
-
Seite 19: Windueberwachung, Zeit Endlage, Zeit Zwischenposition, Zeit Tuchspannung/Wendung
EINSTELLUNG WINDUEBERWACHUNG, ZEIT ENDLAGE, ZEIT ZWISCHENPOSITION, ZEIT TUCHSPANNUNG/WENDUNG WINDÜBER ZEIT WACHUNG ENDLAGE ZEIT ZWISCHEN� POSITION ZEIT TUCHSPANNUNG/ WENDUNG 1. Sie haben den Menüpunkt WINTER OFF/ON bestätigt. WINDUEBERWACHUNG erscheint. 2. Mit der +/ Taste können sie den Windwert verstellen. 3. Bestätigen Sie Ihre Eingabe mit OK. ZEIT ENDLAGE erscheint. 4. -
Seite 20: Sonne Zwischenposition, Sonne Tuchspannung/Wendung, Sonne Endlage
Montage- und Betriebsanleitung EINSTELLUNG SONNE ZWISCHENPOSITION, SONNE TUCHSPANNUNG/WENDUNG, SONNE ENDLAGE 1. Sie haben den Menüpunkt ZEIT ENDLAGE bestätigt. SONNE ZWISCHEN- POSITION erscheint. 2. Mit der +/- Taste können Sie zwischen SONNE ZWISCHENPOSITION, SON- NE TUCHSPANNUNG/WENDUNG, SONNE ENDLAGE auswählen. 3. Bestätigen Sie Ihre Auswahl mit OK. 4. - Seite 21 EINSTELLUNG DEUTSCH, SO/WI (Sprachauswahl, Automatische Sommer/Winterzeitumstellung) SO/WI DEUTSCH HAUPTMENUE OFF/ON 1. Sie haben den Menüpunkt SONNE ZWISCHENPOSITION bestätigt. Bestätigen Sie mit OK. DEUTSCH erscheint. 2. Mit der +/ Taste können Sie die gewünschte Sprache einstellen. 3. Bestätigen Sie Ihre Sprachauswahl mit OK. 4.
- Seite 22 Montage- und Betriebsanleitung FUNKTION (nur für Fachpersonal) MARKISE/JALOUSIE, LAUFZEIT (Auswahl des Behanges, Laufzeit der Markise/Jalousie) 1. Drücken Sie die MENUETaste. 2. Um das Menü FUNKTION auszuwählen, drücken Sie die + Taste bis FUNK- TION erscheint. 3. Bestätigen Sie mit OK. MARKISE/JALOUSIE erscheint. 4.
- Seite 23 FUNKTION (nur für Fachpersonal) EXPERTEN SPERRZEIT/ FUNKTION MODUS OFF/ON SCHALTZEIT 1. Sie haben die Funktion LAUFZEIT bestätigt SPERRZEIT/SCHALTZEIT er- scheint. 2. Mit der +/ Taste können Sie zwischen SPERRZEIT/SCHALTZEIT auswählen. 3. Bestätigen Sie Ihre Auswahl mit OK. EXPERTEN MODUS OFF/ON erscheint. 4.
-
Seite 24: Montage Wandhalterung
Montage- und Betriebsanleitung Montage Wandhalterung • Prüfen Sie vor der Montage an der gewünschten Montageposition die Wandhalter einwandfreie Funktion von Sender und Empfänger. • Befestigen Sie die Halterung mit den zwei beigelegten Schrauben an der W a n d h a l t e r - Entriegelung Wand. -
Seite 25: Reinigung
Reinigung Reinigen Sie das Gerät nur mit einem feuchten Tuch. Verwenden Sie kein Reini- gungsmittel, da dieses den Kunststoff angreifen kann. Technische Daten Nennspannung 3 V DC Batterietyp LR03 (AAA) Schutzart IP 20 Zulässige Umgebungstemperatur 10 bis +55 °C Funkfrequenz 915,3 MHz... -
Seite 26: Was Tun Wenn
Montage- und Betriebsanleitung Was tun wenn ... ? Störung Ursache Abhilfe Antrieb läuft nicht. 1. Batterien sind leer. 1. Neue Batterien ein- legen. 2. Batterien sind falsch 2. Batterien richtig ein- eingelegt. legen. 3. Empfänger außerhalb 3. Entfernung zum Emp- der Funkreichweite. fänger verringern. 4.