Ripmax MINI WOT 4 Anleitung

Verwandte Anleitungen für Ripmax MINI WOT 4


Inhaltszusammenfassung für Ripmax MINI WOT 4
- Seite 1 A-CF010...
- Seite 4 Mini Wot4 Instructions | Mini Wot4 Anleitung Chris Foss Chris Foss The Designer / Der Designer The fascination of flight captured Chris's imagination early on in his life when he started building, from kits and plans, simple free flight gliders and rubber powered models.
-
Seite 5: Introduction / Einführung
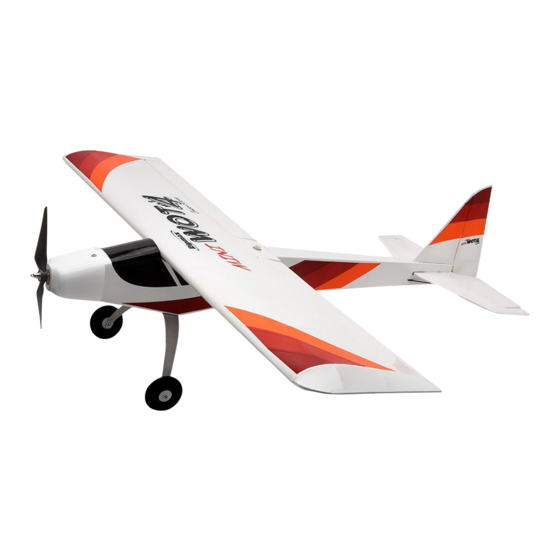
Mini Wot4 Instructions | Mini Wot4 Anleitung Introduction / Einführung Congratulations on your purchase of the Mini Wot4 ARTF! The Mini Wot4 is supplied in ARTF format with most of the electronics needed to complete the airframe. You only need to add a suitable 2S battery and receiver to get in the air. Take care to read these instructions through carefully before you start your build to familiarise yourself with the build process. - Seite 6 Mini Wot4 Instructions | Mini Wot4 Anleitung Stage 1 / Schritt 1 The wings and ailerons are supplied with the hinges loosely fitted, ready for installation. Remove both ailerons and insure that the hinges are inserted mid-way in their slots. Using thin cyano, pour a drop onto each hinge –...
- Seite 7 Mini Wot4 Instructions | Mini Wot4 Anleitung Stage 4 / Schritt 4 Prepare your aileron servos by connecting a suitable 100mm extension lead to each servo. It is a good idea to use a lead- lock, a turn of insulation tape or heat shrink tube over the joint for additional security.
- Seite 8 Mini Wot4 Instructions | Mini Wot4 Anleitung Stage 8 / Schritt 8 Locate the aileron pushrod connectors. Prepare the aileron horn by assembling the pushrod connector as shown. Slip the connector onto the horn, secure with the clip. This is easier to do now than when the aileron horn is attached to the aileron.
- Seite 9 Mini Wot4 Instructions | Mini Wot4 Anleitung Stage 13 / Schritt 13 Insert the axle screw through the undercarriage leg and secure with a plain nut (thread lock advised). Then slide the wheel onto the axle and secure using a nyloc nut. Do not overtighten the nyloc nut as the wheel needs to spin freely.
- Seite 10 Mini Wot4 Instructions | Mini Wot4 Anleitung Stage 18 / Schritt 18 Locate the slots in the fuselage for the tail plane and fin, carefully trim away the covering as shown. Lokalisieren Sie mit einem scharfen Messer die Öffnungen für das Höhen- und Seitenleitwerk, und schneiden vorsichtig die Folie aus, wie gezeigt.
- Seite 11 Mini Wot4 Instructions | Mini Wot4 Anleitung Stage 23 / Schritt 23 Slot the tailplane into position and check the alignment again (stage 21).When satisfied run thin cyano into the joint to secure in place. Take care to ensure it runs fully into the joint on both sides on tops and bottom of the tailplane.
- Seite 12 Mini Wot4 Instructions | Mini Wot4 Anleitung Stage 26 / Schritt 26 The elevator and rudder are supplied with the hinges loose fitted, ready for installation. Remove both elevator and rudder and ensure that the hinges are inserted midway in their slots. Using thin cyano, pour a drop onto each hinge –...
- Seite 13 Mini Wot4 Instructions | Mini Wot4 Anleitung Stage 30 / Schritt 30 Locate the elevator and rudder pushrod connectors. Prepare the elevator and rudder servo horns by assembling the pushrod connector as shown. Slip the connector onto the horn and secure with the clip.
- Seite 14 Mini Wot4 Instructions | Mini Wot4 Anleitung Stage 35 / Schritt 35 Screw the electric motor to the motor mount with the small screws provided. Schrauben Sie den Elektromotor mit den kleinen Schrauben an den Motorträger. Stage 36 / Schritt 36 Bolt the motor/plate to the firewall with the screws and washers provided, with the motor wires at the bottom of the firewall.
- Seite 15 Mini Wot4 Instructions | Mini Wot4 Anleitung Stage 40 / Schritt 40 Fit the propeller & adaptor to the motor shaft. Adjust the cowl to fit the fuselage, making sure the cowl is centre of the prop adaptor and that the prop has clearance from the cowl as shown. Befestigen Sie den Propeller und Adapter.
- Seite 16 Mini Wot4 Instructions | Mini Wot4 Anleitung Stage 45 / Schritt 45 Place the propeller adaptor on to the motor shaft, then the propeller and dome nut. Now tighten the prop nut with as small bar or allen key as shown. Platzieren Sie den Propelleradapter auf der Motorwelle, dann den Propeller und die Hutmutter.
- Seite 17 Mini Wot4 Instructions | Mini Wot4 Anleitung Pre-Flight Checks / Schritt 49 entfernen Vorflug Checks While the Mini Wot4 is not a trainer, it does make an excellent first aileron model with reduced control throws. In this case, we recommend that your completed model is checked over and test flown by a competent pilot first. Subsequent flights should also be supervised, and assisted where necessary, by an experienced pilot.
-
Seite 18: Konformitätserklärung
Declaration of Conformity: Hereby Ripmax Ltd., declares that this device is in compliance with the essential requirements and other relevant provisions of the relevant EU directives. The original declaration of conformity can be found on the internet at www. - Seite 19 Mini Wot4 Instructions | Mini Wot4 Anleitung Notes / Notize n...
- Seite 20 Kopie und Nachdruck, auch auszugsweise, nur mit written permission of Ripmax Ltd. schriftlicher Genehmigung der Ripmax Ltd. Made in China Manufactured for and distributed to your local model shop by: Ripmax Ltd., 241 Green Street, Enfield, EN3 7SJ. United Kingdom.