Herunterladen Inhalt Inhalt Diese Seite drucken
Inhaltsverzeichnis

Werbung

Verfügbare Sprachen

Verfügbare Sprachen

Smart 60 | Smart 75
Handleiding en installatievoorschriften
Users guide and installation manual
Mode d'emploi et instructions d'installation
Gebrauchsanweisung und Montagevorschriften
2
14
25
37
270616
INK.00.7035.v.1.5
1

Werbung

Inhaltsverzeichnis
loading

Inhaltszusammenfassung für WANDERS Smart 60

  • Seite 1 Smart 60 | Smart 75 Handleiding en installatievoorschriften Users guide and installation manual Mode d’emploi et instructions d’installation 270616 Gebrauchsanweisung und Montagevorschriften INK.00.7035.v.1.5...
  • Seite 2: Inhaltsverzeichnis

    Accessoires Top down aansteken © Copyright 2016 Wanders fires & stoves De informatie in dit document kan zonder voorafgaande kennisgeving worden gewijzigd. Wanders fires & stoves aanvaard geen aansprakelijkheid voor technische fouten, redactionele fouten, drukfouten of weglatingen in deze publicatie.
  • Seite 3 Het is raadzaam om voor de ingebruikname van uw houtkachel deze handleiding zorgvuldig te lezen en vervolgens goed te bewaren. Uw installateur kan deze handleiding nodig hebben voor het jaarlijkse onderhoud van uw haard. Wij wensen u veel warmte met uw aanschaf. Het Team van WANDERS. • Het toestel mag niet gebruikt worden zonder glas.
  • Seite 4: Uw Smart Houtkachel In Éen Oogopslag

    Uw Smart houtkachel in éen oogopslag De Smart 60 | Smart 75 rechts De Smart is een combinatie van comfort en een efficiënte warmteafgifte. Door de grote hoeveelheid glas zal de warmte in de kachel direct uitgestraald worden zodat u zoveel mogelijk warmte in het vertrek krijgt.
  • Seite 5: Eerste Keer Stoken

    Brandstof De Smart kan alleen gestookt worden met hout. Leg niet meer dan 2 kg (Smart 60) en 3 kg (Smart 75) brandstof tegelijk in de kachel. Gebruik altijd schoon, gekapt hout dat voldoende droog is. Zie voor de droogtijden onderstaande tabel.
  • Seite 6: Aansteken Van De Kachel

    en weinig tot geen rook. Tijdens het branden hoort u het hout knapperen. Nat hout geeft een sissend geluid, veel rook en een minimaal vlambeeld. Het vermindert het stookplezier en rendement aanzienlijk. Houtsoort Droogtijd Den, Populier 1 jaar Linde, Wilg, Spar, Berk, Es, Els 1,5 jaar Fruitboom, Beuk 2 jaar...
  • Seite 7: Werking Van De Luchtschuif

    Raak de gelakte delen nooit aan bij het opwarmen van de haard. De optimale stookwijze Kachels van WANDERS zijn zo ontworpen, dat ze maximaal rendement leveren. Een goed gestookte houtkachel kan een rendement halen van ongeveer 75-80%. Hierdoor hebt u minder hout nodig voor evenveel warmte.
  • Seite 8: Onderhoud

    Laat jaarlijks alle afdichtingen van deuren en glasramen controleren op slijtage. Veiligheid Met een houthaard van WANDERS heeft u een comfortabele én veilige warmtebron in huis. De brandveiligheid begint bij een correcte installatie en een goed werkend rookgasafvoerkanaal. Uw installateur dient zich daartoe te houden aan de installatievoorschriften, zoals omschreven op pagina 9 en verder.
  • Seite 9: Garantie

    9. Laat de haard alleen repareren door een erkend installateur en met originele onderdelen. Garantie Op de constructie van uw houtkachel biedt WANDERS Metaalproducten B.V. te Netterden een garantie van 5 jaar na aankoopdatum, mits de haard op een juiste wijze is geïnstalleerd en wordt gebruikt volgens de aanwijzingen in deze handleiding.
  • Seite 10: Voorbereiding

    Smart 60 front: 497 x 614 x 360 mm (h x b x d) Smart 60 hoek L/R: 495 x 605 x 356 mm Smart 75 front: 547 x 764 x 397 mm...
  • Seite 11: Installatie

    kachel) dienen brandvrij bekleed te worden. 4. Indien de rookgasafvoer door een plafond en/of dak gaat dat bestaat uit brandbare materialen, dienen plafond en dak ongeveer 80 centimeter rondom bekleed te worden met brandvrije materialen. Let hierbij op balklagen en eventuele elektrische leidingen. 5.
  • Seite 12: Aansluiten Van De Haard

    Aansluiten van de haard De Smart is een middelzware (Smart 60, 80 kg) tot zware (Smart 75, 100 kg) inzethaard. Verzeker u ervan dat de vloer waar u de haard op plaatst sterk genoeg is en vlak. Volg, voordat u de haard monteert, eerst de aanwijzingen op uit het vorige hoofdstuk ‘Voorbereiding’...
  • Seite 13: Reparaties

    Voor alle modellen geldt het volgende: Verwijder eerst de keerplaat (A) dan de achterwand (B), de bodemplaat (C) en de zijwanden (D & E) Smart 60 front Smart 60 hoek L/R Smart 75 front Smart 75 hoek L/R Types koord De Smart is in de deur voorzien van 10 mm hol profi el koord.
  • Seite 14 Technical details Accessories Top down lighting © Copyright 2016 Wanders fires & stoves The information contained herein is subject to change without notice. Wanders fires & stoves shall not be liable for technical or editorial errors or omissions contained herein.
  • Seite 15 We advise you to read this manual thoroughly before using your new stove and to keep the manual in a handy place. Your installer may need the manual for the yearly maintenance of your fireplace. We wish you much warmth with your new fireplace! The WANDERS team • Do not use the appliance without glass.
  • Seite 16: Your Smart Stove At A Single Glance

    Your Smart stove at a single glance The Smart 60 | Smart 75 corner right The Smart is a combination of comfort and efficient heat emission. The large glass panes allow emission of the heat from the stove directly to the environment to make your room instantly comfortable. The built-in flue gas deflector ensures circulation of flue gases in the interior parts.
  • Seite 17: Hi2 Insides

    Fuel The Smart only burns on wood. Never place more than 2 kg (Smart 60) and 3 kg (Smart 75) of fuel in the fire at once. Always use clean, harvested timber that has been allowed to dry thoroughly. See the table below for drying times.
  • Seite 18: Igniting The Stove

    Do not put any paraffi n-containing logs in your stove. When the door is closed, the high heat will melt the paraffi n from the logs too quickly. The polluted fl ue gasses which consequently develop will deposit on and burn in the glass of your stove and cannot be removed later. Do not use any wood that is painted, impregnated, glued together or processed in any other way.
  • Seite 19: The Best Way To Burn Your Stove

    The best way to burn your stove All WANDERS’ stoves are designed so that they give a maximum output. A well-lit wood-burning stove can produce a yield of about 75-80%. This means that you need less wood for the same amount of heat. Moreover, a well-lit stove produces less smoke pollution.
  • Seite 20: Maintenance

    Have the sealing of doors and glass panes checked for wear and tear. Safety A WANDERS wood-burning stove gives you a comfortable and a safe source of heat in your home. Fire safety starts with a proper installation and a properly working flue tube. Your installer must therefore comply with the installation instructions as listed on page 21 and further.
  • Seite 21: General Instructions

    The guarantee does not include: the glass, failure due to improper use; non-compliance with the national regulations and enclosed installation and operating instructions; installation by an installer of dealer who is not acknowledged by WANDERS, negligence of the unit and change of owner. The guarantee is also disclaimed when a wrong fuel is used.
  • Seite 22: Ventilation In The Hearth

    Ventilation in the hearth We advise adding ventilation to the hearth where possible. These ventilation holes, both above and below the stove, must be at least 400 cm2 in size. Do not fit the upper ventilation grills too close to the ceiling. The chimney flue Before placing the stove you must observe the following points: •...
  • Seite 23: External Air Supply

    Connecting the stove The Smart is a medium-heavy (Smart 60, 80 kg) to heavy (Smart 75, 100 kg) fi tted wood stove. Make sure beforehand that the fl oor on which it is to be mounted is strong enough. Before mounting the stove, fi rst follow the instructions in the previous section ‘Preparation’...
  • Seite 24: Repairs

    For all models, the following applies: First remove the baffl e plate (A) then the rear panel (B), the base plate (C) and the side panels (D & E). Smart 60 front Smart 60 corner L/R Smart 75 front Smart 75 corner L/R Types of cord The Smart is fi tted with 10 mm hollow profi le cord in the doors.
  • Seite 25 © Copyright 2016 Wanders fires & stoves Les informations contenues dans le présent document sont sujettes à modifation sans préavis. Wanders fires & stoves ne saurait être tenu pour responsable d’éventuelles erreurs ou omissions techniques ou rédactionnelles contenues dans le présent document.
  • Seite 26 Cher client, Nous vous félicitons pour l’acquisition de votre nouveau poêle à bois de WANDERS. C’ e st une source de chaleur confortable qui vous donnera beaucoup de plaisir pendant de longues années. Par son design unique est visible de tous les coins de la pièce.
  • Seite 27: Votre Poêle À Bois Smart

    Votre poêle à bois Smart Smart 60 | Smart 75 Le Smart vous offre à la fois le confort et une émission de chaleur efficace. L’émission de la chaleur est très importante, car la surface de la vitre du poêle par laquelle la chaleur se diffuse directement est très grande.
  • Seite 28: Revêtement Intérieur Hi2

    Combustible Seul le bois peut être utilisé comme combustible du poêle Smart. Ne posez pas plus de 2 kg (Smart 60) et 3 kg (Smart 75) de combustible à la fois dans le poêle. Utilisez toujours du bois coupé propre suffisamment sec. Voir le tableau ci-dessous pour les temps de séchage.
  • Seite 29: Allumage Du Poêle

    Espèce de bois Durée de séchage Peuplier 1 an Tilleul, Saule, Sapin, Bouleau, Frêne, Aune 1,5 an Arbre fruitier, Hêtre 2 ans Chêne, Pin 2,5 ans Les bûches contenant de la paraffi ne ne sont pas admises au poêle. Après la fermeture de la porte, la paraffi ne se séparerait des bûches en se fondant trop vite en raison de la température élevée.
  • Seite 30: La Façon Optimale De Chauffer Le Poêle

    La façon optimale de chauff er le poêle Les poêles de WANDERS ont été conçus pour produire un rendement maximal. Un poêle à bois bien chauff é peut avoir un rendement d’environ 75-80%. Ainsi, pour obtenir la même chaleur vous avez besoin d’une quantité de bûches inférieure.
  • Seite 31: Entretien

    Tous les ans, faites vérifier si les joints des portes et des châssis ne sont pas usés. Sécurité Un poêle à bois de WANDERS, c’est toujours une source de chaleur confortable et sûre. Ce qui est primordial pour assurer la sécurité contre l’incendie, ce sont une installation correcte et un tuyau d’évacuation des gaz de fumée fonctionnant correctement.
  • Seite 32: Garantie

    9. Le poêle à bois ne doit être réparé que par un installateur agréé en utilisant des pièces d’origine. Garantie Votre poêle à bois de WANDERS Metaalproducten B.V. à Netterden bénéficie d’une garantie de 5 ans à partir de la date d’achat, à condition que le poêle ait été installé et utilisé conformément aux instructions données dans ce mode d’emploi.
  • Seite 33: Préparation

    De plus, les législations et réglementations nationales et locales relatives au montage et à l’utilisation de poêles à bois devront être respectées. WANDERS n’est soumise à aucune garantie si le Smart a été raccordé et/ou installé de manière incomplète ou inappropriée.
  • Seite 34: Sécurité Anti-Incendie

    Sécurité anti-incendie En vue de la sécurité anti-incendie, il est important de respecter les prescriptions suivantes avant l’installation du poêle. 1. Si le plancher autour du poêle est fait en matière combustible, utilisez une plaque d’assise. La plaque doit avoir les dimensions minimales de: - sur le devant de la porte: 50 cm depuis le poêle - à...
  • Seite 35: Bordures Et Cadre Intérieur

    Raccordement du poêle Le Smart est un poêle encastré de poids moyen (Smart 60, 80 kg) à lourd (Smart 75, 100 kg). Assurez-vous que le sol sur lequel vous posez le poêle est assez robuste et plat. Avant de monter le poêle, suivez d'abord les instructions du chapitre précédent «...
  • Seite 36: Enlever L'intérieur

    Pour tous les modèles, les consignes suivantes s'appliquent : Enlever d'abord le défl ecteur (A), puis le mur postérieur (B), la plaque de fond (C) et enfi n les parois latérales (D & E) Smart 60 front Smart 60 gauche/droite...
  • Seite 37 Ersatzteile Technische Angaben Zubehör Top down © Copyright 2016 Wanders fires & stoves Die Informationen in diesem Dokument können ohne vorherige Ankündigung geändert werden. Wanders fires & stoves haftet nicht für technische oder redaktionelle Fehler oder Auslassungen in diesem Dokument.
  • Seite 38 Vor Gebrauch Ihres Holzofens bitten wir Sie die Gebrauchsanweisung sorgfältig zu lesen und sie dann gut zu bewahren. Ihr Installateur braucht vielleicht diese Anleitung für die jährliche Wartung Ihres Ofens. Wir wünschen Ihnen viel Wärme mit Ihrem Kauf. Das WANDERS Team • Das Gerät darf nicht ohne Scheibe benutzt werden.
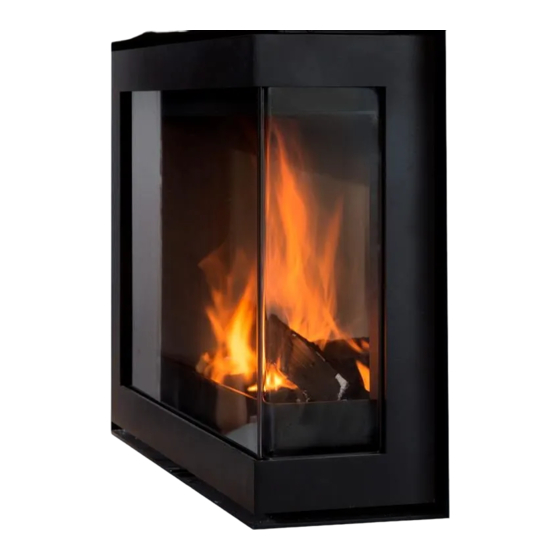
  • Seite 39: Ihr Smart Auf Einen Blick

    Ihr Smart auf einen Blick Der Smart 60 | Smart 75 Rechts Der Smart kombiniert Komfort und effiziente Wärmeabgabe. Durch die große Glasoberfläche wird die Wärme im Ofen direkt ausgestrahlt, sodass so viel wie möglich Wärme in den Raum gelangt. Die eingebaute Rauchgas Kehrplatte bewirkt, dass den Rauchgasen extra Wärme entzogen wird, wodurch der Ofen mehr Wärme ausstrahlt.
  • Seite 40: Hi2 Das Innere

    Heizmaterial Der Smart kann nur mit Holz beheizt werden. Legen sie nie mehr als 2 Kg (Smart 60) oder 3 Kg (Smart 75) Heizmaterial in den Ofen. Benützen Sie immer sauberes, gehacktes Holz das genügend trocken ist. Die Trocknungszeiten sehen Sie in der Tabelle oben.
  • Seite 41: Den Ofen Anmachen

    Holzart Trocknungszeit Kiefer, Pappel 1 Jahr Linde, Weide, Tanne, Birke, Esche, Erle 1,5 Jahren Obstbäume, Buch 2 Jahren Eiche 2,5 Jahren Benutzen Sie in Ihrem Ofen keine Holzblöcke die Paraffi n enthalten. Wenn die Ofentür geschlossen ist schmilzt das Paraffi n zu schnell aus den Holzblöcken. Die verschmutzten Rauchgase die dadurch entstehen, bilden einen Niederschlag auf der Scheibe der Ofentür, brennen ins Glas und können dann nicht mehr entfernt werden.
  • Seite 42: Die Wirkung Des Luftschiebers

    Berühren Sie während des Heizens nie die lackierten Teile des Ofens. Die optimale Art zu Heizen Die Öfen von WANDERS sind so entworfen, dass sie die beste Nutzleistung erzeugen. Ein gut beheizter Holzofen kann eine Nutzleistung von etwa 75-80% erreichen. Dadurch verbrauchen Sie weniger Holz um genauso viel Wärme zu erzeugen.
  • Seite 43: Schornstein Mit Gutem Zug

    Lassen sie jährlich all Dichtungen von Türen und Glasscheiben auf Verschleißerscheinungen prüfen. Brandschutz Mit einem Holzofen von WANDERS haben Sie eine bequeme und sichere Wärmequelle im Haus. Der Brandschutz fängt schon bei der korrekten Montage und einem gut funktionierendem Rauchgasabzug an. Ihr Installateur muss sich deshalb an die Montagevorschriften, sowie auf Seit 44 und folgende Seiten beschrieben, halten.
  • Seite 44: Garantie

    Für folgendes Zubehör gilt eine Garantiefrist von 1 Jahr: alle gusseisernen und vermiculiet Teile, das elektrische Zubehör, und der Lack. Glass ist ausgeschlossen von der Garantie. Wanders ist nicht verantwortlich für eventuelle Risse im fein Putz und Verfärbungen der Wände, Decken und/ oder Roste nach Heizen des Ofens. Verfärbungen können entstehen weil Staubteilchen im Konvektionsmantel verbrennen.
  • Seite 45: Vorbereitung

    Luftzufuhr direkt von außen geholt wird sodass die Verbrennung ohne Gefahr geschehen kann. Vorbereitung Mindestmaße der Nische Um den Smart 60 oder 75 ein zu bauen muss die Nische mindestens die folgende Abmessung haben. Smart 60 Front: 497 x 614 x 360 mm (H x B x T)
  • Seite 46: Installation

    3. Hölzerne Konstruktion die innerhalb des 80 cm Bereichs des Ofens sind, müssen mit feuerfestem Material verkleidet werden. 4. Wenn der Rauchgasabzug durch die Decke und/oder das Dach führt welche aus brennbarem Material bestehen, müssen diese rundum 80 cm mit feuerfestem Material bekleidet werden. Achten sie hierbei auf Zwischenbalken und eventuell elektrische Leitungen.
  • Seite 47: Zierleisten Und Einbauleiste

    Den Ofen anschließen Der Smart ist ein mittelschwerer (Smart 60, 80 kg) bis schwerer (Smart 75, 100 kg) Kamineinsatz. Überzeugen Sie sich davon, dass der Boden, auf den Sie den Kamineinsatz stellen, fl ach und stark genug ist. Befolgen Sie, bevor Sie mit der Installation beginnen, erst die Anweisungen aus dem vorigen Abschnitt ‘Vorbereitungen’...
  • Seite 48: Verkleidung Aus Innenraum Entfernen

    Verkleidung aus Innenraum entfernen Für alle Modelle gilt folgendes: Entfernen Sie zuerst die Umlenkplatte (A), dann die Rückwand (B), die Bodenplatte (C) und die Seitenwände (D & Smart 60 front Smart 60 gauche/droite Smart 75 front Smart 75 gauche/droite Dichtungen Der Smart hat in der Tür eine 10 mm hohle Profi lschnur Die selbstklebende Schnur zwischen dem Glas und der...
  • Seite 50: Technische Tekeningen

    Technische tekeningen | Technical drawings | Dessins techniques | Technische Zeichnungen Smart 60 432,23 600,00  150,00 Smart 60 links | left | gauche 424,21 246,78 298,52 594,50  150,00 Smart 60 rechts | right | droite 424,21 298,51 246,79 594,50 ...
  • Seite 51 Smart 75 750,00 512,95  150,00 Smart 75 links | left | gauche 574,21 321,64 373,66  150,00 745,50 Smart 75 rechts | right | droite 574,21 373,50 321,80  150,00 745,50...
  • Seite 52: Onderdelen

    Onderdelen | Parts | Pièces détachée | Ersatzteile Smart 60 Smart 60 links | left | gauche Smart 60 rechts | right | droite...
  • Seite 53 Smart 75 Smart 75 links | left | gauche Smart 75 rechts | right | droite...
  • Seite 54: Technische Details

    EN 13229:2001/A2:2004/AC:2007 Keuringsrapport | Test report | Rapport d’inspection | Prüfgutachten RRF - 2915 4141 (Smart 60), RRF - 2915 4143 (Smart 75) BStV of the City of Munich and the City of Regensburg, FBStVO fo the City of Aachen and the City of Düsseldorf, Voldoet aan | Fulfi lled requirements | Conforme aux | Erfüllte Anforderungen...
  • Seite 55: Top Down Aansteken

    Top down...
  • Seite 56 Tel: +31 (0)315 - 386 414 Amtweg 4 Fax: +31 (0)315 - 386 201 7077 AL NETTERDEN info@wanders.nl Type- en zetfouten voorbehouden. Wanders fi res & stoves is een onderdeel van de Wanders Groep Nederland www.wanders.nl © 2016 Wanders Metaalproducten B.V. - All rights reserved...

Diese Anleitung auch für:

Smart 75

Inhaltsverzeichnis