Herunterladen Inhalt Inhalt Diese Seite drucken

Werbung

Verfügbare Sprachen
  • DE

Verfügbare Sprachen

  • DEUTSCH, seite 1
Dunstabzugshaube
10031698 10031699

Werbung

Inhaltsverzeichnis
loading

Inhaltszusammenfassung für Klarstein 10031699

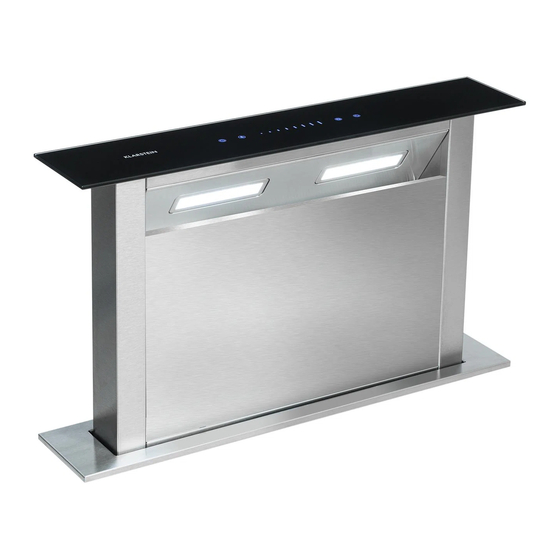
  • Seite 1 Dunstabzugshaube 10031698 10031699...
  • Seite 3: Technische Daten

    Sie diese, um möglichen Schäden vorzubeugen. Für Schäden, die durch Missachtung der Hinweise und unsachgemäßen Gebrauch entstehen, übernehmen wir keine Haftung. Technische Daten Artikelnummer 10031698, 10031699 Stromversorgung 220-240 V ~ 50-60 Hz Sicherheitshinweise • Lesen Sie sich alle Hinweise vor der Benutzung sorgfältig durch und bewahren Sie die Bedienungsanleitung zum späteren Nachschlagen gut auf.
  • Seite 4 Wichtige Hinweise zur Installation • Die Luft darf nicht in einen Abzug abgeleitet werden, der zum Absaugen von Rauchgasen von Gas- oder anderen Brennstoffen verwendet wird (gilt nicht für Geräte, die nur die Luft in den Raum zurückführen). • Der Mindestabstand zwischen Wand und Dunstabzugshaube sollte 15 mm betragen. •...
  • Seite 5: Installation

    Installation Auslass Gehäuse Befestigung Die Dunstabzugshaube sollte mindestens 15 mm von der Wand entfernt sein (siehe Bild 1). 2. Geben Sie etwas Glaskleber auf den unteren Rand des Bedienfelds (siehe Bild 3) und versenken Sie die Abzugshaube im vorgebohrten Loch (Abmes- sungen siehe Bild 2).
  • Seite 6: Reinigung Und Pflege

    So wechseln Sie die Birne Öffnen Sie die Tür der Abzugshaube. Stecken sie einen Schraubenzieher mit geradem Schlitz in die Lam- penabdeckung und heben Sie sie an. Schalten Sie die Abzugshaube aus und ziehen Sie den Stecker aus der Steckdose, bevor Sie die Birnen tauschen. Reinigung und Pflege Filterreinigung Reinigen Sie den Filter regelmäßig.
  • Seite 7: Filterreinigung - Schritt Für Schritt

    Filterreinigung - Schritt für Schritt Hinweis: Der Aluminiumfilter kann von Hand gereinigt werden. Der Aktivkohlefilter sollte etwa alle 6 Monate durch einen neuen Aktivkohlefilter ersetzt werden. 1 Entfernen Sie die Abdeckung [04] und wischen Sie sie mit einem feuchten Tuch ab. Entfernen Sie dann den Aluminiumfilter, indem Sie die 2 Schlitze links und rechts gedrückt halten.
  • Seite 8 3 Weichen Sie den Aluminiumfilter etwa 10 Minuten in eine Lösung aus warmem Wasser und mildem Reini- gungsmittel ein. 10 Minuten 1x pro Monat 4 Reinigen Sie den Aluminiumfilter danach mit einem weichen Tuch oder einer wichen Bürste. Spülen Sie ihn unter fließendem Wasser und trocknen Sie ihn sorgfältig ab.
  • Seite 9 5 Befestigen Sie den Aktivkohlefilter nach der Reinigung mit 4 Drähten am Aluminiumfilter. Aktivkohlefilter Draht Aluminiumfilter 6 Setzen Sie den Aluminiumfilter in die Dunstabzugshaube ein. Setzen Sie die Abdeckung [04] wieder ein und schließen Sie sie. Aluminiumfilter [04] Wichtige Hinweise zu den Filtern •...
  • Seite 10 Bedienfeld Das Bedienfeld verfügt über 5 Funktionen: Timer Licht Slider-Leiste Geschwindigkeit Power Tastenfunktionen Grundlegende Funktionen • Stecken Sie den Stecker in die Steckdose. Die Hintergrundbeleuchtung geht an und erlischt nach 5 Sekun- den, sofern Sie keine Taste berühren. Das Gerät wechselt in den Standby-Modus. Um es wieder zu aktivie- ren, drücken Sie eine beliebige Taste.
  • Seite 11: Fehlersuche Und Fehlerbehebung

    Beleuchtung einschalten Sobald die Abzugshaube ausgefahren ist, geht nach 8-10 Sekunden automatisch das Licht an, • Drücken Sie auf die LICHT-Taste, um das Licht auszuschalten. Drücken Sie die Taste erneut, um das Licht wieder einzuschalten. • Wenn Sie auf die LICHT-Taste drücken, um das Licht einzuschalten blinkt es für kurze Zeit. In dieser Zeit können Sie die Lichtintensität mit der SLIDER-LEISTE anpassen.
  • Seite 12: Hinweise Zur Entsorgung

    Problem Mögliche Ursache Lösungsansatz Das Gehäuse vibriert. Die Rotorblätter sind beschädigt. Wenden Sie sich an einen Fachbetrieb. Der Motor ist locker. Befestigen Sie den Motor. Das Gehäuse ist nicht richtig Befestigen Sie das Gehäuse. befestigt. Die Absaugleistung ist Der Abstand zwischen Herd und Verringern Sie den Abstand.
  • Seite 13: Technical Data

    Any failure caused by ignoring the mentioned items and cautions mentioned in the instruction manual are not covered by our warranty and any liability. Technical Data Item number 10031698, 10031699 Power supply 220-240 V ~ 50-60 Hz Safety Instructions •...
  • Seite 14 Important Hints on Installation • The air must not be discharged into a flue that is used for exhausting fumes from appliances burning gas or other fuels (not applicable to appliances that only discharge the air back into the room). •...
  • Seite 15 Installation Outlet Casing fasten lock The cooker hood should be placed at a distance of 15mm from the wall at least. (See Pic1) 2. Put moderate glass cement on the edge of the panel bottom(See pic 3), and put the hood into the hole of the cabinet.(See pic 2) Use 4pcs screw ST4*8 and screw ST4*14 &...
  • Seite 16: Cleaning And Care

    Lamp Replacement Open the door of the hood, insert the gap by a small screw-driver with ”-“ type and prize up the lamp (see pic8). But switch the unit off and pull out the plug first. Cleaning and Care Replace and clean the filter Method 1: Put the filter into 40-50°C clean water, pour on detergent, and soak for 2-3 minutes.
  • Seite 17 Filter Cleaning - Step by Step Note: The aluminum filter can be cleaned by hand. The activated carbon filter should be replaced about every 6 months with a new activated carbon filter. 1 Remove the decorative board [04] and wipe it clean with a damp cloth. Then,remove the aluminium filter by pressing and holding the 2 slots.
  • Seite 18 3 Soak the aluminium filter into the solution of warm water and mild detergent for about 10 minutes. 10 Minuten 1x per month 4 Clean with a soft cloth/brush. Rinse thoroughly and dry well. You can also clean the aluminum filter in the dishwasher (max 65 °...
  • Seite 19 5 After cleaning, attach the charcoal filter to the aluminium filter. Then secure with the 4 iron wires. Charcoal filter iron wire Aluminium filter 6 Insert the aluminium filter into the cooker hood. Then insert the decorative board [04] and close it into place.
  • Seite 20: Control Panel

    Control Panel Touch panel contains five function buttons: Timer Light Slide control Speed Power Functions of the Controls General Functions • Power on, the hood will standby with backlight, backlight will be extinguished after 5 seconds without any operation, for using the hood again, touch any key to wake up it’ s standby motion. •...
  • Seite 21: Troubleshooting

    Lighting After the hood slides up, the lights will turn on automatically in 8-10 seconds. • Touch the button of LIGHT, lights will turn off. Touch the LIGHT button again, the lights will turn off. • When you touch the button of LIGHT, the pilot light is flashing. Use the SLIDE CONTROL to control the light intensity when the pilot light is flashing.
  • Seite 22: Hints On Disposal

    Problem Possible Cause Suggested Solution Shake of the body The leaf damaged and causes Replace the leaf shaking The motor is not tightly hanged Lock the motor tightly The body is not tightly hanged Fixed the body tightly Insufficient suction The distance between the body Readjust the distance and the gas top too long...
  • Seite 23: Datos Técnicos

    La empresa no se responsabiliza de los daños ocasionados por un uso indebido del producto o por haber desatendido las indicaciones de seguridad. Datos técnicos Número de artículo 10031698, 10031699 Suministro eléctrico 220-240 V ~ 50-60 Hz Indicaciones de seguridad Indicaciones de seguridad •...
  • Seite 24 Indicaciones importantes de instalación • El aire no puede desviarse a un tiro de salida que se emplee para evacuar humos de gases u otras sustancias inflamables (no se aplica para aparatos que solo desvíen el aire a la sala). •...
  • Seite 25 Installation Salida Carcasa Fijación La campana debe estar a una distancia de al menos 15 mm de la pared (véase imagen 1). 2. Añada un poco de pegamento de vidrio en el marco inferior del panel de control (véase imagen 3) y baje la campana hasta los orificios previamente perforados (dimensiones en imagen 2).
  • Seite 26: Limpieza Y Cuidado

    Cómo cambiar las bombillas Abra la puerta de la campana extractora. Encaje el destornillador plano en el portalámparas y levántelo. Apague la carcasa y desconecte el enchufe antes de sustituir la bombilla. Limpieza y cuidado Limpieza del filtro Limpie el filtro con frecuencia. Limpie el filtro siguiendo uno de los métodos siguientes: Método 1: Empape la red del filtro 2-3 minutos en agua tibia a 40-50 °C y añada un poco de lavavajillas al agua.
  • Seite 27 Limpieza de filtros - Paso a paso Atención: Puede limpiar el filtro de aluminio a mano. Cambie el filtro de carbón activado por un filtro de carbón activado nuevo cada 6 meses. 1 Retire la cubierta [04] y límpiela con un paño húmedo. A continuación, extraiga el filtro de aluminio presio- nando las 2 ranuras, izquierda y derecha.
  • Seite 28 3 Ponga el filtro de aluminio en remojo en una solución de agua tibia y un producto de limpieza suave durante 10 minutos. 10 minutos 1 vez al mes 4 A continuación, limpie el filtro de aluminio con un paño seco o un cepillo suave. Enjuáguelo con agua corri- ente y séquelo con cuidado.
  • Seite 29 5 Después de limpiar el filtro de carbón activado, fíjelo en el filtro de aluminio con la ayuda de los 4 alambres. Filtro de carbón activado Alambre Filtro de aluminio 6 Introduzca el filtro de aluminio en la campana. Coloque la cubierta [04] y ciérrela. Filtro de aluminio [04] Indicaciones importantes sobre los filtros...
  • Seite 30: Panel De Control

    Panel de control El panel de control cuenta con 5 funciones: Temporizador Barra lateral Velocidad Potencia Funciones de los botones Funciones básicas Conecte el enchufe a la toma de corriente. La iluminación de fondo se enciende y se apaga a los 5 segundos si no pulsa ningún botón.
  • Seite 31: Detección Y Resolución De Problemas

    Encender la iluminación En cuanto la campana esté en funcionamiento, la luz se enciende tras 8-10 segundos automáticamente. • Pulse el botón LUZ para apagar la luz. Pulse de nuevo el botón para encenderla. • Si pulsa el botón LUZ para encender la luz, parpadea durante un momento. En este tiempo puede ajustar la intensidad luminosa con la BARRA LATERAL.
  • Seite 32: Indicaciones Para La Retirada Del Aparato

    Problema Posible causa Solución propuesta La carcasa vibra. Las hojas del rotor están dañadas. Contacte con un servicio técnico. El motor está suelto. Fije el motor. La carcasa no está correctamente Fije la carcasa. fijada. La potencia de extrac- La distancia entre la campana Reduzca la distancia.
  • Seite 33: Fiche Technique

    é viter d’ é ventuels dommages. Le fabricant ne saurait être tenu pour re- sponsable des dommages dus au non-respect des consignes de sécurité et à la mauvaise utilisation de l’ a ppareil. Fiche technique Numéro d’ a rticle 10031698, 10031699 Alimentation 220-240 V ~ 50-60 Hz Consignes de sécurité...
  • Seite 34 Consignes importantes pour l’installation • L’ a ir ne doit pas être dirigé vers un conduit d’ é vacuation utilisé pour aspirer et évacuer les gaz de combustion d’ a ppareils utilisant du gaz ou d’ a utres matériaux combustibles (ne concerne pas les appareils qui font seule- ment re-circuler l’...
  • Seite 35 Installation Sortie Châssis attachement La hotte aspirante doit être installée à au moins 15 mm de distance du mur (voir schéma 1). 2. Mettez un peu de colle pour le verre sur le bord inférieur du panneau de commande (voir schéma 3) et abaissez la hotte aspirante dans le trou pré percé...
  • Seite 36: Nettoyage Et Entretien

    Remplacement des lampes Ouvrez la porte de la hotte aspirante. Insérez un tournevis plat dans le cache des lampes et soulevez-le. Eteig- nez la hotte aspirante et débranchez la fiche de la prise avant de changer les ampoules. Nettoyage et entretien Nettoyage du filtre Nettoyez régulièrement le filtre.
  • Seite 37 Nettoyage des filtres – étape par étape Remarque : vous pouvez nettoyer le filtre en aluminium à la main. Le filtre à charbon actif doit être remplacé par un neuf tous les 6 mois environ. 1. Démontez le cache [04] et essuyez-le avec un chiffon humide. Démontez ensuite le filtre en aluminium en tenant enfoncées les 2 fentes gauche et droite Filtre en aluminium Fente...
  • Seite 38 3. Faites tremper le filtre en aluminium dans un solution d‘eau chaude et de produit de nettoyage doux pen- dant environ 10 minutes. 10 minutes 1 x par mois 4. Ensuite, nettoyez le filtre en aluminium avec un chiffon doux ou une brosse. Rincez à l‘eau courante et es- suyez avec soin.
  • Seite 39 5. Après l’ a voir nettoyé, remettez le filtre à charbon actif en place et maintenez-le avec ses 4 fils sur le filtre en aluminium. Filtre à charbon actif Filtre en aluminium 6. Insérez le filtre en aluminium dans la hotte. Replacez le couvercle [04] et fermez-le. Filtre en aluminium [04] Importantes remarques concernant les filtres...
  • Seite 40: Panneau De Commande

    Panneau de commande Le panneau de commande comprend 5 fonctions : Minuterie Eclairage Bande curseur Vitesse Power Touches de fonctions Fonctions de base • Branchez la fiche dans la prise. Le rétroéclairage s’ a llume et s’ é teint au bout de 5 secondes tant que vous n’...
  • Seite 41: Identification Et Résolution Des Problèmes

    Allumer l’éclairage Dès que la hotte aspirante a cessé de se déplacer, l’ é clairage s’ a llume automatiquement au bout de 8-10 secondes. • Appuyez sur la touche ECLAIRAGE pour éteindre la lumière. Appuyez de nouveau sur la touche pour rallu- mer la lumière.
  • Seite 42: Conseils Pour Le Recyclage

    Problème Cause possible Méthode de résolution Vibrations du châssis. Les pales du rotor sont Adressez-vous à un spécialiste. endommagées. Le moteur est desserré. Fixez le moteur. Le châssis n’ e st pas correctement Fixez le châssis. fixé. La puissance La distance entre les plaques de Réduisez l’...
  • Seite 43: Dati Tecnici

    Non ci assumiamo alcuna responsabilità per danni derivati da una mancata osservazione delle avvertenze di sicurezza e da un uso improprio del dispositivo. Dati tecnici Articolo numero 10031698, 10031699 Alimentazione 220-240 V ~ 50-60 Hz Avvertenze di sicurezza •...
  • Seite 44 Note importanti per l´installazione • L´aria non deve essere condotta in uno scarico utilizzato per aspirare gas di combustione o altri combustibili (ciò non si applica per dispositivi che emettono solo aria nella stanza). • La distanza minima tra la piastra di cottura e la parte inferiore della cappa aspirante deve essere almeno di 65 cm.
  • Seite 45 Installation Uscita Alloggiamento Blocco Collocare la cappa aspirante almeno a 15 mm di distanza dalla parete (vedere la figura 1). 2. Mettere un po´ di colla per vetro sul bordo inferiore del pannello di controllo (vedere la figura 3) e inserire la cappa aspirante nel foro apposito (per le dimensioni vedere figura 2).
  • Seite 46: Pulizia E Manutenzione

    Sostituire le lampadine Aprire lo sportello della cappa aspirante. Inserire un cacciavite nel coperchio della lampada e sollevarlo. Prima di sostituire le lampadine, spegnere la cappa aspirante e staccare la spina dalla presa. Pulizia e manutenzione Pulizia del filtro Pulire regolarmente il filtro seguendo uno dei seguenti metodi: Metodo 1: Mettere in ammollo per 2-3 minuti il filtro in acqua calda (40-50°C) e aggiungere un po´...
  • Seite 47 Pulizia dei filtri – Passo per passo Avvertenza: il filtro in alluminio può essere pulito a mano. Il filtro ai carboni attivi dovrebbe essere sostituito circa ogni 6 mesi con uno nuovo. 1 Rimuovere la copertura [04] e pulirla con un panno umido. Rimuovere il filtro in alluminio tenendo premute le 2 fessure a destra e sinistra.
  • Seite 48 3 Mettere a mollo il filtro in alluminio per circa 10 minuti in una soluzione di acqua calda e detergente delicato. 10 minuti 1 volta al mese 4 Pulire poi il filtro in alluminio con un panno umido o una spazzola morbida. Sciacquarlo sotto acqua corrente e asciugarlo con cura.
  • Seite 49 5 Dopo la pulizia, fissare il filtro ai carboni attivi al filtro in alluminio con 4 fili metallici. Filtro ai carboni attivi Filo metallico Filtro in alluminio 6 Inserire il filtro in alluminio nella cappa aspirante. Riposizionare la copertura [04] e chiuderla. Filtro in alluminio [04] Importanti avvertenze sui filtri...
  • Seite 50: Pannello Dei Comandi

    Pannello dei comandi Il pannello dei comandi dispone di 5 funzioni: Timer Luce Comandi slider Velocitá Power Funzione dei tasti Funzioni di base • Inserire la spina nella presa: la retroilluminazione si accende. Se non si preme alcun tasto, la retroilluminazi- one si spegne dopo 5 secondi e il dispositivo passa in modalità...
  • Seite 51: Ricerca E Risoluzione Dei Problemi

    Accendere la luce Appena la cappa aspirante si solleva, la luce si accende automaticamente in 8-10 secondi. • Premere il tasto LIGHT per spegnere la luce. Premere di nuovo il tasto per accendere di nuovo la luce. • Se si preme il tasto LIGHT per accendere la luce, la spia inizia a lampeggiare. Mentre la spia lampeggia, è possibile regolare l’intensità...
  • Seite 52: Dichiarazione Di Conformità

    Problema Causa possibile Soluzione Vibrazioni. Le pale rotanti sono danneggiate. Rivolgersi ad un tecnico competente. Il motore è allentato. Fissare il motore. L´alloggiamento non è fissato Fissare l´alloggiamento. correttamente. La potenza aspirante Eccessiva distanza tra i fornelli e la Diminuire la distanza. è...

Diese Anleitung auch für:

10031698

Inhaltsverzeichnis