Herunterladen Inhalt Inhalt Diese Seite drucken
Klarstein 10029385 Bedienungsanleitung
Vorschau ausblenden Andere Handbücher für 10029385:

Werbung

Verfügbare Sprachen
  • DE

Verfügbare Sprachen

  • DEUTSCH, seite 1
Dunstabzugshaube
10029385 10029387 10029388
10031900 10031902 10031903 10031904

Werbung

Inhaltsverzeichnis
loading

Inhaltszusammenfassung für Klarstein 10029385

  • Seite 1 Dunstabzugshaube 10029385 10029387 10029388 10031900 10031902 10031903 10031904...
  • Seite 2: Inhaltsverzeichnis

    Birnen und Lampen austauschen 13 Fehlersuche und Fehlerbehebung 13 Hinweise zur Entsorgung 14 Konformitätserklärung 14 Technische Daten Artikelnummer 10029385, 10029387, 10029388, 10031900, 10031902, 10031903, 10090904 Stromversorgung 220-240 V ~ 50-60 Hz Sicherheitshinweise Installation • Das Gerät muss durch einen qualifizierten Techniker installiert werden.
  • Seite 3 Während der Verwendung • Das Gerät ist für die Verwendung im Haushalt entwickelt worden und darf niemals in einem kommerziellen Anwendungsbereich betrieben werden. • Achten Sie bitte darauf, das Gerät ausschließlich bestimmungsgemäß zu gebrauchen. • Dieses Gerät ist nicht dafür bestimmt, durch Personen (einschließlich Kinder) mit eingeschränkten physi- schen, sensorischen oder geistigen Fähigkeiten oder mangels Erfahrung und/oder mangels Wissen benutzt zu werden, es sei denn,sie werden durch eine für ihre Sicherheit zuständige Person beaufsichtigt oder er- hielten von ihr Anweisungen, wie das Gerät zu benutzen ist.
  • Seite 4: Installation

    Installation Vorbereitung Falls sie über einen Abzug nach außen verfügen, können Sie die Abzugshaube wie auf dem Bild rechts installieren. Der Abzugskanal sollte eine Durchmesser von min- destens 150 mm haben und aus Emaille, Aluminium oder einem flexiblen, hitzebe- ständigen Rohr bestehen. •...
  • Seite 5 Kamininstallation 1. Stecken Sie den oberen Kamin in den unteren 2. Sobald der Kamin die richtige Höhe hat, hängen Kamin. Ziehen Sie dann den oberen Kamin bis Sie die Befestigungsbohrung in die Haltekrallen zur erforderlichen Höhe heraus. ein. Kamininstallation für Rauchfänge 1.
  • Seite 6 3. Ziehen Sie den oberen Kamin bis zur benötigten 4. Bohren Sie 2 x 8 mm Löcher, zur Befestigung der Höhe heraus. Sobald er die richtige Höhe hat, fi- zweiten Fixierplatte (siehe Pfeil). Fixieren Sie die xieren Sie ihn mit zwei 4x8 mm Schrauben an Platte mit 2 der mitgelieferten Schrauben.
  • Seite 7 Installation mit Innenentlüftung Falls Sie nicht über einen Außenabzug verfügen, benötigen Sie kein Abluftrohr. Die Installation entspricht der Installation mit Außenentlüftung. Aktivkohlefilter einbauen HINWEIS: Ein Aktivkohlefilter gehört nicht zum Lieferumfang. Sie können ihn aber zur Abzugshaube dazukaufen. 1. Mit einem Aktivkohlefilter lassen sich bei innen- 2.
  • Seite 8: Bedienung Und Funktionstasten

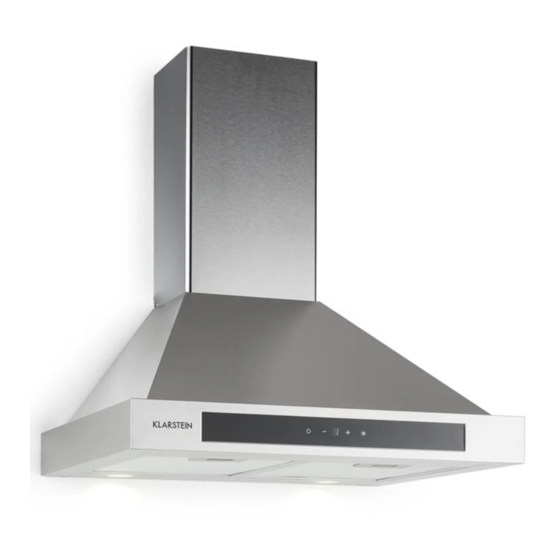
    Bedienung und Funktionstasten Mechanische Funktionstasten Motor ein- und ausschalten. Niedrige Geschwindigkeit: Drücken Sie die Taste, um den Motor mit niedriger Geschwindigkeit laufen zu lassen. Drücken Sie ein weiteres Mal, um den Motor wieder auszuschalten. Mittlere Geschwindigkeit: Drücken Sie die Taste, um den Motor mit niedriger Geschwindigkeit laufen zu lassen.
  • Seite 9 Touch-Bedienfeld 1 Motor ein- und ausschalten. Lüftergeschwindigkeit erhöhen. Lüftergeschwindigkeit verringern. Licht ein- und ausschalten. Zeigt die Lüftergeschwindigkeit an: 1 = Niedrige Geschwindigkeit 2= Mittlere Geschwindigkeit 3 = Hohe Geschwindigkeit Quick Timer Funktion: Halten Sie + und - gleichzeitig gedrückt. Das Display blinkt und es beginnt ein 5-minütiger Countdown. Nach 5 Minuten gehen das Licht und der Motor automatisch aus und ein Summen ertönt.
  • Seite 10 Displayanzeigen 1 Lüftersymbol 2 Zeitanzeige 3 Timer 4 Licht 5 Lüftergeschwindigkeit 6 Alarm-Symbol 7 Reinigungs-Symbol: Erscheint nach einer Benutzungsdauer von 14 Stunden. Erweiterte Funktionen der Licht-Taste: Halten Sie die Licht-Taste lang gedrückt, um das Reinigungs-Symbol auszuschalten und den Zähler für die Benutzungsdauer zurückzusetzen.
  • Seite 11 Licht-Taste • Drücken Sie einmal kurz auf die Taste, um das Licht ein- und auszuschalten. • Halten Sie die Licht-Taste lang gedrückt, um das Reinigungs-Symbol auszuschalten und den Zähler für die Benutzungsdauer zurückzusetzen. • Wenn sie die Taste gedrückt halten, während das Reinigungs-Symbol aus ist wird ihnen die aktuelle Benut- zungsdauer angezeigt.
  • Seite 12 Ein/Aus Taste • Drücken Sie die Taste im Standby-Modus. Die Fenster öffnen sich, das Display und alle Tasten leuchten und das Gerät befindet sich im Betriebsmodus. Falls Sie das Gerät erstmalig benutzen, arbeitet der Motor automatisch mit langsamer Geschwindigkeit und das Licht ist aus. Wenn sie das Gerät anders einstellen werden die Einstellungen beim nächsten Start übernommen.
  • Seite 13: Birnen Und Lampen Austauschen

    Manuelles Zurücksetzen des Reinigungs-Symbols • Drücken Sie im Standby-Modus 3 Sekunden lang auf die Ein/Aus-Taste am Bedienfeld. Die Fenster öffnen sich automatisch. Sobald die Fenster offen sind befindet sich das Display im Standby-Modus. • Halten Sie die Ein-Aus-Taste erneut 3 Sekunden lan gedrückt. Die Fenster schließen sich und automatisch und das System wechselt in den Standby-Modus.
  • Seite 14: Hinweise Zur Entsorgung

    Fehler Mögliche Ursache Lösung Die Absaugleistung ist Zu großer Abstand zwischen Hängen Sie die Abzugshaube so auf, dass der schlecht. Abzugshaube und Herd. Abstand zwischen Herd und Abzug 65-75 cm beträgt. Hinweise zur Entsorgung Befindet sich die linke Abbildung (durchgestrichene Mülltonne auf Rädern) auf dem Pro- dukt, gilt die Europäische Richtlinie 2002/96/EG.
  • Seite 15: Technical Data

    Bulb and Lamp Replacement 26 Troubleshooting 26 Hints on Disposal 27 Declaration of Conformity 27 Technical Data Item number 10029385, 10029387, 10029388, 10031900, 10031902, 10031903, 10090904 Power supply 220-240 V ~ 50-60 Hz Safety Instructions Installation • Your safety is of the utmost importance to us. Please make sure that you read this instruction booklet before attempting to install or use the appliance.
  • Seite 16 Whe the Unit is in Use • When the hood is being used in its extractor function, ensure that the ducting is fire retardant and that there are no bends sharper than 90 degrees as this will reduce the efficiency of the hood. •...
  • Seite 17: Installation

    Installation Preparation If you have an outlet to the outside, your cooker hood can be connected as below picture by means of an extraction duct (enamel, aluminium, flexible pipe or inflam- mable material with an interior diameter of 150mm) • Before installation, turn the unit off and unplug it from the outlet. •...
  • Seite 18 Chimney Installation 1. Put the upper chimney into lower chimney .Then 2. Sliding the chimney to adjust the chimney pulling out the upper chimney upwards. Adjust to height. When the height you required is reached, reach the height required. then hang the fixing hole to the fixing screws as showed in picture.
  • Seite 19 3. Sliding the chimney to adjust the chimney 4. Drill 2 x 8mm holes to accommodate the plate height. When the height you required is reached, (see arrow). Screw and tighten the plate II onto then fix 2 pcs of 4x8mm screws onto the hole the wall with 2 screws provided.
  • Seite 20 Installation (Vent inside) If you do not have an outlet to the outside, exhaust pipe is not required and the installation is similar to the one show in section “Installation (Vent outside)”. Installing the Carbon Filter NOTE: Carbon Filter is not standard accessory, these can be purchased as an accessory. 1.
  • Seite 21: Operation And Controls

    Operation and Controls Mechanical Push Button Control Depress this button to turn off the motor Low –Depress this button to enter into low speed and again to turn off motor. Medium –Depress this button to enter into medium speed and again to turn off motor. High –Depress this button to enter into high speed and again to turn off motor.
  • Seite 22 Touch Control 1 Depress this button to turn on/off the motor. Press this button for increasing the speed of the fan. Press this button for decreasing the speed of the fan. Turn on/off light. Fan speed display: 1 = low speed 2 = medium speed 3 = high speed Quick timer:...
  • Seite 23 Display 1 Fan symbol, will turn when the fan is working 2 Time display 3 Timer 4 Light 5 Fan speed 6 Alarm symbol 7 Cleanning symbol, appear when total working time up to 14 hours. Light Button Functions: Short press for lamp power control. Long press for turning off the “Cleanning symbol” & reset total working time when “Cleanning symbol”...
  • Seite 24 LIGHT button: • Short press for lamp power control. • Long press for turning off the “Cleanning symbol” & reset total working time when “Cleanning symbol” is on. • For checking current total working time when “Cleanning symbol” is off. Clock setting: •...
  • Seite 25 ON/OFF key • In STANDBY MODE press the ON/OFF key, the windows will open, when finish opening display & all button light on hood in WORKING MODE. If the first motor start working in LOW speed & light off automatically; or recover from the same setting of last working operation (Same for Remote control).
  • Seite 26: Bulb And Lamp Replacement

    Manual Clearing Mode for Cleaning Operation: • In STANDBY MODE, press & hold ON/OFF for 3 seconds,(it must operate with the control panel on the hood) window open automatically. When the window opening complete, display as STANDBY MODE. • In MANUAL CLEARING MODE, press & hold ON/OFF for 3 seconds(it must operate with the control panel on the hood), window close automatically.
  • Seite 27: Hints On Disposal

    Fault Cause Solution Suction per-formance Too long distance between Readjust the distance to 65-75cm not good the unit and the cooking plane Hints on Disposal According to the European waste regulation 2002/96/EC this symbol on the product or on its packaging indicates that this product may not be treated as household waste. Instead it should be taken to the appropriate collection point for the recycling of electrical and electronic equipment.
  • Seite 28: Données Techniques

    Remplacer les ampoules et les lampes 39 Résolution des problèmes 39 Information sur le recyclage 40 Déclaration de conformité 40 Données techniques Numéro d’ a rticle 10029385, 10029387, 10029388, 10031900, 10031902, 10031903, 10090904 Alimentation électrique 220-240 V ~ 50-60 Hz Consignes de sécurité Installation •...
  • Seite 29 Pendant l’utilisation • L’ a ppareil a été conçu pour un usage domestique et ne doit jamais être utilisé dans un cadre commercial. • Veiller à utiliser le produit uniquement en conformité avec son usage prévu. • Les enfants ainsi que les personnes dont les capacités physiques, mentales ou sensorielles sont réduites, ou qui présentent une expérience et/ou des connaissances insuffisantes, doivent utiliser l’...
  • Seite 30: Installation

    Installation Préparation Si l’ e space dispose d’une bouche d’ a ération dirigée vers l’ e xtérieur, il est possible d’installer la hotte comme sur l’image de droite. Le conduit d’ a spiration doit avoir un diamètre d’ a u moins 150 mm et doit être composé d’ é mail, d’ a luminium ou d’un tuyau flexible et thermorésistant.
  • Seite 31 Installation de la cheminée 1. Introduire la partie supérieure de la cheminée 2. Une fois que la cheminée a la hauteur exacte, fi- dans la partie inférieure. Puis tirer sur la partie su- xer les vis de fixation aux crans d’ a rrêt. périeure jusqu’...
  • Seite 32 3. Tirer sur la partie supérieure de la cheminée 4. Percer deux trous de 2 x 8 mm pour fixer la deu- jusqu’ à atteindre la hauteur nécessaire. Une fois xième barre de fixation (cf. flèche). Fixer la barre que la cheminée a la hauteur exacte, la fixer à la avec 2 des vis fournies.
  • Seite 33 Installation avec évacuation intérieure de l’air Si l’ e space ne dispose pas d’une bouche d’ a ération dirigée vers l’ e xtérieur, un tuyau d’ é vacuation de l’ a ir n’ e st pas nécessaire. L’installation est semblable à l’installation avec évacuation extérieure. Installer le filtre à...
  • Seite 34: Utilisation Et Touches De Commande

    Utilisation et touches de commande Touches de commande mécaniques Mettre le moteur en marche. Vitesse basse : appuyer sur cette touche pour faire fonctionner le moteur à vitesse basse. Appuyer de nouveau dessus pour ré-éteindre le moteur. Vitesse moyenne : appuyer sur cette touche pour faire fonctionner le moteur à vitesse moyenne. Appuyer de nouveau dessus pour ré-éteindre le moteur.
  • Seite 35 Panneau de commande tactile 1 Mettre le moteur en marche. Augmenter la vitesse du ventilateur. Diminuer la vitesse du ventilateur. Allumer et éteindre la lumière. Affiche la vitesse du ventilateur : 1 = vitesse basse 2 = vitesse moyenne 3 = vitesse haute Fonction Quick Timer Maintenir les touches + et - simultanément enfoncées.
  • Seite 36 Symboles de l’ a ffichage 1 Symbole de ventilation 2 Affichage du temps 3 Minuteur 4 Éclairage 5 Vitesse de ventilation 6 Symbole d’ a lerte 7 Symbole de nettoyage : apparaît après une durée d’utilisation de 14 heures. Fonctions avancées de la touche d’ é clairage : Rester longuement appuyer sur la touche d’...
  • Seite 37 Touche d’ é clairage • Appuyer brièvement sur cette touche pour allumer et éteindre la lumière. • Rester longuement appuyer sur la touche d’ é clairage pour faire disparaître le symbole de nettoyage et réin- itialiser le compteur relatif à la durée d’utilisation. •...
  • Seite 38 Touche marche/arrêt • En mode veille, appuyer sur cette touche. Les fenêtres s’ o uvrent, toutes les touches s’ a llument et l’ a ppareil se met en marche. Lors de la première utilisation, le moteur démarre automatiquement en vitesse lente et la lumière reste éteinte.
  • Seite 39: Remplacer Les Ampoules Et Les Lampes

    Réinitialisation manuelle du symbole de nettoyage • En mode veille, appuyer pendant 3 secondes sur la touche marche/arrêt du panneau de commande. Les fenêtres s’ o uvrent automatiquement. Quand les fenêtres sont ouvertes, l’ a ffichage se met en mode veille. •...
  • Seite 40: Information Sur Le Recyclage

    Problème Cause possible Solution L’ a spiration est mauvaise. Écart trop important entre la Monter la hotte aspirante de telle manière à ce hotte et la cuisinière. que l’ é cart avec la cuisinière soit compris entre 65 et 75 cm. Information sur le recyclage Vous trouverez sur le produit l’image ci-contre (une poubelle sur roues, barrée d‘une croix), ce qui indique que le produit se trouve soumis à...
  • Seite 41: Datos Técnicos

    Detección y resolución de problemas 52 Indicaciones para la retirada del aparato 53 Declaración de conformidad 53 Datos técnicos Número de artículo 10029385, 10029387, 10029388, 10031900, 10031902, 10031903, 10090904 Suministro eléctrico 220-240 V ~ 50-60 Hz Indicaciones de seguridad Instalación •...
  • Seite 42 Durante la utilización • El aparato se ha diseñado para un uso doméstico, no comercial. • Asegúrese de utilizar el aparato solamente para el fin para el que ha sido diseñado. • Los niños y las personas con discapacidades físicas, psíquicas o sensoriales o carentes de la experiencia y conocimiento necesarios no podrán utilizar el aparato salvo que estén bajo supervisión o hayan sido pre- viamente instruidas sobre su utilización y las indicaciones de seguridad y se hayan familiarizado con sus funciones.
  • Seite 43: Instalación

    Instalación Preparación Si cuenta con una salida de aire al exterior, puede instalar la campana tal y como indica la ilustración de la derecha. El tiro de aire debe contar con un diámetro mínimo de 150 mm y el conducto deberá estar fabricado en esmalte, aluminio o un material flexible y resistente al calor.
  • Seite 44 Instalación de la chimenea 1. Encaje la chimenea superior en la inferior. Des- 2. Cuando haya conseguido la altura necesaria para lice entonces la chimenea superior hasta la con- la chimenea, cuelgue la pieza de los soportes por seguir la altura deseada. medio de las ranuras de esta.
  • Seite 45 3. Deslice la chimenea superior hasta la altura ne- 4. Perfore dos agujeros 2x8 mm para fijar la segun- cesaria. Cuando la haya alcanzado, fije la pieza da placa (consulte la flecha). Fije las dos placas a con dos tornillos 4x8 mm a la placa (observe la la pared con los dos tornillos incluidos.
  • Seite 46 Instalación con ventilación inferior Si no dispone de una salida de aire al exterior, no necesita un conducto de salida. La instalación es idéntica a la descrita anteriormente. Montaje del filtro de carbón activo Advertencia: el filtro de carbón activo no está incluido, debe adquirirlo por separado. 1.
  • Seite 47: Manejo Y Controles

    Manejo y controles Botones de funciones mecánicas Encender/apagar motor. Velocidad baja: pulse este botón para poner en marcha el motor a velocidad baja. Pulse una vez más para apagarlo. Velocidad media: pulse este botón para poner en marcha el motor a velocidad media. Pulse una vez más para apagarlo.
  • Seite 48 Panel de control táctil 1 Encender/apagar motor. Aumentar la velocidad del aire. Reducir la velocidad del aire. Encender/apagar luz. Mostrar la velocidad del aire: 1= velocidad baja 2= velocidad media 3= velocidad alta Función de temporizador rápido Mantenga pulsados simultáneamente + y -. El display parpadea y comienza una cuenta atrás de 5 minutos. Cuando haya transcurrido el tiempo, la luz y el motor se apagan y escuchará...
  • Seite 49 Indicadores del display 1 Símbolo del ventilador 2 Indicador del tiempo 3 Temporizador 4 Luz 5 Velocidad del ventilador 6 Símbolo de la alarma 7 Símbolo de limpieza: aparece tras una utilización de 14 horas. Funciones adicionales del botón de la luz: Mantenga el botón de la luz pulsado para desactivar el símbolo de limpieza y restablecer el contador.
  • Seite 50 Botón de la luz • Pulse una vez para encender o apagar la luz. • Mantenga el botón pulsado para que el símbolo de limpieza desaparezca y el contador se restablezca. • Si mantiene pulsado el botón con el símbolo de limpieza desactivado, aparecerá en el display el valor del contador actual.
  • Seite 51 Botón on/off • Pulse el botón en el modo standby. La ventana se abre, el display y todos los botones se iluminan y el dis- play activará el modo funcionamiento. Si utiliza el aparato por primera vez, el motor funcionará automáti- camente a la velocidad más baja y a la luz estará...
  • Seite 52: Detección Y Resolución De Problemas

    Reinicio manual del símbolo de limpieza • Pulse el botón on/off en el panel de control durante 3 segundos con la campana en modo standby. La ven- tana se abrirá automáticamente, lo que significará que el display estará en modo standby. •...
  • Seite 53: Indicaciones Para La Retirada Del Aparato

    Problema Posible causa Solución La potencia extractora es Demasiada distancia entre la Cuelgue la campana entre 65-75 cm por enci- insuficiente. campana y la cocina. ma de la superficie de cocción. Indicaciones para la retirada del aparato Si el aparato lleva adherida la ilustración de la izquierda (el contenedor de basura tachado) entonces rige la normativa europea, directiva 2002/96/CE.
  • Seite 54: Dati Tecnici

    Sostituire le lampade e le lampadine 65 Ricerca e risoluzione dei problemi 65 Smaltimento 66 Dichiarazione di conformità 66 Dati tecnici Articolo numero 10029385, 10029387, 10029388, 10031900, 10031902, 10031903, 10090904 Alimentazione 220-240 V ~ 50-60 Hz Avvertenze di sicurezza Installazione •...
  • Seite 55 Durante l’utilizzo • Il dispositivo è destinato esclusivamente ad un uso domestico. • Utilizzare il dispositivo esclusivamente nelle modalità previste. • Il dispositivo non è destinato ad essere utilizzato da persone (bambini inclusi) con capacità fisiche e mentali ridotte o prive di esperienza e/o della conoscenza necessaria, a meno che non vengano sorvegliate da una persona responsabile della loro sicurezza che spieghi loro le avvertenze e le funzioni del dispositivo.
  • Seite 56: Installazione

    Installazione Preparazione Se si possiede uno scarico verso l‘esterno, è possibile installare la cappa come mostrato nell‘immagine a destra. Il condotto di scarico deve avere un diametro mi- nimo di 150 mm ed essere composto da smalto, alluminio, da un tubo flessibile, resistente al calore.
  • Seite 57 Installazione del camino 1. Inserire il camino superiore in quello inferiore. 2. Una volta che il camino è installato alla giusta Tirare verso l’ a lto il camino superiore e regolare altezza, agganciare il foro di fissaggio alle viti di la sua altezza.
  • Seite 58 3. Tirare il camino superiore verso l’ a lto e regolare la 4. Eseguire i fori (2 x 8 mm) per installare la piastra sua altezza. Fissarlo infine utilizzando due viti da di fissaggio (vedere la freccia). Fissare la piastra 4x8 mm alla piastra di fissaggio (vedere la frec- utilizzando le 2 viti incluse nella consegna.
  • Seite 59 Installazione con scarico interno Se non si dispone di uno scarico esterno, occorre un tubo di scarico. L‘installazione è simile all’installazione con scarico esterno. Installare il filtro a carbone attivo NOTA: il filtro a carbone attivo non è incluso nella consegna. Questo può essere acquistato come accessorio. 1.
  • Seite 60: Utilizzo E Tasti Funzione

    Utilizzo e tasti funzione Tasti funzione meccanici Accendere e spegnere la ventola. Velocità minima: premere il tasto per avviare la ventola a velocità minima. Premere una seconda volta per spegnere la ventola. Velocità media: premere il tasto per avviare la ventola a velocità media. Premere il tasto una seconda volta per spegnere il motore.
  • Seite 61 Pannello di controllo touch 1 Accendere e spegnere il motore. Aumentare la velocità della ventola. Diminuire la velocità della ventola. Accendere e spegnere la luce. Indica la velocità della ventola: 1= velocità minima 2= velocità media 3= velocità massima Funzione Quick Timer: Tenere premuti contemporaneamente i tasti + e -.
  • Seite 62 Spie sul display 1 Simbolo ventola 2 Tempo 3 Timer 4 Luce 5 Velocità della ventola 6 Simbolo allarme 7 Simbolo pulizia: compare dopo un utilizzo di 14 ore. Ulteriori funzioni del tasto luce: Tenere premuto il tasto luce per spegnere il simbolo “pulizia” e per azzerare il contatore del tempo di utilizzo. Se si tiene premuto il tasto mentre simbolo “pulizia”...
  • Seite 63 Tasto luce • Premere il tasto per accendere e spegnere la luce. • Tenere premuto il tasto per spegnere il simbolo “pulizia” e azzerare il contatore del tempo di utilizzo. • Se si tiene premuto il tasto mentre il simbolo “pulizia” è spento, verra0 visualizzata il tempo di utilizzo attuale.
  • Seite 64 Tasto On / Off • Premere il tasto in modalità standby. Le finestre si aprono, il display e tutti i tasti si illuminano e il dispositivo passa in modalità di operatività. Se si utilizza il dispositivo per la prima volta, la ventola si avvia automatica- mente a velocità...
  • Seite 65: Sostituire Le Lampade E Le Lampadine

    Reimpostare manualmente il simbolo “pulizia” • In modalità standby, premere per 3 secondi il tasto on/off sul pannello di controllo. Le finestre si aprono automaticamente. Una volta che le finestre sono aperte, il display si trova in modalità standby. • Tenere premuto di nuovo il tasto on/off per 3 secondi. Le finestre si chiudono e il sistema passa automati- camente in modalità...
  • Seite 66: Smaltimento

    Problema Causa possibile Soluzione La potenza aspirante è Troppa distanza tra la cappa Installare la cappa in modo tale che la distanza ridotta. e il fornello. tra il fornello e la cappa sia compresa tra i 65 e i 75 cm. Smaltimento Se sul prodotto è...

Inhaltsverzeichnis