Timex W 263 Benutzerhandbuch
THANK YOU FOR PURCHASING YOUR TIMEX
EXTENDED WARRANTY
Available in U.S. only. Extend your warranty for an additional 4 years from date of purchase for $5. You can
pay with AMEX, Discover, Visa or MasterCard by calling 1 800-448-4639 during normal business hours. Payment
must be made within 30 days of purchase. Name, address, telephone number, purchase date, and 5-digit model
number required. You can also mail a check for $5 to: Timex Extended Warranty, P.O. Box 1676, Dept. EF, Little Rock,
AR 72203.
Please read instructions carefully to understand how to operate your Timex
The built-in accelerometer detects movement through the natural swinging-motion of your arm. For best results,
allow the watch-wearing arm to swing freely during walks or runs. The watch will start recording movement after
five to ten steps.
•
Time/date
•
100-hour chronograph with accelerometer step counter.
•
Measures distance traveled, distance remaining to goal, total activity time, time remaining to goal, active
time, stop time, pace, speed, steps and calories.
•
Review and stores 10 activities with date stamp
•
24 hour timer
•
Three alarms
•
Personal goals
•
Multiple calibration options
•
INDIGLO
®
night-light with NIGHT-MODE
DONE/SET
Set clock OR
save Changes
MODE/NEXT
Choose mode OR
choose entry field
SETTING TIME AND DATE
1.
In TIME mode, press and hold SET.
2.
Press + or – to select time zone 1 or 2.
3.
Press NEXT to set hour. Digits flash.
4.
Press + or – to change hour.
5.
Press NEXT and + / – to set minutes.
6.
Continue pressing NEXT and + / – to set seconds, month, day, year, time format (12- or 24-hour), and date
format (MM/DD or DD/MM).
7.
Press DONE to exit.
TIP: Press START/SPLIT/+ to view second time zone; hold START/SPLIT/+ to switch time zones.
CHOOSING PERSONAL SETTINGS
Personal settings are used to calculate average walking stride length, distance, pace, and calories burned.
Gender, age, and height are used to calculate average walking stride length. Taller people usually have longer
strides. You can customize your stride length (ex. for running) from the STRIDE SETUP screen. See CALIBRATING
THE SENSOR MANUALLY.
1.
Press MODE to select SETUP.
2.
Press START/SPLIT/+ to select PERSONAL SETUP.
3.
Press SET.
4.
Press + / – to set gender.
5.
Press NEXT to set height. Digits flash.
6.
Press + / – to set height in feet.
7.
Continue pressing NEXT and + / – to set height in inches, weight, pack weight (if applicable), and age.
8.
Press DONE to exit.
NOTE: Pack weight setting is used to calculate how many calories are burned.
CHOOSING SYSTEM SETTINGS
1.
Press MODE to select SETUP.
2.
Press START/SPLIT/+ to select SYSTEM SETUP.
3.
Press SET.
4.
Press + / – to set UNITS (IMPERIAL/METRIC).
5.
Press NEXT and + / – to set CHIME (ON/OFF).
6.
Continue pressing NEXT and + / – to set BEEP (ON/OFF).
7.
Press DONE to exit.
SETTING UP GOALS
Workouts are compared to distance and time targets set up in this menu.
1.
Press MODE to select SETUP.
2.
Press START/SPLIT/+ to select GOALS SETUP.
3.
Press SET.
4.
Press + / – to set GOAL ALERT (ON/OFF).
5.
Press NEXT and + / – to set ALERT TYPE (DISTANCE/TIME).
6.
Continue pressing NEXT and + / – to set DIST. TRGT and TIME TRGT.
7.
Press DONE to exit.
CALIBRATING THE SENSOR AUTOMATICALLY
Calibrate the sensor for more accurate pace and distance calculations.
1. Press MODE to select SETUP.
2. Press START/SPLIT/+ to select STRIDE SETUP.
3. Press SET.
4. Press + / – to select AUTOMATIC. Press NEXT.
5. Press + /- to select WALK or RUN.
6. Press NEXT and + / – to set thousands digit of CAL. LENGTH.
7. Continue pressing NEXT and + / – to set remaining digits. Press NEXT when finished.
8. When prompted, hold START.
9. When prompted, walk or run selected distance.
10. When distance is reached, press STOP.
If CALIBRATION OKAY displays, setup is complete. If CALIBRATION FAILED displays, repeat calibration.
TIP: Longer distances make more accurate calibrations than shorter ones. The default distance is the distance
of a football field from end zone to end zone (300 ft).
CALIBRATING THE SENSOR MANUALLY
If you know your stride length, you can enter the exact measurement without running Automatic calibration.
Calibrating the sensor to your precise stride length will result in the most accurate distance calculations.
1.
Press MODE to select SETUP.
2.
Press START/SPLIT/+ to select STRIDE SETUP.
3.
Press SET.
4.
Press + / – to select MANUAL.
5.
Press NEXT and + / – to set stride length in feet and inches.
6.
Press DONE to save settings and exit.
TIPS: Manually adjust stride length in small increments to improve accuracy.
USING THE CHRONO
TIPS: While chrono is running, w icon displays.
While chrono is running, accelerometer tracks number of steps and watch calculates distance and calories burned.
Accelerometer is only "on" when chrono is running.
1.
Press MODE to select CHRONO.
2.
Press START/SPLIT/+ to start chrono. The display toggles between total workout time and label for selected
display.
3.
While the chrono is running, press START/SPLIT/+ to take a split.
4.
Press STOP to stop chrono.
5.
While the chrono is stopped, hold RESET to clear chrono and store activity.
If you have set goals in SETUP mode, alert sounds at halfway point and when goal is met. See SETTING UP GOALS.
While chrono is running, hold SET to choose whether the lap time or the split time appear at the top of the display.
When chrono is running, press SET to choose which of these data appear in the bottom of the display:
•
Lap time plus total time (if split has been taken) • Total distance • Remaining distance to goal (if goal is
set) • Total time • Remaining time to goal (if goal is set) • Active time • Stop time • Pace (minutes/mile
or km) • Speed • Steps • Calories
egister your product at
www.timex.com
W 63
574-095000 NA
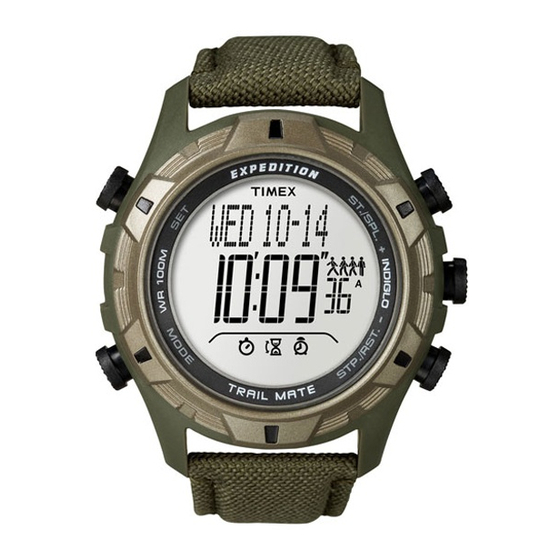
FUNCTIONS
®
feature
BASIC OPERATION
GETTING STARTED
SETUP MODE
CHRONO MODE
®
WATCH.
®
watch.
START/SPLIT/+
Start chrono OR choose view
screen OR increase value
INDIGLO
®
BUTTON
Turn on night-light
OR enter Night-Mode
®
STOP/RESET/–
Stop chrono OR reset/
save chrono OR decrease
feature

Verwandte Anleitungen für Timex W 263


Inhaltszusammenfassung für Timex W 263
- Seite 1 30 days of purchase. Name, address, telephone number, purchase date, and 5-digit model number required. You can also mail a check for $5 to: Timex Extended Warranty, P.O. Box 1676, Dept. EF, Little Rock, AR 72203.
- Seite 2 (this is not a repair charge): a US$ 8.00 check or money order in the U.S.; a CAN$7.00 cheque or money order in Canada; and a UK£2.50 cheque or money order in the U.K. In other countries, Timex will charge you for postage and handling.
- Seite 3 NACHTVERLICHTING / DE FUNCTIE NIGHT-MODE ® ® BATTERIJ Timex raadt ten sterkste aan om de batterij door een winkelier of juwelier te laten vervangen. DE BATTERIJ NIET IN HET VUUR WEGGOOIEN. NIET OPLADEN. LOSSE BATTERIJEN UIT DE BUURT VAN KINDEREN HOUDEN.
- Seite 4 WECKER EIN- UND AUSSCHALTEN TIPPS: INDIGLO ® -ZIFFERBLATTBELEUCHTUNG/NIGHT-MODE ® -FUNKTION BATTERIE Timex empfiehlt dringend, die Batterie nur von einem Händler oder Juwelier auswechseln zu lassen. BATTERIE NICHT INS FEUER WERFEN. NICHT WIEDERAUFLADBAR. BATTERIEN VON KINDERN FERNHALTEN. WASSERBESTÄNDIGKEIT 30 m 50 m 100 m ACHTUNG: UM WASSERBESTÄNDIGKEIT ZU BEWAHREN, UNTER WASSER KEINE...
- Seite 5 INDIGLO /FUNZIONE NIGHT-MODE ® ® BATTERIA La Timex raccomanda caldamente di portare l’orologio da un dettagliante o un gioielliere per far cambiare la batteria. NON SMALTIRE LE BATTERIE INCENDIANDOLE. NON RICARICARLE. TENERE LE BATTERIE SCIOLTE LONTANO DAI BAMBINI. IMPERMEABILITÀ 30 m/98 piedi...
- Seite 6 ® COM A FUNÇÃO NIGHT-MODE ® PILHA A Timex recomenda vivamente que mande substituir a pilha numa relojoaria ou numa joalharia. NÃO DEITE A PILHA NO FOGO. NÃO RECARREGUE A PILHA. MANTENHA AS PILHAS SOLTAS FORA DO ALCANCE DAS CRIANÇAS.
- Seite 7 GARANTIA INTERNACIONAL DA TIMEX IMPORTANTE — NOTE QUE ESTA GARANTIA NÃO COBRE DEFEITOS OU DANOS NO RELÓGIO:...
- Seite 8 à 5 chiffres. Il est également possible d’envoyer un chèque de 5 $ US par courrier à : Timex Extended Warranty, P.O. Box 1676, Dept. EF, Little Rock, AR 72203. Veuillez lire les instructions attentivement pour bien comprendre le fonctionnement de votre montre Timex ®...
- Seite 9 également vous prévaloir d’autres droits qui varient d’un état ou d’une province à l’autre. Pour obtenir le service garanti, retourner la montre à Timex, à une de ses filiales ou au détaillant Timex où il a été acheté. Inclure un coupon de réparation original dûment rempli ou, aux É.-U.
-
Seite 10: Operaciones Básicas
(5 dígitos). También puede enviar un cheque de $5 por correo a: Timex Extended Warranty, P.O. Box 1676, Dept. EF, Little Rock, AR 72203. Lea atentamente las instrucciones para saber cómo funciona el reloj Timex ®... - Seite 11 US $ 8,00 (dólares estadounidenses); en Canadá, un cheque certificado o giro por valor de CAN $7,00 (dólares canadienses); en el Reino Unido, un cheque certificado o giro por valor de UK £ 2,50 (libras). En otros países, Timex se encar- gará...