Timex INTELLIGENT QUARTZ-Serie Bedienungsanleitung

Verwandte Anleitungen für Timex INTELLIGENT QUARTZ-Serie


Inhaltszusammenfassung für Timex INTELLIGENT QUARTZ-Serie
- Seite 1 Perpetual Calendar Fly Back Chronograph • Flyback Chrono Compass World Time Calendrier perpétuel Chronographe avec Fly-Back • Boussole chrono avec Fly-Back Heure mondiale Calendario Perpetuo Cronógrafo Fly-back • Brújula Fly-back Hora mundial ™ W268 NA 350-095000...
- Seite 2 English......... Page.1 Français....... page.67 Español........ página.141...
- Seite 3 TIMEX WATCHES ® Congratulations on purchasing your TIMEX ® watch. Please read these instructions carefully to understand how to operate your Timex watch. Your watch may not have all of the features described in this booklet. For more information, and to register your product please visit: www.timex.com...
-
Seite 4: Inhaltsverzeichnis
TABLE OF CONTENTS Bracelet Link Removal ............59 Battery ................60 How to Start Your Watch ............ 5 Warranty ................61 Water and Shock Resistance ..........6 Indiglo Night-Light ............8 ® Perpetual Calendar ............9 Fly-Back Chronograph ............15 Flyback Chronograph Compass ........ -
Seite 5: How To Start Your Watch
(Does not apply to Perpetual Calendar models.) To start Timex Intelligent Quartz technology brings the power your watch remove the plastic guard from under the of a micro-processor to the reliability and accuracy of crown, then press the crown in against the case. -
Seite 6: Water And Shock Resistance
WATER AND SHOCK RESISTANCE WARNING: TO MAINTAIN WATER-RESISTANCE, DO NOT PRESS ANY BUTTONS UNDER WATER UNLESS If your watch is water-resistant, meter marking (WR_M) YOUR WATCH IS INDICATED AS 200 METER WATER- is indicated. RESISTANT. NEVER PULL OUT THE CROWN WHILE UNDER WATER. -
Seite 7: Indiglo ® Night-Light
INDIGLO NIGHT-LIGHT PERPETUAL CALENDAR ® Press button or crown to activate light. FEATURES Electroluminescent technology used in the INDIGLO Your Intelligent Quartz time instrument has these ® ™ night-light illuminates entire watch face at night and in features: low light conditions. •... - Seite 8 Timex factory. You only need to adjust Hour Hand the time. The watch has two recessed push buttons for use by Timex Service Center to set the day and date after CROWN 1 2 3 Minute Hand battery replacement.
-
Seite 9: Care And Maintenance
2. The watch is not a diver watch and should not be used for the current leap year offset. This setting is made at the for diving. Timex factory or after battery replacement and cannot be 3. Rinse the watch with fresh water after exposure to changed, only viewed. -
Seite 10: Fly-Back Chronograph
When the battery is depleted, have it replaced promptly. FLY-BACK CHRONOGRAPH For battery replacement, please visit a Timex Service FEATURES Center. Your Intelligent Quartz time instrument has these ™ features: • Fly-back chronograph (up to 4 hours) • Second time zone •... -
Seite 11: Date And Time Setting
OVERVIEW NOTE: Your Intelligent Quartz watch crown has three ™ positions: closed, middle, and outer. To familiarize yourself 4th Center Hand to the difference between the various positions, extend Hour Hand the crown to its outer position and then push the crown Button A very lightly until you feel it click into the middle position. -
Seite 12: Second Time Zone
3. Push crown to closed position after setting time. The SECOND TIME ZONE second hand will begin moving. The upper hand shows the time for the second time zone. Note that the scale NOTE: For months with fewer than 31 days, the date will is 24-hours, with midnight need to be adjusted. - Seite 13 hand shows the minutes. The upper and 4th center NOTE: The second time zone can alternatively be used to hands move together. As the 4th center hand makes display your home time on a 24-hour format, if you prefer. one revolution, the upper hand moves one hour. When setting the second time in this manner, ensure that the hour/minute display corresponds to the 24-hour 2.
- Seite 14 2. To stop, press Button A (Start/Stop) again. All hands timing from time of button release. This “fly-back” stop moving. feature allows for the measurement of lap time. 3. To resume, press Button A (Start/Stop) again. CARE AND MAINTENANCE 4. To reset the fly-back chronograph to zero position, To maintain water-resistance, do not press or pull any press Button B (Fly-back/Reset).
-
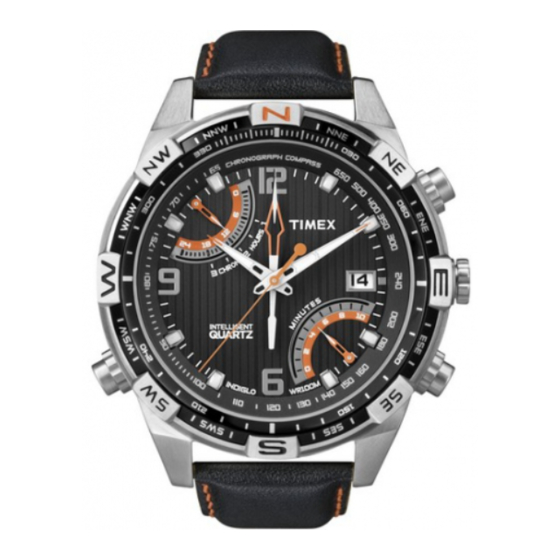
Seite 15: Flyback Chronograph Compass
The actual battery life will vary based on individual use. FEATURES When the battery is depleted, have it replaced promptly. • Fly-back chronograph (up to 4 hours) For battery replacement, please visit an TIMEX SERVICE • Electronic compass with magnetic declination CENTER. compensation •... - Seite 16 OVERVIEW NOTE: Your Intelligent Quartz watch crown has three ™ positions: closed, middle and outer. To familiarize yourself 4th Center Hand to the difference between the various positions extend Minute Hand the crown to its outer position and then push the crown Button A very lightly until you feel it click into the middle position.
- Seite 17 3. Push the crown in when finished. SECOND TIME ZONE The upper hand normally shows the time for the second For months with fewer than 31 days, the date will need time zone. Note that the scale is 24 hours, with midnight to be adjusted.
- Seite 18 2. Press B to move the 4th center hand forward. Hold the CHRONOGRAPH button to move the hand quickly. The upper and 4th The watch provides a 4-hour fly-back chronograph. center hands move together; as the 4th center hand To start, press A (START/STOP). The 4th center hand makes one revolution, the upper hand moves one shows the seconds with 1/5-second resolution and the hour.
- Seite 19 To stop, press A again (START/STOP). All hands freeze. running without interfering with its operation. See COMPASS OPERATION. To resume, press A (START/STOP) again, or to reset the chronograph to zero, press B (FLY-BACK/RESET). TACHYMETER Your watch may include a tachymeter scale, which can be When the chronograph is reset, all hands move to zero.
-
Seite 20: Compass Calibration
Press B (FLYBACK/RESET) to reset (zero) the chronograph. is calibrated away from such objects, it will not work properly near them. For best results, calibrate in the area When using distances other than one mile or kilometer, of intended use. multiply the result by the distance. - Seite 21 To calibrate the compass: 1. Pull the crown to its middle position and wait for the indicator hands to stop moving. 2. Keep the watch level or place it on a level surface (if the band interferes, place the watch on an inverted cup).
-
Seite 22: Magnetic Declination
6. Press A or B to move the 4th center hand west (-) MAGNETIC DECLINATION or east (+), respectively, to point to your location’s A compass needle points to “magnetic north,” which may declination angle (see table on the following page) be slightly different from “true north,”... - Seite 23 Paris ....1W Waterbury, CT ..14W While holding the watch level, press C (COMPASS) to For further magnetic declination information, see www.timex.com activate the compass. The compass hand moves to point north. If the watch is turned, the 4th center hand will continue to move, always pointing north.
- Seite 24 conserves battery life. Press C (COMPASS) at any time to COMPASS USE keep the compass on for another 20 seconds. Once the compass is activated, there are two typical ways to use it. The compass may be activated while the chronograph is Which way am I headed? Hold the watch so that 12 in use.
-
Seite 25: Worldtime
WORLDTIME OVERVIEW FEATURES 24 cities Your Intelligent Quartz time instrument has these ™ Hour Hand features: Upper Hand 4th Center Hand World Time Button A • Time display capability for 24 locations around the Scale world Date Window • Season setting display Minute Hand CROWN •... - Seite 26 Your Intelligent Quartz watch crown has three positions: 3. Push the crown in when finished. ™ closed, middle and outer. To familiarize yourself to the For months with fewer than 31 days, the date will need difference between the various positions extend the to be adjusted.
- Seite 27 NOTE: If no button is pressed for five seconds after the SEASON SETTING hands stop, the watch proceeds to the world time setting The season setting allows the watch to compensate for operation (see WORLD TIME SETTING). daylight savings time (also called “summer time”). CITY TIME DISPLAY Different cities go on and off daylight savings time on Press A or B to move the...
- Seite 28 WINTER. The watch knows which cities are in each setting will be correct for all cities. For more information, hemisphere. see timex.com. EXAMPLE: Australia and much of Europe change time in Setting the world time consists of selecting a city within March and October.
- Seite 29 move the hand quickly. Any city may be used. TO SET THE WORLD TIME: 1. Pull the crown to its middle position. The center hand 3. Pull the crown to its outer position. The city selector shows the world time zone city and the upper hand hand will revert back to the 12:00 position as indicated shows the world time.
-
Seite 30: Care And Maintenance
The actual battery life may vary depending on actual use. hands should be aligned. When the battery is depleted, have it replaced promptly. 6. Push the crown in when finished. For battery replacement, please visit a Timex Service CARE AND MAINTENANCE Center. To maintain water-resistance, do not press any buttons under water. -
Seite 31: Tachymeter Function
TACHYMETER FUNCTION 4. The chronograph second hand is compared to the tachymeter markings to determine the target’s speed. (not all models) The tachymeter will only determine speeds greater than HOW TO ADJUST BRACELET 60 units per hour using this method; slower speeds can (Variations of the following bracelet sections apply to all be measured by decreasing the unit of measurement. -
Seite 32: Bracelet Link Removal
BRACELET LINK REMOVAL FOLDOVER CLASP BRACELET 1. Find spring bar that connects bracelet to clasp. REMOVING LINKS: 1. Place bracelet upright and insert pointed tool in 2. Using a pointed tool, push in spring bar and gently opening of link. twist bracelet to disengage. -
Seite 33: Battery
RECHARGE. KEEP LOOSE BATTERIES AWAY FROM When the battery needs to be changed, we recommend CHILDREN. that only TIMEX replace it. Your watch will need to be recalibrated to correct time and date after changing the TIMEX INTERNATIONAL WARRANTY battery. To return your watch to Timex use a pre-paid shipper. - Seite 34 To obtain warranty service, please return your watch to 5. lens or crystal, strap or band, watch case, attachments Timex, one of its affiliates or the Timex retailer where or battery. Timex may charge you for replacing any of the watch was purchased, together with a completed these parts.
-
Seite 35: Extended Warranty
Portugal, call 351 212 946 017. For France, call 33 3 81 63 ©2010 Timex Group USA, Inc. TIMEX, INDIGLO, INTELLIGENT QUARTZ 42 00. For Germany/Austria, call 43 662 88921 30. For the AND IQ are trademarks of Timex Group B.V. and its subsidiaries. Middle East and Africa, call 971-4-310850. - Seite 36 MONTRES TIMEX ® ® Félicitations pour votre achat d’une montre Timex . Lire les instructions attentivement pour bien comprendre le fonctionnement de votre montre Timex. Il est possible que ce modèle ne présente pas toutes les fonctions décrites dans le dépliant.
- Seite 37 SOMMAIRE Démontage de maillons du bracelet ......130 Pile .................. 132 Comment mettre la montre en marche ......71 Garantie ................133 Résistance aux chocs et à l’eau ........73 Veilleuse Indiglo ............. 75 ® Calendrier perpétuel ............76 Chronographe avec Fly-Back ........... 82 Boussole chrono avec Fly-Back ........
-
Seite 38: Comment Mettre La Montre En Marche
, la technologie analogique à ™ LA MONTRE EN MARCHE quartz du futur. La technologie Timex Intelligent Quartz (Ne concerne pas les modèles à calendrier perpétuel.) combine la puissance d’un microprocesseur à la fiabilité Pour mettre la montre en marche, retirer la bague et la précision des montres à... -
Seite 39: Résistance Aux Chocs Et À L'eau
RÉSISTANCE AUX CHOCS ET À L’EAU Pour visser, enfoncer fermement la couronne sur le bouton fileté et la maintenir enfoncée tout en la faisant Si la montre est étanche, la profondeur maximale (WR_M) tourner dans le sens horaire. Continuer à visser la est indiquée. -
Seite 40: Veilleuse Indiglo
VEILLEUSE INDIGLO ATTENTION : POUR PRÉSERVER L’ÉTANCHÉITÉ, NE ® PAS ENFONCER LES BOUTONS SOUS L’EAU, SAUF SUR Appuyez sur le bouton ou la couronne pour activer LES MODÈLES ÉTANCHES JUSQU’À 200 MÈTRES. NE l’éclairage. La technologie électroluminescente de la JAMAIS TIRER LA COURONNE ALORS QUE LA MONTRE veilleuse INDIGLO permet d’illuminer tout le cadran de la ®... -
Seite 41: Calendrier Perpétuel
CALENDRIER PERPÉTUEL VUE D’ENSEMBLE FONCTIONS Aiguille de la date Aiguille Bouton A La montre Intelligent Quartz possède les fonctions ™ des jours (ENCASTRÉ) suivantes : Aiguille des heures • Calendrier perpétuel - la date est toujours correcte jusqu’en 2100 Aiguille 1 2 3 COURONNE •... - Seite 42 Ce réglage est effectué à l’usine 1. Tirez complètement la couronne. Toutes les aiguilles Timex ou après le remplacement de la pile et ne peut être se règlent automatiquement en allant se placer en modifié mais seulement affiché.
-
Seite 43: Soin Et Entretien
Pour faire changer la pile, adressez-vous à un centre de 1. La montre est étanche aussi longtemps que le verre, services Timex. les boutons et le boîtier sont intacts. 2. La montre n’est pas conçue pour la plongée. Ne pas... -
Seite 44: Chronographe Avec Fly-Back
CHRONOGRAPHE AVEC FLY-BACK VUE D’ENSEMBLE 4ème aiguille centrale FONCTIONS Aiguille des heures La montre Intelligent Quartz possède les fonctions ™ suivantes : Aiguille Bouton A supérieure • Chronographe avec fly-back ou retour à la volée Dateur Heure du (jusqu’à 4 heures) chronographe Deuxième •... -
Seite 45: Réglage De La Date Et De L'heure
(22h00) et 2 am (2h00). Ne pas changer la date REMARQUE : La montre Intelligent Quartz comporte ™ pendant ce laps de temps. Ceci aurait pour effet trois positions : enfoncée, intermédiaire et extrême. Pour d’endommager le mouvement de la montre. vous familiariser avec les différentes positions, tirez la couronne en position extrême et poussez-la doucement 3. - Seite 46 le sens anti-horaire ou dans le sens horaire jusqu’à ce POUR RÉGLER LE SECOND FUSEAU HORAIRE : qu’elle indique 12 heures. 1. Tirez la couronne en position intermédiaire. L’aiguille supérieure indique l’heure du second fuseau horaire et 3. Enfoncez la couronne pour valider. la 4ème aiguille centrale indique les minutes.
- Seite 47 3. Appuyez sur le bouton A pour faire avancer l’aiguille CHRONOGRAPHE AVEC FLY-BACK OU RETOUR supérieure par intervalles d’une heure jusqu’à ce À LA VOLÉE qu’elle atteigne l’heure désirée dans le second fuseau La montre comporte un chronographe avec fly-back ou horaire.
- Seite 48 2. Pour l’arrêter, appuyez de nouveau sur le bouton A Les aiguilles n’ont pas besoin d’atteindre la position (Démarrage/Arrêt). Toutes les aiguilles s’arrêtent. zéro avant de relâcher le bouton B. Si le bouton B est relâché avant le retour à la position zéro des aiguilles, 3.
-
Seite 49: Boussole Chrono Avec Fly-Back
• Second fuseau horaire l’utilisation qui est faite de la montre. • Tachymètre (sur certains modèles) Remplacez rapidement la pile lorsque celle-ci est usée. • Veilleuse INDIGLO ® Pour faire changer la pile, s’adresser à un centre de services Timex. - Seite 50 VUE D’ENSEMBLE REMARQUE : La montre Intelligent Quartz comporte trois ™ positions : enfoncée, intermédiaire et extrême. Pour vous 4ème aiguille centrale familiariser avec les différentes positions, tirez la couronne Aiguille des minutes en position extrême et poussez-la doucement jusqu’à ce Aiguille Bouton A qu’elle se place en position intermédiaire par un clic.
- Seite 51 pendant ce laps de temps. Ceci aurait pour effet 3. Enfoncer la couronne pour valider. d’endommager le mouvement de la montre. SECOND FUSEAU HORAIRE 3. Enfoncez la couronne pour valider. L’aiguille supérieure indique normalement l’heure pour le second fuseau horaire. Notez qu’il s’agit d’une échelle sur Pour les mois de moins de 31 jours, la date devra être 24 heures, minuit se situant à...
- Seite 52 2. Appuyez sur B pour faire avancer la 4ème aiguille fuseau horaire sur une échelle de 24 heures. Si vous centrale. Maintenir le bouton enfoncé pour déplacer utilisez le second fuseau horaire de cette manière, l’aiguille rapidement. L’aiguille supérieure et la 4ème assurez-vous que l’affichage heure/minute correspond aiguille centrale se déplacent ensemble, l’aiguille bien à...
- Seite 53 inférieure indique le dernier chiffre des minutes, en Vous pouvez également remettre à zéro et/ou redémarrer comptant jusqu’à dix puis en répétant l’opération. le chronographe lorsqu’il est en marche. Pour cela, L’aiguille supérieure indique le temps total, heures et appuyez et maintenez enfoncé le bouton B (FLY-BACK OU minutes, avec des divisions toutes les dix minutes.
-
Seite 54: Étalonnage De La Boussole
Notez que le temps de parcours entre les deux bornes TACHYMÈTRE doit être inférieur à une minute. Si la montre est équipée d’une échelle tachymétrique, elle permet de mesurer une vitesse en miles par heure, Appuyez sur B (FLY-BACK OU RETOUR À LA VOLÉE/RESET) en kilomètres par heure ou en nœuds pour des valeurs pour remettre le chronographe à... - Seite 55 électromagnétique, tels que téléviseurs ou ordinateurs, dont l’effet pourrait produire des mesures inexactes. En susceptibles d’affecter le champ magnétique autour de présence de toute mesure suspecte, effectuer un nouvel la montre. Si la boussole est étalonnée à proximité de étalonnage. tels objets, elle ne fonctionnera correctement qu’à...
- Seite 56 3. Appuyez sur C (BOUSSOLE) pour commencer. L’aiguille se déplace ensuite pour le réglage de la déclinaison centrale effectue deux tours complets pour vous magnétique du moment (se reporter à DÉCLINAISON rappeler de faire pivoter la montre. Tenez la montre à MAGNÉTIQUE).
- Seite 57 7. Enfoncez la couronne pour valider. Cependant, si vous souhaitez tenir compte de cette différence, il y a deux façons de le faire. Manuellement, en tournant la lunette de la boussole jusqu’à ce que l’aiguille centrale indique votre déclinaison magnétique (voir tableau ci-dessous) plutôt que le nord, à...
- Seite 58 L’aiguille se déplace et pointe vers le nord. Si on tourne Pour connaître d’autres valeurs de déclinaison magnétique, consultez le site la montre, l’aiguille centrale se déplace, pointant toujours www.timex.com vers le nord. Après 20 secondes, la boussole s’arrête automatiquement et l’aiguille centrale reprend son...
- Seite 59 fonctionnement habituel. Ceci permet de prolonger la de position pour revenir en position initiale après durée de vie de la pile. Appuyez sur C (BOUSSOLE) à tout désactivation de la boussole. Ceci est normal et permet moment pour maintenir la boussole activée pendant 20 d’obtenir les meilleurs relevés d’orientation.
-
Seite 60: Heure Mondiale
direction correspondant à 12 heures. Puis tournez sur VUE D’ENSEMBLE vous-même jusqu’à ce que l’aiguille centrale s’aligne 24 villes sur le point nord indiqué sur la lunette de la boussole. Aiguille des heures Aiguille 4ème aiguille centrale On se retrouve alors face à la direction de déplacement supérieure souhaitée. - Seite 61 La montre Intelligent Quartz comporte trois positions : d’endommager le mouvement de la montre. ™ enfoncée, intermédiaire et extrême. Pour vous familiariser 3. Enfoncez la couronne pour valider. avec les différentes positions, tirez la couronne en Pour les mois de moins de 31 jours, la date devra être position extrême et poussez-la doucement jusqu’à...
- Seite 62 midi au milieu. REMARQUE : Si aucun bouton n’est enfoncé dans les cinq secondes suivant l’arrêt des aiguilles, la montre Appuyez sur C pour changer de saison (se reporter à procède au réglage du temps mondial (se reporter à RÉGLAGE DES SAISONS). RÉGLAGE DE L’HEURE MONDIALE).
- Seite 63 (SUMMER) à des dates différentes en raison d’une (hiver). La montre connaît la situation des villes dans législation différente. La plupart du temps, néanmoins, le chaque hémisphère. réglage des saisons sera correct pour toutes les villes. Pour de plus amples informations, consulter le site timex.com.
- Seite 64 Régler l’heure mondiale consiste à sélectionner une ville dans votre fuseau horaire et à régler l’heure pour cette ville comme celle de votre heure locale. La montre saura ensuite l’heure qu’il est dans toutes les autres villes. 1 2 3 POUR RÉGLER L’HEURE MONDIALE : 1.
-
Seite 65: Soin Et Entretien
RÉGLAGE DES AIGUILLES INDICATRICES. Après cinq horaire local. Maintenez le bouton enfoncé pour secondes, l’aiguille supérieure indique l’heure locale régler l’heure rapidement. Les aiguilles se déplacent (c’est à dire l’heure qu’il est dans la ville sélectionnée ensemble ; l’aiguille supérieure se déplace d’une à... -
Seite 66: Fonction Tachymètre
Remplacez rapidement la pile lorsque celle-ci est usée. tous les calculs. Pour faire changer la pile, s’adresser à un centre de services Timex. 1. Déterminez les marqueurs de début et de fin pour toutes vos distances prédéterminées. 2. Démarrez le chronographe dès que la cible, dont vous voulez mesurer la vitesse, dépasse le marqueur de... -
Seite 67: Comment Ajuster Le Bracelet
3. Arrêtez le chronographe dès que la cible, dont vous le fermoir d’avant en arrière jusqu’à ce qu’il s’engage voulez mesurer la vitesse, dépasse le marqueur de fin. dans les rainures sur la face inférieure du bracelet. 4. L’aiguille des secondes du chronographe indique sur 4. -
Seite 68: Démontage De Maillons Du Bracelet
RÉASSEMBLAGE : 1. Mettre les pièces du bracelet en place. 2. Poussez la goupille dans le maillon dans le sens opposé à la flèche. 3. Enfoncez la goupille jusqu’à ce qu’elle ne dépasse plus DÉMONTAGE DE MAILLONS DU BRACELET du bracelet. DÉMONTAGE DE MAILLONS : 1. -
Seite 69: Pile
(ce ne sont pas des frais de d’UN AN, à compter de la date d’achat. Timex ainsi que réparation) : un chèque ou mandat-poste de 8,00 $ US ses filiales du monde entier honoreront cette Garantie Internationale. - Seite 70 Pour obtenir le service garanti, retourner la montre à pièces peut vous être facturé par Timex. Timex, à une de ses filiales ou au détaillant Timex où la montre a été achetée. Inclure un coupon de réparation CETTE GARANTIE AINSI QUE LES RECOURS PRÉVUS DANS original dûment rempli ou, aux É.-U.
- Seite 71 Afrique, composer le 971-4-310850. $ CAN au Canada et de 2,50 £ au Royaume-Uni. Dans les autres pays, Timex vous facturera les frais d’envoi et de manutention. N’INCLUEZ JAMAIS DANS VOTRE ENVOI UN BRACELET SPÉCIAL OU TOUT AUTRE ARTICLE AYANT UNE VALEUR PERSONNELLE.
- Seite 72 également possible d’envoyer un chèque de 5 $ US par courrier à : Timex Extended Warranty, P.O. Box 1676, Dept. EF, Little Rock, AR 72203. ©2010 Timex Group USA, Inc. TIMEX, INDIGLO, INTELLIGENT QUARTZ et IQ sont des marques déposées de Timex Group B.V. et de ses filiales.
- Seite 73 TIMEX RELOJ ® Felicitaciones por la compra de su reloj TIMEX ® . Por favor lea atentamente las instrucciones para saber cómo funciona su reloj Timex ® Es posible que su reloj no tenga todas las características descritas en este folleto.
- Seite 74 ÍNDICE Remoción de eslabones de la pulsera ......203 Pila .................. 204 Cómo inicializar su reloj ..........145 Garantía ................205 Resistencia al agua y a golpes ........146 Botón Indiglo ............... 148 ® Calendario Perpetuo ............149 Cronógrafo Fly-back ............155 Brújula Fly-back ..............
-
Seite 75: Cómo Inicializar Su Reloj
Con segundero comenzará a avanzar a intervalos de un segundo. los relojes Timex de cuarzo inteligentes, la tecnología se Algunos relojes resistentes al agua a grandes inscribe dentro del diseño, entregando un nuevo nivel profundidades necesitan que la corona de ajuste se de complejidad en la esfera. -
Seite 76: Resistencia Al Agua Y A Golpes
RESISTENCIA AL AGUA Y A GOLPES ADVERTENCIA: PARA MANTENER LA RESISTENCIA AL AGUA, NO APRIETE NINGÚN BOTÓN DEBAJO DEL Si su reloj es resistente al agua, se indicarán los metros AGUA A MENOS QUE SU RELOJ ESTÉ INDICADO PARA (WR_M). UNA RESISTENCIA AL AGUA DE 200 METROS. -
Seite 77: Botón Indiglo
BOTÓN INDIGLO CALENDARIO PERPETUO ® Pulse el botón o la corona para activar la luz. FUNCIONES Electroluminescent technology used in the INDIGLO Su reloj Quartz inteligente tiene estas características: ® ™ night-light illuminates entire watch face at night and in •... - Seite 78 CORONA de activación empotrados para uso de un distribuidor de minutos autorizado o sucursal de Timex para ajustar la fecha y Manecilla de mes el día después del reemplazo de la pila. Además de lo mencionado no tienen otro uso.
- Seite 79 Esta configuración es hecha en la fábrica de Timex ciclos, auto-ajustándose en forma automática. Esto o después del reemplazo de la pila y no se puede cambiar, corrige cualquier desalineamiento de las manecillas.
-
Seite 80: Cuidado Y Mantenimiento
La pila debe durar 6 años con uso normal del reloj. La vida real de la pila puede variar según el uso que tenga. Cuando la pila se agote, hágala cambiar rápidamente. Para efectuar el reemplazo, vaya a un centro de servicio de Timex. - Seite 81 DESCRIPCIÓN GENERAL NOTA: Su reloj Quartz inteligente tiene tres posiciones: ™ cerrada, media y externa. Para que se acostumbre a la Cuarta manecilla central diferencia entre las distintas posiciones, pulse la corona Manecilla horaria a la posición más externa y luego pulse ligeramente la Manecilla Botón A corona hasta que sienta un clic en la posición media.
-
Seite 82: Segunda Zona Horaria
3. Pulse la corona a la posición cerrada después de fijar 3. Pulse la corona a la posición cerrada cuando acabe. la hora. El segundero se pondrá en movimiento. SEGUNDA ZONA HORARIA NOTA: Se requerirá ajustar la fecha en los meses que La manecilla superior tengan menos de 31 días. - Seite 83 3. Pulse el botón A para mover la manecilla superior PARA AJUSTAR LA SEGUNDA ZONA HORARIA: hacia adelante, en incrementos de una hora, hasta 1. Jale la corona hasta su posición media. La manecilla que llegue a la hora deseada de la segunda zona superior muestra la hora de la segunda zona horaria y la cuarta manecilla central muestra los minutos.
- Seite 84 4. Para reiniciar el cronógrafo fly-back desde cero, pulse CRONÓGRAFO FLY-BACK el botón B (Fly-back/Reset). El reloj tiene un cronógrafo “fly-back” (que revisa marcajes anteriores) de 4 horas. Cuando se reinicia el cronógrafo, todas las manecillas se ponen la posición cero. Después de otros ocho 1.
- Seite 85 • El reloj es resistente al agua solamente mientras el cristal, Para efectuar el reemplazo, vaya a un centro de servicio el botón táctil, la corona y la caja permanezcan intactos. de Timex. • El reloj no es apropiado para hacer submarinismo y no debería utilizarse para ello.
-
Seite 86: Brújula Fly-Back
BRÚJULA FLY-BACK DESCRIPCIÓN GENERAL Cuarta manecilla central CARACTERÍSTICAS Manecilla de minutos • Cronógrafo Fly-back (hasta por 4 horas) Botón A Manecilla • Brújula electrónica con compensación de declinación superior Ventanilla de fecha magnética Horas marcadas • Segunda zona horaria 2a zona horaria 1 2 3 CORONA •... - Seite 87 3. Pulse la corona hacia adentro cuando termine. NOTA: Su reloj Quartz inteligente tiene tres posiciones: ™ cerrada, media y externa. Para que se acostumbre a la Se requerirá ajustar la fecha en los meses que tengan diferencia entre las distintas posiciones, pulse la corona menos de 31 días.
- Seite 88 3. Pulse la corona hacia adentro cuando termine. 2. Pulse B para mover hacia delante la cuarta manecilla central. Sostenga el botón para mover con rapidez la SEGUNDA ZONA HORARIA manecilla. Las manecillas superior y cuarta manecilla La manecilla superior normalmente muestra la hora para central se mueven a la vez;...
- Seite 89 de 24 horas, si lo prefiere. Cuando se ajusta la segunda Para detener, pulse A zona horaria de esta manera, asegúrese que el gráfico (START/STOP). Todas las de horas y minutos corresponda con el gráfico de las manecillas se inmovilizan. 24 horas, al verificar que la fecha cambie a medianoche Para reanudar, pulse A y no al mediodía.
- Seite 90 y sostenga B (FLY-BACK/RESET) para poner a cero el Inicie el cronógrafo en el primer marcador de milla o cronógrafo y suéltelo cuando desee reiniciarlo. No kilómetro pulsando A (START/STOP). Detenga luego el tiene que esperar a que todas las manecillas lleguen cronógrafo en el siguiente marcador de milla o kilómetro a cero antes de soltar el botón;...
-
Seite 91: Calibración De La Brújula
resultar en errores grandes. Hay que evitar también áreas CALIBRACIÓN DE LA BRÚJULA que pudieran exhibir concentraciones de hierro duro y Se debe calibrar la brújula, antes de usarse. suave más elevadas de lo normal, pues pueden ocasionar Dado que la brújula usa el campo magnético de la rumbos incorrectos. - Seite 92 Para calibrar la brújula: 1. Jale la corona a su posición media y espere que las manecillas indicadoras se detengan. 2. Mantenga el reloj a nivel o colóquelo sobre una superficie horizontal (si la pulsera interfiere, coloque el reloj sobre un vaso invertido). El reloj puede estar bocabajo, pero tome precauciones para proteger el cristal.
- Seite 93 hacer que el reloj compense automáticamente el 7. Pulse la corona hacia adentro cuando termine. ángulo de declinación, mueva el anillo giratorio de la brújula hasta que el Norte esté en las 12 en punto. 6. Pulse A o B para mover la cuarta manecilla central hacia el Oeste (-) o Este (+), respectivamente, y apuntar hacia el ángulo de declinación de su posición (ver la tabla de abajo) usando la escala de declinación.
- Seite 94 Orlando ......5W Vancouver ....18E apropiada, la cuarta manecilla central apuntará al Norte Denver ....9E Oslo ........ 1E Washington DC ..11W verdadero. Jerusalén ..4E París ......1W Waterbury, CT ... 14W Para más información sobre declinación magnética, vea www.timex.com...
- Seite 95 retornará a su operación normal. Esto alarga la duración FUNCIONAMIENTO DE LA BRÚJULA de la pila. Pulse C (BRÚJULA) en cualquier momento para Normalmente, la brújula está apagada y la cuarta mantener la brújula encendida por otros 20 segundos. manecilla central apunta a las 12 en punto o muestra los segundos del cronógrafo.
-
Seite 96: Hora Mundial
HORA MUNDIAL USO DE LA BRÚJULA Estando la brújula activada, hay dos maneras típicas de CARACTERÍSTICAS proceder para usarla. Su reloj Quartz inteligente tiene estas características: ™ ¿Hacia dónde voy? Sostenga el reloj de modo que las • Muestra la hora de 24 ciudades alrededor del mundo 12 en punto estén en la dirección de su viaje. - Seite 97 Su reloj Quartz inteligente tiene tres posiciones: cerrada, DESCRIPCIÓN GENERAL ™ media y externa. Para que se acostumbre a la diferencia 24 ciudades Manecilla horaria entre las distintas posiciones, pulse la corona a la Cuarta manecilla posición más externa y luego pulse ligeramente la corona Manecilla central superior...
- Seite 98 3. Pulse la corona hacia adentro cuando termine. NOTA: Si no se pulsa botón alguno por cinco segundos después que se detienen las manecillas, el reloj pasa a Se requerirá ajustar la fecha en los meses que tengan realizar el ajuste de hora mundial (ver AJUSTE DE HORA menos de 31 días.
- Seite 99 Pulse C para cambiar la estación (ver AJUSTE DE ESTACIÓN) AJUSTE DE ESTACIÓN El ajuste de estación permite al reloj compensar por la hora de aprovechamiento de luz solar (también llamada “hora de verano”). Cuando la estación de una ciudad se establece en La hora de verano para diferentes ciudades se inicia VERANO, todas las ciudades en el mismo hemisferio son y termina en fechas distintas mientras que algunas...
- Seite 100 1 2 3 veces, sin embargo, el ajuste de estación será correcto para todas las ciudades. Para información adicional, ver timex.com. Ajustar la hora mundial consiste en seleccionar una ciudad dentro de la zona horaria local y ajustar en dicha ciudad la misma hora local.
- Seite 101 2. Pulse A o B para seleccionar la ciudad que representa después que se haya jalado la corona a la posición su zona horaria local. Sostenga un botón para mover más externa). con rapidez la manecilla. Se puede utilizar cualquier 4.
-
Seite 102: Cuidado Y Mantenimiento
2. Inicie el cronógrafo una vez el objetivo para la medida Cuando la pila se agote, hágala cambiar rápidamente. de velocidad pase por el punto inicial. Para efectuar el reemplazo, vaya a un centro de servicio de Timex. -
Seite 103: Cómo Ajustar La Pulsera
3. Detenga el cronógrafo una vez el objetivo para la 3. Ejerza presión mientras sostiene la chapa de cierre y medida de velocidad pase por el punto final. deslice el broche hacia atrás y hacia adelante hasta que se acople en las ranuras situadas en la parte de 4. -
Seite 104: Remoción De Eslabones De La Pulsera
REMOCIÓN DE ESLABONES DE LA PULSERA PULSERA CON BROCHE PLEGABLE 1. Localice el perno de resorte que conecta la pulsera al CÓMO QUITAR LOS ESLABONES: broche. 1. Coloque la pulsera en posición vertical e introduzca la 2. Utilizando una herramienta puntiaguda, empuje el herramienta puntiaguda en la abertura del eslabón. -
Seite 105: Pila
MANTENGA LAS PILAS SUELTAS FUERA DEL ALCANCE la hora y fecha correctas después del cambio de pila. DE LOS NIÑOS. Para devolver su reloj a Timex use un envío de prepago. Para obtener un envío prepago llame al 1-800-448-4639 GARANTÍA INTERNACIONAL DE TIMEX o visite el comercio donde adquirió... - Seite 106 GARANTÍA, EXPRESA O IMPLÍCITA, INCLUSO CUALQUIER GARANTÍA IMPLÍCITA DE COMERCIABILIDAD O 1. después que expira el periodo de garantía; ADECUACIÓN PARA UN FIN PARTICULAR. TIMEX NO SE 2. si el reloj inicialmente no se compró a un distribuidor HARÁ RESPONSABLE POR CUALQUIER DAÑO ESPECIAL, de Timex autorizado;...
- Seite 107 Para solicitar los servicios incluidos en la garantía, PULSERA ESPECIAL NI NINGÚN OTRO ARTÍCULO DE VALOR devolver el reloj a Timex, a una de sus sucursales PERSONAL. o al comercio minorista adonde se compró el reloj, En EE.UU., por favor llame al 1-800-448-4639 para obtener adjuntando el cupón de reparación que originalmente...
- Seite 108 (5 dígitos). También puede enviar un cheque de $5 por correo a: Timex Extended Warranty, P.O. Box 1676, Dept. EF, Little Rock, AR 72203. ©2010 Timex Group USA, Inc. TIMEX, INDIGLO, INTELLIGENT QUARTZ y IQ son marcas registradas de Timex Group B.V. y sus afiliados.
- Seite 109 Perpetual Calendar Fly Back Chronograph • Flyback Chrono Compass World Time Calendrier perpétuel Chronographe avec Fly-Back • Boussole chrono avec Fly-Back Heure mondiale Calendario Perpetuo Cronógrafo Fly-back • Brújula Fly-back Hora mundial Calendário perpétuo Cronógrafo Flyback • Bússola e cronógrafo Flyback ™...
- Seite 110 English......... Page.1 Français....... page.67 Español........ página.141 Português......página.213...
- Seite 111 TIMEX WATCHES ® Congratulations on purchasing your TIMEX ® watch. Please read these instructions carefully to understand how to operate your Timex watch. Your watch may not have all of the features described in this booklet. For more information, and to register your product please visit: www.timex.com...
- Seite 112 TABLE OF CONTENTS Bracelet Link Removal ............59 Battery ................60 How to Start Your Watch ............ 5 Warranty ................61 Water and Shock Resistance ..........6 Indiglo Night-Light ............8 ® Perpetual Calendar ............9 Fly-Back Chronograph ............15 Flyback Chronograph Compass ........
-
Seite 113: How To Start Your Watch
(Does not apply to Perpetual Calendar models.) To start Timex Intelligent Quartz technology brings the power your watch remove the plastic guard from under the of a micro-processor to the reliability and accuracy of crown, then press the crown in against the case. -
Seite 114: Water And Shock Resistance
WATER AND SHOCK RESISTANCE WARNING: TO MAINTAIN WATER-RESISTANCE, DO NOT PRESS ANY BUTTONS UNDER WATER UNLESS If your watch is water-resistant, meter marking (WR_M) YOUR WATCH IS INDICATED AS 200 METER WATER- is indicated. RESISTANT. NEVER PULL OUT THE CROWN WHILE UNDER WATER. -
Seite 115: Indiglo ® Night-Light
INDIGLO NIGHT-LIGHT PERPETUAL CALENDAR ® Press button or crown to activate light. FEATURES Electroluminescent technology used in the INDIGLO Your Intelligent Quartz time instrument has these ® ™ night-light illuminates entire watch face at night and in features: low light conditions. •... - Seite 116 Timex factory. You only need to adjust Hour Hand the time. The watch has two recessed push buttons for use by Timex Service Center to set the day and date after CROWN 1 2 3 Minute Hand battery replacement.
-
Seite 117: Care And Maintenance
2. The watch is not a diver watch and should not be used for the current leap year offset. This setting is made at the for diving. Timex factory or after battery replacement and cannot be 3. Rinse the watch with fresh water after exposure to changed, only viewed. -
Seite 118: Fly-Back Chronograph
When the battery is depleted, have it replaced promptly. FLY-BACK CHRONOGRAPH For battery replacement, please visit a Timex Service FEATURES Center. Your Intelligent Quartz time instrument has these ™ features: • Fly-back chronograph (up to 4 hours) • Second time zone •... -
Seite 119: Date And Time Setting
OVERVIEW NOTE: Your Intelligent Quartz watch crown has three ™ positions: closed, middle, and outer. To familiarize yourself 4th Center Hand to the difference between the various positions, extend Hour Hand the crown to its outer position and then push the crown Button A very lightly until you feel it click into the middle position. -
Seite 120: Second Time Zone
3. Push crown to closed position after setting time. The SECOND TIME ZONE second hand will begin moving. The upper hand shows the time for the second time zone. Note that the scale NOTE: For months with fewer than 31 days, the date will is 24-hours, with midnight need to be adjusted. - Seite 121 hand shows the minutes. The upper and 4th center NOTE: The second time zone can alternatively be used to hands move together. As the 4th center hand makes display your home time on a 24-hour format, if you prefer. one revolution, the upper hand moves one hour. When setting the second time in this manner, ensure that the hour/minute display corresponds to the 24-hour 2.
- Seite 122 2. To stop, press Button A (Start/Stop) again. All hands timing from time of button release. This “fly-back” stop moving. feature allows for the measurement of lap time. 3. To resume, press Button A (Start/Stop) again. CARE AND MAINTENANCE 4. To reset the fly-back chronograph to zero position, To maintain water-resistance, do not press or pull any press Button B (Fly-back/Reset).
-
Seite 123: Flyback Chronograph Compass
The actual battery life will vary based on individual use. FEATURES When the battery is depleted, have it replaced promptly. • Fly-back chronograph (up to 4 hours) For battery replacement, please visit an TIMEX SERVICE • Electronic compass with magnetic declination CENTER. compensation •... - Seite 124 OVERVIEW NOTE: Your Intelligent Quartz watch crown has three ™ positions: closed, middle and outer. To familiarize yourself 4th Center Hand to the difference between the various positions extend Minute Hand the crown to its outer position and then push the crown Button A very lightly until you feel it click into the middle position.
- Seite 125 3. Push the crown in when finished. SECOND TIME ZONE The upper hand normally shows the time for the second For months with fewer than 31 days, the date will need time zone. Note that the scale is 24 hours, with midnight to be adjusted.
- Seite 126 2. Press B to move the 4th center hand forward. Hold the CHRONOGRAPH button to move the hand quickly. The upper and 4th The watch provides a 4-hour fly-back chronograph. center hands move together; as the 4th center hand To start, press A (START/STOP). The 4th center hand makes one revolution, the upper hand moves one shows the seconds with 1/5-second resolution and the hour.
- Seite 127 To stop, press A again (START/STOP). All hands freeze. running without interfering with its operation. See COMPASS OPERATION. To resume, press A (START/STOP) again, or to reset the chronograph to zero, press B (FLY-BACK/RESET). TACHYMETER Your watch may include a tachymeter scale, which can be When the chronograph is reset, all hands move to zero.
-
Seite 128: Compass Calibration
Press B (FLYBACK/RESET) to reset (zero) the chronograph. is calibrated away from such objects, it will not work properly near them. For best results, calibrate in the area When using distances other than one mile or kilometer, of intended use. multiply the result by the distance. - Seite 129 To calibrate the compass: 1. Pull the crown to its middle position and wait for the indicator hands to stop moving. 2. Keep the watch level or place it on a level surface (if the band interferes, place the watch on an inverted cup).
-
Seite 130: Magnetic Declination
6. Press A or B to move the 4th center hand west (-) MAGNETIC DECLINATION or east (+), respectively, to point to your location’s A compass needle points to “magnetic north,” which may declination angle (see table on the following page) be slightly different from “true north,”... - Seite 131 Paris ....1W Waterbury, CT ..14W While holding the watch level, press C (COMPASS) to For further magnetic declination information, see www.timex.com activate the compass. The compass hand moves to point north. If the watch is turned, the 4th center hand will continue to move, always pointing north.
- Seite 132 conserves battery life. Press C (COMPASS) at any time to COMPASS USE keep the compass on for another 20 seconds. Once the compass is activated, there are two typical ways to use it. The compass may be activated while the chronograph is Which way am I headed? Hold the watch so that 12 in use.
-
Seite 133: Worldtime
WORLDTIME OVERVIEW FEATURES 24 cities Your Intelligent Quartz time instrument has these ™ Hour Hand features: Upper Hand 4th Center Hand World Time Button A • Time display capability for 24 locations around the Scale world Date Window • Season setting display Minute Hand CROWN •... - Seite 134 Your Intelligent Quartz watch crown has three positions: 3. Push the crown in when finished. ™ closed, middle and outer. To familiarize yourself to the For months with fewer than 31 days, the date will need difference between the various positions extend the to be adjusted.
- Seite 135 NOTE: If no button is pressed for five seconds after the SEASON SETTING hands stop, the watch proceeds to the world time setting The season setting allows the watch to compensate for operation (see WORLD TIME SETTING). daylight savings time (also called “summer time”). CITY TIME DISPLAY Different cities go on and off daylight savings time on Press A or B to move the...
- Seite 136 WINTER. The watch knows which cities are in each setting will be correct for all cities. For more information, hemisphere. see timex.com. EXAMPLE: Australia and much of Europe change time in Setting the world time consists of selecting a city within March and October.
- Seite 137 move the hand quickly. Any city may be used. TO SET THE WORLD TIME: 1. Pull the crown to its middle position. The center hand 3. Pull the crown to its outer position. The city selector shows the world time zone city and the upper hand hand will revert back to the 12:00 position as indicated shows the world time.
-
Seite 138: Care And Maintenance
The actual battery life may vary depending on actual use. hands should be aligned. When the battery is depleted, have it replaced promptly. 6. Push the crown in when finished. For battery replacement, please visit a Timex Service CARE AND MAINTENANCE Center. To maintain water-resistance, do not press any buttons under water. -
Seite 139: Tachymeter Function
TACHYMETER FUNCTION 4. The chronograph second hand is compared to the tachymeter markings to determine the target’s speed. (not all models) The tachymeter will only determine speeds greater than HOW TO ADJUST BRACELET 60 units per hour using this method; slower speeds can (Variations of the following bracelet sections apply to all be measured by decreasing the unit of measurement. -
Seite 140: Bracelet Link Removal
BRACELET LINK REMOVAL FOLDOVER CLASP BRACELET 1. Find spring bar that connects bracelet to clasp. REMOVING LINKS: 1. Place bracelet upright and insert pointed tool in 2. Using a pointed tool, push in spring bar and gently opening of link. twist bracelet to disengage. -
Seite 141: Battery
RECHARGE. KEEP LOOSE BATTERIES AWAY FROM When the battery needs to be changed, we recommend CHILDREN. that only TIMEX replace it. Your watch will need to be recalibrated to correct time and date after changing the TIMEX INTERNATIONAL WARRANTY battery. To return your watch to Timex use a pre-paid shipper. - Seite 142 To obtain warranty service, please return your watch to 5. lens or crystal, strap or band, watch case, attachments Timex, one of its affiliates or the Timex retailer where or battery. Timex may charge you for replacing any of the watch was purchased, together with a completed these parts.
-
Seite 143: Extended Warranty
Portugal, call 351 212 946 017. For France, call 33 3 81 63 ©2010 Timex Group USA, Inc. TIMEX, INDIGLO, INTELLIGENT QUARTZ 42 00. For Germany/Austria, call 43 662 88921 30. For the AND IQ are trademarks of Timex Group B.V. and its subsidiaries. Middle East and Africa, call 971-4-310850. - Seite 144 MONTRES TIMEX ® ® Félicitations pour votre achat d’une montre Timex . Lire les instructions attentivement pour bien comprendre le fonctionnement de votre montre Timex. Il est possible que ce modèle ne présente pas toutes les fonctions décrites dans le dépliant.
- Seite 145 SOMMAIRE Démontage de maillons du bracelet ......130 Pile .................. 132 Comment mettre la montre en marche ......71 Garantie ................133 Résistance aux chocs et à l’eau ........73 Veilleuse Indiglo ............. 75 ® Calendrier perpétuel ............76 Chronographe avec Fly-Back ........... 82 Boussole chrono avec Fly-Back ........
-
Seite 146: Comment Mettre La Montre En Marche
, la technologie analogique à ™ LA MONTRE EN MARCHE quartz du futur. La technologie Timex Intelligent Quartz (Ne concerne pas les modèles à calendrier perpétuel.) combine la puissance d’un microprocesseur à la fiabilité Pour mettre la montre en marche, retirer la bague et la précision des montres à... -
Seite 147: Résistance Aux Chocs Et À L'eau
RÉSISTANCE AUX CHOCS ET À L’EAU Pour visser, enfoncer fermement la couronne sur le bouton fileté et la maintenir enfoncée tout en la faisant Si la montre est étanche, la profondeur maximale (WR_M) tourner dans le sens horaire. Continuer à visser la est indiquée. -
Seite 148: Veilleuse Indiglo
VEILLEUSE INDIGLO ATTENTION : POUR PRÉSERVER L’ÉTANCHÉITÉ, NE ® PAS ENFONCER LES BOUTONS SOUS L’EAU, SAUF SUR Appuyez sur le bouton ou la couronne pour activer LES MODÈLES ÉTANCHES JUSQU’À 200 MÈTRES. NE l’éclairage. La technologie électroluminescente de la JAMAIS TIRER LA COURONNE ALORS QUE LA MONTRE veilleuse INDIGLO permet d’illuminer tout le cadran de la ®... -
Seite 149: Calendrier Perpétuel
CALENDRIER PERPÉTUEL VUE D’ENSEMBLE FONCTIONS Aiguille de la date Aiguille Bouton A La montre Intelligent Quartz possède les fonctions ™ des jours (ENCASTRÉ) suivantes : Aiguille des heures • Calendrier perpétuel - la date est toujours correcte jusqu’en 2100 Aiguille 1 2 3 COURONNE •... - Seite 150 Ce réglage est effectué à l’usine 1. Tirez complètement la couronne. Toutes les aiguilles Timex ou après le remplacement de la pile et ne peut être se règlent automatiquement en allant se placer en modifié mais seulement affiché.
-
Seite 151: Soin Et Entretien
Pour faire changer la pile, adressez-vous à un centre de 1. La montre est étanche aussi longtemps que le verre, services Timex. les boutons et le boîtier sont intacts. 2. La montre n’est pas conçue pour la plongée. Ne pas... -
Seite 152: Chronographe Avec Fly-Back
CHRONOGRAPHE AVEC FLY-BACK VUE D’ENSEMBLE 4ème aiguille centrale FONCTIONS Aiguille des heures La montre Intelligent Quartz possède les fonctions ™ suivantes : Aiguille Bouton A supérieure • Chronographe avec fly-back ou retour à la volée Dateur Heure du (jusqu’à 4 heures) chronographe Deuxième •... -
Seite 153: Réglage De La Date Et De L'heure
(22h00) et 2 am (2h00). Ne pas changer la date REMARQUE : La montre Intelligent Quartz comporte ™ pendant ce laps de temps. Ceci aurait pour effet trois positions : enfoncée, intermédiaire et extrême. Pour d’endommager le mouvement de la montre. vous familiariser avec les différentes positions, tirez la couronne en position extrême et poussez-la doucement 3. - Seite 154 le sens anti-horaire ou dans le sens horaire jusqu’à ce POUR RÉGLER LE SECOND FUSEAU HORAIRE : qu’elle indique 12 heures. 1. Tirez la couronne en position intermédiaire. L’aiguille supérieure indique l’heure du second fuseau horaire et 3. Enfoncez la couronne pour valider. la 4ème aiguille centrale indique les minutes.
- Seite 155 3. Appuyez sur le bouton A pour faire avancer l’aiguille CHRONOGRAPHE AVEC FLY-BACK OU RETOUR supérieure par intervalles d’une heure jusqu’à ce À LA VOLÉE qu’elle atteigne l’heure désirée dans le second fuseau La montre comporte un chronographe avec fly-back ou horaire.
- Seite 156 2. Pour l’arrêter, appuyez de nouveau sur le bouton A Les aiguilles n’ont pas besoin d’atteindre la position (Démarrage/Arrêt). Toutes les aiguilles s’arrêtent. zéro avant de relâcher le bouton B. Si le bouton B est relâché avant le retour à la position zéro des aiguilles, 3.
-
Seite 157: Boussole Chrono Avec Fly-Back
• Second fuseau horaire l’utilisation qui est faite de la montre. • Tachymètre (sur certains modèles) Remplacez rapidement la pile lorsque celle-ci est usée. • Veilleuse INDIGLO ® Pour faire changer la pile, s’adresser à un centre de services Timex. - Seite 158 VUE D’ENSEMBLE REMARQUE : La montre Intelligent Quartz comporte trois ™ positions : enfoncée, intermédiaire et extrême. Pour vous 4ème aiguille centrale familiariser avec les différentes positions, tirez la couronne Aiguille des minutes en position extrême et poussez-la doucement jusqu’à ce Aiguille Bouton A qu’elle se place en position intermédiaire par un clic.
- Seite 159 pendant ce laps de temps. Ceci aurait pour effet 3. Enfoncer la couronne pour valider. d’endommager le mouvement de la montre. SECOND FUSEAU HORAIRE 3. Enfoncez la couronne pour valider. L’aiguille supérieure indique normalement l’heure pour le second fuseau horaire. Notez qu’il s’agit d’une échelle sur Pour les mois de moins de 31 jours, la date devra être 24 heures, minuit se situant à...
- Seite 160 2. Appuyez sur B pour faire avancer la 4ème aiguille fuseau horaire sur une échelle de 24 heures. Si vous centrale. Maintenir le bouton enfoncé pour déplacer utilisez le second fuseau horaire de cette manière, l’aiguille rapidement. L’aiguille supérieure et la 4ème assurez-vous que l’affichage heure/minute correspond aiguille centrale se déplacent ensemble, l’aiguille bien à...
- Seite 161 inférieure indique le dernier chiffre des minutes, en Vous pouvez également remettre à zéro et/ou redémarrer comptant jusqu’à dix puis en répétant l’opération. le chronographe lorsqu’il est en marche. Pour cela, L’aiguille supérieure indique le temps total, heures et appuyez et maintenez enfoncé le bouton B (FLY-BACK OU minutes, avec des divisions toutes les dix minutes.
- Seite 162 Notez que le temps de parcours entre les deux bornes TACHYMÈTRE doit être inférieur à une minute. Si la montre est équipée d’une échelle tachymétrique, elle permet de mesurer une vitesse en miles par heure, Appuyez sur B (FLY-BACK OU RETOUR À LA VOLÉE/RESET) en kilomètres par heure ou en nœuds pour des valeurs pour remettre le chronographe à...
- Seite 163 électromagnétique, tels que téléviseurs ou ordinateurs, dont l’effet pourrait produire des mesures inexactes. En susceptibles d’affecter le champ magnétique autour de présence de toute mesure suspecte, effectuer un nouvel la montre. Si la boussole est étalonnée à proximité de étalonnage. tels objets, elle ne fonctionnera correctement qu’à...
- Seite 164 3. Appuyez sur C (BOUSSOLE) pour commencer. L’aiguille se déplace ensuite pour le réglage de la déclinaison centrale effectue deux tours complets pour vous magnétique du moment (se reporter à DÉCLINAISON rappeler de faire pivoter la montre. Tenez la montre à MAGNÉTIQUE).
- Seite 165 7. Enfoncez la couronne pour valider. Cependant, si vous souhaitez tenir compte de cette différence, il y a deux façons de le faire. Manuellement, en tournant la lunette de la boussole jusqu’à ce que l’aiguille centrale indique votre déclinaison magnétique (voir tableau ci-dessous) plutôt que le nord, à...
- Seite 166 L’aiguille se déplace et pointe vers le nord. Si on tourne Pour connaître d’autres valeurs de déclinaison magnétique, consultez le site la montre, l’aiguille centrale se déplace, pointant toujours www.timex.com vers le nord. Après 20 secondes, la boussole s’arrête automatiquement et l’aiguille centrale reprend son...
- Seite 167 fonctionnement habituel. Ceci permet de prolonger la de position pour revenir en position initiale après durée de vie de la pile. Appuyez sur C (BOUSSOLE) à tout désactivation de la boussole. Ceci est normal et permet moment pour maintenir la boussole activée pendant 20 d’obtenir les meilleurs relevés d’orientation.
-
Seite 168: Heure Mondiale
direction correspondant à 12 heures. Puis tournez sur VUE D’ENSEMBLE vous-même jusqu’à ce que l’aiguille centrale s’aligne 24 villes sur le point nord indiqué sur la lunette de la boussole. Aiguille des heures Aiguille 4ème aiguille centrale On se retrouve alors face à la direction de déplacement supérieure souhaitée. - Seite 169 La montre Intelligent Quartz comporte trois positions : d’endommager le mouvement de la montre. ™ enfoncée, intermédiaire et extrême. Pour vous familiariser 3. Enfoncez la couronne pour valider. avec les différentes positions, tirez la couronne en Pour les mois de moins de 31 jours, la date devra être position extrême et poussez-la doucement jusqu’à...
- Seite 170 midi au milieu. REMARQUE : Si aucun bouton n’est enfoncé dans les cinq secondes suivant l’arrêt des aiguilles, la montre Appuyez sur C pour changer de saison (se reporter à procède au réglage du temps mondial (se reporter à RÉGLAGE DES SAISONS). RÉGLAGE DE L’HEURE MONDIALE).
- Seite 171 (SUMMER) à des dates différentes en raison d’une (hiver). La montre connaît la situation des villes dans législation différente. La plupart du temps, néanmoins, le chaque hémisphère. réglage des saisons sera correct pour toutes les villes. Pour de plus amples informations, consulter le site timex.com.
- Seite 172 Régler l’heure mondiale consiste à sélectionner une ville dans votre fuseau horaire et à régler l’heure pour cette ville comme celle de votre heure locale. La montre saura ensuite l’heure qu’il est dans toutes les autres villes. 1 2 3 POUR RÉGLER L’HEURE MONDIALE : 1.
- Seite 173 RÉGLAGE DES AIGUILLES INDICATRICES. Après cinq horaire local. Maintenez le bouton enfoncé pour secondes, l’aiguille supérieure indique l’heure locale régler l’heure rapidement. Les aiguilles se déplacent (c’est à dire l’heure qu’il est dans la ville sélectionnée ensemble ; l’aiguille supérieure se déplace d’une à...
-
Seite 174: Fonction Tachymètre
Remplacez rapidement la pile lorsque celle-ci est usée. tous les calculs. Pour faire changer la pile, s’adresser à un centre de services Timex. 1. Déterminez les marqueurs de début et de fin pour toutes vos distances prédéterminées. 2. Démarrez le chronographe dès que la cible, dont vous voulez mesurer la vitesse, dépasse le marqueur de... -
Seite 175: Comment Ajuster Le Bracelet
3. Arrêtez le chronographe dès que la cible, dont vous le fermoir d’avant en arrière jusqu’à ce qu’il s’engage voulez mesurer la vitesse, dépasse le marqueur de fin. dans les rainures sur la face inférieure du bracelet. 4. L’aiguille des secondes du chronographe indique sur 4. -
Seite 176: Démontage De Maillons Du Bracelet
RÉASSEMBLAGE : 1. Mettre les pièces du bracelet en place. 2. Poussez la goupille dans le maillon dans le sens opposé à la flèche. 3. Enfoncez la goupille jusqu’à ce qu’elle ne dépasse plus DÉMONTAGE DE MAILLONS DU BRACELET du bracelet. DÉMONTAGE DE MAILLONS : 1. -
Seite 177: Pile
(ce ne sont pas des frais de d’UN AN, à compter de la date d’achat. Timex ainsi que réparation) : un chèque ou mandat-poste de 8,00 $ US ses filiales du monde entier honoreront cette Garantie Internationale. - Seite 178 Pour obtenir le service garanti, retourner la montre à pièces peut vous être facturé par Timex. Timex, à une de ses filiales ou au détaillant Timex où la montre a été achetée. Inclure un coupon de réparation CETTE GARANTIE AINSI QUE LES RECOURS PRÉVUS DANS original dûment rempli ou, aux É.-U.
- Seite 179 Afrique, composer le 971-4-310850. $ CAN au Canada et de 2,50 £ au Royaume-Uni. Dans les autres pays, Timex vous facturera les frais d’envoi et de manutention. N’INCLUEZ JAMAIS DANS VOTRE ENVOI UN BRACELET SPÉCIAL OU TOUT AUTRE ARTICLE AYANT UNE VALEUR PERSONNELLE.
- Seite 180 également possible d’envoyer un chèque de 5 $ US par courrier à : Timex Extended Warranty, P.O. Box 1676, Dept. EF, Little Rock, AR 72203. ©2010 Timex Group USA, Inc. TIMEX, INDIGLO, INTELLIGENT QUARTZ et IQ sont des marques déposées de Timex Group B.V. et de ses filiales.
- Seite 181 TIMEX RELOJ ® Felicitaciones por la compra de su reloj TIMEX ® . Por favor lea atentamente las instrucciones para saber cómo funciona su reloj Timex ® Es posible que su reloj no tenga todas las características descritas en este folleto.
- Seite 182 ÍNDICE Remoción de eslabones de la pulsera ......203 Pila .................. 204 Cómo inicializar su reloj ..........145 Garantía ................205 Resistencia al agua y a golpes ........146 Botón Indiglo ............... 148 ® Calendario Perpetuo ............149 Cronógrafo Fly-back ............155 Brújula Fly-back ..............
-
Seite 183: Cómo Inicializar Su Reloj
Con segundero comenzará a avanzar a intervalos de un segundo. los relojes Timex de cuarzo inteligentes, la tecnología se Algunos relojes resistentes al agua a grandes inscribe dentro del diseño, entregando un nuevo nivel profundidades necesitan que la corona de ajuste se de complejidad en la esfera. -
Seite 184: Resistencia Al Agua Y A Golpes
RESISTENCIA AL AGUA Y A GOLPES ADVERTENCIA: PARA MANTENER LA RESISTENCIA AL AGUA, NO APRIETE NINGÚN BOTÓN DEBAJO DEL Si su reloj es resistente al agua, se indicarán los metros AGUA A MENOS QUE SU RELOJ ESTÉ INDICADO PARA (WR_M). UNA RESISTENCIA AL AGUA DE 200 METROS. -
Seite 185: Botón Indiglo
BOTÓN INDIGLO CALENDARIO PERPETUO ® Pulse el botón o la corona para activar la luz. FUNCIONES Electroluminescent technology used in the INDIGLO Su reloj Quartz inteligente tiene estas características: ® ™ night-light illuminates entire watch face at night and in •... -
Seite 186: Descripción General
CORONA de activación empotrados para uso de un distribuidor de minutos autorizado o sucursal de Timex para ajustar la fecha y Manecilla de mes el día después del reemplazo de la pila. Además de lo mencionado no tienen otro uso. - Seite 187 Esta configuración es hecha en la fábrica de Timex ciclos, auto-ajustándose en forma automática. Esto o después del reemplazo de la pila y no se puede cambiar, corrige cualquier desalineamiento de las manecillas.
-
Seite 188: Cuidado Y Mantenimiento
La pila debe durar 6 años con uso normal del reloj. La vida real de la pila puede variar según el uso que tenga. Cuando la pila se agote, hágala cambiar rápidamente. Para efectuar el reemplazo, vaya a un centro de servicio de Timex. - Seite 189 DESCRIPCIÓN GENERAL NOTA: Su reloj Quartz inteligente tiene tres posiciones: ™ cerrada, media y externa. Para que se acostumbre a la Cuarta manecilla central diferencia entre las distintas posiciones, pulse la corona Manecilla horaria a la posición más externa y luego pulse ligeramente la Manecilla Botón A corona hasta que sienta un clic en la posición media.
-
Seite 190: Segunda Zona Horaria
3. Pulse la corona a la posición cerrada después de fijar 3. Pulse la corona a la posición cerrada cuando acabe. la hora. El segundero se pondrá en movimiento. SEGUNDA ZONA HORARIA NOTA: Se requerirá ajustar la fecha en los meses que La manecilla superior tengan menos de 31 días. - Seite 191 3. Pulse el botón A para mover la manecilla superior PARA AJUSTAR LA SEGUNDA ZONA HORARIA: hacia adelante, en incrementos de una hora, hasta 1. Jale la corona hasta su posición media. La manecilla que llegue a la hora deseada de la segunda zona superior muestra la hora de la segunda zona horaria y la cuarta manecilla central muestra los minutos.
- Seite 192 4. Para reiniciar el cronógrafo fly-back desde cero, pulse CRONÓGRAFO FLY-BACK el botón B (Fly-back/Reset). El reloj tiene un cronógrafo “fly-back” (que revisa marcajes anteriores) de 4 horas. Cuando se reinicia el cronógrafo, todas las manecillas se ponen la posición cero. Después de otros ocho 1.
- Seite 193 • El reloj es resistente al agua solamente mientras el cristal, Para efectuar el reemplazo, vaya a un centro de servicio el botón táctil, la corona y la caja permanezcan intactos. de Timex. • El reloj no es apropiado para hacer submarinismo y no debería utilizarse para ello.
-
Seite 194: Brújula Fly-Back
BRÚJULA FLY-BACK DESCRIPCIÓN GENERAL Cuarta manecilla central CARACTERÍSTICAS Manecilla de minutos • Cronógrafo Fly-back (hasta por 4 horas) Botón A Manecilla • Brújula electrónica con compensación de declinación superior Ventanilla de fecha magnética Horas marcadas • Segunda zona horaria 2a zona horaria 1 2 3 CORONA •... - Seite 195 3. Pulse la corona hacia adentro cuando termine. NOTA: Su reloj Quartz inteligente tiene tres posiciones: ™ cerrada, media y externa. Para que se acostumbre a la Se requerirá ajustar la fecha en los meses que tengan diferencia entre las distintas posiciones, pulse la corona menos de 31 días.
- Seite 196 3. Pulse la corona hacia adentro cuando termine. 2. Pulse B para mover hacia delante la cuarta manecilla central. Sostenga el botón para mover con rapidez la SEGUNDA ZONA HORARIA manecilla. Las manecillas superior y cuarta manecilla La manecilla superior normalmente muestra la hora para central se mueven a la vez;...
- Seite 197 de 24 horas, si lo prefiere. Cuando se ajusta la segunda Para detener, pulse A zona horaria de esta manera, asegúrese que el gráfico (START/STOP). Todas las de horas y minutos corresponda con el gráfico de las manecillas se inmovilizan. 24 horas, al verificar que la fecha cambie a medianoche Para reanudar, pulse A y no al mediodía.
- Seite 198 y sostenga B (FLY-BACK/RESET) para poner a cero el Inicie el cronógrafo en el primer marcador de milla o cronógrafo y suéltelo cuando desee reiniciarlo. No kilómetro pulsando A (START/STOP). Detenga luego el tiene que esperar a que todas las manecillas lleguen cronógrafo en el siguiente marcador de milla o kilómetro a cero antes de soltar el botón;...
- Seite 199 resultar en errores grandes. Hay que evitar también áreas CALIBRACIÓN DE LA BRÚJULA que pudieran exhibir concentraciones de hierro duro y Se debe calibrar la brújula, antes de usarse. suave más elevadas de lo normal, pues pueden ocasionar Dado que la brújula usa el campo magnético de la rumbos incorrectos.
- Seite 200 Para calibrar la brújula: 1. Jale la corona a su posición media y espere que las manecillas indicadoras se detengan. 2. Mantenga el reloj a nivel o colóquelo sobre una superficie horizontal (si la pulsera interfiere, coloque el reloj sobre un vaso invertido). El reloj puede estar bocabajo, pero tome precauciones para proteger el cristal.
- Seite 201 hacer que el reloj compense automáticamente el 7. Pulse la corona hacia adentro cuando termine. ángulo de declinación, mueva el anillo giratorio de la brújula hasta que el Norte esté en las 12 en punto. 6. Pulse A o B para mover la cuarta manecilla central hacia el Oeste (-) o Este (+), respectivamente, y apuntar hacia el ángulo de declinación de su posición (ver la tabla de abajo) usando la escala de declinación.
- Seite 202 Orlando ......5W Vancouver ....18E apropiada, la cuarta manecilla central apuntará al Norte Denver ....9E Oslo ........ 1E Washington DC ..11W verdadero. Jerusalén ..4E París ......1W Waterbury, CT ... 14W Para más información sobre declinación magnética, vea www.timex.com...
- Seite 203 retornará a su operación normal. Esto alarga la duración FUNCIONAMIENTO DE LA BRÚJULA de la pila. Pulse C (BRÚJULA) en cualquier momento para Normalmente, la brújula está apagada y la cuarta mantener la brújula encendida por otros 20 segundos. manecilla central apunta a las 12 en punto o muestra los segundos del cronógrafo.
-
Seite 204: Hora Mundial
HORA MUNDIAL USO DE LA BRÚJULA Estando la brújula activada, hay dos maneras típicas de CARACTERÍSTICAS proceder para usarla. Su reloj Quartz inteligente tiene estas características: ™ ¿Hacia dónde voy? Sostenga el reloj de modo que las • Muestra la hora de 24 ciudades alrededor del mundo 12 en punto estén en la dirección de su viaje. - Seite 205 Su reloj Quartz inteligente tiene tres posiciones: cerrada, DESCRIPCIÓN GENERAL ™ media y externa. Para que se acostumbre a la diferencia 24 ciudades Manecilla horaria entre las distintas posiciones, pulse la corona a la Cuarta manecilla posición más externa y luego pulse ligeramente la corona Manecilla central superior...
- Seite 206 3. Pulse la corona hacia adentro cuando termine. NOTA: Si no se pulsa botón alguno por cinco segundos después que se detienen las manecillas, el reloj pasa a Se requerirá ajustar la fecha en los meses que tengan realizar el ajuste de hora mundial (ver AJUSTE DE HORA menos de 31 días.
- Seite 207 Pulse C para cambiar la estación (ver AJUSTE DE ESTACIÓN) AJUSTE DE ESTACIÓN El ajuste de estación permite al reloj compensar por la hora de aprovechamiento de luz solar (también llamada “hora de verano”). Cuando la estación de una ciudad se establece en La hora de verano para diferentes ciudades se inicia VERANO, todas las ciudades en el mismo hemisferio son y termina en fechas distintas mientras que algunas...
- Seite 208 1 2 3 veces, sin embargo, el ajuste de estación será correcto para todas las ciudades. Para información adicional, ver timex.com. Ajustar la hora mundial consiste en seleccionar una ciudad dentro de la zona horaria local y ajustar en dicha ciudad la misma hora local.
- Seite 209 2. Pulse A o B para seleccionar la ciudad que representa después que se haya jalado la corona a la posición su zona horaria local. Sostenga un botón para mover más externa). con rapidez la manecilla. Se puede utilizar cualquier 4.
-
Seite 210: Taquímetro
2. Inicie el cronógrafo una vez el objetivo para la medida Cuando la pila se agote, hágala cambiar rápidamente. de velocidad pase por el punto inicial. Para efectuar el reemplazo, vaya a un centro de servicio de Timex. -
Seite 211: Cómo Ajustar La Pulsera
3. Detenga el cronógrafo una vez el objetivo para la 3. Ejerza presión mientras sostiene la chapa de cierre y medida de velocidad pase por el punto final. deslice el broche hacia atrás y hacia adelante hasta que se acople en las ranuras situadas en la parte de 4. -
Seite 212: Remoción De Eslabones De La Pulsera
REMOCIÓN DE ESLABONES DE LA PULSERA PULSERA CON BROCHE PLEGABLE 1. Localice el perno de resorte que conecta la pulsera al CÓMO QUITAR LOS ESLABONES: broche. 1. Coloque la pulsera en posición vertical e introduzca la 2. Utilizando una herramienta puntiaguda, empuje el herramienta puntiaguda en la abertura del eslabón. -
Seite 213: Pila
MANTENGA LAS PILAS SUELTAS FUERA DEL ALCANCE la hora y fecha correctas después del cambio de pila. DE LOS NIÑOS. Para devolver su reloj a Timex use un envío de prepago. Para obtener un envío prepago llame al 1-800-448-4639 GARANTÍA INTERNACIONAL DE TIMEX o visite el comercio donde adquirió... - Seite 214 GARANTÍA, EXPRESA O IMPLÍCITA, INCLUSO CUALQUIER GARANTÍA IMPLÍCITA DE COMERCIABILIDAD O 1. después que expira el periodo de garantía; ADECUACIÓN PARA UN FIN PARTICULAR. TIMEX NO SE 2. si el reloj inicialmente no se compró a un distribuidor HARÁ RESPONSABLE POR CUALQUIER DAÑO ESPECIAL, de Timex autorizado;...
-
Seite 215: Garantía
Para solicitar los servicios incluidos en la garantía, PULSERA ESPECIAL NI NINGÚN OTRO ARTÍCULO DE VALOR devolver el reloj a Timex, a una de sus sucursales PERSONAL. o al comercio minorista adonde se compró el reloj, En EE.UU., por favor llame al 1-800-448-4639 para obtener adjuntando el cupón de reparación que originalmente... - Seite 216 (5 dígitos). También puede enviar un cheque de $5 por correo a: Timex Extended Warranty, P.O. Box 1676, Dept. EF, Little Rock, AR 72203. ©2010 Timex Group USA, Inc. TIMEX, INDIGLO, INTELLIGENT QUARTZ y IQ son marcas registradas de Timex Group B.V. y sus afiliados.
- Seite 217 RELÓGIOS TIMEX ® ® Parabéns por ter comprado um relógio TIMEX . Leia atentamente as instruções para saber como operar o relógio Timex. É possível que o seu relógio não possua todos os recursos descritos neste folheto. Para obter mais informações e registrar seu produto, visite: www.timex.com...
- Seite 218 ÍNDICE Retirada dos elos da pulseira ......... 277 Pilha ................278 Como iniciar o funcionamento do relógio ..... 217 Garantia ................279 Resistência à água e ao choque ........219 Luz noturna Indiglo ............221 ® Calendário perpétuo ............222 Cronógrafo fly-back ............
-
Seite 219: Como Iniciaro Funcionamento Do Relógio
, o futuro da tecnologia analógica de quartzo. ™ O FUNCIONAMENTO DO RELÓGIO A tecnologia Timex Intelligent Quartz traz o poder do (Não se aplica aos modelos com calendário perpétuo) microprocessador à confiabilidade e precisão da medição Retire a proteção plástica abaixo da coroa e pressione da hora analógica com quartzo. -
Seite 220: Resistência À Água E Ao Choque
RESISTÊNCIA À ÁGUA E AO CHOQUE Para atarraxar, pressione e mantenha pressionada a coroa firmemente contra a saliência rosqueada e gire-a Se o relógio for resistente à água, haverá uma indicação simultaneamente no sentido horário. Continue a atarraxar de profundidade em metros (WR_M). a coroa até... -
Seite 221: Luz Noturna Indiglo
LUZ NOTURNA INDIGLO ADVERTÊNCIA – PARA MANTER A RESISTÊNCIA À ® ÁGUA, NÃO PRESSIONE NENHUM BOTÃO EMBAIXO Pressione o botão ou a coroa para ativar a luz. A D’ÁGUA, A MENOS QUE O RELÓGIO SEJA RESISTENTE tecnologia eletroluminescente utilizada na luz noturna À... -
Seite 222: Calendário Perpétuo
CALENDÁRIO PERPÉTUO VISÃO GERAL RECURSOS O instrumento de medição de intervalos de tempo Ponteiro da data Intelligent Quartz conta com estes recursos: Ponteiro dos Botão A ™ dias (ENCAIXADO) • Calendário perpétuo - com data correta até 2100 Ponteiro das horas •... - Seite 223 1. Puxe a coroa para a posição externa. Todos os Essa configuração é realizada na fábrica Timex ou após a ponteiros indicadores passam para o final dos seus substituição da pilha e não pode ser alterada, somente vista.
-
Seite 224: Cuidado E Manutenção
CUIDADO E MANUTENÇÃO descarregada. Para substituir a pilha, visite o Centro de Para manter a resistência à água, não pressione Serviço Timex. nenhum botão quando estiver embaixo d’água. 1. Essa resistência à água continuará invariável sempre que o cristal, os botões e a caixa se mantiverem intactos. -
Seite 225: Cronógrafo Fly-Back
CRONÓGRAFO FLY-BACK VISÃO GERAL RECURSOS Quarto ponteiro central O instrumento de medição de intervalos de tempo Ponteiro das horas Intelligent Quartz conta com estes recursos: ™ Ponteiro Botão A superior • Cronógrafo fly-back (até quatro horas) Horas do Janela da data •... - Seite 226 de tempo. Se o fizer poderá danificar o mecanismo do OBSERVAÇÃO – A coroa do relógio Intelligent Quartz ™ relógio. tem três posições: fechada, intermédia e externa. Para se acostumar com a diferença entre as diversas posições, 3. Empurre a coroa para a posição de fechada depois de puxe a coroa para a sua posição externa e, depois, ajustar a hora.
-
Seite 227: Segundo Fuso Horário
central não apontar para as 12h00, pressione o botão ponteiro dos minutos do relógio. A ou B para mover o ponteiro no sentido anti-horário PARA CONFIGURAR O SEGUNDO FUSO HORÁRIO: ou horário até o ponteiro apontar para as 12h00. 1. Puxe a coroa até a posição intermédia. O ponteiro 3. -
Seite 228: Cronógrafo Fly-Back
3. Pressione o botão A para que o ponteiro superior CRONÓGRAFO FLY-BACK avance em incrementos de uma hora até alcançar a O relógio tem um cronógrafo fly-back de quatro horas. hora desejada do segundo fuso horário. Para mover 1. Para começar, pressione o botão A (“Start/Stop”) rapidamente o ponteiro, pressione e mantenha [Iniciar/Parar]. - Seite 229 4. Para reconfigurar o cronógrafo fly-back para a posição CUIDADO E MANUTENÇÃO zero, pressione o botão B (Fly-back/Reset). Para manter a resistência à prova d’água, não pressione nem puxe nenhum botão ou a coroa Ao reconfigurar o cronógrafo, todos os ponteiros embaixo d’água.
-
Seite 230: Bússola E Cronógrafo Fly-Back
• Cronógrafo fly-back (até quatro horas) Substitua sem demora a pilha quando estiver • Bússola eletrônica com compensação da declinação descarregada. magnética Para substituir a pilha, visite o CENTRO DE SERVIÇO • Segundo fuso horário TIMEX. • Taquímetro (modelos selecionados) • Luz noturna INDIGLO ®... - Seite 231 VISÃO GERAL OBSERVAÇÃO – A coroa do relógio Intelligent Quartz ™ tem três posições: fechada, intermédia e externa. Quarto ponteiro central Para se acostumar com a diferença entre as diversas Ponteiro dos minutos posições, puxe a coroa para a posição externa e, depois, Botão A Ponteiro empurre-a delicadamente até...
- Seite 232 da madrugada. Não mude a data durante este período para a posição externa o 4° ponteiro central não de tempo. Se o fizer poderá danificar o mecanismo do apontar para as 12h00, pressione o botão A ou B para relógio. mover o ponteiro no sentido anti-horário ou horário respectivamente até...
- Seite 233 1. Puxe a coroa até a posição intermédia. O ponteiro 4. Pressione a coroa quando terminar superior mostra a hora do segundo fuso horário no Se preferir, o segundo fuso horário pode ser utilizado formato de 24 horas, e o 4° ponteiro central mostra como uma alternativa para exibir a sua hora local no os minutos.
- Seite 234 os segundos com uma resolução de 1/5 de segundo, e reinicializado enquanto está em funcionamento. Para isso, o ponteiro inferior mostra o último dígito dos minutos, pressione e mantenha pressionado B (FLY-BACK/RESET) contando até dez e repetindo. O ponteiro superior mostra para zerar o cronógrafo e solte quando desejar recomeçar.
-
Seite 235: Calibração Da Bússola
Inicie o cronógrafo no marcador da primeira milha ponteiro central aponta para o número 80, a velocidade ou do primeiro quilômetro pressionando o botão A será de 40 milhas por hora (1/2 x 80). (START/STOP). Depois, pare o cronógrafo no marcador CALIBRAÇÃO DA BÚSSOLA da milha ou do quilômetro seguinte pressionando A bússola deve ser calibrada antes do seu uso. - Seite 236 Como se deve fazer com todas as bússolas, ao calibrar e Para calibrar a bússola: obter direções, é importante manter a bússola nivelada. 1. Puxe a coroa até a posição intermédia e espere que o Realizar uma calibração ou obter uma direção com o ponteiro indicador pare de se mover.
- Seite 237 coincida com as 12 horas em ponto. 6. Pressione A ou B para mover o 4° ponteiro central para o oeste (-) ou leste (+), respectivamente, para apontar para o ângulo de declinação da sua posição (consulte a tabela na página seguinte) utilizando a escala de declinação.
- Seite 238 Paris ....1O Waterbury, CT ..14O a configuração da declinação magnética após a calibração da Para obter mais informações sobre declinação magnética, visite: www.timex.com bússola (consulte a seção CALIBRAÇÃO DA BÚSSOLA). Com a correta configuração da declinação magnética, o 4° ponteiro central apontará para o norte verdadeiro.
- Seite 239 bússola se desligará automaticamente e o 4° ponteiro FUNCIONAMENTO DA BÚSSOLA central voltará ao seu funcionamento normal. Com isso, Normalmente, a bússola permanece inativa, com o 4° conserva-se a vida útil da pilha. Pressione C (COMPASS) ponteiro central apontando para as 12 horas em ponto ou [bússola] a qualquer momento para manter ligada a mostrando os segundos do cronógrafo.
-
Seite 240: Hora Mundial
de posição, voltando às suas posições normais quando a Norte no anel da bússola. Agora, você está de frente para bússola for desativada. Essa operação é normal e produz a direção que deseja ir. a maior precisão na leitura da bússola. HORA MUNDIAL USO DA BÚSSOLA Depois de ativada, a bússola pode ser utilizada... - Seite 241 A coroa do relógio Intelligent Quartz tem três posições: VISÃO GERAL ™ fechada, intermédia e externa. Para se acostumar com a 24 cidades diferença entre as diversas posições, puxe a coroa para a Ponteiro das horas Ponteiro posição externa e, depois, empurre-a delicadamente até Quarto ponteiro central superior sentir que se encaixa na posição intermédia.
- Seite 242 de tempo. Se o fizer poderá danificar o mecanismo do apontar para as 12h00, pressione o botão A ou B para relógio. mover o ponteiro no sentido anti-horário ou horário respectivamente até apontar para as 12h00. 3. Pressione a coroa quando terminar. 3.
- Seite 243 VISOR DA HORA DA CIDADE CONFIGURAÇÃO DA ESTAÇÃO Pressione A ou B para A configuração da estação permite que o relógio mover o ponteiro central compense o horário de verão. respectivamente para Algumas cidades entram e saem do horário de verão em trás ou para a frente e datas diferentes e outras, não observam o horário de selecione uma cidade.
- Seite 244 EXEMPLO: A Austrália e a maior parte da Europa mudam a hora em março e outubro. Se a cidade escolhida for Paris, selecione WINTER entre outubro e março. Selecione SUMMER entre março e outubro. Quando a cidade muda para Sidney, a indicação da estação muda automaticamente para ser a oposta daquela de Paris, já...
- Seite 245 Para obter informações adicionais, visite o site timex.com. O ajuste da hora mundial consiste em selecionar uma cidade localizada no seu fuso horário e ajustar a hora dessa cidade para que seja a mesma da sua hora local.
- Seite 246 pressionado um botão para mover rapidamente o 4. Se a estação exibida não for a correta para o fuso ponteiro. Qualquer cidade pode ser utilizada. horário local, pressione C para mudá-la. Se o fuso horário local observar o horário de verão, o ponteiro 3.
-
Seite 247: Função Do Taquímetro
2. Inicie o cronógrafo assim que o alvo de medição da A duração real da pilha variará com o seu uso real. velocidade ultrapassar o marcador inicial. Substitua sem demora a pilha quando estiver descarregada. Para substituir a pilha, visite o Centro de Serviço Timex. -
Seite 248: Como Ajustar A Pulseira
3. Pare o cronógrafo assim que o alvo de medição da COMO AJUSTAR A PULSEIRA velocidade ultrapassar o marcador final. (variações das seguintes seções das pulseiras aplicam-se 4. Compara-se o ponteiro dos segundos do cronógrafo a todos os modelos de relógio). com os marcadores do taquímetro para determinar a PULSEIRA COM FIVELA DESLIZANTE velocidade alvo. -
Seite 249: Retirada Dos Elos Da Pulseira
RETIRADA DOS ELOS DA PULSEIRA PULSEIRA DE FIVELA DOBRÁVEL 1. Encontre a barra de mola que une a pulseira à fivela. RETIRADA DOS ELOS: 2. Empurre a barra de mola com uma ferramenta 1. Coloque a pulseira na vertical e insira uma ferramenta pontuda e torça delicadamente a pulseira para pontuda na abertura do elo. -
Seite 250: Pilha
GARANTIA INTERNACIONAL TIMEX ajustar a hora e a data. Para devolver o relógio à Timex, faça-o por meio de um remetente com frete pré-pago. A Timex Group USA, Inc. garante o relógio TIMEX contra ®... - Seite 251 Estado para outro. 5. se o defeito for no cristal, na cinta ou pulseira, na caixa do relógio, nos acessórios ou na pilha. A Timex Para obter o serviço de garantia, devolva o relógio à...
- Seite 252 Canadá, um cheque ou vale-postal no valor de ligue para 971-4-310850. CAN$7,00; no Reino Unido, um cheque ou vale-postal no valor de £2,50. Nos outros países, a Timex cobrará do cliente as despesas de manuseio e remessa do produto. NUNCA INCLUA NENHUMA PULSEIRA ESPECIAL OU OUTRO ARTIGO DE VALOR PESSOAL NA SUA REMESSA.
- Seite 253 (5) dólares americanos por correio ao seguinte endereço: Timex Extended Warranty, P.O. Box 1676, Dept. EF, Little Rock, AR 72203. ©2010 Timex Group USA, Inc. TIMEX, INDIGLO, INTELLIGENT QUARTZ E IQ são marcas comerciais registradas da Timex Group B.V. e suas subsidiárias.
- Seite 254 Perpetual Calendar Fly Back Chronograph • Flyback Chrono Compass World Time Eeuwige kalender Flyback chronograaf • Flyback chronograaf/kompas Wereldtijd Ewiger Kalender Fly-Back-Chronograph • Fly-Back-Chronograph-Kompass Weltzeit Calendario perpetuo Cronografo Fly-back • Bussola del cronografo Fly-back ™ Ora nel mondo W268 EU2 350-095002...
- Seite 255 English......... Page.1 Nederlands......pagina.67 Deutsch....... Seite.137 Italiano........ pagina.209...
- Seite 256 TIMEX WATCHES ® Congratulations on purchasing your TIMEX ® watch. Please read these instructions carefully to understand how to operate your Timex watch. Your watch may not have all of the features described in this booklet. For more information, and to register your product please visit: www.timex.com...
- Seite 257 TABLE OF CONTENTS Bracelet Link Removal ............59 Battery ................60 How to Start Your Watch ............ 5 Warranty ................61 Water and Shock Resistance ..........6 Indiglo Night-Light ............8 ® Perpetual Calendar ............9 Fly-Back Chronograph ............15 Flyback Chronograph Compass ........
-
Seite 258: How To Start Your Watch
(Does not apply to Perpetual Calendar models.) To start Timex Intelligent Quartz technology brings the power your watch remove the plastic guard from under the of a micro-processor to the reliability and accuracy of crown, then press the crown in against the case. -
Seite 259: Water And Shock Resistance
WATER AND SHOCK RESISTANCE WARNING: TO MAINTAIN WATER-RESISTANCE, DO NOT PRESS ANY BUTTONS UNDER WATER UNLESS If your watch is water-resistant, meter marking (WR_M) YOUR WATCH IS INDICATED AS 200 METER WATER- is indicated. RESISTANT. NEVER PULL OUT THE CROWN WHILE UNDER WATER. -
Seite 260: Indiglo ® Night-Light
INDIGLO NIGHT-LIGHT PERPETUAL CALENDAR ® Press button or crown to activate light. FEATURES Electroluminescent technology used in the INDIGLO Your Intelligent Quartz time instrument has these ® ™ night-light illuminates entire watch face at night and in features: low light conditions. •... - Seite 261 Timex factory. You only need to adjust Hour Hand the time. The watch has two recessed push buttons for use by Timex Service Center to set the day and date after CROWN 1 2 3 Minute Hand battery replacement.
-
Seite 262: Care And Maintenance
2. The watch is not a diver watch and should not be used for the current leap year offset. This setting is made at the for diving. Timex factory or after battery replacement and cannot be 3. Rinse the watch with fresh water after exposure to changed, only viewed. -
Seite 263: Fly-Back Chronograph
When the battery is depleted, have it replaced promptly. FLY-BACK CHRONOGRAPH For battery replacement, please visit a Timex Service FEATURES Center. Your Intelligent Quartz time instrument has these ™ features: • Fly-back chronograph (up to 4 hours) • Second time zone •... -
Seite 264: Date And Time Setting
OVERVIEW NOTE: Your Intelligent Quartz watch crown has three ™ positions: closed, middle, and outer. To familiarize yourself 4th Center Hand to the difference between the various positions, extend Hour Hand the crown to its outer position and then push the crown Button A very lightly until you feel it click into the middle position. -
Seite 265: Second Time Zone
3. Push crown to closed position after setting time. The SECOND TIME ZONE second hand will begin moving. The upper hand shows the time for the second time zone. Note that the scale NOTE: For months with fewer than 31 days, the date will is 24-hours, with midnight need to be adjusted. - Seite 266 hand shows the minutes. The upper and 4th center NOTE: The second time zone can alternatively be used to hands move together. As the 4th center hand makes display your home time on a 24-hour format, if you prefer. one revolution, the upper hand moves one hour. When setting the second time in this manner, ensure that the hour/minute display corresponds to the 24-hour 2.
- Seite 267 2. To stop, press Button A (Start/Stop) again. All hands timing from time of button release. This “fly-back” stop moving. feature allows for the measurement of lap time. 3. To resume, press Button A (Start/Stop) again. CARE AND MAINTENANCE 4. To reset the fly-back chronograph to zero position, To maintain water-resistance, do not press or pull any press Button B (Fly-back/Reset).
-
Seite 268: Flyback Chronograph Compass
The actual battery life will vary based on individual use. FEATURES When the battery is depleted, have it replaced promptly. • Fly-back chronograph (up to 4 hours) For battery replacement, please visit an TIMEX SERVICE • Electronic compass with magnetic declination CENTER. compensation •... - Seite 269 OVERVIEW NOTE: Your Intelligent Quartz watch crown has three ™ positions: closed, middle and outer. To familiarize yourself 4th Center Hand to the difference between the various positions extend Minute Hand the crown to its outer position and then push the crown Button A very lightly until you feel it click into the middle position.
- Seite 270 3. Push the crown in when finished. SECOND TIME ZONE The upper hand normally shows the time for the second For months with fewer than 31 days, the date will need time zone. Note that the scale is 24 hours, with midnight to be adjusted.
- Seite 271 2. Press B to move the 4th center hand forward. Hold the CHRONOGRAPH button to move the hand quickly. The upper and 4th The watch provides a 4-hour fly-back chronograph. center hands move together; as the 4th center hand To start, press A (START/STOP). The 4th center hand makes one revolution, the upper hand moves one shows the seconds with 1/5-second resolution and the hour.
- Seite 272 To stop, press A again (START/STOP). All hands freeze. running without interfering with its operation. See COMPASS OPERATION. To resume, press A (START/STOP) again, or to reset the chronograph to zero, press B (FLY-BACK/RESET). TACHYMETER Your watch may include a tachymeter scale, which can be When the chronograph is reset, all hands move to zero.
-
Seite 273: Compass Calibration
Press B (FLYBACK/RESET) to reset (zero) the chronograph. is calibrated away from such objects, it will not work properly near them. For best results, calibrate in the area When using distances other than one mile or kilometer, of intended use. multiply the result by the distance. - Seite 274 To calibrate the compass: 1. Pull the crown to its middle position and wait for the indicator hands to stop moving. 2. Keep the watch level or place it on a level surface (if the band interferes, place the watch on an inverted cup).
-
Seite 275: Magnetic Declination
6. Press A or B to move the 4th center hand west (-) MAGNETIC DECLINATION or east (+), respectively, to point to your location’s A compass needle points to “magnetic north,” which may declination angle (see table on the following page) be slightly different from “true north,”... - Seite 276 Paris ....1W Waterbury, CT ..14W While holding the watch level, press C (COMPASS) to For further magnetic declination information, see www.timex.com activate the compass. The compass hand moves to point north. If the watch is turned, the 4th center hand will continue to move, always pointing north.
- Seite 277 conserves battery life. Press C (COMPASS) at any time to COMPASS USE keep the compass on for another 20 seconds. Once the compass is activated, there are two typical ways to use it. The compass may be activated while the chronograph is Which way am I headed? Hold the watch so that 12 in use.
-
Seite 278: Worldtime
WORLDTIME OVERVIEW FEATURES 24 cities Your Intelligent Quartz time instrument has these ™ Hour Hand features: Upper Hand 4th Center Hand World Time Button A • Time display capability for 24 locations around the Scale world Date Window • Season setting display Minute Hand CROWN •... - Seite 279 Your Intelligent Quartz watch crown has three positions: 3. Push the crown in when finished. ™ closed, middle and outer. To familiarize yourself to the For months with fewer than 31 days, the date will need difference between the various positions extend the to be adjusted.
- Seite 280 NOTE: If no button is pressed for five seconds after the SEASON SETTING hands stop, the watch proceeds to the world time setting The season setting allows the watch to compensate for operation (see WORLD TIME SETTING). daylight savings time (also called “summer time”). CITY TIME DISPLAY Different cities go on and off daylight savings time on Press A or B to move the...
- Seite 281 WINTER. The watch knows which cities are in each setting will be correct for all cities. For more information, hemisphere. see timex.com. EXAMPLE: Australia and much of Europe change time in Setting the world time consists of selecting a city within March and October.
- Seite 282 move the hand quickly. Any city may be used. TO SET THE WORLD TIME: 1. Pull the crown to its middle position. The center hand 3. Pull the crown to its outer position. The city selector shows the world time zone city and the upper hand hand will revert back to the 12:00 position as indicated shows the world time.
-
Seite 283: Care And Maintenance
The actual battery life may vary depending on actual use. hands should be aligned. When the battery is depleted, have it replaced promptly. 6. Push the crown in when finished. For battery replacement, please visit a Timex Service CARE AND MAINTENANCE Center. To maintain water-resistance, do not press any buttons under water. -
Seite 284: Tachymeter Function
TACHYMETER FUNCTION 4. The chronograph second hand is compared to the tachymeter markings to determine the target’s speed. (not all models) The tachymeter will only determine speeds greater than HOW TO ADJUST BRACELET 60 units per hour using this method; slower speeds can (Variations of the following bracelet sections apply to all be measured by decreasing the unit of measurement. -
Seite 285: Bracelet Link Removal
BRACELET LINK REMOVAL FOLDOVER CLASP BRACELET 1. Find spring bar that connects bracelet to clasp. REMOVING LINKS: 1. Place bracelet upright and insert pointed tool in 2. Using a pointed tool, push in spring bar and gently opening of link. twist bracelet to disengage. -
Seite 286: Battery
RECHARGE. KEEP LOOSE BATTERIES AWAY FROM When the battery needs to be changed, we recommend CHILDREN. that only TIMEX replace it. Your watch will need to be recalibrated to correct time and date after changing the TIMEX INTERNATIONAL WARRANTY battery. To return your watch to Timex use a pre-paid shipper. - Seite 287 To obtain warranty service, please return your watch to 5. lens or crystal, strap or band, watch case, attachments Timex, one of its affiliates or the Timex retailer where or battery. Timex may charge you for replacing any of the watch was purchased, together with a completed these parts.
-
Seite 288: Extended Warranty
Portugal, call 351 212 946 017. For France, call 33 3 81 63 ©2010 Timex Group USA, Inc. TIMEX, INDIGLO, INTELLIGENT QUARTZ 42 00. For Germany/Austria, call 43 662 88921 30. For the AND IQ are trademarks of Timex Group B.V. and its subsidiaries. Middle East and Africa, call 971-4-310850. - Seite 289 TIMEX HORLOGE ® ® Gefeliciteerd met de aankoop van uw TIMEX horloge. Lees de instructies goed door zodat u weet hoe u uw Timex horloge moet bedienen. Het is mogelijk dat uw horloge niet alle functies heeft die in dit boekje worden beschreven.
- Seite 290 INHOUDSOPGAVE Armbandschakels verwijderen ........127 Batterij ................129 Uw horloge starten ............71 Garantie ................131 Waterbestendigheid en schokvastheid......73 Indiglo nachtverlichting ..........75 ® Eeuwige kalender ............. 76 Flyback chronograaf ............82 Flyback chronograaf/kompas .......... 92 Wereldtijd ..............112 Tachymeterfunctie ............
-
Seite 291: Uw Horloge Starten
De secondewijzer begint te lopen in stappen analoog uurwerken. Bij Timex Intelligent Quartz horloges van één seconde. is de technologie in het ontwerp ingebouwd en biedt de Bij sommige waterbestendige horloges voor grote diepte wijzerplaat een nieuw niveau van complexiteit. -
Seite 292: Waterbestendigheid En Schokvastheid
WATERBESTENDIGHEID Om de kroon naar binnen te draaien, houdt u hem stevig tegen het uitsteeksel met schroefdraad aan gedrukt EN SCHOKVASTHEID terwijl u de kroon met de klok mee draait. Blijf de kroon Als het horloge waterbestendig is, wordt de vastdraaien totdat hij stevig vastzit. -
Seite 293: Indiglo ® Nachtverlichting
voor schokvastheid voldoen. Beschadiging van het WAARSCHUWING: OM HET HORLOGE horlogeglas moet echter worden vermeden. WATERBESTENDIG TE HOUDEN MAG U ONDER WATER OP GEEN ENKELE KNOP DRUKKEN TENZIJ IS INDIGLO NACHTVERLICHTING ® AANGEGEVEN DAT UW HORLOGE TOT 200 METER Druk op de knop of kroon om het licht in te schakelen. WATERBESTENDIG IS. -
Seite 294: Eeuwige Kalender
EEUWIGE KALENDER OVERZICHT FUNCTIES Datumwijzer Uw Intelligent Quartz uurwerk heeft de volgende ™ Dagwijzer Knop A (VERZONKEN) functies: Uurwijzer • Eeuwige kalender - tot 2100 is de datum altijd correct • Weergave van dag, maand en datum 1 2 3 KROON Minuutwijzer •... - Seite 295 Hierdoor wordt een mogelijke en datum. De dag en datum zijn in de Timex-fabriek verkeerde uitlijning van de wijzers gecorrigeerd. De vooringesteld. U hoeft alleen de tijd af te stellen. Het...
- Seite 296 Druk onder water op geen enkele knop opdat het horloge waterbestendig blijft. instelling voor de verstelling van het huidige schrikkel- jaar. Deze instelling wordt in de Timex-fabriek of nadat 1. Het horloge is alleen waterbestendig zo lang het glas, de batterij is vervangen, uitgevoerd en kan niet worden de drukknoppen en de kast intact blijven.
-
Seite 297: Flyback Chronograaf
Wanneer de batterij leeg is, moet u hem onmiddellijk laten OVERZICHT vervangen. Bezoek voor het vervangen van de batterij een 4e middelste wijzer Timex-servicecentrum. Uurwijzer FLYBACK CHRONOGRAAF Bovenste Knop A wijzer FUNCTIES Uren van Datumvenster Uw Intelligent Quartz uurwerk heeft de volgende chronograaf ™... -
Seite 298: Datum En Tijd Instellen
Opmerking: De datum verandert tussen 22 en 2 uur. OPMERKING: Uw Intelligent Quartz horloge heeft ™ Verander de datum niet tijdens deze tijd. Anders raakt een kroon met drie standen: gesloten, middelste en het mechaniek van het horloge beschadigd. buitenste. Om gewend te raken aan het verschil tussen de verschillende standen, trekt u de kroon naar de buitenste 3. -
Seite 299: Tweede Tijdzone
12 uur wijst, drukt u op knop A of B om de wijzer de tweede tijdzone hetzelfde als wat de minuutwijzer van tegen de klok in of met de klok mee te draaien totdat het horloge aangeeft. hij naar 12 uur wijst. DE TWEEDE TIJDZONE INSTELLEN: 3. - Seite 300 3. Druk op knop A om de bovenste wijzer in stappen van De 4e middelste wijzer toont de seconden met een één uur vooruit te draaien totdat deze het gewenste resolutie van 1/5 seconde. De onderste wijzer toont uur van de tweede tijdzone bereikt. Houd knop A het laatste cijfer van de minuten, oplopend tot tien en ingedrukt om de wijzer snel te draaien.
- Seite 301 Wanneer de batterij leeg is, moet u hem onmiddellijk laten Druk of trek onder water op of aan geen enkele knop vervangen. of de kroon opdat het horloge waterbestendig blijft. Bezoek voor het vervangen van de batterij een Timex- servicecentrum.
-
Seite 302: Flyback Chronograaf/Kompas
FLYBACK CHRONOGRAAF/KOMPAS OVERZICHT 4e middelste wijzer FUNCTIES Minuutwijzer • Flyback chronograaf (maximaal 4 uur) Bovenste Knop A • Elektronisch kompas met magnetische wijzer Datumvenster miswijzingscompensatie Uren van chronograaf • Tweede tijdzone 2e tijdzone 1 2 3 KROON • Tachymeter (bepaalde modellen) Uurwijzer •... - Seite 303 Opmerking: De datum verandert tussen 22 en 2 uur. OPMERKING: Uw Intelligent Quartz horloge heeft ™ Verander de datum niet tijdens deze tijd. Anders raakt een kroon met drie standen: gesloten, middelste en het mechaniek van het horloge beschadigd. buitenste. Om gewend te raken aan het verschil tussen de verschillende standen, trekt u de kroon naar de buitenste 3.
- Seite 304 B om de wijzer respectievelijk tegen de klok in of met 2. Druk op B om de 4e middelste wijzer vooruit te de klok mee te draaien totdat hij naar 12 uur wijst. draaien. Houd de knop ingedrukt om de wijzer snel te draaien.
- Seite 305 op deze manier instelt, verzeker u er dan van dat de uur/ minuten, met een verdeling om de tien minuten. De minutenweergave met de 24-uurs weergave overeenkomt chronograaf loopt tot vier uur voordat hij automatisch door te controleren of de datum om middernacht en niet stopt.
- Seite 306 te wachten tot alle wijzers op nul staan voordat u de knop kilometerpaaltje door nogmaals op A (START/STOP) te loslaat; het opnemen van de tijd begint intern vanaf het drukken. De 4e middelste wijzer wijst naar het aantal moment dat u de knop loslaat. Met deze “flyback” functie mijlen of km per uur op de tachymeterschaal.
- Seite 307 belangrijk, zoals bij alle kompassen, om het kompas KOMPAS KALIBREREN horizontaal te houden. Het kalibreren of het aflezen Het kompas moet worden gekalibreerd voordat u het van de koers terwijl het horloge niet horizontaal is, kan gebruikt. grote fouten tot gevolg hebben. Vermijd ook plaatsen Omdat een kompas gebruik maakt van het magnetische die hogere dan normale concentraties hard en zacht veld van de aarde, moet u zich bewust zijn van grote...
- Seite 308 Het kompas kalibreren: 1. Trek de kroon naar de middelste stand en wacht tot de wijzers niet meer draaien. 2. Houd het horloge horizontaal of plaats het op een horizontaal oppervlak (als het bandje in de weg zit, plaatst u het horloge op een omgekeerd kopje). De 4.
- Seite 309 6. Druk op A of B om de 4e middelste wijzer MAGNETISCHE MISWIJZING respectievelijk naar het westen (-) of oosten (+) te Een kompasnaald wijst naar het “magnetische noorden” verplaatsen zodat hij naar de miswijzing van uw dat enigszins kan verschillen van het "ware noorden" dat locatie wijst (zie de onderstaande tabel) met behulp op kaarten wordt gebruikt.
- Seite 310 Waterbury, CT ..14W draait tot hij naar het noorden wijst. Als het horloge wordt Ga voor verdere informatie over magnetische miswijzing naar www.timex.com gedraaid, blijft de 4e middelste wijzer draaien en wijst hij steeds naar het noorden. Na 20 seconden gaat het...
- Seite 311 kompas automatisch uit en keert de 4e middelste wijzer nauwkeurige kompaswaarden. naar de normale stand terug. Hierdoor gaat de batterij GEBRUIK VAN KOMPAS langer mee. Druk op elk gewenst moment op C (KOMPAS) Als het kompas eenmaal geactiveerd is, zijn er twee om het kompas nog 20 seconden aan te laten staan.
-
Seite 312: Wereldtijd
WERELDTIJD OVERZICHT FUNCTIES steden Uurwijzer Uw Intelligent Quartz uurwerk heeft de volgende ™ Bovenste 4e middelste wijzer functies: wijzer Wereldtijd- Knop A • Het kan de tijd op 24 plaatsen over de hele wereld schaal Datumvenster weergeven • Weergave van instelling van seizoen Minuutwijzer KROON •... - Seite 313 Uw Intelligent Quartz horloge heeft een kroon met drie Opmerking: De datum verandert tussen 22 en 2 uur. ™ standen: gesloten, middelste en buitenste. Om gewend te Verander de datum niet tijdens deze tijd. Anders raakt raken aan het verschil tussen de verschillende standen, het mechaniek van het horloge beschadigd.
- Seite 314 B om de wijzer respectievelijk tegen de klok in of met de tijd in de gekozen stad te tonen. U kunt zien dat de de klok mee te draaien totdat hij naar 12 uur wijst. schaal 24 uur heeft met middernacht aan beide einden en 12 uur 's middags in het midden.
- Seite 315 Zie voor op ZOMER ingesteld, terwijl alle steden in het andere meer informatie timex.com. halfrond automatisch op WINTER worden ingesteld. Het horloge weet welke steden in elk halfrond zijn.
- Seite 316 de knop ingedrukt om de wijzer snel te draaien. Elke DE WERELDTIJD INSTELLEN: stad kan worden gebruikt. 1. Trek de kroon naar de middelste stand. De middelste wijzer toont de stad in de wereldtijdzone en de 3. Trek de kroon naar de buitenste stand. De bovenste wijzer toont de wereldtijd.
- Seite 317 6. Druk de kroon naar binnen wanneer u klaar bent. naargelang het werkelijke gebruik. ONDERHOUD Wanneer de batterij leeg is, moet u hem onmiddellijk laten Druk onder water op geen enkele knop opdat het vervangen. Bezoek voor het vervangen van de batterij een horloge waterbestendig blijft. Timex-servicecentrum.
-
Seite 318: Tachymeterfunctie
TACHYMETERFUNCTIE 4. De secondewijzer van de chronograaf wordt vergelek- en met de tachymetermarkeringen om de snelheid (niet alle modellen) van het doel te bepalen. 60 eenheden per uur met behulp van deze methode; ARMBAND AFSTELLEN lagere snelheden kunnen worden gemeten door de (Variaties van de volgende gedeelten over de armband maateenheid te verlagen. -
Seite 319: Armbandschakels Verwijderen
4. Druk het borgplaatje naar beneden totdat het dicht klikt. De sluiting kan beschadigd raken als te veel kracht wordt uitgeoefend. ARMBAND MET KLAPSLUITING 1. Zoek het veerstaafje op waarmee de armband aan de sluiting vastzit. ARMBANDSCHAKELS VERWIJDEREN 2. Druk het veerstaafje met een puntig stuk gereedschap naar binnen en draai de armband voorzichtig los. -
Seite 320: Weer In Elkaar Zetten
(dit zijn geen reparatiekosten): een cheque of postwissel voor US$ 8,00 in de VS.; een cheque of postwissel voor CAN$ 7,00 in Canada; en in andere landen zal Timex port en behandeling in rekening brengen. -
Seite 321: Internationale Garantie Van Timex
Timex en gelieerde ondernemingen over KINDEREN HOUDEN. de hele wereld erkennen deze internationale garantie. Timex mag, naar eigen keuze, het horloge repareren door nieuwe of grondig gereviseerde en geïnspecteerde componenten te installeren of het vervangen door een identiek of gelijksoortig model. BELANGRIJK – DEZE... - Seite 322 3. als gevolg van reparaties die niet door Timex zijn geen uitsluitingen of beperkingen met betrekking tot uitgevoerd, schade toe, zodat deze beperkingen wellicht niet voor u van toepassing zijn. Deze garantie geeft u specifieke 4. als gevolg van ongelukken, knoeien of misbruik en wettelijke rechten en u kunt ook andere rechten hebben 5.
- Seite 323 Voor Portugal 351 212 946 017. Voor Frankrijk 33 3 81 63 ©2010 Timex Group USA, Inc. TIMEX, INDIGLO, INTELLIGENT 42 00. Voor Duitsland/Oostenrijk 43 662 88921 30. Voor QUARTZ en IQ zijn handelsmerken van Timex Group B.V. en zijn het Midden-Oosten en Afrika 971-4-310850. dochterondernemingen.
- Seite 324 TIMEX ® ® Herzlichen Glückwunsch zum Kauf Ihrer TIMEX -Uhr. Bitte lesen Sie die Gebrauchsanweisung für Ihre Timex Uhr genau durch. Ihre Uhr besitzt eventuell nicht alle der hier aufgeführten Funktionen. Um mehr Informationen zu erhalten und Ihr Produkt zu registrieren, gehen Sie bitte zu: www.timex.com...
- Seite 325 INHALT Armband anpassen ............197 Entfernen von Armbandgliedern ........200 Inbetriebnahme der Uhr ..........141 Batterie ................202 Wasserbeständigkeit Garantie ................204 und Stossfestigkeit ............143 Indiglo -Zifferblattbeleuchtung ........145 ® Ewiger Kalender ............. 146 Fly-Back-Chronograph ........... 152 Fly-Back-Chronograph-Kompass ........163 Weltzeit .................
-
Seite 326: Inbetriebnahme Der Uhr
Krone und drücken Sie die Krone gegen das Gehäuse. Zuverlässigkeit und Genauigkeit der analogen Quarz- Der Sekundenzeiger bewegt sich in Sekundenintervallen Zeitmessung. Bei Timex Intelligent Quartz Uhren spiegelt vorwärts. sich die Technologie im Design wider, was dem Ziffernblatt Bei einigen wasserbeständigen Uhren für große völlig neue Ebenen eröffnet. -
Seite 327: Wasserbeständigkeit Und Stossfestigkeit
WASSERBESTÄNDIGKEIT Dazu wird die Krone fest gegen den Gewindeaufsatz gedrückt und gehalten, während die Krone im UND STOSSFESTIGKEIT Uhrzeigersinn hineingeschraubt wird. Drehen Sie die Wasserdichte Uhren sind mit Tiefenangabe in Metern Krone so weit hinein, bis sie fest sitzt. Sie müssen die (WR_M) gekennzeichnet. -
Seite 328: Indiglo ® -Zifferblattbeleuchtung
INDIGLO -ZIFFERBLATTBELEUCHTUNG ACHTUNG: UM BEI UHREN, DIE NICHT BIS ® ZU 200 METERN WASSERBESTÄNDIG SIND, Knopf oder Krone drücken, um Zifferblatt zu beleuchten. WASSERBESTÄNDIGKEIT ZU GEWÄHRLEISTEN, UNTER Die für die INDIGLO -Zifferblattbeleuchtung verwendete ® WASSER KEINE KNÖPFE DRÜCKEN. NIEMALS DIE Elektroleuchttechnik gewährleistet das Aufleuchten des KRONE UNTER WASSER HERAUSZIEHEN. -
Seite 329: Ewiger Kalender
EWIGER KALENDER ÜBERBLICK FUNKTIONEN Datumszeiger Knopf A Tageszeiger Ihr Intelligent Quartz Zeitmesser verfügt über diese ™ (VERTIEFT) Funktionen: Stundenzeiger • Ewiger Kalender – das Datum ist bis zum Jahr 2100 vorprogrammiert 1 2 3 KRONE Minutenzeiger • Anzeige von Wochentag, Monat, Datum •... -
Seite 330: Einführung
Datum akkurat an. Wochentag und Datum wurden AM/PM so einstellen, dass sich das Datum um vom Timex-Werk bereits eingegeben. Sie brauchen nur die Mitternacht – und nicht mittags – ändert. Zeit einzustellen. Die Uhr ist mit zwei vertieften Knöpfen... -
Seite 331: Pflege Und Wartung
Damit Wasserbeständigkeit gewährleistet ist, unter werden. Für Batterieersatz wenden Sie sich bitte an ein Wasser keine Knöpfe drücken. Timex Service Center. 1. Die Uhr ist nur wasserdicht, solange Glas, Knöpfe und Gehäuse intakt sind. 2. Dies ist keine Taucheruhr und sie sollte nicht zum Tauchen benutzt werden. -
Seite 332: Fly-Back-Chronograph
FLY-BACK-CHRONOGRAPH ÜBERBLICK Vierter mittlerer Zeiger FUNKTIONEN Ihr Intelligent Quartz Zeitmesser verfügt über diese Stundenzeiger ™ Oberer Funktionen: Knopf A Zeiger • Fly-Back Chronograph (bis zu 4 Stunden) Chrono- Datumsfenster Stunden • Zweite Zeitzone 2. Zeitzone • INDIGLO Zifferblattbeleuchtung ® KRONE Minutenzeiger Chrono-Minutenskala Sekunden-... -
Seite 333: Einstellung Von Datum Und Zeit
3. Nach dem Einstellen der Zeit Krone in Geschlossen- HINWEIS: Ihre Intelligent Quartz Uhr verfügt über drei ™ position drücken. Der Sekundenzeiger beginnt sich zu Positionen: Normal-, Mittel- und Außenposition. Zur bewegen. Gewöhnung an die unterschiedlichen Positionen, die Krone zuerst in die Außenposition ziehen und sie dann langsam HINWEIS: Für Monate mit weniger als 31 Tagen muss das zurück drücken, bis sie in die Mittelposition einklickt. -
Seite 334: Zweite Zeitzone
3. Nach Einstellung die Krone wieder hineindrücken. EINSTELLEN DER ZEIT IN DER ZWEITEN ZEITZONE: 1. Krone bis zur Mittelposition herausziehen. Der obere ZWEITE ZEITZONE Zeiger zeigt die Zeit in der zweiten Zeitzone an und der Der obere Zeiger zeigt vierte mittlere Zeiger die Minuten. Die Zeiger bewegen die Zeit für die zweite sich gemeinsam, wobei der vierte mittlere Zeiger eine Zeitzone an. - Seite 335 3. A drücken, um den unteren Zeiger in einstündigen vierte mittlere Zeiger zeigt die Sekunden mit Intervallen bis zur gewünschten zweiten Zeitzone 1/5-Sekundenschritten. Der untere Zeiger zeigt die vorzustellen. Den Knopf festhalten für schnellen letzte Minutenstelle, wobei er bis zu zehn zählt Durchlauf des Zeigers.
- Seite 336 5. Zum Zurücksetzen bzw. Neustart des laufenden Fly- PFLEGE UND WARTUNG Back-Chronographs, Knopf B (Fly-back/Reset) drücken. Damit Wasserbeständigkeit gewährleistet ist, unter Knopf für Neustart freigeben. Wasser keine Knöpfe drücken. Die Zeiger brauchen nicht die Null-Positionen zu • Die Uhr ist nur wasserdicht, solange Glas, Knöpfe und erreichen, bevor Knopf B freigegeben wird.
-
Seite 337: Fly-Back-Chronograph-Kompass
• Fly-Back Chronograph (bis zu 4 Stunden) Sobald die Batterie schwach wird, sollte sie sofort ersetzt • Elektronischer Kompass mit magnetischer werden. Deklinationskorrektur Für Batterieersatz wenden Sie sich bitte an ein Timex • Zweite Zeitzone Service Center. • Tachymeter (einige Modelle) • INDIGLO Zifferblattbeleuchtung ®... - Seite 338 HINWEIS: Ihre Intelligent Quartz Uhr verfügt über drei ™ ÜBERBLICK Positionen: Normal-, Mittel- und Außenposition. Zur Vierter mittlerer Zeiger Gewöhnung an die unterschiedlichen Positionen, die Minutenzeiger Krone zuerst in die Außenposition ziehen und sie dann Knopf A langsam zurück drücken, bis sie in die Mittelposition Oberer Zeiger Datumsfenster einklickt.
- Seite 339 Das Datum während dieses Zeitrahmens nicht manuell ZWEITE ZEITZONE ändern, da dies Schäden am Uhrwerk verursachen Der obere Zeiger zeigt die Zeit für die zweite Zeitzone könnte. an. Beachten Sie, dass es eine 24-Stundenskala ist mit Mitternacht als Endpunkte und Mittag in der Mitte. 3.
- Seite 340 2. B drücken, um den vierten mittleren Zeiger vorwärts 24-Stundenskala anzuzeigen. Bei Einstellung der zweiten zu drehen. Den Knopf festhalten für schnellen Zeit auf diese Weise bitte beachten, dass die Minuten-/ Durchlauf des Zeigers. Die Zeiger bewegen sich Stundenanzeige der 24-Stundenanzeige entspricht und gemeinsam, wobei der vierte mittlere Zeiger eine volle sich das Datum um Mitternacht ändert und nicht mittags.
- Seite 341 Gesamtzeit, inkl. Stunden und Minuten, mit Divisionen alle werden soll. Man muss nicht warten, bis alle Zeiger zehn Minuten. Der Chronograph misst bis zu vier Stunden auf Null stehen, bevor der Knopf losgelassen wird; die und hört dann automatisch auf. Zeitmessung beginnt, sobald der Knopf losgelassen wird.
-
Seite 342: Kompasskalibrierung
Starten Sie den Chronographen bei der ersten Meilen- mittlere Zeiger steht auf 80, dann ist die Geschwindigkeit oder Kilometer-Markierung, indem Sie A (START/STOP) 40 Kilometer pro Stunde (1/2 x 80). drücken. Beenden Sie danach die Zeitmessung bei der KOMPASSKALIBRIERUNG nächsten Meilen- oder Kilometer-Markierung, indem Sie Der Kompass muss vor dem Gebrauch kalibriert werden. - Seite 343 Wie bei allen Kompassen ist es wichtig, den Kompass bei Kompass kalibrieren: der Kalibrierung und Richtungsfindung eben zu halten. 1. Krone zur Mittelposition herausziehen und warten, bis Anderenfalls kann es zu großen Ungenauigkeiten führen. die Zeiger still stehen. Bereiche mit übermäßiger Konzentration von Eisen 2.
- Seite 344 6. Drücken Sie A (-) oder B (+), um den vierten mittleren Zeiger nach Westen (-) oder Osten (+) zu bewegen, um mit Hilfe der Deklinationsskala (siehe unten) auf die magnetische Deklination Ihres Standortes zu zeigen. Den Knopf festhalten für beschleunigten Durchlauf des Zeigers.
-
Seite 345: Magnetische Deklination
Norden zeigt. Oder die Uhr gleicht dieses Jerusalem ..4O Paris ....1W Waterbury, CT ..14W automatisch aus, indem die magnetische Deklination Für weitere Information über magnetische Deklination gehen Sie zu www.timex.com nach der Kompasskalibrierung eingestellt wird (siehe... - Seite 346 Funktion zurück. Dadurch wird die Batterie geschont. C KOMPASSFUNKTIONEN (COMPASS) kann jederzeit nochmals gedrückt werden, um Vor dem Gebrauch ist der Kompass ausgestellt, und der den Kompass für weitere 20 Sekunden zu aktivieren. vierte mittlere Zeiger steht auf 12.00 Uhr oder zeigt die Stoppuhrsekunden.
-
Seite 347: Benutzung Des Kompass
WELTZEIT BENUTZUNG DES KOMPASS Nach dem Aktivieren des Kompasses kann er FUNKTIONEN üblicherweise auf zwei Arten benutzt werden. Ihr Intelligent Quartz Zeitmesser verfügt über diese ™ In welche Richtung bewege ich mich? Halten Sie Funktionen: die Uhr so, dass 12.00 Uhr die Richtung ist, in die Sie •... - Seite 348 Die Krone Ihrer Intelligent Quartz Uhr verfügt über drei ÜBERBLICK ™ Positionen: Normal-, Mittel- und Außenposition. Zur 24 Städte Gewöhnung an die unterschiedlichen Positionen die Stundenzeiger Vierter mittlerer Zeiger Oberer Zeiger Krone zuerst in die Außenposition ziehen und sie dann langsam zurück drücken, bis sie in die Mittelposition Weltzeitskala Knopf A...
- Seite 349 ändern, da dies Schäden am Uhrwerk verursachen HINWEIS: Wird 5 Sekunden lang kein Knopf gedrückt, könnte. nachdem die Zeiger still stehen, geht die Uhr weiter zur Weltzeiteinstellung (siehe WELTZEIT EINSTELLEN). 3. Nach Einstellung die Krone wieder hineindrücken. STADTZEITANZEIGE Für Monate mit weniger als 31 Tagen muss das Datum A oder B drücken und den angepasst werden.
-
Seite 350: Jahreszeit Einstellen
Ist eine Stadt auf SOMMER eingestellt, stehen alle Städte JAHRESZEIT EINSTELLEN in derselben Hemisphäre auch auf SOMMER; alle Städte in Die Jahreszeitfunktion passt die Sommerzeit automatisch der anderen Hemisphäre befinden sich dann automatisch auf WINTER. Die Uhr ordnet die Städte der korrekten Städte, die auf Sommerzeit umstellen, führen dies zu Hemisphäre zu. -
Seite 351: Einstellen Der Weltzeit
Zeiger zeigt die jeweilige Stadt einer Fällen stimmt jedoch die Jahreszeit für die meisten Städte bestimmten Weltzeitzone an und der obere Zeiger die überein. Mehr Information unter timex.com. entsprechende Weltzeit. Bei der Weltzeiteinstellung wird eine Stadt innerhalb Ihrer Zeitzone gewählt und dann die Zeit in dieser Stadt Ihrer lokalen Zeit gleichgestellt. - Seite 352 2. A oder B drücken und den mittleren Zeiger zu 4. Erscheint die inkorrekte Jahreszeit für die derjenigen Stadt drehen, die Ihrer Ortszeit entspricht. Standardzeitzone, C drücken, um sie zu ändern. Hat Den Knopf festhalten für beschleunigten Durchlauf des die Standardzeitzone Sommerzeit, rückt der obere Zeigers.
-
Seite 353: Tachymeter Funktion
Batterie ist abhängig vom tatsächlichen Gebrauch. 2. Chronograph starten, sobald das Ziel für die Sobald die Batterie schwach wird, sollte sie sofort ersetzt Geschwindigkeitserfassung den Startpunkt werden. Für Batterieersatz wenden Sie sich bitte an ein durchlaufen hat. Timex Service Center. -
Seite 354: Armband Anpassen
3. Chronograph stoppen, sobald das Ziel für die 3. Verschlussplatte festhalten und Schließvorrichtung Geschwindigkeitserfassung den Endpunkt hin und her bewegen, bis sie in die Rillen an der durchlaufen hat. Unterseite des Armbandes einrastet. 4. Der Sekundenzeiger des Chronographen wird 4. Verschlussplatte andrücken, bis sie einklinkt. mit den Tachymeter-Punkten verglichen, um die Nicht gewaltsam schließen. -
Seite 355: Entfernen Von Armbandgliedern
4. Feder herunterdrücken und in das Loch an der ENTFERNEN VON ARMBANDGLIEDERN Oberseite gleiten lassen, um das Armband zu GLIEDER ENTFERNEN: befestigen. 1. Armband aufrecht stellen und mit einem spitzen Gegenstand in die Gliedöffnung stechen. 2. Stift in Pfeilrichtung kräftig herausdrücken, bis Glied sich löst. - Seite 356 Wir empfehlen, den Austausch der Batterie nur von TIMEX In allen anderen Ländern wird Ihnen Timex die Porto- und vornehmen zu lassen. Nach dem Batteriewechsel muss Verpackungskosten in Rechnung stellen. Ihre Uhr für die korrekte Zeit- und Datumseinstellung KEINE BESONDEREN ARMBÄNDER ODER ANDERE neu kalibriert werden.
-
Seite 357: Timex Internationale Garantie
TIMEX INTERNATIONALE GARANTIE 1. wenn die Garantiezeit abgelaufen ist; 2. wenn das Produkt ursprünglich nicht von einem Für Ihr Produkt übernimmt die Timex Group USA, Inc. autorisierten Timex-Händler gekauft wurde; eine Garantie auf Herstellungsmängel für die Dauer EINES JAHRES vom Original-Verkaufsdatum. Timex und ihre Partner 3. - Seite 358 Rechnung. KEINE BESONDEREN ARMBÄNDER ODER ANDERE ARTIKEL MIT PERSÖNLICHEM WERT BEIFÜGEN. Um den Garantie-Service in Anspruch zu nehmen, senden Sie Ihre Uhr an Timex, einen Timex-Partner oder Für die USA erhalten Sie zusätzliche Garantie- den Timex-Einzelhändler, bei dem Sie die Uhr gekauft informationen unter der Nummer 1 800 448 4639.
-
Seite 359: Erweiterte Garantie
Scheck i.H.v. $ 5 an Timex Extended Warranty, P.O. Box 1676, Dept. EF, Little Rock, AR 72203 schicken. ©2010 Timex Group USA, Inc. TIMEX, INDIGLO, INTELLIGENT QUARTZ und IQ sind Marken der Timex Group B.V. und ihren angeschlossenen Unternehmen. - Seite 360 TIMEX WATCHES ® ® Congratulazioni per l’acquisto di un orologio TIMEX Si prega di leggere attentamente le istruzioni per capire come usare l’orologio Timex. L’orologio in dotazione potrebbe non disporre di tutte le funzioni descritte in questo opuscolo. Per ulteriori informazioni e per registrare il prodotto, visitare il sito: www.timex.com...
- Seite 361 INDICE ANALITICO Rimozione delle maglie del bracciale ......272 Batteria ................273 Come avviare l’orologio ..........213 Garanzia ................. 274 Resistenza all’acqua e agli urti ........214 Illuminazione del quadrante Indiglo ......216 ® Calendario perpetuo ............217 Cronografo Fly-back (con ritorno indietro) ....223 Bussola del cronografo Fly-back ........
- Seite 362 , il futuro della tecnologia analogica al quarzo. ™ (Non pertiene ai modelli con calendario perpetuo.) Per La tecnologia Timex Intelligent Quartz unisce il potere di avviare l’orologio, rimuovere la protezione di plastica da un microprocessore all’affidabilità e all’accuratezza della sotto la corona, quindi premere la corona in dentro, contro misurazione del tempo analogica al quarzo.
- Seite 363 RESISTENZA ALL’ACQUA E AGLI URTI AVVERTENZA: PER SALVAGUARDARE LA RESISTENZA ALL’ACQUA DELL’OROLOGIO, NON PREMERE ALCUN Se l’orologio in dotazione è impermeabile, riporta una PULSANTE SOTT’ACQUA, A MENO CHE NON SIA dicitura in metri di profondità o il contrassegno (WR_M). INDICATO CHE L’OROLOGIO È IMPERMEABILE FINO A 200 METRI.
-
Seite 364: Illuminazione Del Quadrante Indiglo
agli urti. Occorre tuttavia prestare attenzione per CALENDARIO PERPETUO evitare di danneggiare il cristallo dell’orologio. FUNZIONI ILLUMINAZIONE DEL QUADRANTE INDIGLO ® Il vostro orologio Intelligent Quartz presenta queste ™ caratteristiche. Premere la corona per attivare l’illuminazione del quadrante. La tecnologia elettroluminescente impiegata •... - Seite 365 Lancetta 1 2 3 CORONA parte del Timex Service Center per impostare il giorno e dei minuti la data dopo la sostituzione della batteria. Questi pulsanti Lancetta del non hanno altro uso.
-
Seite 366: Cura E Manutenzione
Timex oppure dopo la sostituzione della batteria, erroneo delle lancette. Le lancette indicatrici ritornano e non può essere cambiata, ma solo visualizzata. quindi a indicare il giorno, il mese e la data. Per visualizzare la compensazione, estrarre la corona nella sua posizione intermedia. - Seite 367 • Secondo fuso orario dell’orologio. La durata effettiva della batteria potrebbe • Illuminazione del quadrante Indiglo ® variare a seconda dell’uso effettivo. Quando la batteria si scarica, farla sostituire prontamente. Per la sostituzione della batteria, si prega di visitare un Timex Service Center.
-
Seite 368: Impostazione Di Data E Ora
PANORAMICA NOTA: Il vostro orologio Intelligent Quartz presenta tre ™ posizioni: chiusa, intermedia, esterna. Per abituarsi alla 4a lancetta centrale differenza fra le varie posizioni, estendere la corona alla Lancetta delle ore sua posizione più esterna, poi spingerla molto leggermente Lancetta Pulsante A finché... -
Seite 369: Secondo Fuso Orario
durante questo periodo, onde evitare di danneggiare il nella sua posizione esterna la quarta lancetta centrale movimento dell’orologio. non punta sulle ore 12, premere il Pulsante A o B per spostare la lancetta in senso antiorario o in senso 3. Dopo aver impostato l’ora, spingere la corona sulla orario finché... - Seite 370 in incrementi di un’ora. In tali casi, il valore dei minuti del quarta lancetta centrale in avanti finché non risulta secondo fuso orario sarà quello visualizzato dalla lancetta allineata con la lancetta dei minuti. Per spostare dei minuti dell’orologio. rapidamente la quarta lancetta centrale, premere e tenere premuto il Pulsante B.
- Seite 371 4. Per azzerare il cronografo fly-back, premere il Pulsante CRONOGRAFO FLY-BACK B (Fly-back/Ripristina). L’orologio è dotato di un cronografo fly-back di 4 ore. Quando il cronografo è ripristinato, tutte le lancette 1. Per avviare, premere il Pulsante A (Avvio/Stop). passano sullo zero. Dopo altri otto secondi, l’orologio La quarta lancetta centrale mostra i secondi con una riprende il normale display del secondo fuso orario.
- Seite 372 Per la sostituzione della batteria, si prega di visitare un sott’acqua. Timex Service Center. • L’orologio è impermeabile solo se il cristallo, il pulsante, la corona e la cassa restano intatti.
- Seite 373 BUSSOLA DEL CRONOGRAFO FLY-BACK PANORAMICA 4a lancetta centrale FUNZIONI Lancetta dei minuti • Cronografo Fly-back (fino a 4 ore) Pulsante A Lancetta • Bussola elettronica con compensazione della superiore Finestrella della data declinazione magnetica Cronografo/Ore secondo fuso • Secondo fuso orario orario 1 2 3 CORONA...
- Seite 374 e le 2 del mattino. Non cambiarla manualmente NOTA: il vostro orologio Intelligent Quartz presenta ™ durante questo periodo, onde evitare di danneggiare il tre posizioni: chiusa, intermedia ed esterna. Per movimento dell’orologio. abituarsi alla differenza fra le varie posizioni, estendere la corona alla sua posizione più...
- Seite 375 la corona alla sua posizione esterna, premere A o La lancetta superiore mostra l’ora del secondo fuso B per spostare la lancetta rispettivamente in senso orario, mentre la 4a lancetta centrale indica i minuti. antiorario od orario, finché non punta sulle ore 12. 2.
- Seite 376 Volendo, l’ora del secondo fuso orario può essere usata inferiore indica l’ultima cifra dei minuti, contando verso per visualizzare la propria ora di casa in un formato a 24 l’alto fino a dieci e ripetendo. La lancetta superiore indica ore. Quando si imposta in questo modo il secondo fuso il tempo totale, incluse le ore ed i minuti, con divisioni orario, assicurarsi che la visualizzazione di ore/minuti ogni dieci minuti.
- Seite 377 Si può anche ripristinare e/o riavviare il cronografo Per iniziare, occorre ripristinare (azzerare) il cronografo. mentre sta scorrendo. Per farlo, premere e tenere Vedere CRONOGRAFO. premuto B (FLY-BACK/RIPRISTINA) per azzerare il Avviare il cronografo al primo marcatore di miglio o cronografo e rilasciarlo quando si desidera riavviarlo.
-
Seite 378: Calibrazione Della Bussola
mezzo miglio, e la 4a lancetta centrale punta su 80, la Nel calibrare e nell’usare la bussola per le letture, è velocità è di 40 miglia all’ora (1/2 x 80). importante, come nel caso di tutte le bussole, mantenerla a livello. In caso contrario, si può incorrere in gravi CALIBRAZIONE DELLA BUSSOLA errori di lettura. - Seite 379 Per calibrare la bussola 1. Estrarre la corona nella sua posizione intermedia e attendere che le lancette indicatrici smettano di muoversi. 2. Tenere l’orologio a livello o posarlo su una superficie a livello (se il cinturino interferisce, mettere l’orologio sopra una tazza capovolta). L’orologio può essere appoggiato sul quadrante, ma fare attenzione a 4.
- Seite 380 automatica per l’angolo di declinazione, girare l’anello della bussola finché il nord non si trova in corrispondenza delle ore 12. 6. Premere A o B per spostare la 4a lancetta centrale rispettivamente verso ovest (-) o verso est (+), per puntare sull’angolo di declinazione della propria ubicazione (vedere la tabella sotto) usando la scala di Declinazione magnetica impostata su -14°...
- Seite 381 4a lancetta centrale Denver ... 9 E Oslo ......1 E Washington DC ..11 O punterà sul nord geografico. Gerusalemme 4 E Parigi ....1 O Waterbury, CT ..14 O Per ulteriori informazioni sulle declinazioni magnetiche, vedere il sito www.timex.com...
- Seite 382 ritorna al suo funzionamento normale. In questo modo FUNZIONAMENTO DELLA BUSSOLA si risparmia il consumo della batteria. Per riattivare la Di solito, la bussola è inattiva, con la 4a lancetta centrale bussola per altri 20 secondi, premere di nuovo il pulsante che punta sulle ore 12 o indica i secondi del cronografo.
- Seite 383 la bussola. Questo funzionamento è normale e offre la girare il proprio corpo finché la 4a lancetta centrale non lettura più accurata della bussola. punta a nord sull’anello della bussola. Ora si è rivolti verso la direzione nella quale ci si vuole spostare. USO DELLA BUSSOLA ORA MONDIALE Una volta attivata la bussola, sono due i modi in cui essa...
- Seite 384 La corona del vostro orologio Intelligent Quartz PANORAMICA ™ presenta tre posizioni: chiusa, intermedia ed esterna. Per 24 città abituarsi alla differenza fra le varie posizioni, estendere Lancetta delle ore Lancetta la corona alla sua posizione più esterna, poi spingerla 4a lancetta centrale superiore molto leggermente finché...
- Seite 385 la data giusta. Nota: la data cambia fra le 10 di sera Se non lo fa entro 5 secondi da quando si è estratta e le 2 del mattino. Non cambiarla manualmente la corona alla sua posizione esterna, premere A o durante questo periodo, onde evitare di danneggiare il B per spostare la lancetta rispettivamente in senso movimento dell’orologio.
- Seite 386 VISUALIZZAZIONE DELL’ORA DELLE CITTÀ IMPOSTAZIONE DELLA STAGIONE L’impostazione della stagione permette all’orologio di Premere A o B per compensare per l’ora legale (detta anche “ora estiva”). spostare la lancetta centrale rispettivamente In città diverse l’ora legale entra in vigore (e scade) in date all’indietro o in avanti diverse, mentre alcune città...
- Seite 387 INVERNO. L’orologio sa quali città si trovano in ciascun per tutte le città. Per ulteriori informazioni, andare al sito emisfero. timex.com. ESEMPIO: l’Australia e gran parte dell’Europa cambiano L’impostazione dell’ora mondiale consiste nella selezione l’ora in marzo e ottobre. Se come città si sceglie Parigi, di una città...
- Seite 388 2. Premere A o B per selezionare la città che rappresenta PER IMPOSTARE L’ORA MONDIALE il proprio fuso orario locale. Tenere premuto un 1. Estrarre la corona nella sua posizione intermedia. pulsante per spostare la lancetta rapidamente. Si può La lancetta centrale indica la città del fuso orario usare qualsiasi città.
- Seite 389 10 secondi dopo che la corona viene estratta nella sua CURA E MANUTENZIONE posizione esterna.) Per salvaguardare la resistenza all’acqua dell’orologio, non premere alcun pulsante sott’acqua. 4. Se la stagione visualizzata non è quella giusta per il fuso orario locale, premere C per cambiarla. Se il fuso 1.
- Seite 390 Per la sostituzione della batteria, si prega di visitare un 3. Fermare il cronografo una volta che l’obiettivo della Timex Service Center. misurazione di velocità supera il marcatore di fine. FUNZIONAMENTO DEL TACHIMETRO 4.
- Seite 391 3. Tenendo la piastrina di chiusura, esercitare pressione 4. Premere la barretta a molla, allinearla con il foro su di essa e far scorrere avanti e indietro il fermaglio superiore, quindi rilasciarla per bloccare il bracciale in finché non si innesta nelle scanalature presenti nella posizione.
- Seite 392 2. Spingere di nuovo lo spillo nella maglia, in direzione Canada; un assegno o vaglia da UK£ 2,50 nel Regno Unito. opposta alla freccia. Negli altri Paesi, la Timex addebiterà il cliente per le spese 3. Premere con fermezza lo spillo nel bracciale finché di spedizione e la gestione.
-
Seite 393: Garanzia Internazionale Timex
è garantito contro difetti di produzione ® dalla Timex Group USA, Inc. per un periodo di UN ANNO 5. a lenti o cristallo, cinturino in pelle o a catena, cassa dalla data di acquisto originaria. Timex e le sue affiliate di dell’orologio, periferiche o batteria. - Seite 394 Canada; un assegno o vaglia da UK£ 2,50 nel Regno Unito. potrebbero non pertenere al cliente. Questa garanzia dà Negli altri Paesi, la Timex addebiterà il cliente per le spese al cliente diritti legali specifici, e il cliente potrebbe avere di spedizione e la gestione.
- Seite 395 5 dollari USA a: Timex Extended Warranty, P.O. Box 1676, Dept. EF, Little Rock, AR 72203. ©2010 Timex Group USA, Inc. TIMEX, INDIGLO, INTELLIGENT QUARTZ ED IQ sono marchi commerciali del Timex Group B.V. e delle sue sussidiarie.
- Seite 396 Perpetual Calendar Fly Back Chronograph • Flyback Chrono Compass World Time 年历 飞返计时码表 • 飞返计时码表指南针 世界时间 万年カレンダー フライバッククロノグラフ • フライバッククロノコンパス ワールドタイ ム Вечный календарь Хронограф с функцией обратного хода • Компас-хронограф ™ с функцией обратного хода Мировое время W268 AS 350-095003...
- Seite 397 English......... Page.1 中文........页码.67 日本語........ページ 123 Pусский........ страница.183...
- Seite 398 TIMEX WATCHES ® Congratulations on purchasing your TIMEX ® watch. Please read these instructions carefully to understand how to operate your Timex watch. Your watch may not have all of the features described in this booklet. For more information, and to register your product please visit: www.timex.com...
- Seite 399 TABLE OF CONTENTS Bracelet Link Removal ............59 Battery ................60 How to Start Your Watch ............ 5 Warranty ................61 Water and Shock Resistance ..........6 Indiglo Night-Light ............8 ® Perpetual Calendar ............9 Fly-Back Chronograph ............15 Flyback Chronograph Compass ........
-
Seite 400: How To Start Your Watch
(Does not apply to Perpetual Calendar models.) To start Timex Intelligent Quartz technology brings the power your watch remove the plastic guard from under the of a micro-processor to the reliability and accuracy of crown, then press the crown in against the case. -
Seite 401: Water And Shock Resistance
WATER AND SHOCK RESISTANCE WARNING: TO MAINTAIN WATER-RESISTANCE, DO NOT PRESS ANY BUTTONS UNDER WATER UNLESS If your watch is water-resistant, meter marking (WR_M) YOUR WATCH IS INDICATED AS 200 METER WATER- is indicated. RESISTANT. NEVER PULL OUT THE CROWN WHILE UNDER WATER. -
Seite 402: Indiglo ® Night-Light
INDIGLO NIGHT-LIGHT PERPETUAL CALENDAR ® Press button or crown to activate light. FEATURES Electroluminescent technology used in the INDIGLO Your Intelligent Quartz time instrument has these ® ™ night-light illuminates entire watch face at night and in features: low light conditions. •... - Seite 403 Timex factory. You only need to adjust Hour Hand the time. The watch has two recessed push buttons for use by Timex Service Center to set the day and date after CROWN 1 2 3 Minute Hand battery replacement.
-
Seite 404: Care And Maintenance
2. The watch is not a diver watch and should not be used for the current leap year offset. This setting is made at the for diving. Timex factory or after battery replacement and cannot be 3. Rinse the watch with fresh water after exposure to changed, only viewed. -
Seite 405: Fly-Back Chronograph
When the battery is depleted, have it replaced promptly. FLY-BACK CHRONOGRAPH For battery replacement, please visit a Timex Service FEATURES Center. Your Intelligent Quartz time instrument has these ™ features: • Fly-back chronograph (up to 4 hours) • Second time zone •... -
Seite 406: Date And Time Setting
OVERVIEW NOTE: Your Intelligent Quartz watch crown has three ™ positions: closed, middle, and outer. To familiarize yourself 4th Center Hand to the difference between the various positions, extend Hour Hand the crown to its outer position and then push the crown Button A very lightly until you feel it click into the middle position. -
Seite 407: Second Time Zone
3. Push crown to closed position after setting time. The SECOND TIME ZONE second hand will begin moving. The upper hand shows the time for the second time zone. Note that the scale NOTE: For months with fewer than 31 days, the date will is 24-hours, with midnight need to be adjusted. - Seite 408 hand shows the minutes. The upper and 4th center NOTE: The second time zone can alternatively be used to hands move together. As the 4th center hand makes display your home time on a 24-hour format, if you prefer. one revolution, the upper hand moves one hour. When setting the second time in this manner, ensure that the hour/minute display corresponds to the 24-hour 2.
- Seite 409 2. To stop, press Button A (Start/Stop) again. All hands timing from time of button release. This “fly-back” stop moving. feature allows for the measurement of lap time. 3. To resume, press Button A (Start/Stop) again. CARE AND MAINTENANCE 4. To reset the fly-back chronograph to zero position, To maintain water-resistance, do not press or pull any press Button B (Fly-back/Reset).
-
Seite 410: Flyback Chronograph Compass
The actual battery life will vary based on individual use. FEATURES When the battery is depleted, have it replaced promptly. • Fly-back chronograph (up to 4 hours) For battery replacement, please visit an TIMEX SERVICE • Electronic compass with magnetic declination CENTER. compensation •... - Seite 411 OVERVIEW NOTE: Your Intelligent Quartz watch crown has three ™ positions: closed, middle and outer. To familiarize yourself 4th Center Hand to the difference between the various positions extend Minute Hand the crown to its outer position and then push the crown Button A very lightly until you feel it click into the middle position.
- Seite 412 3. Push the crown in when finished. SECOND TIME ZONE The upper hand normally shows the time for the second For months with fewer than 31 days, the date will need time zone. Note that the scale is 24 hours, with midnight to be adjusted.
- Seite 413 2. Press B to move the 4th center hand forward. Hold the CHRONOGRAPH button to move the hand quickly. The upper and 4th The watch provides a 4-hour fly-back chronograph. center hands move together; as the 4th center hand To start, press A (START/STOP). The 4th center hand makes one revolution, the upper hand moves one shows the seconds with 1/5-second resolution and the hour.
- Seite 414 To stop, press A again (START/STOP). All hands freeze. running without interfering with its operation. See COMPASS OPERATION. To resume, press A (START/STOP) again, or to reset the chronograph to zero, press B (FLY-BACK/RESET). TACHYMETER Your watch may include a tachymeter scale, which can be When the chronograph is reset, all hands move to zero.
- Seite 415 Press B (FLYBACK/RESET) to reset (zero) the chronograph. is calibrated away from such objects, it will not work properly near them. For best results, calibrate in the area When using distances other than one mile or kilometer, of intended use. multiply the result by the distance.
- Seite 416 To calibrate the compass: 1. Pull the crown to its middle position and wait for the indicator hands to stop moving. 2. Keep the watch level or place it on a level surface (if the band interferes, place the watch on an inverted cup).
- Seite 417 6. Press A or B to move the 4th center hand west (-) MAGNETIC DECLINATION or east (+), respectively, to point to your location’s A compass needle points to “magnetic north,” which may declination angle (see table on the following page) be slightly different from “true north,”...
- Seite 418 Paris ....1W Waterbury, CT ..14W While holding the watch level, press C (COMPASS) to For further magnetic declination information, see www.timex.com activate the compass. The compass hand moves to point north. If the watch is turned, the 4th center hand will continue to move, always pointing north.
- Seite 419 conserves battery life. Press C (COMPASS) at any time to COMPASS USE keep the compass on for another 20 seconds. Once the compass is activated, there are two typical ways to use it. The compass may be activated while the chronograph is Which way am I headed? Hold the watch so that 12 in use.
-
Seite 420: Worldtime
WORLDTIME OVERVIEW FEATURES 24 cities Your Intelligent Quartz time instrument has these ™ Hour Hand features: Upper Hand 4th Center Hand World Time Button A • Time display capability for 24 locations around the Scale world Date Window • Season setting display Minute Hand CROWN •... - Seite 421 Your Intelligent Quartz watch crown has three positions: 3. Push the crown in when finished. ™ closed, middle and outer. To familiarize yourself to the For months with fewer than 31 days, the date will need difference between the various positions extend the to be adjusted.
- Seite 422 NOTE: If no button is pressed for five seconds after the SEASON SETTING hands stop, the watch proceeds to the world time setting The season setting allows the watch to compensate for operation (see WORLD TIME SETTING). daylight savings time (also called “summer time”). CITY TIME DISPLAY Different cities go on and off daylight savings time on Press A or B to move the...
- Seite 423 WINTER. The watch knows which cities are in each setting will be correct for all cities. For more information, hemisphere. see timex.com. EXAMPLE: Australia and much of Europe change time in Setting the world time consists of selecting a city within March and October.
- Seite 424 move the hand quickly. Any city may be used. TO SET THE WORLD TIME: 1. Pull the crown to its middle position. The center hand 3. Pull the crown to its outer position. The city selector shows the world time zone city and the upper hand hand will revert back to the 12:00 position as indicated shows the world time.
- Seite 425 The actual battery life may vary depending on actual use. hands should be aligned. When the battery is depleted, have it replaced promptly. 6. Push the crown in when finished. For battery replacement, please visit a Timex Service CARE AND MAINTENANCE Center. To maintain water-resistance, do not press any buttons under water.
-
Seite 426: Tachymeter Function
TACHYMETER FUNCTION 4. The chronograph second hand is compared to the tachymeter markings to determine the target’s speed. (not all models) The tachymeter will only determine speeds greater than HOW TO ADJUST BRACELET 60 units per hour using this method; slower speeds can (Variations of the following bracelet sections apply to all be measured by decreasing the unit of measurement. -
Seite 427: Bracelet Link Removal
BRACELET LINK REMOVAL FOLDOVER CLASP BRACELET 1. Find spring bar that connects bracelet to clasp. REMOVING LINKS: 1. Place bracelet upright and insert pointed tool in 2. Using a pointed tool, push in spring bar and gently opening of link. twist bracelet to disengage. -
Seite 428: Battery
RECHARGE. KEEP LOOSE BATTERIES AWAY FROM When the battery needs to be changed, we recommend CHILDREN. that only TIMEX replace it. Your watch will need to be recalibrated to correct time and date after changing the TIMEX INTERNATIONAL WARRANTY battery. To return your watch to Timex use a pre-paid shipper. - Seite 429 To obtain warranty service, please return your watch to 5. lens or crystal, strap or band, watch case, attachments Timex, one of its affiliates or the Timex retailer where or battery. Timex may charge you for replacing any of the watch was purchased, together with a completed these parts.
- Seite 430 Portugal, call 351 212 946 017. For France, call 33 3 81 63 ©2010 Timex Group USA, Inc. TIMEX, INDIGLO, INTELLIGENT QUARTZ 42 00. For Germany/Austria, call 43 662 88921 30. For the AND IQ are trademarks of Timex Group B.V. and its subsidiaries. Middle East and Africa, call 971-4-310850.
- Seite 431 TIMEX ® 手表 感谢您选购 TIMEX 手表。请仔细阅读下面的说明,以了解 ® Timex 手表的操作方法。 您的手表不一定具备本手册描述的全部功能。 欲知更多详情及注册自己 的产品,请访问: www.timex.com...
- Seite 432 目录 拆卸表带环扣................电池..................启用方法..................全球联保.................. 防水防震..................Indiglo 夜间照明灯..............® 万年历..................飞返计时码表................飞返计时码表指南针..............世界时间.................. 测速计功能................如何调整表带................
-
Seite 433: 启用方法
启用方法 欢迎光临 Timex Intelligent Quartz 表的世界:石英模拟 ® ™ 技术的未来。 Timex Intelligent Quartz (智能石英)技术为石 不适用于带万年历的款式 要启用手表,请从表冠下方揭掉 英模拟计时的可靠性和准确性赋予微处理器的动力。 Timex 塑料保护罩,然后将表冠按向表壳。此时,秒针将以 秒为 Intelligent Quartz 表的内在设计具有该项技术,从而推出新水 间隔开始向前走动。 准的表盘复杂度。装备三个额外独行指针,在传统的模拟格 有些防水表型需要将表冠旋入固定,以确保防水性能。如果 式中显示通常仅出现在数字表上的多重信息。 您的表壳上有带镙纹的凸起部分,则必须在设置好手表后 将表冠旋入。 旋入时,请将表冠紧贴带螺纹的凸起部分,同时沿顺时针方 向旋转表冠。继续旋转直到将表冠拧紧。下一次设置手表 时,需要先旋出表冠(沿逆时针方向)才能将其拔出。... -
Seite 434: 防水防震
防水防震 警告:为保持防水性能,请勿在水中按任何键钮,除非您的 手表标明其防水深度为 米。切勿在水中将表冠拔出。 如果您的手表具有防水性能,则会显示米数刻度( )。 WR_M 只有在水晶镜面、表冠和表壳保持完整无损的情况下, 手表才具有防水性能。 防水深度 p.s.i.a. * 水压 水面以下 本表非潜水用手表,不宜在潜水时使用。 接触盐水后,请用清水冲洗。 30米/98英尺 表盘上或表壳背面会注明手表是否具有防震性能。本表 的防震设计通过了 国际标准测试。但应注意避免损坏 50米/164英尺 水晶镜面。 100米/328英尺 200米/656英尺 *按磅计算的每平方英寸压力绝对值... -
Seite 435: Indiglo ® 夜间照明灯
万年历 INDIGLO 夜间照明灯 ® 特色 按下键钮或表冠打开照明灯。 INDIGLO 夜间照明灯采用了电 ® 您的 Intelligent Quartz 手表具有以下特色: ™ 致发光技术,可在夜间和低光度环境下照亮整个表盘。 • 万年历- 2100 年之前的日期永远准确 • 星期、月份、日期显示 夜间照明灯 • Indiglo ®... - Seite 436 概览 介绍 您的手表拥有万年历功能, 年之前都无需调校日期。手 2100 日期指针 表将根据小月和闰年自动调整,永远正确显示星期和日期。 键钮 星期和日期已在 Timex 工厂预先设置。您只需要调校一下时 星期指针 (嵌入) 间。手表有两个嵌入键钮,供 Timex 服务中心在更换电池后用 时针 于设置星期和日期。除此之外,没有其它用途。 时间设置 1 2 3 分针 表冠 要设置时间: 将表冠拔出至外部档位。所有指针移到刻度尽头,进行 自动调校。这样就校准了所有指针。然后指针恢复指示 月份指针 星期、月和日期。 键钮 秒针 旋转表冠,直到指示正确的时间。时间指针在午夜 点 (嵌入) 两侧移动时,星期和日期会自动改变。 关闭 中间 外部 完成后将表冠按回。 档位...
-
Seite 437: 飞返计时码表
闰年调整 手表正常使用时电池可维持 年。电池寿命长短取决于实际 为保证日期正确,手表包含了当前闰年调整设置。此设置在 使用方式。 Timex 出厂时或在电池更换后完成,仅可查看,不可变更。 电池电量耗尽后,请及时更换。要更换电池,请访问 Timex 要查看调整数,将表冠拔到中间档位。日期指针指示调整 服务中心。 数: 闰年后 年; 闰年后 年; 润年后 年; 闰年。 完成后将表冠按回,指针恢复指示星期、月份和日期。 飞返计时码表 保养和维护 特色 为保持防水性能,请勿在水中按任何键钮。 您的 Intelligent Quartz 手表具有以下特色: ™ 只有在镜面、键钮和表壳完好无损的情况下,本表才能 • 飞返计时码表(最长 小时) 保持防水性能。 • 第二时区 本表非潜水用手表,不宜在潜水时使用。 • Indiglo 夜间照明灯... - Seite 438 概览 注:您的 Intelligent Quartz 手表表冠有三个档位:关闭、中 ™ 第4中心指针 间和外部档位。为熟悉表冠的不同档位,请将表冠拔出至外 时针 部档位,然后轻按表冠直至您感觉到其扣进中间档位。 键钮 时间和日期设置 上端指针 要设置日期和时间: 日期显示窗 计时码表时钟. 将表冠拔出至外部档位,然后转动表冠直至显示出正确 第二时区 的时间。检查日期是在午夜而不是正午改变的,以确认 表冠 AM/PM 设置正确。 分针 将表冠拔出至中间档位,然后转动表冠直至日期显示窗 计时码表分钟刻度 显示出正确的日期。注: 日期在下午 10 pm 和凌晨 2 am 之 键钮 间变动。请勿在此时间段变动日期。这样做可能会损坏 秒针 手表机芯。 下端指针 设置时间后,将表冠推回至关闭档位。此时,秒针将开 关闭 中间...
- Seite 439 第二时区 第 中心指针调整 上端指针指示的是第二时区的时间。请注意:刻度为 小时 要重调偏离的第 中心指针: 制式,两端为午夜,中间为 将表冠拔出至外部档位。上端指针和下端指针自动重置 正午。大多数情况下,各时 至刻度尽头。 区之间的差异是时钟的递增 第 中心指针应指向 点方向。如果在表冠拔出至外部档 量。因此,第二时区的分钟 位 秒内第 中心指针未指向 点方向,可按键钮 或 , 数将会与手表分针显示的分 将指针逆时针或顺时针转动直至其指向 点方向。 钟数相同。 调整完成后,将表冠推回至关闭档位。 要设置第二时区: 将表冠拔出至中间档 位。上端指针指示第二时区的时间,第 中心指针指示分 钟。上端指针和第 中心指针同时转动。第 中心指针转 一圈,上端指针走一小时。 假设第二时区时间的分钟值与第一时区时间保持一致, 那么第 中心指针和分针应保持重合。如果指针未重合,...
- Seite 440 请按键钮 ,向前调第 中心指针,直至其与分针重合。 次总时间,包括小时和分钟。计时码表计时到 小时后自 要快速转动第 中心指针,可按住键钮 。 动停止。 按键钮 将上端指针以一小时为递增量向前调,直至达到 . 再次按键钮 (开始/停止)可停止计时。所有指针停止转 所需的第二时区时钟。要快速转动指针,可按住键钮 。 动。 完成后将表冠按回。 再按键钮 (开始/停止)可恢复计时。 注:如果您愿意,第二时区时间也可以 小时制式显示您 要将飞返计时码表重置归零,按键钮 (飞返/重置)。 的本地时间。以此方式设置第二时区时,请检查日期是在 计时码表重置时,所有指针归零。再过 秒种后,手表恢 午夜而不是正午改变的,以确保时钟/分钟的显示采用的是 复正常显示第二时区的时间。 小时制式。 要在飞返计时码表运行时重置和/或重启它,可按住键钮 飞返计时码表 (飞返/重置)。在要重启时,松开键钮 。 本表提供 小时飞返计时码表功能。 在松开键钮 之前,指针不需要归零。如果在指针归零之 按键钮 (开始/停止)开始计时。 前松开了键钮...
-
Seite 441: 飞返计时码表指南针
飞返计时码表指南针 保养和维护 为保持手表的防水性能,请不要在水下按动任何键钮或拔 特色 出表冠。 • 飞返计时码表(最长 小时) • 只有在水晶镜面、键钮、表冠和表壳完好无损的情况下, • 带磁偏角矫正功能的电子指南针 本表才能保持防水性能。 • 第二时区 • 本表非潜水用手表,不宜在潜水时使用。 测速计(选定款式) • • 接触盐水后,请用清水冲洗。 • INDIGLO 夜间照明灯 ® • 本表可用软布和中性肥皂在温水中清洗。 手表正常使用时电池可维持 年。电池寿命长短取决于实际 使用方式。 电池电量耗尽后,请及时更换。 要更换电池,请访问 Timex 服务中心。... - Seite 442 概览 注:您的 Intelligent Quartz 手表表冠有三个档位:关闭、中 ™ 间和外部档位为习惯表冠的不同档位,请将表冠拔出至外部 第4中心指针 档位,然后轻按表冠直至您感觉到其扣进中间档位。 分针 键钮 时间和日期设置 上端指针 要设置日期和时间: 日期显示窗 计时码表/. 将表冠拔出至外部档位,然后转动表冠直至显示出正确 时钟. 第二时区 的时间。检查日期是在午夜而不是正午改变的,以确认 表冠 1 2 3 AM/PM 设置正确。 时针 将表冠拔出至中间档位,然后转动表冠直至日期显示窗 计时码表分钟刻度 显示出正确的日期。注: 日期在下午 10 pm 和凌晨 2 am 之 键钮 键钮 间变动。请勿在此时间段变动日期。这样做可能会损坏 手表机芯。...
- Seite 443 指针 第二时区 第 中心指针 调整 上端指针正常指示的是第二时区时间。请注意刻度为 小时 要重调偏离的指针: 制式,两端为午夜,中间为正午。 将表冠拔出至外部档位。上端指针和下端指针自动重置 设置第二时区时间: 至刻度尽头。 将表冠拔出至中间档 . 第 中心指针应指向 点方向。如果指针没有指向该方 位。上端指针以 小时 向,则在拔出表冠至外部档位 秒内按键钮 或 ,将指针 格式指示第二时区的时 分别逆时针或顺时针转动直至指向 点方向。 钟,而第 中心指针指 1 2 3 示分钟。 完成后将表冠按回。...
- Seite 444 计时码表 按键钮 向前移动第 中心指针。按住键钮可快速移动指 本表提供 小时飞返计时码 针。上端指针和第 中心指针同时转动,第 中心指针转 表功能。 一圈,上端指针走一小时。假设第二时区时间在分钟上 与您的第一时区时间保持一致,那么第 中心指针和分针 按 (开始/停止)开始计 应保持重合。 时。第 中心指针以 秒 1 2 3 分辨度显示秒数。下端指 . 按键钮 将上端指针以一小时为递增量移动。按住键钮可 针显示分钟的最后一位数 快速移动指针。 字,数到 后重复。上端 . 完成后将表冠按回。 指针每 分钟显示一次总 如果您愿意,第二时区时间也可以 小时制式显示您本地时 时间,包括小时和分钟。 间。以此方式设置第二时区时,请检查日期是在午夜而不是 计时码表计时到 小时后 正午改变的,以确保时钟/分钟的显示采用的是...
- Seite 445 计时码表重置时,所有指针归零。八秒种后,手表恢复正常 请注意两个标志间隔的时间必须小于一分钟。 指示第二时区时间。您也可在计时码表运行过程中重置及/或 按键钮 (飞返/重置)将计时码表重置(归零)。 重新开始。如果要这么做,按住 (飞返/重置),将计时码表 不用一英里或一公里表示距离时,将得数乘以距离。举例来 归零,等您想重新开始的时候再松开。您无须等所有指针都 说,如果两标志的间距为半英里,第 中心指针指示 ,那 归零后再松开键钮,键钮松开时内部会开始计时。这一“飞 么速度为 公里/每小时( )。 返”特色使您能测量分段时间。计时码表运转时,可以使用 指南针校准 指南针,不会产生干扰。请参阅“指南针操作”。 指南针使用前必须先校准。 测速计 由于指南针利用了地球磁场,您必须注意较大的磁性物体 您的手表可能包含测速计刻度,可以用来测量每小时英里速 如车辆或桥梁)或发出电磁辐射的物体 如电视或电脑 , 度、公里速度或海里速度( 60-500 节)。 这些物体会影响手表周围的磁场。如果指南针在这些物体 开始前,计时码表必须重置(归零)。请参阅“计时码 附近校准,那么它只会在同样的位置才正常工作。如果指 表”。 南针在远离这些物体的地方校准,那么在这些物体附近就 在第一个英里或公里标志处按键钮 (开始/停止)启动计时 不能正常工作。为取得最佳效果,请在您预计使用的地方 码表。然后在下一个英里或公里标志处再次按键钮 校准指南针。 开始/停止 停止计时码表。第...
- Seite 446 在校准和测方向时请一定注意,和所有指南针一样,需水平 放置。校准和测方向时如未水平放置指南针,将导致出现较 大偏差。同时请避开硬铁和软铁浓度超过正常值的地区,这 些地区也可能导致方向不准确。任何时候方向可疑时,请重 新校准指南针。 请勿将手表置于磁体源附近,如电脑、家电或电视,因为手 表可能吸收磁性,导致指示方向不准确。腕表通常准确性在 度以内。 要校准指南针: 完成后,按键钮 (指南针),保持手表水平。第 中心 将表冠拔出至中间档位,并等待指针停止移动。 指针来回摆动表示校准结束,然后指向当前磁偏角(请 参阅“磁偏角”)。 将手表持平或放置在水平表面(如表带干扰,将手表置于 倒放的杯子上)。手表可以倒置,但请注意保护表面。 如果您不想设置磁偏角,可将表冠按回。否则,让手表 自动改正偏角度:转动指南针刻度外圈直到北端指向 按键钮 (指南针)开始。第 中心指针旋转两圈提示您 点方向。 旋转手表。水平放置时,缓慢旋转手表两圈,每圈用至 少 秒。...
- Seite 447 磁偏角 按键钮 或 ,使用偏角刻度将第 中心指针分别向西( )或 指南针指向的是“磁北”,可能与地图上的“正北”略有差 东(+)移动,指向您所在地的偏角度(见下页表格)。按 异。这一差异被称为“磁偏角”。磁偏角在全球各地均不 住键钮可快速移动指针。见下图为例。 同,由于通常很小,很多情况下都忽略不计。 完成后将表冠按回。 但是,如果您希望改正这一差异,有两种方式。您可以手动 操作,利用外圈偏角刻度,转动指南针刻度外圈直至第 中 心指针指向您所在地区磁偏角(见下页表格)而不是正北。 或者您可以在指南针校准后,通过设置磁偏角让手表自动改 正偏角度(请参阅“指南针校准”)。通过正确的磁偏角设 置,第 中心指针将指向正北。 磁偏角设为 -14° ( 西 14°)
- Seite 448 ......18E 针指向北端。如果转动手表,第 中心指针将继续移动,一 丹佛 ....9E . 奥斯陆 ......1E . 华盛顿特区 ....11W 直指向北端。 秒后,指南针功能将自动关闭,第 中心指 耶路撒冷 . 巴黎 . 康涅狄克州沃特伯里..4E ......1W 针恢复正常运行。这样可节省电池。可随时按键钮 (指南 如需查询更多磁偏角信息,请登录 www.timex.com 针)可让指南针继续运行 秒。 指南针可以在使用计时码表时启用。第 中心指针仅会暂时 转换运行。上端指针和下端指针继续显示计时码表时间, 所有计时码表功能可通过键钮 (开始/停止)和键钮 飞返/重置)实现。...
-
Seite 449: 世界时间
世界时间 注: 指南针工作时,秒针以两秒的间隔移动。此外,启动 指南针时,上端指针和下端指针可能微微改变位置。指南针 特色 功能停止后会回复正常。这一现象是正常的,并会取得最准 您的 Intelligent Quartz 手表具有以下特色: ™ 确的指南针指示。 • 全球24个地区的时间显示功能 使用指南针 • 季节设置显示 指南针启动后,有两种最常见的使用方法。 夜间照明灯 • Indiglo ® 我正在朝哪个方向走?持表使 点方向对准您要去的方向。 转动指南针刻度外圈,直到第 中心指针指向外圈上的北 端。您走的方向就是外圈上的 点方向。 我应该朝哪个方向走?如果您知道要去的方向 比如东北 , 转动指南针刻度外圈直到那个方向出现在 点方向。持表 使您面朝 点方向方向。然后,转动身体,直到第 中心指 针指向指南针外圈的北端。现在,您面朝的方向就是您要 去的方向。... - Seite 450 概览 您的 Intelligent Quartz 手表表冠有三个档位:关闭、中间和 ™ 外部档位为习惯表冠的不同档位,请将表冠拔出至外部档 24城市 位,然后轻按表冠直至您感觉到其扣进中间档位。 时针 上端指针 第4中心指针 时间和日期设置 世界时间. 要设置日期和时间: 键钮 刻度 日期显示窗 将表冠拔出至外部档位,然后转动表冠直至显示出正确 的时间。检查日期是在午夜而不是正午改变的,以确认 分针 表冠 AM/PM 设置正确。 将表冠拔出至中间位置,然后转动表冠直至日期显示窗 显示出正确的日期。注: 日期在下午 10 pm 和凌晨2.am之 键钮 键钮 间变动。请勿在此时间段变动日期。这样做可能会损坏 手表机芯。 季节刻度 完成后将表冠按回。 秒针 下端指针 关闭 中间 外部...
- Seite 451 指针 城市时间显示 (第 中心指针)调整 按键钮 或 分别将中心指 要重调偏离的指针: 针前后移动,选择城市。上 将表冠拔出至外部档位。上端指针和下端指针自动重置 端指针移动指示所选城市的 至刻度尽头。 时间。请注意刻度为 小时 1 2 3 制式,两端为午夜,中间 第 中心指针应指向 点方向。如果指针没有指向该方 为正午。 向,则在拔出表冠至外部档位 秒内按键钮 或 ,将指针 分别逆时针或顺时针转动直至指向 点方向。 按键钮 更改所选城市的 季节(请参阅“季节设 完成后将表冠按回。 置”)。 注: 如果在指针停止后未按任何键钮持续 秒钟,手表将进 入世界时间设置操作(请参阅“世界时间设置”)。...
- Seite 452 季节设置 当一个城市的季节设置为夏季,与其在同个半球的所有城市 季节设置功能使手表可以改正日光节约时间(也称“夏令 都将自动设置为夏季,同时另一个半球的所有城市将自动设置 时”)。 为冬季。本表识别各个半球上有哪些城市。 不同城市启动和结束夏令时的日期不同,而有些城市根本不 示例: 澳大利亚和欧洲大部分国家在三月和十月变更时间。 实行夏令时。 如所选城市为巴黎,在十月到三月间选择冬季。在三月到十 月间选择夏季。当所选城市改为悉尼,季节指示自动变更为 本表提供了一项设置用以表示实行夏令时城市的两个周期。 与巴黎相反的状态,因为悉尼在另一半球上。对东京而言, 本表夏令时周期为夏季,正常周期为冬季。 季节将和巴黎一样,但是由于东京不实行夏令时,季节设置 并不影响时间。 根据不同的法律规定,同一半球的城市可能将冬季时间和 夏季时间的更替设置在不同的日期。然而大多数时候,所 有城市的季节设置都将是正确的。有关详细信息,请访问 timex.com 。 设置世界时间时,选择一个与您当地时区同一时区的城市, 将该城市的时间设置为您的当地时间。手表将自动识别其它 所有城市的时间。...
- Seite 453 要世界时间设置: 将表冠拔出至外部档位。如“指针调整”中所述,城市 将表冠拔出至中间档位。中心指针指示世界时区城市, 选择指针将回到 的位置。暂停 秒后,上端指针将指 上端指针 针指示世界时间。 示世界时间(先前步骤中所选择城市的时间),中心指 针指示世界时间的分钟,下端指针指示季节(请参阅 “ 季节设置 ” )。重要说明:中心指针完成调校之前不要触 碰任何键钮或表冠。(拔出表冠至外部档位后约 秒)。 如果当地时区显示的季节不正确,请按键钮 更改。如果 当地时区实行夏令时,上端指针将移动一小时。 1 2 3 按键钮 或 分别将时间向后或向前移动,将世界时间时 区与您的当地时区设置成一致。按住键钮可快速移动指 针。指针一起移动,中心指针转一圈,上端指针走一小 时。设置完毕后,中心指针和分针保持重合。 完成后将表冠按回。 按键钮 或 转动中心指针指向处在您当地时区的城市。 按住键钮可快速移动指针。可以选择任何城市。...
-
Seite 454: 测速计功能
测速计功能 保养和维护 为保持防水性能,请勿在水中按任何键钮。 不包含所有款式) 只有在镜面、键钮和表壳完好无损的情况下,本表才能 使用此方法本测速计只能检测每小时大于 单位的速度;更 保持防水性能。 慢的速度可以通过减小计量单位来测量。只要使用相同的长 . 本表非潜水用手表,不宜在潜水时使用。 度单位进行所有计算,测速计的功能将独立于距离单位(如 法定英里、海里数、公里、米等)。 接触盐水后,请用清水冲洗。 确定预定距离起点和终点的标志。 本表可用软布和中性肥皂在温水中清洗。 被测目标一旦经过预定起点标志,立刻启动计时码表。 手表正常使用时电池可维持 年。电池寿命长短取决于实际 使用方式。 . 被测目标一旦经过终点标志,立刻停止计时码表。 电池电量耗尽后,请及时更换。要更换电池,请访问 Timex 计时码表的秒针将与测速计标度进行比较来确定目标的 服务中心。 速度。... -
Seite 455: 如何调整表带
如何调整表带 翻扣式表带 找到连接表带和搭扣的弹簧轴。 各表型均可能出现与以下有关表带的描述略有不符的情形 。 用一个带尖头的工具将弹簧轴推进去,然后轻轻扭动表 滑扣式表带 带,使其脱扣。 打开锁盖。 确定好腕长之后,将弹簧轴插入正确的底端轴孔。 移动搭扣,使表带达到所需长度。 将弹簧轴按入,与上端轴孔对齐,然后松开使之锁定到 用力按住锁盖并来回滑动搭扣,直 位。 到搭扣被卡入表链底侧的槽内。 将锁盖按下卡紧。请勿过分用力, 否则可能损坏搭扣。... -
Seite 456: 拆卸表带环扣
拆卸表带环扣 电池 拆卸环扣: 如需更换电池,我们建议仅使用 TIMEX 电池。换好电池后, 垂立放置表带,并用带尖头工具插入环扣上的针口。 需要重新校准手表的时间和日期。将手表退还给 Timex 时,请 使用邮资预付的托运公司。请致电 1-800-448-4639 、前往您购 沿箭头方向用力推挤插针,使环扣脱节(插针经专门设 置手表的商店或访问 www.Timex.com 获得有关邮资预付托运 计,难以拆卸)。 公司的信息。请随表按以下费率寄交邮费和手续费(不属于 重复上述步骤,直到拆掉所有不需要的环扣。 修理费):美国用户请寄一张 8.00 美元的支票或汇票;加拿 重新组装: 大用户请寄一张 7.00 加元的支票或汇票;其它国家和地区的 将表带各部分重新接好。 用户, Timex 会相应收取邮费和手续费。 按箭头反方向把插针推入环扣。 切勿在寄送的包裹内夹带特殊款式的表带或其它个人贵重 物品。 用力将插针按入表链,直到针尾与孔口保持齐平。 切勿将电池弃置于火内。请勿为电池充电。请将拆下的电池 放在远离儿童的地方。... -
Seite 457: 全球联保
TIMEX 全球联保 本保修规定及其所含补偿条款具有专有性质,并取代所有其 它明示或暗示的保修承诺,包括任何对适销性和适宜任何具 Timex Group USA, Inc. 为您的 TIMEX 手表提供自原购买日起计 ® 体目的的暗示保证。 TIMEX 对任何特别、附带或因之而产生 算,为期一年的无制造缺陷担保。 Timex 及其遍布全球的加盟 的损失概不负责。部分国家和州不允许限制暗示性保证,也 机构都会承诺这项国际担保义务。 不允许排除或限制有关损失,因此上述限制可能对您无效。 请注意, Timex 在为您修理手表时,既可能安装新配件,也可 本保修规定赋予您特定的合法权利,同时因所在国家或地区 能安装经过完全修复和检验的配件,还可能更换为相同或近 而异,您可能还享有其它权利。 似型号。重要说明 - 请注意,本保修不适用于以下情况: 如需保修服务,请将您的手表退还给 、其联属机构 Timex 保修期已过; 或购买该表的 Timex 零售店,同时附上填好的“手表维修 单” (Watch Repair Coupon )原件。如果您在美国或加拿大,... - Seite 458 Timex Extended 。法国请致电 。德国/奥地利请致电 946 017 33 3 81 63 42 00 Warranty, P .O. Box 1676, Dept. EF, Little Rock, AR 72203. 662 88921 30 。中东和非洲请致电 971-4-310850 。 ©2010 Timex Group USA Inc. TIMEX INDIGLO INTELLIGENT QUARTZ和IQ是 Timex Group B.V及其子公司的商标。...
- Seite 459 TIMEX ® 腕時計 腕時計をお買い上げいただきありがと う ございま Timex ® す。 Timex 腕時計をご使用の際は、 取り扱い説明書をよく お読 みくださ い。 お買い上げの腕時計によっては、 ここに記載されているすべての 機能が備わっていない場合もあり ます。 使い方の詳細やお客様の腕時計の登録は www.Timex.com にアクセスしてくださ い。...
- Seite 460 目次 ブレスレッ トのリ ンクの取りはずし ............. 電池 ......................腕時計を始動させるには ..............国際保証書....................耐水性と耐衝撃性 ................. ナイ トライ ト ................INDIGLO ® 万年カ レンダー ..................フライバッ ククロノ グラフ ..............フライバッ ククロノ グラフコ ンパス ............. ワールドタイム ..................タキメ ーターの機能 ................ブレスレッ トを調整するには ...............
-
Seite 461: 腕時計を始動させるには
Timex Intelligent Quartz 腕時計をお買い上げありがと う ご ® ™ ざいます。 この腕時計はクオーツによるアナログ技術の未来を (万年カ レンダーのモデルには適用しません) 。 腕時計を始動 表すものです。 の技術はマイ クロプロセ Timex Intelligent Quartz させるには、 リ ューズの下からプラスチッ クガー ドをはずした後 ッサーのパワーを発揮し、 確実性とクオーツによるアナログ時計 で、 リ ューズをケース側に押し込みます。 秒針が 秒ごとに動 の精密さをもたら します。 腕時計では、 技 Timex Intelligent Quartz き始めます。... -
Seite 462: 耐水性と耐衝撃性
耐水性と耐衝撃性 警告 : 耐水性を維持するため、 お買い上げの腕時計に メ ー トルの耐水性があると表記されている場合以外は、 水面下でボ 腕時計に耐水性がある場合は、 メ ー トルのマーク ( WR_M ) が表 タンを押さないでください。 水面下では絶対に リ ュ ーズを引き出 記されています。 したり しないでください。 耐水性の深度 水面下水圧 . 腕時計の耐水性はク リスタル、 リ ューズ、 ケースが無傷の場 p.s.i.a. * 合に限り保たれます。 . 腕時計はダイバーウオッチではあり ません。 ダイ ビングには 使用しないでくださ... -
Seite 463: Indiglo ® ナイ トライ ト
INDIGLO ナイ トライ ト 万年カ レンダー ® ボタ ンまたはリ ューズを押してライ トを作動させます。 機能 INDIGLO ® ナイ トライ トに使用されているエレク トロルミネッセン ト技術に Intelligent Quartz 腕時計には つの機能が備わっています : ™ よって、 夜間や暗い場所で腕時計の文字盤全体が明るくなり • 万年カ レンダー - 2100 年まで正確な日付 ます。 • 曜日、 月、 日付の表示 • INDIGLO ナイ... - Seite 464 年まで日 2100 日付針 付を調整する必要はあり ません。 腕時計が小の月やう るう年を ボタン 曜日針 自動的に調整し、 常に正確な日付と曜日を示します。 日付と曜 (引っ込んだもの) 日は の工場で前もって設定されています。 お客様は時刻 Timex 時針 のみを調整してくださ い。 この腕時計には引っ込んだところに つのプッ シュボタ ンがあり ますが、 サー ビスセンターが電池 Timex 1 2 3 分針 リ ューズ 交換後に日付と曜日を設定するために使う もので、 その他に使 う ことはあり ません。...
- Seite 465 . 腕時計はダイバーウオッチではあり ません。 ダイ ビングには AM/PM 使用しないでくださ い。 うるう年のオフセッ ト 正確な日付を維持するため、 この腕時計には近年のう るう年を . 腕時計が塩水にさ らされた場合は真水ですすいでくださ い。 オフセ ッ トする設定が含まれています。 この設定は の工 Timex 腕時計はぬるま湯に溶かしたマイルドな洗剤と布地でふいて汚 場または電池交換後に行われ、 見るだけで変更はできません。 れを落と してくださ い。 このオフセ ッ トを見るには、 リ ューズを中間の位置まで引き出 電池は腕時計を通常に使用して 年もちます。 電池の寿命は します。 日付針がオフセ ッ トを示します :...
-
Seite 466: フライバッククロノグラフ
フライバッククロノグラフ 概要 機能 第 4 中央針 Intelligent Quartz 腕時計には下記の機能が備わっています : ™ 時針 ボタン • フライバッ ククロノ グラフ ( 時間まで) 上方針 • 第 時間帯 日付の窓 クロノの時刻 第 2 時間帯 • Indiglo ナイ トライ ト ® リ ューズ 分針 クロノの分の目盛り ボタン 秒針 下方針... - Seite 467 注意: 腕時計のリ ューズには つの位置が . 時刻を設定したら リ ューズを閉じた位置まで押します。 秒針 Intelligent Quartz ™ あり ます : 閉じた位置、 中間の位置、 外側の位置。 これらの位置 が動き始めます。 の差に慣れるため、 リ ューズを外側の位置まで引き出し、 その 注意 : 日数が 日未満の月は、 日付を調整する必要があり 後でリ ューズを軽く押してカチッ と中間の位置に変わる感覚を ます。 覚えてくださ い。 第 中央針の調整 日付と時刻の設定 ずれた第 中央針を調整するには : 日付と時刻を設定するには...
- Seite 468 . 第 時間帯の分が最初の時間帯の分と同じだと、 第 中 第 時間帯 上方針は第 時間帯の時刻を示します。 目盛りは 時間で、 央針は分針と並ぶはずです。 もし針が並ばない場合は、 ボ 真夜中が両端で、 正午が タ ン を押して第 中央針が分針と並ぶまで前方に動 真ん中にあることに注意して かします。 第 中央針を速く動かすには、 ボタ ン を押し 続けます。 くださ い。 ほとんどの場合、 時 間帯の間は時刻ごとで異なり . ボタ ン を押して上方針を 時間ごとに前方に動かし、 希 ます。 その場合、 第 時間帯...
- Seite 469 クロノ グラフをリセ ッ トすると、 すべての針がゼロの位置に動 フライバッククロノグラフ この腕時計には 時間のフライバッ ククロノ グラフが備わって きます。 秒後、 腕時計は第 時間帯の通常表示を再開し います。 ます。 . 始動させるには、 ボタ ン (開始 / 停止) を押します。 . フライバッ ククロノ グラフを作動中にリセ ッ ト してリスター ト、 リセ ッ トまたはリスター トする場合は、 ボタ ン (フライバッ ク 第...
-
Seite 470: フライバッククロノグラフコンパス
第 時間帯 腕時計はダイバーウオッチではあり ません。 ダイ ビングには使 • • タキメ ーター (限定モデル) 用しないでくださ い。 ナイ トライ ト • Indiglo ® • 腕時計が塩水にさ らされた場合は真水ですすいでくださ い。 腕時計はぬるま湯に溶かしたマイルドな洗剤と布地でふいて • 汚れを落と してくださ い。 電池は腕時計を通常に使用して 年もちます。 電池の実際の 寿命はその人の使い方によって異なり ます。 電池が消耗したらすぐに交換してくださ い。 電池の交換は サー ビスセンターをご利用くださ い。 Timex... - Seite 471 概要 注意 : 腕時計のリ ューズには つの位置が Intelligent Quartz ™ あり ます : 閉じた位置、 中間の位置、 外側の位置。 これらの位置 第 4 中央針 の差に慣れるため、 リ ューズを外側の位置まで引き出し、 その 分針 ボタン 後でリ ューズを軽く押してカチッ と中間の位置に変わる感覚を 上方針 覚えてくださ い。 日付の窓 日付と時刻の設定 クロノの時刻 第 2 時間帯 日付と時刻を設定するには : リ ューズ 1 2 3 .
- Seite 472 . 終了したら リ ューズを押し戻します。 第 時間帯 通常上方針は第 時間帯の時刻を示します。 目盛りは 時 日数が 日未満の月は日付を調整する必要があり ます。 間で、 真夜中が両端にあり、 正午が真ん中にあることに注意し 指示針 てくださ い。 (第 中央針) の調整 第 時間帯の時刻の設定 : ずれた指示針を調整するには : リ ューズを中間の位置ま . リ ューズを外側の位置まで引き出します。 上方針と下方針が で引き出します。 上方針 自動的にその端にリセ ッ ト します。 が第 時間帯の時刻を...
- Seite 473 ます。 第 中央針が 回転すると、 上方針が 時間動きま クロノグラフ この腕時計には 時間のフライバッ ククロノ グラフが備わって す。 第 時間帯の分が最初の時間帯の分と同じだと、 第 います。 中央針は分針と並ぶはずです。 始動させるには、 (開始 / 停止) を押します。 第 中央針が秒 3. A を押して上方針を 時間ごとに前方へ動かします。 ボタ ンをおさえて針を速く動かします。 を 秒ごとに示し、 下方針が分の一の位の数字を示して までカ ウ ン トア ッ プし、 繰り返します。 上方針は時刻と分 ( 分単...
- Seite 474 再開するには、 もう一度 開始 / 停止) を押すか、 またはクロノ タキメ ーター 腕時計によってはタキメ ーターの目盛りがあり、 マイルまたは グラフをゼロにリセ ッ トするため (フライバッ ク / リセ ッ ト) を キロメ ー トル、 ノ ッ トでの時速を計ることができます。 目盛りは 押します。 です。 60 – 500 クロノ グラフをリセ ッ トすると、 すべての針はゼロに動きます。 秒後、 腕時計は第 時間帯の時刻の通常表示を再開します。...
- Seite 475 で校正または読み取りを行う と、 大きな誤差がでることになり ま マイルまたは キロメ ー トル以外の距離を使う場合は、 その結 す。 また鋼鉄や軟鉄が普通よ り高い割合で凝縮している地域 果と距離をかけます。 例えば マイル離れた つのマーカ ー は、 正確な読み取りを妨げることがあり ますので避けてくださ い。 を使って、 第 中央針が を指していると、 そのスピー ドは時速 読み取りが疑わしい場合は再校正してくださ い。 マイル ( 1/2 x 80 ) という ことになり ます。 コンパスの校正 腕時計をコ ンピューター、 電気器具、 テレビなど、 磁気を発する物 ご使用の前にコ...
- Seite 476 そうでない場合は腕時計が自動的に偏角を補正するよう、 (コ ンパス) を押して始動させます。 第 中央針が 回転し 3. C 北が 時を指すまでコ ンパスリ ングを回します。 て腕時計を回転させるよう促します。 腕時計を水平にしたま まゆっ く り と腕時計を 回転させ、 回転ごとに少なく とも または を押して第 中央針をそれぞれ西 ( ) または東 6. A 秒かけるよう にします。 (+) に動かし、 偏角の目盛りを使って、 お客様の現在置の偏角 (次ページの表を参照) を指すよう にします。 ボタ ンをおさえ ると針が速く動きます。...
- Seite 477 Orlando ....Vancouver ....次ページの表を参照) を指すよ う にします。 またはコ ンパス校正 Denver ..... Oslo ......Washington D ..「コ ンパス校正」 を参照) の後で、 お客様の現在置の磁気偏角を Jerusalem ..Paris ...... Waterbury, T ..設定し、 腕時計が自動的に補正するよ う にします。 正しい磁気偏 磁気偏角についての詳細は www.timex.com をご覧ください。 角を設定するこ とによって、 第 中央針は真北を指します。...
- Seite 478 は継続してクロノ グラフのタイムを示し、 クロノ グラフのすべての コンパスの操作 通常コ ンパスは休止しており、 第 中央針は 時を指すか、 ま 機能はボタ ン (開始 / 停止) と (フライバッ ク / リセ ッ ト) に たはクロノ グラフの秒を示します。 よって作動します。 コ ンパスはご使用の前に校正する必要があ り、 校正はコ ンパスを 注意 : コ ンパスを操作中は秒針が 秒ごとに動きます。 また 使う予定の地域内で行ってく ださ い ( 「コ ンパス校正」 を参照) 。 電 コ...
-
Seite 479: ワールドタイム
ワールドタイム コンパスの使用 コ ンパスが作動すると、 典型的な 通りの使い方があり ます。 機能 どの方位に向かっているのか ? 時がお客様の向かう方向に 腕時計には下記の機能が備わっています : Intelligent Quartz ™ なるよう に腕時計を持ちます。 リ ング上で第 中央針が北を指 • 世界中の の都市の時刻表示が可能 すまでコ ンパスリ ングを回します。 お客様が向かっているのは • 季節設定表示 リ ング上の 時の方位です。 • Indiglo ナイ トライ ト ® どの方向に進むべきか ? お客様が行きたい方位 (例えば北西) が分かっている場合は、... - Seite 480 概要 腕時計のリ ューズには つの位置があり ま Intelligent Quartz ™ す : 閉じた位置、 中間の位置、 外側の位置。 これらの位置の差 24 の都市 に慣れるため、 リ ューズを外側の位置まで引き出し、 その後で 時針 第 4 中央針 リ ューズを軽く押してカチッ と中間の位置に変わる感覚を覚え 上方針 てくださ い。 ボタン ワールドタイ ムの目盛り 日付と時刻の設定 日付の窓 日付と時刻を設定するには : 分針 リ ューズ .
- Seite 481 . 終了したら リ ューズを押し戻します。 都市の時刻を表示 または を押して中央針を 日数が 日未満の月は日付を調整する必要があり ます。 それぞれ後方または前方に 指示針 動かし、 ひとつの都市を選び (第 中央針) の調整 ます。 上方針が動いて選んだ 1 2 3 ずれた指示針を調整するには : 都市の時刻を示します。 目盛 . リ ューズを外側の位置まで引き出します。 上方針と下方針が りは 時間で、 真夜中が両 自動的にその端にリセ ッ ト します。 端で、 正午が真ん中にあるこ . 第 中央針は...
- Seite 482 計用と して、 デイライ トセー ビングタイムの期間を夏、 スタ ンダー は季節はパリ と同じですが、 デイライ トセー ビングタイムを採用 ドタイムの期間を冬と します。 していないため、 季節設定は時刻には影響しません。 同じ半球にある都市でも法律が異なるため、 異なった日に冬時 間と夏時間を切り替えることがあり ますが、 ほとんどの場合、 す べての都市の季節設定は正確です。 詳細については Timex.com をご覧くださ い。 ワールドタイムの設定は、 ホームタイムの時間帯の中の都市を ひとつ選び、 その都市の時刻 (ローカルタイムと同じ) を設定し ひとつの都市を夏と設定すると、 同じ半球にあるすべての都市 ます。 これによって腕時計がその他のすべての都市の時刻を は自動的に夏と設定され、 反対側の半球にあるすべての都市は 認識します。...
- Seite 483 ワールドタイムの設定 : リ ューズを外側の位置まで引き出します。 都市選択針が リ ューズを中間の位置まで引き出します。 中央針がワールド 時の位置に逆戻り して、 INDICATOR HAND ADJUSTMENT タイムの時間帯の都市を示し、 上方針がワールドタイムを示 と示されます。 秒間止まった後で、 上方針がワールドタイム します。 (前記のステッ プで選んだ都市の時刻) を示し、 中央針がワ ールドタイムの分を示し、 下方針が季節 ( 「季節の設定」 を参 照) を示します。 重要: 中央針が調整を完了するまで、 プッ シ ャ ーまたはリ ューズをいじらないでくださ い リ ューズを外側 の位置まで引き出した後、...
-
Seite 484: タキメ ーターの機能
. 腕時計が塩水にさ らされた場合は真水ですすいでくださ い。 す。 腕時計はぬるま湯に溶かしたマイルドな洗剤と布地で汚れを . スピー ドを計るターゲッ トが開始点のマーカ ーを通過したらク 落と してくださ い。 ロノ グラフを始動させます。 電池は腕時計を通常に使用して 年もちます。 電池の寿命は . スピー ドを計るターゲッ トが終点のマーカ ーを通過したらクロ 実際の使い方によって異なり ます。 ノ グラフを止めます。 電池が消耗したらすぐに交換してくださ い。 電池の交換は Timex . クロノ グラフの秒針が指すタキメ ーターの目盛り によってそ サー ビスセンターをご利用くださ い。 のターゲッ トの時速が分かり ます。... -
Seite 485: ブレスレッ トを調整するには
ブレスレッ トを調整するには 折り重ね式留め金ブレスレッ ト ブレスレッ トと留め金をつないでいるスプリ ングバーをみつ (下記のブレスレッ トの調整法のバリエーシ ョ ンは腕時計のすべ けます。 てのモデルに適用します) 。 先の尖った道具を使ってスプリ ングバーを押し、 ブレスレッ ト スライ ド式留め金ブレスレッ ト をそっ とねじってブレスレッ トをはずします。 ロ ッキングプレー トを開けます。 . 手首の長さを決めたら、 正しい下穴にスプリ ングバーを差し ブレスレッ トが希望の長さ になるよう 入れます。 に留め金を動かします。 ロ ッキングプレー トをしっかり と持ち、 スプリ... - Seite 486 ブレスレッ トのリ ンクの取りはずし 電池 ブレスレッ トのリ ンクの取りはずし 腕時計の電池の交換が必要な場合は、 でのみ交換す Timex . ブレスレッ トを垂直に立てて置き、 先の尖った道具を使って るよう にお勧めします。 お客様の腕時計は電池の交換後、 正し リ ンクの隙間に入れます。 い時刻と日付を合わせるために再調整する必要があり ます。 腕時計を に返送する場合は、 郵送料支払い済みの封筒 Timex . リ ンクがはずれるまで、 力をいれてピンを矢印の方向に押し ( ) をご利用くださ い。 郵送料支払い済みの封 pre-paid shipper ます (ピンははずれ難いよう に設計されています) 。...
- Seite 487 レンズまたはク リスタル、 ス トラ ッ プまたはバン ド、 腕時計の TIMEX 国際保証書 ケース、 付属品または電池。 Timex ではこれらの交換は有償 お買い上げの 腕時計はお買い上げの日よ り 年 Timex ® 対応とさせていただきますのでご了承くださ い。 間、 の製造上の欠陥に対して保証されて Timex Group, USA, Inc. この保証およびここに含まれる救済は排他的なものであり、 商 います。 および世界各地の関連会社がこの国際保証を Timex 品性または特定目的適合性に関する黙示の保証を含めて、 履行します。 明示または黙示を問わず他のすべての保証に代わるもので は当社の判断に基づいて、 お客様の腕時計を新品、 また Timex す。 はいかなる特別損害、 付随的損害、 派生的損害に対 Timex は再調整して検査済みの部品を使って修理するか、...
- Seite 488 Warranty, P .O. Box 1676, Dept. EF, Little Rock, AR 72203. 保証の詳細については、 米国では 1-800-448-4639 にお問い合 2010 © Timex Group US , Inc. TIMEX、 INDIGLO、 INTELLIGENT QU RTZ、 IQ わせくださ い。 カナダでは 。 ブラジルでは 1-800-263-0981 +55 (11) はTimex Group .V. とその関連会社の商標です。...
- Seite 489 Поздравляем Вас с покупкой часов Timex . Пожалуйста, ® внимательно прочитайте инструкцию по эксплуатации, чтобы понять, как правильно пользоваться часами Timex. В Ваших часах могут отсутствовать те или иные характеристики, описание которых приводится в настоящем буклете. Для получения информации и регистрации Вашего...
- Seite 490 СОДЕРЖАНИЕ Удаление лишних звеньев браслета ......250 Батарейка ..............252 С чего начать настройку Ваших часов ......187 Гарантия ............... 254 Водонепроницаемость и ударопрочность ....189 Ночная подсветка Indiglo ® ........... 191 Вечный календарь ............192 Хронограф с функцией обратного хода ...... 198 Хронограф-компас...
-
Seite 491: С Чего Начать Настройку Ваших Часов
С ЧЕГО НАЧАТЬ НАСТРОЙКУ ВАШИХ ЧАСОВ Добро пожаловать в мир часов Timex Intelligent ® Quartz ™ , будущее кварцевой аналоговой технологии. (Не относится к моделям с вечным календарем). Удалите Технология Timex Intelligent Quartz добавляет мощность из-под заводной головки блокировочную вставку. -
Seite 492: Водонепроницаемостьи Ударопрочность
ВОДОНЕПРОНИЦАЕМОСТЬ плотно закреплена. В следующий раз, когда Вам будет необходимо произвести настройку часов, для того чтобы И УДАРОПРОЧНОСТЬ выдвинуть головку, Вы должны будете ее отвинтить Если Ваши часы водонепроницаемы, на них будет (против часовой стрелки). обозначена соответствующая глубина в метрах (WR_M). Глубина... -
Seite 493: Ночная Подсветка Indiglo
ВНИМАНИЕ: ДЛЯ СОХРАНЕНИЯ части корпуса. Такие часы отвечают требованиям MOC ВОДОНЕПРОНИЦАЕМОСТИ НЕ НАЖИМАЙТЕ КНОПКИ по противоударности. Тем не менее, следует избегать ПОД ВОДОЙ, ЕСЛИ НА ВАШИХ ЧАСАХ НЕ УКАЗАНО, повреждения стекла циферблата. ЧТО ОНИ ВОДОНЕПРОНИЦАЕМЫ НА ГЛУБИНЕ ДО НОЧНАЯ ПОДСВЕТКА INDIGLO ®... -
Seite 494: Вечный Календарь
ВЕЧНЫЙ КАЛЕНДАРЬ ОПИСАНИЕ ФУНКЦИИ Стрелка даты Ваши наручные часы Intelligent Quartz имеют Кнопка А ™ Стрелка (УГЛУБЛЕННАЯ) следующие функции: дня Часовая • Вечный календарь - правильные даты до 2100 года стрелка • Отображение дня, месяца и даты 1 2 3 ЗАВОДНАЯ... - Seite 495 3. По окончании задвиньте заводную головку. кнопки, предназначенные для использования центром Позаботьтесь о правильной установке временного обслуживания Timex с целью настройки дня и даты после формата AM/PM (до полудня/после полудня); замены батарейки. Другого предназначения для них нет. убедитесь, что дата меняется в полночь, а не в полдень.
- Seite 496 Когда срок службы батарейки закончился, ее следует Для сохранения водонепроницаемости, не немедленно заменить. Пожалуйста, обращайтесь в центр нажимайте кнопки под водой. обслуживания Timex для замены батарейки. 1. Часы сохраняют водонепроницаемость только до тех пор, пока стекло циферблата, кнопки и корпус остаются неповрежденными.
-
Seite 497: Хронограф С Функцией Обратного Хода
ХРОНОГРАФ С ФУНКЦИЕЙ ОПИСАНИЕ 4-ая центральная ОБРАТНОГО ХОДА стрелка ФУНКЦИИ Часовая стрелка Ваши наручные часы Intelligent Quartz ™ имеют Верхняя Кнопка А стрелка следующие функции: Окно даты Часы • Хронограф с функцией обратного хода (до 4-х часов) хронографа • Второй часовой пояс 2-й... -
Seite 498: Установка Даты И Времени
ПРИМЕЧАНИЕ: Заводная головка Ваших наручных 2. Вытяните заводную головку в среднее положение часов Intelligent Quartz имеет три положения: закрытое, и вращайте ее, пока в окошке даты не появится ™ среднее и крайнее. Чтобы оценить разницу между правильная дата. Примечание: Дата меняется автоматически... - Seite 499 2. 4-ая центральная стрелка должна указывать на ВТОРОЙ ЧАСОВОЙ ПОЯС 12 часов. Если по истечении 5 секунд после того, как Верхняя стрелка показывает время второго часового Вы вытянули заводную головку в крайнее положение, пояса. При этом, отсчет ведется на протяжении 24 4-ая...
- Seite 500 ЧТОБЫ УСТАНОВИТЬ ВТОРОЙ ЧАСОВОЙ ПОЯС: держите нажатой кнопку B. 1. Вытяните заводную головку в среднее положение. 3. Нажимайте на кнопку A, чтобы передвигать верхнюю Верхняя стрелка показывает время второго часового стрелку вперед часовыми интервалами, пока она не пояса, а 4-ая центральная стрелка показывает сравняется...
- Seite 501 ХРОНОГРАФ С ФУНКЦИЕЙ ОБРАТНОГО ХОДА 4. Чтобы обнулить хронограф с функцией обратного Часы оснащены хронографом с 4-х часовой функцией хода, нажмите кнопку B (Fly-back/Reset). обратного хода. После сброса хронографа все стрелки вернутся в 1. Для начала нажмите на кнопку A (Start/Stop). нулевую...
- Seite 502 Когда срок службы батарейки закончился, ее следует нажимайте и не вытягивайте кнопки или заводную немедленно заменить. Пожалуйста, обращайтесь в головку под водой. ЦЕНТР ОБСЛУЖИВАНИЯ TIMEX для замены батарейки. • Часы сохраняют водонепроницаемость только до тех пор, пока стекло циферблата, кнопки, заводная головка и корпус остаются неповрежденными.
-
Seite 503: Хронограф-Компас С Функцией Обратного Хода
ХРОНОГРАФ-КОМПАС С ФУНКЦИЕЙ ОПИСАНИЕ 4-ая центральная ОБРАТНОГО ХОДА стрелка ФУНКЦИИ Минутная стрелка Верхняя Кнопка А • Хронограф с функцией обратного хода (до 4-х часов) стрелка • Электронный компас с учетом магнитного склонения Окно даты Хронограф/ Часы • Второй часовой пояс 2-й... - Seite 504 ПРИМЕЧАНИЕ: Заводная головка Ваших наручных 2. Вытяните заводную головку в среднее положение часов Intelligent Quartz имеет три положения: закрытое, и вращайте ее, пока в окошке даты не появится ™ среднее и крайнее. Чтобы оценить разницу между правильная дата. Примечание: Дата меняется автоматически...
- Seite 505 2. 4-ая центральная стрелка должна указывать на 12 ВТОРОЙ ЧАСОВОЙ ПОЯС часов. Если по истечении 5 секунд после того, как Вы Верхняя стрелка обычно показывает время второго вытянули заводную головку в крайнее положение, часового пояса. При этом, отсчет ведется на протяжении 4-ая...
- Seite 506 2. Нажмите кнопку B, чтобы переместить 4-ю 4. По окончании задвиньте заводную головку. центральную стрелку вперед. Чтобы передвинуть По желанию, время второго часового пояса может также стрелку быстро, необходимо держать кнопку быть использовано для индикации времени Вашей зоны в нажатом положении. Верхняя стрелка и 4-ая в...
- Seite 507 ХРОНОГРАФ Для остановки хронографа нажмите кнопку A снова Часы оснащены хронографом с 4-х часовой функцией (START/STOP). Все стрелки остановятся. обратного хода. Чтобы восстановить работу хронографа, нажмите кнопку Нажмите кнопку A (START/STOP), чтобы запустить A (START/STOP) снова, или, чтобы обнулить хронограф, нажмите...
- Seite 508 с момента, когда кнопка будет отпущена. Эта функция километра повторным нажатием кнопки A (START/STOP). «обратного хода» (fly-back) позволяет Вам измерять 4-ая центральная стрелка указывает значение в милях временные отрезки. или километрах в час на шкале тахиметра. Компас может быть использован при работающем Обратите...
- Seite 509 КАЛИБРОВКА КОМПАСА При калибровке и вычислении направления очень Перед началом эксплуатации компас необходимо важно держать компас в горизонтальном положении. откалибровать. Произведение калибровки или вычисление направления, когда часы не находятся в горизонтальном Так как компас использует магнитное поле Земли, Вы положении, может привести к серьезным ошибкам. должны...
- Seite 510 Для того, чтобы откалибровать компас: 1. Вытяните заводную головку в среднее положение и подождите, пока стрелки не перестанут двигаться. 2. Держите часы в горизонтальном положении или поместите их на ровную поверхность (если ремешок не позволяет обеспечить горизонтальное положение, 4. По окончании, удерживая часы в горизонтальном поместите...
- Seite 511 6. Нажмите кнопку A или B, чтобы передвинуть стрелку МАГНИТНОЕ СКЛОНЕНИЕ компаса на восток (+) или на запад (–) соответственно, Стрелка компаса указывает на “магнитный север,” который для установки магнитного склонения для Вашей может слегка отличаться от “географического севера,” местности (см. таблицу на следующей станице), используемого...
- Seite 512 нажмите кнопку C (COMPASS) для включения компаса. Париж.... 1W Уотербери, штат Коннектикут......14W Стрелка компаса повернется и будет показывать на Для получения дополнительной информации по магнитному склонению север. Если Вы повернете часы, 4-ая центральная обращайтесь на сайт www.timex.com стрелка будет продолжать двигаться и всегда будет...
- Seite 513 показывать на север. Через 20 секунд компас отключится свое исходное положение после выключения компаса. автоматически, и 4-ая центральная стрелка вернется в Такое функционирование является нормальным и дает свое первоначальное положение. Такой режим работы наиболее точные показания компаса. продлевает срок действия батарейки. В любой момент ИСПОЛЬЗОВАНИЕ...
-
Seite 514: Мировое Время
МИРОВОЕ ВРЕМЯ В каком направлении мне следует двигаться? Если Вы знаете нужное Вам направление (например, северо- ФУНКЦИИ восток), вращайте кольцо компаса, пока это направление Ваши наручные часы Intelligent Quartz имеют ™ не совпадет с отметкой 12 часов. Держите часы так, следующие... -
Seite 515: Настройка Времени
ОПИСАНИЕ Заводная головка Ваших наручных часов Intelligent Quartz ™ имеет три положения: закрытое, среднее и Часовая города стрелка крайнее. Чтобы оценить разницу между различными 4-ая центральная Верхняя положениями, вытяните заводную головку в крайнее стрелка стрелка положение, потом слегка нажмите на нее, пока Вы не Шкала... - Seite 516 2. Вытяните заводную головку в среднее положение 2. 4-ая центральная стрелка должна указывать на 12 и вращайте ее до тех пор, пока правильная дата не часов. Если по истечении 5 секунд после того, как Вы появится в окне даты. Примечание: Дата меняется вытянули...
- Seite 517 ОТОБРАЖЕНИЕ ВРЕМЕНИ В ГОРОДЕ НАСТРОЙКА СЕЗОНА Нажимайте кнопки А Настройка сезона позволяет учитывать переход на летнее или В для перемещения или зимнее время. центральной стрелки назад Разные города переходят на летнее и зимнее время в и вперед соответственно и разные даты, а некоторые города вообще не меняют время. выберите...
- Seite 518 большинстве случаев, тем не менее, настройка сезонов «знают», какие города находятся в каком полушарии. будет правильной для всех городов. За дополнительной информацией обращайтесь на сайт timex.com. ПРИМЕР: Австралия и большинство европейских стран переходят на новое время в марте и октябре. Если Вы...
- Seite 519 ЧТОБЫ УСТАНОВИТЬ ДАТУ И ВРЕМЯ: часового пояса. Для быстрого передвижения стрелки 1. Вытяните заводную головку в среднее положение. держите кнопку нажатой. Вы можете использовать Центральная стрелка показывает город из часового любой город. пояса мирового времени, а верхняя стрелка 3. Вытяните заводную головку в крайнее положение. показывает...
- Seite 520 4. Если показываемый сезон не является правильным Для сохранения водонепроницаемости, не сезоном для Вашего часового пояса, нажмите кнопку нажимайте кнопки под водой. C, чтобы его изменить. Если в Вашем часовом поясе 1. Часы сохраняют водонепроницаемость только до соблюдается переход на летнее/зимнее время, тех...
-
Seite 521: Функция Тахиметра
Когда срок службы батарейки закончился, ее следует которого измеряется, пройдет начальную отметку. немедленно заменить. Пожалуйста, обращайтесь в центр 3. Остановите хронограф, как только объект, скорость обслуживания Timex для замены батарейки. которого измеряется, пройдет конечную отметку. ФУНКЦИЯ ТАХИМЕТРА 4. Секундная стрелка хронографа сопоставляется с... - Seite 522 3. Удерживая и прижимая блокировочную пластину, 3. Определите размер запястья, затем установите двигайте застежку взад-вперед, пока она не встанет в стержень в соответствующее нижнее отверстие. направляющие канавки на нижней стороне браслета. 4. Нажмите на подпружиненный стержень, направьте в 4. Закройте блокировочную пластину, вдавив ее до верхнее...
- Seite 523 УДАЛЕНИЕ ЛИШНИХ ЗВЕНЬЕВ БРАСЛЕТА Сборка: 1. Соедините элементы браслета. УДАЛЕНИЕ ЗВЕНЬЕВ: 1. Поставьте браслет на торец и вставьте инструмент с 2. Вставьте штифт обратно в звено в направлении, острым концом в открытое отверстие звена. противоположном направлению стрелки. 2. Сильно нажмите на штифт в направлении 3.
- Seite 524 БАТАРЕЙКА В других странах фирма Timex предъявит Вам счет за почтовые расходы и затраты на упаковку. Фирма TIMEX рекомендует обращаться только к НИ В КОЕМ СЛУЧАЕ НЕ ПРИЛАГАЙТЕ К ВАШЕЙ производителю часов для замены батарейки. После ПОСЫЛКЕ БРАСЛЕТ ОТ ЧАСОВ ИЛИ КАКИЕ-ЛИБО...
- Seite 525 ® 2. если часы были первоначально приобретены не у производственных дефектов на период до ОДНОГО официального распространителя продукции фирмы ГОДА со дня первоначальной покупки. Фирма Timex Timex; и ее международные филиалы признают настоящую 3. если повреждения явились результатом ремонта или...
- Seite 526 зависимости от конкретной страны или штата. ЯВЛЯЮТСЯ ИСКЛЮЧИТЕЛЬНЫМИ И ЗАМЕНЯЮТ ВСЕ Для получения гарантийного обслуживания, пожалуйста, ДРУГИЕ ГАРАНТИИ, ЯВНЫЕ ИЛИ ПОДРАЗУМЕВАЕМЫЕ, отправьте Ваши часы на фирму Timex, в одно из ее ВКЛЮЧАЯ ЛЮБЫЕ ПОДРАЗУМЕВАЕМЫЕ ГАРАНТИИ отделений или официальному распространителю ее КОММЕРЧЕСКОГО КАЧЕСТВА ИЛИ ПРИГОДНОСТИ...
- Seite 527 фунтов стерлингов на территории Великобритании. 8687 9620. В Португалии звоните по телефону 351 В других странах фирма Timex предъявит Вам счет 212 946 017. Во Франции звоните по телефону 33 3 за почтовые расходы и затраты на упаковку. НИ В...
- Seite 528 на 5 долларов США почтой по адресу: Timex Extended Warranty, P.O. Box 1676, Dept. EF, Little Rock, AR 72203. © 2010 Timex Group USA, Inc. TIMEX, INDIGLO, INTELLIGENT QUARTZ AND IQ являются зарегистрированными торговыми марками компании Timex Group B.V. и ее филиалов.