Herunterladen Inhalt Inhalt Diese Seite drucken
Bontempi 40 1040 Bedienungsanleitung

Bontempi 40 1040 Bedienungsanleitung

Showtime stage microphone

Werbung

Verfügbare Sprachen
  • DE

Verfügbare Sprachen

  • DEUTSCH, seite 6
Showtime
Microphone
GB - INSTRUCTION MANUAL ................ 2
F - MANUEL D'INSTRUCTIONS ............ 4
D - BEDIENUNGSANLEITUNG ..............6
E - MANUAL DE INSTRUCCIONES.......8
P - MANUAL DE INSTRUÇÕES ........... 10
I - MANUALE DI ISTRUZIONI ..............12
Stage
40 1040
40 1071

Werbung

Inhaltsverzeichnis
loading

Inhaltszusammenfassung für Bontempi 40 1040

  • Seite 1 Showtime Stage Microphone 40 1040 40 1071 GB - INSTRUCTION MANUAL ....2 F - MANUEL D’INSTRUCTIONS .... 4 D - BEDIENUNGSANLEITUNG ....6 E - MANUAL DE INSTRUCCIONES..8 P - MANUAL DE INSTRUÇÕES ... 10 I - MANUALE DI ISTRUZIONI ....12...
  • Seite 2: Power Supply

    E N G L I S H POWER SUPPLY Use a screwdriver to open the battery compartment. Insert 4x R6/AA 1.5V R6/AA 1.5V 1.5 V batteries R6/AA (not supplied), ensuring correct polari- ty. Re-fit battery cover. Replace batteries when the quality of R6/AA 1.5V R6/AA 1.5V sound becomes bad.
  • Seite 3: Power On/Off

    HOW TO ASSEMBLE THE MIC STAND 1. Place the adjustable microphone stand into the relative seat in the base. 2. Insert the microphone into the microphone holder. 3. Adjust the height of the stand by sliding the central part. 4. Adjust the microphone according to the desired angulation.
  • Seite 4 F R A N Ç A I S ALIMENTATION R6/AA 1.5V R6/AA 1.5V Ouvrir l’emplacement porte-piles avec un tournevis. Insérer 4 piles de 1,5 V type R6/AA (non fournies), en faisant attention à la pola- R6/AA 1.5V R6/AA 1.5V rité correcte. Remettre le couvercle à son emplacement. Substituer R6/AA 1.5V R6/AA 1.5V les piles quand la qualité...
  • Seite 5: Montage Du Microphone

    MONTAGE DU MICROPHONE 1. Placer le pied du micro réglable sur la base, dans l'emplacement prévu à cet effet. 2. Mettre le micro sur le porte-micro. 3. Relever le tube supérieur jusqu’à ce que le micro soit à votre hauteur. 4.
  • Seite 6: Störungsbeseitigung

    D E U T S C H STROMVERSORGUNG R6/AA 1.5V R6/AA 1.5V Das Batteriefach öffnen. Dann werden 4 Batterien à 1,5V (Typ R6/ AA) einlegen. Batterien sind nicht im Lieferumfang enthalten. R6/AA 1.5V R6/AA 1.5V Batteriefach schließen Batterien auswechseln, sobald die R6/AA 1.5V R6/AA 1.5V Klangqualität abnimmt.
  • Seite 7: Einschalten / Ausschalten

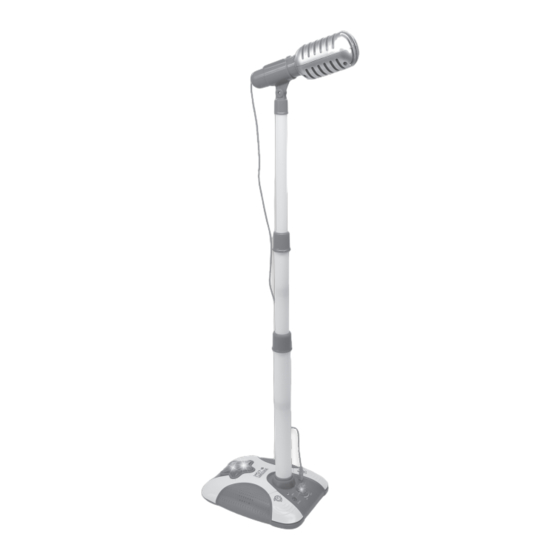
    MONTAGEANLEITUNG Die höhenverstellbare Mikrofonstange in die dafür vorgesehene Öffnung im Sockel Einfügen (1). Das Mikrofon in den Halter stecken (2). Ziehen Sie die Mikrofonstange, durch Verschieben des Mittelteiles derselben, auf die gewünschte Höhe aus (3). Mikrofon je nach gewünschter Neigung regulie- ren (4).
  • Seite 8 E S P A Ñ O L ALIMENTACION Abran el hueco destinado a las pilas. Coloquen 4 pilas de 1,5V del R6/AA 1.5V R6/AA 1.5V tipo R6/AA (que no se entregan con el aparato). Cierren la tapa. R6/AA 1.5V R6/AA 1.5V Sustituya las baterías cuando la calidad del sonido se convierta mediocre.
  • Seite 9: Instrucciones De Ensamblaje

    INSTRUCCIONES DE ENSAMBLAJE 1. Coloque el soporte de micrófono ajustable o el soporte de mesa en el lugar correspon- diente de la base. 2. Introduzca el micrófono en el soporte. 3. Regule la altura del pie moviendo la parte central. 4.
  • Seite 10: Guia Para A Solução De Problemas

    P O R T U G U Ê S ALIMENTAÇÃO Abrir a tampa do alojamento das pilhas. Inserir 4 pilhas de 1,5V tipo R6/AA 1.5V R6/AA 1.5V R6/AA (não incluídas). Fechar novamente a tampa. Substituir as pilhas quando a qualidade do som não for boa. Para uma longa R6/AA 1.5V R6/AA 1.5V duração, aconselha-se o uso de pilhas alcalinas.
  • Seite 11: Instruções De Montagem

    INSTRUÇÕES DE MONTAGEM 1. Posicione a haste do microfone regulável no sítio apropriado da base. 2. Introduza o microfone no suporte. 3. Regule a haste em altura fazendo deslizar a parte central. 4. Regule o microfone segundo a angulação desejada. O microfone pode ficar também no suporte ou na mão.
  • Seite 12 I T A L I A N O ALIMENTAZIONE Aprire il vano batterie con un cacciavite. Inserire 4 batterie da 1.5 V tipo R6/AA (non incluse), facendo attenzione alla corretta polarità. R6/AA 1.5V R6/AA 1.5V Richiudere il coperchio. R6/AA 1.5V R6/AA 1.5V Sostituire le batterie quando la qualità...
  • Seite 13: Istruzioni Di Montaggio

    ISTRUZIONI DI MONTAGGIO 1. Posizionare l’asta microfono regolabile nell’ap- posita sede della base. 2. Inserire il microfono nel supporto. 3. Regolare l’asta in altezza facendo scorrere la parte centrale. 4. Regolare il microfono secondo l’angolazione desiderata. Il microfono si può tenere sul sup- porto o in mano.
  • Seite 14 40 1040...
  • Seite 15 40 1071...
  • Seite 16 40 1040 40 1071 GB - ICOM S.p.A. reserves all rights to modify specifications of this product without notice. Read and keep this manual for future reference. ATTENTION: Do not use alcohol, solvents or similar chemical substances for cleaning. Use a soft cloth dampened in a bland solution of water and neutral detergent.

Diese Anleitung auch für:

40 1071

Inhaltsverzeichnis