Herunterladen Inhalt Inhalt Diese Seite drucken
Bontempi 40 1220 Bedienungsanleitung

Bontempi 40 1220 Bedienungsanleitung

Showtime stage microphone
Vorschau ausblenden Andere Handbücher für 40 1220:

Werbung

Verfügbare Sprachen
  • DE

Verfügbare Sprachen

  • DEUTSCH, seite 6
Showtime Stage
Microphone
40 1220
40 1271
GB - OWNER'S MANUAL ...............2
F - MANUEL D' INSTRUCTIONS .......4
D - BEDIENUNGSANLEITUNG ........6
E - LIBRO DE INSTRUCCIONES ........8
P - MANUAL DE INSTRUÇÕES .......10
I - MANUALE DI ISTRUZIONI ........12

Werbung

Inhaltsverzeichnis
loading

Inhaltszusammenfassung für Bontempi 40 1220

  • Seite 1 Showtime Stage Microphone 40 1220 40 1271 GB - OWNER’S MANUAL ....2 F - MANUEL D’ INSTRUCTIONS ..4 D - BEDIENUNGSANLEITUNG ..6 E - LIBRO DE INSTRUCCIONES ..8 P - MANUAL DE INSTRUÇÕES ..10 I - MANUALE DI ISTRUZIONI ..12...
  • Seite 2: Troubleshooting Guide

    E N G L I S H POWER SUPPLY Use a screwdriver to open the battery compartment. Insert 3 x 1.5 V batteries R6/AA (not supplied), ensuring correct polarity. Re-fit batte- ry cover. Replace batteries when the quality of sound becomes bad. Use alkaline batteries to obtain a longer duration.
  • Seite 3 HOW TO ASSEMBLE THE MIC STAND 1. Place the adjustable microphone stand into the relati- ve seat in the base 2. Insert the microphone into the microphone holder 3. Adjust the height of the stand by sliding the central part 4.
  • Seite 4 F R A N Ç A I S ALIMENTATION Ouvrir l’emplacement porte-piles avec un tournevis. Insérer 3 piles de 1,5 V type R6/AA (non fournies), en faisant attention à la polarité correcte. Remettre le couvercle à son emplacement. Substituer les piles quand la qualité...
  • Seite 5 MONTAGE DU MICROPHONE 1. Placer le pied du micro réglable sur la base, dans l'emplacement prévu à cet effet 2. Mettre le micro sur le porte-micro 3. Relever le tube supérieur jusqu’à ce que le micro soit à votre hauteur 4.
  • Seite 6: Störungsbeseitigung

    D E U T S C H STROMVERSORGUNG Das Batteriefach öffnen. Dann werden 3 Batterien à 1,5V (Typ R6/AA) einlegen. Batterien sind nicht im Lieferumfang enthalten. Batteriefach schließen Batterien auswechseln, sobald die Klangqualität abnimmt. Um die Lebensdauer des Instrumentes zu verlängern, wird die Verwendung von Alkalibatterien empfohlen.
  • Seite 7: Verwendung Des Mikrofons

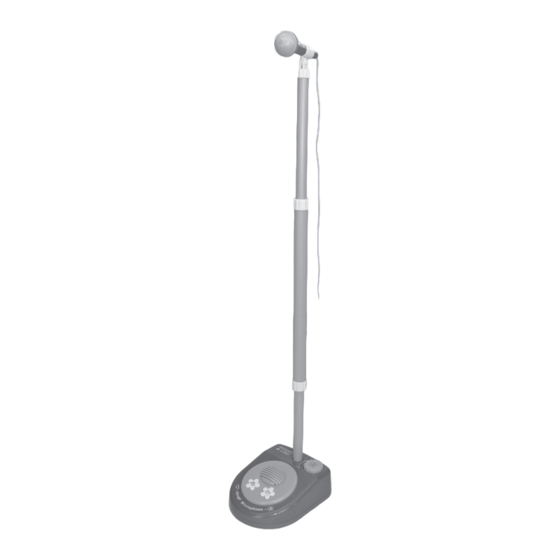
    MONTAGEANLEITUNG 1. Die höhenverstellbare Mikrofonstange in die dafür vor- gesehene Öffnung im Sockel Einfügen 2. Das Mikrofon in den Halter stecken 3. Ziehen Sie die Mikrofonstange, durch Verschieben des Mittelteiles derselben, auf die gewünschte Höhe aus 4. Mikrofon je nach gewünschter Neigung regulieren Es kann auf der Halterung angebracht oder frei in der Hand benutzt werden.
  • Seite 8 E S P A Ñ O L ALIMENTACION Abran el hueco destinado a las pilas. Coloquen 3 pilas de 1,5V del tipo R6/AA (que no se entregan con el aparato). Cierren la tapa. Sustituya las baterías cuando la calidad del sonido se convierta mediocre.
  • Seite 9: Instrucciones De Ensamblaje

    INSTRUCCIONES DE ENSAMBLAJE 1. Coloque el soporte de micrófono ajustable o el soporte de mesa en el lugar correspondiente de la base 2. Introduzca el micrófono en el soporte 3. Regule la altura del pie moviendo la parte cen- tral 4.
  • Seite 10: Guia Para A Solução De Problemas

    P O R T U G U Ê S ALIMENTAÇÃO Abrir a tampa do alojamento das pilhas. Inserir 3 pilhas de 1,5V tipo R6/AA (não incluídas). Fechar novamente a tampa. Substituir as pilhas quando a qualidade do som não for boa. Para uma longa duração, aconselha-se o uso de pilhas alcalinas.
  • Seite 11: Instruções De Montagem

    INSTRUÇÕES DE MONTAGEM 1. Posicionar a haste do microfone regulável no respetivo alojamento da base 2. Inserir o microfone no suporte 3. Regular a haste deslizando a parte central 4. Regular o microfone segundo o ângulo deseja- . O microfone pode ser utilizado na mão ou no suporte.
  • Seite 12 I T A L I A N O ALIMENTAZIONE Aprire il coperchio del vano batterie. Inserire 3 batterie da 1,5V tipo R6/AA (non incluse). Richiudere il coperchio. Sostituire le batterie quando la qualità del suono diventa scadente. Per una lunga durata si consiglia l’uso di batterie alcaline. ACCORGIMENTI NELL’USO DELLE BATTERIE: •...
  • Seite 13: Istruzioni Di Montaggio

    ISTRUZIONI DI MONTAGGIO 1. Posizionare l’asta microfono regolabile nell’ap- posita sede della base 2. Inserire il microfono nel supporto 3. Regolare l’asta in altezza facendo scorrere la parte centrale 4. Regolare il microfono secondo l’angolazione desiderata . Il microfono si può tenere sul supporto o in mano.
  • Seite 14 40 1271...
  • Seite 15 40 1220...
  • Seite 16 Immergere il panno nella soluzione e strizzarlo fino a quando è quasi asciutto. ICOM S.p.A. IMPORTED and DISTRIBUTED by: Via Caduti del Lavoro, 4 - 60131 Ancona - Italy Sede Legale: Viale Don bosco, 35 - 62018 Potenza Picena (MC) - Italy Sede Amministrativa: www.bontempi.com e-mail: info@bontempi.com Cod. 20193651...

Diese Anleitung auch für:

40 1271

Inhaltsverzeichnis