Inhaltsverzeichnis
Werbung
Verfügbare Sprachen
Verfügbare Sprachen
Quicklinks
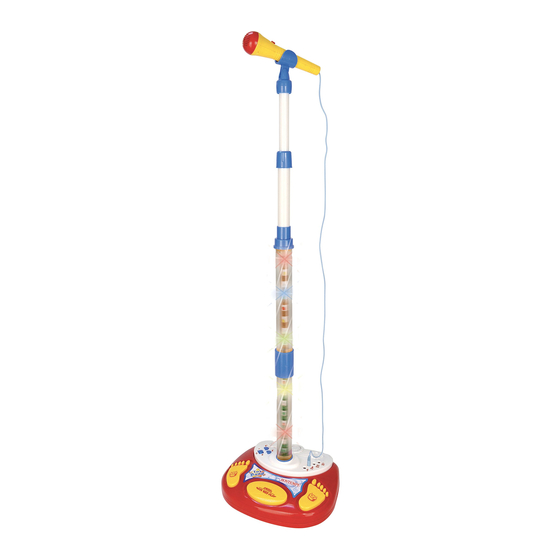
Showtime
Stage
Microphone
with connection
to music device
40 2300
GB - ASSEMBLY INSTRUCTIONS .............. 2
F - INSTRUCTIONS POUR LE MONTAGE .. 2
D - MONTAGEANWEISUNG ..................... 2
E - INSTRUCCIONES PARA EL MONTAJE ..... 2
P - INSTRUÇÕES DE MONTAGEM ............. 2
I - ISTRUZIONI DI MONTAGGIO .................. 2
GB - OWNER'S MANUAL .................4
F - MANUEL D' INSTRUCTIONS .........6
D - BEDIENUNGSANLEITUNG ..........8
E - LIBRO DE INSTRUCCIONES ........10
P - MANUAL DE INSTRUÇÕES ........12
I - MANUALE DI ISTRUZIONI ...........14
Werbung
Inhaltsverzeichnis

Verwandte Anleitungen für Bontempi 40 2300


Inhaltszusammenfassung für Bontempi 40 2300
- Seite 1 Showtime Stage Microphone with connection to music device 40 2300 GB - ASSEMBLY INSTRUCTIONS ....2 F - INSTRUCTIONS POUR LE MONTAGE .. 2 D - MONTAGEANWEISUNG ..... 2 E - INSTRUCCIONES PARA EL MONTAJE ..2 P - INSTRUÇÕES DE MONTAGEM ..... 2 I - ISTRUZIONI DI MONTAGGIO ....
- Seite 2 GB - ASSEMBLY INSTRUCTIONS 1. Place the microphon rod as shown in the figure (A-B-C-D-E-F). plug d . 2. Connect the microphone cable to the socket e . 3. To use headphones (not supplied), insert the jack in the F - INSTRUCTIONS POUR LE MONTAGE 1.
- Seite 3 * Headphone not supplied * Casque non fourni * Kopfhörer nicht im Lieferumfang enthalten * Auriculares no suministrados * Ouvido não fornecido * cuffia non fornita...
-
Seite 4: Troubleshooting Guide
E N G L I S H MAINS SUPPLY The instrument can be supplied by the AC/DC (Vdc =6V / I = 500 mA) positive central adapter (not supplied) conforms to national and international safety regulations covering electrical appliances. Insert the jack in the DC socket c . •... -
Seite 5: Using The Microphone
USING THE MICROPHONE a to the I position. To switch the instrument off Turn on the instrument by moving the switch move the same selector to O. to listen to the 6 tunes (3 on each pad) On pressing you can use the 2 Pads "Feet" or play them in Any Key Play (each time you press the button corresponds to a demosong note). - Seite 6 F R A N Ç A I S ALIMENTATION SUR SECTEUR L’instrument peut être alimenté par un adaptateur de réseau (qui n’est pas fourni) qui aura en sortie les caractéristiques suivantes: Vdc = 6V; I = 500 mA (terminal positif central). Insérer la fiche dans la prise DC c .
- Seite 7 USAGE DU MICRO en position I. Pour l'éteindre, déplacer Allumer l’instrument en déplaçant l’interrupteur l’interrupteur sur O. pour écouter les 6 En pressant la touche on peut utiliser les 2 Pads « Pieds » morceaux musicaux (3 pour chaque pad) ou pour exécuter en Any Key Play (à chaque pression de la touche correspond une note de la demosong).
-
Seite 8: Störungsbeseitigung
D E U T S C H NETZANSCHLUSS Der Netzanschluß erfolgt über einem handelsüblichen Netzadapter (nicht enthalten) mit folgenden Eigenschaften: Vdc = 6V; I =500mA (positiv mittlerer Steckerkontakt). Den Stecker in die Steckdose DC stecken c . • Das Spielzeug ist für Kinder unter 3 Jahren nicht geeignet. • Das Spielzeug kann nur mit dem empfohlenen Transformator benutzt werden. -
Seite 9: Gebrauch Des Mikrofons
GEBRAUCH DES MIKROFONS auf I, zum Ausschalten auf O stellen. Zum Einzuschalten des Geräts Wahlschalter Wird die Taste gedrückt, können die 2 Pads "Füße" verwendet werden, um die 6 Musikstücke (3 pro Pad) anzuhören oder um sie in der Funktion Any Key Play auszuführen (jeder Tastendruck entspricht einer Note des Demo-Songs). - Seite 10 E S P A Ñ O L ALIMENTACIÓN CON LA CORRIENTE La alimentación puede ser suministrada por un adaptador (que no se entrega con el instrumento) que tenga las siguientes caracteristicas: (Vdc =6V; I = 500 mA) (positivo central). Introduzca la clavija en la toma DC c .
-
Seite 11: Uso Del Micrófono
USO DEL MICRÓFONO a la posición I. Para apagar, desplazarlo Encienda el instrumento desplazando el interruptor en O. para escuchar las 6 pistas Presionando el botón se pueden utilizar los 2 Pads "Pies" musicales (3 por cada pad) o para reproducirlas en Any Key Play (a cada presión de la tecla corresponde una nota de la canción de demostración). -
Seite 12: Guia Para A Solução De Problemas
P O R T U G U Ê S ALIMENTAÇÃO COM A REDE ELÉCTRICA O instrumento pode ser alimentado com um adaptador de rede (não incluído) que possua em saida as siguintes caracteristicas: Vdc = 6V; I = 500 mA (terminal positivo central). - Seite 13 USO DO MICROFONE para a posição I. Para desligar, recoloque-o na Ligar o instrumento deslocando o interruptor posição O. para ouvir as 6 canções (3 Ao pressionar o botão é possível utilizar os 2 Pads "Pés" para cada pad) ou para executá-las em Any Key Play (cada pressão da tecla corresponde a uma nota da canção demonstrativa) .
- Seite 14 I T A L I A N O ALIMENTAZIONE A RETE Lo strumento può essere alimentato con adattatore da rete (non fornito) che abbia in uscita le seguen- ti caratteristiche: Vdc = 6V; I = 500 mA (terminale positivo centrale). Inserire lo spinot- to nella presa DC c .
-
Seite 15: Uso Del Microfono
USO DEL MICROFONO in posizione I. Per spegnere, riportarlo su O. Accendere lo strumento spostando l'interruttore Premendo il pulsante si possono utilizzare i 2 Pads "Piedi" per ascoltare i 6 brani musicali (3 per ogni pad) o per eseguirli in Any Key Play: ad ogni pressione del tasto corrisponde una nota della demosong. - Seite 16 è quasi asciutto. ICOM S.p.A. IMPORTED and DISTRIBUTED by: Via Caduti del Lavoro, 4 - 60131 Ancona - Italy Sede Legale: Viale Don Bosco, 35 - 62018 Potenza Picena (MC) - Italy Sede Amministrativa: www.bontempi.com e-mail: info@bontempi.com Cod. 402300IM1...