Herunterladen Inhalt Inhalt Diese Seite drucken

Werbung

Verfügbare Sprachen
  • DE

Verfügbare Sprachen

  • DEUTSCH, seite 8
40 1320
40 1371
Stage
microphone
GB - OWNER'S MANUAL ..................... 2
F - MANUEL D' INSTRUCTIONS ......... .5
D - BEDIENUNGSANLEITUNG ............. 8
E - LIBRO DE INSTRUCCIONES ........ 11
P - MANUAL DE INSTRUÇÕES .......... 14
I - MANUALE DI ISTRUZIONI .......... 17

Werbung

Inhaltsverzeichnis
loading

Inhaltszusammenfassung für Bontempi 40 1320

  • Seite 1 40 1320 40 1371 Stage microphone GB - OWNER’S MANUAL ..... 2 F - MANUEL D’ INSTRUCTIONS ..5 D - BEDIENUNGSANLEITUNG ..... 8 E - LIBRO DE INSTRUCCIONES ..11 P - MANUAL DE INSTRUÇÕES ..14 I - MANUALE DI ISTRUZIONI ..17...
  • Seite 2 E N G L I S H S TA GE MI CROPHO NE POWER SUPPLY Use a screwdriver to open the battery compartment. R6/AA 1.5V R6/AA 1.5V Insert 3 x 1.5 V batteries R6/AA (not supplied), ensuring correct polarity. Re-fit battery cover. Replace R6/AA 1.5V R6/AA 1.5V batteries when the quality of sound becomes bad.
  • Seite 3: Main Features

    MUSIC IN ON OFF MAIN FEATURES: A. Adjustable microphone pole (2 pieces); B. Microphone with on/off switch; C. Disk; D. Ring; E. Support Base; Microphone support; G. Star Module (containing plugs, power switch, battery compartment and speaker); H. Cable for connecting to other music sources. ASSEMBLY INSTRUCTIONS 1.
  • Seite 4: Switching On/Off

    SWITCHING ON/OFF 1. Turn on the instrument by moving the switch placed behind the module to the ON position. To switch the instrument off R6/AA 1.5V R6/AA 1.5V move the same selector to OFF. R6/AA 1.5V R6/AA 1.5V R6/AA 1.5V R6/AA 1.5V N.B.
  • Seite 5 I T A L I A N O F R A N Ç A I S MICRO DE SCÈNE ALIMENTATION Ouvrir l’emplacement porte-piles avec un tournevis. Insérer 3 piles de 1,5 V type R6/AA (non fournies), en faisant R6/AA 1.5V R6/AA 1.5V attention à...
  • Seite 6: Instructions De Montage

    MUSIC IN ON OFF LE PRODUIT EST COMPOSE DE: A. Perche micro réglable (2 pièces); B. Micro avec interrupteur de marche/arrêt; C. Disque; D. Anneau; E. Base de support; F. Support micro; G. Module à étoile (contenant prise, interrupteur de marche, compartiment piles et haut-parleur); H.
  • Seite 7 ALLUMAGE/ARRET 1. Allumer l’instrument déplaçant l’interrupteur situé derrière le module, en position ON. Pour l'éteindre, déplacer R6/AA 1.5V R6/AA 1.5V l’interrupteur sur OFF. R6/AA 1.5V R6/AA 1.5V N.B.: En cas de non-emploi de R6/AA 1.5V R6/AA 1.5V l’instrument, pour éviter que les MUSIC IN ON OFF piles...
  • Seite 8 D E U T S C H BÜHNENMIKROPHON STROMVERSORGUNG Das Batteriefach öffnen. Dann werden 3 Batterien à 1,5V (Typ R6/AA) einlegen. Batterien sind nicht im Lieferumfang R6/AA 1.5V R6/AA 1.5V enthalten. Batteriefach schließen Batterien auswechseln, R6/AA 1.5V R6/AA 1.5V sobald die Klangqualität abnimmt. Um die Lebensdauer R6/AA 1.5V R6/AA 1.5V des Instrumentes zu verlängern, wird die Verwendung von...
  • Seite 9: Das Gerät Besteht Aus Folgenden Teilen

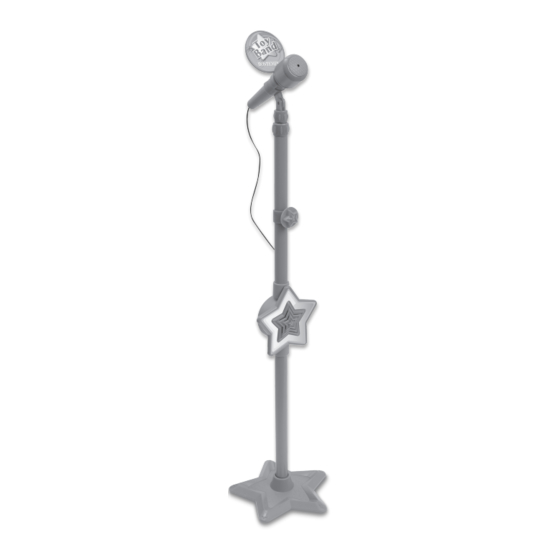
    MUSIC IN ON OFF DAS GERÄT BESTEHT AUS FOLGENDEN TEILEN: A. Verstellbarer Mikrofonständer (2 Teile); B. Mikrofon mit Ein/Aus-Schalter; C. Diskette; D. Ring; E. Sockel; F. Mikrofonhalter; G. Sternförmiges Modul (mit Buchsen, Ein/Aus- Schalter, Batterieraum und Lautsprecher); H. Litze zum Anschluss an andere Musikquellen. MONTAGEANLEITUNGEN 1.
  • Seite 10: Singen Mit Musikbegleitung

    EIN/AUS SCHALTEN 1. Das Instrument einschalten. Dazu den Schalter hinter dem Modul auf ON stellen. Zum Ausschalten auf OFF drehen. R6/AA 1.5V R6/AA 1.5V N.B.: Sollte das Instrument nicht R6/AA 1.5V R6/AA 1.5V benutzt werden, sollte es ausge- R6/AA 1.5V R6/AA 1.5V schaltet werden, um einen MUSIC IN...
  • Seite 11 E S P A Ñ O L MICRÓFONO DE ESCENARIO ALIMENTACION Abran el hueco destinado a las pilas. Coloquen 3 pilas de 1,5V del tipo R6/AA (que no se entregan con el aparato). R6/AA 1.5V R6/AA 1.5V Cierren la tapa. R6/AA 1.5V R6/AA 1.5V Sustituya las baterías cuando la calidad del sonido se...
  • Seite 12: Instrucciones Para El Montaje

    MUSIC IN ON OFF EL PRODUCTO ESTÁ COMPUESTO POR: A. Pértiga micrófono regulable (2 piezas); B. Micrófono con interruptor de encendido/apa- gado; C. Disquete; D. Anillo; E. Base de soporte; Soporte micrófono; G. Módulo en estrella (recipiente tomas, interrup- tor de encendido, vano de pilas y altavoz); H.
  • Seite 13 ENCENDIDO / APAGADO 1. Encienda instrumento desplazando el interruptor, ubicado detrás del módulo a la posición ON. Para apagar, R6/AA 1.5V R6/AA 1.5V desplazarlo en OFF. R6/AA 1.5V R6/AA 1.5V NOTA: Si no se utiliza el instru- R6/AA 1.5V R6/AA 1.5V mento, para evitar un consumo MUSIC IN ON OFF...
  • Seite 14 P O R T U G U Ê S MICROFONE ESTÁGIO ALIMENTAÇÃO Abrir a tampa do alojamento das pilhas. Inserir 3 pilhas de R6/AA 1.5V R6/AA 1.5V 1,5V tipo R6/AA (não incluídas). Fechar novamente a R6/AA 1.5V R6/AA 1.5V tampa. Substituir as pilhas quando a qualidade do som não for boa.
  • Seite 15: Instruções De Montagem

    MUSIC IN ON OFF O PRODUTO É COMPOSTO POR: A. Haste do microfone regulável (2 peças); B. Microfone com interruptor para ligar/desligar; C. disco; D. Anel; E. Base de suporte; Suporte do microfone; G. Módulo estrela (contém fichas, interruptor para ligar o aparelho, alojamento para pilhas e alti- falante);...
  • Seite 16: Liga / Desliga

    LIGA / DESLIGA 1. Ligar o instrumento deslocando o interruptor posicionado atrás do módulo para a posição ON. Para desligar, recoloque-o na R6/AA 1.5V R6/AA 1.5V posição OFF. R6/AA 1.5V R6/AA 1.5V N.B.: Em caso de não utilização R6/AA 1.5V R6/AA 1.5V do instrumento, lembre-se de MUSIC IN...
  • Seite 17 I T A L I A N O MICROFONO DA PALCOSCENICO ALIMENTAZIONE Aprire il vano batterie con un cacciavite. Inserire 3 batte- rie da 1.5 V tipo R6/AA (non incluse), facendo attenzione R6/AA 1.5V R6/AA 1.5V alla corretta polarità. Richiudere il coperchio. R6/AA 1.5V R6/AA 1.5V Sostituire le batterie quando la qualità...
  • Seite 18: Istruzioni Di Montaggio

    MUSIC IN ON OFF IL PRODOTTO È COMPOSTO DA: A. Asta microfono regolabile (2 pezzi); B. Microfono con interruttore di accensione/spegni- mento; C. Dischetto; D. Anello; E. Base di supporto; Supporto microfono; G. Modulo a stella (contenente prese, interruttore di accensione, vano pile e altoparlante);...
  • Seite 19 ACCENSIONE / SPEGNIMENTO 1. Accendere lo strumento spo- stando l'interruttore, posiziona- to dietro il modulo, in posizione R6/AA 1.5V R6/AA 1.5V ON. Per spegnere, riportarlo su R6/AA 1.5V R6/AA 1.5V OFF. R6/AA 1.5V R6/AA 1.5V N.B.: In caso di non utilizzo MUSIC IN ON OFF dello strumento, ricordarsi di...
  • Seite 20 è quasi asciutto. ICOM S.p.A. IMPORTED and DISTRIBUTED by: Via Caduti del Lavoro, 4 - 60131 Ancona - Italy Sede Legale: Viale Don Bosco, 35 - 62018 Potenza Picena (MC) - Italy Sede Amministrativa: www.bontempi.com e-mail: info@bontempi.com...

Diese Anleitung auch für:

40 1371

Inhaltsverzeichnis