Conrad 19 22 14 Bedienungsanleitung
Kurzwellen-retroradio
CONRAD IM INTERNET http://www.conrad.com
Impressum
Diese Bedienungsanleitung ist eine Publikation der Conrad Electronic SE, Klaus-Conrad-Str. 1, D-92240 Hirschau
(www.conrad.com).
Alle Rechte einschließlich Übersetzung vorbehalten. Reproduktionen jeder Art, z. B. Fotokopie, Mikroverfilmung, oder die
Erfassung in elektronischen Datenverarbeitungsanlagen, bedürfen der schriftlichen Genehmigung des Herausgebers.
Nachdruck, auch auszugsweise, verboten.
Diese Bedienungsanleitung entspricht dem technischen Stand bei Drucklegung. Änderung in Technik und Ausstattung
vorbehalten.
© Copyright 2009 by Conrad Electronic SE.
Legal notice
These operating instructions are a publication by Conrad Electronic SE, Klaus-Conrad-Str. 1, D-92240 Hirschau
(www.conrad.com).
All rights including translation reserved. Reproduction by any method, e.g. photocopy, microfilming, or the capture in
electronic data processing systems require the prior written approval by the editor. Reprinting, also in part, is prohibited.
These operating instructions represent the technical status at the time of printing. Changes in technology and equipment
reserved.
© Copyright 2009 by Conrad Electronic SE.
Information légales
Ce mode d'emploi est une publication de la société Conrad Electronic SE, Klaus-Conrad-Str. 1, D-92240 Hirschau
(www.conrad.com).
Tous droits réservés, y compris de traduction. Toute reproduction, quelle qu'elle soit (p. ex. photocopie, microfilm,
saisie dans des installations de traitement de données) nécessite une autorisation écrite de l'éditeur. Il est interdit de le
réimprimer, même par extraits.
Ce mode d'emploi correspond au niveau technique du moment de la mise sous presse. Sous réserve de modifications
techniques et de l'équipement.
© Copyright 2009 by Conrad Electronic SE.
Colofon
Deze gebruiksaanwijzing is een publicatie van de firma Conrad Electronic SE, Klaus-Conrad-Str. 1, D-92240 Hirschau
(www.conrad.com).
Alle rechten, vertaling inbegrepen, voorbehouden. Reproducties van welke aard dan ook, bijvoorbeeld fotokopie, microver-
filming of de registratie in elektronische gegevensverwerkingsapparatuur, vereisen de schriftelijke toestemming van de
uitgever. Nadruk, ook van uittreksels, verboden.
Deze gebruiksaanwijzing voldoet aan de technische stand bij het in druk bezorgen. Wijziging van techniek en uitrusting
voorbehouden.
© Copyright 2009 by Conrad Electronic SE.
B E D IE N U N G S A N LE I TU N G
N OT IC E D ' E MP L OI
Kurzwellen-Retroradio
Shortwave Retro Style Radio
Radio-rétro ondes courtes
Kortegolf-retroradio
Best.-Nr. / Item-No. / No de commande / Bestnr.:
01_0809_01/AB
OP E R A TI N G IN S TR U C TI ON S
GE B R U IK S A A N W IJ Z IN G
Version 08/09
Seite 3 - 17
Page 18 - 32
Page 33 - 47
Pagina 48 - 62
19 22 14
Inhaltsverzeichnis

Verwandte Anleitungen für Conrad 19 22 14

Inhaltszusammenfassung für Conrad 19 22 14
- Seite 1 Page 33 - 47 © Copyright 2009 by Conrad Electronic SE. Information légales Ce mode d'emploi est une publication de la société Conrad Electronic SE, Klaus-Conrad-Str. 1, D-92240 Hirschau (www.conrad.com). Kortegolf-retroradio Tous droits réservés, y compris de traduction. Toute reproduction, quelle qu'elle soit (p. ex. photocopie, microfilm, Pagina 48 - 62 saisie dans des installations de traitement de données) nécessite une autorisation écrite de l'éditeur.
- Seite 2 Diese Bedienungsanleitung gehört zu diesem Produkt. Sie enthält wichtige Hinweise zur Inbetriebnahme und Handhabung. Achten Sie hierauf, auch wenn Sie dieses Pro- dukt an Dritte weitergeben. Heben Sie deshalb diese Bedienungsanleitung zum Nachlesen auf! These operating instructions belong with this product. They contain important infor- mation for putting it into service and operating it.
-
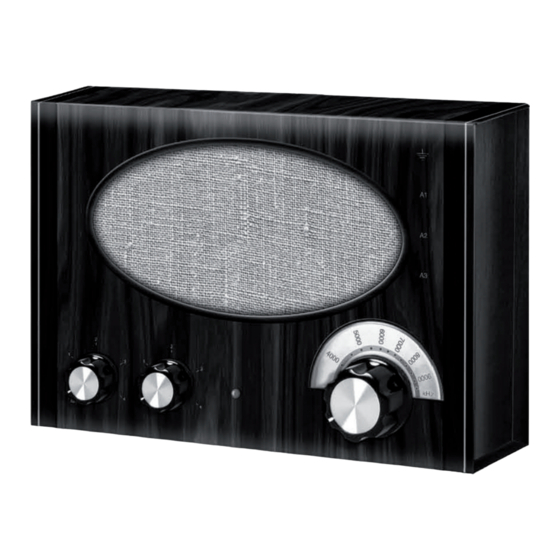
Seite 3: Das Kurzwellen-Retroradio
Das Kurzwellen-Retroradio Dieses nostalgische Kurwellenradio ist ein Transistor-Einkreisempfänger mit einstellbarer Rückkopp- lung. Das Empfangsprinzip entspricht dem Röhren-Audion aus der Anfangszeit der Radiotechnik. Schon vor 80 Jahren fand sich ein solches Radio in vielen Wohnzimmern. Das Audion war aber auch bei Funkamateuren, in der militärischen Nachrichtentechnik sowie im Schiffsfunk im Einsatz. Bei einem Audion handelt es sich um einen sogenannten Geradeausempfänger, der im Gegensatz zum später üblichen Superhet keine Zwischenfrequenz benötigt. - Seite 4 Nehmen Sie sich viel Zeit und Ruhe für ausgedehnte Ausflüge in die Kurzwelle. Genießen Sie die Een bijzonderheid van deze audionschakeling is de directe koppeling van de transistor aan de tril- Vielfalt der Stationen – vor allem am Abend. Stellen Sie Frequenz und Rückkopplung messerscharf lingskring.
-
Seite 5: Montage Der Bedienelemente
Franxis www.elo-web.de. Een passende uitbreidingsset met onderdelen en een uitvoerige handleiding voor DRM-ontvangst kunt u voor deze radio vinden bij Conrad Electronic SE (www.conrad.nl) onder het bestelnummer 19 22 43 voor Ä9,95. Deze kan ook worden gebruikt voor de middengolfradio van vorig jaar. - Seite 6 De schaalverdeling ijken De opgedrukte frequentieschaalverdeling reikt van 3,5 MHz tot 9,5 MHz. Om de aangeduide fre- quenties zo nauwkeurig mogelijk te laten kloppen, moet u de ontvanger afstellen. Daarvoor heeft u twee radiostations met een bekende frequentie nodig aan de onderste en de bovenste rand van het bereik of een tweede radio als vergelijking.
- Seite 7 Test de radio ook zonder aardverbinding alleen met de antennedraad aan A1. Bij scherpe instelling Lötarbeiten van de terugkoppeling is de gevoeligheid om sterke stations te ontvangen voldoende. Omgekeerd kan een langere antenne met aardverbinding de ontvanger overmoduleren. Gebruik dan de lossere Zum Aufbau des Radios werden 13 Kabel benötigt.
- Seite 8 Löten Sie beide Drähte auf der Unterseite an. Schneiden Sie dann die überstehenden Drähte mit Nu is de radio volledig opgebouwd en kunt u hem testen. Teken de opbouw met uw naam en de datum einer scharfen Zange etwa 2 mm über der Platine ab. in het schakelplan op de laatste pagina van de gebruiksaanwijzing af.
- Seite 9 Soldeer vervolgens de passende kabelstukken. De lengtes kunt u zien in het bedradingsplan. U kunt de vertinde draaduiteindes naar keuze door de gaten steken en zoals de overige onderdelen vast- solderen, of ze aan de bovenkant plat op de soldeerplekken vastsolderen. Aan de aansluiting Bat moet de zwarte draad van het batterijvak worden aangesloten.
- Seite 10 Die mittleren Anschlüsse sind leitend mit der Achse verbunden und bilden den Gegenanschluss für De middelste aansluitingen zijn leidend verbonden met de as, en vormen de tegenaansluiting voor alle Teile des Drehkondensators. Zusätzlich gibt es Trimmkondensatoren, die oberhalb von C1 und alle onderdelen van de draaicondensator.
- Seite 11 Löten Sie als Nächstes die passenden Kabelstücke ein. Die Längen sind im Verdrahtungsplan zu sehen. Sie können die verzinnten Drahtenden wahlweise durch die Löcher stecken und wie die übri- gen Bauteile anlöten oder sie auf der Unterseite flach auf die Lötflächen anlöten. An den Anschluss Bat, muss der schwarze Draht des Batteriefachs angeschlossen werden.
- Seite 12 Nun ist das Radio vollständig aufgebaut und kann getestet werden. Zeichnen Sie den Aufbau mit Soldeer beide draden op de onderkant. Snijd dan de bovenstaande draden met een scherpe tang Ihrem Namen und dem Datum im Schaltplan auf der letzten Seite des Anleitungshefts ab. Diese Seite ongeveer 2 mm boven de printplaat af.
- Seite 13 Testen Sie das Radio auch ohne Erdanschluss nur mit dem Antennendraht an A1. Bei scharfer Ein- Soldeerwerkzaamheden stellung der Rückkopplung reicht die Empfindlichkeit für den Empfang starker Stationen aus. Umge- kehrt kann eine längere Antenne mit Erdanschluss den Empfänger übersteuern. Verwenden Sie Om de radio te monteren zijn er 13 kabels nodig.
- Seite 14 Die Skala eichen Die aufgedruckte Frequenzskala reicht von 3,5 MHz bis 9,5 MHz. Damit die angezeigten Frequenzen möglichst genau stimmen, müssen Sie den Empfänger abgleichen. Sie benötigen dazu zwei Radio- stationen mit bekannter Frequenz am unteren und am oberen Rand des Bereichs oder ein zweites Radio zum Vergleich.
-
Seite 15: Montage Van De Bedieningselementen
Ein passendes Ergänzungsset mit Bauteilen und ausführlicher Anlei- tung zum DRM-Empfang gibt es passend für dieses Radio bei Conrad Electronic SE (www.conrad.de) unter der Bestellnummer 19 22 43 für 9,95 Euro. Es ist auch für das Mittelwellenradio vom vergange- nem Jahr einsetzbar. - Seite 16 Eine Besonderheit dieser Audionschaltung ist die direkte Kopplung des Transistors an den Schwing- Neem veel tijd en rust voor verlengde uitstapjes naar de korte golf. Geniet van de grote verscheide- kreis. T1 arbeitet dabei mit einer Kollektoremitterspannung von nur ca. 0,6 V. Außerdem wirkt sich nheid van de stations - vooral ‘s avonds.
- Seite 17 De kortegolf-retroradio Deze nostalgische kortegolfradio is een transistorontvanger met één resonantiekring en instelbare terugkoppeling. Het ontvangstprincipe komt overeen met de buizenaudion uit de begintijd van de radiotechniek. 80 jaar geleden stond zo’n radio al in veel woonkamers. De audion werd echter ook bij radioamateurs, in de militaire boodschappentechniek alsook in de scheepsradio gebruikt.
- Seite 18 The Shortwave Retro Style Radio This nostalgic shortwave radio is a single-circuit receiver with adjustable acoustic feedback. The reception principle is the same as the Audion tubes from the early days of radio technology. Just 80 years ago, there was a similar radio in many living rooms. Further, the Audion was also used by radio amateurs, for military telecommunications as well as by ship radios.
- Seite 19 La particularité de ce montage Audion est le couplage direct du transistor au circuit oscillant. T1 Take plenty of time and peace for long trips through the shortwave. Enjoy the variety of stations - fonctionne avec une tension de collecteur-émetteur d’environ 0,6 V seulement. Par ailleurs, la capa- especially in the evenings.
- Seite 20 Franzis Verlag www.elo-web.de. Un kit complémentaire avec des composants et des instruc- tions détaillées pour la réception DRM peut être obtenu pour cette radio chez Conrad Electronic SE (www.conrad.de) pour Euros 9,95 sous le numéro de commande 19 22 43. Il peut également être uti- The variable capacito lisé...
- Seite 21 Étalonner l’échelle L’échelle de fréquences imprimée est comprise entre 3,5 MHz et 9,5 MHz. Pour que les fréquences indiquées soient aussi correctes que possibles, le récepteur doit être syntonisé. Pour cela il vous faut des stations de radio à la fréquence connue aux extrémités inférieure et supérieure de la plage ou une deuxième radio pour comparer.
- Seite 22 Testez la radio également sans raccordement de terre uniquement avec le fil d’antenne sur A1. Pour Soldering un réglage précis de la rétroaction, la sensibilité est suffisante pour la réception de stations puis- santes. Inversement, une antenne plus longue avec raccordement à la terre peut également sur- 13 cables are required to assemble the radio.
- Seite 23 La radio est alors complètement montée et peut être testée. Marquez votre nom sur le montage et la Solder both wires on the rear side. Then cut the wires that stand proud with sharp pliers, about 2 mm date dans le schéma de montage sur la dernière page du manuel d’instructions. Nous vous over the board.
- Seite 24 Ensuite, souder les pièces de câble correspondantes. Les longueurs sont indiquées dans le schéma de câblage. Au choix, vous pouvez passer les extrémités de fils étamées par les orifices et souder comme les autres composants ou encore les souder à plat sur la face inférieure sur les surfaces à souder.
- Seite 25 Les connexions centrales sont reliées de manière conductrice à l’axe et constituent le contre-raccor- The middle connections are connected conductively to the spindle and build the counter-connection dement pour toutes les pièces du condensateur variable. En outre, il y a des condensateurs d’équili- for all parts of the variable capacitor.
- Seite 26 Now, solder the appropriate cable sections. The lengths are specified in the wiring diagram. You can either push the tinned wire ends through the holes and solder them, as with the other components, or solder them on the rear side, flat to the soldered surfaces. Connect the black wire of the battery box to the Bat connection.
- Seite 27 Souder les deux fils sur la face inférieure. Ensuite couper les fils qui dépassent avec une pince cou- Now the radio is assembled correctly and can be tested. Draw the design with your name and the date pante à environ 2 mm au-dessus de la platine. in the schematic diagram on the last page of the instruction booklet.
- Seite 28 Also test the radio without the earth connection, only using the antenna A1. With a exact adjustment Travaux de soudage of the feedback, the sensitivity is sufficient to pick up powerful stations. On the other hand, a longer antenna with an earth connection can overload the receiver. In which case, use the looser antenna Pour le montage de la radios il faut 13 câbles.
-
Seite 29: Calibrating The Scale
Calibrating the Scale The printed frequency scale ranges from 3.5 MHz to 9.5 MHz. You must calibrate the receiver, to ensure that the frequencies indicated are as accurate as possible. You need two radio stations, with known frequency, on the lower and upper end of the range or a second radio for comparison. Adjust the high frequency receiver first. -
Seite 30: Montage Des Éléments De Commande
Verlag (publishing house), at www.elo-web.de A suitable additional set for this radio, with components and detailed instructions for DRM reception is available from Conrad Electronic SE (www.conrad.de), order no. 19 22 43, price: Ä9.95. It can also be used with the medium wave radio from last year. - Seite 31 Prenez tout votre temps en toute tranquillité pour de longues excursions sur les ondes courtes. itance of approx. 5 pF has strong effects on the oscillating circuit. The close coupling ensures that the Savourez la diversité des stations - surtout le soir. Réglez la fréquence et la rétroaction avec la plus transistor also acts as a varactor diode and allows the fine tuning of the frequency via the feedback grande précision possible et écoutez les stations les plus lointaines.
- Seite 32 La radio-rétro ondes courtes Cette radio nostalgique ondes courtes est un transistor à un seul circuit avec rétroaction réglable. Le principe de réception correspond à la lampe Audion des débuts de la radiotechnique. Il y a 80 ans, on pouvait déjà trouver cette radio dans de nombreux salons. Mais l’Audion était également utilisé par les radioamateurs, dans la technique des télécommunications comme dans les émetteurs-récep- teurs maritimes.