Herunterladen Inhalt Inhalt Diese Seite drucken
Inhaltsverzeichnis

Werbung

Verfügbare Sprachen
  • DE

Verfügbare Sprachen

  • DEUTSCH, seite 61
TSL-9000
DDS Autoloader
User's Guide
Mode d'emploi
Bedienungsanleitung
Guía del usuario
Istruzioni per I'uso
取扱説明書
──────────────
────────────
──────────
─────
─────────
────────
2
page
31
page
60
Seite
89
página
118
pagina
147
ページ
3-862-380-01(1)

Werbung

Inhaltsverzeichnis
loading

Inhaltszusammenfassung für Sony TSL-9000

  • Seite 1 3-862-380-01(1) TSL-9000 DDS Autoloader User’s Guide ──────────── page Mode d’emploi ────────── page Bedienungsanleitung ───── Seite Guía del usuario ───────── página Istruzioni per I’uso ──────── pagina 取扱説明書 ────────────── ページ...
  • Seite 2 TSL-9000 DDS Autoloader User’s Guide Mode d’emploi Bedienungsanleitung Guía del usuario Istruzioni per I’uso 取扱説明書 Printed in Japan © 1997 Sony Corporation...
  • Seite 3: Safety Regulations

    Safety Regulations Owner’s Record The model and serial numbers are located on the rear. Record the serial number in the space provided below. Refer to them whenever you call upon your Sony dealer regarding this product. Model No. Serial No.
  • Seite 4: How To Use This Guide

    How to Use this Guide This Guide describes the DDS Autoloader TSL-9000 and how to take care of it. Please read it carefully before using the drive, and keep it handy for future reference. The Guide consists of two parts plus the specifications. Refer to the parts that relate to your use of the drive.
  • Seite 5: Inhaltsverzeichnis

    Acoustic Noise ..................26 Suspended Particulate ................27 EMC ..................... 27 Air-cooling Requirement ............... 27 Power Requirements & Miscellaneous..........27 Third Party Support Contacts ............28 Sony Contacts ................. 30 For further information, please contact: ..........30 Table of Contents...
  • Seite 6: About The Dds Autoloader

    Recording media can be loaded in all 8 cartridge slots of the magazine, or, depending on the application software, an 8-cartridge magazine can be loaded with 1 cleaning cartridge and 7 recording cartridges. This configuration results in the TSL-9000 having a typical total capacity of 168 GB with data compression. Features The TSL-9000 DDS Autoloader has the following features: •...
  • Seite 7: Useable Cartridges

    Useable Cartridges Data cartridges used with the TSL-9000 must be marked with the DDS-3 or DDS-2 or DDS-1 logo. DDS-3 Logo DDS-2 Logo DDS-1 logo Caution: Be sure to use only the cartridges designed specifically for DDS (do not use DAT music cartridges).
  • Seite 8: Part Names And Functions

    Part Names and Functions Front Panel BUSY SELECT EJECT TAPE Magazine receptacle See page 16 and 18 for information on inserting and removing a magazine. See page 11 for information on inserting data cartridges. EJECT Button When pushed, the data cartridge in the DDS drive is returned to the magazine, then the magazine is ejected from the drive.
  • Seite 9 LCD panel The liquid crystal display contains five indicators that indicate the status of the DDS autoloader. These indicators are as follows. WARNING indicator This indicator lights upon occurrence of a condition that requires caution. The specific type of condition is indicated by the numeral that is displayed by the 7-segment numeric indicator.
  • Seite 10: Select Button

    When WARNING indicator lit Indicates a cleaning request. (Drive needs cleaning.) End of tape reached during cleaning. DDS cartridge loaded with incorrect orientation or slide shutter is positioned incorrectly. Remove all cartridges from the magazine, then reload them correctly. Magazine does not contain correct number of cartridges. “1”...
  • Seite 11: Magazine

    Magazine Stopper Prevents loaded cartridges from slipping out of the magazine. See page 11 and 13 for information on loading and removing cartridges. Write-protect tab Used to inhibit writes to data cartridges. Sliding this tab to the right write-protects all data cartridges, whether or not write protection is set on the individual data cartridges.
  • Seite 12: Loading Cartridges Into The Magazine

    Chapter 2 Operation This section describes how to insert data cartridges into the magazine, how to start up the drive unit, and how to handle the magazine and data cartridges. Loading Cartridges into the Magazine Loading 8 cartridges into the magazine It is recommended that all 8 cartridges be used as recording media.
  • Seite 13 Load data cartridges into the magazine as follows. First, load data cartridges into the bottom shelf of the magazine as shown in the figure below. Load cartridge 3 first, followed by cartridges 2 and 1 (in that order). Load data cartridges into the top shelf of the magazine as shown in the figure below.
  • Seite 14: Removing Cartridges From The Magazine

    A data cartridge should be set into the middle shelf of the magazine. Depending on the application software, a cleaning cartridge can be inserted instead of a data cartridge. Removing Cartridges from the Magazine Remove cartridges from the magazine as follows. While pressing down on the magazine stopper, place your finger in the hole at the rear of the magazine and push data cartridges toward the front of the magazine.
  • Seite 15 Position your thumb in the slot in the bottom of the magazine and continue sliding the cartridges toward the front of the magazine. Repeat steps 1 and 2 to remove five of the cartridges. Turn the magazine so that the open end faces up and tap it gently against your hand or a soft object.
  • Seite 16 Repeat steps 1 and 2 to remove the cartridges from the bottom shelf. Finally, remove the cartridge from the cleaning cartridge position in the middle shelf. Chapter 2 Operation...
  • Seite 17: How To Use The Dds Auto Loader

    Apply steady pressure until the mechanism pulls the magazine into the autoloader. The TSL-9000 runs a rotation test automatically to check which cartridges are loaded in the magazine, and whether they are inserted in the correct direction.
  • Seite 18: Data Cartridge Selection

    Data Cartridge Selection When 7 or 8 cartridges are loaded in the magazine You can select data cartridges loaded into the magazine as necessary by using the software on your computer. Data cartridges can also be selected by using the SELECT button on the drive.
  • Seite 19: Ejecting The Magazine

    Ejecting the Magazine Press the EJECT button. The LCD indicator displays “E,” then the magazine is ejected after the data cartridge inside the DDS drive has been returned to the magazine. Time required for magazine ejection may be up to 140 seconds. Caution: If the EJECT button is pressed while the BUSY indicator is flashing, the read or write operation currently in progress is aborted and the magazine is ejected...
  • Seite 20: Taking Care Of Magazines And Cartridges

    Taking Care of Magazines and Cartridges Use Precautions • Avoid heavy vibration and dropping. • The shutter on the face of the cartridge is opened automatically when it is inserted into the drive. Do not open the shutter by hand, as touching the tape may damage it.
  • Seite 21: Storage Precautions

    Label attachment position Using your fingernail, push the switch in the direction of the arrow to protect the tape from writing or accidental erasure. Return the switch to its original position to re-enable writing. • In case of a sudden change in temperature, condensation may interfere with reading and writing to a tape.
  • Seite 22: Head Cleaning

    Head Cleaning To keep the DDS Autoloader in top condition, clean the head as needed, using the proper head cleaning cartridge (sold separately). How to Clean The magazine is primarily intended to be used with 7 data cartridges, which ordinarily should be set together with 1 cleaning cartridge (the DG-5CL) in its prescribed position on the middle shelf.
  • Seite 23: Installation

    Installation SCSI Connection/Setting the SCSI ID/Option Switches R e a r o f R e a r o f E m b e d d e d D r i v e E m b e d d e d D r i v e 5V GND GND 12V Power Connector Jumpers...
  • Seite 24: Interface Implementation

    Interface Implementation Supported SCSI Messages Supported SCSI Commands Abort Erase Bus Device Reset Initialize Element Status (LUN=1) Command Complete Inquiry (LUN= 0 or 1) Disconnect Load/Unload (LUN= 0 or 1) Extended Message Locate -Synchronous Data Transfer Request Log Select Identify (w/&w/o Disconnect) Log Sense Initiator Detected Error Mode Select (6)
  • Seite 25: Mounting Holes

    Mounting Holes 2-M3 2-M3 8-M3 (Bottom) 21.8mm 139.7mm 0.86" 5.50" 82.5mm 146mm 3.25" 5.75" BUSY SELECT EJECT TAPE Note: Maximum mounting screw thread length is 3.0 mm. Longer thread length may damage the drive. Chapter 2 Operation...
  • Seite 26: Orientation

    Orientation The TSL-9000 can be installed in three different mounting positions as shown in the figure below. Each position has a maximum tolerance of +/– 10 degrees. BUSY SELECT EJECT TAPE Chapter 2 Operation...
  • Seite 27: Appendix

    Appendix Specifications Performance Shock Storage Capacity Operating 96 to 192 GB compressed No Data Loss (with 125m DDS-3 tape) Half Sine Bit Error Rate 5 G Peak 3 ms less than 10 3 axes, 3 directions Data Transfer Rate (Tape) *Interval 10 seconds 1.2 MB/s uncompressed Non-Operating...
  • Seite 28: Suspended Particulate

    Weight Suspended Particulate Autoloader 2.4 kg (not including magazine) Operating Less than 150 microgram/m Magazine 215 g (not including cartridges) Specifications may be subject to change, in the interest of technological improvement, without EMC Directive: 89/336/EEC notice or obligation. Air-cooling Requirement <40 °C Surrounding temperature Clean air flow is recommended to minimize the...
  • Seite 29: Third Party Support Contacts

    Third Party Support Contacts Host Adapter Vendors Phone Numbers Adaptec 408-945-8600 ATTO 716-691-1999 Bus Logic 408-492-9090 407-830-5522 Future Domain 714-253-0400 Initio 408-988-1919 Qlogic 714-438-2200 Ultera Systems Inc. 714-367-8800 Operating Systems Backup Software Vendors Phone Numbers Seagate 407-333-7500 Cheyenne 516-484-5110 NovaStor 805-579-6700 Macintosh Cheyenne...
  • Seite 30 Operating Systems Backup Software Vendors Phone Numbers AIX Unix Cheyenne 516-484-3150 Legato 415-812-6000 NovaStor 818-707-9900 Novell NLM Seagate 407-263-3500 Legato 415-812-6000 NovaStor 818-707-9900 Novell 801-429-5544 * All phone numbers listed are in the USA. Add the country code(1) prior to those numbers when calling from outside the USA. Appendix...
  • Seite 31: Sony Contacts

    Gotenyama Hills, 4-7-35 Kitashinagawa, Shinagawa-ku, Tokyo 104 Japan Tel: (03) 5448-2289 FAX: (03) 5448-7902 TELEX: J22262 Sony of Canada Ltd., Computer and Personal Information Dividion 405 Gordon Baker Road, Willowdale, Onsro, MZH 286, Canada TEL: (418) 499-1414 FAX: (416) 499-8541...
  • Seite 33 SONY NE DONNE AUCUNE GARANTIE EN CE QUI CONCERNE CE DOCUMENT. Sony ne peut étre tenu responsable pour toute errour contenue ici ou pour tout dommage indirect, accidentel ou consécutif en relation avec la fourniture, les performances ou l’utilisation de ce document.
  • Seite 34 Matière particulaire en suspension ............56 Compatibilité électromagnétique ............56 Refroidissement nécessaire de l’air ............56 Alimentation et divers ................56 Coordonnées d’assistance tiers ............ 57 Coordonnées de Sony ..............59 Pour de plus amples informations, contacter: ........59 Table des matières...
  • Seite 35: Au Sujet De L'unité De Chargement Automatique Dds

    DDS et un mécanisme de chargement de cassettes permettant une grande capacité d’enregistrement de données en utilisant la technologie DAT (bande audio numérique) de 4 mm. Le TSL-9000 donne une grande fiabilité de données grâce à la lecture après écriture, à un niveau supplémentaire de code de correction d’erreur et à...
  • Seite 36: Cassettes Utilisables

    Logo DDS Précaution: S’assurer de n’utiliser que les cassettes désignées spécifiquement pour DDS (ne pas utiliser de cassettes musicales DAT). Composants du système Le TSL-9000 se raccorde à l’ordinateur central via l’interface SCSI-2. Ordinateur central Périphériques TSL-9000 (ce périphérique) Chapitre 1...
  • Seite 37: Nomenclature

    Nomenclature Panneau avant BUSY SELECT EJECT TAPE Casier du chargeur Voir les pages 45 et 47 pour les informations sur l’insertion et le retrait du chargeur. Voir page 40 pour les informations sur l’insertion des cassettes de données. Touche d’éjection EJECT En appuyant sur cette touche, la cassette de données dans le lecteur DDS revient dans le chargeur qui est ensuite éjecté...
  • Seite 38 Panneau LCD L’affichage à cristaux liquides contient cinq témoins qui indiquent l’état de l’unité de chargement automatique DDS. Ces témoins sont les suivants: Témoin d’avertissement WARNING Ce témoin s’allume chaque fois qu’une précaution est nécessaire. Le type de condition est indiqué par le chiffre affiché sur le témoin numérique à 7 segments.
  • Seite 39 Lorsque le témoin WARNING s’allume Indique une nécessité de nettoyage (le lecteur doit être nettoyé). Fin de la bande pendant le nettoyage. Cassette DDS chargée dans le mauvais sens ou l’obturateur est mal positionné. Retirer toutes les cassettes du chargeur, puis les remettre correctement. Le chargeur ne contient pas le bon nombre de cassettes.
  • Seite 40: Chargeur

    Chargeur Arrêtoir Empêche les cassettes chargées de glisser hors du chargeur. Voir pages 40 et 43 pour les informations sur le chargement et le retrait des cassettes. Languette de protection contre l’écriture Utilisée pour empêcher l’écriture sur les cassettes de données. Glisser cette languette vers la droite pour protéger les cassettes de données contre l’écriture sans tenir compte de la position de la languette de protection de chaque cassette.
  • Seite 41: Chargement Des Cassettes Dans Le Chargeur

    Chapitre 2 Fonctionnement Cette section décrit comment placer les cassettes de données dans le chargeur, démarrer le lecteur et manipuler le chargeur et les cassettes de données. Chargement des cassettes dans le chargeur Chargement de 8 cassettes dans le chargeur Il est recommandé...
  • Seite 42 Chargement d’une cassette dans le chargeur Une cassette de données ou une cassette de nettoyage peut être chargée dans la fente ‘8’. Voir “Lorsqu’une seule cassette est insérée dans le chargeur” en page 46 pour la procédure de chargement correspondante. Lorsque la cassette de nettoyage est utilisée, le chargeur est automatiquement éjecté...
  • Seite 43 Charger les cassettes de données dans le compartiment supérieur du chargeur tel qu’indiqué dans la figure ci-dessous. Charger la cassette 4 en premier, suivie des cassettes 5, 6 et 7 (dans l’ordre). Une cassette de données doit être réglée dans le compartiment central du chargeur.
  • Seite 44: Retrait Des Cassettes Du Chargeur

    Retrait des cassettes du chargeur Retirer les cassettes du chargeur comme suit: Tout en appuyant sur l’arrêtoir, placer un doigt dans la fente à l’arrière du chargeur et pousser les cassettes de données vers l’avant du chargeur. Placer le pouce dans la fente en bas du chargeur et continuer à glisser les cassettes vers l’avant du chargeur.
  • Seite 45 Répéter les étapes 1 et 2 pour retirer 5 cassettes. Tourner le chargeur en dirigeant la face ouverte vers le haut et le taper doucement contre la main ou un objet mou. Ceci permet de déplacer les cassettes du compartiment supérieur vers le compartiment inférieur. Répéter les étapes 1 et 2 pour retirer les cassettes du compartiment inférieur.
  • Seite 46: Utilisation De L'unité De Chargement Automatique Dds

    Le TSL-9000 lance automatiquement un test de rotation pour vérifier les cassettes insérées dans le chargeur et leur sens. La vérification de rotation demande environ 90 secondes. A la fin du test, les numéros ‘1’...
  • Seite 47: Sélection De La Cassette De Données

    Sélection de la cassette de données Lorsque 7 ou 8 cassettes sont placées dans le chargeur Il est possible de sélectionner les cassettes de données dans le chargeur en utilisant le logiciel de l’ordinateur. Les cassettes de données peuvent également être sélectionnées en utilisant la touche de sélection SELECT sur l’unité.
  • Seite 48: Ejection Du Chargeur

    Ejection du chargeur Appuyer sur la touche d’éjection EJECT. Le témoin LCD affiche “E”, puis le chargeur est éjecté après que la cassette de données dans le lecteur DDS retourne dans le chargeur. La durée nécessaire pour l’éjection du chargeur peut être de 140 secondes maximum.
  • Seite 49: Manipulation Du Chargeur Et Des Cassettes

    Manipulation du chargeur et des cassettes Précautions d’utilisation • Eviter les fortes vibrations et les chutes. • L’obturateur sur la face de la cassette est automatiquement ouvert lorsqu’il est inséré dans le lecteur. Ne pas ouvrir l’obturateur à la main au risque d’endommager la bande en la touchant.
  • Seite 50: Précautions De Rangement

    Fixation de l’étiquette Position En utilisant l’ongle, pousser le commutateur dans la direction de la flèche pour protéger la bande contre l’écriture ou l’effacement accidentel. Remettre le commutateur sur sa position d’origine pour permettre l’écriture. • Dans le cas de changement brusque de température, la condensation peut empêcher la lecture ou l’écriture sur la bande.
  • Seite 51: Nettoyage De Tête

    Nettoyage de tête Pour garder l’unité de chargement automatique DDS en bonne condition, nettoyer la tête chaque fois que c’est nécessaire en utilisant la cassette de nettoyage de tête appropriée (vendue séparément). Nettoyage Le chargeur est conçu pour être normalement utilisé avec 7 cassettes de données, qui doivent être placées avec une cassette de nettoyage (la DG-5CL) dans la position destinée du compartiment central.
  • Seite 52: Installation

    Installation Connexion SCSI/ Réglage du SCSI ID/ Commutateurs optionnels R e a r o f R e a r o f E m b e d d e d D r i v e E m b e d d e d D r i v e 5V GND GND 12V Power Connector Jumpers...
  • Seite 53: Mise En Place D'interface

    Mise en place d’interface Messages SCSI compatibles Commandes SCSI compatibles Abort Erase Bus Device Reset Initialize Element Status (LUN=1) Command Complete Inquiry (LUN= 0 or 1) Disconnect Load/Unload (LUN= 0 or 1) Extended Message Locate -Synchronous Data Transfer Request Log Select Identify (w/&w/o Disconnect) Log Sense Initiator Detected Error...
  • Seite 54: Fentes De Montages

    Fentes de montages 2-M3 2-M3 8-M3 (Bottom) 21.8mm 139.7mm 0.86" 5.50" 82.5mm 146mm 3.25" 5.75" BUSY SELECT EJECT TAPE Remarque: La longueur maximale des vis de montage doit être de 3,0 mm. Des vis plus longues risquent d’endommager le lecteur. Chapitre 2 Fonctionnement...
  • Seite 55: Orientation

    Orientation Le TSL-9000 peut être installé dans trois différentes positions de montage tel qu’indiqué dans la figure ci-dessous. Chaque position peut avoir un écart admissible de +/– 10 degrés. BUSY SELECT EJECT TAPE Chapitre 2 Fonctionnement...
  • Seite 56: Appendice

    Appendice Spécifications Performances Choc Capacité d’enregistrement Fonctionnement 96 à 192 GB compressés Pas de perte de données (avec une bande DDS-3 de 125m) Demi sinusoïde Pourcentage d’erreur par bit Crête 5 G 3 ms inférieur à 10 3 axes, 3 directions Vitesse de transfert de données (Bande) *Intervalle de 10 secondes 1,2 MB/s non compressés...
  • Seite 57: Matière Particulaire En Suspension

    Poids Matière particulaire en suspension Unité de chargement automatique 2,4 kg (sans le chargeur) Fonctionnement Chargeur 215 g Inférieure à 150 microgrammes/m (sans les cassettes) Les spécifications sont sujettes à des Compatibilité électromagnétique modifications, dans l’intérêt du développement technologique, sans préavis ni obligation. Directive CEM: 89/336/CEE Refroidissement nécessaire de...
  • Seite 58: Coordonnées D'assistance Tiers

    Coordonnées d’assistance tiers Fournisseurs d’adaptateur central Numéros de téléphones Adaptec 408-945-8600 ATTO 716-691-1999 Bus Logic 408-492-9090 407-830-5522 Future Domain 714-253-0400 Initio 408-988-1919 Qlogic 714-438-2200 Ultera Systems Inc. 714-367-8800 Fournisseurs de logiciels Systèmes d’exploitation Numéros de téléphone de sauvegarde Seagate 407-333-7500 Cheyenne 516-484-5110 NovaStor...
  • Seite 59 Fournisseurs de logiciels Systèmes d’exploitation Numéros de téléphone de sauvegarde AIX Unix Cheyenne 516-484-3150 Legato 415-812-6000 NovaStor 818-707-9900 Novell NLM Seagate 407-263-3500 Legato 415-812-6000 NovaStor 818-707-9900 Novell 801-429-5544 * Tous les numéros de téléphone indiqués sont aux Etats-Unis. Ajoutez le code du pays(1) avant ces numéros lorsque vous téléphonez d’en dehors des Etats-Unis. Appendice...
  • Seite 60: Coordonnées De Sony

    Gotenyama Hills, 4-7-35 Kitashinagawa, Shinagawa-ku, Tokyo 104 Japan Tel: (03) 5448-2289 FAX: (03) 5448-7902 TELEX: J22262 Sony of Canada Ltd., Computer and Personal Information Dividion 405 Gordon Baker Road, Willowdale, Onsro, MZH 286, Canada TEL: (418) 499-1414 FAX: (416) 499-8541...
  • Seite 61: Sicherheitsvorkehrungen

    Sicherheitsvorkehrungen Diese Ausrüstung erfüllt die Europäischen EMC-Bestimmungen für die Verwendung in folgender / folgenden Umgebung (en) : • Wohngegenden • Gewerbegebiete • Leichtindustriegebiete (Diese Ausrüstung erfüllt die Bestimmungen der Norm EN55022, Klass B.)
  • Seite 62 Hinweise zu dieser Bedienungsanleitung Diese Anleitung erklärt die Bedienung und Pflege des DDS-Autoloaders TSL-9000. Bitte lesen Sie diese Anleitung vor dem Benutzen des Laufwerks sorgfältig durch und heben Sie sie für späteres Nachschlagen auf. Die Anleitung besteht aus zwei Kapiteln und den technischen Daten. Bitte lesen Sie die Abschnitte durch, in denen Ihre Verwendung des Gerätes erklärt...
  • Seite 63 Höhe über dem Meeresspiegel .............. 84 Geräuschpegel ..................84 Schwebeteilchen ..................85 Elektromagnetische Verträglichkeit (EMV) .......... 85 Luftkühlung ................... 85 Stromversorgung und Verschiedenes ............ 85 Telefonnummern unserer Servicepartner ........86 Sony Kontaktadressen ..............88 Für weitere Informationen wenden Sie sich bitte an: ......88 Inhalt...
  • Seite 64: Kapitel 1 Einführung

    Über den DDS-Autoloader Wir gratulieren Ihnen zum Kauf des SDT-9000 DDS-3 Bandlaufwerks von Sony. Der Sony TSL-9000 Autoloader ist ein DDS-Laufwerk mit und Kassettenwechselmechanismus, mit dem unter Einsatz der 4-mm DAT- Technologie (DAT steht für Digital Audio Tape) große Datenmengen gespeichert werden können.
  • Seite 65: Geeignete Kassetten

    Geeignete Kassetten Die mit dem TSL-9000 benutzten Datenkassetten müssen das DDS, DDS-2 oder DDS-3-Logo tragen. DDS-3-Logo DDS-2-Logo DDS-Logo Vorsicht: Benutzen Sie ausschließlich eigens für DDS konzipierte Kassetten (benutzen Sie keine DAT-Musikkassetten). Systemkomponenten Die Verbindung des TSL-9000 zum Hostcomputer erfolgt über eine SCSI-2 Schnittstelle.
  • Seite 66: Name Und Funktion Der Bauteile

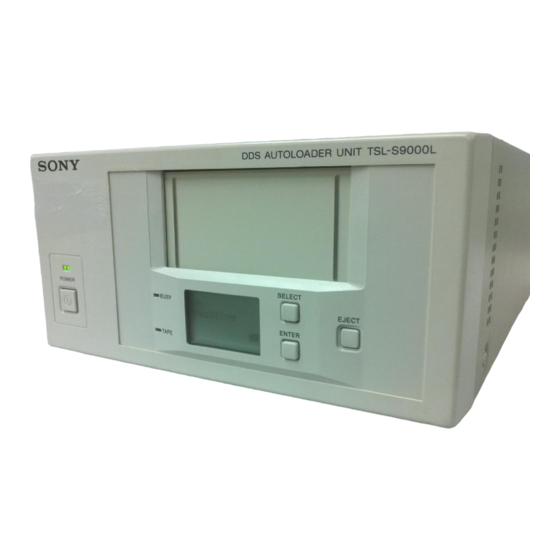
    Name und Funktion der Bauteile Frontseite BUSY SELECT EJECT TAPE Magazinaufnahme Wie Magazine eingesetzt und entnommen werden, lesen Sie bitte auf den Seiten 74 und 76. Auf Seite 69 wird das Einsetzen von Datenkassetten erklärt. Taste EJECT Durch Drücken dieser Taste wird die Datenkassette aus dem DDS- Laufwerk zurück ins Magazin transportiert und das Magazin anschließend aus dem Gerät ausgeworfen.
  • Seite 67 LCD-Anzeige Die LCD-Anzeige gibt fünf Meldungen aus, die den jeweiligen Zustand des DDS-Autoloaders anzeigen. Diese Meldungen sind: a WARNING Aufleuchten dieser Anzeige bedeutet, daß Sie Vorsicht walten lassen müssen. Worum es sich dabei genau handelt, wird von der 7-teiligen numerischen Anzeige durch eine Ziffer angegeben. Schreibschutz Diese Anzeige leuchtet, wenn eine schreibgeschützte Datenkassette ins Laufwerk geladen ist.
  • Seite 68: Taste Select

    Wenn die Anzeige WARNING leuchtet Aufforderung zum Reinigen. (Laufwerk muß gereinigt werden.) Bandende beim Reinigen erreicht. DDS-Kassette verkehrt eingesetzt oder Schiebeverschluß falsch positioniert. Alle Kassetten aus dem Magazin entfernen und richtig einsetzen. Magazin enthält nicht die richtige Anzahl Kassetten. “1” wird angezeigt, wenn : das Laufwerk nach jeweils 24 Stunden Trommeldrehung automatisch zur Kopfreinigung auffordert oder aufgrund von Ablagerungen auf dem Lese-/Schreibkopf die Daten nicht lesen oder schreiben kann.
  • Seite 69: Magazin

    Magazin Stopper Verhindert, daß geladene Kassetten aus dem Magazin herausrutschen. Das Laden und Entnehmen von Kassetten wird auf den Seiten 69 und 72 erklärt. Schreibschutzschalter Wird benutzt, um das Beschreiben von Datenkassetten zu verhindern. Wird der Schalter nach rechts geschoben, können die Kassetten nicht beschrieben werden, und zwar ungeachtet der Schreibschutzeinstellung der einzelnen Datenkassetten.
  • Seite 70: Kapitel 2 Bedienung

    Kapitel 2 Bedienung In diesem Abschnitt wird das Einsetzen von Datenkassetten ins Magazin, die Inbetriebnahme des Laufwerks, sowie die Handhabung des Magazins und der Datenkassetten erklärt. Kassetten ins Magazin einsetzen 8 Kassetten ins Magazin einsetzen Es empfiehlt sich, alle 8 Kassetten als Aufzeichnungsmedien zu benutzen. Ja nach Anwendungssoftware, kann eine der Datenkassetten durch eine Reinigungskassette ersetzt werden.
  • Seite 71 1 Kassette ins Magazin einsetzen In Magazinplatz 8 kann entweder eine Datenkassette oder eine Reinigungskassette eingesetzt werden. Wie das Magazin in diesem Fall eingesetzt wird, erfahren Sie unter “Wenn 1 Kassette ins Magazin eingesetzt ist” auf Seite 75. Ist die Reinigungskassette eingesetzt, wird das Magazin nach Abschluß...
  • Seite 72 Setzen Sie nun wie nachfolgend abgebildet Datenkassetten ins oberte Magazinfach ein. Zuerst Kassette 4, dann die Kassetten 5, 6 und 7 einsetzen (in dieser Reihenfolge). Im mittleren Magazinfach sollte eine Datenkassette eingesetzt werden. Je nach Anwendungssoftware, kann anstelle einer Datenkassette auch eine Reinigungskassette eingesetzt werden.
  • Seite 73: Kassetten Aus Dem Magazin Entfernen

    Kassetten aus dem Magazin entfernen Die Kassetten werden wie folgt aus dem Magazin entfernt: Während Sie auf den Magazinstopper drücken, stecken Sie Ihren Finger in die Öffnung an der Rückseite des Magazins und drücken die Datenkassetten in Richtung Magazin-Vorderseite. Legen Sie Ihren Daumen in den Schlitz in der Magazin-Unterseite und schieben Sie die Kassetten weiter in Richtung Magazin-Vorderseite.
  • Seite 74 Wiederholen Sie die Schritte 1 und 2, um 5 Kassetten zu entfernen. Drehen Sie das Magazin so, daß die offene Seite nach oben weist und schlagen Sie es leicht gegen Ihre Hand oder einen weichen Gegenstand. Dadurch rutschen die Kassetten aus dem oberen Fach ins untere Fach. Wiederholen Sie die Schritte 1 und 2, um die Kassetten aus dem unteren Fach zu entfernen.
  • Seite 75: Benutzung Des Dds-Autoloaders

    Autoloaders in Richtung des großen Pfeils ein. Drücken Sie gleichmäßig, bis der Mechanismus das Magazin in den Autoloader zieht. Das TSL-9000 führt automatisch einen Rotationstest durch, um zu prüfen, welche Kassetten ins Magazin eingesetzt sind und ob diese richtig ausgerichtet sind.
  • Seite 76: Auswahl Der Datenkassetten

    Auswahl der Datenkassetten Wenn 7 oder 8 Kassetten ins Magazin eingesetzt sind Sie können die ins Magazin eingesetzten Datenkassetten je nach Bedarf über die auf Ihrem Computer laufenden Software wählen. Zum Wählen der Datenkassetten kann aber auch die Taste SELECT auf dem Gerät selbst benutzen werden.
  • Seite 77: Magazinauswurf

    Magazinauswurf Drücken Sie die Taste EJECT. Die LCD-Anzeige zeigt “E” und das Magazin wird ausgeworfen, sobald die im DDS-Laufwerk geladene Datenkassette ins Magazin zurücktransportiert ist. Es kann bis zu 140 Sekunden dauern, bis das Magazin ausgeworfen wird. Vorsicht: Wird die EJECT-Taste gedrückt, während die BUSY-Lampe blinkt, wird der aktuelle Lese- oder Schreibvorgang abgebrochen und das Magazin wie oben beschrieben ausgeworfen.
  • Seite 78: Behandlung Von Magazinen Und Kassetten

    Behandlung von Magazinen und Kassetten Vorsichtsmaßnahmen bei der Bedienung • Starke Erschütterungen und Fallenlassen vermeiden. • Der Verschluß an der Vorderseite der Kassetten öffnet sich beim Einschieben ins Laufwerk automatisch. Den Verschluß nicht von Hand öffnen, da das Band durch Berühren beschädigt werden kann. •...
  • Seite 79: Vorsichtsmaßnahmen Bei Der Lagerung

    Stelle zum Anbringen des Etiketts Schieben Sie den Schalter mit Ihrem Fingernagel in Pfeilrichtung, um das Band vor Beschreiben oder irrtümliches Löschen zu schützen. Um das Band beschreiben zu können, den Schalter in die ursprüngliche Position zurückschiebenn. • Plötzliche Temperaturschwankungen können Kondensation verursachen und zu Beeinträchtigungen beim Lesen und Schreiben von Bändern führen.
  • Seite 80: Reinigung Des Kopfes

    Reinigung des Kopfes Um den DDS-Autoloader in gutem Zustand zu halten, sollten Sie den Kopf nach Bedarf mit der geeigneten Kopf-Reinigungskassette (separat erwerben) reinigen. Reinigung Das Magazin ist vor allem zur Verwendung mit 7 Datenkassetten gedacht, die gewöhnlich zusammen mit 1 Reinigungskassette (der DG-5CL) eingesetzt werden sollten, deren Position wie beschrieben im Mittelfach des Magazins ist.
  • Seite 81: Installation

    Installation SCSI-Anschluß/Einstellen des SCSI-ID/Optionsschalter R e a r o f R e a r o f E m b e d d e d D r i v e E m b e d d e d D r i v e 5V GND GND 12V Power Connector Jumpers...
  • Seite 82: Schnittstellen

    Schnittstellen Unterstützte SCSI-Meldungen Unterstützte SCSI-Befehle Abort Erase Bus Device Reset Initialize Element Status (LUN=1) Command Complete Inquiry (LUN= 0 or 1) Disconnect Load/Unload (LUN= 0 or 1) Extended Message Locate -Synchronous Data Transfer Request Log Select Identify (w/&w/o Disconnect) Log Sense Initiator Detected Error Mode Select (6) Message Parity Error...
  • Seite 83: Montagelöcher

    Montagelöcher 2-M3 2-M3 8-M3 (Bottom) 21.8mm 139.7mm 0.86" 5.50" 82.5mm 146mm 3.25" 5.75" BUSY SELECT EJECT TAPE Hinweis: Das Gewinde der Befestigungsschrauben darf maximal 3,0 mm lang sein. Längere Gewinde können das Gerät beschädigen. Kapitel 2 Bedienung...
  • Seite 84: Ausrichtung

    Ausrichtung Wie die nachfolgende Abbildung zeigt, kann das TSL-9000 in drei verschiedenen Montagepositionen installiert werden. Die maximale Toleranz jeder Montageposition beträgt +/– 10 Grad. BUSY SELECT EJECT TAPE Kapitel 2 Bedienung...
  • Seite 85: Anhang

    Anhang Technische Daten Produktdaten Erschütterungen Speicherkapazität Betrieb 96 bis 192 GB komprimiert Kein Datenverlust (mit 125 m langen DDS-3-Bändern) Halber Sinus Bitfehlerrate 5 G Spitzenwert 3 ms weniger als 10 3 Achsen, 3 Richtungen Datenübertragungsrate (Band) *Abstand 10 Sekunden 1,2 MB/s nicht komprimiert Lagerung 2,4 MB/s komprimiert Keine Geräteschäden...
  • Seite 86: Schwebeteilchen

    Gewicht Schwebeteilchen Autoloader 2,4 kg (ohne Magazin) Betrieb Weniger als 150 Mikrogramm/m Magazin 215 g (ohne Kassetten) Elektromagnetische Verträglichkeit Änderung der technischen Daten, die der (EMV) technischen Verbesserung dienen, Irrtümer und technische Änderungen vorbehalten. EMV-Weisung: 89/336/EEC Luftkühlung <40 °C Umgebungstemperatur Ein sauberer Luftstrom reduziert die Gefahr von Datenverlust.
  • Seite 87: Telefonnummern Unserer Servicepartner

    Telefonnummern unserer Servicepartner Händler für Hostadapter Telefonnummern Adaptec 408-945-8600 ATTO 716-691-1999 Bus Logic 408-492-9090 407-830-5522 Future Domain 714-253-0400 Initio 408-988-1919 Qlogic 714-438-2200 Ultera Systems Inc. 714-367-8800 Betriebssysteme Händler für Backup-Software Telefonnummern Seagate 407-333-7500 Cheyenne 516-484-5110 NovaStor 805-579-6700 Macintosh Cheyenne 516-484-5110 Dantz 510-253-3000 NovaStor...
  • Seite 88 Betriebssysteme Händler für Backup-Software Telefonnummern AIX Unix Cheyenne 516-484-3150 Legato 415-812-6000 NovaStor 818-707-9900 Novell NLM Seagate 407-263-3500 Legato 415-812-6000 NovaStor 818-707-9900 Novell 801-429-5544 * Die hier aufgelisreten Kundendienstnummen anderer Firmen befinden sich alle in den U.S.A. Bitte wählen sie die Länderkennzahl +001 für die U.S.A, wenn sie von außerhalb der U.S.A. anrufen. Anhang...
  • Seite 89: Sony Kontaktadressen

    Gotenyama Hills, 4-7-35 Kitashinagawa, Shinagawa-ku, Tokyo 104 Japan Tel: (03) 5448-2289 FAX: (03) 5448-7902 TELEX: J22262 Sony of Canada Ltd., Computer and Personal Information Dividion 405 Gordon Baker Road, Willowdale, Onsro, MZH 286, Canada TEL: (418) 499-1414 FAX: (416) 499-8541...
  • Seite 91: Cómo Utilizar Esta Guía

    Cómo utilizar esta guía Esta guía describe el autocargador DDS modelo TSL-9000 y cómo cuidar de él. Léala cuidadosamente antes de utilizar la unidad de cinta, y guárdela a mano para utilizarla como referencia en el futuro. La guía consiste en dos partes más las especificaciones. Consulte las partes relacionadas con la utilización de su unidad de cinta.
  • Seite 92 Partículas suspendidas ................. 114 EMC ....................114 Requerimientos de refrigeración de aire ..........114 Requerimientos de alimentación y demás ........... 114 Contactos de apoyo de terceros ..........115 Contactos Sony ................117 Para obtener más información, póngase en contacto con: ....117 Índice...
  • Seite 93: Acerca Del Autocargador Dds

    DAT (cinta audiodigital) de 4 mm. El TSL-9000 logra una alta fiabilidad de los datos mediante la función de lectura tras escritura, un nivel adicional de código de corrección de errores y otras características.
  • Seite 94: Cartuchos Utilizables

    Precaución: Asegúrese de utilizar solamente cartuchos diseñados específicamente para DDS (no utilice cartuchos musicales DAT). Componentes del sistema El TSL-9000 se conecta al ordenador principal a través de una interfaz SCSI-2. Ordenador principal TSL-9000 (este dispositivo) Dispositivos periféricos Capítulo 1 Introducción...
  • Seite 95: Nombres Y Funciones De Las Partes

    Nombres y funciones de las partes Panel frontal BUSY SELECT EJECT TAPE Receptáculo del cargador Consulte las páginas 103 y 105 para obtener información relacionada con la inserción y la extracción de un cargador. Consulte la página 98 para conocer la información relacionada con la inserción de cartuchos de datos.
  • Seite 96 Panel LCD El panel de cristal líquido contiene cinco indicadores que indican el estado del autocargador DDS. Estos indicadores son los siguientes. Indicador WARNING Este indicador se enciende al producirse una condición que requiere precaución. El tipo específico de la condición se indica mediante el número visualizado por el indicador numérico de 7 segmentos.
  • Seite 97 Cuando está encendido el indicador WARNING Indica una solicitud de limpieza. (La unidad de cinta necesita ser limpiada.) Se ha llegado al final de una cinta durante la limpieza. Un cartucho DDS ha sido introducido mal o un obturador deslizante está mal colocado. Saque todos los cartuchos del cargador y vuelva a introducirlos correctamente.
  • Seite 98: Cargador

    Cargador Tope Impide que los cartuchos cargados se salgan del cargador. Consulte las páginas 98 y 101 para tener información de la carga y extracción de los cartuchos. Lengüeta de protección contra escritura Se utiliza para evitar escribir en los cartuchos de datos. Al deslizar esta lengüeta hacia la derecha, todos los cartuchos de datos quedan protegidos contra la escritura, tanto si la lengüeta de protección contra escritura de cada cartucho de datos individual está...
  • Seite 99: Carga De Cartuchos En El Cargador

    Capítulo 2 Operación Esta sección describe cómo insertar cartuchos de datos en el cargador, cómo arrancar la unidad de cinta y cómo manejar el cargador y los cartuchos de datos. Carga de cartuchos en el cargador Carga de 8 cartuchos en el cargador Se recomienda utilizar todos los 8 cartuchos como medio de grabación.
  • Seite 100 Carga de 1 cartucho en el cargador En la ranura “8” se puede cargar un cartucho de datos o un cartucho de limpieza. Consulte “Cuando se introduzca 1 cartucho en el cargador”, en la página 104, para conocer el procedimiento pertinente para cargar el cargador. Cuando se utilice el cartucho de limpieza, el cargador será...
  • Seite 101 Cargue cartuchos de datos en el estante superior del cargador como se muestra en la figura de abajo. Cargue primero el cartucho número 4 y luego el 5, el 6 y el 7 (en este orden). En el estante del medio del cargador deberá ponerse un cartucho de datos.
  • Seite 102: Extracción De Cartuchos Del Cargador

    Extracción de cartuchos del cargador Quite los cartuchos del cargador de la forma siguiente. Mientras pulsa hacia abajo el tope del cargador, ponga su dedo en el orificio de la parte trasera del cargador y empuje los cartuchos de datos hacia la parte delantera del cargador.
  • Seite 103 Repita los pasos 1 y 2 para quitar cinco de los cartuchos. Gire el cargador para que el extremo abierto quede hacia arriba, y golpee el cargador ligeramente contra su mano o contra un objeto blando. Esto hará que los cartuchos se desplacen del estante superior al estante inferior.
  • Seite 104: Cómo Utilizar El Autocargador Dds

    Presione un poco el cargador hasta que el mecanismo lo introduzca en el autocargador. El TSL-9000 ejecuta automáticamente una prueba de rotación para comprobar qué cartuchos están cargados en el cargador, y si éstos se encuentran insertados en el sentido correcto.
  • Seite 105: Selección De Cartuchos De Datos

    Selección de cartuchos de datos Cuando se carguen 7 u 8 cartuchos en el cargador Utilizando el software de su ordenador, usted podrá seleccionar los cartuchos de datos cargados en el cargador. Los cartuchos de datos también se pueden seleccionar con el botón SELECT de la unidad de cinta.
  • Seite 106: Expulsión Del Cargador

    Expulsión del cargador Pulse el botón EJECT. El indicador LCD visualizará “E”, y luego el cargador será expulsado después de que el cartucho de datos del interior de la unidad de cinta DDS haya sido devuelto al cargador. El tiempo necesario para la expulsión del cargador puede llegar a ser de 140 segundos.
  • Seite 107: Cuidados De Los Cargadores Y Los Cartuchos

    Cuidados de los cargadores y los cartuchos Precauciones de utilización • Evite vibraciones fuertes y caídas. • El obturador de la cara del cartucho se abre automáticamente cuando éste se inserta en la unidad de cinta. No abra el obturador con la mano porque si toca la cinta ésta se estropeará.
  • Seite 108: Precauciones Para Guardar Cargadores Y Cartuchos

    Posición de colocación de la etiqueta Usando su uña, empuje el interruptor en el sentido de la flecha para proteger la cinta contra la escritura o el borrado accidental. Vuelva a poner el interruptor en su posición original para permitir la escritura. •...
  • Seite 109: Limpieza De La Cabeza

    Limpieza de la cabeza Para mantener el autocargador DDS en las mejores condiciones, limpie la cabeza cuando sea necesario utilizando el cartucho de limpieza de cabezas apropiado (vendido por separado). Cómo limpiar El cargador ha sido diseñado principalmente para ser utilizado con 7 cartuchos de datos, que generalmente deberán instalarse junto con 1 cartucho de limpieza (el DG-5CL) que deberá...
  • Seite 110: Instalación

    Instalación Conexión SCSI/Selección de identificación SCSI/Interruptores de opciones R e a r o f R e a r o f E m b e d d e d D r i v e E m b e d d e d D r i v e 5V GND GND 12V Power Connector Jumpers...
  • Seite 111: Implementación De Interfaz

    Implementación de interfaz Mensajes SCSI soportados Comandos SCSI soportados Abort Erase Bus Device Reset Initialize Element Status (LUN=1) Command Complete Inquiry (LUN= 0 or 1) Disconnect Load/Unload (LUN= 0 or 1) Extended Message Locate -Synchronous Data Transfer Request Log Select Identify (w/&w/o Disconnect) Log Sense Initiator Detected Error...
  • Seite 112: Agujeros De Montaje

    Agujeros de montaje 2-M3 2-M3 8-M3 (Bottom) 21.8mm 139.7mm 0.86" 5.50" 82.5mm 146mm 3.25" 5.75" BUSY SELECT EJECT TAPE Nota: La máxima longitud de rosca de los tornillos de montaje es de 3 mm. Una longitud superior podría estropear la unidad de cinta. Capítulo 2 Operación...
  • Seite 113: Orientación

    Orientación El TSL-9000 puede instalarse en tres posiciones de montaje diferentes, como se muestra en la figura de abajo. Cada posición tiene una tolerancia máxima de +/– 10 grados. BUSY SELECT EJECT TAPE Capítulo 2 Operación...
  • Seite 114: Apéndice

    Apéndice Especificaciones Prestaciones Golpes Capacidad de almacenamiento Funcionando 96 a 192 GB comprimidos Sin pérdida de datos (con cinta DDS-3 de 125 m) Semisinusoide Proporción de errores de bits 5 G cresta 3 ms menos de10 3 ejes, 3 sentidos Velocidad de transferencia de datos (cinta) *Intervalo de 10 segundos 1,2 MB/s sin comprimir...
  • Seite 115: Partículas Suspendidas

    Peso Partículas suspendidas Autocargador 2,4 kg (sin incluir el cargador) Funcionando Menos de 150 microgramos/m Cargador 215 g (sin incluir cartuchos) Por motivos de mejoras tecnológicas, las especificaciones están sujetas a cambios sin Directiva EMC: 89/336/EEC previo aviso y sin ninguna obligación por nuestra parte.
  • Seite 116: Contactos De Apoyo De Terceros

    Contactos de apoyo de terceros Vendedores de adaptadores principales Números de teléfono Adaptec 408-945-8600 ATTO 716-691-1999 Bus Logic 408-492-9090 407-830-5522 Future Domain 714-253-0400 Initio 408-988-1919 Qlogic 714-438-2200 Ultera Systems Inc. 714-367-8800 Sistemas operativos Vendedores de software de apoyo Números de teléfono Seagate 407-333-7500 Cheyenne...
  • Seite 117 Sistemas operativos Vendedores de software de apoyo Números de teléfono AIX Unix Cheyenne 516-484-3150 Legato 415-812-6000 NovaStor 818-707-9900 Novell NLM Seagate 407-263-3500 Legato 415-812-6000 NovaStor 818-707-9900 Novell 801-429-5544 * Todos los números de teléfono listados son de los EE.UU. Añada el código del país (1) antes de los números de teléfono cuando llame desde el exterior de los EE.UU.
  • Seite 118: Contactos Sony

    Gotenyama Hills, 4-7-35 Kitashinagawa, Shinagawa-ku, Tokyo 104 Japan Tel: (03) 5448-2289 FAX: (03) 5448-7902 TELEX: J22262 Sony of Canada Ltd., Computer and Personal Information Dividion 405 Gordon Baker Road, Willowdale, Onsro, MZH 286, Canadá TEL: (418) 499-1414 FAX: (416) 499-8541...
  • Seite 120 Uso di questa guida Questa guida descrive il DDS Autoloader TSL-9000 e la sua manutenzione. prima di utilizzarlo, leggere con attenzione questo manuale, conservandolo poi in un luogo sicuro così da poterlo consultare di nuovo al momento del bisogno. Questo manuale consiste di due parti, più i dati tecnici. Consultare le parti che interessano, tralasciando le altre.
  • Seite 121 Particelle in sospensione ..............143 EMC ....................143 Aerazione ..................... 143 Alimentazione ed altre caratteristiche ..........143 Assistenza tecnica da terze parti ..........144 Assistenza tecnica Sony .............. 146 Per maggiori informazioni, entrare in contatto con: ......146 Table of Contents...
  • Seite 122: Il Dds Autoloader

    Il DDS Autoloader Congratulazioni per avere acquistato un drive Sony DDS-3 Serie SDT-9000. Il Sony TSL-9000 Autoloader è un drive DDS con dispositivo di scambio automatico di cartucce che permette di salvare grandi quantità di dati su cassette DAT (Digital Audio Tape). Il TSL-9000 raggiunge altissimi livelli di affidabilità...
  • Seite 123: Cartucce Utilizzabili

    Cartucce utilizzabili Le cartucce utilizzabili con il TSL-9000 devono essere contrassegnate con il logo DDS-3, DDS-2 o DDS-1. Logo DDS-3 Logo DDS-2 Logo DDS-1 Attenzione: Usare solo cartucce progettate specificamente per il sistema DDS (e non cartucce ad uso audio).
  • Seite 124: Nome E Funzione Delle Varie Parti

    Nome e funzione delle varie parti Pannello anteriore BUSY SELECT EJECT TAPE Ricettacolo caricatore Per informazioni sul caricamento e l’estrazione di un caricatore, consultare pag. 132 e pag. 134. Per informazioni sul caricamento delle cartucce, consultare pag. 127. Pulsante EJECT Se viene premuto, la cartuccia dati nel drive DDS fa ritorno nel caricatore e questo viene espulso dal drive.
  • Seite 125 Pannello LCD Il pannello a cristalli liquidi contiene cinque indicatori che mostrano lo status del DDS Autoloader. Questi indicatori sono i seguenti. Indicatore WARNING Questo indicatore si accende quando si verifica una situazione anormale. Il tipo di condizione viene a sua volta indicato da un numero che appare nell’indicatore numerico a sette cifre.
  • Seite 126 Ad indicatore WARNING acceso Richiesta di pulizia delle testine. Il drive venire ripulito. Durante la pulizia si è raggiunta la fine del lato della cartuccia. La cartuccia DDS è stata caricata in modo scorretto o lo sportello scorrevole si trova in una posizione scorretta. Rimuovere le cartucce dal caricatore e ricaricarle correttamente.
  • Seite 127: Caricatore

    Caricatore Arresto Evita la fuoriuscita delle cartucce dal caricatore. Per informazioni su come caricare e togliere le cartucce, consultare le pagine 127 e 129. Linguetta di protezione dalla scrittura Rende impossibile la scrittura di dati sulle cartucce. Facendola scivolare verso destra si proteggono dalla scrittura tutte le cartucce a prescindere dalla posizione della linguetta di ciascuna cartuccia individuale.
  • Seite 128: Caricamento Delle Cartucce Nel Caricatore

    Capitolo 2 Uso del drive Questa sezione descrive come inserire cartucce nel drive, come avviare l’unità e come usare e mantenere in buone condizioni caricatore e cartucce dati. Caricamento delle cartucce nel caricatore Caricamento di otto cartucce nel caricatore Si raccomanda che tutte ed otto le cartucce siano usate come media di registrazione.
  • Seite 129 Caricare cartucce dati nel caricatore nel modo seguente. Per prima cosa, caricare cartucce dati nel ripiano inferiore del caricatore nel modo mostrato nella figura qui sotto. Caricare la cartuccia numero tre per prima, facendola seguire da quella due e quella uno in quest’ordine. Caricare le cartucce dati nel ripiano superiore nel modo mostrato in figura qui sotto.
  • Seite 130: Rimozione Delle Cartucce Dal Caricatore

    Una cartuccia dati deve venire caricata nel ripiano intermedio del caricatore. Certi applicativi permettono di usare un particolare vano del caricatore per una cartuccia di pulizia. Rimozione delle cartucce dal caricatore Togliere le cartucce dal caricatore nel modo seguente. Premere verso il basso l’arresto del caricatore, mettere il dito nel foro sul retro del caricatore stesso e spingere le cartucce dati in avanti.
  • Seite 131 Mettere il pollice nella fessura sul fondo del caricatore e continuare a far scivolare le cartucce verso la parte anteriore del caricatore. Ripetere le fasi 1 e 2 per togliere cinque delle cartucce. Rovesciare il caricatore in modo che il lato aperto sia rivolto in alto e picchettarlo delicatamente sulla mano o contro un oggetto morbido.
  • Seite 132 Ripetere le fasi 1 e 2 per togliere le cartucce dal ripiano inferiore. Infine, togliere la cartuccia dalla posizione della cartuccia di pulizia sul ripiano intermedio. Capitolo 2 Uso del drive...
  • Seite 133: Uso Del Dds Autoloader

    Applicare una pressione costante sino a che non si avverte il meccanismo ritirare il caricatore nell’unità. Il TSL-9000 quindi controlla che tutte le cartucce siano contenute dal caricatore e che siano orientate correttamente. Ciò richiede circa 90 secondi. Completato il controllo, i numeri delle cassette da “1”...
  • Seite 134: Scelta Della Cartuccia Dati

    Scelta della cartuccia dati Se il caricatore contiene sette o otto cartucce Si può scegliere a piacere una cartuccia dati dal caricatore usando il software installato sul computer. Le cartucce possono anche venire scelte facendo uso del pulsante SELECT del caricatore stesso. Premendo il pulsante SELECT, l’indicatore a sette segmenti sul display LDC visualizza il numero della cartuccia che avete scelto.
  • Seite 135: Espulsione Del Caricatore

    Espulsione del caricatore Premere il pulsante EJECT, L’indicatore LCD visualizza una “E” e quindi il caricatore viene espulso dopo che la cartuccia dati all’interno del drive DDS è stata riportata nel caricatore. Il tempo richiesto per l’espulsione del caricatore può arrivare a 140 secondi. Attenzione: Se il pulsante EJECT viene premuto l’indicatore BUSY lampeggia, l’operazione di lettura o scrittura in atto viene abbandonata ed il caricatore...
  • Seite 136: Cura Dei Caricatori E Delle Cartucce

    Cura dei caricatori e delle cartucce Precauzioni per l’uso • Evitare di sottoporre il drive a vibrazioni ed urti violenti. • La sportello della cartuccia viene aperto automaticamente quando questa viene inserita nel drive. Non tentare di aprirlo manualmente, dato che toccando il nastro lo si può...
  • Seite 137: Precauzioni Per La Conservazione

    Posizione dell’adesivo Spingere con un’unghia la linguetta nella direzione indicata dalla freccia per proteggere i dati dalla scrittura accidentale. Riportarla nella posizione originale per rendere la registrazione possibile. • Nel caso di cambiamenti improvvisi della temperatura, la formazione di condensa può interferire con la normale lettura o scrittura di dati sulle cartucce.
  • Seite 138: Pulizia Delle Testine

    Pulizia delle testine er mantenere il DDS Autoloader in buio condizioni, pulire le testine quando necessario servendosi di una cassetta apposita disponibile in vendita separatamente. Come pulire le testine Il caricatore è stato disegnato principalmente per l’uso con solo sette cartucce dati ed una di pulizia (la DG-5CL) nella posizione apposita nel ripiano intermedio.
  • Seite 139: Installazione

    Installazione Collegamenti ad un bus SCSI/impostazione numero ID SCSI/interruttori delle opzioni R e a r o f R e a r o f E m b e d d e d D r i v e E m b e d d e d D r i v e 5V GND GND 12V Power Connector Jumpers...
  • Seite 140: Interfaccia

    Interfaccia Messaggi SCSI supportati Comandi SCSI supportati Abort Erase Bus Device Reset Initialize Element Status (LUN=1) Command Complete Inquiry (LUN= 0 or 1) Disconnect Load/Unload (LUN= 0 or 1) Extended Message Locate -Synchronous Data Transfer Request Log Select Identify (w/&w/o Disconnect) Log Sense Initiator Detected Error Mode Select (6)
  • Seite 141: Fori Di Installazione

    Fori di installazione 2-M3 2-M3 8-M3 (Bottom) 21.8mm 139.7mm 0.86" 5.50" 82.5mm 146mm 3.25" 5.75" BUSY SELECT EJECT TAPE Nota: La lunghezza massima della filettatura delle viti è di 3.0 mm. Una lunghezza maggiore può danneggiare il drive. Capitolo 2 Uso del drive...
  • Seite 142: Orientamento

    Orientamento Il TSL-9000 può venire installato in tre posizioni differenti mostrate di seguito. Ciascuna ha una tolleranza massima di +/– 10 gradi. BUSY SELECT EJECT TAPE Capitolo 2 Uso del drive...
  • Seite 143: Appendice

    Appendice Dati tecnici Prestazioni Urti Capacità Durante il lavoro Da 96 a 192 GB con compattazione Nessuna perdita di dati (nastri DDS-3 da 125 m) Mezza sinusoide Numero errori bit 5 G di picco, 3 ms Meno di 10 3 assi, 3 direzioni Velocità...
  • Seite 144: Particelle In Sospensione

    Peso Particelle in sospensione Autoloader 2.4 kg (senza caricatore) Durante il lavoro Caricatore 215 g meno di 150 microgrammi//m (senza cartucce) Dati tecnici soggetti a modifiche senza preavviso o responsabilità per migliorie. Direttiva EMC: 89/336/EEC Aerazione <40 °C Temperatura circostante Per minimizzare la possibilità...
  • Seite 145: Assistenza Tecnica Da Terze Parti

    Assistenza tecnica da terze parti Venditori di adattatori Telefono Adaptec 408-945-8600 ATTO 716-691-1999 Bus Logic 408-492-9090 407-830-5522 Future Domain 714-253-0400 Initio 408-988-1919 Qlogic 714-438-2200 Ultera Systems Inc. 714-367-8800 Sistema operativo Venditori utilità salvataggio Telefono Seagate 407-333-7500 Cheyenne 516-484-5110 NovaStor 805-579-6700 Macintosh Cheyenne 516-484-5110...
  • Seite 146 Sistema operativo Venditori utilità salvataggio Telefono AIX Unix Cheyenne 516-484-3150 Legato 415-812-6000 NovaStor 818-707-9900 Novell NLM Seagate 407-263-3500 Legato 415-812-6000 NovaStor 818-707-9900 Novell 801-429-5544 *Tutti i numeri indicati si trovano negli USA. Se si chiama da un altro paese, aggiungere al numero il codice di chiamata internazionale per gli USA (1).
  • Seite 147: Assistenza Tecnica Sony

    Gotenyama Hills, 4-7-35 Kitashinagawa, Shinagawa-ku, Tokyo 104 Japan Tel: (03) 5448-2289 FAX: (03) 5448-7902 TELEX: J22262 Sony of Canada Ltd., Computer and Personal Information Dividion 405 Gordon Baker Road, Willowdale, Onsro, MZH 286, Canada TEL: (418) 499-1414 FAX: (416) 499-8541...
  • Seite 148 説明書の使いかた この取扱説明書は、 DDSオー ト ローダーTSL-9000の使いかた、 取り扱いかたについ て説明しています。お使いになる前に必ずお読みく ださい。 お読みになったあとは、後日お役に立つこ と もあ り ますので、保存しておいてく ださ い。 この説明書は、 次の2 つの章と付録で構成されています。 目的に合わせてお読みく ださい。 □ 第 章 概要 本機の特長やシステム構成、各部の名称と働きなどについて説明しています。 □ 第 章 準備 本機の電源の入れかた、 マガジンやカー ト リ ッ ジの取り扱いかたについて説明してい ます。 また、 ヘッ ドのク リ ーニングについても説明しています。 実際にお使いになる と...
  • Seite 149 目次 オートローダーについて ................. 第 章 特長 ......................149 概要 使用でき るカー ト リ ッ ジ .................. 150 システム構成 ....................150 各部の名称と働き ..................... 前面 ......................151 マガジン ......................154 データカートリッジをセットする ..............第 章  データカー ト リ ッ ジの取り出しかた ..............158 使いかた オートローダーを使う...
  • Seite 150: Dds オートローダーについて

    カー ト リ ッ ジと7 巻の記録用のカー ト リ ッ ジをセッ トする こ と もできます。 データ圧縮をす れば、 TSL-9000 の容量は 168G バイ ト になり ます。 特長 TSL-9000 DDS オー ト ローダーには、次のよ う な特長があ り ます。 □ 高耐久性のリニアガイ ド機構によ り 、 付属のマガジンにセッ ト したテープカー ト リ ッ ジを、内蔵の DDSドライ ブユニッ トSDT-9000に自動的にセッ ト入したり、取り出...
  • Seite 151: 使用できるカートリッジ

    使用できるカートリッジ TSL-9000には、 DDS-3マーク、 DDS-2マークまたはDDS-1マークのついたDDSデー タカー ト リ ッ ジが使用できます。 DDS-3 マーク DDS-2 マーク DDS-1 マーク ご注意 DDSの専用データカー ト リ ッジをご使用く ださい。 (音楽用のDATテープは使用しない でく ださい。 ) システム構成 本機は、 イ ンターフェース と してSCSI-2を採用しているホス ト コ ンピューターに接続しま す。 ホストコンピューター SCSI TSL-9000 ( 周辺機器...
  • Seite 152: 各部の名称と働き

    各部の名称と働き 前面 BUSY SELECT EJECT TAPE マガジン挿入口 マガジンの挿入方法については160ページを、 取り出し方法については162ペー ジをご覧く ださい。 データカー ト リ ッ ジのセッ ト方法については 155 ページをご覧く ださい。 EJECT ボタン このボタ ンを押すと、 DDS ドライ ブ内のデータカー ト リ ッ ジがマガジンに戻され、 マ ガジンが ドライ ブから排出されます。 第 章 概要...
  • Seite 153 液晶ディスプレイ 液晶ディ スプレイ は、 DDSオー ト ローダーの状態を示すために、 次の5種類のイ ン ジケーターで構成されています。 警告インジケーター 注意すべき事態が発生したと きに点灯します。 警告の内容については、 7セグメ ン ト イ ンジケーターに表示される数値で確認します。 ライトプロテクトインジケーター データカー ト リ ッ ジが書き込み禁止状態になっている と きに点灯します。 データカー ト リ ッ ジの書き込み禁止は、 テープカー ト リ ッ ジまたはマガジンのライ ト プロテク ト タ ブで設定できます。...
  • Seite 154 警告インジケーター点灯時 クリーニングの必要がある (クリーニングリクエス ト)。 クリーニング中にクリーニングが終了した。 DDSカー ト リ ッジが逆にセッ トされている。 または、カー ト リ ッジの裏蓋が開いたままマガジンにセッ トされている。マ ガジンからすべてのカー ト リ ッジを取り出し、正しく入れ直し てく ださい。 マガジンに指定の数のカー ト リ ッジが入っていない。 ドラムローテーシ ョ ン24 時間ごとに、 またはリ ー ド/ライ トヘッ ドに付着した汚れの ために ドライ ブがデータ を書き込んだり読み出したりできないと きに、 ドライ ブが自 動的にヘッ...
  • Seite 155: マガジン

    マガジン ストッパー マガジンにセッ ト したカー ト リ ッ ジがマガジンから抜け出るのを防ぎます。 カー ト リ ッ ジのセッ ト 、 取り出しについては、 155ページおよび158ページをご覧く だ さい。 ライトプロテクトタブ データカー ト リ ッ ジを書き込み禁止状態にします。 このタブを右にス ライ ド しておく と、 個々のカー ト リ ッ ジが書き込み禁止になっていなく ても、 データの書き込みが できなく なり ます。 ご注意...
  • Seite 156: データカートリッジをセットする

    第 章 使いかた こ こでは、 カー ト リ ッ ジをマガジンにセッ トする順番、 ドライ ブユニッ トの立ち上げかた、 マガジンやカー ト リ ッ ジの取り扱いかたについて説明します。 データカートリッジをセットする 巻セットする場合 8巻のデータカー ト リ ッ ジのすべてを記録メディ アと して使用する こ と を推奨します。 ア プリ ケーシ ョ ンソフ ト ウェアに応じて、 データカー ト リ ッ ジのう ちのひとつの代わり にク リ ー ニングカー...
  • Seite 157 巻セットする場合 スロ ッ ト8には、 データカー ト リ ッ ジまたはク リ ーニングカー ト リ ッ ジのどち らでもセッ トでき ます。 この場合のマガジンの挿入方法については、 161ページの 「1巻セッ トの場合」 をご覧く ださい。 ク リ ーニングカー ト リ ッ ジを使用した場合、 ク リ ーニングが終わる と自 動的にマガジンが排出されます。 ご注意 上図の8 の位置にカー ト リ ッ ジが入っていないと、マガジンは排出されます。 データカー...
  • Seite 158 マガジンの上段の挿入口に、下図の向きでデータカー ト リ ッ ジを挿入します。 上段の挿入口からは、 4→5→6→7の順に、 4巻のデータカー ト リ ッジを連続して 挿入できます。 マガジンの中段の挿入口に、データカー ト リ ッ ジを挿入します。 アプリ ケーシ ョ ンソフ ト ウェアによっては、データカー ト リ ッ ジの代わりにク リ ーニン グカー ト リ ッジを挿入します。 第 章 使いかた...
  • Seite 159: 使いかた データカー ト リ ッ ジの取り出しかた

    データカートリッジの取り出しかた データカー ト リ ッ ジは、次の順番でマガジンから取り出してく ださい。 マガジンのス ト ッパーを下げながら、 マガジン後部の穴に指をかけ、 データカー ト リ ッ ジを前にス ライ ド させます。 マガジンの底部にある穴に指をかけ、 データカー ト リ ッ ジをさ らに前にス ライ ド させ、 データカー ト リ ッ ジを押し出します。 手順1と2を繰り返し、 続けて5巻のデータカー ト リ ッ ジを押し出すこ とができます。 第...
  • Seite 160 マガジンの挿入口の部分を上に向け、 手のひらなどの柔らかいものに当てなが らマガジンを軽く 上下させます。 マガジン上段のデータカー ト リ ッ ジが下段に移動します。 手順の1∼2と同じ要領で、 下段に移動したカー ト リ ッ ジをス ライ ド させながら取り 出します。 最後に、マガジンの中段にセッ ト したカー ト リ ッ ジを取り出します。 第 章 使いかた...
  • Seite 161: Dds オートローダーを使う

    法については 155 ページをご覧く ださい。 オー ト ローダー前面のス ロ ッ ト にマガジンを挿入します。 マガジンがオー ト ローダー に引き込まれるまで、マガジンを静かに押し込みます。 TSL-9000が自動的にローテーシ ョ ンテス ト を行います。マガジンにセッ ト された カー ト リ ッ ジとその挿入方向がチェ ック されます。 このローテーシ ョ ンチェ ッ クはおよそ90秒かかり ます。 このチェ ッ クが終了する と、 液晶ディ スプレイの1∼8 の点滅が点灯に変わり ます。...
  • Seite 162: データカートリッジの選択

    データカートリッジの選択 巻、 巻セットの場合 コ ンピューターのソフ ト ウェアを使って、 必要に応じてマガジンにセ ッ ト されたデータカー ト リ ッ ジを選択する こ とができます。 また、 SELECTボタ ンを使ってデータカー ト リ ッ ジを選択する こ と もできます。 SELECTボタンを押すと、液晶ディ スプレイ にカー ト リ ッジの番号が表示されます。 (SELECTボタ ンを押すたびに番号が切り替わり ます。 ) 番号が点灯してから5 秒以上何も しないでいると、 DDSドライ ブにセッ ト されていた データカー...
  • Seite 163: マガジンを排出させるには

    マガジンを排出させるには EJECTボタ ンを押します。 液晶ディ スプレイ に 「E」 と表示され、 DDS ドライ ブ内のデータカー ト リ ッ ジがマガジンに 収納されて自動的にマガジンが排出されます。 マガジンの排出には最大 140 秒かかる こ とがあ り ます。 ご注意 BUSYイ ンジケーターの点滅中にEJECTボタ ンを押すと、 読み取りや書き込みの動作 が中断され、上記のマガジン排出の動作が行われます。 第 章 使いかた...
  • Seite 164: マガジンおよびカートリッジの取り扱い

    マガジンおよびカートリッジの取り扱い 取り扱い上のご注意 □ マガジンおよびカー ト リ ッ ジに激しい振動を与えたり 、 落と したり しないでく ださい。 □ カー ト リ ッ ジは、 DDS ドライ ブにセ ッ ト される と自動的にシャ ッ ターが開く 自動装填式 です。 カー ト リ ッ ジのシャ ッ ターを手で開けて、 中のテープに触れないでく ださい。 □ マガジンおよびカー ト リ ッ ジは工場出荷時に精密に調整されていますので、 分解 しないでく...
  • Seite 165: 保管上のご注意

    ラベル貼り付け位置 タブを矢印の側にスライドすると書き込みができ ない 元に戻すと書き込みができる □ 温度差の激しい所や湿気の多い所では、 結露によ り書き込み、 読み取りができ なく なる こ とがあ り ます。 □ 書き込み、 読み取りの必要がないと きは、 DDSドライ ブに不必要にカー ト リ ッ ジを 出し入れしないでく ださい。 □ マガジンおよびカー ト リ ッ ジに付属のラベルは上図に示すラベル貼り付け位置の 枠内に正しく 貼ってく ださい。 枠外にはみ出したり 、 2枚以上重ねて貼ったり しな いでく...
  • Seite 166: ヘッドクリーニングについて

    ヘッドクリーニングについて DDSオー ト ローダーユニッ トの信頼性を維持するため、 別売りのク リ ーニングテープを 使って定期的にヘッ ドをク リ ーニングしてく ださい。 クリーニングのしかた マガジンには7 巻のデータカー ト リ ッ ジと、中段に1巻のク リ ーニングカー ト リ ッ ジ (DG- 5CL) をセッ ト して使う こ とを推奨します。 液晶ディ スプレイ にク リ ーニングリ クエス ト( 1) が表示されたら、...
  • Seite 167: 初期設定

    初期設定 SCSI SCSI ID 接続・ の設定・オプションスイッチ R e a r o f R e a r o f E m b e d d e d D r i v e E m b e d d e d D r i v e 5V GND GND 12V Power Connector Jumpers...
  • Seite 168: 実装されるインターフェース

    実装されるインターフェース SCSI SCSI サポートされる メッセージ サポートされる コマンド Abort Erase Bus Device Reset Initialize Element Status (LUN=1) Command Complete Inquiry (LUN=0 or 1) Disconnect Load/Unload (LUN=0 or 1) Extended Message Locate -Synchronous Data Transfer Request Log Select Identify (w/&w/o Disconnect) Log Sense Initiator Detected Error Mode Select (6) Message Parity Error...
  • Seite 169: 取り付けネジの位置

    取り付けネジの位置 2-M3 2-M3 8-M3 (Bottom) 21.8mm 139.7mm 0.86" 5.50" 82.5mm 146mm 3.25" 5.75" BUSY SELECT EJECT TAPE ご注意 取り付けネジの長さは最大3.0mmです。 これよ り長いネジを使う と、 ドライ ブに損傷を 与える こ とがあ り ます。 第 章 使いかた...
  • Seite 170: 設置方向

    設置方向 TSL-9000は、下図のよ う な3 つの方向に設置する こ とができ ます。 各設置方向の最大許容誤差は +/-10 度です。 BUSY SELECT EJECT TAPE 第 章 使いかた...
  • Seite 171: 付録 主な仕様

    付録 主な仕様 衝撃 使用時 性能 データ損失なし ハーフサイ ン 記憶容量 圧縮で 96GB から192GB (125m 5Gピーク3ms DDS-3テープ使用時) 3 軸、 3 方向 ビッ トエラーレー ト 10 以下 *10 秒間隔 データ転送速度 (TAPE) 非動作時 非圧縮で 1.2MB/ 秒 デバイ ス損傷なし 圧縮で 2.4MB/ 秒 ハーフサイ ン バース トデータ転送速度 (SCSI) 90Gピーク3ms 非同期で最大...
  • Seite 172: 音響ノイズ

    音響ノイズ 電源・その他 ス ト リ ー ミ ング書き込み / 読み出し 電源 : 35dBA 5VDC 許容誤差 : ± 5% 挿入 /イ ジェク ト : 60dBA 電流 : 1.3A (平均) : 2.9A (最大値) ご注意 12VDC 許容誤差 : ± 10% サウン ドメーターをAスケールにセッ ト し、 ドライ ブのフ 電流...
  • Seite 173: サードパーティーサポート連絡先

    サードパーティーサポート連絡先 ホストアダプタベンダー 電話番号 Adaptec 408-945-8600 ATTO 716-691-1999 Bus Logic 408-492-9090 407-830-5522 Future Domain 714-253-0400 Initio 408-988-1919 Qlogic 714-438-2200 Ultra Systems Inc. 714-367-8800 オペレーティングシステム バックアップソフトウェアベンダー 電話番号 Seagate 407-333-7500 Cheyenne 516-484-5110 NovaStor 805-579-6700 Macintosh Cheyenne 516-484-5110 Dantz 510-253-3000 NovaStor 805-579-6700 OS/2 Cheyenne 516-484-5110 NovaStor 805-579-6700...
  • Seite 174 オペレーティングシステム バックアップソフトウェアベンダー 電話番号 AIX Unix Cheyenne 516-484-3150 Legato 415-812-6000 NovaStor 818-707-9900 Novell NLM Seagate 407-263-3500 Legato 415-812-6000 NovaStor 818-707-9900 Novell 801-429-5544 * こ こに示された電話番号はすべて合衆国内のものです。 合衆国外から電話する際は、電話番号の前に国別コー ド 「1」 を付けてく ださい。 付録...
  • Seite 175: ソニー連絡先

    郵便番号 104 東京都品川区北品川 4-7-35 御殿山ヒルズ TEL : (03) 5448-2289 FAX : (03) 5448-7902 TELEX : J22262 Sony of Canada Ltd., Computer and Personal Information Division 405 Gordon Baker Road, Willowdale, Onsro, MZH 286, Canada TEL : (418) 499-1414 FAX : (416) 499-8541...

Inhaltsverzeichnis