Herunterladen Inhalt Inhalt Diese Seite drucken
Inhaltsverzeichnis

Werbung

Verfügbare Sprachen

Verfügbare Sprachen

MD Multi-Track
Recorder
Operating Instructions
Mode d'emploi
Bedienungsanleitung
T
MDM-X4
© 1996 by Sony Corporation
3-858-580-12(1)
EN
F
D

Werbung

Inhaltsverzeichnis
loading

Inhaltszusammenfassung für Sony MDM-X4

  • Seite 1 3-858-580-12(1) MD Multi-Track Recorder Operating Instructions Mode d’emploi Bedienungsanleitung MDM-X4 © 1996 by Sony Corporation...
  • Seite 2 Refer to them prevent heat buildup in the multi personnel only. whenever you call upon your Sony track recorder. dealer regarding this product. • Do not place the unit in an inclined position.
  • Seite 3: Inhaltsverzeichnis

    Connections for Recording ..................13 room, moisture may condense on the Connecting MIDI Equipment ..................14 lens inside the MD deck. Should this MDM-X4 Signal Flow Diagram ................. 14 occur, the system will not operate Monitoring properly. Remove the MD and leave Monitoring Preparations ....................15...
  • Seite 4: Overview Of Mdm-X4

    Standard Recording Procedures 4 You want to add a harmony chorus, The MDM-X4 is an integrated multichannel recorder/ but there’s no more tracks left! mixer that can record up to 4 tracks using MD-DATA discs. In addition to 4 track recording and playback,...
  • Seite 5: Other Convenient Functions

    Overview of MDM-X4 Other convenient functions µ • Equipped with an easy to use Jog/Shuttle dial. • The Auto Punch-In/Out function lets you rerecord part of a song by enabling the record mode 6 You decide you want to change the automatically only during the part which you have structure of the song.
  • Seite 6: Names And Functions Of Parts

    Names and Functions of Parts 2 INPUT selector keys The Mixer Allow you to select either LINE/MIC (sound from the INPUT CH jacks) or TRACK 1~4 (sound from the Also refer to the “Block Diagram” on page 64. recorder) for input to mixer channels 1~4. LINE/MIC : Use to input external sounds from an instrument or microphone (etc.).
  • Seite 7 Names and Functions of Parts 8 PAN knobs 3 LOW knob Adjust the sound balance of the stereo or group bus. Adjusts the bass of the sound input to the INPUT 5/6 Turn towards “L” to move the sounds toward group jacks at the top of the unit.
  • Seite 8: The Recorder

    Names and Functions of Parts 9 TRACK 1~4 knobs The Recorder Use to adjust the overall sound balance when monitoring playback from the recorder (CUE monitor) by turning the knob for each track as desired. When Control Panel using the CUE monitor function, be sure to press down the monitor track setting CUE key (0 below).
  • Seite 9 Names and Functions of Parts 3 OUT key !¢ REPEAT/DISPLAY key Sets the out point (edit end point). Press to activate the repeat playback mode. The repeat mode changes as follows each time you press the key: 4 IN/DEST key •...
  • Seite 10: The Display

    Names and Functions of Parts !¶ RHSL (Rehearsal) key The Display This key has two functions: • Record rehearsal (rehearsal function) Press during record pause mode to cause the indicator to blink and set this unit to operate as if it were recording, without actually recording.
  • Seite 11: Input And Output Jacks

    Names and Functions of Parts 5 [EDIT] indicator Input and Output Jacks Lights during edit operations (track, section, song, disc). Top panel 6 [SYSTEM] indicator Lights during system setting operations. 7 R indicators Lights to indicate that the respective track was selected for recording using the REC SELECT keys.
  • Seite 12: Front Panel

    Names and Functions of Parts 4 OUTPUT AUX 1/2 jacks Front Panel Output sound for use as the send output. After adding an outboard effect to the sound output from these jacks, use the RETURN 1/2 (L/R) jacks to input it back to this unit.
  • Seite 13: Connections And Signal Flow

    Connections and Signal Flow Connections for Recording Connect instruments, microphones, and amp and headphones for monitoring as shown below. External amplifier and speakers Instruments or microphones To INPUT CH1~CH 6 jacks (You can use XLR type plugs with CH-1 and CH-2) From the MONITOR OUT jacks on the rear panel of this unit From the HEADPHONES jacks...
  • Seite 14: Connecting Midi Equipment

    Connections and Signal Flow Connecting MIDI Equipment MDM-X4 Signal Flow Diagram Connect MIDI equipment as shown in the following The following diagram shows the internal signal flow diagram. of this unit. For details regarding connections for synchronized operation with a sequencer (etc.), see “Synchronization with MIDI Equipment”...
  • Seite 15: Monitoring

    Monitoring Monitoring Preparations Monitoring Example This unit enables you to monitor the following 4 types EXAMPLE 1: Monitoring the sound from of signals as necessary. 1 Group 1, 2 : Select to monitor mixer group bus 1 and group bus 1 and 2 (during recording, etc.) 2.
  • Seite 16 Monitoring EXAMPLE 3: Rerecording part of track 1 EXAMPLE 5: Monitoring the sound of the while monitoring the sound of tracks 3 stereo bus (for mixdown, etc.) and 4 (during punch-in/out recording, etc.) Turn to adjust level Press down Press down Turn to adjust level Turn to adjust level EXAMPLE 4: Mixing tracks 1~4 for...
  • Seite 17: Setting Up The Operating Environment

    Setting Up the Operating Environment Pre-roll/Post-roll setting (Roll) System Settings Allows you to set the pre-roll/post-roll time used during rehearsal (locate point adjustment) and auto punch-in/out operations in 1 second increments. It is You customize the operating environment by turning adjustable from 1 to 10 seconds.
  • Seite 18 Setting Up the Operating Environment Rehearsal mode setting (RHSL) Changing a Setting This setting lets you determine whether the volume will increase or decrease after the locate point when adjusting the position of a locate point with the Use the following operations to change the system rehearsal function.
  • Seite 19: Recording

    Recording Recording Turn the MONITOR knob to adjust the sound to a Initial Recording level which can be monitored. This shows you how to record the very first track onto Use the fader to adjust the recording level. a blank disc. Play a relatively loud phrase and make adjustments by watching the level meter for the track you want to record.
  • Seite 20: Overdub Recording

    Recording Checking the Recording Overdub Recording You can record other sound on a different track while listening to the playback from a previously recorded track. This kind of recording is called overdubbing. Section Recorded section recorded by overdubbing Press CUE to prepare for monitoring. Preparations Adjust the monitor volume using the respective TRACK knobs and the MONITOR knob.
  • Seite 21 Recording Checking the Recording Use the fader to adjust the recording level. Play a relatively loud phrase and make adjustments by watching the level meter for the track you want to record. If necessary, you can use the TRIM knob to adjust the recording level and equalizer.
  • Seite 22: Auto Punch-In/Out Recording

    Recording At the point you want to stop recording, press Auto Punch-In/Out Recording MARK then press OUT. The punch out position is set at the point where You can rerecord a certain portion of a previously you press OUT. recorded track. This is called punch-in/out recording. Press p STOP.
  • Seite 23: Rehearsing The Punch-In/Out

    Recording Press ( PLAY. Use the fader to adjust the recording level. Play a relatively loud phrase and make Playback starts pre-rolling from a point slightly adjustments by watching the level meter for the before the punch-in position in accordance with track you want to record.
  • Seite 24: Using The Undo Function With Auto Punch-In/Out Recording

    Recording Recording Turn the jog dial to set the counter to the point you want to hear. Pressing the IN key automatically locates the punch-in point. Press CUE to prepare for monitoring. Adjust the monitor volume using the respective TRACK knobs and the MONITOR knob. Press ( PLAY.
  • Seite 25: Manual Punch-In/Out Recording

    Recording Press CUE, then turn the TRACK knob Manual Punch-In/Out corresponding to the track containing the recorded sound you want to hear while recording Recording to adjust the sound to a level which can be monitored. Manual punch-in/out recording is when you start and Use the MONITOR knob to adjust the monitor stop recording manually with the appropriate timing level.
  • Seite 26 Recording Press ( PLAY when you reach the point where Checking the Recording you want to stop recording (the punch out point). The REC key goes out and the unit stops recording and switches to playback mode. Press p STOP. Playback ends.
  • Seite 27: Mix Write Recording (Basics)

    Recording Set the channel 2 ASSIGN switch and PAN knobs Mix Write Recording (Basics) to direct the sound to track 1. (Set the chorus vocals input from channel 2 to be You can record other sounds on top of a previously recorded on track 1.) recorded track.
  • Seite 28: Mix Write Recording (Applied Operations)

    Recording Use the channel 1 and 2 faders to adjust the Mix Write Recording (Applied balance between the vocals and chorus to be recorded on track 1. Operations) You may also need to adjust the monitor balance at this time. Mix write also comes in handy in a variety of other Press the p STOP key after making the necessary situations not mentioned on the previous pages.
  • Seite 29 Recording Checking the Recording Set the ASSIGN switches and PAN knobs for channels 1~4 to direct the sound to track 4. Turn the jog dial to set the counter to the point (Set the playback sounds input from the recorder you want to hear.
  • Seite 30 Recording Preparations Recording Press REC. The unit switches to record pause mode. Press ( PLAY. Recording begins. Play together with the previously recorded performance. When you’ve finished playing, press p STOP. Checking the Recording Turn the jog dial to set the counter to the point Press down the INPUT switches on channels 1~4.
  • Seite 31: Editing Part Of A Song (Track Edit)

    Editing Part of a Song (Track Edit) Editing Part of a Song (Track Edit) Track Edit Overview Specifying the Locate Points The track editing operations let you specify a part (an Before editing, it is necessary to specify the locate arbitrary section of an arbitrary track) and copy it over points (edit points).
  • Seite 32 Editing Part of a Song (Track Edit) Correcting the position of the locate point Press MARK. The indicator on the MARK key starts blinking. Press the key for the locate point you desire. • IN point : Press IN. • OUT point : Press OUT. •...
  • Seite 33: Copying A Part (Track Copy)

    Editing Part of a Song (Track Edit) During rehearsal mode, press the = or + key to Copying a Part (Track Copy) switch between increased or decreased volume after the locate point. You can copy part of a track and place it in another Turn the jog dial to adjust the position of the location.
  • Seite 34: Moving A Part (Track Move)

    Editing Part of a Song (Track Edit) Turn the jog dial so that “Trak Copy” appears in Moving a Part (Track Move) the display. The name of the edit function starts blinking in the display. You can move part of a track to a different position in a different track.
  • Seite 35 Editing Part of a Song (Track Edit) Press ENTER. Switching the Locations of 2 The edit setting items appear in the display. Parts (Track Exchange) Turn the jog dial to display the setting you desire. This determines which tracks the part will be You can switch the location one part of a track with moved to.
  • Seite 36: Erasing A Part (Track Erase)

    Editing Part of a Song (Track Edit) Press ENTER. Erasing a Part (Track Erase) The edit setting items appear in the display. You can erase part of a track. The part which was Turn the jog dial to display the setting you desire. This determines which tracks the parts will be erased becomes a part with no sound.
  • Seite 37 Editing Part of a Song (Track Edit) Press ENTER. The edit setting items appear in the display. Turn the jog dial to display the setting you desire. This determines which tracks the part will be erased from. Use the jog dial to display the track number(s) containing the part(s) to be erased below the respective track number indicator(s) ( mark).
  • Seite 38: Changing The Construction Of A Song (Section Edit)

    Changing the Construction of a Song (Section Edit) Using the Undo Function with section Section Edit Overview editing operations You can undo an edit immediately after execution if The section editing operations let you specify sections the undo indicator is lit green. common to all 4 tracks and move them to other To carry out the undo function, press UNDO.
  • Seite 39: Moving A Section (Section Move)

    Changing the Construction of a Song (Section Edit) Turn the jog dial so that “Sect Move” appears in Moving a Section (Section the display. The name of the edit function starts blinking in Move) the display. You can move a section to a different place in the song. Press ENTER.
  • Seite 40 Changing the Construction of a Song (Section Edit) Press ENTER. Switching the Locations of 2 “OK?” appears in the display. Sections (Section Exchange) 0 0 1 : X c g , O K ? You can switch the location of two sections. Press ENTER again.
  • Seite 41: Inserting Another Section (Section Insert)

    Changing the Construction of a Song (Section Edit) Press ENTER. Inserting Another Section “OK?” appears in the display. (Section Insert) 0 0 1 : I n s , O K ? This function lets you copy a section and insert it at another place in the song.
  • Seite 42: Deleting A Section (Section Delete)

    Changing the Construction of a Song (Section Edit) Press ENTER. Deleting a Section (Section “OK?” appears in the display. Delete) 0 0 1 : D e l , O K ? This function lets you delete a section of the song. Press ENTER again.
  • Seite 43: Editing Entire Songs (Song Edit)

    Editing Entire Songs (Song Edit) Editing Entire Songs (Song Edit) Song Edit Overview Copying a Song (Song Copy) The following sections show you how to divide a This function lets you duplicate a song. Newly created completed song and connect 2 adjacent songs (etc.) so copy is treated as a new recording and becomes the last you can easily locate the positions you desire on the song on the disc.
  • Seite 44: Moving A Song (Song Move)

    Editing Entire Songs (Song Edit) Press ENTER again. Moving a Song (Song Move) The selected song is copied. To start over again from the beginning, or quit the edit operation, press EXIT instead of ENTER. This function lets you change the order of the songs by When the edit operation has finished, the edit moving the song you select to a different position.
  • Seite 45: Changing The Song Order (Song Exchange)

    Editing Entire Songs (Song Edit) Turn the jog dial to display the number you want Changing the Song Order to move the selected song to. (Song Exchange) Press ENTER “OK?” appears in the display. This function lets you switch the position of 2 songs of your choice.
  • Seite 46: Dividing A Song (Song Divide)

    Editing Entire Songs (Song Edit) Turn the jog dial to display the song number you Dividing a Song (Song Divide) want to exchange the first song with. Press ENTER This function lets you divide a song into different “OK?” appears in the display. songs.
  • Seite 47: Connecting 2 Songs (Song Combine)

    Editing Entire Songs (Song Edit) Press ENTER again. Connecting 2 Songs (Song The song is divided at the specified point. To start over again from the beginning, or quit the Combine) edit operation, press EXIT instead of ENTER. When the edit operation has finished, the edit This function lets you combine two songs into one.
  • Seite 48: Deleting A Song (Song Delete)

    Editing Entire Songs (Song Edit) Press ENTER. Deleting a Song (Song Delete) The edit setting items appear in the display. This function allows you to easily delete a recorded C m b 0 0 2 + 0 0 3 song by specifying its song number. To delete all of the songs on the disc, see “Erasing the Disc Contents (Disc Erase)”...
  • Seite 49: Naming A Song (Song Name)

    Editing Entire Songs (Song Edit) Press ENTER Naming a Song (Song Name) “OK?” appears in the display. Press ENTER again. This function lets you assign names to songs using The selected songs are exchanged. upper and lower case letters of the alphabet, numbers, and symbols.
  • Seite 50: Editing The Entire Disc (Disc Edit)

    Editing the Entire Disc (Disc Edit) Overview Erasing the Disc Contents (Disc Erase) This chapter shows you how to erase all the information on the disc and how to assign a disc name. This function erases the entire disc. Both the recorded audio data and the disc name will be erased.
  • Seite 51: Naming The Disc (Disc Name)

    Editing the Entire Disc (Disc Edit) Press EXIT when the cursor is in the leftmost Naming the Disc (Disc Name) position or press ENTER when the cursor is in the rightmost This function lets you assign names to the disc using position to enter the final name.
  • Seite 52: Synchronization With Midi Equipment

    (etc.). The MTC (MIDI Time Code), MIDI clock, or MMC (MIDI Machine Control) features allow you to MDM-X4 (this unit) coordinate this unit with external MIDI components. This chapter explains how to use MIDI messages MIDI MIDI...
  • Seite 53: Midi Synchronization Using The Midi Clock

    8,9,,,, Connections 2,5,7, Use a MIDI cable to connect this unit to a MIDI 9,11,, compatible sequencer (etc.). MDM-X4 (this unit) The following step show you how to make the tempo MIDI MIDI map shown in the previous example. Sequencer (etc.)
  • Seite 54 Synchronization with MIDI Equipment Press ENTER. Turn the jog dial to display 02. The tempo map setting display appears. 0 2 : - - - - - - - 0 1 : - - - - - - - Repeat steps 3~9 to create the new tempo map. Tempo When the tempo map is complete, the settings are Tempo change position...
  • Seite 55: Controlling This Unit From Other Midi Components Using Mmc

    Synchronization with MIDI Equipment Setup Press ENTER. The indication for the tempo change position Set this unit’s “MMC” system setting to “on”. starts blinking. See “Changing a Setting” (page 18) for details. Tempo map 1 can only be set to the first bar. This unit accepts the following MMC command/ Turn the jog dial to the right to display Del.
  • Seite 56: Example Of A Midi System

    Synchronization with MIDI Equipment Example of a MIDI System The following explains the construction of a synchronized MIDI system using both MMC and MTC and a MIDI sound module. Connections Computer MIDI MIDI MIDI sound MIDI interface module Note data (etc.) MIDI OUT MIDI IN AUDIO...
  • Seite 57: Mixdown

    Mixdown Mixdown Use the = or + keys or the jog dial to locate Mixdown (Basics) the beginning of the desired song. Press ( PLAY. The following explains how to dub the song to a master recorder (such as a DAT or MD recorder) while Playback begins.
  • Seite 58: Mixdown (Applied Operations)

    Mixdown How to save up to 8 tracks of data Mixdown (Applied Operations) independently You can record sound parts numbering greater than the number of tracks available on this unit (4) by using How to use the TRACK jacks the bounce recording function (page 29). The TRACK 1~4 jacks on the top panel of this unit However, some of the features available during the provide a direct output of the signals from each track...
  • Seite 59 Mixdown Overdub the keyboard in stereo to tracks 3 and 4 Use the Song Copy edit function to back up the while listening to the playback from tracks 1 and vocals, then copy tracks 3 and 4 to tracks 1 and 2. 2.
  • Seite 60: Additional Information

    / Insert the disc in accordance with the direction of the arrow on the disc case. Error** / Nothing has been recorded on the current A serious error has occurred. Please contact a Sony disc. Load a disc that has been recorded. service station. Invalid...
  • Seite 61: System Limitations Of Mds

    Additional Information Unit enters the play/pause mode between songs during System Limitations of MDs continuous playback. This unit enters the play/pause mode momentarily before resuming playback each time it reaches a new song number The recording system in your MD deck has limitations or division created using Song Divide.
  • Seite 62 Additional Information RETURN 1~2 (L/R) Frequency response Type : Phone (Unbalanced) 5 ~ 20,000 Hz ±1.0 dB Input impedance : greater than 20 kohm Signal to noise ratio Standard input level : –10 dBs (Max: + 10dBs) More than 94 dB during playback Maximum song number OUTPUTS STEREO OUT (L/R)
  • Seite 63: Glossary

    Additional Information Ping Pong Recording Glossary Normally, this term refers to the practice of dubbing the sound from tracks 1 through 3 onto track 4 in order to gain additional tracks. With this unit, you can dub TOC (Table of Contents) the sound from tracks 1 through 4 to track 4.
  • Seite 64: Block Diagram

    Additional Information Block Diagram The block diagram for this unit is shown below. to CHANNEL...
  • Seite 65: Midi Implementation Chart

    Additional Information Sony Multi Track Recorder MDM-X4 MIDI Implementation Chart SEP 21, 1996 Version: 1.0 Function... Transmitted Recognized Remarks Basic Default Channel Changed Default Mode Messages Altered * * * * * * * * * * * * * *...
  • Seite 66: Track Sheet

    Track sheet Répertoire des pistes Spurübersicht (Make copies as necessary.) (Faites autant de photocopies que nécessaire) (Gegebenenfalls kopieren) Sony MDM-X4 Track Sheet Title Date Note Song No. Track No. (Time) ○ ○ ○ ○ ○ ○ ○ ○ ○ ○...
  • Seite 67 N’utilisez aucun Sony. détergent abrasif, poudre décapante ou solvant, tel que de l’alcool ou de la benzine.
  • Seite 68 Prises d’entrée et de sortie ..................11 l’utilisation. Raccordements et sens du signal Raccordements pour l’enregistrement ..............13 Raccordement d’appareils MIDI ................14 Schéma du parcours des signaux MDM-X4 ............14 Contrôle Bienvenue Préparations pour le contrôle ..................15 Exemple de contrôle ....................15 Réglage de l’environnement de fonctionnement...
  • Seite 69: Vue D'ensemble Du Mdm-X4

    µ Procédures d’enregistrement standard 4 Vous voulez ajouter des chœurs, mais Le MDM-X4 est un enregistreur/mixeur multipiste il n’y a plus de pistes disponibles! intégré qui peut enregistrer jusqu’à 4 pistes avec des minidisques MD-DATA. En plus des possibilités Aucun problème! Si vous avez déjà utilisé...
  • Seite 70: Autres Fonctions Pratiques

    Vue d’ensemble du MDM-X4 Autres fonctions pratiques µ • Équipé d’une molette de recherche Jog/Shuttle facile à utiliser. • La fonction punch-in/out automatique vous permet 6 Vous décidez de changer la structure de réenregistrer une partie d’un morceau en mettant de la chanson.
  • Seite 71: Appellation Et Fonction Des Organes

    Appellation et fonction des organes 2 Touches de sélection d’entrée (INPUT) Mixeur Vous permettent de sélectionner LINE/MIC (son des prises INPUT CH) ou TRACK 1 à 4 (son de l’enregistreur) Se référer aussi au “Schéma fonctionnel” à la page 64. pour l’acheminement vers les canaux 1 à...
  • Seite 72 Appellation et fonction des organes 8 Boutons de commande panoramique (PAN) 3 Bouton de réglage des graves (LOW) Ajustent l’équilibre sonore du bus stéréophonique ou Ajuste le niveau des graves du son reçu par les prises de groupe. Tournez vers “L” pour déplacer le son vers INPUT 5/6 en haut de l’appareil.
  • Seite 73: Enregistreur

    Appellation et fonction des organes 9 Boutons TRACK 1 à 4 Enregistreur Utilisez-les pour ajuster l’équilibre sonore d’ensemble quand vous contrôlez la lecture à partir de l’enregistreur (contrôle CUE) en tournant le bouton Panneau de commande correspondant à chaque piste comme vous le souhaitez.
  • Seite 74 Appellation et fonction des organes 3 Touche OUT !£ Fente d’introduction du minidisque Règle le point de sortie (point de fin de montage). Insérez le minidisque dans cette fente. 4 Touche IN/DEST !¢ Touche REPEAT/DISPLAY Règle le point d’entrée (point de début de montage). Appuyez sur cette touche pour activer le mode de Appuyez sur cette touche en maintenant SHIFT répétition de lecture.
  • Seite 75: Afficheur

    Appellation et fonction des organes !¶ Touche de répétition RHSL (Rehearsal) Afficheur Cette touche a deux fonctions: • Répétition d’enregistrement (fonction de répétition) Appuyez sur cette touche en mode de pause d’enregistrement pour faire clignoter le témoin et régler l’appareil afin qu’il fonctionne comme s’il enregistrait, mais sans enregistrer réellement.
  • Seite 76: Prises D'entrée Et De Sortie

    Appellation et fonction des organes 5 Indicateur [EDIT] Prises d’entrée et de sortie S’allume pendant les opérations de montage (piste, section, morceau, minidisque). Panneau supérieur 6 Indicateur [SYSTEM] S’allume pendant les opérations de réglage du système. 7 Indicateurs R S’allument pour indiquer que la piste respective a été sélectionnée pour l’enregistrement à...
  • Seite 77: Panneau Avant

    Appellation et fonction des organes 4 Prises OUTPUT AUX 1/2 Panneau avant Transmettent le son à utiliser comme son de sortie. Après avoir ajouté un effet extérieur au son transmis par ces prises, utilisez les prises RETURN 1/2 (L/R) pour retourner le son vers cet appareil. Panneau arrière 1 Prise de casque HEADPHONES Branchez un casque avec fiche standard.
  • Seite 78: Raccordements Et Sens Du Signal

    Raccordements et sens du signal Raccordements pour l’enregistrement Raccordez des instruments, des microphones, des amplificateurs et des casques pour le contrôle comme montré ci-dessous. Amplificateur et enceintes extérieurs Instruments ou microphones A INPUT CH1 à CH 6 (Vous pouvez utiliser des fiches de type XLR avec CH-1 et CH-2) Des prises MONITOR OUT du...
  • Seite 79: Raccordement D'appareils Midi

    Raccordements et sens du signal Raccordement d’appareils MIDI Schéma du parcours des signaux MDM-X4 Raccordez des appareils MIDI comme montré dans le schéma ci-dessous. Le schéma suivant montre le parcours des signaux Pour des détails concernant les raccordements pour le internes de cet appareil.
  • Seite 80: Contrôle

    Contrôle Préparations pour le contrôle Exemple de contrôle Cet appareil vous permet de contrôler 4 types de EXEMPLE 1: Contrôle du son du bus des signaux en fonction des nécessités. 1 Groupe 1, 2: A sélectionner pour contrôler les bus groupes 1 et 2 (pendant l’enregistrement, de groupe 1 et 2 du mixeur.
  • Seite 81 Contrôle EXEMPLE 3 : Réenregistrement d’une partie EXEMPLE 5 : Contrôle du son du bus de la piste 1 en contrôlant le son des stéréophonique (pour le mixdown, etc.) pistes 3 et 4 (pendant l’enregistrement punch-in/out, etc.) Tournez pour ajuster le niveau Appuyez Appuyez Tournez pour ajuster...
  • Seite 82: Réglage De L'environnement De Fonctionnement

    Réglage de l’environnement de fonctionnement PLAY (punch-out). Ce réglage vous permet Réglages du système d’effectuer un enregistrement avec punch-in/out au moyen d’un commutateur extérieur. Vous pouvez personnaliser l’environnement de Stop: Arrête le fonctionnement du minidisque. fonctionnement en mettant en/hors service les IOply (In-Out Play): Commence la lecture IN-OUT.
  • Seite 83: Modification D'un Réglage

    Réglage de l’environnement de fonctionnement Réglage du nombre de pistes enregistrables sur le Modification d’un réglage minidisque (Rec) Pour régler le nombre de pistes à utiliser sur le minidisque. Utilisez les opérations suivantes pour modifier les Le nombre de pistes sélectionné est effectif la réglages du système prochaine fois qu’un morceau est enregistré.
  • Seite 84: Enregistrement

    Enregistrement Enregistrement Utilisez le potentiomètre pour ajuster le niveau Enregistrement initial d’enregistrement. Jouez une phrase relativement bruyante et effectuez les réglages en surveillant le Cette section vous montre comment enregistrer la toute crête-mètre correspondant à la piste que vous première piste sur un minidisque vierge. voulez enregistrer.
  • Seite 85: Enregistrement Overdub

    Enregistrement Vérification de l’enregistrement Enregistrement overdub Vous pouvez enregistrer d’autres sons sur une piste différente en écoutant la lecture d’une piste précédemment enregistrée. Ce type d’enregistrement est appelé “enregistrement overdub”. Piste Partie Partie enregistrée enregistrée par enregistrement Appuyez sur CUE pour préparer le contrôle. overdub Ajustez le volume de contrôle avec les boutons TRACK respectifs et le bouton MONITOR.
  • Seite 86 Enregistrement Vérification de l’enregistrement Utilisez le potentiomètre pour ajuster le niveau d’enregistrement. Jouez une phrase relativement bruyante et effectuez les réglages en surveillant le crête-mètre correspondant à la piste que vous voulez enregistrer. Si nécessaire, vous pouvez utiliser le bouton TRIM pour ajuster le niveau d’enregistrement et l’égaliseur.
  • Seite 87: Enregistrement Punch-In/Out Automatique

    Enregistrement Au point où vous voulez commencer Enregistrement punch-in/out l’enregistrement, appuyez sur MARK, puis sur IN. La position punch-in est réglée au point où vous automatique avez appuyé sur IN. Vous pouvez réenregistrer une certaine partie d’une Au point où vous voulez arrêter l’enregistrement, piste précédemment enregistrée.
  • Seite 88 Enregistrement Appuyez sur ( PLAY. Utilisez le potentiomètre pour ajuster le niveau d’enregistrement. Jouez une phrase relativement La lecture commence avec le pre-roll à partir d’un bruyante et effectuez les réglages en surveillant le point légèrement avant la position punch-in crête-mètre correspondant à...
  • Seite 89 Enregistrement Enregistrement Tournez la molette de recherche pour régler le compteur sur le point que vous voulez entendre. Quand vous appuyez sur la touche IN, le point punch-in est automatiquement localisé. Appuyez sur CUE pour préparer le contrôle. Ajustez le volume de contrôle avec les boutons TRACK respectifs et le bouton MONITOR.
  • Seite 90: Enregistrement "Punch-In/Out" Manuel

    Enregistrement Appuyez sur CUE, puis tournez le bouton Enregistrement “punch-in/out” TRACK correspondant à la piste contenant le son enregistré que vous voulez écouter en manuel enregistrant, pour ajuster le son à un niveau permettant le contrôle. L’enregistrement punch-in/out manuel est effectué Utilisez le bouton MONITOR pour ajuster le quand vous commencez et arrêtez l’enregistrement niveau de contrôle.
  • Seite 91 Enregistrement Appuyez sur p STOP. Appuyez sur ( PLAY quand vous atteignez le La lecture s’arrête. point où vous voulez arrêter l’enregistrement (le point punch-out). Le témoin de la touche REC s’éteint, l’enregistrement Vérification de l’enregistrement s’arrête et l’appareil passe en mode de lecture. Appuyez sur p STOP.
  • Seite 92: Enregistrement Mix Write (Principes Fondamentaux)

    Enregistrement Réglez le commutateur ASSIGN du canal 2 et les Enregistrement mix write boutons PAN pour diriger le son vers la piste 1. (Réglez l’entrée du chœur du canal 2 pour qu’il (principes fondamentaux) soit enregistré sur la piste 1.) Vous pouvez enregistrer d’autres sons sur une piste Appuyez précédemment enregistrée.
  • Seite 93: Enregistrement Mix Write (Applications)

    Enregistrement Utilisez les potentiomètres des canaux 1 et 2 pour Enregistrement mix write régler l’équilibre entre les voix et le chœur à enregistrer sur la piste 1. (applications) Il peut être aussi nécessaire de régler l’équilibre de contrôle à ce moment. Mix write est pratique aussi dans une variété...
  • Seite 94 Enregistrement Vérification de l’enregistrement Réglez les commutateurs ASSIGN et les boutons PAN correspondant aux canaux 1 à 4 pour diriger Tournez la molette de recherche pour régler le le son vers la piste 4. compteur sur le point que vous voulez entendre. (Réglez l’entrée du son de lecture de l’enregistreur vers les canaux 1 à...
  • Seite 95 Enregistrement Préparatifs Enregistrement Appuyez sur REC. L’appareil passe en mode de pause d’enregistrement. Appuyez sur ( PLAY. L’enregistrement commence. Effectuez simultanément la lecture du morceau précédemment enregistré. Quand vous avez terminé la lecture, appuyez sur p STOP. Vérification de l’enregistrement Appuyez sur les commutateurs INPUT des canaux 1 à...
  • Seite 96: Montage D'une Partie D'un Morceau (Track Edit)

    Montage d’une partie d’un morceau (Track Edit) Montage d’une partie d’un morceau (Track Edit) Vue d’ensemble du montage Spécification des points de de piste (Track Edit) localisation Les opérations de montage de piste vous permettent de Avant le montage, il est nécessaire de spécifier les spécifier une partie (une section arbitraire d’une piste points de localisation (points de montage).
  • Seite 97 Montage d’une partie d’un morceau (Track Edit) Correction de la position d’un point de Appuyez sur MARK. Le témoin sur la touche MARK commence à localisation clignoter. Appuyez sur la touche correspondant au point de localisation souhaité. • Point IN: Appuyez sur IN. •...
  • Seite 98: Copie D'une Partie (Track Copy)

    Montage d’une partie d’un morceau (Track Edit) Tournez la molette de recherche pour régler la Copie d’une partie (Track Copy) position du point de localisation. Le point de localisation se déplace proportionnellement à la rotation de la molette Vous pouvez copier une partie d’une piste et l’insérer à chaque fois que la partie est répétée.
  • Seite 99: Déplacement D'une Partie (Track Move)

    Montage d’une partie d’un morceau (Track Edit) Tournez la molette de recherche afin que “Track Déplacement d’une partie Copy” apparaisse sur l’afficheur. Le nom de la fonction de montage commence à (Track Move) clignoter sur l’écran. Vous pouvez déplacer une partie d’une piste sur une Appuyez sur ENTER.
  • Seite 100 Montage d’une partie d’un morceau (Track Edit) Appuyez sur ENTER. Échange de position de 2 Les paramètres de la fonction de montage apparaissent sur l’écran. parties (Track Exchange) Tournez la molette de recherche pour afficher le Vous pouvez interchanger la position d’une partie d’une réglage souhaité.
  • Seite 101: Effacement D'une Partie (Track Erase)

    Montage d’une partie d’un morceau (Track Edit) Appuyez sur ENTER. Effacement d’une partie (Track Les paramètres de la fonction de montage apparaissent sur l’écran. Erase) Tournez la molette de recherche pour afficher le Vous pouvez effacer une partie d’une piste. La partie réglage souhaité.
  • Seite 102 Montage d’une partie d’un morceau (Track Edit) Appuyez sur ENTER. Les paramètres de la fonction de montage apparaissent sur l’écran. Tournez la molette de recherche pour afficher le réglage souhaité. Vous déterminez ainsi sur quelle piste la partie sera effacée. Utilisez la molette de recherche pour afficher le numéro de la piste contenant la partie à...
  • Seite 103: Changement De Structure D'un Morceau (Section Edit)

    Changement de structure d’un morceau (Section Edit) Utilisation de la fonction d’annulation avec Vue d’ensemble du montage les opérations de montage de section de section (Section Edit) Vous pouvez annuler un montage immédiatement après l’exécution si le témoin d’annulation est Les opérations de montage de section vous permettent allumé...
  • Seite 104: Déplacement De Section (Section Move)

    Changement de structure d’un morceau (Section Edit) Tournez la molette de recherche afin que “Sect Déplacement de section Move” apparaisse sur l’afficheur. Le nom de la fonction de montage commence à (Section Move) clignoter sur l’écran. Vous pouvez déplacer une section sur une position Appuyez sur ENTER.
  • Seite 105: Échange De Position De Deux Sections (Section Exchange)

    Changement de structure d’un morceau (Section Edit) Appuyez sur ENTER. Échange de position de deux “OK?” apparaît sur l’afficheur. sections (Section Exchange) 0 0 1 : X c g , O K ? Vous pouvez interchanger la position de deux sections. Appuyez de nouveau sur ENTER.
  • Seite 106: Insertion D'une Autre Section (Section Insert)

    Changement de structure d’un morceau (Section Edit) Appuyez sur ENTER. Insertion d’une autre section “OK?” apparaît sur l’afficheur. (Section Insert) 0 0 1 : I n s , O K ? Cette fonction vous permet de copier une section et de l’insérer à...
  • Seite 107: Effacement De Section (Section Delete)

    Changement de structure d’un morceau (Section Edit) Appuyez sur ENTER. Effacement de section (Section “OK?” apparaît sur l’afficheur. Delete) 0 0 1 : D e l , O K ? Cette fonction vous permet d’effacer une section du morceau. Appuyez de nouveau sur ENTER. L’opération de montage sélectionnée est effectuée.
  • Seite 108: Montage De Morceaux Complets (Song Edit)

    Montage de morceaux complets (Song Edit) Montage de morceaux complets (Song Edit) Vue d’ensemble du montage de Copie d’un morceau (Song morceau (Song Edit) Copy) Les sections suivantes vous montrent comment diviser Cette fonction vous permet de recopier un morceau. La un morceau complété...
  • Seite 109: Déplacement D'un Morceau (Song Move)

    Montage de morceaux complets (Song Edit) Appuyez de nouveau sur ENTER. Déplacement d’un morceau Le morceau sélectionné est copié. Pour recommencer à partir du début, ou quitter (Song Move) l’opération de montage, appuyez sur EXIT au lieu de ENTER. Cette fonction vous permet de changer l’ordre des Quand l’opération de montage est terminée, morceaux en déplaçant le morceau sélectionné...
  • Seite 110: Changement De L'ordre Des Morceaux (Song Exchange)

    Montage de morceaux complets (Song Edit) Tournez la molette de recherche pour afficher le Changement de l’ordre des numéro correspondant à la position sur laquelle vous voulez déplacer le morceau. morceaux (Song Exchange) Appuyez sur ENTER. Cette fonction vous permet d’interchanger la position “OK?”...
  • Seite 111: Division De Morceau (Song Divide)

    Montage de morceaux complets (Song Edit) Tournez la molette de recherche pour afficher le Division de morceau (Song numéro du morceau que vous voulez échanger avec le premier morceau. Divide) Appuyez sur ENTER. Cette fonction vous permet de diviser un morceau en “OK?”...
  • Seite 112: Combinaison De 2 Morceaux (Song Combine)

    Montage de morceaux complets (Song Edit) Appuyez de nouveau sur ENTER. Combinaison de 2 morceaux Le morceau est divisé au point spécifié. Pour recommencer à partir du début, ou quitter (Song Combine) l’opération de montage, appuyez sur EXIT au lieu de ENTER.
  • Seite 113: Effacement D'un Morceau (Song Delete)

    Montage de morceaux complets (Song Edit) Appuyez sur ENTER. Effacement d’un morceau Les paramètres de réglage de montage apparaissent sur l’afficheur. (Song Delete) C m b 0 0 2 + 0 0 3 Cette fonction vous permet d’effacer facilement un morceau enregistré...
  • Seite 114: Titrage De Morceau (Song Name)

    Montage de morceaux complets (Song Edit) Appuyez sur ENTER. Titrage de morceau (Song “OK?” apparaît sur l’afficheur. Name) Appuyez de nouveau sur ENTER. Les morceaux sélectionnés sont effacés. Cette fonction vous permet d’assigner des titres aux Pour recommencer à partir du début, ou quitter morceaux en utilisant les majuscules et les minuscules l’opération de montage, appuyez sur EXIT au lieu de l’alphabet, des nombres et des symboles.
  • Seite 115: Montage Du Minidisque Entier (Disc Edit)

    Montage du minidisque entier (Disc Edit) Vue d’ensemble Effacement du contenu d’un minidisque (Disc Erase) Ce chapitre vous montre comment effacer toutes les informations du minidisque et comment assigner un Cette fonction efface le minidisque tout entier. Aussi titre au minidisque. bien les données audio enregistrées que le titre du minidisque sont effacés.
  • Seite 116: Titrage Du Minidisque (Disc Name)

    Montage du minidisque entier (Disc Edit) Appuyez sur ENTER. Titrage du minidisque (Disc Le caractère sélectionné à l’étape 4 s’allume en continu et le curseur commence à clignoter dans Name) la position suivante. Pour revenir à la position précédente, appuyez Cette fonction vous permet d’assigner des titres aux sur EXIT.
  • Seite 117: Synchronisation Avec Des Appareils Midi

    MIDI (etc.). avec des sons provenant d’un module sonore lus par l’intermédiaire d’un séquenceur (etc.) pendant le MDM-X4 (cet appareil) mixdown. Cette méthode de mixage vous permet d’effectuer des enregistrements sans utiliser de pistes MIDI MIDI superflues.
  • Seite 118: Synchronisation Midi Avec Horloge Midi

    Raccordements 3,4,6, Utilisez un câble MIDI pour raccorder cet appareil à un séquenceur compatible MIDI (etc.). 8,9,,,, 2,5,7, MDM-X4 (cet appareil) 9,11,, MIDI MIDI Séquenceur L’étape suivante vous explique comment créer l’allocation (etc.) Signal MIDI de rythme montrée dans l’exemple précédent.
  • Seite 119 Synchronisation avec des appareils MIDI Appuyez sur ENTER. Tournez la molette de recherche pour afficher 02. L’affichage de réglage de l’allocation de rythme 0 2 : - - - - - - - apparaît. Répétez les étapes 3 à 9 pour créer la nouvelle 0 1 : - - - - - - - allocation de rythme.
  • Seite 120: Pilotage De Cet Appareil À Partir D'autres Composants Midi Avec Mmc

    Synchronisation avec des appareils MIDI Réglages Appuyez sur ENTER. L’affichage de réglage de l’allocation de rythme Réglez le paramètre “MMC” du système de cet apparaît. appareil sur “on”. Voir “Modification d’un réglage” (page 18) pour les Tournez la molette de recherche pour afficher détails.
  • Seite 121: Exemple De Système Midi

    Synchronisation avec des appareils MIDI Exemple de système MIDI Vous trouverez ci-après des explications sur la construction d’un système MIDI synchronisé utilisant MMC et MTC ainsi qu’un module sonore MIDI. Raccordements Ordinateur MIDI MIDI Module sonore Interface MIDI MIDI Données de notes (etc.) MIDI OUT MIDI IN...
  • Seite 122: Mixdown

    Mixdown Mixdown Appuyez sur la touche STEREO des pistes de Mixdown (principes contrôle. fondamentaux) Utilisez les touches = ou + ou la molette de recherche pour localiser le début du morceau Vous trouverez ci-après des explications sur la façon souhaité. de repiquer un morceau sur un enregistreur final (tel qu’un enregistreur DAT ou MD) tout en réglant Appuyez sur ( PLAY.
  • Seite 123: Mixdown (Applications)

    Mixdown Comment sauvegarder jusqu’à 8 pistes de Mixdown (applications) données indépendamment Vous pouvez enregistrer un nombre de parties sonores supérieur au nombre de pistes disponibles sur cet Comment utiliser les prises TRACK appareil (4) en utilisant la fonction d’enregistrement Les prises TRACK 1 à 4 du panneau supérieur de cet bounce (page 29).
  • Seite 124 Mixdown Ajoutez le clavier en stéréo aux pistes 3 et 4 en Utilisez la fonction de repiquage d’un morceau écoutant la lecture des pistes 1 et 2. (Morceau 1) pour sauvegarder la partie voix, puis repiquez les pistes 3 et 4 sur les pistes 1 et 2. Morceau 1 Morceau 2 Ce processus vous permet d’effectuer une...
  • Seite 125: Informations Complémentaires

    Error ** heures. Une erreur sérieuse s’est produite. Veuillez contacter / Mettez l’appareil sous tension. un centre de réparations Sony. / Insérez le minidisque dans le sens de la flèche Invalid imprimée sur son boîtier. Une opération a été annulée à cause d'un réglage non / Rien n’a été...
  • Seite 126: Limites Du Système D'enregistrement De Minidisque

    Informations complémentaires L’appareil entre en mode de lecture/pause entre les Limites du système morceaux pendant la lecture continue Cet appareil entre en mode de lecture/pause un instant d’enregistrement de minidisque avant de poursuivre la lecture chaque fois qu’il atteint un nouveau numéro de morceau ou une section créée avec la Le système d’enregistrement de votre platine MD a les fonction de division de morceau.
  • Seite 127: Généralités

    Informations complémentaires RETURN 1 et 2 (L/R) Réponse en fréquence Type : Jack quart de pouce (Asymétrique) 5 à 20 000 Hz ±1,0 dB Impédance d’entrée : supérieure à 20 kilohms Rapport signal/bruit Niveau d’entrée nominal : –10 dB (Max: +10 dB) Supérieur à...
  • Seite 128: Glossaire

    Informations complémentaires Enregistrement ping-pong Glossaire Normalement, ce terme décrit l’opération consistant à repiquer le son des pistes 1 à 3 sur la piste 4 de façon à libérer des pistes supplémentaires. Avec cet appareil, TOC (Sommaire) vous pouvez repiquer le son des pistes 1 à 4 sur la piste Zone dans laquelle les données non musicales, telles 4.
  • Seite 129: Schéma Fonctionnel

    Informations complémentaires Schéma fonctionnel Le schéma fonctionnel pour cet appareil est montré ci- dessous to CHANNEL...
  • Seite 130 Informations complémentaires Sony Multi Track Recorder MDM-X4 Tableau de mise en applIcation MIDI SEP 21, 1996 Version: 1.0 Function... Transmitted Recognized Remarks Basic Default Channel Changed Default Mode Messages Altered * * * * * * * * * * * * * *...
  • Seite 131: Zur Besonderen Beachtung

    Das Typenschild befindet sich unten an ausgesetzt sind. der Außenseite des Geräts. Bei weiterführenden Fragen wenden Sie Zur Reinigung des Gehäuses sich bitte an den nächsten Sony Reinigen Sie das Gehäuse, das Händler. Bedienungspult und die Bedienungselemente mit einem weichen, leicht mit mildem Haushaltsreiniger angefeuchteten Tuch.
  • Seite 132: Zu Dieser Anleitung

    Inhaltsverzeichnis Zu dieser Anleitung Überblick über den MDM-X4 Grundlegendes Aufnahmeverfahren ................. 4 In der Anleitung wird das folgende Bezeichnung und Funktion der Teile Symbol verwendet: Der Mischer ........................6 Tips zur Recorder ........................... 8 Bedienungserleichterung. Display ........................... 10 Eingangs- und Ausgangsbuchsen ................11 Anschluß...
  • Seite 133: Überblick Über Den Mdm-X4

    Überblick über den MDM-X4 µ Grundlegendes Aufnahmeverfahren 4 Sie wollen einen Begleitchor Der MDM-X4 besteht aus einem Mehrkanal-Recorder aufnehmen, es ist jedoch keine Spur und -Mischer. Bis zu vier Spuren können auf eine MD- mehr frei. DATA-Disc aufgenommen werden. Darüber hinaus...
  • Seite 134: Weitere Praktische Funktionen

    Überblick über den MDM-X4 Weitere praktische Funktionen µ • Jog/Shuttle-Knopf zum schnellen Ansteuern der gewünschten Stelle. • Mit der Auto Punch-In/Out-Funktion kann ein Teil 6 Die Struktur eines Songs soll geändert eines Songs neu aufgenommen werden; der Recorder werden. schaltet nur am spezifizierten Teil auf Aufnahme.
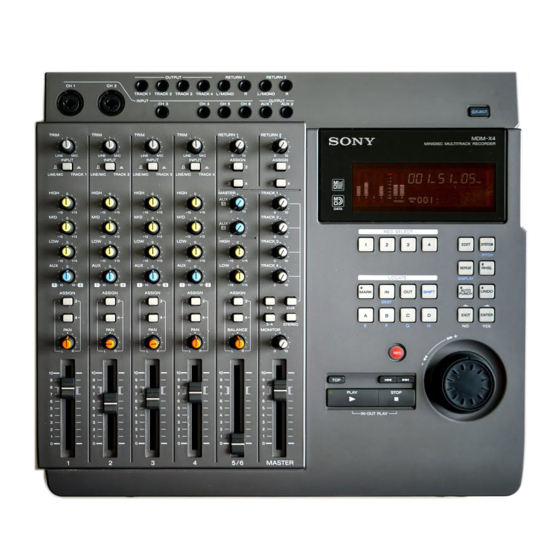
  • Seite 135: Bezeichnung Und Funktion Der Teile

    Bezeichnung und Funktion der Teile 2 INPUT-Wahltasten Der Mischer Mit diesen Tasten wird das Eingangssignal für die Mischerkanäle 1 bis 4 gewählt; es kann zwischen Siehe auch das „Blockdiagramm“ auf Seite 64. LINE/MIC (Signal der INPUT CH-Buchsen) und TRACK 1 - 4 (Signal des Recorders) gewählt werden. LINE/MIC: Zur Wahl des Eingangssignals eines Bedienfeld für Kanäle 1 - 4 externen Instrumentes, Mikrofons usw.
  • Seite 136 Bezeichnung und Funktion der Teile 7 ASSIGN-Tasten 1 MASTER AUX 1-2-Regler Diese Tasten legen fest, welchem Gruppen-Bus die Zur Einstellung des Gesamtpegels des AUX-Bus- Kanäle zugeordnet werden (d.h. auf welcher Spur sie Ausgangssignals der Buchsen AUX OUTPUT 1-2. aufgezeichnet werden). 2 HIGH-Regler Das Signal des Kanals wird stets dem Stereo-Bus zugeleitet.
  • Seite 137: Recorder

    Bezeichnung und Funktion der Teile 8 ASSIGN-Tasten Recorder Diese Tasten legen fest, welchem Gruppen-Bus (1 - 4) das Return-Signal (Rücklaufsignal) zugeordnet wird (d.h. auf welcher Spur der Recorder die Signale Bedienungspult aufzeichnet). Beispiel: Rücklaufsignal 1 und 2 wird dem Gruppen- Bus 1 und 2 zugeordnet (der Recorder zeichnet die Signale auf den Spuren 1 und 2 auf).
  • Seite 138 Bezeichnung und Funktion der Teile 3 OUT-Taste und OUT-Punkt wird wiederholt wiedergegeben. Zur Festlegung des Out-Punktes Durch Drücken der Taste im Stoppmodus werden die (Schnittausstiegspunkt). TOC-Daten* auf die Disc geschrieben. 4 IN/DEST-Taste !™ § EJECT-Taste Zur Festlegung des IN-Punktes Zum Herausnehmen der Disc. (Schnitteinstiegspunkt).
  • Seite 139: Display

    Bezeichnung und Funktion der Teile !ª ENTER-Taste Pitch-Steuerung „Ein“: Die Aufnahme bzw. Wiedergabe wird mit dem voreingestellten Pitch- Durch Drücken dieser Taste wird der gewählte Wert ausgeführt („Vari Pitch“ erscheint im Vorgang usw. ausgeführt. Display). @º EXIT-Taste Pitch-Steuerung „Aus“: Die Aufnahme bzw. Wiedergabe wird mit dem normalen Pitch-Wert Durch Drücken dieser Taste wird der gewählte ausgeführt („Fixed Pitch“...
  • Seite 140: Eingangs- Und Ausgangsbuchsen

    Bezeichnung und Funktion der Teile 1 Pegelmeter Eingangs- und • 1 - 4 Bei der Wiedergabe: Der Ausgangspegel der Ausgangsbuchsen einzelnen Spuren wird angezeigt. Bei der Aufnahme: Der Eingangspegel der einzelnen Spuren wird angezeigt. Oberseite Im Stoppmodus oder wenn keine Disc eingelegt ist: Der Pegel von Gruppen-Bus 1 - 4 wird angezeigt.
  • Seite 141: Monitor Out

    Bezeichnung und Funktion der Teile 3 CH 1-6-Eingangsbuchsen 5 MONITOR OUT-Buchse Zum Einspeisen von Tonsignalen für die Kanäle 1-6. Gibt das Tonsignal vom Monitor-Bus aus. Verbinden Die CH 1 - 4-Buchsen sind für Mikrofonsignale und Sie die Buchse mit einem Monitorboxenpaar oder Line-Signalquellen bestimmt.
  • Seite 142: Anschluß Und Signalfluß

    Anschluß und Signalfluß Anschluß für Aufnahme Schließen Sie die Instrumente, die Mikrofone sowie den Verstärker und den Kopfhörer (für Monitorbetrieb) wie folgt an: Externer Verstärker und Lautsprecher Instrumente und Mikrofone An INPUT CH-1-CH-6-Buchsen (an CH-1 und CH-2 können XLR-Stecker angeschlossen werden) Von MONITOR OUT-Buchsen an der Rückseite des Geräts...
  • Seite 143: Anschluß Eines Midi-Geräts

    Anschluß und Signalfluß Anschluß eines MIDI-Geräts MDM-X4-Signalflußdiagramm Ein MIDI-Gerät wird wie folgt angeschlossen. Das folgende Diagramm zeigt den internen Signalfluß. Einzelheiten zum Synchronbetrieb mit einem Sequencer usw. finden Sie unter „Synchronisation mit einem MIDI-Gerät“ auf Seite 52-56. Sequencer MIDI IN-Buchse...
  • Seite 144: Monitorbetrieb

    Monitorbetrieb Vorbereitung des Monitorbeispiele Monitorbetriebs Beispiel 1: Das Tonsignal von Gruppen-Bus Im Monitorbetrieb können mit diesem Gerät die 1 und 2 wird abgehört (während der folgenden vier Signaltypen abgehört werden. Aufnahme usw.) 1 Group 1, 2: Zum Abhören des Mischer-Gruppen- Bus 1 und 2.
  • Seite 145 Monitorbetrieb Beispiel 3: Ein Teil von Spur 1 wird bespielt, Beispiel 5: Das Stereo-Bus-Tonsignal wird während gleichzeitig Spur 3 und 4 abgehört (zum Abmischen usw.) abgehört wird (während Punch-In/Out- Aufnahme usw.) Zur Pegeleinstellung Drücken Drücken Zur Pegeleinstellung Zur Pegeleinstellung Beispiel 4: Die Spuren 1 bis 4 werden gemischt auf die Spuren 1 und 2 aufgenommen (während Mischaufnahme usw.)
  • Seite 146: Wunschgemäßes Konfigurieren Des Geräts

    Wunschgemäßes Konfigurieren des Geräts Stop: Stoppen der Disc. Systemeinstellungen IOply (In-Out Play): Starten der IN-OUT-Wiedergabe. PlayS (Play-Stop): Durch einmaliges Drücken wird die Um das Gerät wunschgemäß zu konfigurieren schalten Wiedergabe gestartet, durch erneutes Drücken Sie je nach den Erfordernissen die MIDI- wieder gestoppt.
  • Seite 147: Ändern Von Einstellungen

    Wunschgemäßes Konfigurieren des Geräts Aufnahmemodus Verwendbare Aufnahmezeit Disc-Typ Ändern von Einstellungen Spuren 37 Min. MD DATA Zum Ändern von Systemeinstellungen verfahren Sie 1, 2 74 Min. MD DATA, Musik-MD wie folgt. MD DATA, 148 Min. Musik-MD Hinweis Im Aufnahmemodus schaltet das Gerät bei Musik-MDs automatisch auf 2-Spur-Modus, auch wenn zuvor 4-Spur- Modus gewählt war.
  • Seite 148: Aufnahme

    Aufnahme Aufnahme Stellen Sie am MONITOR-Regler die Lautstärke Erstaufnahme des Mithörtons ein. Zum Aufnehmen auf die erste Spur einer leeren Disc Stellen Sie am Faderregler den Aufnahmepegel verfahren Sie wie folgt. ein. Geben Sie hierzu eine relativ laute Passage wieder und beobachten Sie beim Einstellen das Pegelmeter der Spur, auf die aufgenommen Track Spur...
  • Seite 149: Überprüfen Der Aufnahme

    Aufnahme Überprüfen der Aufnahme Overdub-Aufnahme Beim Aufnehmen auf eine Spur kann gleichzeitig eine andere Spur abgehört werden (Mithöraufnahme). Spur Im Overdub- Aufnahmesektor Aufnahmebetrieb bespielter Teil Vorbereitungen Drücken Sie CUE, um den Monitorbetrieb vorzubereiten. Stellen Sie mit dem betreffenden TRACK-Reglern und dem MONITOR-Regler die Monitorlautstärke ein.
  • Seite 150 Aufnahme Überprüfen der Aufnahme Stellen Sie am Faderregler den Aufnahmepegel ein. Geben Sie hierzu eine relativ laute Passage wieder und beobachten Sie beim Einstellen das Pegelmeter der Spur, auf die aufgenommen werden soll. Falls erforderlich, stellen Sie auch die TRIM- Regler und die Klangregler ein.
  • Seite 151: Auto Punch-In/Out-Aufnahme

    Aufnahme Drücken Sie an der Stelle, an der die Aufnahme Auto Punch-In/Out-Aufnahme enden soll, die MARK- und dann die OUT-Taste. Die Position bei Drücken der OUT-Taste wird als Im Punch-In/Out-Aufnahmebetrieb kann ein Teil einer Punch-Out-Punkt festgelegt. existierenden Aufnahme neu bespielt werden. Dabei Drücken Sie p STOP.
  • Seite 152: Simulation Der Punch-In/Out-Aufnahme

    Aufnahme Drücken Sie ( PLAY. Stellen Sie am Faderregler den Aufnahmepegel ein. Geben Sie hierzu eine relativ laute Passage Das Gerät sucht den Pre-roll-Punkt auf, und wieder und beobachten Sie beim Einstellen das beginnt dort mit der Wiedergabe. Um welchen Pegelmeter der Spur, auf die aufgenommen Betrag der Pre-roll-Punkt vor dem Punch-In-Punkt werden soll.
  • Seite 153: Verwendung Der Undo-Funktion Bei Der Auto Punch-In/Out-Aufnahme

    Aufnahme Aufnahme Suchen Sie mit dem Jog-Knopf den Zählerstand der Stelle auf, die Sie hören möchten. Durch Drücken der IN-Taste kehrt das Gerät zum Punch-In-Punkt zurück. Drücken Sie CUE, um auf Monitorbereitschaft zu schalten. Stellen Sie mit den betreffenden TRACK-Reglern und dem MONITOR-Regler die Monitorlautstärke ein.
  • Seite 154: Manuelle Punch-In/Out-Aufnahme

    Aufnahme Drücken Sie CUE, und stellen Sie dann den Manuelle Punch-In/Out- TRACK-Regler des Kanals, der während der Aufnahme mitgehört werden soll, so ein, daß der Aufnahme Ton zu hören ist. Stellen Sie am MONITOR-Regler die Lautstärke Beim manuellen Punch-In/Out-Betrieb werden die des Mithörtons ein.
  • Seite 155 Aufnahme Überprüfen der Aufnahme Drücken Sie am gewünschten Aufnahme- Endpunkt (Punch-Out-Punkt) die ( PLAY- Taste. Die REC-Taste erlischt, und das Gerät schaltet von Aufnahme auf Wiedergabe um. Drücken Sie p STOP. Die Wiedergabe endet. Wenn ASSIGN SW an der Vorderseite des Geräts auf REC IO steht, kann die Punch-In/Out-Aufnahme mit einem Fußschalter usw.
  • Seite 156: Mischaufnahme (Grundlagen)

    Aufnahme Stellen Sie den ASSIGN-Schalter von Kanal 2 und Mischaufnahme (Grundlagen) die PUNCH-Regler so ein, daß das Tonsignal zur Spur 1 geleitet wird. Auf eine bereits bespielte Spur können zusätzliche (Die Chorstimmen von Kanal 2 werden auf Spur 1 Daten aufgezeichnet werden, ohne die ursprüngliche aufgezeichnet.) Aufzeichnung zu löschen.
  • Seite 157: Mischaufnahme (Fortgeschrittener Betrieb)

    Aufnahme Stellen Sie mit den Faderreglern von Kanal 1 und Mischaufnahme 2 die Pegelbalance, mit der die Vokalstimmen und der Chor auf Spur 1 aufgezeichnet werden sollen, (fortgeschrittener Betrieb) ein. Eventuell muß gleichzeitig auch die Außer dem auf den vorhergehenden Seiten Monitorbalance einjustiert werden.
  • Seite 158: Beispiel 2: Aufnahme Des Tons Der Spuren

    Aufnahme Überprüfen der Aufnahme Stellen Sie die ASSIGN-Schalter und PAN-Regler der Kanäle 1 - 4 so ein, daß das Tonsignal zu Spur Suchen Sie mit dem Jog-Knopf den Zählerstand 4 geleitet wird. der Stelle auf, die Sie hören möchten. (Das den Kanäle 1 - 4 zugeleitete Recorder- Wiedergabe-signal wird auf Spur 4 Drücken Sie CUE, um auf Monitorbereitschaft zu aufgezeichnet.)
  • Seite 159 Aufnahme Vorbereitungen Aufnahme Drücken Sie REC. Das Gerät schaltet auf Aufnahme-Pause. Drücken Sie ( PLAY. Die Aufnahme beginnt. Musizieren Sie zusammen mit der zu hörenden vorhergehenden Aufnahme. Am Ende drücken Sie p STOP. Überprüfen der Aufnahme Suchen Sie mit dem Jog-Knopf den Zählerstand Drücken Sie die INPUT-Schalter der Kanäle 1 - 4.
  • Seite 160: Editieren Eines Song-Teils (Spur-Editierbetrieb)

    Editieren eines Song-Teils (Spur-Editierbetrieb) Editieren eines Song-Teils (Spur-Editierbetrieb) Überblick über den Spur- Festlegung von Suchpunkten Editierbetrieb Vor dem Editierbetrieb müssen die Suchpunkte (Editierpunkte) festgelegt werden. Zwischen den Im Spur-Editierbetrieb kann ein beliebiger Teil einer folgenden elf Suchpunkttypen wird unterschieden: beliebigen Spur an eine andere Stelle verschoben, •...
  • Seite 161: Korrektur Der Position Des Suchpunktes

    Editieren eines Song-Teils (Spur-Editierbetrieb) Korrektur der Position des Suchpunktes Drücken Sie MARK Die Anzeige der MARK-Taste beginnt zu blinken. Drücken Sie die Taste des gewünschten Suchpunktes. • Für IN-Punkt: Drücken Sie IN. • Für OUT-Punkt: Drücken Sie OUT. • Für DEST-Punkt (Zielpunkt): Halten Sie die SHIFT-Taste gedrückt und drücken Sie gleichzeitig IN.
  • Seite 162: Kopieren Eines Teils (Track Copy)

    Editieren eines Song-Teils (Spur-Editierbetrieb) Während des Rehearsal-Betriebs kann durch Drücken Kopieren eines Teils (Track der = oder + Taste zwischen Pegelanstieg und Pegelabfall hinter dem Suchpunkt umgeschaltet Copy) werden. Ein Teil einer Spur kann an eine andere Stelle kopiert Stellen Sie mit dem Jog-Knopf die Position des werden.
  • Seite 163: Verschieben Eines Teils (Track Move)

    Editieren eines Song-Teils (Spur-Editierbetrieb) Drehen Sie den Jog-Knopf, so daß im Display die Verschieben eines Teils (Track Editierfunktion „Trak Copy“ angezeigt wird. Der Name der Editierfunktion blinkt. Move) Drücken Sie ENTER. Ein Teil einer Spur kann an eine beliebige Stelle einer Die einzustellenden Editierparameter erscheinen anderen Spur verschoben werden.
  • Seite 164: Vertauschen Von Zwei Teilen (Track Exchange)

    Editieren eines Song-Teils (Spur-Editierbetrieb) Drücken Sie ENTER. Vertauschen von zwei Teilen Die einzustellenden Editierparameter erscheinen im Display. (Track Exchange) Legen Sie mit dem Jog-Knopf den Ein bestimmter Teil einer Spur kann gegen einen Verschiebevorgang fest: bestimmten anderen Teil einer beliebigen anderen Spur Drehen Sie den Jog-Knopf so, daß...
  • Seite 165: Löschen Eines Teils (Track Erase)

    Editieren eines Song-Teils (Spur-Editierbetrieb) Drücken Sie ENTER. Löschen eines Teils (Track Die einzustellenden Editierparameter erscheinen im Display. Erase) Legen Sie mit dem Jog-Knopf den Ein bestimmter Teil einer Spur kann gelöscht werden; Vertauschungsvorgang fest: der gelöschte Teil liefert anschließend kein Tonsignal. Drehen Sie den Jog-Knopf so, daß...
  • Seite 166 Editieren eines Song-Teils (Spur-Editierbetrieb) Drücken Sie ENTER. Die einzustellenden Editierparameter erscheinen im Display. Legen Sie mit dem Jog-Knopf die Spuren, in denen ein Teil gelöscht werden soll, fest: Drehen Sie den Jog-Knopf so, daß die Nummern der Spuren unterhalb der Marke ( ) erscheinen.
  • Seite 167: Ändern Der Struktur Eines Songs (Sektor-Editierbetrieb)

    Ändern der Struktur eines Songs (Sektor-Editierbetrieb) Verwendung der Undo-Funktion beim Überblick über den Sektor- Sektor-Editierbetrieb Editierbetrieb Wenn die Undo-Anzeige grün leuchtet, kann durch Aktivieren der Undo-Funktion ein zuvor Im Sektor-Editierbetrieb kann ein sich über alle vier ausgeführter Editiervorgang rückgängig gemacht Spuren erstreckender Sektor an eine andere Stelle werden.
  • Seite 168: Verschieben Eines Sektors (Section Move)

    Ändern der Struktur eines Songs (Sektor-Editierbetrieb) Drehen Sie den Jog-Knopf, so daß im Display die Verschieben eines Sektors Editierfunktion „Sect Move“ angezeigt wird. Der Name der Editierfunktion blinkt. (Section Move) Drücken Sie ENTER. Ein bestimmter Sektor kann an eine andere Stelle des „OK?“...
  • Seite 169: Vertauschen Von Zwei Sektoren (Section Exchange)

    Ändern der Struktur eines Songs (Sektor-Editierbetrieb) Drücken Sie ENTER. Vertauschen von zwei Sektoren „OK?“ erscheint im Display. (Section Exchange) 0 0 1 : X c g , O K ? Zwei Sektoren können wie folgt vertauscht werden. Drücken Sie ENTER erneut. IN-Punkt Der gewählte Editiervorgang wird ausgeführt.
  • Seite 170: Kopieren Und Einfügen Eines Sektors (Section Insert)

    Ändern der Struktur eines Songs (Sektor-Editierbetrieb) Drücken Sie ENTER. Kopieren und Einfügen eines „OK?“ erscheint im Display. Sektors (Section Insert) 0 0 1 : I n s , O K ? Ein bestimmter Sektor kann kopiert und an einer anderen Stelle des Songs eingefügt werden. Drücken Sie ENTER erneut.
  • Seite 171: Löschen Eines Sektors (Section Delete)

    Ändern der Struktur eines Songs (Sektor-Editierbetrieb) Drücken Sie ENTER. Löschen eines Sektors (Section „OK?“ erscheint im Display. Delete) 0 0 1 : D e l , O K ? Ein bestimmter Sektor eines Songs kann wie folgt gelöscht werden. Drücken Sie ENTER erneut. Der gewählte Editiervorgang wird ausgeführt.
  • Seite 172: Editieren Des Ganzen Songs (Song-Editierbetrieb)

    Editieren des ganzen Songs (Song-Editierbetrieb) Editieren des ganzen Songs (Song-Editierbetrieb) Verwendung der Undo-Funktion beim Überblick über den Song- Sektor-Editierbetrieb Editierbetrieb Wenn die Undo-Anzeige grün leuchtet, kann durch Im Song-Editierbetrieb können Sie die Songs auf der Aktivieren der Undo-Funktion ein zuvor Disc so umarrangieren, daß...
  • Seite 173: Verschieben Eines Songs (Song Move)

    Editieren des ganzen Songs (Song-Editierbetrieb) Verschieben eines Songs (Song Move) Ein Song kann zu einer beliebigen anderen Stelle verschoben werden. 3,5,6 Verschieben des dritten Songs vor den zweiten Song Vor dem Verschieben Drücken Sie EDIT. [EDIT] erscheint im Display. Nach dem Verschieben Drehen Sie den Jog-Knopf, so daß...
  • Seite 174: Vertauschen Von Songs (Song Exchange)

    Editieren des ganzen Songs (Song-Editierbetrieb) Wählen Sie mit dem Jog-Knopf die Nummer des Vertauschen von Songs (Song Songs, zu dem der gewählte Song verschoben werden soll. Exchange) Drücken Sie ENTER. Zwei beliebige Songs können gegeneinander „OK?“ erscheint im Display. vertauscht werden. Nach der Vertauschung werden die Songs automatisch chronologisch neu numeriert.
  • Seite 175: Unterteilen Von Songs (Song Divide)

    Editieren des ganzen Songs (Song-Editierbetrieb) Wählen Sie mit dem Jog-Knopf die Nummer des Unterteilen von Songs (Song zweiten Songs, der gegen den ersten Song vertauscht werden soll. Divide) Drücken Sie ENTER. Mit dieser Funktion kann ein Song in zwei Songs „OK?“...
  • Seite 176: Kombinieren Von Zwei Songs (Song Combine)

    Editieren des ganzen Songs (Song-Editierbetrieb) Drücken Sie ENTER erneut. Kombinieren von zwei Songs Der Song wird an der betreffenden Stelle unterteilt. (Song Combine) Um erneut von Anfang an zu beginnen oder den Editiervorgang zu stornieren, drücken Sie die Mit dieser Funktion können zwei Songs zu einem EXIT-Taste statt der ENTER-Taste.
  • Seite 177: Löschen Eines Songs (Song Delete)

    Editieren des ganzen Songs (Song-Editierbetrieb) Drücken Sie ENTER. Löschen eines Songs (Song Die Editierparameter erscheinen im Display. Delete) C m b 0 0 2 + 0 0 3 Nach Vorgabe der Nummer kann ein Song gelöscht werden. Außerdem ist es auch möglich, alle Songs der Wählen Sie mit dem Jog-Knopf die Nummer des Disc zu löschen;...
  • Seite 178: Zuteilen Eines Song-Namens (Song Name)

    Editieren des ganzen Songs (Song-Editierbetrieb) Wählen Sie mit dem Jog-Knopf die Nummer des Zuteilen eines Song-Namens zu löschenden Songs. (Song Name) Drücken Sie ENTER. „OK?“ erscheint im Display. Jedem Song kann ein aus Großbuchstaben, Kleinbuchstaben, Ziffern und Symbolen bestehender Drücken Sie ENTER erneut. Name zugeteilt werden.
  • Seite 179: Editieren Der Ganzen Disc (Disc-Editierbetrieb)

    Editieren der ganzen Disc (Disc-Editierbetrieb) Überblick Löschen einer Disc (Disc Erase) In den folgenden Abschnitten wird das Löschen einer Mit dieser Funktion kann die Disc vollständig gelöscht ganzen Disc und das Zuteilen eines Disc-Namens werden. Das Löschen umfaßt sowohl die Audiodaten behandelt.
  • Seite 180: Zuteilen Eines Disc-Namens (Disc Name)

    Editieren der ganzen Disc (Disc-Editierbetrieb) Drücken Sie EXIT, wenn sich der Cursor ganz Zuteilen eines Disc-Namens links befindet oder drücken Sie ENTER, wenn sich der Cursor ganz (Disc Name) rechts befindet, um den endgültigen Namen zu speichern. Der Disc kann ein aus Großbuchstaben, Falls erwünscht, kann mit dem Jog-Knopf ein Kleinbuchstaben, Ziffern und Symbolen bestehender weiterer Editiervorgang definiert werden.
  • Seite 181: Synchronisation Mit Einem Midi-Gerät

    Bei dieser Mischmethode ein MIDI-Kabel mit diesem Gerät. reduziert sich die Anzahl der erforderlichen Spuren. MTC (MIDI Time Code), MIDI-Takt und MMC (MIDI MDM-X4 (dieses Gerät) Machine Control) ermöglichen eine Koordination dieses Geräts mit externen MIDI-Geräten. In diesem MIDI...
  • Seite 182: Midi-Synchronisation Mit Dem Midi-Takt

    =100 daher vor einem Synchronbetrieb die Suchfunktion des Takt 17~ Taktart Sequencers. Anschluß Verbinden Sie den MIDI-kompatiblen Sequencer über ein MIDI-Kabel mit diesem Gerät. 3,4,6, MDM-X4 (dieses Gerät) 8,9,,,, MIDI MIDI 2,5,7, Sequencer usw. MIDI-Signal 9,11,, Um die Tempotabelle des obigen Beispiels zu erstellen,...
  • Seite 183: Löschen Einer Tempotabelle

    Synchronisation mit einem MIDI-Gerät Drücken Sie ENTER. Stellen Sie mit dem Jog-Knopf 02 ein. Die Tempotabellenanzeige erscheint im Display. 0 2 : - - - - - - - 0 1 : - - - - - - - Wiederholen Sie die Schritte 3 bis 9, um noch Tempo weitere Tempotabellen zu erstellen.
  • Seite 184: Steuerung Dieses Geräts Über Von Einem Midi-Gerät Ausgegebene Mmc-Befehle

    Synchronisation mit einem MIDI-Gerät Vorbereitung Drücken Sie ENTER erneut. Das Feld der Tempoänderungsposition beginnt zu Setzen Sie an diesem Gerät den Systemparameter blinken. MMC auf „on“. Tempotabelle 1 kann nur für den ersten Takt Einzelheiten finden Sie unter „Ändern von erstellt werden.
  • Seite 185: Beispiel Eines Midi-Systems

    Synchronisation mit einem MIDI-Gerät Beispiel eines MIDI-Systems Das folgende Beispiel zeigt ein synchronisiertes MIDI- System, das sowohl MMC als auch MTC verwendet und ein MIDI-Sound-Modul enthält. Anschluß Computer MIDI MIDI MIDI-Sound- MIDI-interface Modul Notendaten usw. MIDI OUT MIDI IN AUDIO AUDIO OUT (L) OUT (R)
  • Seite 186: Abmischen

    Abmischen Abmischen Drücken Sie die STEREO-Taste der Abmischen (Grundlagen) Monitorspuren. Suchen Sie mit den =- oder +-Tasten oder Nachdem ein Song mit diesem Gerät aufgezeichnet und gegebenenfalls editiert wurde, kann er mit der dem Jog-Knopf den Anfang des gewünschten gewünschten Pegelbalance und der gewünschten Songs auf.
  • Seite 187: Abmischen (Fortgeschrittener Betrieb)

    Abmischen Getrenntes Sichern von 8 Datenspuren Abmischen (fortgeschrittener Mit der Bounce-Aufnahmefunktion (siehe Seite 29) ist Betrieb) eine Aufnahme auch dann möglich, wenn die Anzahl der Song-Parts größer ist als die Anzahl der Spuren dieses Geräts (d.h. größer als 4). Verwendung der TRACK-Buchsen Allerdings sind dann einige der normalen Bounce- Aufnahmefunktionen, wie beispielsweise Die TRACK 1-4-Buchsen an der Oberseite des Geräts...
  • Seite 188 Abmischen Im Mischaufnahmebetrieb werden die Spuren 1 Im Overdub-Verfahren werden die Vokalstimmen und 2 von Song 1 auf Spur 4 abgemischt. auf die Spuren 3 und 4 aufgenommen, während das Wiedergabesignal der Spuren 1 und 2 (Song Song 1 Song 2 1) abgehört wird.
  • Seite 189: Zusatzinformationen

    / Die Disc entsprechend des auf der Cartridge aufzunehmen. angegebenen Pfeils einschieben. Error** / Die Disc enthält keine Aufzeichnung. Eine Ein ernsthaftes Problem, das nur von einer Sony Disc mit Aufzeichnung einlegen. Kundendienststelle behoben werden kann, ist aufgetreten. Keine Aufnahme möglich...
  • Seite 190: Besonderheiten Des Md-Systems

    Zusatzinformationen Während kontinuierlicher Wiedergabe schaltet das Gerät Besonderheiten des MD- zwischen den Songs auf Wiedergabe/Pausen-Funktion Das Gerät schaltet kurzzeitig auf Wiedergabe/Pause, sobald Systems es die Nummer eines neuen Songs oder eines mit Song Divide kreierten Song-Teils erreicht. Das MD-Deck weist die folgenden Besonderheiten auf. Diese sind bei MDs systembedingt es handelt sich nicht um eine Störung.
  • Seite 191: Allgemeines

    Zusatzinformationen Return 1-2 (L/R) Frequenzgang Typ: Klinke (unsymmetrisch) 5-20.000 Hz ±1,0 dB Eingangsimpedanz: über 20 kOhm Signal-Rauschabstand Nenneingangspegel: –10 dBs (max. +10 dBs) über 94 dB bei Wiedergabe Max. Anzahl der Songs Ausgänge STEREO OUT (L/R) Pitch-Regler Typ: Cinch (unsymmetrisch) Lastimpedanz: über 20 kOhm ±8,0% Nenneingangspegel: –10 dBs...
  • Seite 192: Glossar

    Zusatzinformationen Ping Pong-Aufnahme Glossar Hierunter versteht man normalerweise das Überspielen der Spuren 1 bis 3 auf Spur 4, um anschließend die Spuren 1 bis 3 erneut verwenden zu TOC (Table of Contents, Inhaltsverzeichnis) können. Bei diesem Gerät können die Spuren 1 bis 4 Ein vom Musik-Datenbereich getrennter Disc-Bereich auf Spur 4 überspielt werden.
  • Seite 193: Blockdiagramm

    Zusatzinformationen Blockdiagramm Die folgende Abbildung zeigt das Blockdiagramm dieses Recorders. to CHANNEL...
  • Seite 194 Zusatzinformationen Sony Multi Track Recorder MDM-X4 MIDI-Implementationstabelle SEP 21, 1996 Version: 1.0 Function... Transmitted Recognized Remarks Basic Default Channel Changed Default Mode Messages Altered * * * * * * * * * * * * * * Note Number:...

Inhaltsverzeichnis