
Verwandte Anleitungen für IFM Electronic efector300 SA3010


Inhaltszusammenfassung für IFM Electronic efector300 SA3010
- Seite 1 Bedienungsanleitung Operating instructions Notice utilisateurs Strömungswächter Flow monitor Contrôleur de débit d’eau SA3010...
-
Seite 2: Inhaltsverzeichnis
Inhalt Bedien- und Anzeigeelemente ......Seite 4 Maßzeichnung ........Seite 4 Bestimmungsgemäße Verwendung . - Seite 3 Menü-Übersicht / Menu structure / Structure du menu OU2 = Hno, Hnc, Fno, Fnc OU2 = I, U Mode/Enter Seite 3...
-
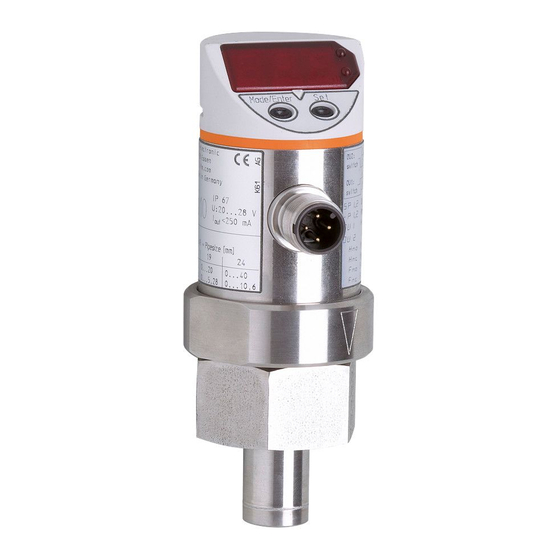
Seite 4: Bedien- Und Anzeigeelemente
Bedien- und Anzeigeelemente Mode/Enter Kalibrier-Indi- Aktiv, wenn kundenseitige Kalibrierung kator durchgeführt wurde 7-Segment- Anzeige der aktuellen Strömungsgeschwindigkeit Anzeige Anzeige der Parameter und Parameterwerte Anzeige des Schaltzustands; 2 x LED rot leuchtet, wenn Ausgang I / II durchgeschaltet ist Einstelltaste Anwahl der Parameter und Bestätigen der Mode / Enter Parameterwerte Einstellen der Parameterwerte... -
Seite 5: Bestimmungsgemäße Verwendung
Bestimmungsgemäße Verwendung • Der Strömungswächter erfaßt den Durchfluß von Wasser, • zeigt ihn durch ein Display an (max. Anzeige: Meßbereichsendwert + 20%) • und erzeugt 2 Ausgangssignale entsprechend der eingestellten Ausgangskonfiguration. Ausgang 1 Ausgang 2 4 ... 20 mA (I) Analogausgang (nur Ausgang 2) 0 ... -
Seite 6: Betriebsarten
Betriebsarten Run-Modus Normaler Arbeitsbetrieb Nach Einschalten der Versorgungsspannung und Ablauf der Bereit- schaftsverzögerungszeit* (ca. 10s) befindet sich das Gerät im Run- Modus. Es führt seine Überwachungsfunktion aus und gibt Ausgangs- signale entsprechend den eingestellten Parametern. Das Display zeigt den aktuellen Durchfluß an (kann ausgeschaltet werden; → Seite 12). Die roten LEDs signalisieren den Schaltzustand der Ausgänge. -
Seite 7: Montage
Montage Schritt 1 Fetten Sie die Überwurfmutter (A) mit Schmierpaste ein, um Fett mehrmaliges Lösen und Festzie- hen der Mutter zu gewährleisten. Achtung: Es darf kein Fett auf die Sensorspitze gelangen. Entfernen Sie die Schutzkappe (B) der Sensorspitze. Setzen Sie das Gerät in das T-Stück ein. -
Seite 8: Elektrischer Anschluß
Elektrischer Anschluß Das Gerät darf nur von einer Elektrofachkraft installiert werden. Befolgen Sie die nationalen und internationalen Vorschriften zur Errichtung elektrotechnischer Anlagen. Spannungsversorgung nach EN50178, SELV, PELV. Schalten Sie die Anlage spannungsfrei und schließen Sie das Gerät folgendermaßen an: 2 x p-schaltend 2 x n-schaltend 2: OUT2 2: OUT2... -
Seite 9: Programmieren
Programmieren Einstellbare Parameter → Seite 10 Drücken Sie die Taste Mode/Enter, Menüstruktur bis der gewünschte Parameter Mode/Enter Set → Ausklappseite im Display erscheint. Drücken Sie die Taste Set und halten Sie sie gedrückt. Mode/Enter Set Der aktuelle Parameterwert wird 5s lang blinkend angezeigt, danach wird er erhöht* (schrittweise durch Einzeldruck oder kontinuierlich durch Festhal-... -
Seite 10: Technik-Information / Funktionsweise / Parameter
Technik-Informationen / Funktionsweise / Parameter Menüstruktur: → Ausklappseite Einstellbare Parameter Schaltpunkt 1 / 2: Oberer Grenzwert, bei dem der Ausgang seinen Schaltzustand ändert. Einstellbereich (in Klammern: Schrittweite): Liter / min 0,1 ... 12 (0,1) 0,2 ... 24 (0,1) 0,4 ... 48 (0,1) Gallons/ min 0,03 ... - Seite 11 Technik-Informationen / Funktionsweise / Parameter → Analogstartpunkt (Erläuterung Seite 14) Meßwert, bei dem 4mA / 0V ausgegeben werden Einstellbereich (in Klammern: Schrittweite): Liter / min 0 ... 8 (0,1) 0 ... 16 (0,1) 0 ... 32 (0,1) Gallons/ min 0,00 ... 2,11 (0,01) 0,00 ...
- Seite 12 Technik-Informationen / Funktionsweise / Parameter Rücksetzen der Kalibrierung - Drücken Sie die “Mode/Enter”-Taste, bis CAr erscheint. - Drücken Sie die “Set”-Taste und halten Sie sie fest, bis die Anzeige “- - -” erscheint. - Drücken Sie dann kurz die “Mode/Enter”-Taste. Die mit CGA eingestellte Kalibrierung ist zurückgesetzt;...
-
Seite 13: Meßgenauigkeit
Technik-Informationen / Funktionsweise / Parameter Meßgenauigkeit Typischer Meßfehler für Medium Wasser bei verschiede- max. pos. Fehler 10% nen Mediumstemperaturen. des Endwerts 80 °C 25 °C 10 °C max. neg. Fehler 10% des Endwerts Q min. Q max. Hysteresefunktion Die Hysterese hält den Schaltzu- stand des Ausgangs stabil, wenn die Strömung um den Sollwert schwankt. -
Seite 14: Skalieren Des Meßbereichs (Analogausgang)
Technik-Informationen / Funktionsweise / Parameter Skalieren des Mit dem Parameter Analogstartpunkt (ASP) legen Sie fest, bei wel- Meßbereichs chem Meßwert das Ausgangssignal 4mA bzw. 0V beträgt. (Analogausgang) Mit dem Parameter Analogendpunkt (AEP) legen Sie fest, bei welchem Meßwert das Ausgangssignal 20mA bzw. 10V beträgt. Mindestabstand zwischen ASP und AEP = 40% des Meßbereichsend- werts. -
Seite 15: Kundenseitige Kalibrierung (Cga)
Technik-Informationen / Funktionsweise / Parameter Kundenseitige Durch die Kalibrierung wird die Anzeige Kalibrierung (CGA) Steigung der Meßwertkurve ver- ändert. Sie beeinflußt die Anzei- Analog- 12 l/min ausgang. 10 l/min Die Kalibrierung ist erst möglich 8 l/min ab Werten > 25% des Meß- bereichsendwerts. - Seite 16 Technik-Informationen / Funktionsweise / Parameter Beispiel: dSt bei Fensterfunktion Strömung erreicht 3% MEW → dSt startet, Ausgang wird aktiv dSt abgelaufen, Strömung hat Gutbereich erreicht → Ausgang bleibt aktiv Strömung steigt über SP (verläßt Gutbereich) → Ausgang wird zurückgesetzt Strömung fällt wieder unter SP → Ausgang wird wieder aktiv Strömung fällt unter rP (verläßt Gutbereich) →...
-
Seite 17: Technische Daten
Technik-Informationen / Funktionsweise / Parameter Technische Daten Einsatzbereich ......T-Stücke (DIN 2353): QL 18-18-18 (Nennweite 15mm) QL 22-18-22 (Nennweite 19mm) QL 28-18-28 (Nennweite 24mm) -
Seite 18: Controls And Visual Indication
Controls and visual indication Mode/Enter Calibration active if customer-specific calibration indicator has been carried out 7-segment display of the current flow velocity display display of parameters and parameter values 2 x LED red switching status; lights if output I / II has switched Mode / Enter selection of the parameters button... -
Seite 19: Function And Features
Function and features • The flow monitor detects the flow rate of water, • shows the current flow rate on its display, (max. value displayed: final value of measuring range + 20%) • and generates 2 output signals according to the set output configuration. -
Seite 20: Operating Modes
Operating modes Run mode Normal operating mode With power on and the power-on delay time elapsed* (approx. 10 s) the unit is in the Run mode. It monitors and generates output signals according to the set parameters. The display indicates the current flow (can be deactivated, → page 26). The red LEDs indicate the switching state of the outputs. -
Seite 21: Installation
Installation Step 1 Grease the nut (A) with greasing grease paste to ensure the nut can be loosened and tightened several times. Note: No grease must be applied to the sensor tip. Remove the protective cap (B) from the sensor tip. Insert the unit into the T-piece. -
Seite 22: Electrical Connection
Electrical connection The unit must only be connected by an electrician. The national and international regulations for the installation of elec- trical equipment must be observed. Voltage supply to EN50178, SELV, PELV. Disconnect power before connecting the unit. Wiring: 2 x p-switching 2 x n-switching 2: OUT2 2: OUT2... -
Seite 23: Programming
Programming Adjustable parameters → page 24 Press the Mode/Enter button Menu structur several times until the respective Mode/Enter Set → fold out page parameter is displayed. Press the Set button and keep it pressed. The current parameter Mode/Enter Set value flashes for 5s, then the value is increased* (incremental by pressing briefly or scrolling by holding pressed). -
Seite 24: Technical Informations / Functioning / Parameters
Technical information / Functioning / Parameters Menu structure → fold-out page Adjustable parameters Switch-on point 1 / 2: Upper limit value at which the output changes its switching status. Setting range(in brackets: in steps of): litre / min. 0.1 ... 12 (0.1) 0.2 ... - Seite 25 Technical information / Functioning / Parameters → Lower end of analog output (Explanation page 28) Measured value for which the output signal is 4mA / 0V Setting range (in brackets: in steps of): litre / min. 0 ... 8 (0.1) 0 ...
- Seite 26 Technical information / Functioning / Parameters Calibration reset - Press the "Mode/Enter" button until CAr is displayed. - Press the "Set" button and keep it pressed until “- - -” is displayed. - Then press the "Mode/Enter" button briefly. The calibration set by CGA is reset; the calibration indicator no longer lights. Start-up delay During this time special conditions apply to the switching of the outputs →...
-
Seite 27: Measurement Accuracy
Technical information / Functioning / Parameters Measurement Typical measurement errors for accuracy water and different temperatures max. pos. error 10 % of the medium. of the end value 80 °C 25 °C 10 °C max. neg. error 10 % of the end value Q min. -
Seite 28: Scaling The Measuring Range (Analog Output)
Technical information / Functioning / Parameters Scaling the measuring With the parameter "Lower end of analog output" (ASP) you can range select the measuring value for which the output signal is 4 mA or (analog output) 0V. With the parameter "Upper end of analog output" (AEP) you can select the measuring value for which the output signal is 20 mA or 10 V. -
Seite 29: Customer-Specific Calibration (Cga)
Technical information / Functioning / Parameters Customer-specific This calibration changes the slope display calibration (CGA) of the curve of measured values. It influences the display and the analog output. 12 l/min Calibration is only possible for 10 l/min values > 25 % of the final value 8 l/min of the measuring range. - Seite 30 Technical information / Functioning / Parameters Example: dSt with window function: flow reaches 3 % of the final value (FV) → dSt starts, the output becomes active dSt has elapsed, flow has reached the acceptable range → the output remains active flow exceeds SP (leaves the acceptable range) →...
-
Seite 31: Technical Data
Technical information / Functioning / Parameters Technical data Application ......T-shape fittings (DIN 2353): QL 18-18-18 (nominal diameter 15mm) QL 22-18-22 (nominal diameter 19mm) QL 28-18-28 (nominal diameter 24mm) -
Seite 32: Eléments De Service Et D'indication
Eléments de service et d’indication Mode/Enter indicateur de actif si le calibrage spécifique au client a été effectué calibrage affichage visualisation du débit actuel digital des paramètres et des valeurs du paramètre état de commutation; 2 x LED rouge allumée si la sortie I / II a commuté bouton sélection des paramètres et validation Mode / Enter... -
Seite 33: Fonctionnement Et Caractéristiques
Fonctionnement et caractéristiques • Ce contrôleur de débit contrôle le débit de l'eau • visualise le débit à l’aide d’un affichage digital, (valeur maximum affichée: valeur finale de l'étendue de mesure + 20 %) • et génère 2 signaux de sortie selon la configuration de sortie réglée. -
Seite 34: Modes De Fonctionnement
Modes de fonctionnement Mode Run Mode de fonctionnement norma Après la mise sous tension et l'écoulement du retard à la disponibilité* (env. 10 s) l'appareil se trouve en mode Run. Il surveille et génère les signaux de sortie selon les paramètres réglés. L'affichage digital indique le débit actuel du circuit (peut être désactivé, →... -
Seite 35: Montage
Montage Pas 1 Graisser l'écrou (A) afin que l'é- graisse crou puisse être desserré et serré plusieurs fois. Remarque: Aucune graisse ne doit être appliquée au bout de la sonde. Enlever le capot protecteur (B) du bout de la sonde. Insérer la sonde dans le raccord en T. -
Seite 36: Raccordement Électrique
Raccordement électrique L'appareil doit être monté par un électricien. Les règlements nationaux et internationaux relatifs à l'installation de matériel électrique doivent être respectés. Alimentation selon EN50178, TBTS, TBTP. Mettre l’installation hors tension avant le raccordement. Schéma de branchement: 2 x pnp 2 x npn 2: OUT2 2: OUT2... -
Seite 37: Programmation
Programmation Paramètres réglables: Appuyer sur le bouton → page 38 Mode/Enter plusieurs fois jusqu'à Structure du menu: Mode/Enter Set ce que le paramètre désiré soit → page avec rabat affiché. Appuyer sur le bouton Set et le maintenir appuyé. Mode/Enter Set La valeur de paramètre actuelle clignote pendant 5s, après la valeur est incrémentée*... -
Seite 38: Informations Techniques / Fonctions / Paramètres
Informations techniques / Fonctions / Paramètres Structure du menu: → page avec rabat Paramètres réglables Point de consigne haut 1 / 2: Seuil auquel la sortie change son état de commutation. Plage de réglage (entre parenthèses: en pas de): litre / min. 0,1 ... - Seite 39 Informations techniques / Fonctions / Paramètres → Valeur minimum de la sortie analogique (explication page 42) Valeur mesurée dont le signal de sortie est 4mA / 0V Plage de réglage (entre parenthèses: en pas de): litre / min. 0 ... 8 (0,1) 0 ...
- Seite 40 Informations techniques / Fonctions / Paramètres Remise à 0 du calibrage - Appuyer sur le bouton "Mode/Enter" jusqu'à ce que CAr soit affiché. - Appuyer sur le bouton et le maintenir appuyé jusqu'à ce que “- - -” soit affiché. - Appuyer brièvement sur le bouton "Mode/Enter".
-
Seite 41: Erreur De Mesure
Informations techniques / Fonctions / Paramètres Erreur de mesure Erreur de mesure typique pour erreur max. l’eau à différentes températures pos. 10 % de du fluide. la valeur finale 80 °C 25 °C 10 °C erreur max. neg. 10 % de la valeur finale Q min. -
Seite 42: Réglage De L'étendue De Mesure (Sortie Analogique)
Informations techniques / Fonctions / Paramètres Réglage de l'étendue Par le paramètre "Valeur minimum de la sortie analogique" (ASP) on de mesure peut sélectionner la valeur mesurée pour laquelle le signal de sortie est (sortie analogique) 4mA ou 0V. Par le paramètre "Valeur maximum de la sortie analogique" (AEP) on peut sélectionner la valeur mesurée pour laquelle le signal de sortie est 20 mA ou 10 V. -
Seite 43: Calibrage Spécifique Au Client (Cga)
Informations techniques / Fonctions / Paramètres Calibrage spécifique Ce calibrage modifie la pente de Anzeige au client (CGA) la courbe des valeurs mesurées. Il influence l'afficheur et la sortie analogique. Le calibrage n'est 12 l/min possible que pour les valeurs 10 l/min >... - Seite 44 Informations techniques / Fonctions / Paramètres Exemple fonction fenêtre: le débit atteint 3 % de VF → dSt commence, la sortie devient active dSt écoulé, le débit a atteint la plage acceptable → la sortie reste active le débit dépasse SP (quitte la plage acceptable) → la sortie est remise à 0 le debit tombe de nouveau en dessous de SP →...
-
Seite 45: Données Techniques
Informations techniques / Fonctions / Paramètres Données techniques Application ......raccords en T (DIN 2353): QL 18-18-18 (diamètre nominal 15 mm) QL 22-18-22 (diamètre nominal 19mm) QL 28-18-28 (diamètre nominal 24mm) - Seite 46 • 31135 Hildesheim • Tel. 0 51 21 / 76 67-0 ifm electronic gmbh vertrieb west • 45329 Essen • Tel. 02 01 / 3 64 75 -0 ifm electronic gmbh vertrieb mitte-west • 58511 Lüdenscheid • Tel. 0 23 51 / 43 01-0 ifm electronic gmbh vertrieb süd-west •...