Herunterladen Inhalt Inhalt Diese Seite drucken
Inhaltsverzeichnis

Werbung

Verfügbare Sprachen
  • DE

Verfügbare Sprachen

  • DEUTSCH, seite 51
Istruzioni d'uso e manutenzione
per forni ad incasso B600
Operating and maintenance
instructions for built-in ovens B600
Bedienungs und Wartungsanleitungen
für Einbaubacköfen B600
Instructions pour l'usage et la maintenance
des fours a encastrement B600
Instrucciones de uso y mantenimiento
para hornos de encastre B600
Instruções de uso e manutenção
para fornos de encastrar B600
Gebruiksaanwijzing en instructies
voor onderhoud en installatie B600
MODEL
FM 54 RK.A

Werbung

Inhaltsverzeichnis
loading

Inhaltszusammenfassung für Indesit FM 54 RK.A

  • Seite 1 MODEL Istruzioni d'uso e manutenzione per forni ad incasso B600 FM 54 RK.A Operating and maintenance instructions for built-in ovens B600 Bedienungs und Wartungsanleitungen für Einbaubacköfen B600 Instructions pour l'usage et la maintenance des fours a encastrement B600 Instrucciones de uso y mantenimiento para hornos de encastre B600 Instruções de uso e manutenção...
  • Seite 3 ITALIANO DUT C H Dismissione de g li elettr odo m est i c i Vernietiging van oude electrische apparaten La direttiva Europea 2002/96/CE sui rifiuti di apparecchiature De Europese Richtlijn 2002/96/EC over Vernietiging van Electrische en elettriche ed elettroniche (RAEE), prevede che gli elettrodomestici Electronische Apparatuur (WEEE), vereist dat oude huishoudelijke non debbano essere smaltiti nel normale flusso dei rifiuti solidi electrische apparaten niet mogen vernietigd via de normale...
  • Seite 4 DANISH (Dansk) POLISH POLISH DANISH (Dansk) Affaldsh ndtering af gamle elektronisk apperater Pozbywanie si´ starych urzàdzeƒ elektrycznych. Det Europ iske Direktiv 2002/96/EC ang ende Waste Eelectrical Europejska Dyrektywa 2002/96/EC dotyczàca Zu˝ytych and Electronic Equipment (WEEE — Affaldsh ndtering af Elektriske Elektrycznych i Elektronicznych Urzàdzeƒ...
  • Seite 7: Inhaltsverzeichnis

    Indice Caratteristiche tecniche Istruzioni per l’installazione Cruscotto comandi Funzioni del selettore Tabella cottura Uso del grill Uso del girarrosto Contaminuti meccanico 60’ Fine cottura meccanico 120’ Programmatore analogico Orologio analogico Programmatore elettronico 14-15-16 Sostituzione della lampada forno Smontaggio della porta forno Optional su richiesta Pulizia e manutenzione del forno...
  • Seite 9: Dichiarazione Di Conformità Ce

    DICHIARAZIONE DI CONFORMITÀ CE Questo apparecchio è conforme alle seguenti direttive CE: 93/68/CEE : Norme Generali 2006/95/CE : Bassa tensione 2004/108/CEE : Compatibilità elettromagnetica Regolamento CE n° 1935/2004 : Idoneità dei materiali al contatto con i cibi AVVERTENZE GENERALI Questo manuale costituisce parte integrante dell’apparecchio. Si raccomanda di conservarlo per l’...
  • Seite 10 In caso di guasto di funzionamento o di una riparazione indispensabile, richiedere l'intervento del servizio assistenza clienti. Se il forno presenta danni visibili non metterlo in funzione, staccarlo dalla rete elettrica e rivolgersi al servizio assistenza clienti. Non appena viene rilevato un problema di funzionamento, il forno deve essere staccato dalla rete elettrica.
  • Seite 11: Caratteristiche Tecniche

    CARATTERISTICHE TECNICHE Dimensioni: Altezza: 591mm Larghezza: 597mm Profondità: 547mm Tensione di alimentazione: 220-240V~ 50Hz Allacciamento elettrico: Assicurarsi che il voltaggio corrisponda a quello indicato nella targhetta dati tecnici, situata nella parete destra del frontale del forno, visibile a porta aperta. Il forno deve essere collegato con un cavo di sezione minima di 1,5mm nel retro, prevedendo un interruttore omnipolare conforme alle norme in vigore, avente una distanza di apertura fra i contatti di almeno 3mm.
  • Seite 12: Installazione Del Forno

    INSTALLAZIONE DEL FORNO Il forno deve essere alloggiato in un’apertura standard di 560mm (vedi figure a inizio libretto), sia sotto un piano di lavoro, sia in posizionamento a colonna. Nell’inserimento del forno a colonna è indispensabile praticare, al fine di assicurare una sufficiente ventilazione, un’apertura di almeno 85-90mm.
  • Seite 13: Cruscotto Comandi

    Cruscotto comandi 1. Termostato 5. Spia verde 2. Selettore 6. Spia gialla 3. Programmatore elettronico 7. Contaminuti 4. Fine cottura 8. Programmatore analogico e Orologio analogico...
  • Seite 14: Funzioni Del Selettore

    Funzioni del selettore: SCONGELAMENTO La luce del forno e la spia verde si accendono come per tutte le altre funzioni del forno. Entra in funzione la ventola, ma senza propagazione di calore (il termostato non è operante). La porta del forno dev'essere chiusa. Questo tipo di funzione permette lo scongelamento delle vivande utilizzando circa 1/3 del tempo normalmente impiegato.
  • Seite 15 Funzioni del selettore: COTTURA TRADIZIONALE + VENTOLA Selezionare la temperatura desiderata tra i 50°C ed i 250°C, tenendo la porta del forno chiusa. Questo tipo di cottura è l'integrazione tra convenzionale e ventilato. Cottura indicata per cuocere (pane, pizza, lasagne). E' consigliabile il preriscaldamento del forno.
  • Seite 16: Tabella Cottura

    Tavola 1 Tipo di pietanza Temp. Guida * Tempo cottura °C d'inserim. in minuti Dolci a stampo con impasto sbattuto Raccomandata Propria Panettoni o focacce 55 - 65 Focaccia reale 60 - 70 Torta sublime 60 - 70 Dolci a stampo con impasto di pastafrolla Fondo torta 8 - 10 Fondo torta con ricotta...
  • Seite 17: Uso Del Grill

    Come si usa il grill C. Con forno multifunzione/ventilato Pos. del selettore Collocare la vivanda da grigliare sull'apposita griglia o in una teglia dai bordi molto bassi. D. Con forno multifunzionale Pos. La griglia va posta nel gradino più alto del selettore possibile, mentre la leccarda per la raccolta dei grassi, dovrà...
  • Seite 18: Contaminuti Meccanico 60

    Contaminuti meccanico 60 min - Fig. 3 Il contaminuti può essere regolato per un periodo massimo di un'ora. La manopola di regolazione deve essere ruotata in senso orario fino alla posizione 60 minuti e poi posizionarla ruotandola in senso antiorario sino al tempo desiderato.
  • Seite 19 Orologio analogico - Fig.6 Regolazione dell’orologio : per la messa a punto dell’ora esatta, premere e ruotare in senso orario o antiorario la manopola “A”. Fig. 6...
  • Seite 20: Programmatore Analogico

    PROGRAMMATORE ANALOGICO OROLOGIO Per regolare l’ora corrente, premere e girare il pulsante in senso orario. Posizionare le lancette A e B sull’ora esatta. COME IMPOSTARE LA DURATA DELLA COTTURA Questa funzione consente l’inizio immediato della cottura, mentre la fine della cottura viene impostata in automatico.
  • Seite 21: Orologio Analogico

    Lancetta dei minuti Lancetta delle ore Indice Tempo di cottura Inizio della cottura Per regolare l’ora: premere leggermente e girare in senso orario Per impostare la durata della cottura : girare in senso orario Per impostare l’inizio della cottura : tirare leggermente e girare in senso orario.
  • Seite 22: Programmatore Elettronico

    Programmatore elettronico - Fig. 7 Il programmatore elettronico è un dispositivo che raggruppa le funzioni seguenti: - Orologio 24 ore con display illuminato - Timer (fino a 23 ore 59 minuti) - Programma per inizio e fine cottura automatica - Programma per cottura semiautomatica (possibilità...
  • Seite 23 Orologio digitale Dopo queste operazioni apparirà costantemente sul display il simbolo «AUTO», Indica le ore (0-24) e i minuti. indicando che il forno è stato programmato. Subito dopo il collegamento (come pure dopo un'eventuale interruzione di corrente) compaiono sul pannello TRE cifre Esempio pratico : Vogliamo fare una cottura intermittenti.
  • Seite 24 Avvisatore elettronico Cottura semiautomatica La funzione del «timer» consiste unicamente A. Programmazione del tempo di di un avvisatore acustico, che può essere cottura. regolato per un periodo massimo di 23 ore e B. Programmazione dell'ora di fine 59 minuti. Per regolare il timer premere sul pulsante cottura.
  • Seite 25: Sostituzione Della Lampada Forno

    Sostituzione della lampada forno - Fig.8 Il forno è provvisto di una lampadina avente le seguenti caratteristiche: Attacco a vite E-14 T 300° C ATTENZIONE: Disinserire l'apparecchio dalla corrente elettrica. Nell' eventualità fosse necessario sostituire la lampada di illuminazione del forno, occorre togliere la copertura di protezione A svitandola in senso antiorario.
  • Seite 26: Optional Su Richiesta

    Installazione dei pannelli autopulenti (optional) - Fig. 10 1) Fissare il pannello (A) con 4 viti autofilettanti. 2) Appoggiare i pannelli (C) ai fianchi del forno,posizionare sopra le griglie tolte in precedenza e riagganciare. 3) Reinserire nel forno gli accessori precedentemente tolti .
  • Seite 27: Pulizia E Manutenzione Del Forno

    Pulizia e manutenzione del forno Importante: Prima di procedere alla ma- filo cromato; tirare verso l'alto la parte an- nutenzione del forno occorre staccare teriore per sganciarli dalla parete e sfilarli sempre la spina dalla presa di corrente o dai fori posteriori. togliere la corrente dalla linea di alimenta- Pulire il forno con un panno soffice imbe- zione a mezzo dell'interruttore generale...
  • Seite 29 Table of contents Technical specifications Installation instruction Control panel Description of control panel symbols 28-29 Cooking table Using the grill Using the rotisserie Minute minder End of cooking 120’ Analog programmer Analog timer Electronic programmer 36-37-38 Replacing the oven bulb Removing the oven door Optional Cleaning and maintenance...
  • Seite 31: Declaration Of Ce Compliance

    DECLARATION OF CE COMPLIANCE This appliance is in compliance with the following European Directives: 93/68 : General regulations 2006/95/CE : Concerning low tensions 2004/108/CEE : Electromagnetic compatibility CE Regulation n° 1935/2004 : this appliance is suitable to come in contact with food products.
  • Seite 32 Make sure the power cord of the appliance is not crushed by the oven door as this may damage the electrical insulation. If the power cord has been damaged, it must be replaced by the technical service centre in order to avoid the creation of hazardous situations. Before closing the oven door, make sure there are no foreign bodies or pets inside the oven.
  • Seite 33: Technical Data

    TECHNICAL DATA Dimensions: Height: 591mm Width: 597mm Depth: 547mm Voltage regulations: 220-240V~ 50Hz Electrical connection: Make sure that the voltage supply is the same as what is on the rating plate which can be found on the right side of the oven face. The oven must be connected at the back using a cable with minimum section of 1.5mm providing an omnipolar switch in compliance with current regulations with a contact opening distance of at least 3mm.
  • Seite 34: Installation Of The Oven

    INSTALLATION OF THE OVEN The oven can be built into a standard 560mm housing unit (see drawings at the beginning of the booklet), either when built under the worktop or built in a tall housing unit. In both cases ventilation provisions must be made; for this reason, there must be a gap of 85-90mm at the back of the housing unit.
  • Seite 35: Control Panel

    Control panel 1. Thermostat 5. Green light 2. Selector 6. Yellow light 3. Electronic timer 7. Minute minder 4. End of cooking 8. Analog programmer and Analog timer...
  • Seite 36 Selector functions: DEFROSTING The oven and the green light will stay on during this and all the following functions. The fan motor comes on, but there is no heat. The oven door should be kept in the close position. Recommended use: for defrosting frozen foods in general, this will help cut down the defrosting time by about on third of the normal time.
  • Seite 37 Selector functions: TRADITIONAL COOKING + FAN By turning the thermostat knob, a desired temperature of 50°C to 250°C can be selected, keeping the door closed. This cooking mode integrates natural convection and ventilation. Cooking mode suited to bake bread, pizzas and lasagne. It is recommended that the oven be pre-heated LIGHT ONLY BOTTOM ELEMENT ONLY...
  • Seite 38 Table 1 Type of food Temp. Insertion* Cooking time °C guide in minutes Cake in mould with beaten mixture Suggested Personal Panettone or focaccia 55 - 65 60 - 70 Focaccia Cake 60 - 70 Pie in mould (short pastry) Pie base 8 - 10 25 - 35...
  • Seite 39 How to use the grill C. Multifunction-Fan oven : adjust selector Lay the food in the wire shelf or, in a tray in on position case of small pieces. The rack must be positioned in the highest D. Multifunction oven :adjust selector on runner possible and the grease drip pan in position the runner below.
  • Seite 40: Operating

    Programming your oven with mechanical 60 minutes timer - Fig. 3 The regulating knob (Fig. 3) must be turned in a clockwise direction until it reaches the 60 minutes position and then turned to the desired time by turning the knob in a counter clockwise direction.
  • Seite 41 Analog timer - Fig.6 Setting the clock: to set the clock, press and turn the knob “A” in a clockwise or anticlockwise direction. Fig. 6...
  • Seite 42: Analog Programmer

    ANALOG PROGRAMMER CLOCK To set the time of day, push and turn the shaft clockwise. Set the hands A et B in the right position of time of day. COOKING TIME Immediate start of cooking and automatic stop of cookin. Maximum duration : 180 minutes with a double scale ( 3 hours ).
  • Seite 43 Minute hand Hour hand Index Cooking time Start of cooking To set time of day: push and turn clockwise To set the cooking time: turn To set the start cooking time: pull and turn.
  • Seite 44: Electronic Programmer

    Electronic programmer - Fig. 7 The electronic programmer is a device which groups together the following functions: - 24 hours clock with illuminated display - Timer (up to 23 hours and 59 min.) - Program for automatic beginning and end of cooking - Program for semi-automatic cooking (either start or finish only).
  • Seite 45 Digital clock After this setting the symbol «AUTO» will flash, this means the oven has been Clock numbers show hours (0-24) and programmed. minutes. An example : cooking lasts 45 minutes and is Upon immediate hooking up of the oven or expected to stop at 14.00.
  • Seite 46 Semi-automatic cooking Timer = buzzer A. Set the length of cooking time The timer program consists only of a buzzer which may be set for a maximum period of B. Set the end of cooking time 23 hours and 59 min. To set the timer, push the button and, A) Set the length of cooking time by pu-...
  • Seite 47: Removing The Oven Door

    Replacing the oven light - Fig. 8 The oven is equipped with a lamp having the following features: screw cap E-14 T 300° C WARNING: disconnect the appliance from the power supply. lf the oven light needs to be replaced, the protective cover «A»...
  • Seite 48: Optional

    Installation of the self-cleaning liners (optional) - Fig. 10 1) Fix the wall (A) with four auto-tapping screws. 2) Lean the walls (C ) against the side of the oven and refasten the guides which were earlier taken away. 3) Replace the accessories into the oven. Fig.
  • Seite 49: Cleaning And Maintenance

    Cleaning and maintenance Important: The cleaning of the Wipe the inside of the oven by using a appliance must be carried out after the damp cloth with a diluted ammonia power supply has been disconnected. product; rinse and dry the oven. In case of persistent marks, leave a How to clean the oven: The cleaning of soaking ammonia cloth at the bottom...
  • Seite 51 Inhaltsverzeichnis Technische Daten Installierung Bedienungsblenden Beschreibung der Symbole auf der Bedienungsblende 50-51 Kochtabelle Grillbenützung Drehspießnützung 60 Minuten Minutenzähler 120 Minuten mechanische Schaltuhr Analoge Schaltuhr Analoge Uhr Elektronische Schaltuhr 58-59-60 Ersatz der Glühbirne der Ofenbeleuchtung Abmontierung der Ofentür Optional auf Anfrage Reinigung und Instandhaltung des Backofens...
  • Seite 53: Benutzerhinweise

    KONFORMITÄTSERKLÄRUNG EG Dieses Gerät entspricht den folgenden EG-Richtlinien: 93/68/EWG : Allgemeine Normen 2006/95/EG : Niederspannung 2004/108/EWG : elektromagnetische Verträglichkeit EG-VERORDNUNG Nr. 1935/2004 : Eignung der Materialien, die mit Lebensmitteln in Berührung kommen BENUTZERHINWEISE Dieses Handbuch ist integrierender Bestandteil des Gerätes. Es sollte während der gesamten Nutzungszeit des Gerätes aufbewahrt und vor der Installation, dem Gebrauch, der Wartung, Reinigung und Behandlung des Gerätes aufmerksam durchgelesen werden.
  • Seite 54 Auf keinen Fall dürfen im und am Gerät Änderungen oder Umrüstungen oder Reparaturversuche, z.B. unter Anwendung von Werkzeugen (Schraubenzieher, usw.), vorgenommen werden. Reparaturen, insbesondere von elektrischen Komponenten, dürfen ausschließlich von einer qualifizierten Fachkraft vorgenommen werden. Nicht fachgerecht durchgeführte Reparaturen können schweren Körperverletzungen führen, das Gerät und dessen Ausrüstungen beschädigen und zu Betriebsstörungen führen.
  • Seite 55: Technische Daten

    Für die Wartung und das Handling, die Installation und die Reinigung des Gerätes die entsprechenden Vorbeugungs- und Schutzmassnahmen ergreifen (Handschuhe, usw.) Das Anheben und das Handling von Geräten mit einem Gewicht über 25 kg, die nicht leicht zu greifen sind, muss mit geeigneten Hilfsmitteln oder mit zwei Personen erfolgen, um Gefahren oder Unannehmlichkeiten zu vermeiden.
  • Seite 56: Anweisungen Zur Richtigen Installation

    ANWEISUNGEN ZUR RICHTIGEN INSTALLATION Der Ofen muss in einer Standardöffnung von 560mm entweder unter einer Arbeitsplatte oder in einem Säulenelement untergebracht werden. Bei Einbau in ein Säulenelement muss eine Öffnung von mindestens 85-90mm vorhanden sein, damit der Backofen ausreichend belüftet wird. Der Backofen wird mit 4 Schrauben A, die sich in den entsprechenden Löchern im Geräterahmen befinden, am Einbaumöbel befestigt.
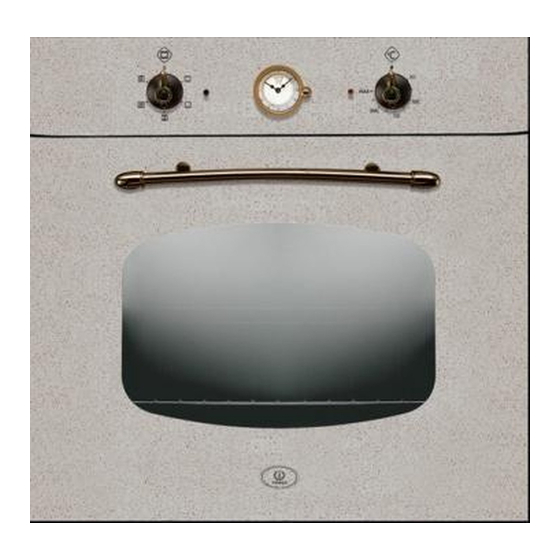
  • Seite 57: Bedienungsblenden

    Bedienungsblenden 1. Thermostat 5. Grünes Licht 2. Drehschalter 6. Gelbes Licht 3. Elektronische Schaltuhr 7. 60 Minuten Minutenzähler 4. 120 Minuten mechanische Schaltuhr 8. Analoge Schaltuhr und Analoge Uhr...
  • Seite 58 Ofenfunktionen AUFTAUSTUFE Die Backofenbeleuchtung und die grüne Lampe schalten sich ein. Der Ventilator wird eingeschaltet, ohne Wärmeübertragung (der Thermostat wird nicht eingeschaltet). Die Ofentür soll geschlossen bleiben. Mit Hilfe dieser Funktionen kann man in 1/3 der üblichen Zeit auftauen. OBER-/UNTERHITZE Die gewünschte Temperatur zwischen 5O°C und 250°C einstellen.
  • Seite 59: Ofenbeleuchtung

    Ofenfunktionen UMLUFTOBER-/UNTERHITZE Die gewünschte Temperatur zwischen 50°C und 250°C wählen, bei geschlossener Ofentür. Diese Funktion stellt einen Ergänzung der klassischen Beheizungsart durch Umluft dar und eignet sich besonders zum Backen von Pizza, Brot, Lasagne usw. OFENBELEUCHTUNG UNTERHITZE Die gewünschte Temperatur bei geschlossener Ofentür zwischen 50°C und 250°C einstellen;...
  • Seite 60 Tabelle 1 Brat/Backzeit Gericht Temp. Schiene * °C in Minuten Süßes Hefegebäck Geratet Persönlich Panettone/Gugelhupf 55 - 65 Hefekuchen 60 - 70 Torten 60 - 70 Mürbeteigkuchen Tortenboden 8 - 10 Tortenboden mit Quark 25 - 35 Tortenboden mit Obst 25 - 35 Hefegebäck Tortenboden...
  • Seite 61: Grillbenützung

    Grillbenützung C. Bei Elektrobackofen Pos. Wahlschalters. Legen Sie bitte die Speise auf den entsprechenden Rost oder in eine Form mit D. Bei Multifunktionsofen Pos. niedrigen Seitenwänden. oder des Wahlschalters. Den Rost in die höchste Schiene und die Fettpfanne in die Schiene direkt darunter Je nach Speise (z.B.
  • Seite 62: Minuten Minutenzähler

    60 Minuten Minutenzähler - Abb. 3 Der Minutenzähler kann auf maximal eine Stunde eingestellt werden. Der Drehschalter wird im Uhrzeigersinn bis zur Position 60 Minuten gedreht und dann entgegen dem Uhrzeigersinn bis zur gewünschten Minutenzahl gedreht. Nach Ablauf der eingestellten Zeit hört man ein akustisches Signal, das automatisch aufhört.
  • Seite 63 Analoge Uhr - Abb. 6 Einstellung der Uhr: zur Einstellung der genauen Uhrzeit, auf den Schaltknopf “A” drücken und diesen im oder entgegen dem Uhrzeigersinn drehen. Abb. 6...
  • Seite 64: Analoge Schaltuhr

    ANALOGE SCHALTUHR Zum Einstellen der Uhrzeit Spindel drücken und im Uhrzeigersinn drehen. Die Zeiger A und B in die richtige Stellung für die Uhrzeit bringen. GARZEIT Sofortiger Beginn der Garzeit und automatisches Garzeitende. Maximale Dauer : 180 Minuten mit zweifachen Einteilung ( 3 Stunden ). Zum Einstellen der Garzeit die Spindel im Uhrzeigersinn drehen und die Einteilung der Scheibe E vor der Anzeige D des Zifferblatts setzen.
  • Seite 65 Minutenzeiger Stundenzeiger Anzeige Garzeit Beginn der Garzeit Zum Einstellen der Uhrzeit: drücken und im Uhrzeigersinn drehen Zum Einstellen der Garzeit: drehen Zum Einstellen des Garzeitbeginns: ziehen und drehen.
  • Seite 66: Elektronische Schaltuhr

    Elektronische Schaltuhr - Abb. 7 Die Schaltuhr hat folgende Funktionen: - Uhr mit 24-Stunden-Leuchtdisplay - Zeitmesser (maximal 23 Stunden und 59 Minuten) - Programmierung von Anfang und Ende des Brat-/Backvorgangs - halbautomatische Programmierung (nur Anfang oder nur Ende des Brat-/Backvorgangs). Beschreibung der Knöpfe Abb.
  • Seite 67 Digitaluhr Nach diesen Schritten erscheint auf dem Display die Leuchtanzeige "AUTO", was Zeigt die Stunden (0 - 24) und Minuten an. bedeutet, daß der Backofen programmiert Gleich nach Anschluß des Backofens (auch worden ist. nach einer Stromunterbrechung) erschei- Praktisches Beispiel: nen auf der Bedienungblende DREI Die Backzeit soll 45 Minuten dauern und um blinkende Ziffern.
  • Seite 68 Halbautomatisches Braten oder Backen Elektronisches Signal A. Programmierung der Brat-/Backzeit Der Zeitmesser kann auf eine Maximaldauer B. Programmierung des Brat- von 23 Stunden und 59 Minuten eingestellt /Backendes werden und gibt nach Ablauf der entspre- chenden Zeit ein akustisches Signal ab. A) Die gewünschte Brat-/Backzeit mit dem Schalter einstellen.
  • Seite 69: Ersatz Der Glühbirne Der Ofenbeleuchtung

    Ersatz der Glühbirne der Ofenbeleuchtung - Abb. 8 Der Ofen ist mit einer Glühbirne ausgestattet, die folgende Merkmale hat: Schraubsockel E-14 T 300° C ACHTUNG: Zuerst die Stromzufuhr unter- brechen. Falls die Glühbirne der Ofenbeleuchtung ausgetauscht werden muß, muß man die Schutzabdeckung “A”...
  • Seite 70 Installierung der Selbstreinigenden Wanden (Optional) - Abb. 10 1) Die Platte (A) mit 4 selbstschneidenden Schrauben befestigen. 2) Die Platten (C) an die Seitenwände des Backofens lehnen und die vorher entfernten Gitter darauf befestigen. 3) Die vorher entfernten Zubehörteile wieder in den Backofen schieben und befestigen.
  • Seite 71: Reinigung Und Instandhaltung Des Backofens

    Reinigung und Instandhaltung des Backofen Wichtig: Bevor man mit Instand- Der Backofen wird zuerst mit einem Haltungsmaßnahmen beginnt, den weichen, in verdünnte Stromstecker aus der Steckdose ziehen Ammoniaklösung getauchten Tuch oder den Strom ganz abschalten. gereinigt, dann mit sauberem Wasser abgespült und schließlich Reinigung des Backofens: Bei trockengerieben.
  • Seite 73 Index Données techniques Instructions d’installation Bandeau Éléments et opérations commandés par le sélecteur 72-73 Table cuisson Comment utiliser le grill Comment utiliser le tournebroche Minuterie à alarme sonore Minuterie de fin de cuisson 120 minutes Programmateur analogique Horloge analogique Programmateur électronique 80-81-82 Replacement de la lampe à...
  • Seite 75: Déclaration De Conformité Ce

    DÉCLARATION DE CONFORMITÉ CE Cet appareil est conforme aux suivantes directives CE : 93/68/CEE : Normes Générales 2006/95/CE : Basse tension 2004/108/CEE : Compatibilité électromagnétique Règlement CE n° 1935/2004 : Aptitude des matériaux en contact avec les aliments RECOMMANDATIONS GENERALES Ce manuel constitue partie intégrante de l’appareil.
  • Seite 76 En cas de panne de fonctionnement ou en cas de réparation nécessaire, demander l'intervention du service d'assistance clientèle. Si le four présente des dommages apparents, ne pas le mettre en fonction, mais le débrancher du secteur et contacter le service d'assistance clientèle. Si vous deviez constater quelque problème de fonctionnement, débrancher immédiatement le four du secteur.
  • Seite 77: Caracteristiques Techniques

    CARACTERISTIQUES TECHNIQUES Dimensions: Hauteur: 591mm Largeur: 597mm Profondeur: 525mm Tension d’alimentation: 220-240V~ 50Hz Raccordement électrique Vérifier que le voltage et la capacité de la ligne d’alimentation de l’habitation correspondent au voltage et à la puissance indiqués sur la plaquette fixée dans la socle du four et visible en démontant la porte.
  • Seite 78: Remarques Importantes Pour Le Montage

    REMARQUES IMPORTANTES POUR LE MONTAGE Pour l’encastrement respecter les dimensions indiquées à les figures dans le première deux pages du manuel, dans une ouverture standard de 560mm. Le four peut être placé sous le plan de travail ou en colonne, dans ce cas le meuble devra être prévu avec un jour de 85-90cm à...
  • Seite 79: Bandeau

    Bandeau 1. Thermostat 5. Lampe verte 2. Commutateur 6. Lampe jaune 3. Programmateur électronique 7. Minuterie à alarme sonore 4. Minuterie fin de cuisson 8. Programmateur analogique et Horloge analogique...
  • Seite 80: Éléments Et Opérations Commandés Par Le Sélecteur

    Éléments et opérations commandés par le sélecteur: DECONGELATION La lumière du four et le voyant vert s’allument comme pour toutes les autres fonctions du four. Le ventilateur se met en route, mais sans propagation de chaleur (le thermostat n’est pas en fonction). La porte du four doit être fermée. Ce type de fonction permet la décongélation des aliments en utilisant environ 1/3 du temps normalement employé.
  • Seite 81 Éléments et opérations commandés par le sélecteur: CUISSON TRADITIONNELLE + VENTILATEUR Sélectionner la température désirée comprise entre 50°C et 250°C, en maintenant la porte du four fermée. Ce type de cuisson est l’intégration entre cuisson conventionnelle et ventilée. Cuisson indiquée pour cuire (pain, pizza, lasagne).
  • Seite 82: Table Cuisson

    Table 1 Plat Temp. Niveau * Temps en °C Grille en min. Gâteaux dans moule à pâte battue Conseillé Personelle Galette, fouace 55 - 65 Fouace 60 - 70 Tarte 60 - 70 Gâteaux dans moule de pâte brisée Fond de Tarte 8 - 10 Tarte au fromage, cheesecake 25 - 35...
  • Seite 83: Comment Utiliser Le Grill

    Comment utiliser le grill C. Pour le four Multifonction-Ventilé : Placer les aliments à griller sur la grille ou Pos. du sélecteur dans un plat aux bords très bas. Introduire la grille dans le four au niveau le D. Pour le four Multifonction: Pos. plus élevé...
  • Seite 84: Minuterie À Alarme Sonore

    Minuterie à alarme sonore - Fig. 3 Elle peut être réglée pour une période maximale d'une heure. Le retentissement du signal sonore n'interrompt pas le fonctionnement du four. Pour régler la minuterie, tourner le bouton (Fig. 3) à droite jousqu'à 60 minutes. Ramener le bouton en le tournant à...
  • Seite 85: Programmateur Analogique

    Horloge analogique - Fig. 6 Réglage de l’horloge : pour la mise au point de l’heure exacte, appuyer et tourner dans le sens des aiguilles d’une montre ou dans le sens contraire le bouton “A”. Fig. 6...
  • Seite 86: Horloge Analogique

    PROGRAMMAUTER ANALOGIQUE HORLOGE Pour mettre à l’heure, pousser et tourner l’axe dans le sens horaire. Positionner les aiguilles A et B en face de l’heure exacte. DUREE DE CUISSON Fonction pour un départ immédiat et un arrêt automatique de la cuisson. Duréee maximum : 180 minutes avec double échelle (3 heures).
  • Seite 87 Aiguille des minutes Aiguille des heures Index Temps de cuisson Début de cuisson Pour régler l’heure: pousser et tourner dans le sens des aiguilles Pour régler la durée de cuisson : tourner dans le sens des aiguilles Pour régler le début de cuisson : tirer et tourner dans le sens des aiguilles.
  • Seite 88 Programmateur électronique - Fig. 7 Le programmateur électronique regroupe les fonctions suivantes: - Horloge de 24 h. avec affichage lumineux - Timer, avertisseur sonore jusqu' à maximum 23 h. et 59 min. - Programme en mode automatique de début ou fin cuisson - Programme en mode semi-automatique (soit seul début cuisson soit seul fin cuisson).
  • Seite 89 Horloge digitale Après ces opérations le symbole «AUTO» s'allumera en permanence, cela signifie Les chiffres de l'horloge montrent les heures que le four a été programmé. (0-24) e les minutes. Voilà un exemple pratique : l'utilisateur A la première mise sous tension ou après souhaite une cuisson de 45 minutes, qui une interruption du courant trois chiffres doit terminer à...
  • Seite 90 Cuisson semi-automatique Timer = signal sonore A. Programmation du temps de cuisson Le «timer» est uniquement un avertisseur sonore qui peut être réglé pour une période B. Programmation de l'heure de fin maximale de 23 heures et 59 min. Régler le cuisson timer en enfonçant le bouton et même...
  • Seite 91: Replacement De La Lampe À L'intérieur Du Four

    Remplacement de la lampe à l’intérieur du four - Fig. 8 Le four est équipé d’une lampe avec les caractéristiques suivantes: Fixation à vis E-14 T 300° C ATTENTION: Couper le courant du four en débranchant la fiche de l'installation électrique.
  • Seite 92: Accessoires À Option

    Installation des panneaux autonettoyants (optionnel) - Fig. 10 1) Fixer avec les vis la paroi arrière (A). 2) Les côtés (C) se fixent en détachant les grilles latérales. 3) Ensuite remettre le tout en place. Fig. 10 Accessoires en dotation - Fig. 11 L'appareil peut être équipé...
  • Seite 93: Nettoyage Et Entretien Du Four

    Nettoyage et entretien du four Attention: Avant de procéder à l'entretien Retirer les supports latéraux en fil chromé: du four, il faut toujours débrancher la tirer vers le haut la partie avant pour les fiche de la prise de courant ou couper décrocher des parois.
  • Seite 95 Índice Datos técnicos Instrucciones para el usuario Salpicadero mandos Funciones del selector 94-95 Tabla cocción Cómo se usa el grill Utilización del rustepollos Temporizador mecánico 60’ Final cocción 120’ Programador analógico Reloj analógico Programador electrónico 102-103-104 Sustitución de la lámpara del horno Desmontaje de la puerta el horno Accesorios a pedido Limpieza y mantenimiento del horno...
  • Seite 97: Declaración De Conformidad Ce

    DECLARACIÓN DE CONFORMIDAD CE Este electrodoméstico se encuentra en conformidad con las siguientes directivas CE: 93/68/CEE : Normas generales 2006/95/CE : Baja tensión 2004/108/CEE : Compatibilidad electromagnética Reglamento CE n° 1935/2004 : Idoneidad de materiales en contacto con los alimentos. ADVERTENCIAS GENERALES Este manual es parte integrante del electrodoméstico.
  • Seite 98 En caso de avería o si necesitar efectuar alguna reparación, diríjase al servicio de asistencia al cliente. No encienda el horno si presenta daños visibles. Desconéctelo de la red eléctrica y diríjase al servicio de asistencia al cliente. Nada más detectar un problema de funcionamiento, es necesario desconectar el horno de la red eléctrica.
  • Seite 99: Datos Técnicos

    DATOS TÉCNICOS Dimensiones internas: Altura: 591mm Anchura: 597mm Profundidad: 547mm Tensión de alimentación: 220-240V~ 50Hz Conexión eléctrica Comprobar que el voltaje corresponda al indicado en la placa que se encuentra en la parte de abajo de la pared interior de la puerta. El horno tiene que ser conectado con un cable que tenga una sección mínima de 1,5mm en la parte trasera, preparando un interruptor omnipolar que respete las normas vigentes y que tenga una distancia de apertura entre los contactos de por lo...
  • Seite 100: Instrucciones Para El Usuario

    INSTRUCCIONES PARA UNA CORRECTA INSTALACION El horno tiene que estar instalado en un hueco estándar de 560mm, ya sea debajo de una encimera, ya sea colocado en una columna. Al insertar el horno en una columna es indispensable, para asegurar una ventilación sufisuficiente, llevar a cabo una abertura de por lo menos 85÷90 mm.
  • Seite 101: Salpicadero Mandos

    Salpicadero mandos 1. Termostato 5. Luz verde 2. Selector 6. Luz amarilla 3. Programador electrónico 7. Temporizador mecánico 60’ 4. Final cocción 120’ 8. Programador analógico y Reloj analógico...
  • Seite 102: Funciones Del Selector

    Funciones del selector: DESCONGELACION La luz del horno y el indicador luminosos amarillo se encienden como todas las demás funciones del horno. Entra en función únicamente el ventilador, pero sin difundir calor (y el termostato no está en función). La puerta del horno tiene que estar cerrada.
  • Seite 103 Funciones del selector: COCCIÓN TRADICIONAL + VENTILADOR Seleccionar la temperatura deseada entre los 50°C y los 250°C. Este tipo de función supone una integración entre la convección natural y la ventilación. Cocción indicada para cocinar pan, pizza, lasaña. LUZ DEL HORNO RESISTENCIA SOLERA Seleccionar la temperatura deseada entre los 5O°C y los 250°C, manteniendo la puerta del horno cerrada.
  • Seite 104: Tabla Cocción

    Tabla 1 Tipo de alimento Temp. Guida * Tiempo cocción °C de activ. en minutos Aconsejado Dulces en molde con masa batida Personal Bizcochos o bollos 55 - 65 Focaccia real 60 - 70 Tarta sublime 60 - 70 Dulces en molde de pastaflora Fondo para tartas 8 - 10 Fondo de tarta con requesón...
  • Seite 105: Cómo Se Usa El Grill

    Cómo se usa el grill C. Posición del selector en hornos mutifunción/ventilados. Colocar los alimentos que se desea dorar en la rejilla o en una fuente de bordes muy D. Posición del selector en bajos. La rejilla se tiene que colocar en el hornos multifunción.
  • Seite 106: Temporizador Mecánico 60

    Temporizador mecánico 60‘ - Fig. 3 Se puede regular por un período máximo de 60 minutos. Gire el mando en sentido horario hasta alcanzar la posición de 60 minutos, y luego gire en sentido inverso hasta fijar el tiempo deseado; al cabo del cual sonará...
  • Seite 107 Reloj analógico - Fig.6 Regulación del reloj: Para la puesta a punto de la hora exacta, presionar y hacer girar en sentido horario o antihorario la empuñadura “A”. Fig. 6...
  • Seite 108: Programador Analógico

    PROGRAMADOR ANALÓGICO RELOJ Para ajustar la hora del día, pulse el mando y gírelo en el sentido de las agujas del reloj. Ponga las manecillas A y B a la hora del día correcta. TIEMPO DE COCCIÓN Inicio inmediato de la cocción y fin automático de la cocción. Duración máxima: 180 minutos con doble escala (3 horas).
  • Seite 109: Reloj Analógico

    Manecilla de los minutos Manecilla de las horas Indicador Tiempo de cocción Inicio de cocción Para ajustar la hora del día: pulse y gire en el sentido de las agujas del reloj Para ajustar el tiempo de cocción: gire Para ajustar la hora de inicio de la cocción: tire y gire.
  • Seite 110 Programador electrónico - Fig. 7 Funciones del mismo: - Reloj de display iluminado con indicación de 24 horas - Avisador acústico (máximo 23 horas y 59 minutos) - Programación automática (inicio y fin de la cocción) - Programación semi-automática (sólo inicio ó...
  • Seite 111 Tras estas operaciones, aparecerá el símbolo Reloj electrónico «AUTO» de manera fija en el marcador, Indica las horas (0-24) y los minutos. indicándonos que el horno ha quedado Inmediatamente después de la conexión programado. (también después de un eventual corte de energía eléctrica) aparecerán TRES dígitos intermitentes en el panel.
  • Seite 112 Cocción semi automática Avisador electrónico A. Programación del tiempo de duración La función del «timer» consiste unicamente de la cocción. en un avisador acústico que puede ser re- gulado por un período máximo de 24 horas B. Programación de la hora de final de 59 minutos.
  • Seite 113: Sustitución De La Lámpara Del Horno

    Sustitución de la lámpara del horno -Fig. 8 El horno está provisto de una lámpara que posee las siguientes características: Unión con tornillo E-14 T 300° C ATENCIÓN: Desconectar el aparejo de la corriente eléctrica En caso de que fuera necesario sustituir la lámpara de iluminación del horno, será...
  • Seite 114: Accesorios A Pedido

    Instalación de los paneles autolimpiadores (sólo en algunos modelos) - Fig. 10 1) Fijar, mediante sus tornillos, el fondo (A). 2) Apoyar los paneles (C) a los lados del horno, ubicar arriba las rejillas quitadas precedentemente y volver a enganchar. 3) Volver a introducir en el horno los accesorios quitados precedentemente.
  • Seite 115: Limpieza Y Mantenimiento Del Horno

    Limpieza y mantenimiento del horno Importante: Antes de llevar a cabo las alambre cromado; tirar hacia arriba de la operaciones de mantenimiento del horno es parte dalantera para desengancharlos de necesario desenchufarlo de la toma de la pared y sacarlos de los orificios traseros.
  • Seite 117 Índice Características técnicas Instruções para a instalação Painel de comandos Funções do selector 16-117 Tabela de cozedura Modo de uso do grelhador Modo de uso do espeto rotativo Temporizador mecânico 60 min Fim da cozedura mecânico 120 min Programador analógico Relógio analógico Programador electrónico 124-125-126...
  • Seite 119: Declaração De Conformidade Ce

    DECLARAÇÃO DE CONFORMIDADE CE Este aparelho é conforme às seguintes directivas CE: 93/68/CEE : Normas Gerais 2006/95/CE : Baixa tensão 2004/108/CEE : Compatibilidade electromagnética Regulamento CE n° 1935/2004 : Idoneidade dos materiais ao contacto com os alimentos. ADVERTENCIAS GERAIS Este manual constitui parte integrante do aparelho. Recomenda-se de guardar o mesmo durante todo o ciclo de vida do aparelho e ler com atenção para executar a instalação, utilização, manutenção, limpeza e tratamento do aparelho.
  • Seite 120 As reparações não apropriadas podem provocar graves acidentes, danificar o aparelho e o equipamento, não só mas também provocar interferências no funcionamento. No caso de avaria de funcionamento ou de uma reparação indispensável, exigir a intervenção do serviço de assistência clientes. Se o forno apresenta danos visíveis não o colocar em função, desligá-lo da rede eléctrica e dirigir-se ao serviço de assistência clientes.
  • Seite 121: Características Técnicas

    Para a manutenção e a movimentação, instalação e limpeza do aparelho usar meios de prevenção e protecção adequados (luvas, etc.). A elevação e a movimentação de aparelhos com peso >25kg ou com medidas que não permitem a presa facilitada deve ser efectuada com o uso de meios idóneos ou com a intervenção de duas pessoas a fim de evitar riscos ou dificuldades.
  • Seite 122 INSTRUÇÕES PARA UMA CORRECTA INSTALAÇÃO O forno deve ser incastrado numa abertura standard de 560mm, seja sob uma bancada, seja posicionado na coluna. Se o forno for instalado na coluna, é indispensavel, para garantir uma ventilação suficiente, fazer uma abertura de pelo menos 85-90mm. A fixação do forno no móvel é...
  • Seite 123: Painel De Comandos

    Painel de comandos 1. Termóstato 6. Luz piloto amarela 2. Selector 7. Temporizador 3. Programador electrónico 8. Programador analógico e 4. Fim da cozedura Relógio analógico 5. Luz piloto verde...
  • Seite 124: Funções Do Selector

    Funções do selector: DESCONGELAÇÃO A luz do forno e a luz piloto verde acendem-se como para todas as outras funções do forno. Começa a funcionar a ventoinha, mas sem propagação do calor (o termóstato não está activo). A porta do forno deve estar fechada. Este tipo de função permite a descongelação dos alimentos utilizando aproximadamente 1/3 do tempo normalmente necessário.
  • Seite 125 Funções do selector: COZEDURA TRADICIONAL + VENTOINHA Seleccione a temperatura desejada entre 50°C e 250°C, mantendo a porta do forno fechada. Este tipo de cozedura é a integração entre convencional e ventilado. Cozedura indicada para cozer (pão, pizza, lasanhas). Recomenda-se o pré-aquecimento do forno. LUZ DO FORNO RESISTÊNCIA DA BASE Seleccione a temperatura apropriada entre 50°C e 250°C.
  • Seite 126 Tabela 1 Temp. Corrediça Tempo de cozedura Tipo de alimento (°C) (*). (minutos) Doces em forma de massa batida Aconselhada Pessoal Fogaça 55-65 Fogaça real 60-70 Torta sublime 60-70 Doces em forma de massa tenra 8-10 Torta Torta com requeijão 25-35 Torta com fruta 25-35...
  • Seite 127 Como usar o grelhador C. Com forno multifunção/ventilado Coloque alimento grelhar Pos. do selector respectiva grelha ou num tabuleiro com D. Com forno multifunção Pos. bordas muito baixas. do selector A grelha deve ser colocada na posição De acordo com o tipo de alimento (ex. mais alta possível, e o tabuleiro para carnes, peixe, aves de capoeira, etc.)
  • Seite 128 Temporizador mecânico 60 min - Fig. 3 O temporizador pode ser regulado para um intervalo máximo de uma hora. O botão de regulação deve ser girado no sentido horário até à posição 60 minutos e então posicionado, girando no sentido anti-horário, junto do tempo desejado.
  • Seite 129 Relógio analógico - Fig. 6 Como acertar o relógio: para acertar a hora exacta, carregue e gire no sentido horário ou anti-horário o botão “A”. Fig. 6...
  • Seite 130: Programador Analógico

    PROGRAMADOR ANALÓGICO RELÓGIO Para acertar o relógio, carregue e rode o botão para a direita. Coloque os ponteiros A e B na posição correspondente à hora certa. TEMPO DE COZEDURA Início imediato da cozedura e paragem automática da cozedura. Duração máxima: 180 minutos com uma escala dupla (3 horas). Para definir o tempo de cozedura, rode o botão para a direita e coloque a graduação do disco E em frente do indicador D do mostrador.
  • Seite 131 Ponteiro dos minutos Ponteiro das horas Indicador Tempo de cozedura Início cozedura Para acertar o relógio: carregue e rode para a direita. Para definir o tempo de cozedura: rode Para definir o início do tempo de cozedura: puxe e rode.
  • Seite 132 Programador electrónico - Fig. 7 O programador electrónico é um dispositivo que reúne as funções a seguir: - Relógio 24 horas com visor iluminado - Temporizador (até 23 horas 59 minutos) - Programa para início e fim da cozedura automática - Programa para cozedura semi-automática (possibilidade de programar só...
  • Seite 133 Relógio digital Após estas operações, será apresentado constantemente no visor o símbolo Indica as horas (0-24) e os minutos. «AUTO», Logo após a ligação (como também após indicando que o forno foi programado. uma eventual interrupção de corrente) aparecem painel TRÊS cifras intermitentes.
  • Seite 134 Cozedura semi-automática Sinalizador electrónico A. Programação do tempo de A função do «temporizador» consiste cozedura. somente sinalizador acústico, que pode ser regulado por um período B. Programação da hora de fim da máximo de 23 horas e 59 minutos. cozedura. Para regular o temporizador, pressione o botão e ao mesmo tempo [+] ou [-]...
  • Seite 135 Substituição da lâmpada do forno - Fig.8 O forno é dotado de uma lâmpada com as seguintes características: Casquilho de rosca E-14 T 300° C ATENÇÃO: Desligue aparelho corrente eléctrica. necessário substituir lâmpada iluminação do forno, é necessário retirar a cobertura de protecção A desaparafusando-a no sentido anti-horário.
  • Seite 136 Instalação dos painéis auto-limpantes (opcional) - Fig. 10 1) Fixe o painel (A) com 4 parafusos auto- atarraxadores. 2) Apoie os painéis (C) nas laterais do forno, posicione por cima as grelhas retiradas anteriormente e engate. 3) Recoloque no forno os acessórios retirados anteriormente .
  • Seite 137: Limpeza E Manutenção Do Forno

    Limpeza e manutenção do forno ainda não formou uma casca dura e consistente. Retire os suportes laterais Importante: Antes de fazer a manutenção arame cromado; puxe para cima a do forno, é sempre necessário desligar parte anterior a ficha da tomada de corrente ou para os soltar da parede e retire-os desligar a corrente da rede eléctrica dos orifícios posteriores.
  • Seite 138 Inhoud Technische gegevens Belangrijke opmerking betreffende de installatie Bedieningspaneel Elementen en functies die met 137-138 Kooktijdentabel Gebruik van de grill Gebruik van het draaispit Timer met geluidssignaal Timer einde bak/braadtijd (120 minuten) Analogische programmeereenheid Analogische klok Programmeereenheid (elektronisch) 45 46 47 Vervanging van de ovenlamp Verwijderen van de ovendeur Accessoires op aanvraag...
  • Seite 140: Eu-Verklaring Van Overeenstemming

    EU-VERKLARING VAN OVEREENSTEMMING Dit apparaat voldoet aan de volgende EG richtlijnen: 93/68/EEG : Algemene voorschriften 2006/95/EG : Laagspanningsrichtlijn 2004/108/EEG : Elektromagnetische compatibiliteit Verordening EG nr. 1935/2004 : Geschiktheid van materialen en voorwerpen bestemd om met levensmiddelen in contact te komen INSTRUCTIES VOOR DE GEBRUIKER Deze handleiding maakt integrerend deel uit van het apparaat.
  • Seite 141 Niet goed verrichte reparaties kunnen ernstige ongelukken veroorzaken, het apparaat en de uitrusting beschadigen, en ook storingen in de werking teweegbrengen. Vraag bij een storing of een noodzakelijke reparatie om een ingreep van de servicedienst . Schakel de oven niet in als hij zichtbaar beschadigd is, koppel hem van het elektriciteitsnet en wend u tot de servicedienst.
  • Seite 142 TECHNICAL DATA Afmetingen: Hoogte: 591mm Breedte: 597mm Diepte: 547mm Voedingsspanning: 220-240V~ 50Hz Aansluiting Verzeker u ervan dat de stroomspanning overeenkomt met de op de gegevensplaat, onderaan de binnenkant van de deur, aangegeven spanning. De oven moet met een kabel met een doorsnede van tenminste 1,5mm aan de achterkant verbonden worden, met een omnipolare schakelaar in overeenstemming met de geldende voorschriftenen met een openingsafstand tussen de contacten van tenminste 3mm.
  • Seite 143 INBOUWEN Het apparaat kan zowel onder een aanrecht, als in een kolom worden geplaatst. Neem in beide gevallen de afmetingen in acht. Als de oven in een kolom wordt geplaatst, moet voor een goede ventilatie een opening van ten minste 85-90 mm worden gemaakt. De oven wordt met 4 schroeven "A"...
  • Seite 144: Bedieningspaneel

    Bedieningspaneel 1. Thermostaatknop 5. Spanningscontrolelampje 2. Functiekiezer 6. Thermostaatcontrolelampje 3. Programmeereenheid (elektronisch) 7. Timer 60’ 4. Timer einde bak/braadtijd (120’) 8. Programmeereenheid (analoog)
  • Seite 145: Elementen En Functies Die Met

    Elementen en functies die met Ovenverlichting + rood controlelampje ventilator. Geen enkele weerstand, noch de thermostaat treedt in werking. Ontdooien van diepvriesproducten (gesloten deur). De ovenverlichting en het rode controlelampje branden ook in alle hiernavolgende standen. Perimetrische koepelweerstand + bodemweerstand. Traditioneel bakken/braden, statische oven (gesloten deur).
  • Seite 146 Elementen en functies die met Koepelweerstand + bodemweerstand + ventilator. Traditioneel bakken/braden met ventilatie (gesloten deur). De oventemperatuur wordt gekozen door de thermostaatknop in te stellen op een temperatuur tussen 50°C en 230°C (50°C-250°C). Aanbevolen voor gerechten die binnenin en aan de buitenkant hetzelfde bakniveau vereisen (gebraad, gebak).
  • Seite 147 Tabel 1 Gerecht Temp. Inschuifhoogte Tijd in min. in °C * rooster In bakvorm met mengseldeeg Aanbevolen Juiste Panettone of focaccia 55 - 65 Focaccia reale 60 - 70 Hoge taart 60 - 70 In bakvorm met zanddeeg Taartbodem 8 - 10 Taartbodem met zachte kaas 25 - 35 Taartbodem met vruchten...
  • Seite 148: Gebruik Van Het Draaispit

    Hoe u de grill gebruikt C. Multifunctionele/Geventileerde oven: Plaats het te roosteren gerecht op de Inschuifhoogte daarvoor bestemde grill of in een braadbak D. Multifunctionele oven: Inschuifhoogte met heel lage rand. De grill moet zo hoog mogelijk geplaatst worden met daaronder de lekbak voor het opvangen van de vetten.
  • Seite 149: Timer Met Geluidssignaal

    Timer met geluidssignaal (60 minuten) - Fig. 3 De maximuminsteltijd bedraagt 1 uur. Wanneer het geluidssignaal weerklinkt, wordt de werking van de oven niet onderbroken. Om de timer in te stellen, draait u de knop zover mogelijk met de wijzers van de klok mee. Draai vervolgens de knop terug tot op de gewenste insteltijd.
  • Seite 150: Analogische Klok

    Analogische klok - Fig. 6 Klok instellen: Druk op knop “A” en draai hem tegen de wijzers van de klok in of mee om de juiste tijd in te stellen. Fig. 6...
  • Seite 151 ANALOGISCHE PROGRAMMEERINRICHTING KLOK Om de uren in te stellen, drukt u de pin in en draait u hem met de klok mee. Stel de wijzers A en B op de juiste stand van de uren. BEREIDINGSTIJD Onmiddellijk begin van de bereiding en automatische stop van de bereiding. Maximumduur : 180 minuten met dubbele schaal ( 3 uur ).
  • Seite 152 Minutenwijzer Uurwijzer Wijzer Bereidingstijd Begin van de bereiding Om de uren in te stellen: indrukken en met de klok mee draaien Om de bereidingstijd in te stellen: draaien Om de bereidingstijd te beginnen: indrukken en draaien.
  • Seite 153 Programmeereenheid (elektronisch) - Fig. 7 De elektronische programmeereenheid omvat volgende functies: - 24u-klok met verlichte display - Timer, geluidssignaal tot maximum 23u 59min - Automatisch programma met instelling begin- en einde bak/braadtijd - Halfautomatisch programma (hetzij alleen begin-, hetzij alleen einde bak/braadtijd). Functieomschrijving van de toetsen Fig.
  • Seite 154 Digitale klok Vervolgens verschijnt er “AUTO” op de display. Het symbool blijft branden, wat betekent dat De cijfers op de klok geven de uren (0-24) de oven werd geprogrammeerd. en minuten aan. Nadat de oven voor het eerst onder Een praktisch voorbeeld: de gebruiker wenst spanning wordt gezet of na een een bak/braadtijd van 45 minuten, die om 14 stroomonderbreking knipperen er 3 nullen...
  • Seite 155 Halfautomatische modus Timer = Geluidssignaal A. Programmeren van de bak/braadtijd. De timer is slechts een geluidssignaal dat men voor een maximumduur van 23 uur en B. Programmeren van het einde van de 59 minuten kan instellen. bak/braadtijd. Druk tegelijk op de -toets en (+) of (-) A) Druk op om de gewenste...
  • Seite 156: Vervanging Van De Ovenlamp

    Vervanging van de ovenlamp - Fig. 8 De oven is voorzien van een lampje met de volgende kenmerken: Schroefaansluiting E-14 T 300° C OPGELET: Onderbreek eerst de stroomtoevoer naar de oven! Schroef de beschermdop “A” los door tegen de wijzers van de klok in te draaien.
  • Seite 157 De zelfreinigende panelen monteert u door – Fig. 10 1) met de schroeven de achterwand (A) vast te zetten. 2) de zijroosters te verwijderen en de zijpanelen (C) vast te zetten . 3) vervolgens het geheel opnieuw op zijn plaats te zetten.
  • Seite 158: Reiniging En Onderhoud Van De Oven

    Reiniging en onderhoud van de oven Belangrijk: Alvorens tot het onderhoud van staaldraad; trek de voorkant naar boven oven over te gaan, moet altijd eerst de de om ze van de wand los te maken en trek ze stekker uit de contactdoos verwijderd worden uit de openingen aan de achterkant naar of de stroomtoevoer afgesloten worden via de buiten.
  • Seite 160 Viale Aristide Merloni, 47 60044 Fabriano (AN) Italy Tel. +39 0732 6611 www.indesit.com Cod. 12300136140...

Inhaltsverzeichnis