Sanitas SBM 22 Gebrauchsanweisung
Vorschau ausblenden
Andere Handbücher für SBM 22:
- Gebrauchsanweisung (122 Seiten) ,
- Gebrauchsanweisung (72 Seiten) ,
- Gebrauchsanweisung (100 Seiten)
Inhaltsverzeichnis
Werbung
Verfügbare Sprachen
Verfügbare Sprachen
SBM 22
D Blutdruckmessgerät
Gebrauchsanweisung ............................................. 2-14
G Blood pressure monitor
Instructions for use ............................................... 15-26
F Tensiomètre
Mode d´emploi ...................................................... 27-39
I Misuratore di pressione
Istruzioni per l'uso ................................................. 40-51
r Прибор для измерения кровяного давления в
плечевой артерии
Инструкция по применению ............................... 52-66
Electromagnetic Compatibility Information ............ 67-72
Werbung
Kapitel
Inhaltsverzeichnis
Fehlerbehebung

Verwandte Anleitungen für Sanitas SBM 22


Inhaltszusammenfassung für Sanitas SBM 22
- Seite 1 SBM 22 D Blutdruckmessgerät Gebrauchsanweisung ..........2-14 G Blood pressure monitor Instructions for use ..........15-26 F Tensiomètre Mode d´emploi ............27-39 I Misuratore di pressione Istruzioni per l’uso ..........40-51 r Прибор для измерения кровяного давления в плечевой артерии...
-
Seite 2: Inhaltsverzeichnis
Benutzung auf und machen Sie diese auch anderen Benut- durch, bewahren Sie sie für späteren Gebrauch auf, machen zern zugänglich. Sie sie anderen Benutzern zugänglich und beachten Sie die Hinweise. 1. Kennenlernen Überprüfen Sie das Sanitas SBM 22 Blutdruckmessgerät auf äußere Unversehrtheit der Verpackung und auf die Voll-... -
Seite 3: Wichtige Hinweise
2. Wichtige Hinweise Zulässige Lagerungstemperatur und -luft- Storage feuchtigkeit 55°C Zeichenerklärung -20°C RH 10-90% In der Gebrauchsanweisung, auf der Verpackung und auf Zulässige Betriebstemperatur und -luft- Operating dem Typschild des Geräts und des Zubehörs werden fol- 40°C feuchtigkeit gende Symbole verwendet: 10°C RH 15-85% Vor Nässe schützen... - Seite 4 • Mindestens 30 Minuten vor der Messung sollten Sie nicht • Die Blutzirkulation darf durch die Blutdruckmessung nicht essen, trinken, rauchen oder sich körperlich betätigen. unnötig lange unterbunden werden. Bei einer Fehlfunktion • Wiederholen Sie die Messung im Falle zweifelhaft gemes- des Gerätes nehmen Sie die Manschette vom Arm ab.
- Seite 5 nicht für Schäden, die durch unsachgemäßen oder fal- Hinweise zum Umgang mit Batterien schen Gebrauch verursacht wurden. • Wenn Flüssigkeit aus einer Batteriezelle mit Haut oder Hinweise zur Aufbewahrung und Pflege Augen in Kontakt kommt, die betroffene Stelle mit Wasser auswaschen und ärztliche Hilfe aufsuchen.
-
Seite 6: Gerätebeschreibung
3. Gerätebeschreibung Hinweise zu Reparatur und Entsorgung • Batterien gehören nicht in den Hausmüll. Bitte entsorgen Sie die verbrauchten Batterien an den dafür vorgesehenen Sammelstellen. • Öffnen Sie nicht das Gerät. Bei Nichtbeachten erlischt die Garantie. • Das Gerät darf nicht selbst repariert oder justiert werden. Eine einwandfreie Funktion ist in diesem Fall nicht mehr gewährleistet. -
Seite 7: Messung Vorbereiten
4. Messung vorbereiten Anzeigen auf dem Display: Batterie einlegen • Öffnen Sie den Deckel des Batterie- faches. • Legen Sie vier Batterien vom Typ 1,5V AA (Alkaline Type LR6) ein. Achten Sie unbedingt darauf, dass die Batterien entsprechend der Kennzeichnung mit korrekter Polung eingelegt werden. -
Seite 8: Blutdruck Messen
Hinweis: Diese Zeichen finden Sie auf schadstoffhaltigen • Im Display wird Alarm 1 angezeigt, gleichzeitig blinkt Batterien: Pb: Batterie enthält Blei, Cd: Batterie enthält Cad- „on“ bzw „off“. Wählen Sie mit den Funktionstasten -/+ ob mium, Hg: Batterie enthält Quecksilber. Alarm 1 aktiviert („on“... - Seite 9 Die Manschette ist am Oberarm so • Ruhen Sie sich vor jeder Messung ca. 5 Minuten aus! zu platzieren, dass der untere Rand Ansonsten kann es zu Abweichungen kommen. 2 – 3 cm über der Ellen beuge und • Sie können die Messung im Sitzen oder im Liegen durch- über der Arterie liegt.
-
Seite 10: Ergebnisse Beurteilen Herzrhythmusstörungen
6. Ergebnisse beurteilen • Während der gesamten Messung wird das Symbol für die Manschettensitzkontrolle angezeigt. Wenn die Herzrhythmusstörungen: Manschette zu straff oder zu locker angebracht ist, wird Dieses Gerät kann während der Messung eventuelle Störun- und „ “ angezeigt. In diesem Fall wird die Messung gen des Herzrhythmus identifizieren und weist gegebenen- nach ca. -
Seite 11: Messwerte Speichern, Abrufen Und Löschen
Diese Standardwerte dienen jedoch lediglich als allgemeine Bereich der Systole Diastole Maßnahme Richtlinie, da der individuelle Blutdruck bei verschiede- Blutdruckwerte (in mmHg) (in mmHg) nen Personen und unterschiedlichen Altersgruppen usw. Stufe 1: regelmäßige abweicht. leichte 140 – 159 90 – 99 Kontrolle beim Es ist wichtig, dass Sie Ihren Arzt in regelmäßigen Abstän- Hypertonie... -
Seite 12: Fehlermeldung/Fehlerbehebung
Bei Fehlern erscheint auf dem Display die Fehlermeldung _. Fehlermeldungen können auftreten, wenn 10. Technische Angaben • der Puls nicht korrekt erfasst werden konnte: Modell-Nr. SBM 22 • wenn keine Messung möglich war: • die Manschette zu stark bzw. zu schwach angelegt ist: Messmethode Oszillometrisch, nicht invasive Blut- •... - Seite 13 Genauigkeit der systolisch ± 3 mmHg, Zubehör Gebrauchsanweisung, 4 x 1,5 V AA Anzeige diastolisch ± 3 mmHg, Batterien, Aufbewahrungstasche Puls ± 5 % des angezeigten Wertes Klassifikation Interne Versorgung, IPX0, kein AP Messunsicherheit max. zulässige Standardabwei- oder APG, Dauerbetrieb, Anwen- chung gemäß...
-
Seite 14: Garantie / Service
Service Hotline: mit geeigneten Mitteln durchzuführen. Genaue Angaben Tel.: +49 (0) 7374-915766 zur Überprüfung der Genauigkeit können unter der Ser- E-Mail: service@sanitas-online.de vice-Adresse angefragt werden. Fordern wir Sie zur Übersendung des defekten Produk- 11. Garantie / Service tes auf, ist das Produkt an folgende Adresse zu senden: Wir leisten 2 Jahre Garantie ab Kaufdatum für Material- und... -
Seite 15: Getting To Know Your Device
The following symbols are used in these instructions for use, on the packaging and on the type plate for the device Check that the packaging of the Sanitas SBM 22 blood and the accessories: pressure monitor has not been tampered with and make sure that the required contents are present. - Seite 16 Attention Protect from moisture Serial number Note Note on important information The CE labelling certifies that the product complies with the essential requirements Observe the instructions for use of Directive 93/42/EEC on medical pro- 0483 ducts. Application part, type BF Notes on use Direct current •...
- Seite 17 • Do not use the blood pressure monitor on newborns or e.g. intravascular access or intravascular or therapy, or an patients with pre-eclampsia. We recommend consulting arteriovenous (AV) shunt. a doctor before using the blood pressure monitor during • Do not use the cuff on people who have undergone a pregnancy.
- Seite 18 – Only use the cuff included with the delivery or original • Do not use rechargeable batteries. replacement parts. Otherwise incorrect measured values • Do not disassemble, split or crush the batteries. will be recorded. Instructions for repairs and disposal •...
-
Seite 19: Device Description
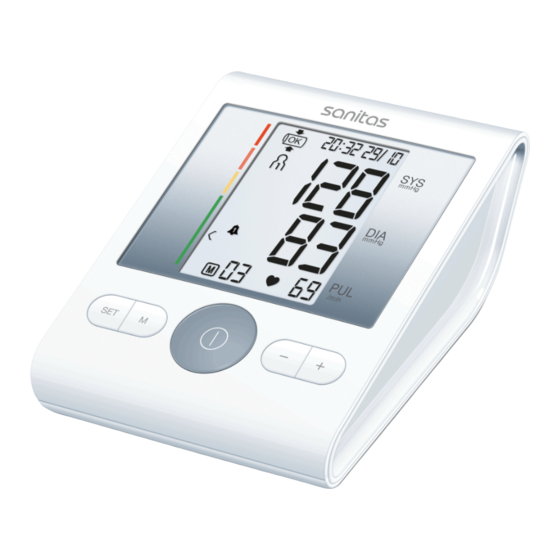
3. Device description Information on the display: 1. Time and date 1. Cuff 2. Systolic pressure 2. Cuff line 3. Diastolic pressure 3. Cuff connector 4. Calculated pulse value 4. Display 5. Cardiac arrhythmia symbol 5. Connection for cuff connector 6. -
Seite 20: Preparing The Measurement
4. Preparing the measurement To set the date and time, proceed as follows: • Insert the batteries, or press and Inserting the batteries hold the setting button SET for at • Open the battery compartment lid. least 5 seconds if the batteries have •... -
Seite 21: Measuring Blood Pressure
• If alarm 1 is activated, the hours flash on the display. Now tighten the free end of the Select the desired hour using the function buttons -/+ and cuff, but make sure that it is not confirm with SET. The minutes flash on the display. Select too tight around the arm and close the desired minute using the function buttons -/+ and con- the hook-and-loop fastener. -
Seite 22: Evaluating Results
ing on something. Do not cross your legs. Place your feet • _ appears if the measurement has not been performed flat on the ground. properly. Observe the chapter on error messages/trou- • To avoid falsifying the measurement, it is important to bleshooting in these instructions for use and repeat the remain still during the measurement and not to speak. -
Seite 23: Saving, Displaying And Deleting Measured Values
an examination by your doctor. If the symbol is shown Blood pressure Systole Diastole Action on the display after the measurement has been taken, value category (in mmHg) (in mmHg) repeat the measurement. Please ensure that you rest for 5 Setting 3: seek medical minutes beforehand and do not speak or move during the... -
Seite 24: Error Messages/Troubleshooting
• Errors occur during the measurement: • If you press the function button +, the average value of • The pump pressure is higher than 300 mmHg: all the stored measured values in the user memory will be displayed. If you press the function button + again, the •... -
Seite 25: Technical Specifications
10. Technical specifications Permissible sto- -20°C to +55°C, 10-90% relative rage conditions humidity, 800-1050 hPa ambient Model No. SBM 22 pressure Measurement Oscillometric, non-invasive blood Power supply 4 x 1.5 V AA batteries method pressure measurement on the upper arm Battery life For approx. - Seite 26 (Medizinproduktgesetz) and the standards EN1060-1 (Non-invasive sphygmomanometers – Part 1: General requirements), EN1060-3 (Non-invasive sphygmoma- nometers – Part 3: Supplementary requirements for elec- tro-mechanical blood pressure measuring systems) and IEC80601-2-30 (Medical electrical equipment – Part 2 – 30: Particular requirements for the basic safety and essential performance of automated non-invasive sphyg- momanometers).
-
Seite 27: Présentation
FRANÇAIS Sommaire ne présentent aucun dommage visible et que la totalité de l’emballage a bien été retirée. En cas de doute, ne l’utilisez 1. Présentation ..............27 pas et adressez-vous à votre revendeur ou au service client 2. Conseils importants............27 indiqué. - Seite 28 Attention : Température et taux d’humidité d’utilisa- Operating 40°C tion admissibles 10°C RH 15-85% Remarque Protéger contre l’humidité Indication d’informations importantes Respecter les consignes du mode Numéro de série d’emploi Le sigle CE atteste de la conformité aux exigences fondamentales de la directive Appareil de type BF 93/42/EEC relative aux dispositifs médi- 0483...
- Seite 29 • Les mesures que vous avez établies servent uniquement • Évitez de presser, d’aplatir ou de plier le tuyau du bras- d’information – elles ne remplacent pas un examen médi- sard en le manipulant. cal ! Communiquez vos résultats à votre médecin, vous •...
- Seite 30 et la durée de vie de l’appareil dépendent d’un manie- • Si la pile a coulé, enfilez des gants de protection et net- ment soigné : toyez le compartiment à piles avec un chiffon sec. – Protégez l’appareil contre les chocs, l’humidité, les sale- •...
-
Seite 31: Description De L'appareil
3. Description de l’appareil veuillez contrôler au préalable l’état des piles et les rem- placer le cas échéant. • Veuillez éliminer l’appareil conformément à la directive européenne – WEEE (Waste Electrical and Electronic Equipment) relative aux appareils électriques et électroniques usagés. Pour toute question à... -
Seite 32: Préparer La Mesure
4. Préparer la mesure Données affichées à l’écran : Insertion des piles • Ouvrez le couvercle du comparti- ment à piles. • Insérez quatre piles de type 1,5 V AA (type alcaline LR6). Veillez im- pérativement à insérer les piles en respectant la polarité indiquée. N’utilisez pas de batteries rechar- geables. -
Seite 33: Mesurer La Tension
Remarque : Ces pictogrammes se trouvent sur les piles à • L’alarme 1 s’affiche à l’écran et « On » ou « Off » substances nocives : Pb : pile contenant du plomb, Cd : pile clignote simultanément. À l’aide des touches de fonction contenant du cadmium, Hg : pile contenant du mercure. -/+, déterminez si l’alarme 1 doit être activée (« On »... - Seite 34 Positionnez la manchette sur le Adopter une position adéquate bras de façon à ce que le bord infé- rieur se trouve 2 à 3 cm au-dessus du pli du coude et au-dessus de l’artère. Le tuyau est dirigé vers le milieu de la paume de la main. Refermez maintenant la partie •...
-
Seite 35: Évaluer Les Résultats
• La manchette se gonfle automatiquement. Relâchez • Appuyez sur la touche MARCHE/ARRÊT pour éteindre lentement la pression d’air contenu dans la manchette. l’appareil. Si vous oubliez d’éteindre l’appareil, il s’étein- En cas de tendance connue à une tension élevée, gonflez dra automatiquement après environ 3 minutes. -
Seite 36: Enregistrer, Récupérer Et Supprimer Les Valeurs De Mesure
base des résultats de la mesure. Suivez impérativement les Plage des valeurs Systole Diastole Mesures instructions de votre médecin. de tension (en mmHg) (en mmHg) Niveau 2 : Classement des résultats de mesure : consulter un hypertonie 160 – 179 100 – 109 Les résultats de mesure sont classés et évalués selon le médecin moyenne... -
Seite 37: Message D'erreur/Résolution Des Erreurs
8. Message d’erreur/Résolution des erreurs 10. Caractéristiques techniques En cas d’erreur, un message d’erreur s’affiche à l’écran _. N° du modèle SBM 22 Des messages d’erreur peuvent s’afficher lorsque Mode de mesure Mesure de la tension artérielle au bras, • le pouls n’a pas pu être pris correctement : ;... - Seite 38 Plage de mesure Pression dans la manchette Alimentation élec- 4 piles 1,5 V 0-300 mmHg trique Pression systolique 50-250 mmHg Durée de vie de la Environ 300 mesures, selon l’élévation Pression diastolique 30-200 mmHg batterie de la tension artérielle ainsi que la pres- Pouls 40-180 pulsations/minute sion de gonflage Précision de systolique ±3 mmHg Accessoires...
- Seite 39 produits médicaux ainsi qu’aux normes européennes EN1060-1 (tensiomètres non invasifs, partie 1 : exigences générales), EN1060-3 (tensiomètres non invasifs, partie 3 : exigences complémentaires sur les tensiomètres élec- tromécaniques) et EC80601-2-30 (appareils électromédi- caux, partie 2-30 : exigences particulières pour la sécu- rité et les performances essentielles des tensiomètres non invasifs automatiques).
-
Seite 40: Introduzione
I seguenti simboli sono utilizzati nelle istruzioni per l‘uso, 1. Introduzione sull‘imballo e sulla targhetta dell‘apparecchio e degli acces- sori: Controllare l‘integrità esterna della confezione e del conte- nuto del misuratore di pressione Sanitas SBM 22. Prima dell‘uso assicurarsi che l‘apparecchio e gli accessori... - Seite 41 Attenzione Proteggere dall'umidità Numero di serie Nota Indicazione di importanti informazioni Il marchio CE certifica la conformità ai requisiti di base della direttiva 93/42/EEC Seguire le istruzioni per l'uso 0483 sui dispositivi medici. Indicazioni per l’uso Parte applicativa tipo BF •...
- Seite 42 tore di pressione in gravidanza, si consiglia di consultare il quali dispositivo di accesso o terapia intravascolare o medico. shunt arterovenoso. • In caso di patologie del sistema cardiovascolare possono • Non applicare il manicotto a persone che hanno subito verificarsi errori di misurazione o una riduzione della preci- una mastectomia (asportazione della mammella).
- Seite 43 – Utilizzare esclusivamente i manicotti forniti in dotazione o • Utilizzare solo tipologie di batterie uguali o equivalenti. ricambi originali. In caso contrario le misurazioni potreb- • Sostituire sempre tutte le batterie contemporaneamente. bero non essere corrette. • Non utilizzare batterie ricaricabili! •...
-
Seite 44: Descrizione Dell'apparecchio
3. Descrizione dell‘apparecchio Indicatori sul display: 1. Ora e data 1. Manicotto 2. Pressione sistolica 2. Tubo del manicotto 3. Pressione diastolica 3. Attacco del manicotto 4. Battito cardiaco rilevato 4. Display 5. Icona disturbo del ritmo cardiaco 5. Ingresso per la spina del manicotto 6. -
Seite 45: Preparazione Della Misurazione
4. Preparazione della misurazione Impostazione del formato dell‘ora, della data e dell‘ora La data e l‘ora devono essere asso- Inserimento delle batterie lutamente impostate. Solo in questo • Aprire il coperchio del vano batterie. modo è possibile memorizzare cor- • Inserire quattro batterie AA da 1,5V (tipo alcalino LR6). rettamente le misurazioni con data e Verificare che le batterie siano inserite correttamente, con ora per poterle richiamare in seguito. -
Seite 46: Misurazione Della Pressione
Posizionare il manicotto in modo • Sul display viene visualizzata l’icona Sveglia 1 , con- tale che il bordo inferiore si trovi temporaneamente lampeggia “on” o “off”. Con i pulsanti a 2-3 cm al di sopra del gomito e funzione -/+ scegliere se attivare (lampeggia “on”) o disat- dell‘arteria. - Seite 47 • Prima di ogni misurazione rilassarsi per ca. 5 minuti. In . Se il manicotto è troppo teso o allentato, vengono visua- caso contrario le misurazioni potrebbero non essere cor- lizzati e “ ”. In questo caso la misurazione viene rette.
-
Seite 48: Interpretazione Dell'esito
6. Interpretazione dell‘esito Tali valori standard costituiscono tuttavia solo un riferimento generale in quanto la pressione individuale presenta diffe- Disturbi del ritmo cardiaco renze a seconda della persona e dell‘età. Questo apparecchio è in grado di individuare eventuali di- È importante consultare regolarmente il proprio medico per sturbi del ritmo cardiaco durante la misurazione e in tal caso sapere qual è... -
Seite 49: Memorizzazione, Ricerca E Cancellazione Dei Valori Misurati
7. Memorizzazione, ricerca e cancellazione Intervallo dei valori Sistole Diastole Misura da dei valori misurati di pressione (in mmHg) (in mmHg) adottare Normale 120 – 129 80 – 84 Autocontrollo Gli esiti di ogni misurazione corretta vengono memorizzati Ottimale < 120 <... -
Seite 50: Messaggi Di Errore/Soluzioni
8. Messaggi di errore/Soluzioni 10. Dati tecnici In caso di errori sul display compare il messaggio di errore Codice SBM 22 Metodo di misu- Oscillometrico, misurazione non I messaggi di errore possono essere visualizzati quando razione invasiva della pressione dal braccio •... - Seite 51 Per informazioni più dettagliate, rivolgersi all‘Assistenza Condizioni di Da +10 °C a +40 °C, 15-85% umi- clienti oppure consultare la parte finale delle istruzioni per funzionamento dità relativa (senza condensa) l‘uso. ammesse • L’apparecchio è conforme alla direttiva CE per i dispositivi Condizioni di stoc- Da -20 °C a +55 °C, 10-90% umidità...
-
Seite 52: Знакомство С Прибором
1. Знакомство с прибором Оглавление Проверьте комплектность поставки прибора для 1. Знакомство с прибором ..........52 измерения кровяного давления Sanitas SBM 22 2. Важные указания ............53 и убедитесь в том, что на упаковке нет внешних 3. Описание прибора ............57 повреждений. Перед использованием убедитесь в том, 4. -
Seite 53: Важные Указания
Сохраняйте данную инструкцию по применению для Утилизация прибора в соответствии последующего использования и храните ее в месте, с Директивой ЕС по отходам доступном для других пользователей. электрического и электронного 2. Важные указания оборудования EC — WEEE (Waste Elec- trical and Electronic Equipment). Пояснения к символам Производитель В инструкции по применению, на упаковке и на типовой табличке... - Seite 54 беременности рекомендуется проконсультироваться Указания по применению с врачом. • Чтобы обеспечить сопоставимость данных, всегда • Сердечно-сосудистые заболевания могут привести измеряйте кровяное давление в одно и то же время к неправильным результатам измерения или сниже- суток. нию точности измерения. Погрешности в результатах • Перед каждым измерением давления отдыхайте измерения...
- Seite 55 • Убедитесь в том, что к кровеносным сосудам руки, на — Защищайте прибор от ударов, влажности, загряз- которую накладывается манжета, не подсоединено нения, сильных колебаний температуры и прямых медицинское оборудование (например, оборудование солнечных лучей. для внутрисосудистого доступа или внутрисосудистой — Не роняйте прибор. терапии, а также...
- Seite 56 • Обращайте внимание на обозначение полярности: • Ни в коем случае не ремонтируйте и не регулируйте плюс (+) и минус (-). прибор самостоятельно. В противном случае надеж- • Если батарейка потекла, очистите отделение для бата- ность работы прибора больше не гарантируется. реек сухой салфеткой, надев защитные перчатки. •...
-
Seite 57: Описание Прибора
3. Описание прибора Индикация на дисплее: 1. Время и дата 1. Манжета 2. Систолическое давление 2. Шланг манжеты 3. Диастолическое давление 3. Штекер манжеты 4. Измеренное значение пульса 4. Дисплей 5. Символ нарушения сердечного ритма 5. Разъем для штекера манжеты 6. Спуск воздуха из манжеты 6. -
Seite 58: Подготовка К Измерению
4. Подготовка к измерению электрооборудования или местную точку сбора вторсырья. Подобный порядок действий предписан Установка батареек законодательством. • Откройте крышку отделения для Указание: Эти знаки предупреждают о наличии батареек. в батарейках токсичных веществ: Pb: батарейка • Вставьте четыре батарейки 1,5 В содержит свинец, Cd: батарейка содержит кадмий, Hg: AA (алкалиновые, тип... -
Seite 59: Измерение Кровяного Давления
Настройка будильника Накладывание манжеты Можно установить 2 различных сигнала для Наложите манжету на напоминания о времени измерения. Для установки обнаженную левую руку выше сигнала выполните следующие действия: локтя. Кровоснабжение руки не • Одновременно в течение 5 секунд нажимайте функцио- должно быть нарушено из-за нальные... - Seite 60 Внимание! Прибор разрешается использовать только • Включите прибор для измерения кровяного давления с оригинальными манжетами. Манжета рассчитана на нажатием кнопки ВКЛ./ВЫКЛ. . После появления руку с окружностью плеча от 22 до 36 см. полноэкранного изображения появятся соответствую- щие символы сигнала, если активирован сигнал 1 Правильное...
-
Seite 61: Оценка Результатов
• Теперь при помощи кнопки сохранения M выберите недостаток сна. Аритмия может быть выявлена только нужную пользовательскую память. Если Вы не выбра- в результате обследования у врача. Если после первого ли пользовательскую память, то результат измерения измерения на дисплее отображается символ будет сохранен в пользовательской памяти последне- , повторите... -
Seite 62: Сохранение, Просмотр И Удаление Результатов Измерения
Столбчатая диаграмма на дисплее и шкала на приборе Высокое регулярное показывают, в каком диапазоне находится измеренное в допустимых 130–139 85–89 посещение давление. пределах врача Если значения систолического и диастолического Нормальное 120–129 80–84 Самоконтроль давления находятся в разных диапазонах (например, Оптимальное < 120 < 80 Самоконтроль систолическое... -
Seite 63: Сообщение Об Ошибке/Устранение Ошибок
Сообщения об ошибках появляются, если • не удалось правильно измерить пульс: 10. Технические данные • если измерение было невозможным: № модели SBM 22 • манжета прилегает слишком плотно или слишком слабо: Метод измерения Осциллометрическое, неинвазивное измерение • во время измерения возникли ошибки: кровяного... - Seite 64 Диапазон Давление в манжете Допустимые От +10 до +40 °C, относительная измерения 0–300 мм рт. ст., условия влажность воздуха от 15 до 85 % систолическое 50–250 мм рт. ст., эксплуатации (без образования конденсата) диастолическое 30–200 мм рт. ст., Допустимые От -20 до +55 °C, относительная пульс 40–180 ударов/мин условия хранения влажность воздуха 10-90%, Точность ± 3 мм рт. ст. для систолического, давление...
- Seite 65 • Данный прибор соответствует европейскому атации. При использовании прибора в медицинских стандарту EN60601-1-2 и требует особых мер учреждениях следует выполнять метрологический предосторожности в отношении электромагнитной контроль с помощью соответствующих средств. Точ- совместимости. Следует учесть, что переносные ные данные для проверки точности прибора можно и мобильные высокочастотные коммуникационные запросить...
-
Seite 66: Гарантия
11. Гарантия Дата продажи Мы предоставляем гарантию на дефекты материалов и изготовления этого прибора на срок 24 месяца со дня продажи через розничную сеть. Подпись продавца Гарантия не распространяется: – на случаи ущерба, вызванного неправильным использованием – на быстроизнашивающиеся части Штамп... -
Seite 67: Electromagnetic Compatibility
The Blood pressure monitor (SBM 22) is intended for use in the electromagnetic environment specified below. The customer of the user of the Blood pressure monitor (SBM 22) should assure that it is used in such and environment. Emission test Compliance Electromagnetic environment –... - Seite 68 The Blood pressure monitor (SBM 22) is intended for use in the electromagnetic environment specified below. The customer of the user of the Blood pressure monitor (SBM 22) should assure that it is used in such and environment. Immunity test...
- Seite 69 LIFE-SUPPORTING The Blood pressure monitor (SBM 22) is intended for use in the electromagnetic environment specified below. The customer or the user of Blood pressure monitor (SBM 22) should assure that it is used in such an environment. Immunity test...
- Seite 70 To assess the electromagnetic environment due to fixed RF transmitters, an electromagnetic site survey should be con- sidered. If the measured field strength in the location in which the Blood pressure monitor (SBM 22) is used exceeds the applicable RF compliance level above, the Blood pressure monitor (SBM 22) should be observed to verify normal opera- tion.
- Seite 71 (SBM 22). The Blood pressure monitor (SBM 22) is intended for use in an electromagnetic environment in which radiated RF distur- bances are controlled. The customer or the user of the Blood pressure monitor (SBM 22) can help prevent electromagnetic...
- Seite 72 For transmitters rated at a maximum output power not listed above, the recommended separation distance d in metres (m) can be estimated using the equation applicable to the frequency of the transmitter, where P is the maximum output power rating of the transmitter in watts (W) according to the transmitter manufacturer. NOTE 1 At 80 MHz and 800 MHz, the separation distance for the higher frequency range applies.