Herunterladen Inhalt Inhalt Diese Seite drucken

Werbung

Verfügbare Sprachen

Verfügbare Sprachen

www.
HAND DRYERS / SÉCHE-MAINS /
HÄNDETROCKNER /
M12A / M12ACS
MANUAL DE INSTALACIÓN Y UTILIZACIÓN
INSTALLATION AND OPERATING MANUAL
MANUEL D'INSTALLATION ET D'UTILISATION
MONTAGE-UND BENUTZERHANDBUCH
MANUAL DE INSTALAÇÃO E UTILIZAÇÃO
MANUALE DI INSTALLAZIONE E D'USO
РУКОВОДСТВО ПО УСТАНОВКЕ И ЭКСПЛУАТАЦИИ
ΔΓΥΔΙΡΙΓΙΟ ΔΓΚΑΣΑ΢ΣΑ΢Η΢ ΚΑΙ ΥΡΗ΢Η΢

Werbung

Inhaltsverzeichnis
loading

Inhaltszusammenfassung für Mediclinics M12A

  • Seite 1 HAND DRYERS / SÉCHE-MAINS / HÄNDETROCKNER / M12A / M12ACS MANUAL DE INSTALACIÓN Y UTILIZACIÓN INSTALLATION AND OPERATING MANUAL MANUEL D’INSTALLATION ET D’UTILISATION MONTAGE-UND BENUTZERHANDBUCH MANUAL DE INSTALAÇÃO E UTILIZAÇÃO MANUALE DI INSTALLAZIONE E D’USO РУКОВОДСТВО ПО УСТАНОВКЕ И ЭКСПЛУАТАЦИИ...
  • Seite 2: Operation

    The speed of the air generated by the hand dryer can be adjusted, to achieve an optimum balance between the drying power and noise level. Available finishes: White (M12A) Satin (M12ACS) Dimensions: 656 mm (H) x 320 mm (W) x 226 mm (D).
  • Seite 3: Installation

    INSTALLATION AND MAINTENANCE BOOK (TECHNICAL STAFF) Introduction. „Dualflow Plus‟ family of hand dryers offers the technical features as follows. Automatic operation. Drying cycle starts when putting hands in. Two couple of IR sensors detect hands introduction. Dryer is a class I (earthed) electrical insulation device.
  • Seite 4 Screw the upper plate to the wall (2). Plastic covers which protect the terminal block (inlet power supply) must be removed (3). The hand dryer should be hung on the metal support which has been fitted to the wall (4). Pass the electrical cables from mains through the 22 mm diameter hole located in the rear plastic base3 plate.
  • Seite 5 Installation height must be the showed in figure nº 3. Figure nº 3 ATTENTION: WHEN THE CASING IS DISMANTELED ACTIVE PARTS OF THE DEVICE BECOME ACCESSIBLE. -13-...
  • Seite 6: Maintenance

    Maintenance. ONLY A QUALIFIED TECHNICIAN CAN INSTALL, ADJUST AND MAINTAIN THIS HAND DRYER. Adjust the speed of the motor. To adjust the speed of the motor turn the sensor potentiometer wheel as the picture 4 shows. Figure nº 4 Pilot light information. Light leds on the top of the hand dryer (see figure 5) give advice about: 1: Standby (green colour) or operation status (orange colour).
  • Seite 7 Air filter. Air filter must be changed as the pictures of figure nº 6 shows. Figure nº 6 No smell load charge. Figure nº 7 shows how to install the no smell charge. Figure nº 7 Water tank. Water from hands drops directly to an internal water tank. When water reaches the „full level‟ an acoustic alarm sounds and the blue pilot light bright (see Fig.
  • Seite 8: Connection Diagram

    CONNECTION DIAGRAM Figure nº 9 Figure nº 10 - The installer must make sure that the electric system is grounded in accordance with the law in force. DANGER. - Make sure that the electric system has a high-sensitivity Electric shock risk breaker I n ≤...
  • Seite 9 BASIC EXPLODED VIEW COMPONENT NUMBER CODE Motor set RC9111003SMD Electronic control RC9121012SMD Air filter set RCFILTRODFW -17-...
  • Seite 10 La vitesse de l‟air fourni par le sèche-mains est réglable, de façon à obtenir un équilibre optimal entre la puissance de séchage et le niveau de bruit. Finitions disponibles : Blanc (M12A) Satin (M12ACS) Dimensions : 656 mm (H) x 320 mm (L) x 226 mm (P).
  • Seite 11 MANUEL D’INSTALLATION ET D’ENTRETIEN (ÉQUIPE TECHNIQUE) Introduction La gamme de sèche-mains „Dualflow Plus‟ propose les caractéristiques techniques suivantes : Fonctionnement automatique. Le cycle de séchage commence lorsque les mains sont placées à l‟intérieur du sèche-mains. Deux paires de capteurs à infrarouges détectent l‟introduction des mains.
  • Seite 12 Enlever la poussière et insérer les prises de courant murales. Visser la plaque supérieure au mur (2). Retirer les couvercles en plastique qui protègent la plaquette de connexion (arrivée d‟alimentation) (3). Accrocher le sèche-mains au support métallique qui a été fixé au mur (4). Passer les câbles électriques qui proviennent du réseau à...
  • Seite 13 La hauteur d‟installation doit être celle indiquée sur la figure nº 3. Figure nº 3 ATTENTION : LORSQUE LE BOÎTIER EST DÉMONTÉ, CERTAINES PIÈCES ACTIVES DE L’APPAREIL DEVIENNENT ACCESSIBLES. -21-...
  • Seite 14: Entretien

    Entretien. LE MONTAGE, LE RÉGLAGE ET L’ENTRETIEN DE CE SÈCHE-MAINS DOIVENT UNIQUEMENT ÊTRE EFFECTUÉS PAR DES TECHNICIENS QUALIFIÉS. Réglage de la vitesse du moteur. Pour régler la vitesse du moteur, tourner le curseur du potentiomètre du capteur, comme indiqué sur la figure nº 4. Figure nº...
  • Seite 15 Filtre à air. Le filtre à air doit être remplacé en suivant les indications de la figure nº 6. Figure nº 6 Cartouche anti-odeur. La figure nº 7 indique comment installer la cartouche anti-odeur. Figure nº 7 Réservoir d’eau.
  • Seite 16: Schéma De Câblage

    SCHÉMA DE CÂBLAGE SCHÉMA ÉLECTRIQUE S - Capteur M – Moteur F – Fusible Figure nº 9 Câbles circuit imprimé, émetteur Câbles circuit imprimé, récepteur Câbles circuit imprimé, LED éclairage informations Câbles d’alimentation Câbles du moteur Capteur de niveau d’eau Vibreur sonore Information...
  • Seite 17 VUE ÉCLATÉE DE BASE COMPOSANT NUMÉRO CODE Groupe moteur RC9111003SMD Commande électronique RC9121012SMD Ensemble de filtre à air RCFILTRODFW -25-...
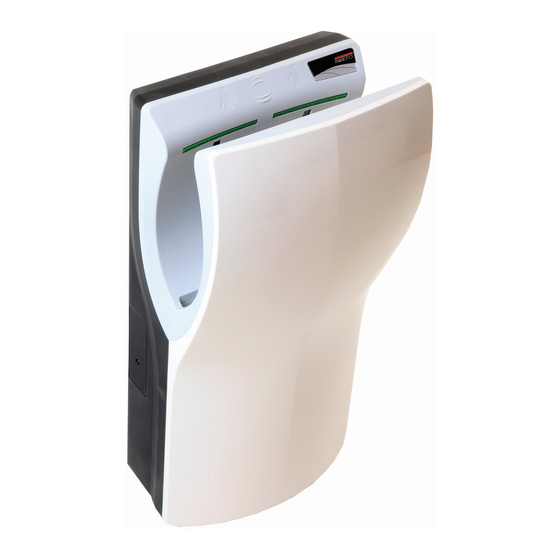
  • Seite 18 Die „Dualflow Plus‟ Handtrocknerserie bietet folgende Leistungen: Automatischer Betrieb ohne jegliche Tastenbetätigung mittels zwei Paar Infrarotsensoren (Sender und Empfänger) Optionale Luftstromregulierung Mögliche Oberflächenfinish: Weiß (M12A) Seidenmatt (M12ACS) Abmessungen: 656 mm (H) x 320 mm (B) x 226 mm (T) Gewicht: 8.3 Kg Montage: Aufputz FUNKTION Die Hände ins Innere des Trockners stecken.
  • Seite 19: Montage- Und Wartungsanleitung (Fachpersonal)

    MONTAGE- UND WARTUNGSANLEITUNG (FACHPERSONAL) Einleitung Die „Dualflow Plus‟ Handtrocknerserie bietet folgende technischen Leistungen: Automatischer Betrieb. Sobald die Hände hineingesteckt werden, empfangen zwei Paar Infrarotsensoren die Bewegung und der Trockner schaltet sich automatisch ein. Der Händetrockner ist ein Gerät mit einer elektrischen Isolierung der Klasse I (also mit Erdanschluss).
  • Seite 20 Reinigen Sie die Stellen von Staub und fügen Sie die Dübel ein. Schrauben Sie die obere Platte an der Wand fest (2). Entfernen Sie die Kunststoffabdeckungen, die den Anschlussblock (Stromversorgungseingang) schützen (3). Hängen Sie den Händetrockner an die Metallhalterung, nachdem Sie diese an der Wand angebracht haben (4).
  • Seite 21 Die Installationshöhe muss der Abbildung 3 entsprechen. Abbildung 3 ACHTUNG: BEI ABMONTIERTEM GEHÄUSE LIEGEN DIE SPANNUNGSFÜHRENDEN TEILE DES GERÄTES FREI. -29-...
  • Seite 22: Wartung

    Wartung MONTAGE, EINSTELLUNGEN UND WARTUNG DIESES HÄNDETROCKNERS DÜRFEN NUR VON QUALIFIZIERTEM FACHPERSONAL DURCHGEFÜHRT WERDEN. Einstellung der Motordrehzahl Drehen Sie das Sensor-Potenziometerrad wie in Abbildung 4, um die Motordrehzahl zu regulieren. Abbildung 4 Hinweise zu den LED-Anzeigen Die oben sichtbaren LEDs (Abbildung 5) geben an: 1: Standby-Modus (grün) oder Betrieb (orange) 2: Die rote LED leuchtet auf, wenn ein Motorproblem vorliegt (aufgrund einer Abnutzung der Stromabnehmer oder einer möglichen Blockierung)
  • Seite 23: Austausch Des Aromatisierers

    Luftfilter Der Luftfilter ist auszuwechseln, wie in Abbildung 6 dargestellt. Abbildung 6 Austausch des Aromatisierers In Abbildung 7 sehen Sie, wie der Antigeruchseinsatz zu installieren ist. Abbildung 7 Wasserbehälter Das Wasser von den Händen tropft direkt in einen internen Wasserbehälter. Wenn das Wasser im Behälter die Markierung „voll“...
  • Seite 24: Anschlussdiagramm

    ANSCHLUSSDIAGRAMM S – Sensor M – Motor F – Sicherung Abbildung 9 PCB-Kabel des Infrarotsenders Versorgungskabel PCB-Kabel des Infrarotempfängers PCB-Kabel der LED-Anzeigen Wasserstandssensor Motorkabel Summer Information Motor-Einstellpotentiometer Abbildung 10 - Der Elektroinstallateur muss sich vergewissern, dass die Elektronik über einen den gültigen gesetzlichen Bestimmungen entsprechenden Erdanschluss verfügt.
  • Seite 25: Grundlegende Explosionszeichnung

    GRUNDLEGENDE EXPLOSIONSZEICHNUNG BESCHREIBUNG BESTELLNUMMER CODE Motorset RC9111003SMD Elektronische Regelung RC9121012SMD Luftfilterset RCFILTRODFW -33-...
  • Seite 26 MODELO MODEL MODÈLE MODELL M12A M12ACS GENERAL: GENERAL: GÉNÉRAL : ALLGEMEIN: Blanco / White / Satinado / Satin / Acabado: Finish: Finition : Finish: Blanche / Weiβ Satiné / Satiniert 220 – 240 V / 50-60Hz. Alimentación: Power supply: Alimentation :...
  • Seite 27 МОДЕЛЬ ΜΟΝΣΔΛΟ MODELO MODELLO M12A M12ACS ОБЩЕЕ: ΓΔΝΙΚΟ: GERAL: GENERALE: Acetinado / Branco / Bianca / Отделка: Φειίμεδθα: Acabamento: Rifinitura: Satinata / Белое / Λεπθό Матовое / ΢αηηλέ Питание: Σξνθνδνζία: 220 – 240 V / 50-60Hz. Alimentação: Alimentazione: Потребление: Καηαλάισζε:...
  • Seite 28 M12A M12ACS 220 – 240 / 50-60 1.100 ( 1,5) 8,3 Kg (183 lb) IP 35 1.100 ( 1,5) 18.000 – 30.000 (26”) (12.6”) (8,9”) CE, GS, EMC GOST (2.750 l/ -76-...
  • Seite 29 ELIMINACIÓN DE RESIDUOS DE APARATOS ELÉCTRICOS Y ELECTRÓNICOS POR PARTE DE USUARIOS DOMÉSTICOS EN LA UNIÓN EUROPEA. El producto que ha adquirido ha sido diseñado y fabricado con materiales y componentes de alta calidad que pueden ser reciclados y reutilizados.
  • Seite 30 ELIMINAÇÃO DE RESÍDUOS DE EQUIPAMENTOS ELÉCTRICOS E ELECTRÓNICOS POR PARTE DE UTILIZADORES DOMÉSTICOS NA UNIÃO EUROPEIA O produto que adquiriu foi concebido e fabricado com materiais e componentes de elevada qualidade que podem ser reciclados e reutilizados. Quando vir um produto marcado com este símbolo de um contentor de rodas barrado com uma cruz significa que esse produto está...
  • Seite 31 DE VERWIJDERING VAN AFVALSTOFFEN UIT ELEKTRISCHE EN ELEKTRONISCHE APPARATEN DOOR HUISHOUDELIJK GEBRUIKERS BINNEN DE EUROPESE GEMEENSCHAP. Het door u gekochte product is ontworpen en vervaardigd met materialen en onderdelen die aan hoge kwaliteitsnormen voldoen en die gerecycled en hergebruikt kunnen worden.
  • Seite 32 9 6 3 1 0 0 3 S MD 15/05/12...

Diese Anleitung auch für:

M12acs

Inhaltsverzeichnis