Tamiya NEO FighterBuggy Bedienungsanleitung
til SCALE
RIC CAR BOOY PARTS SET
CAUTION
'Read carefully and fully understand
tho inotructiono
boforo commoncing
assembly.
'When
assembling this kit, tools in-
Cludinq knives are used. Extra care
should be taken to avoid personal
injury.
'Read
and follow the instructions
supplied
With paints
and/or
cement,
If
used (not included in kit).
'Keep
out of reach Of small children.
Children
mi 1st not he allowed
to put
any parts in their mouths, or pull vinyl
bags over their heads. Sensibly dis-
pose of the leftover parts immediately.
Trimming
*Cut off using scissors or a modeling knife.
This
malk
denotes
numbers
Tamiya Paint Colors. Paint body and wing
from inside using polycarbonate
paints.
TAMIYA
POLYCARBONATE
PAINTS
PS-I
/ White
PS-3 •-34M'V—/Li
ht blue
Preparing body for painting
*Wash
the
body
thoroughly
with
dctcrgcnt
in order to rcmovc
any Oil. thcn
rinse well and allow to air dry.
0114 02014
TAMIYA
Trimming
(DT-03Y+—YE)
*Transponder
stay (DT-03 chassis)
*Cut away.
Painting body
PS-I
White
How to paint
* Mask off areas to be painted White with separately
available masking tape.
*After
paint hag dried. remove protective
Cut away.
*Make
antenna
Wing
Wing
o
PS-I
White
(2) *PS-334
*Paint
Apply
distance from body. After light blue paint has dried,
remove
(PS-I).
film prior to adding
8mm
hole for
pipe. if needed.
PS-I
Wnlte
PS-3
54
Light blue
PS-3
54
Light blue
54
body from inside with Light Blue (PS-3).
thin layer Of paint 2-0 times
keeping
30cm
masking
tape and paint
body
with
White
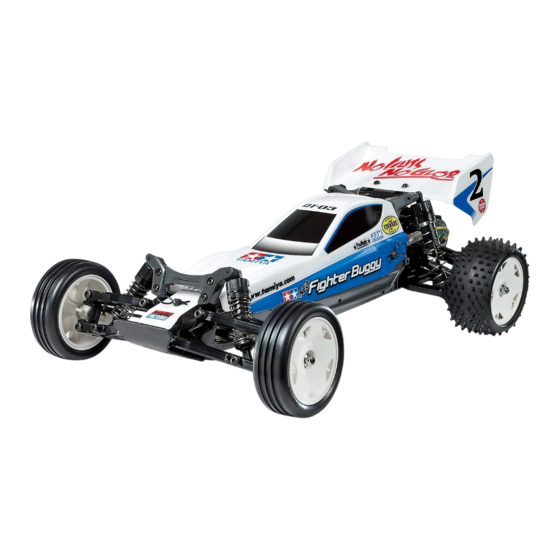
58587 Neo Fighter Buggy Body (11053781)

Verwandte Anleitungen für Tamiya NEO FighterBuggy


Inhaltszusammenfassung für Tamiya NEO FighterBuggy
- Seite 1 Wnlte PS-I White PS-3 Light blue *Cut off using scissors or a modeling knife. This malk denotes numbers Tamiya Paint Colors. Paint body and wing from inside using polycarbonate paints. PS-3 Light blue TAMIYA POLYCARBONATE PAINTS PS-I / White PS-3 •-34M'V—/Li...
- Seite 2 MARKET SERVICE CARD 054-283-0003 When purchasing replacement parts, please take or send this form to your local Tamiya dealer so that the parts required can be correctly identified. Please note that specifications. availability and price are subject to change without notice.
- Seite 3 (NOT INCLUDED) *Specifications are subject to change without notice. *Technische Daten können im Zuge ohne Ankündigung veråndert werden. *Caractéristiques pouvant étre modifiées sans information préalable. TAMIYA, INC. 3-7 ONDAWARA, SURUGA-KU, SHIZUOKA 42-8610 JAPAN 011402014 TAMIYA 58587 RCC DT-03 Chassis (11053781)
-
Seite 4: Tools Recommended
BODY SHELL STROMQUELLE Body shell is not included kit. Purchase Für diesen Bausatz benötigt man den Tamiya Akkupack. separately sold body and wing parts set for 2WD Den Akku gernäß Anweisung aufladen. ractng buggy DT-03. KAROSSERIE ENSEMBLE RADIOCOMMANDE Dieser Baukasten enthålt keine Karosserie. - Seite 5 Ne pas laisser les enfants mettre en bouche ou sucer Ies piéces, ou passer un sachet vinyl sur la téte. 2.4G / ESC (FET7>9) fit*) TAMIYA FINE-SPEC2.4G RIC SYSTEM (WITH ELECTRONIC SPEED CONTROLLER) ESC (FETT>Y) eti&ESC (FETT 3. 'ESC COMPOSmON...
- Seite 6 *Vor Baubcginn die Bauanleitung genau durchlesen. *Viele kleine Schrauben und Muttern etc. müssen genau der Anleitung nach eingebaut werden. Exaktes Bauen bringt ein gutes Modell mit bester Leistung. 75—+Räß6ås Stellen mit diesem Zeichen erst fetten, dann zu- samment)auen. *Assimilez instructions parfaitement avant I'assemblage.
- Seite 7 Chassis Chässis Tapping screw Schneldschraube Vis taraudeuse Attaching front stays *Apply grease to screw tip if the fit is Anbau der Vorderteil-gefestigung tight. Fixation des supports avant *Auf die Schraubensoitze Fett auf- tragen falls der Sitz zu stramm ist. *Appliquer graieeø...
- Seite 8 Ies trims au neutre. Neutralstellung bringen. @Le volant de direction au neutre. *Montcr Commc indique avcc *Use P5 and BA6 when using Tamiya servos. See @ Servo au neutre. le servo au neutre. diagram below when using other brande Of corvo.
- Seite 9 Attaching steenng rods BA13 5m Lenkgestänge-Einbau Make Installation des barres de direction *2 Satz anfertigen. *Faire 2 jeux- BA13 BA12 Adjuster Einstellstück Chape å rotule BA13 BA12 Threaded shaft Tige filetée *Steering servo Lenkservo *Servo de direction Attaching steering servo Len kservo-Einbau Fixation du servo...
- Seite 10 Attaching front lower arms Befestigung des vorderen, Interen Ames Fixation des triangles inférieurs avant Tapping screw Schneidschraube taraudeuse BAIO Screw Din Schraubzapfen Cheville *Remove. * Ent *Enlever. *Front *Vorder *Avant Attaching front upper arms Befestigung des vorderen, oberen Armes Fixation des triangles supérieurs avant *Front *Vorder *Avant...
- Seite 11 Attaching front axles Vorderachsen-Einbau Fixation essieux avant BAII Screw pin Schraubzapfen Cheville å vis BAII BAII BAG B/ SACHET B Tapping screw *Attach steering rod. * Lenkgestänge einbauen. leidsclu aube *Fixer les barres d'accouplement. Vis taraudeuse Small beve gear Kegelrad Klein Differential gear BBII Petit pignm cmiq.je...
- Seite 12 Gearbox Getriebegehäuse Carter Tapping screw Scnnetdscnraube Vis taraudeuse Plastic bearing asti k- Lag cr Palier en plastique Plastik-Lager Palier en plastique Differential gear Differentialgetriebe Différcnticl Spur gear Stirnradgetnebe Motor Couronne intermédiaire Moteur BBIO BBIO Motor plate Spur gear Motor-Platte Couronne interm&iiaire Mote-ur 1150 Screw...
- Seite 13 *Attach correctly by matchingjoints. *Bcim Anbringcn auf pasccndc Verbin- TAMIYA CATALOG dung achten. *fixer en joignant parfaiternent. The latest in cars, bikes, airplanes, Ships and tanks. Motorized museum quality models are all snown in full color in Tamiya's latest catalog. 58587 RCCDT-03Chassis (11053781)
- Seite 14 Attaching rear axles Hinterachsen-Einbau fixation essieux arriére Plastic bearing Plastik-Lager Palier en plastique BAIO Screw pin Schraubzapfen Cheville 1150 BAII Screw pin Schraubzapfen Cheville BAIO BAII 3X32an BAII 3X22m BAIO 3X32m Attaching receiver switch Einbau des Emptanger-scnatters Fixation de l'interrupteur du circuit de réception Tapping screw...
- Seite 15 Attaching gearbox Getriebegehäuse-Einbau Fixation du pont Tapping screw Schneldschraube Vis taraudeuse Tapping screw Schnoidcchraubc Vis taraudeuse * Note direction. *Auf die Richtung achten. *Noter Ie sens. ITEM 74001 LOMiNOSEwa-JTTER ITEM 74002 TWEEZERS ITEM 74003 ammsassons ITEM 74005 (+)SCREWDRIVER-L 100) ITEM 74006 ITCM 74007 FNEPNVSED...
- Seite 16 Damper assembly *After assembly, check damper movement. Zusammenbau der Stoßdämpfer Nach dem Zusammenbau die Beweolichkeit des Dämpfers überprüfen. *Apres assemblage, vérifier le movement de I'amortisseur. Assemblage des amortisseurs *Dampers rnay differ from those Front shown. In such a case, refer to the in- Vorne structions included with the dampers.
- Seite 17 Attaching dampers Einbau der Stoßdämpfer Fixation des amortisseurs Tapping screw Scnne•ascnraube Vis taraudeuse (7 cry Front Step screw Vome Pagschraubo Avant Vis décolletée BAII 3X22•R5 Screw pln Schraubzapfen Cheville Front damper Vorderer Stoßdåmpfer Amortisseur avant Tube *Make sure to attach all parts. Überprüfen Sie,0b alleTeilebefestigtSind.
- Seite 18 Attaching HIG unit (FETT'M) Einbau RC-Einheit *Electronic speed controller Installation de I'ensemble *Elektronischer Fahrregler * Variateur de vitesse electronique *Install RIC unit in desired posi- *Connect referring to the tion. Position RIC unit so as not to diagram at left. obstruct moving parts.
- Seite 19 Wheels Wheels included in chassis kit with body may differ from drawings shown. Räder *Die im Fahrgestell-Bausatz mit Karosserie enthaltenen Räder können von der gezeigten Ab- *Fit into rooves. Roues *Reife r?cht indie Felge eindrücke bildung abweichon. *Les roues incluses dans le kit avec carrosserie peuvent étre différentes de celles montrées Insérer dans les rainures.
- Seite 20 Installing battery pack Einløgen des Akkupacks Installation du pack d'accus Snap pill Federstift *Battery pack Epngle metanjque AkkupacK *Pack d'accus CAUTION VORSICHT PRECAUTIONS BD5 7m DISCONNECT BATTERY WHEN NOT USING THE CAR Disconnect battery When being used. If left connected. a slight movement ot the speed...
- Seite 21 Attaching Wing Spoiler-Einbau Fixation de I'aileron Tapping screw Scnneldscnrauoe Vis taraudeuse *Spoiler 3x 10m Tapping screw Schneidschraube Vis taraudeuse Washer Beilagscheibe Rondelle Attaching body Aufsetzen der Karosserie Fixation la carrossene *Body *Karosserie Snap pin (largo) *Carrosserie Federstift (groß) Epingle métallique (grande) •Refer to body parts instructions for assembling body.
- Seite 22 Drosc„ssls. SAFETY PRECAUTIONS Follow the outlined rules for safe radio control operation. •Avoid running the Carin Crowded and near small children. 'Make sure that no one else is using the same frequency in your running area. using the same frequency at the same time can cause serious accidents, Whether it'S dnvtng, ttyjng, or sailing.
- Seite 23 PRACTICING ÜBUNG ENTRAINEMENT Decelerate when entering into a curve and pick up -ta-,ek--», the speed after vertex of the curve. Use empty cans etc. as pylons for fiqure "8" drill. 'Nehmen Sie beim Einfahren in die Kurve Gas weq 'Verwenden Sie leichte, leere Büchsen...
- Seite 24 PARTS * Specifications are subject to change without notice. *Technische Daten Wine-n im Zuqe ohne Ankündiqunq veråndert *Caractédstiques pouvant étre mochfiées sans informatim prealable. PARTS 19005783 PARTS 64 0 19@0626 t 0004254 PARTS 10004255 PARTS 10004252 Not used. NIct1t Non utilisées. Motor Motew Antenna Pipe...
- Seite 25 BA12 shaft Washer Gewindestmge Beilagscheibe Screw I lge tiletee BAIO 3X32mmÄ5iJa—e•-..' Rondelle Schraube Screw pin 19806766 19804159 Schraubzapfen Chovillc a Vic Lock Sicherungsmutter 3x22rnxoua—e-.• BA13 Ecrou nylstop Schraube Screw Din Adjuster 51283 19804394 BAII Schraubzapfen Einstellstück Cheville å vis Chape rotule connector togosvss...
- Seite 26 DE PIECES DETACHEES Wenn Sie TAMIYA-Ersatzteile kaufen nehmen Se send this form to your local Tamiya dealer so that the parts bitte zur Unterstützung dieses Formular mit zu Ihrem Afin de vous pemettre de vous procurer des pieces de required...