Herunterladen Diese Seite drucken

Werbung

Verfügbare Sprachen

Verfügbare Sprachen

TERMÓMETRO DE FRENTE Y OÍDO SSOT 6 B2
TERMÓMETRO DE FRENTE
Y OÍDO
Instrucciones de uso
STIRN- UND OHR-
THERMOMETER
Bedienungsanleitung
IAN 96247
TERMÒMETRO PARA
TESTA E OUVIDO
Manual de instruções
FOREHEAD & EAR
THERMOMETER
Operating instructions

Werbung

loading

Inhaltszusammenfassung für Silvercrest 96247

  • Seite 1 TERMÓMETRO DE FRENTE Y OÍDO SSOT 6 B2 TERMÓMETRO DE FRENTE TERMÒMETRO PARA Y OÍDO TESTA E OUVIDO Instrucciones de uso Manual de instruções STIRN- UND OHR- FOREHEAD & EAR THERMOMETER THERMOMETER Bedienungsanleitung Operating instructions IAN 96247...
  • Seite 2 Antes de empezar a leer abra las dos páginas que contienen las imágenes y, en seguida, familiarícese con todas las funciones del dispositivo. Antes de começar a ler abra as duas páginas com as imagens e, de seguida, familiarize-se com todas as funções do aparelho. Klappen Sie vor dem Lesen die beiden Seiten mit den Abbildungen aus und machen Sie sich anschließend mit allen Funktionen des Gerätes vertraut.
  • Seite 4 SET 12hr SET 24hr (12/24) (12/24) SET hour SET minute SET sleep SET Year SET month SET day disable...
  • Seite 5 Índice Introducción Utilización correcta ..........Página 7 Volumen de suministro ........Página 8 Descripción de componentes ......Página 8 Datos técnicos ..........Página 9 Seguridad Indicaciones generales de seguridad .....Página 11 Indicaciones de seguridad ......Página 13 Indicaciones de seguridad de la pila .....Página 14 Antes de la puesta en marcha Retirar fusible para la pila .......Página 15 Funcionamiento...
  • Seite 6 En estas instrucciones de uso/ en el aparato, se utilizan los siguientes pictogramas: ¡Lea las instrucciones de uso! ¡Tenga en cuenta las advertencias e indicaciones de seguridad! ¡Peligro de explosión! Corriente continua (tipo de corriente y de tensión) Miliamperio ¡Peligro de muerte y de accidentes para bebés y niños! Producto médico tipo BF Año y mes de fabricación...
  • Seite 7 Introducción Termómetro de frente y oído Introducción Felicidades por la compra de su aparato nuevo. Ha optado por adquirir un producto de alta calidad. Las instrucciones de uso forman parte del producto. Con- tiene indicaciones importantes acerca de la seguridad, uso y evacuación.
  • Seite 8 Introducción Volumen de suministro 1 x Termómetro de frente y oído (incl. pila y tapa protectora 1 x Manual de instrucciones Descripción de componentes Cabezal medidor Tecla “EAR” (medición de temperatura en el oído modo Scan) Tecla “FORHEAD” (medición de temperatura en la frente / sien) Pantalla LC LED rojo: fi...
  • Seite 9 Introducción Pantalla LC Símbolo cambio de pila Símbolo visualización año Símbolo visualización fecha Símbolo modo oídos Símbolo modo estándar Símbolo modo Scan Indicación de temperatura Símbolo modo frente Símbolo de limpieza Fecha y tiempo en el modo estándar Símbolo del modo Sleep Visualización PM Símbolo del modo Setup Símbolo del modo Memory...
  • Seite 10 Introducción Escalas de temperatura: °C (°Celsius) °F (°Fahrenheit) Indicación de fecha y hora: Formato de 12 / 24 horas Desconexión automática: Desconexión automática después de un minuto Rango de medición en modo frente y oído: 32 °C - 42,9 °C (89,6 °F - 109,2 °F) Exactitud de medición: ±...
  • Seite 11 Introducción / Seguridad Temperatura de almacén: –10,0 °C - + 55,0 °C (14,0 °F - 131,0 °F) a 20%RH* - 85%RH* Presión atmosférica: 700 ~ 1060 hPa Dimensiones: aprox.135 x 35 x 58 mm (L x A xH) Peso: aprox. 54 g *Relative humidity = Humedad relativa Seguridad ¡CONSERVE TODAS LAS INDICACIONES DE...
  • Seite 12 Seguridad ¡ADVERTENCIA! ¡PELIGRO DE MUERTE! Podrían tragarse las baterías, lo cual puede suponer un peligro mortal. Si se ha tragado una batería, debe buscar asistencia médica inmediatamente. Este aparato puede ser utilizado por niños a partir de 8 años y por personas cuyas facultades físicas, senso- riales o mentales sean reducidas o carezcan de los conocimientos y de la experiencia necesaria siempre que sean vigilados o hayan sido instruidos correcta-...
  • Seite 13 Seguridad Nunca ponga el aparato en funcionamiento si está daña- do. Ello podría conllevar lesiones y mediciones incorrectas. ¡Por favor consulte a su médico si el termómetro muestra unos valores de temperatura corporal altos! La fi ebre según este método de medición existe con una temperatura superior a los 38 ºC (100,4 °F).
  • Seite 14 Seguridad No continúe utilizando el aparato si aprecia que está dañado o los valores de medición no le parecen rea- les. Consulte en el capítulo “Funciones / análisis de errores – Solución de problemas“ o bien contacte con nuestro departamento de asistencia técnica. Indicaciones de seguridad de la pila Extraiga la pila cuando el aparato no se haya...
  • Seite 15 Seguridad / Antes de la puesta en marcha las pilas por encima de su tensión fi nal. En este caso, existe el riesgo de que se sulfaten. En caso de que se haya derramado el líquido de las pilas dentro del aparato, sáquelas inmediatamente para evitar daños en el aparato.
  • Seite 16 Funcionamiento Funcionamiento Ajustar la fecha y la hora (fi g.C) Este ajuste solo es necesario en el primer uso y después de cambiar la pila. 1. Presione y mantenga pulsada la tecla “MEM / Set” durante dos segundos en modo estándar. Suela una señal acústica.
  • Seite 17 Funcionamiento entrega el modo Sleep, indicado mediante el símbolo , se encuentra activo y la pantalla LC está completamente desconectada. En caso de modo Sleep desactivado, el aparato permanece desactivado y continúan mostrándose la hora y la temperatura ambiente, actualizadas cada minuto.
  • Seite 18 Funcionamiento 2. Pulse de forma cuidadosa la tapa protectora y retíre- la sin emplear fuerza con un ligero movimiento giratorio. 3. Asegúrese de que el cabezal medidor y la sonda de medición estén limpios. 4. Limpie cuidadosamente el conducto auditivo del oído con un bastoncillo.
  • Seite 19 Funcionamiento 10. La indicación se puede realizar tanto en “°C” como en “°F” (véase “Funciones / análisis de errores – Seleccionar unidad de temperatura”). 11. Espere hasta que la indicación “ ” se apague, an- tes de comenzar una nueva medición. Indicación: El aparato se apaga automáticamente cuando no se acciona ninguna tecla durante más de 1 minuto.
  • Seite 20 Funcionamiento Las actividades físicas o un baño deben de ser ante- riores a 30 minutos, de forma que se pueda obtener un resultado de medición lo más exacto posible. Preste atención de que la frente o la sien se encuentra limpia, sin lesiones y libre de sudor, maquillaje o pomadas.
  • Seite 21 Funcionamiento Indicación: LED verde sin fi ebre 34,0 °C - 37,4 °C (93,2 °F - 99,4 °F) LED naranja ligero aumento de temperatura 37,5 °C - 37,9 °C (99,5 °F - 100,3 °F) LED rojo fi ebre 38,0 °C - 42,9 °C (100,4 °F - 109,2 °F) 8.
  • Seite 22 Funcionamiento Utilización como termómetro en el hogar (modo Scan) El termómetro se puede utilizar en el hogar para la medición de temperaturas en un margen de –22,0 ºC a 80,0 ºC (–7,6 °F - 176,0 °F). ¡ATENCIÓN! No emplee este modo para mediciones de la temperatura corporal.
  • Seite 23 Funcionamiento 1. En caso de que el modo Sleep se encuentre activo, active el termómetro antes de la medición pulsando cualquier botón. 2. Pulse de forma cuidadosa la tapa protectora retírela sin emplear fuerza con un ligero movimiento giratorio. 3. Asegúrese de que el cabezal medidor y la sonda de medición estén limpios.
  • Seite 24 Funcionamiento / Funciones / análisis de errores Para volver al modo estándar, proceda como sigue: 1. Pulse simultáneamente las teclas “FOREHEAD“ “EAR“ hasta que en la pantalla LC se vuelva a mostrar la temperatura ambiente, la fecha y la hora, así...
  • Seite 25 Funciones / análisis de errores “MEM / SET” , para consultar el valor de la última medición. En la pantalla LC aparece el símbolo “Memory“ (modo Memory), el número de la medición, fecha, hora y modo de medición, (fi g. F). Al pulsar de nuevo la tecla “MEM / SET“...
  • Seite 26 Funciones / análisis de errores Coloque las nuevas pilas en el compartimento de la pila. Indicación: Aplique la polaridad correcta. Las indicaciones de la pila deben mostrar el signo más hacia arriba. Deslice la nueva pila bajo el tope metálico y presione hacia abajo, hasta que escuche que encaja.
  • Seite 27 Funciones / análisis de errores Error Problema Solución Pila débil Insertar nueva Indicación sím- pila bolo de bate- ría en pantalla ¿Esta posiciona- Siga fi elmente Indicación do el termómetro las instrucciones “Lo“ en panta- correctamente en de uso respecto lla LC (valor el oído o en la...
  • Seite 28 Funciones / análisis ... / Limpieza y cuidados Error Problema Solución Sin resultado de Siga las indica- Indicación medición des- ciones del ma- “ErrU“ en pan- pués de medi- nual talla LC ción. de instrucciones respecto a medi- ciones correctas. Detectado error Contacte con Indicación...
  • Seite 29 Limpieza... / Garantía y servicio de asistencia técnica por la evaporación del alcohol, incluso en pequeñas cantidades puede alterar el resultado Limpie la carcasa con un paño suave y ligeramente humedecido. En caso de suciedad persistente también se puede añadir un producto de limpieza suave al agua de limpieza.
  • Seite 30 Garantía y servicio de asistencia técnica ticket de caja como justifi cante de compra. En caso de garantía póngase en contacto con su asistencia técnica telefónicamente. Sólo así queda garantizado un envío gratuito de su mercancía. Las prestaciones de garantía son únicamente aplicables a fallos de fabricación y de material, sin embargo ello no engloba a las piezas de desgaste o daños en partes frágiles tales como el interruptor o acumuladores.
  • Seite 31 (tarifa normal)) (0,05 EUR/Min. + 0,11 EUR/llamada (tarifa reducida)) E-Mail: kompernass@lidl.es IAN 96247 Disponibilidad de la línea de atención al cliente: de lunes a viernes de 8.00 a 20.00 h (CET) Eliminación El embalaje se compone de materiales que respetan el medio ambiente que podrá...
  • Seite 32 Eliminación Conformidad Las pilas defectuosas o usadas deben ser recicladas según lo indicado en la directiva 2006 / 66 / EC. Para ello devuelva las pilas y / o el aparato en los puntos de recogida indicados. ¡Las pilas no deben eliminarse junto con los residuos domésticos! Lleve las pilas o el aparato a los puntos de recogida disponibles.
  • Seite 33 Conformidad Fabricante: Shenzhen Dongdixin Technology Co., Ltd. No. 3 Building XiliBaimang Xusheng Industrial Estate Nanshan, Shenzhen, China 518108 Tel.: +86 755 27 652 316 E-Mail: service@e-caretalk.com Apoderado EU: Shanghai International Holding Corp. GmbH (Europe) Eiff estraße 80 20537 Hamburg, Germany Tel.: +49 (0) 40 2513175 Fax:...
  • Seite 34 34 ES...
  • Seite 35 Índice Introdução Utilização correcta...........Página 37 Material fornecido ...........Página 38 Descrição das peças ........Página 38 Dados técnicos ..........Página 39 Segurança Indicações gerais de segurança .....Página 41 Indicações de segurança ........Página 43 Indicações de segurança relativas às pilhas ...Página 44 Antes de utilizar o aparelho Remover a protecção da pilha .......Página 45 Funcionamento Configuração da hora / data (fig.
  • Seite 36 Neste manual de instruções/no aparelho são usados os seguintes símbolos: Ler o manual de instruções! Ter em atenção as indicações de aviso e de segurança! Perigo de explosão! Corrente contínua (tipo de corrente e de tensão) Milliampere Perigo de morte e de acidente para bebés e crianças! Dispositivo médico tipo BF Ano e mês de fabrico...
  • Seite 37 Introdução Termómetro para testa e ouvido Introdução Parabéns pela compra do seu aparelho novo. Decidiu-se, assim, por um produto de elevada qualidade. O manual de instruções é constituinte deste produto. Este contém indicações importantes para a segurança, utiliza- ção e eliminação. Antes da primeira utilização, familiari- ze-se com as funções do aparelho.
  • Seite 38 Introdução Material fornecido 1 x Termómetro para testa e ouvido (incl. pilha e tampa de protecção 1 x Manual de instruções Descrição das peças Cabeça de medição Tecla “EAR” (Medição da temperatura no modo scan auricular) Tecla “FOREHEAD” (medição da temperatura na testa / têmpora) Visor LC LED vermelho febre 38,0 °C - 42,9 °C...
  • Seite 39 Introdução Visor LC Símbolo substituição das pilhas Símbolo indicação do ano Símbolo indicação da data Símbolo modo auricular Símbolo modo padrão Símbolo modo scan Indicação da temperatura Símbolo modo frontal Símbolo limpeza Data e tempo no modo padrão Símbolo modo sleep Indicação PM Símbolo modo setup Símbolo modo memory...
  • Seite 40 Introdução Desactivação automática: Desactivação automática após 1 minuto Gama de medição do modo frontal e auricular: 32 °C - 42,9 °C (89,6 °F - 109,2 °F) Níveis de precisão de medida: ± 0,2 °C (± 0,4 °F) no inter- valo de 35,5 °C - 42,0 °C (95,9 °F - 107,8 °F) ±...
  • Seite 41 Introdução / Segurança Modo frontal: + 15,0 °C - + 40,0 °C (59,0 °F - 104,0 °F) Temperatura de armazenamento: –10,0 °C - + 55,0 °C (14,0 °F - 131,0 °F) com 20%RH* - 85%RH* Pressão atmosférica: 700 ~ 1060 hPa Dimensões: aprox.
  • Seite 42 Segurança PERIGO DE MORTE! As pilhas podem AVVISO! ser engolidas, o que constitui perigo de morte. Se uma pilha for engolida, procure imediatamente ajuda médica. Este aparelho pode ser utilizado por crianças a partir dos 8 anos de idade e pessoas com capacidades físi- cas, sensoriais ou mentais reduzidas ou com falta de experiência e conhecimento, caso sejam vigiadas ou instruídas sobre a utilização segura do aparelho e te-...
  • Seite 43 Segurança Consulte um médico caso o termómetro indique valores de temperatura corporal elevados! Com este método de medição, considera-se febre acima dos 38,0 °C (100,4 °F). O LED vermelho aceso é um sinal de aviso. Efectue a medição várias vezes em intervalos de 0,5 minutos a 1 hora para seguir a evolução da temperatura.
  • Seite 44 Segurança Indicações de segurança relativas às pilhas Retire a pilha do aparelho se este não for utilizado durante muito tempo. CUIDADO! PERIGO DE EXPLOSÃO! Nunca recarregue as pilhas! Ao colocar as pilhas, tenha em atenção a polaridade correcta! Esta é indicada no compartimento das pilhas. Se necessário, limpe os contactos das pilhas e do aparelho antes da sua colocação.
  • Seite 45 Antes de utilizar o aparelho / Funcionamento Antes de utilizar o aparelho Remover a protecção da pilha Faça deslizar a tampa do compartimento da bateria para baixo. Extraia do compartimento das pilhas a película protectora da patilha. Volte a deslizar a tampa no compartimento para pilhas até...
  • Seite 46 Funcionamento 3. Prima a tecla “FOREHEAD” . As horas fi cam intermitentes e podem ser alteradas com a tecla “MEM / SET 4. Prima novamente a tecla “FOREHEAD” . Os minutos fi cam intermitentes e podem ser alterados com a tecla “MEM / SET Repita os 3.º...
  • Seite 47 Funcionamento medido a temperatura mais elevada. A nova medição pode ser iniciada quando o visor “ ” se apagar. Não utilize o termómetro no caso de sentir dores ao tirar a temperatura. O canal auditivo pode estar ferido. Não utilize o termómetro em caso de visíveis doenças no ouvido (por ex.
  • Seite 48 Funcionamento 6. Mantenha a orelha ligeiramente puxada e insira cuidadosamente a cabeça de medição no canal auditivo. 7. Prima brevemente a tecla “EAR” . Aparece o símbolo no visor LC e, após um sinal sonoro, inicia-se a medição. 8. O fi nal da medição é assinalado com dois sinais sonoros.
  • Seite 49 Funcionamento disponível juntamente com a data, hora e o modo de medição ao premir novamente a tecla “MEM / SET” O aparelho possui 9 posições de memória (ver capítulo “Funções / Análise de erros - a função Memory”). Medir a temperatura corporal (modo frontal) IMPORTANTE! Recomenda-se efectuar 3 medições consecutivas no mesmo ponto, assumindo a temperatura mais elevada como valor de medição.
  • Seite 50 Funcionamento 3. Certifi que-se de que a cabeça de medição sensor de medição se encontram limpos. 4. Mantenha o sensor de medição a uma distância de aprox. 1 cm da testa ou da têmpora. 5. Para iniciar a medição prima a tecla “FOREHEAD” Aparece o símbolo no visor LC e, após um...
  • Seite 51 Funcionamento juntamente com a data, hora e modo de medição ao premir novamente a tecla “MEM / SET” . O aparelho possui 9 posições de memória (ver capítulo “Funções / Análise de erros - a função Memory”). Utilização como termómetro em casa (modo scan) O termómetro também pode ser utilizado em casa para medições de temperatura à...
  • Seite 52 Funcionamento Exemplo de aplicações: Temperatura do leite em biberões Temperatura da água do banho 1. No caso do modo sleep estar activo, accione o termómetro antes da medição premindo a tecla pretendida. 2. Prima cuidadosamente a tampa de protecção remova-a com um ligeiro movimento rotativo, sem exercer força.
  • Seite 53 Funcionamento / Funções / Análise de erros Para regressar ao modo padrão, proceda da seguinte forma: 1. Prima em simultâneo a tecla “FOREHEAD” tecla “EAR” várias vezes até que sejam mostrados novamente no visor LC temperatura ambiente, data e hora assim como o símbolo (fi...
  • Seite 54 Funções / Análise de erros medição, quando a tecla “MEM / SET” for activada no modo padrão. Prima 1 x a tecla “MEM / SET” para chamar o valor da última medição. No visor LC surge o símbolo “Memory” (modo Memory), o número da medição, data, hora e modo de medição (fi...
  • Seite 55 Funções / Análise de erros pode surgir quando a chave de parafusos, a pilha e as partes condutoras, simultaneamente, tocam no compartimento da pilha. Coloque a nova pilha no compartimento da pilha. Indicação: Tenha em atenção a polaridade certa. A inscrição na nova pilha deve fi car com o sinal positivo virado para cima.
  • Seite 56 Funções / Análise de erros Erro Problema Reparação Verifi que o modo Colocar pilha Indicação sím- de medição. nova bolo de pilha no visor LC O termómetro Siga o manual Indicação está correcta- de instruções no „Lo“ no visor mente posiciona- que diz respeito (valor do no ouvido ou...
  • Seite 57 Funções / Análise de erros Erro Problema Reparação Sem resultado Siga o manual Indicação após medição. de instruções „ErrU“ no relativamente a visor LC medições correc- tas. Detectado erro Contacte o servi- Indicação durante o auto- ço de assistência „ErrH“ no teste.
  • Seite 58 Limpeza e conservação Limpeza e conservação Após algumas medições de temperatura o aparelho irá lembrá-lo de limpar o sensor de medição. Para isso surgi- rá o símbolo limpeza no visor LC-Display e soam sinais acústicos. Para evitar uma contaminação de micró- bios, após cada utilização, a lente deve ser limpa com um pano suave humedecido com álcool etílico de 70 %.
  • Seite 59 Garantia e Assistência técnica Garantia e Assistência técnica Este aparelho tem uma garantia de 3 anos a partir da data de compra. O aparelho foi cuidadosamente produzido e verifi cado antes de ser entregue. Guarde o talão de caixa como comprovativo da compra.
  • Seite 60 Assistência Portugal Tel.: 70778 0005 (0,12 EUR/Min.) E-Mail: kompernass@lidl.pt IAN 96247 Horário de atendimento da linha de apoio: Segunda a sexta das 8:00 horas – 20:00 horas (HEC) Eliminação A embalagem é composta por materiais recicláveis, que pode eliminar nos pontos de reciclagem locais.
  • Seite 61 Eliminação / Declaração de conformidade As pilhas avariadas ou gastas têm de ser recicladas de acordo com a directiva 2006 / 66 / EC. Entregue as pilhas e / ou o aparelho nos locais específi cos destinados à sua recolha. As pilhas não são resíduos domésticos! Devolva as pilhas e / ou o aparelho nos locais específi...
  • Seite 62 Declaração de conformidade Fabricante: Shenzhen Dongdixin Technology Co., Ltd. No. 3 Building XiliBaimang Xusheng Industrial Estate Nanshan, Shenzhen, China 518108 Tel.: +86 755 27 652 316 E-Mail: service@e-caretalk.com Representante na UE: Shanghai International Holding Corp. GmbH (Europe) Eiff estraße 80 20537 Hamburgo, Alemanha Tel.: +49 (0) 40 2513175...
  • Seite 63 Inhaltsverzeichnis Einleitung ......Seite 65 Bestimmungsgemäße Verwendung ............Seite 66 Lieferumfang ..........Seite 66 Teilebeschreibung ..........Seite 67 Technische Daten Sicherheit ......Seite 69 Allgemeine Sicherheitshinweise ..........Seite 71 Sicherheitshinweise ......Seite 71 Sicherheitshinweise zu Batterien Vor der Inbetriebnahme ........Seite 73 Batteriesicherung entfernen Betrieb .......Seite 73 Datum / Uhrzeit einstellen (Abb. C) ..........Seite 74 Temperaturmessungen Funktionen / Fehleranalyse...
  • Seite 64 In dieser Bedienungsanleitung / am Gerät werden folgende Piktogramme verwendet: Bedienungsanleitung lesen! Warn- und Sicherheitshinweise beachten! Explosionsgefahr! Gleichstrom (Strom- und Spannungsart) Milliampere Lebens- und Unfallgefahr für Kleinkinder und Kinder! Medizinprodukt Typ BF Fabrikationsjahr und -monat 2014-01 Entsorgen Sie Verpackung und Gerät umweltgerecht! 64 DE/AT/CH...
  • Seite 65 Einleitung Stirn-und-Ohr-Thermometer Einleitung Herzlichen Glückwunsch zum Kauf Ihres neuen Gerätes. Sie haben sich damit für ein hochwer- tiges Produkt entschieden. Die Bedienungsanleitung ist Bestandteil dieses Produkts. Sie enthält wichtige Hinweise für Sicherheit, Gebrauch und Entsorgung. Machen Sie sich vor der ersten Inbetrieb- nahme mit den Funktionen des Gerätes vertraut.
  • Seite 66 
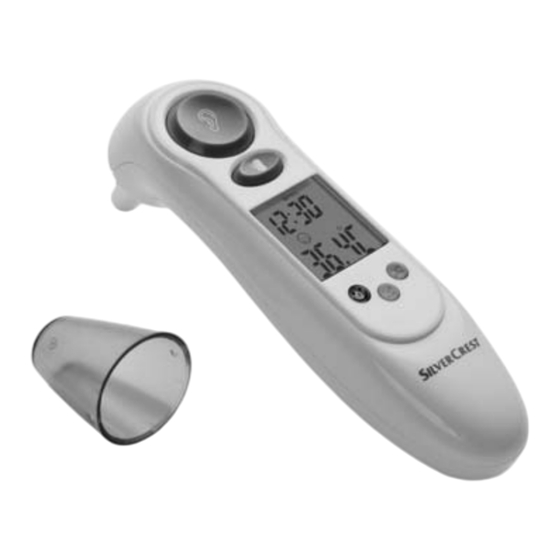
Einleitung Lieferumfang 1 x Stirn-und-Ohr-Thermometer (inkl. Batterie und Schutzkappe 1 x Bedienungsanleitung Teilebeschreibung Messkopf „EAR”-Taste (Temperaturmessung im Ohr / Scan-Modus) „FOREHEAD”-Taste (Temperaturmessung an der Stirn / Schläfe) LC-Display LED rot: Fieber 38,0 °C - 42,9 °C (100,4 °F - 109,2 °F) LED orange: leichte Temperaturerhöhung 37,5 °C - 37,9 °C (99,5 °F - 100,3 °F) LED grün: kein Fieber 34,0 °C - 37,4 °C...
  • Seite 67 Einleitung LC-Display Symbol Batteriewechsel Symbol Anzeige Jahr Symbol Anzeige Datum Symbol Ohren-Modus Symbol Standard-Modus Symbol Scan-Modus Temperaturanzeige Symbol Stirn-Modus Symbol Reinigung Datum und Zeit im Standard-Modus Symbol Sleep-Modus Anzeige PM Symbol Setup-Modus Symbol Memory-Modus Technische Daten Messverfahren: Infrarot (berührungsfrei) Stromversorgung: Lithium-Batterie 3 V CR2032 Stromverbrauch:...
  • Seite 68 Einleitung Automatische Abschaltung: Automatische Abschaltung nach 1 Minute Messbereich Stirn- und Ohren-Modus: 32 °C - 42,9 °C (89,6 °F - 109,2 °F) Messgenauigkeiten: ± 0,2 °C (± 0,4 °F) im Bereich von 35,5 °C - 42,0 °C (95,9 °F - 107,8 °F) ±...
  • Seite 69 Einleitung / Sicherheit Maße: ca. 135 x 35 x 58 mm (L x B x H) Gewicht: ca. 54 g *Relative humidity = relative Luftfeuchte Sicherheit BEWAHREN SIE ALLE SICHERHEITSHINWEISE UND ANWEISUNGEN FÜR DIE ZUKUNFT AUF! Allgemeine Sicherheitshinweise LEBENS- UND WARNUNG! UNFALLGEFAHR FÜR KLEINKINDER UND KINDER! Lassen Sie Kinder niemals...
  • Seite 70 Sicherheit des Gerätes unterwiesen wurden und die daraus re- sultierenden Gefahren verstehen. Kinder dürfen nicht mit dem Gerät spielen. Reinigung und Benutzer-War- tung dürfen nicht von Kindern ohne Beaufsichtigung durchgeführt werden. Setzen Sie das Gerät - keinen extremen Temperaturen, - keinen starken Vibrationen, - keinen starken mechanischen Beanspruchungen, - keiner direkten Sonneneinstrahlung aus.
  • Seite 71 Sicherheit Arzt die Diagnose. Verwenden Sie das Thermometer nicht unter extremen Temperaturbedingungen und / oder im Außenbereich. Ungenaue Messergebnisse sind die Folge. Beachten Sie die Vorgaben zu Umgebungs- und Lagertempera- turen (siehe „Technische Daten“). Der Messfühler sollte weder direkt berührt, noch an- gepustet werden.
  • Seite 72 Sicherheit VORSICHT! EXPLOSIONSGEFAHR! Laden Sie Batterien niemals wieder auf! Achten Sie beim Einlegen auf die richtige Polarität! Diese wird im Batteriefach angezeigt. Reinigen Sie Batterie- und Gerätekontakt vor dem Einlegen falls erforderlich. Batterien gehören nicht in den Hausmüll! Jeder Verbraucher ist gesetzlich verpfl ichtet, Batterien ordnungsgemäß...
  • Seite 73 Vor der Inbetriebnahme / Betrieb Vor der Inbetriebnahme Batteriesicherung entfernen Schieben Sie den Batteriefachdeckel nach unten. Ziehen Sie die Schutzfolie an der Lasche aus dem Batteriefach. Schieben Sie den Batteriefachdeckel wieder auf das Batteriefach, bis er hörbar einrastet (Abb. A). –...
  • Seite 74 Betrieb 3. Drücken Sie die „FOREHEAD“-Taste . Die Stunden blinken und können mit der „MEM / SET“-Taste korrigiert werden. 4. Drücken Sie die „FOREHEAD“-Taste erneut. Die Minuten blinken und können mit der „MEM / SET“- Taste korrigiert werden. Wiederholen Sie die Schritte 3. und 4., um die Werte für Jahr, Monat und Tag einzustellen bzw.
  • Seite 75 Betrieb Körpertemperatur messen (Ohren-Modus) WICHTIG! Es wird empfohlen, 3 Messungen hinter- einander am selben Ohr durchzuführen und dabei die höchste Temperatur als Messwert anzunehmen. Die neue Messung kann jeweils gestartet werden, wenn die Anzeige „ “ erlischt. Verwenden Sie das Thermometer nicht, wenn bei der Messung Schmerzen auftreten.
  • Seite 76 Betrieb 4. Reinigen Sie vorsichtig den Gehörgang des Ohres mit einem Wattestäbchen. 5. Ziehen Sie die Ohrmuschel leicht in Richtung Hinter- kopf schräg nach oben / nach hinten, damit der Gehörgang frei zugänglich wird und sich keine Hin- dernisse zwischen Messfühler und Trommelfell befi...
  • Seite 77 Betrieb Hinweis: Das Ausschalten des Gerätes erfolgt automatisch, wenn es länger als 1 Minute nicht betätigt wird. Bei akti- viertem Sleep-Modus schaltet sich das LC-Display aus. Bei deaktiviertem Sleep-Modus schaltet das Gerät in den Standard-Modus. Wenn das Thermometer unter normalen Bedingungen betrieben wurde, wird immer das Ergebnis der jeweils letzten Messung vor dem Ausschalten automatisch gespeichert.
  • Seite 78 Betrieb Merken Sie sich, mit welchem Messverfahren Sie die Temperatur gemessen haben und teilen Sie dies auch Ihrem Arzt mit. 1. Falls der Sleep-Modus aktiv ist, aktivieren Sie das Thermometer vor der Messung durch Drücken einer beliebigen Taste. 2. Drücken Sie vorsichtig auf die Schutzkappe entfernen Sie sie ohne Kraftaufwendung mit einer leichten Drehbewegung.
  • Seite 79 Betrieb 8. Die Anzeige kann sowohl in „°C“ als auch in „°F“ erfolgen (siehe “Funktionen / Fehleranalyse - Temperatureinheit wählen“). 9. Wiederholen Sie Schritt 3. bis 6., um weitere Messungen durchzuführen. Hinweis: Das Ausschalten des Gerätes erfolgt automa- tisch, wenn es länger als 1 Minute nicht betätigt wird. Bei aktiviertem Sleep-Modus schaltet sich das LC-Display aus.
  • Seite 80 Betrieb von seiner Innentemperatur unterscheiden, besonders, wenn die Oberfl äche der Sonneneinstrahlung oder ei- nem Luftzug ausgesetzt ist! Das Thermometer misst bauartbedingt den exakten Wert, wenn sein Gehäuse Raumtemperatur angenommen hat. Behalten Sie es zur Messung deshalb nicht zu lange in der Hand und halten Sie es von direkter Sonnen- strahlung fern! Benutzen Sie das Gerät nicht sofort nach der Reinigung...
  • Seite 81 Betrieb 5. Halten Sie den Messkopf in einer Entfernung von 1 cm an die Flüssigkeit und / oder Oberfl äche, deren Temperatur Sie messen wollen. 6. Drücken Sie die „EAR“-Taste , um die Messung zu starten. 7. Nun können Sie das Messergebnis auf dem LC-Display ablesen (Abb.
  • Seite 82 Funktionen / Fehleranalyse Funktionen / Fehleranalyse Temperatureinheit wählen Drücken und halten Sie gleichzeitig die „EAR“-Taste und die „FOREHEAD“-Taste , bis hinter der Temperaturanzeige „°F“ erscheint. Ein Umschalten von „°F“ in „°C“ ist mit der gleichen Prozedur möglich. Die Memory-Funktion (Memory-Modus) WICHTIG! Die aktuelle Messung wird stets auf dem letzten Speicher- platz abgelegt.
  • Seite 83 Funktionen / Fehleranalyse Um in den Standard-Modus zurückzukehren, gehen Sie wie folgt vor: 1. Drücken Sie gleichzeitig die „FOREHEAD“-Taste und die „EAR“-Taste so oft, bis im LC-Display wieder Raumtemperatur, Datum und Uhrzeit, sowie das Symbol angezeigt werden (Abb. D). 2. Sie befi nden sich jetzt wieder im Standard-Modus. Batteriewechsel Das Gerät ist mit einer Lithium-Batterie (CR2032, 3 V ausgestattet, die sehr viele Messungen ermöglicht.
  • Seite 84 Funktionen / Fehleranalyse Schieben Sie den Batteriefachdeckel wieder auf das Batteriefach, bis er hörbar einrastet (Abb. A). Behebung von Problemen Falls das Gerät eine Messung nicht im vorgesehenen Bereich durchführen kann, gibt es eine Fehlermeldung aus. Diese Meldung soll zur Problembehebung beitragen. Fehler Problem Beseitigung...
  • Seite 85 Funktionen / Fehleranalyse Fehler Problem Beseitigung Anzeige „Hi“ Überprüfen Sie Befolgen Sie die auf LC-Display den Messmodus. Bedienungsanlei- (Messwert tung hinsichtlich über 42,9°C korrekter oder 109,2°F) Messungen. Anzeige „ErrE“ Umgebungstem- Sorgen Sie für LC-Display eine Umge- peratur außerhalb des Bereiches bungstemperatur 15,0 °C - 40,0 °C / im Bereich...
  • Seite 86 Reinigung und Pflege Reinigung und Pfl ege Nach einigen Temperaturmessungen erinnert Sie das Gerät daran, den Messfühler zu reinigen. Hierzu erscheint das Symbol Reinigung im LC-Display Signaltöne erklingen. Die Linse in der Öff nung des Messfühlers ist das empfi ndlichste Teil des Gerätes. Seien Sie sehr vorsichtig, wenn eine Reinigung erforderlich wird.
  • Seite 87 Reinigung ... / Garantie und Service wird, anderenfalls wird eine Fehlermeldung ausgegeben (siehe „Funktionen / Fehleranalyse - Behebung von Problemen“). Ebenso ist zum Messen eine Raumtemperatur von 5,0 °C 59,9 °C (41,0 °F 139,8 °F) einzuhalten. Liegt sie außerhalb dieses Bereiches, erfolgt eine Fehler- meldung (siehe „Funktionen / Fehleranalyse - Behebung von Problemen“).
  • Seite 88 Tage nach Kaufdatum. Nach Ablauf der Garantiezeit anfallende Reparaturen sind kostenpfl ichtig. Service Deutschland Tel.: 0800 5435 111 E-Mail: kompernass@lidl.de IAN 96247 Service Österreich Tel.: 0820 201 222 (0,15 EUR/Min.) E-Mail: kompernass@lidl.at IAN 96247 88 DE/AT/CH...
  • Seite 89 Service Schweiz Tel.: 0842 665566 (0,08 CHF/Min., Mobilfunk max. 0,40 CHF/Min.) E-Mail: kompernass@lidl.ch IAN 96247 Erreichbarkeit Hotline: Montag bis Freitag von 8:00 Uhr – 20:00 Uhr (MEZ) Entsorgung Die Verpackung besteht aus umweltfreundlichen Materialien, die Sie über die örtlichen Recycling- stellen entsorgen können.
  • Seite 90 Entsorgung / Konformität Defekte oder verbrauchte Batterien müssen gemäß Richtlinie 2006/66/EC recycelt werden. Geben Sie Batterien und / oder das Gerät über die angebotenen Sammeleinrichtungen zurück. Batterien gehören nicht in den Hausmüll! Geben Sie die Batterien und / oder das Produkt über die angebotenen Sammeleinrichtungen zurück.
  • Seite 91 Konformität Hersteller: Shenzhen Dongdixin Technology Co., Ltd. No. 3 Building XiliBaimang Xusheng Industrial Estate Nanshan, Shenzhen, China 518108 Tel.: +86 755 27 652 316 E-Mail: service@e-caretalk.com EU-Bevollmächtigter: Shanghai International Holding Corp. GmbH (Europe) Eiff estraße 80 20537 Hamburg, Germany Tel.: +49 (0) 40 2513175 Fax: +49 (0) 40 255726...
  • Seite 92 92 DE/AT/CH...
  • Seite 93 Table of Contents Introduction Intended use ............Page 95 Scope of delivery ..........Page 96 Description of parts ........... Page 96 Technical data ........... Page 97 Safety General safety instructions ....... Page 99 Safety instructions ..........Page 101 Safety Instructions for the Battery ..... Page 102 Before getting started Removing the battery fuse ........
  • Seite 94 The following pictograms are used in these directions for use or on the device itself: Read the directions for use! Please observe the warning and safety instructions! Risk of explosion! Direct current (type of current and voltage) Milliampere Danger to life and danger of accidents for infants and children! Medical device type BF Year and month of manufacture...
  • Seite 95 Introduction Forehead & Ear Thermometer Introduction Congratulations on the purchase of your new appliance. You have clearly decided in favour of a quality product. These operating instructions are a part of this product. They contain important information in regard to safety, use and disposal.
  • Seite 96 Introduction Scope of delivery 1 x Forehead and ear thermometer (incl. battery and protective head guard 1 x Directions for use Description of parts Measuring head “EAR” button (Temperature measurement in the ear / scan mode) “FOREHEAD” button (Temperature measurement at forehead / temple) LC display Red LED: Fever 38.0 °C - 42.9 °C (100.4 °F - 109.2 °F)
  • Seite 97 Introduction LC display Battery change symbol Year display symbol Date display symbol Ear mode symbol Standard mode symbol Scan mode symbol Temperature display Forehead mode symbol Cleaning symbol Date and time in standard mode Sleep mode symbol PM display Setup mode symbol Memory mode symbol Technical data Measurement...
  • Seite 98 Introduction Temperature scale: °C (°Celsius) °F (°Fahrenheit) Time display: 12 / 24-hour format Automatic switch-off : Automatic switch-off after 1 minute Measurement range forehead & ear mode: 32°C - 42.9°C (89.6°F - 109.2°F) Measurement accuracies: ± 0.2°C (± 0.4°F) in the range from 35.5°C - 42.0°C (95.9°F - 107.8°F) ±...
  • Seite 99 Introduction / Safety (59.0 °F - 104.0 °F) Storage temperature: –10.0 °C - +55.0 °C (14.0°F - 131.0°F) at 20 % RH* - 85 % RH* Atmospheric pressure: 700 ~ 1060 hPa Dimensions: approx. 135 x 35 x 58 mm (L x B x H) Weight: approx.
  • Seite 100 Safety This device may be used by children aged 8 over and by persons with reduced physical, sensory or mental capabilities or lack of experience and knowledge, provided that they are under supervision or have been told how to use the device safely and are aware of the potential risks.
  • Seite 101 Safety Please consult a doctor if the thermometer indicates that the body temperature measured is high. With this measuring method, a fever is indicated if the tempera- ture is above 38.0 °C (100.4 °F). The red LED is a warning. Please take several measurements at intervals of 0.5 to 1 hour in order to follow the progression of the temperature.
  • Seite 102 Safety Safety Instructions for the Battery Remove the battery from the device if it is not going to be used for a prolonged period. CAUTION! DANGER OF EXPLOSION! The battery must never be recharged! Ensure correct polarity when inserting the battery! This is indicated in the battery compartment.
  • Seite 103 Before getting started / Operation Before getting started Removing the battery fuse Push the battery compartment lid downwards. Pull the tab of the protective fi lm out of the battery compartment. Push the battery compartment lid onto the battery compartment until it clicks into place (Fig. A). –...
  • Seite 104 Operation 3. Press the “FOREHEAD” button . The hours will fl ash and can be corrected with the “MEM / SET” button 4. Press the “FOREHEAD” button again. The minutes will fl ash and can be corrected with the “MEM / SET” button Repeat steps 3 and 4 to set the values for the year, month and day or to switch the sleep mode on or off...
  • Seite 105 Operation Do not use the thermometer if pain occurs when the meas- urement is being taken. This could damage the ear canal. Do not use the thermometer with external ear disorders (e.g. infl ammation of the ear canal, injuries to the outer ear).
  • Seite 106 Operation 7. Briefl y press the “EAR” button . The symbol will appear in the LC display and the measurement will start after an acoustic signal. 8. The end of the measurement is indicated by means of 2 acoustic signals. 9.
  • Seite 107 Operation when the “MEM / SET” button is pressed again. The device has 9 storage spaces (see section on “Functions / error analysis - the memory function”). Measuring the body temperature (forehead mode) IMPORTANT! It is advisable to carry out 3 meas- urements in a row at the same place and to take the highest temperature as the measured value.
  • Seite 108 Operation 3. Check that the measuring head and the measuring sensors are clean. 4. Hold the measuring sensor 1 cm away from the forehead or temple. 5. To start the measurement, press on the “FOREHEAD” button . The symbol will appear in the LC display and the measurement will start after an acoustic signal.
  • Seite 109 Operation Note: The appliance automatically switches off if it is not operated for longer than 1 minute. When the sleep mode has been activated, the LC display switches itself off . When the sleep mode has been deactivated, the appliance switches to standard mode.
  • Seite 110 Operation Do not use the appliance immediately after cleaning the measuring head . The evaporative cooling eff ect of the detergent may falsify the measuring result. Sample applications: The temperature of milk in baby bottles The temperature of bathwater 1. If the sleep mode has been activated, activate the thermometer again by pressing any button before taking a measurement.
  • Seite 111 Operation / Functions / error analysis 9. Press the “EAR” button again to carry out further measurements. 10. The appliance automatically switches off if it is not operated for longer than 1 minute. This application is not stored in the device. In order to return to standard mode, proceed as follows: 1.
  • Seite 112 Functions / error analysis Measurements taken in ear and forehead mode are automatically stored in the appliance. The measured values are available again along with information on the date, time and measurement mode when the “MEM / SET” button is operated in standard mode. Press the “MEM / SET”...
  • Seite 113 Functions / error analysis Push the battery compartment lid downwards. Lever the battery out with a small screwdriver. Avoid short-circuiting the battery at all cost. A short- circuit can occur if the screwdriver comes into contact with the battery and the live parts in the battery compartment at the same time.
  • Seite 114 Functions / error analysis Error Problem Solution Weak battery Insert a new Battery sym- battery bol on the LC display Thermometer Pay heed to the “Lo” on the correctly posi- operating in- LC display tioned in the ear structions in re- (measured or on the fore- gard to position-...
  • Seite 115 Functions / error analysis / Cleaning and care Error Problem Solution No measure- Please observe “ErrU” on the ment result after the directions LC display measurement. for use with re- gard to taking correct measure- ments. Error detected Contact the “ErrH”...
  • Seite 116 Cleaning and care / Guarantee and Service added to the water. Keep the appliance in a dry environ- ment and protect from direct sunlight. The appliance can be stored at temperatures of –10.0 °C - 55.0 °C (14.0 °F - 131.0 °F). Temperatures over 80.0 °C are to be avoided! In order to measure with it, however, it is nec- essary to let the appliance adjust to room temperature for a suffi...
  • Seite 117 All repairs required after the guarantee period has expired are subject to a charge. Service Great Britain Tel.: 0871 5000 720 (£ 0.10/Min.) E-Mail: kompernass@lidl.co.uk IAN 96247 Hotline availability: Monday to Friday 08:00 - 20:00 (CET)
  • Seite 118 Disposal Disposal The packaging is made entirely of recyclable materials, which you may dispose of at local recycling facilities. Contact your local refuse disposal authority for more details of how to dispose of your worn-out product. The product is subject to Directive 2012 / 19 / EU (WEEE).
  • Seite 119 Conformity Conformity The CE Mark 0197 has been attached to this product in accordance with the following European Directive: Directive for Medical Products 93/42/EEC, as amended by Directive 2007/47/EC. The associated declaration of conformity has been deposited with the importer: KOMPERNASS HANDELS GMBH BURGSTRASSE 21 44867 BOCHUM, GERMANY...
  • Seite 120 Conformity Manufacturer: Shenzhen Dongdixin Technology Co., Ltd. No. 3 Building XiliBaimang Xusheng Industrial Estate Nanshan, Shenzhen, China 518108 Tel.: +86 755 27 652 316 E-Mail: service@e-caretalk.com EU Representative: Shanghai International Holding Corp. GmbH (Europe) Eiff estrasse 80 20537 Hamburg, Germany Tel.: +49 (0) 40 2513175 Fax:...
  • Seite 121 KOMPERNASS HANDELS GMBH BURGSTRASSE 21 44867 BOCHUM DEUTSCHLAND / GERMANY www.kompernass.com Estado de las informaciones · Estado das informações Stand der Informationen · Last Information Update: 11 / 2013 · Ident.-No.: SSOT6B2-112013-3 IAN 96247...

Diese Anleitung auch für:

Ssot 6 b2