Eufab TECDC1 Bedienungsanleitung
Inhaltsverzeichnis
Verfügbare Sprachen
Verfügbare Sprachen
Quicklinks
3. Kennzeichen bestellen unter
3. Kennzeichen bestellen unter
https://webshop.eal-vertrieb.com
https://webshop.eal-vertrieb.com
D
D
Art.-Nr.: 11622
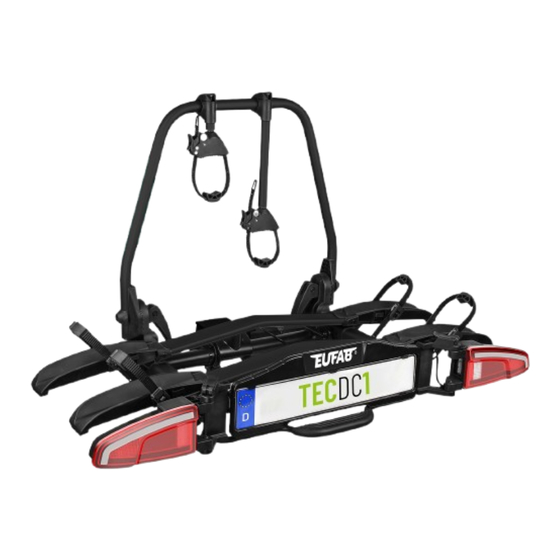
TECDC1
Fahrradträger für die Anhängerkupplung
Bedienungsanleitung ............... 3
Art. no. 11622
TECDC1
Cycle rack for the towbar
Operating instructions .............. 15
Réf. 11622
TECDC1
Porte-vélos pour boule d'attelage
Manuel de l'opérateur .............. 27
Cod. art. 11622
TECDC1
Portabiciclette per gancio di traino
Istruzioni per l'uso ..................... 39
© EAL GmbH, 11622, 06.2024
Kapitel
Inhaltsverzeichnis

Verwandte Anleitungen für Eufab TECDC1


Inhaltszusammenfassung für Eufab TECDC1
- Seite 1 3. Kennzeichen bestellen unter 3. Kennzeichen bestellen unter https://webshop.eal-vertrieb.com https://webshop.eal-vertrieb.com © EAL GmbH, 11622, 06.2024 Art.-Nr.: 11622 Réf. 11622 TECDC1 TECDC1 Fahrradträger für die Anhängerkupplung Porte-vélos pour boule d’attelage Bedienungsanleitung ....3 Manuel de l‘opérateur ....27 Art. no. 11622 Cod.
-
Seite 3: Inhaltsverzeichnis
Fahrradträger TECDC1 1. BESTIMMUNGSGEMÄßER GEBRAUCH Der Fahrradträger TECDC1 dient dem Transport von max. zwei INHALT Fahrrädern. Er darf ausschließlich an Anhängerkupplungen montiert werden, die die Voraussetzungen erfüllen, die im Kapitel 1. BESTIMMUNGSGEMÄßER GEBRAUCH _____________ 3 Kupplungsvoraussetzungen genannt sind. Außerdem darf auf 2. -
Seite 4: Spezifikationen / Kupplungsvoraussetzungen
3. SPEZIFIKATIONEN / KUPPLUNGSVORAUSSETZUNGEN 4. SICHERHEITSHINWEISE Material: Aluminium / Stahl Befolgen Sie die Montageanweisung genau. Wenn Sie die Eigengewicht: ca. 15 kg Anweisungen nicht befolgen, kann das zu Personen- und Nutzlast: max. 60 kg Sachschäden führen. Radschienenabstand: ca. 23 cm Sollten Sie sich bei der Montage nicht sicher sein, bitten Sie Ihren max. - Seite 5 WARNUNG! WARNUNG! Personen- oder Sachschaden durch nicht Personen- oder Sachschaden durch komplett gesicherte Fahrradträger. Abdeckplanen. Das Fahren mit nach hinten geschoben oder zusam- Abdeckplanen erhöhen den Luftwiderstand. Sie mengeklapptem Fahrradträger kann zu Unfällen können sich lösen und umherfliegen, das kann zu führen.
-
Seite 6: Vor Der Ersten Inbetriebnahme
5.2 MONTAGE DER RAHMENHALTER 5. VOR DER ERSTEN INBETRIEBNAHME 5.1 MONTAGE DES KENNZEICHENS Bild 2: Ausschwenken der Rückleuchten Bild 6: Montage der Rahmenhalter 6. MONTAGE UND BENUTZUNG 6.1 MONTAGE DES FAHRRADTRÄGERS AN DER ANHÄNGERKUPPLUNG Stellen Sie Ihr Fahrzeug auf einer ebenen Fläche ab. Ziehen Sie die Handbremse an. -
Seite 7: Einstellen Des Schnellverschlusses
HINWEIS Bei Kupplungen befi ndet sich oft eine Lackschicht auf der Kupplungskugel. Für den bestmöglichen Halt des Fahrradträgers, sollte diese Lackschicht vorsichtig entfernt werden. Beachten Sie die Hinweise des Kupplungsherstellers. Bild 10: Verriegeln des Schnellverschlusses Bild 7: Reinigen der Kupplungskugel Bild 11: Abschließen des Schnellverschlusses HINWEIS Leichte Druckspuren auf der Kupplungskugel sind... -
Seite 8: Anschliessen Des Elektrokabels
6.5 AUSSCHWENKEN DER RÜCKLEUCHTEN 6.3 ANSCHLIESSEN DES ELEKTROKABELS Stecken Sie den Stecker des Elektrokabels des Fahrradträgers in die Anhängersteckdose Ihres Fahrzeugs. Lesen Sie dazu die Anleitung Ihres Fahrzeugs bzw. Ihrer Anhängerkupplung. WARNUNG! Personenschaden durch nicht Wahrgenommen werden von anderen Verkehrsteilnehmern. Fahren ohne funktionsfähige Beleuchtungsanlage kann zu Unfällen führen. -
Seite 9: Ausfahren Der Radschienen
6.6 AUSFAHREN DER RADSCHIENEN das Fahrrad in die Schiene, die sich am nächsten zum Heck des Fahrzeugs befi ndet. WARNUNG! Personen- oder Sachschaden durch nicht ganz ausgefahren Radschienen. Die Radschienen sind verstellbar. Um die optimale Stabilität Ihrer Fahrräder zu gewährleisten, sollten die Radschienen vor der Benutzung immer vollständig ausgefahren werden. - Seite 10 Bild 17: Einstellen der Rahmenhalter Bild 19: Befestigen der Räder des ersten Fahrrads Bild 18: Befestigen des Fahrrads mit dem Rahmenhalter Bild 20: Zusätzliche Befestigung des Vorderrades mit kurzen Spanngurt...
- Seite 11 Benutzen Sie zur zusätzlichen Befestigung der Vorderräder immer die kurzen Spanngurte (Position E im Lieferumfang) um ein Verdrehen des Fahrradlenkers zu vermeiden. Bild 22: Sicherheitsgurt anlegen WARNUNG! Personen- oder Sachschaden durch Verlust eines Fahrrads während der Fahrt. Eine lockere Verbindung zwischen Träger und Fahrrad kann zum Lösen der Verbindung und Verlust des Fahrrads führen.
-
Seite 12: Abklappen Des Fahrradträgers
6.8 ABKLAPPEN DES FAHRRADTRÄGERS VORSICHT! Personen- oder Sachschaden durch Herauf- WARNUNG! klappen möglich. Sachschaden durch öffnende Heckklappe. Körperteile oder Gegenstände, die sich zwischen Die Heckklappe könnte gegen den Fahrradträger Träger und Fahrzeug befinden, können gequetscht schlagen und beschädigt werden. werden. Elektrische Heckklappen abschalten und Vergewissern Sie sich, dass sich nichts zwischen manuell betätigen. -
Seite 13: Tipps Und Tricks
7. TIPPS UND TRICKS 13-polig Der Fahrradträger ist mit einer Beleuchtungsanlage ausgestat- tet. Diese wird mit einem 13 poligen Stecker an der Steckdose der Anhängerkupplung angeschlossen. Sollte Ihr Fahrzeug statt über einen 13 poligen nur über einen 7 poligen Anschluss verfügen sind hier die entsprechenden Belegungen aufgeführt. -
Seite 14: Wartung Und Pflege
8. WARTUNG UND PFLEGE 9. HINWEISE ZUM UMWELTSCHUTZ Durch seine Beleuchtungsanlage ist der Fährradträger ein Elektrogerät. 8.1 WARTUNG Das Symbol mit der durchgestrichenen Mülltonne Prüfen Sie vor jeder Fahrt den Fahrradträger auf Verschleiß. bedeutet, dass Elektro- und Elektronikgeräte nicht zu- Insbesondere defekte Metallteile und Spannriemen müssen sammen mit dem Hausmüll entsorgt werden dürfen. - Seite 52 EAL GmbH info@eal-vertrieb.com Otto-Hausmann-Ring 107 +49 (0)202 42 92 83 0 www.eal-vertrieb.com 42115 Wuppertal +49 (0) 202 42 92 83 – 160 Deutschland...