Watts WFHTRF 010 Bedienungsanleitung
Elektronischer funk-thermostat mit digitalanzeige
Verfügbare Sprachen
Verfügbare Sprachen
Quicklinks
USER GUIDE
RF basic thermostat
WFHTRF 010 (20433)
ON
Switch on and switch
off the thermostat
OFF
TECHNICAL CHARACTERISTICS
Measured temperature precision
0.1°C (or 0.2°F)
0°C - 50°C (or 32°F – 122°F)
Operating temperature
Setting temperature range
5°C - 37°C by 0.5°C step (or 41°F - 99°F by 0.5°F step)
Proportional Integral regulation
Regulation characteristics
(adjustable see installation menu) Cycle
Anti-short cycle: 3min in OFF, 2min in ON.
Electrical Protection
Class II - IP30
Power Supply
2 x 1,5V (AAA) ALKALINE type
Battery operated life
~ 2 years
Radio frequency
868 MHz, <10mW.
CE Directives
R&TTE 1999/5/EC
Your product has been designed in
EMC 2004/108/EC
conformity with the European Directives.
RoHS 2011/65/EU
START UP
Use the switch on the right side of the thermostat to power on or power off the heating.
Be careful! In this mode, your installation can freeze.
The setting temperatures are kept in memory indefinitely.
MODE DESCRIPTION
Use
key to change the mode in the Operating mode menu
COMFORT operating mode:
Force comfort temperature operation indefinitely. By pressing keys
blink and can be adjusted. The measured temperature
REDUCED operating mode:
Force reduced temperature operation indefinitely. By pressing
blink and can be adjusted. The measured temperature
RADIO CONFIGURATION MODE
To assign (*) the RF thermostat with the receiver you must put the receiver in "RF init" mode
(please refer to the receiver leaflet).
key during 5 sec, when the display (rF ""). The thermostat sends its configu-
After you have just Press
ration address by radio signal.
When the receiver is configured, Press
* (In this mode the thermostat should be near the receiver)
The manufacturer herewith
declares that the device
WFHT THER LCD RF 868
complies with the basic
requirements and all other
relevant regulations of the
1999/5/CE directive.
This thermostat can be
Optional external
used in all EU and
sensor 10K at 25°C
EFTA countries.
or
the comfort temperature starts to
reappears after a few seconds.
or
keys the comfort temperature starts to
reappears after a few seconds.
key to return to user menu.
GB
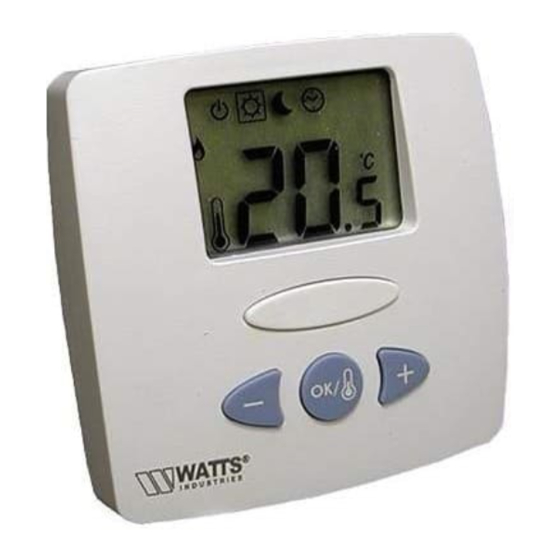
DISPLAY
1: Operating mode menu.
2: Heater indication.
3: Cooler indication.
4: Batteries weak.
5: If lit-up 6 displays the measured temperature
6: Measured temperature or setting temperature.
7: °C or °F indicator.
8: Moving bars when transmitting a radio signal
Or Title for installation Parameters (rF, J0,CLr...)
INSTALLATION PARAMETERS MENUS
Press the
key during 5 seconds, then use
Press
to toggle the parameter setting or edit the value.
If the value starts to blink you can use
Press
and
keys at the same time to reset this value to the factory default value. Once you have adjusted the
value press
to validate this parameter value.
rF:
Radio configuration mode (see the corresponding section).
Press (OK) on this parameter to exit the parameters menu end come back to the main display.
JO: Type of degrees displayed
°C Celsius
°F Fahrenheit
J1:
Operating mode:
Hot for heating application
CLd for cooling application
J5: Anti-lock-braking function of the pump when the pump hasn't worked on a particular day, start it up for one minute each day:
Pmp Function activated
no Function deactivated
J6: Selection of the sensor used for the regulation:
Air: Room sensor only or room sensor with floor limitation if the external sensor is connected.
Flr: External sensor only without limitations.
A0: Calibration of the internal sensor
(The calibration must be done after 12Hours working with the same setting temperature)
- To check the temperature in the room, put a thermometer at 1.5m distance to the floor in the concerned room and wait 1
hour to be sure that the thermometer shows the correct temperature. Then you can enter the value saw on the thermome-
ter with (-◄) or (►+) keys.
F0: Calibration of the external sensor.
The calibration must be done same as described above if the external sensor is connected and used like an external ambi-
ance sensor.
If the external sensor is used as floor sensor, the thermometer should be put on the floor.
FL: Lower limitation of the floor temperature. Only effective if the external sensor is connected and selected:
18°C Adjustable From 5°C to „FH"
FH: Upper limitation of the floor temperature. Only effective if the external sensor is connected and selected:
35°C Adjustable From „Fl" to 37°C
J7: Selection of regulation type:
rEg: Proportional band (PWM)
hys: Static differential of 0.3°K
CY: Proportional Integral regulation time cycle
value in minutes:
15 slow systems adapted to the regulation of actuators.
On: Anti short cycle time ON:
2mn : Minimum time ON
Of: Anti short cycle time OFF:
2mn : Minimum time Off
Bp: Value of the proportional band in °C:
2.0 °C Adjustable 1°C to + 7°C
Increase the value if the temperature in the room is unstable.
Cp: Value of the compensation in °C:
2.0°C Adjustable 1°C to 8°C
* This value must be adjusted by a specialist.
Clr: All parameters are reloaded with default setting values.
End : Exit.
1
2
3
4
5
or
keys to select the installation parameter to be adjusted.
or
keys to adjust this value.
Default value & other possibilities
8
7
6
PPLIMW01332Ca

Verwandte Anleitungen für Watts WFHTRF 010


Inhaltszusammenfassung für Watts WFHTRF 010
- Seite 2 BEDIENUNGSANLEITUNG ANZEIGE Elektronischer Funk-Thermostat mit Digitalanzeige WFHTRF 010 (20433) 1: Betriebsartenanzeige 2: Anzeige Heizen 3: Anzeige Kühlen Hiermit erklärt der Hersteller, dass sich 4: Batterieanzeige das Gerät WFHT THER LCD RF 868 in 5: 6-stufige Temperaturanzeige Übereinstimmung mit den grundlegenden...
- Seite 4 60mm NTC 10k 31mm (25°C) 80mm NTC 10k (25°C) CLIC 1.5V AAA ALKALINE...