Herunterladen Inhalt Inhalt Diese Seite drucken
Airzone EASYZONE AZCE6THINKRB Installationsanleitung

Airzone EASYZONE AZCE6THINKRB Installationsanleitung

Vorschau ausblenden Andere Handbücher für EASYZONE AZCE6THINKRB:
Inhaltsverzeichnis

Werbung

Verfügbare Sprachen
  • DE

Verfügbare Sprachen

  • DEUTSCH, seite 113
Quick Installation Guide
EASYZONE
Español
English
Français
Italiano
Português
Deutsch
P d r a o b p il C
u N e g a
r e b m

Werbung

Inhaltsverzeichnis
loading

Inhaltszusammenfassung für Airzone EASYZONE AZCE6THINKRB

  • Seite 1 Quick Installation Guide Español English Français EASYZONE Italiano Português Deutsch P d r a o b p il C u N e g a r e b m...
  • Seite 3: Inhaltsverzeichnis

    ÍNDICE Precauciones y política medioambiental ......................................4 Precauciones ................................................4 Política medioambiental............................................4 Requisitos generales ..............................................5 Elementos del sistema ..............................................6 Central del sistema Innobus Pro6 (AZCE6IBPRO6) ..................................6 Características técnicas ........................................... 6 Pasarela de comunicación Daikin (AZX6GTCDA1) ..................................7 Características técnicas ...........................................
  • Seite 4: Precauciones Y Política Medioambiental

    Para acceder a toda la documentación técnica, autodiagnósticos, preguntas frecuentes, vídeos de montaje y configuración del sistema y certificados, acceda al apartado de Productos de la web Myzone: myzone.airzone.es/productos/ Para acceder a nuestra declaración de conformidad, consulte: http://doc.airzone.es/producto/Gama_AZ6/Airzone/Certificados/Declarat ion_of_conformity_AZ6.pdf...
  • Seite 5: Requisitos Generales

    Realice todas las conexiones con ausencia total de alimentación. • Para la conexión de comunicación con el sistema, utilice el cable Airzone, cable formado por 4 hilos (2x 0.22 mm hilos trenzados y apantallados para la comunicación de datos y 2x0.5 mm hilos para la alimentación).
  • Seite 6: Elementos Del Sistema

    Comunicación con equipos de control integral de la instalación. • Comunicaciones con otros sistemas de control externo mediante bus de integración. Características técnicas Alimentación y consumo Bus de conexión Airzone Tipo de alimentación Nº de puertos 110 / 230 V Cable apantallado y trenzado...
  • Seite 7: Pasarela De Comunicación Daikin (Azx6Gtcda1)

    Funcionamiento TERMOSTATO INTELIGENTE BLUEFACE (AZCE6BLUEFACEC) Interfaz gráfico a color con pantalla capacitiva y acabado en acero y cristal, para el control de zona en un sistema Airzone. Alimentado a través de la central del sistema. Disponible en blanco y negro.
  • Seite 8: Características Técnicas

    Interfaz gráfico con pantalla de tinta de bajo consumo, botones capacitivos y acabado en acero y cristal, para el control de zona en un sistema Airzone. Comunicaciones vía radio. Alimentado mediante batería de botón CR2450. Disponible en blanco y negro.
  • Seite 9: Termostato Lite Radio (Azce6Liter)

    TERMOSTATO LITE RADIO (AZCE6LITER) Termostato con botones capacitivos y acabado en acero y cristal, para el control de temperatura de zona en un sistema Airzone. Comunicaciones vía radio. Alimentado mediante batería de botón CR2450. Disponible en blanco y negro. Funcionalidades: •...
  • Seite 10: Plenum Motorizado Baja Silueta (Azez6Daisl)

    Configure los distintos termostatos del sistema (Ver apartados Configuración inicial y Configuración avanzada). Recuerde que los sistemas Airzone permiten la configuración de interfaces maestras y de zonas. Desde un termostato maestro podrá realizar un cambio de Modo; definir el grado de eficiencia con la función Eco-Adapt o seleccionar las velocidades en su equipo.
  • Seite 11: Montaje Del Sistema

    MONTAJE DEL SISTEMA MONTAJE EASYZONE Importante: Se recomienda aislar todas las partes metálicas del Easyzone que queden en contacto con el exterior para evitar la aparición de condensación. Recuerde: Las motorizaciones se encuentran numeradas del siguiente modo: MONTAJE A UNIDAD INTERIOR Sitúe el Easyzone en la boca de impulsión del equipo y fíjelo a este mediante tornillos.
  • Seite 12: Montaje De Compuerta Bypass

    MONTAJE DE COMPUERTA BYPASS Mediante un golpe seco retire el área precortada de los laterales correspondiente al bypass. Mediante una cuchilla, retire el aislante que cubre la zona del bypass y descubra las ranuras de fijación del bypass. Encaje la compuerta de bypass en las ranuras y gire de izquierda a derecha hasta llevar al tope. Fije la compuerta bypass al plenum mediante un tornillo rosca-chapa (Ø: 3.9mm).
  • Seite 13: Sustitución Motor

    SUSTITUCIÓN MOTOR Desconecte el motor. Afloje el tornillo de fijación mediante una llave Allen nº3 y retire el motor de la compuerta. Coloque el nuevo motor de forma que coincida con el perno. Gire el motor hasta que coincida el segundo perno con el orificio para que la compuerta quede en la posición correcta. Inserte y apriete el tornillo de fijación.
  • Seite 14: Montaje Termostatos (Azce6Bluefacec / Azce6Thinkr / Azce6Liter)

    Localice la conexión P1 P2 en la unidad interior de Daikin (donde se conecta el termostato). Conecte la pasarela Airzone al puerto P1 P2 de la unidad interior Daikin, mediante el cable suministrado por Airzone. Alimente la unidad interior y el sistema Airzone. Compruebe los LEDs de la pasarela (ver apartado Autodiagnóstico).
  • Seite 15: Montaje Del Sistema

    1.- Conexión de los termostatos Si su termostato es cable, conéctelo en cualquiera de las 3 bornas del bus de conexión Airzone. La conexión se puede realizar tanto en modo bus como en estrella. Utilice cable Airzone de 2x0,5+2x0,22 mm .
  • Seite 16: Reset Del Sistema

    En el cableado de alimentación externo del sistema deberá incorporarse, según la reglamentación local y nacional pertinente, un interruptor principal u otro medio de desconexión que tenga una separación constante en todos los polos. El sistema se reiniciará automáticamente si se apaga la alimentación principal.
  • Seite 17 IMPORTANTE: Recuerde no tener más de un canal abierto en la misma instalación de forma simultánea, puede ocasionar asociaciones erróneas. Inicie la búsqueda de canal Radio, para ello pulse Airzone para comenzar la búsqueda. Compruebe que la cobertura es óptima (mínimo 30%) y confirme.
  • Seite 18: Termostato Lite

    Think Importante: Utilice para confirmar y para volver atrás en el caso de que se encuentre en submenús. TERMOSTATO LITE Importante: Para realizar la configuración del termostato Lite debe retirarlo de la base. Una vez configure los microswitch colóquelo nuevamente en su base. Canal radio (solo para termostatos radio) Abra el canal de asociación radio.
  • Seite 19: Reset Termostato Lite

    COMPROBACIÓN DE CONFIGURACIÓN INICIAL Compruebe los siguientes ítems: Comunicación equipo-Sistema: Configure el sistema Airzone en un modo de funcionamiento distinto de Stop y encienda la zona generando demanda en la misma. Verifique que el modo impuesto en el termostato maestro aparece en el termostato de la unidad interna y que la temperatura de consigna cambia en el mismo.
  • Seite 20: Regulación De Caudal

    REGULACIÓN DE CAUDAL Importante: Comience el ajuste de caudal desde las compuertas centrales hasta finalizar en la compuerta nº1. AJUSTE DE CAUDAL (REG) Encienda y genere demanda en todas las zonas para abrir todas las compuertas. Apague la zona/compuerta que vaya a ajustar. Ajuste la apertura máxima deseada con la palanca REG (I/II/III/IV) Encienda la zona y compruebe que el caudal es correcto.
  • Seite 21: Configuración Avanzada

    CONFIGURACIÓN AVANZADA Para acceder al menú de configuración avanzada del Blueface y del termostato Think siga los siguientes pasos: Blueface Pulsación larga Think Pulsación larga Pulsación corta Pulsación larga Dentro de este menú podrá actuar sobre parámetros de sistema y de zona. PARÁMETROS DE SISTEMA •...
  • Seite 22: Parámetros De Zona

    Estándar: el sistema modifica la velocidad en función del número de zona. Silencio: trabaja a una velocidad menor que en Estándar para favorecer la reducción de ruido. Mínimo: trabaja a velocidad mínima, independientemente del número de zonas. • Canal radio. Permite activar/desactivar el canal de asociación radio del sistema. •...
  • Seite 23: Autodiagnóstico

    Parpadeo Verde Transmisión de datos del bus domótico Parpadeo Rojo Actividad de la central Parpadeo Verde Transmisión de datos del bus de conexión Airzone Parpadeo Rojo Recepción de datos del bus de conexión Airzone Parpadeo Verde On/Off máquina Parpadeo Verde...
  • Seite 24: Termostatos Blueface Y Think (Azce6Bluefacec / Azce6Thinkr)

    TERMOSTATOS BLUEFACE Y THINK (AZCE6BLUEFACEC / AZCE6THINKR) Significado Error 1 Error de comunicaciones con la central Sonda de temperatura en circuito abierto Error 5 Error 6 Sonda de temperatura en cortocircuito Error 8 Termostato Lite no encontrado Error 9 Error de comunicaciones pasarela-sistema Error 11 Error comunicaciones pasarela-máquina TERMOSTATO LITE RADIO (AZCE6LITER)
  • Seite 25 CONTENTS Warnings and environmental policy ........................................26 Precautions ................................................26 Environmental policy ............................................26 General requirements .............................................. 27 System elements ............................................... 28 Innobus Pro6 main control board (AZCE6IBPRO6) ..................................28 Technical specs .............................................. 28 Daikin communication gateway (AZX6GTCDA1) ..................................29 Technical specs ..............................................
  • Seite 26: Warnings And Environmental Policy

    Those breaking the law or by-laws will be subject to such fines and measures as are laid down in environmental protection legislation. Access all our technical documents and the self-diagnosis section, check the most FAQs, certificates and watch our videos at: myzone.airzone.es/products/ Access our declaration of conformity at: http://doc.airzone.es/producto/Gama_AZ6/Airzone/Certificados/Declarat ion_of_conformity_AZ6.pdf...
  • Seite 27: General Requirements

    Use an independent circuit from the controlled system for the power supply. • Once the Airzone system is configured, verify that the static pressure of the duct system complies with the air ent if you need to modify this parameter).
  • Seite 28: System Elements

    Communication with units of integral control of the installation. • Communications with other external control systems through integration bus. Technical specs Power supply and consumption Airzone connection bus Type of power supply Nº of ports 110 / 230 V Shielded twisted pair...
  • Seite 29: Daikin Communication Gateway (Azx6Gtcda1)

    Gateway for the management of Daikin AC units compatible with Airzone control systems. Powered by the indoor unit. Assembly and connection on the AC unit bus of the enabled Airzone devices. Product developed and tested in collaboration with the manufacturer.
  • Seite 30: Technical Specs

    92x 92x15,85 mm WIRELESS THINK THERMOSTAT (AZCE6THINKR) Graphic interface with low-energy e-ink screen and capacitive buttons for controlling zones in Airzone systems. Wireless communications. Powered by battery button CR2450. Finished in steel and glass. Available in white or black. Functionalities: •...
  • Seite 31: Wireless Lite Thermostat (Azce6Liter)

    WIRELESS LITE THERMOSTAT (AZCE6LITER) Thermostat with capacitive buttons for controlling the temperature of the zones in Airzone systems. Finished in steel and glass. Wireless communications. Powered by CR2450 button battery. Available in white and black. Functionalities: • On/off of the zone.
  • Seite 32: Low Profile Motorized Plenum (Azez6Daisl)

    Configure all the thermostats (see sections Initial configuration and Advanced settings). Remember that Airzone system allow you to configure master and zone thermostats (Master thermostats let you change operating modes, select the efficiency degree with the Eco-Adapt function or select the speed of the system).
  • Seite 33: System Assembly

    SYSTEM ASSEMBLY EASYZONE ASSEMBLY Important: It is recommended to insulate all the metal parts of Easyzone that are exposed to outdoor conditions in order to prevent condensation. Remember: The motorized elements are numbered the following way: ASSEMBLY TO INDOOR UNIT Place the Easyzone in the pressure port of the unit and attach it to this using the screws.
  • Seite 34: Bypass Damper Assembly

    BYPASS DAMPER ASSEMBLY Sharply hit it to take away the pre-cut area of the sides corresponding to the bypass. Use a sharp blade to remove the insulation that covers the area of the bypass and uncover the mounting slots on the bypass.
  • Seite 35: How To Change The Actuator

    HOW TO CHANGE THE ACTUATOR Disconnect the actuator. Loosen the fixing screw using an Allen key (number 3) and remove the actuator from the damper. Fix the new actuator to fit in the bolt. Turn the actuator until it fits in the second bolt to guarantee the proper position of the damper. Insert and screw the fixing screw.
  • Seite 36: Thermostat Assembly (Azce6Bluefacec / Azce6Thinkr / Azce6Liter)

    THERMOSTAT ASSEMBLY (AZCE6BLUEFACEC / AZCE6THINKR / AZCE6LITER) Airzone thermostats are mounted on the wall through a support. It is recommended not to locate it more than 40 meters away from the main control board. To fix it to the wall, follow these steps: •...
  • Seite 37: System Assembly

    1.- Airzone thermostats If using a wired thermostat, connect it in one of the 3 Airzone connection bus terminals. The connection can be both a Bus connection or a star connection. Use (2x0.5+2x0.22 mm Airzone wire. For added security, secure the wires using the turrets.
  • Seite 38: Reset The System

    According to the current local and national regulations, it is mandatory to add a switch (or other element to disconnect the system) to the external supply wiring so that a constant separation between poles is guaranteed. The system will restart automatically if the supply is eventually turned off. Use an independent circuit from the controlled system for the power supply.
  • Seite 39 IMPORTANT: not to open more than one radio channel at the same time, it may alter the process. Start the radio channel search, to do so, press Airzone to start the search. Verify the range is correct (30% minimum) and confirm.
  • Seite 40: Lite Thermostat

    Think Important: Use to confirm a nd to return. LITE THERMOSTAT Important: To configure a Lite thermostat you must move it away from its base. Once the microswitches are configured, put it back in its original position. Setting wireless device (only available for wireless thermostat) Open the radio channel.
  • Seite 41: Lite Thermostat Reset

    IMPORTANT: not to open more than one radio channel at the same time, it may alter the process. Zone address Select the zone associated to the thermostat pulling up the microswitch of the corresponding zone. Associated outputs If required, select other control outputs associated to the zone. The address zone will be the one with a lower value. Other settings Configure other functionalities of the Lite thermostat from the advanced configuration menu of a Blueface thermostat (see section Advanced Settings, Zone parameters).
  • Seite 42: Flow Regulation

    FLOW REGULATION Important: Start adjusting the flow from the central dampers and finish off with damper 1. FLOW ADJUSTMENT (REG) Turn on and generate demand in all zones to open all the dampers. Turn off the zone/damper to be adjusted. Adjust the maximum opening you want with the REG lever (I/II/III/IV) Turn on the zone and check the flow is correct.
  • Seite 43: Advanced Settings

    ADVANCED SETTINGS To access the advanced configuration menu of the thermostat and Blueface Think follow the following steps: Blueface Press and hold Think Press and hold Press once Press and hold From this menu you can change the system and zone parameters. SYSTEM PARAMETERS •...
  • Seite 44: Zone Parameters

    Minimum: The system operates at minimum speed, irrespective of the number of zones. • Wireless module. It activates/deactivates the wireless association module of the system. • Information (only for Think thermostats). Displays information about: Zone: Firmware, zone, association, actuator o communications status. System: Firmware, configuration and information about the controllers.
  • Seite 45: Self-Diagnose

    Data reception from automation bus Blinking Green Data transmission from automation bus Blinking Main control board activity Blinking Green Data transmission from Airzone connection bus Blinking Data reception from Airzone connection bus Blinking Green AC unit On/Off Blinking Green Blinking...
  • Seite 46: Blueface And Think Thermostat (Azce6Bluefacec / Azce6Thinkr)

    BLUEFACE AND THINK THERMOSTAT (AZCE6BLUEFACEC / AZCE6THINKR) Meaning Error 1 Error of communication with main control board Open-circuit temperature probe Error 5 Error 6 Short-circuit temperature probe Error 8 Lite thermostat not found Error 9 Gateway-system communication error Error 11 Gateway-AC Unit communication error WIRELESS LITE THERMOSTAT (AZCE6LITER) Meaning...
  • Seite 47 SOMMAIRE Précautions et politique environnementale ...................................... 48 Précautions ................................................48 Politique environnementale ..........................................48 Prérequis générales ..............................................49 Éléments du système ..............................................50 Platine centrale Innobus Pro6 (AZCE6IBPRO6) ................................... 50 Caractéristiques techniques ........................................50 Passerelle de communication Daikin (AZX6GTCDA1) ................................51 Caractéristiques techniques ........................................
  • Seite 48: Précautions Et Politique Environnementale

    Produits de notre site web Myzone : myzone.airzonefrance.fr/produits/ Pour avoir accès à la déclaration de conformité, voir : http://doc.airzone.es/producto/Gama_AZ6/Airzone/Certificados/Declarat ion_of_conformity_AZ6.pdf essentielles et aux autres dispositions pertinentes de la directive 2014/53/EU.
  • Seite 49: Prérequis Générales

    Suivez les recommandations ci-dessous pour le positionnement des thermostats : • Coupez l'alimentation pour effectuer tout branchement. • Pour la connexion des éléments de communication au système, utilisez le câble Airzone : câble blindé et torsadé, de 4 fils (2 x 0,22 mm + 2 x 0,5 mm •...
  • Seite 50: Éléments Du Système

    Sortie de relais configurable comme ventilation mécanique (VMC) ou chaudière. • Gestion des passerelles de contrôle. • • Caractéristiques techniques Alimentation et consommation Bus de connexion Airzone Nombre de ports V max 110 / 230 V Câble torsadé et blindé 2 x 0,22 + 2x0,5 mm 250 mA...
  • Seite 51: Passerelle De Communication Daikin (Azx6Gtcda1)

    • Contrôle de jusqu'à 5 vitesses de manière automatique, permettant ainsi (généralement) un fonctionnement sans by-pass. • Réglage de la température de consigne en fonction des températures sélectionnées à l'aide des thermostats Airzone et de l'algorithme Eco-Adapt. • Lecture de la température de travail de l'unité.
  • Seite 52: Caractéristiques Techniques

    Caractéristiques techniques Alimentation et consommation Températures opérative De stockage 12 V De fonctionnement V max 145 mA Plage de température de consigne I max Précision de lecture ±0,1 ºC Consommation Stand-by 0,876 W 1,74 W ±0,1 ºC Consommation maximale Humidité relative Connection and communications ±4 % Type de câble...
  • Seite 53: Thermostat Lite Radio (Azce6Liter)

    Poids 184 g Dimensions (WxHxD) 92x 92x15,85 mm PLÉNUM MOTORISÉ STANDARD (AZEZ6DAIST) Le plénum motorisé standard Airzone inclut : Platine centrale du système. Passerelle de communication. Registres circulaires de 200 mm de diamètre. Système manuel de régulation de débit. Entrée pour la ventilation mécanique contrôlée (VMC), diamètre équivalent de 150 mm.
  • Seite 54: Plénum Motorisé Extra Plat (Slim) (Azez6Daisl)

    PLÉNUM MOTORISÉ EXTRA PLAT (SLIM) (AZEZ6DAISL) Le plénum motorisé extra plat Airzone inclut : Platine centrale du système. Passerelle de communication. Registres circulaires de 150 mm de diamètre. Système manuel de régulation de débit. Entrée pour la ventilation mécanique contrôlée (VMC), diamètre équivalent de 150 mm.
  • Seite 55: Montage Du Système

    MONTAGE DU SYSTEME MONTAGE DU EASYZONE Attention : Il est conseillé d'isoler toutes les parties métalliques de l'Easyzone qui sont en contact avec l'extérieur afin d'éviter la formation de condensation. Remarque : Les motorisations sont numérotées de la façon suivante : MONTAGE SUR L'UNITE INTERIEURE Placez l'Easyzone au niveau de la bouche de soufflage de l'unité...
  • Seite 56: Montage De Registre De By-Pass

    MONTAGE DE REGISTRE DE BY-PASS Donnez un coup sec sur la zone prédécoupée latérale qui correspond au by-pass puis retirez-la. À l'aide d'un cutter, retirez l'isolant qui recouvre la surface du by-pass ainsi que les rainures de fixation du by-pass. Encastrez le by-pass dans les rainures et tournez dans le sens horaire jusqu'à...
  • Seite 57: Remplacement Du Moteur

    REMPLACEMENT DU MOTEUR Débranchez le moteur. À l'aide d'une clé Allen nº 3, desserrez la vis et retirez le moteur du registre. Placez le nouveau moteur de sorte qu'il coïncide avec le boulon. Tournez le moteur jusqu'à ce que le deuxième boulon coïncide avec l'orifice afin que le registre soit dans la bonne position. Insérez et resserrez la vis de fixation.
  • Seite 58: Montage Du Thermostats (Azce6Bluefacec / Azce6Thinkr / Azce6Liter)

    Localisez la connexion P1 P2 dans l'unité intérieure Daikin. (Endroit où se branche le thermostat). Connectez la passerelle Airzone au port P1 P2 de l'unité intérieure Daikin au moyen d'un câble fourni par Airzone. Rétablir l'alimentation de l'unité intérieure et du système Airzone. Vérifiez l'état des LED de la passerelle (voir la section autodiagnostic).
  • Seite 59: Montage Du Système

    MONTAGE DU SYSTEME PLATINE CENTRALE INNOBUS PRO6 (AZCE6IBPRO6) Nº Description Bus de connexion Airzone Module radio Bus domotique Passerelle Daikin Sorties moteurs Entrée d'alarme (normalement fermée) Sonde température VMC / Chaudière Relais ON / OFF (marche-arrêt) Alimentation Module ON / OFF Attention : Pour le contrôle des entrées du module...
  • Seite 60: Réinitialisation Du Système

    Attention : Conformément à la réglementation locale et nationale pertinente, le câblage d'alimentation externe du système devra comprendre un interrupteur principal ou autre moyen de déconnexion avec une séparation constante de tous les pôles. Si l'alimentation principale est coupée, le système redémarrera automatiquement.
  • Seite 61 REMARQUE : N'oubliez pas ne pas avoir plus d'un canal radio ouvert dans la même installation de manière simultanée, cela peut entraîner des associations erronées. Commencez la recherche du module radio. Pour cela, appuyez sur Airzone pour commencer la recherche. Vérifiez que la couverture du réseau est optimale (30 % minimum) et confirmez.
  • Seite 62: Thermostat Lite

    Think Important : Utilisez pour confirmer et pour revenir en arrière lorsque vous vous trouvez dans un sous-menu. THERMOSTAT LITE Important : pour configurer le thermostat Lite, vous devez au préalable le retirer de son support. Une fois que les microswitchs ont été Configuration dispositif radio (disponible uniquement pour thermostat radio) Vous devez ouvrir le canal d'association radio.
  • Seite 63: Réinitialisation Du Thermostat Lite

    Vérifiez les points suivants : Communication unité-système : Configurez le système Airzone dans un mode de fonctionnement différent de Stop et allumez la zone en demande. Vérifiez que le mode imposé au thermostat principal apparaît sur le thermostat de l'unité...
  • Seite 64: Régulation De Débit

    REGULATION DE DEBIT Attention : Commencez par régler le débit des registres centraux puis finissez par le registre n REGULATION DE DEBIT (REG) Allumez et générez une demande dans toutes les zones pour ouvrir les registres. Éteignez la zone/le registre à réguler. Régler l'ouverture maximale souhaitée au moyen du levier REG (I/II/III/IV).
  • Seite 65: Configuration Avancée

    CONFIGURATION AVANCEE Pour accéder au menu de configuration avancée du Blueface et du thermostat Think, suivez les étapes ci-dessous : Blueface Appui prolongé Think Appui prolongé Appui prolongé Appuyer brièvement Dans ce menu, vous pourrez modifier les paramètres du système et zone. PARAMETRES DU SYSTEME •...
  • Seite 66: Paramètres De Zone

    Standard : Configuration par défaut. Le système adapte la vitesse en fonction du nombre de zone. Silence : Le système travaille à une vitesse inférieure à celle du mode Standard afin de privilégier la diminution du bruit. Minimum : Le système travaille à vitesse minimale, indépendamment du nombre de zones. •...
  • Seite 67: Autodiagnostic

    Vert Transmission de données au bus domotique Clignotement Rouge Activité de la platine centrale Clignotement Vert Transmission de données au bus de connexion Airzone Clignotement Rouge Réception de données du bus de connexion Airzone Clignotement Vert On / Off unité...
  • Seite 68: Thermostats Blueface Et Think (Azce6Bluefacec / Azce6Thinkr)

    THERMOSTATS BLUEFACE ET THINK (AZCE6BLUEFACEC / AZCE6THINKR) Signification Error 1 Erreur de communication avec la platine centrale Sonde de température en circuit ouvert Error 5 Error 6 Sonde de température en court-circuit Error 8 Error 9 Erreur de communication passerellle-système Error 11 Erreur de communication passerele-unité...
  • Seite 69 INDICE Precauzioni e politica ambientale ......................................... 70 Precauzioni ................................................70 Politica ambientale .............................................. 70 Requisiti generali ................................................ 71 Elementi del sistema ..............................................72 Scheda centrale Innobus Pro6 (AZCE6IBPRO6) ..................................72 Caratteristiche tecniche ..........................................72 Interfaccia di comunicazione daikin (AZX6GTCDA1) ................................73 Caratteristiche tecniche ..........................................
  • Seite 70: Precauzioni E Politica Ambientale

    Prodotti del web Myzone: myzone.airzoneitalia.it/prodotti/ Per accedere a la dichiarazione di conformità, consultare: http://doc.airzone.es/producto/Gama_AZ6/Airzone/Certificados/Declarat ion_of_conformity_AZ6.pdf Con il presente, Corporación Empresarial Altra, S.L., dichiara che AZEZ6DAIxxxxxxx soddisfa i requisiti di base e altre disposizioni...
  • Seite 71: Requisiti Generali

    Seguire rigorosamente le indicazioni esposte in questo manuale: • Il sistema deve essere installato da un tecnico qualificato. • Prima di installare il sistema Airzone, verificare che le unità da controllare siano state installate in base ai requisiti del costruttore e funzionano correttamente. • •...
  • Seite 72: Elementi Del Sistema

    Comunicazione con elementi di ulteriore controllo della installazione. • Comunicazione con altri sistemi di controllo esterni mediante bus di integrazione. Caratteristiche tecniche Alimentazione e consumo Bus di collegamento Airzone Tipo di alimentazione Nº porte 110 / 230 V Cable apantallado y trenzado...
  • Seite 73: Interfaccia Di Comunicazione Daikin (Azx6Gtcda1)

    TERMOSTATO INTELLIGENTE BLUEFACE (AZCE6BLUEFACEC) Interfaccia grafica a colori con schermo capacitivo e finitura in acciaio e vetro per il controllo di zona in un sistema Airzone, comunicazione tramite cavo. Alimentato tramite la scheda centrale del sistema e disponibile nei colori Bianco e Nero.
  • Seite 74: Caratteristiche Tecniche

    Interfaccia grafica con schermo monocromatico a basso consumo e tasti capacitivi con finitura in acciaio e vetro per il controllo di una zona in sistemi Airzone. Comunicazioni via cavo/radio. Alimentazione diretta dalla scheda elettronica centrale (cavo) o con batteria a bottone CR2450 (radio). Disponibile nei colori nero e bianco.
  • Seite 75: Termostato Lite Radio (Azce6Liter)

    TERMOSTATO LITE RADIO (AZCE6LITER) Termostato con tasti capacitivi e finitura in acciaio e vetro per il controllo della temperatura in un sistema Airzone. Comunicazioni via cavo/radio. Alimentazione diretta dalla scheda elettronica centrale (cavo) o con batteria a bottone CR2450 (radio). Disponibile nei colori nero e bianco.
  • Seite 76: Plenum Motorizzato Basso Profilo (Azez6Daisl)

    Configurare i vari termostati del sistema (vedi sezioni Configurazioni iniziali e Configurazioni avanzate). Ricordare che i sistemi Airzone permettono di configurare le interfacce maestre e di zona. Da un termostato maestro sarà possibile realizzare un cambio di Modo, definire il grado di efficienza con la funzione Eco-Adapt o selezionare le velocità...
  • Seite 77: Montaggio Del Sistema

    MONTAGGIO DEL SISTEMA MONTAGGIO EASYZONE Importante: Si consiglia di isolare tutte le parti metalliche di Easyzone in contatto con la parte esterna per evitare la formazione di condensa. Ricordare: Le motorizzazioni sono numerate nel seguente modo: INSTALLAZIONE A UNITÀ INTERNA Collocare Easyzone nella bocchetta di mandata dell'unità...
  • Seite 78: Installazione Della Serranda Di Bypass

    INSTALLAZIONE DELLA SERRANDA DI BYPASS Rimuovere la zona pretagliata delle parti laterali corrispondente al bypass con un colpo secco. Rimuovere l'isolante che ricopre la zona del bypass con un coltello e scoprire le fessure di fissaggio del bypass. Collocare la serranda di bypass nelle fessure e girare da sinistra verso destra fino al limite. Fissare la serranda di bypass al plenum con una vite autofilettante (Ø3,9 mm).
  • Seite 79: Sostituzione Del Motore

    SOSTITUZIONE DEL MOTORE Scollegare il motore. Allentare la vite di fissaggio con una brugola n. 3 e rimuovere il motore dalla serranda. Collocare il nuovo motore in modo che coincida con il perno. Girare il motore finché il secondo perno non coincide con il foro per posizionare la serranda in modo corretto. Inserire e stringere la vite di fissaggio.
  • Seite 80: Montaggio Termostati (Azce6Bluefacec / Azce6Thinkr / Azce6Liter)

    MONTAGGIO TERMOSTATI (AZCE6BLUEFACEC / AZCE6THINKR / AZCE6LITER) Il termostati di Airzone vengono montati in superficie mediante supporto. Si prega di ricordare che la distanza massima raccomandabile per questi dispositivi è di 40 metri. Per fissarli alla parete è necessario seguire le seguenti indicazioni: •...
  • Seite 81: Montaggio Del Sistema

    MONTAGGIO DEL SISTEMA SCHEDA CENTRALE INNOBUS PRO6 (AZCE6IBPRO6) Nº Descrizione Bus di collegamento Airzone Modulo radio Bus domotico Interfaccia di comunicazione Daikin Uscite del motore Ingresso dell'allarme (normalmente chiusa) Sonda temperatura VMC/Caldaia Relè On-Off AA Alimentazione Modulo ON/OFF (solo AZCE6IBPRO6) Importante: È...
  • Seite 82: Reset Del Sistema

    Nel cablaggio esterno di alimentazione del sistema dovrà essere inserito un interruttore principale o un altro mezzo di scollegamento dotato di una separazione costante in tutti i poli, secondo la regolamentazione locale o nazionale pertinente. Se l'alimentazione principale si spegne, il sistema si riavvierà...
  • Seite 83 IMPORTANTE: ricordare di non lasciare mai un canale aperto nella stessa installazione simultaneamente, poiché potrebbe provocare associazioni erronee. Iniziare la ricerca del canale radio premendo Airzone. Indirizzo zona Selezionare la zona associata a questo termostato. A ogni zona corrisponde un'uscita di controllo. In questo modo, ad esempio, la zona 1 controllerà...
  • Seite 84: Termostato Lite

    Think Importante: Utilizzare per confermare e per tornare indietro nel caso in cui l'utente si trovi nei sottomenu. TERMOSTATO LITE Importante: Per configurare il termostato Lite è necessario rimuoverlo dalla base. Una volta configurati i microswitch, collocarlo nuovamente nella sua base. Configurazioni dispositivi radio (disponible solo per termostatos radio) Aprire il canale radio per associare i termostati radio.
  • Seite 85: Reset Del Termostato Lite

    VERIFICA DELLE CONFIGURAZIONI INIZIALI Verificare i seguenti item: Comunicazione unità-sistema: configurare il sistema Airzone in un modo di funzionamento diverso da Stop e accendere la zona in regime di domanda della stessa. Verificare che il modo imposto nel termostato maestro compaia nel termostato dell'unità...
  • Seite 86: Regolazione Delle Portate

    REGOLAZIONE DELLE PORTATE Importante: Iniziare la regolazione della portata dalle serrande centrali fino a terminare nella serranda n. 1. REGOLAZIONE DELLA PORTATA (REG) Accendere tutte le zone in regime di domanda per aprire tutte le serrande. Spegnere la zona/serranda da regolare. Regolare l'apertura massima desiderata con la leva REG (I/II/III/IV).
  • Seite 87: Configurazioni Avanzate

    CONFIGURAZIONI AVANZATE Seguire le seguenti indicazioni per accedere al menu delle configurazioni avanzate del Blueface e del termostato Think: Blueface Tenere premuto Think Premere brevemente Tenere premuto Tenere premuto In questo menu è possibile agire sui parametri di sistema e di zona. PARAMETRI DI SISTEMA •...
  • Seite 88: Parametri Di Zona

    Standard: Configurazione predefinita. Il sistema modifica la velocità in funzione del numero di zone aperte. Silenzio: Il sistema lavora a una velocità inferiore che in modo Standard con lo scopo di ridurre il rumore Minimo: Il sistema lavora alla velocità minima disponibile, indipendentemente del numero di zone aperte. •...
  • Seite 89: Autodiagnosi

    Ricezione dati dal bus domotico Lampeggia Verde Trasmissione dati al bus domotico Lampeggia Rosso Attività della scheda Lampeggia Verde Trasmissione dati al bus di collegamento Airzone Lampeggia Rosso Ricezione dati dal bus di collegamento Airzone Lampeggia Verde On/Off macchina Lampeggia Verde...
  • Seite 90: Termostati Blueface E Think (Azce6Bluefacec / Azce6Thinkr)

    TERMOSTATI BLUEFACE E THINK (AZCE6BLUEFACEC / AZCE6THINKR) Significato Error 1 Errore di comunicazione tra termostato e scheda centrale Sonda di temperatura in circuito aperto Error 5 Error 6 Sonda di temperatura in cortocircuito Error 8 Termostato Lite non trovato Error 9 Errore di comunicazione interfaccia - sistema Error 11 Errore di comunicazione interfaccia - unità...
  • Seite 91 ÍNDICE Precauções e política ambiental ..........................................92 Precauções ................................................92 Política medioambiental............................................ 92 Requisitos gerais................................................. 93 Elementos do sistema ............................................... 94 Central do sistema Innobus Pro6 (AZCE6IBPRO6) ..................................94 Características técnicas ..........................................94 Gateway de comunicação Daikin (AZX6GTCDA1) ..................................95 Características técnicas ..........................................
  • Seite 92: Precauções E Política Ambiental

    Para acessar toda a documentação técnica, autodiagnósticos, perguntas frequentes, vídeos de montagem e configuração do sistema, certificados e a declaração de conformidade, acesse a secção de Produtos da web Myzone: myzone.airzone.es/productos/ Para acessar a declaração de conformidade, acesse a: http://doc.airzone.es/producto/Gama_AZ6/Airzone/Certificados/Declarat ion_of_conformity_AZ6.pdf...
  • Seite 93: Requisitos Gerais

    • Faça todas as conexões sem alimentação. • Para a conexão de comunicação com o sistema, utilize o cabo Airzone: cabo blindado e trançado, formado por 4 fios (2x0,22 mm + 2x0,5 mm •...
  • Seite 94: Elementos Do Sistema

    Comunicación con equipos de control integral de la instalación. • Comunicaciones con otros sistemas de control externo mediante bus de integración. Características técnicas Alimentaçao e consumo Barramento de conexão Airzone Tipo de alimentação Nº de portas 110 / 230 V Cabo blindado e trançado...
  • Seite 95: Gateway De Comunicação Daikin (Azx6Gtcda1)

    Armazenamento Funcionamento TERMOSTATO INTELIGENTE BLUEFACE (AZCE6BLUEFACEC) Interface gráfica em cores com ecrã capacitivo e acabamento em aço e cristal para o controlo de zona em um sistema Airzone. Alimentado através da central do sistema. Disponível em branco e negro. Funcionalidades: •...
  • Seite 96: Características Técnicas

    Interface gráfica com ecrã de tinta de baixo consumo, botões capacitivos e acabamento em aço e cristal para o controlo de zona em um sistema Airzone. Comunicação via rádio. Alimentado através de batería de bateria de botão CR2450. Disponível em branco e negro.
  • Seite 97: Termostato Lite Rádio (Azce6Liter)

    TERMOSTATO LITE RÁDIO (AZCE6LITER) Termostato com botões capacitivos e acabamento em aço e cristal para o controlo de temperatura de zona em um sistema Airzone. Comunicação vía rádio. Alimentado através de bateria de botão CR2450. Disponível em branco e negro.
  • Seite 98: Plenum Motorizado Baixo Perfil (Azez6Daisl)

    Configure os diferentes termostatos do sistema (Ver as secções Configuração inicial e Configuração avançada). Lembre-se de que os sistemas Airzone permitem a configuração de interfaces mestras e de zonas. A partir de um termostato mestre, poderá realizar uma troca de Modo, definir o grau de eficiência com a função Eco-Adapt ou selecionar as velocidades do seu equipamento.
  • Seite 99: Montagem Do Sistema

    MONTAGEM DO SISTEMA MONTAGEM EASYZONE Importante: Recomenda-se isolar todas as peças metálicas do Easyzone que ficam em contacto com o exterior para evitar condensação. Lembre-se: As motorizações estão numeradas do seguinte modo: MONTAGEM NA UNIDADE INTERIOR Posicione o Easyzone na boca de impulsão do equipamento e fixe-o com parafusos. Depois de fixar os parafusos, isole o encaixe de conexão para evitar a formação de condensação.
  • Seite 100: Montagem Da Comporta Bypass

    MONTAGEM DA COMPORTA BYPASS Com um golpe seco, retire a área pré-cortada das laterais correspondentes ao bypass. Com uma lâmina, retire o isolante que cobre a zona do bypass e descubra as suas ranhuras de fixação. Encaixe a comporta de bypass nas ranhuras e gire da esquerda para a direita até chegar ao limite. Fixe a comporta de bypass no plenum com um parafuso rosca-chapa (Ø3,9 mm).
  • Seite 101: Substituição Do Motor

    SUBSTITUIÇÃO DO MOTOR Desconecte o motor. Solte o parafuso de fixação com uma chave Allen nº 3 e retire o motor da comporta. Coloque o novo motor de forma que coincida com o prendedor. Gire o motor até que o segundo prendedor coincida com o orifício para que a comporta fique na posição correta. Insira e aperte o parafuso de fixação.
  • Seite 102: Montagem Termostatos (Azce6Bluefacec / Azce6Thinkr / Azce6Liter)

    Localize a conexão P1 P2 na unidade interior Daikin (onde o termostato é conectado). Conecte o gateway Airzone à porta P1 P2 da unidade interior Daikin com o cabo fornecido pela Airzone. Alimente a unidade interior e o sistema Airzone. Verifique os LEDs do gateway (consulte o secção de Autodiagnóstico).
  • Seite 103: Montagem Do Sistema

    MONTAGEM DO SISTEMA CENTRAL DO SISTEMA INNOBUS PRO6 (AZCE6IBPRO6) Nº Descrição Barramento de conexão Airzone Módulo de rádio Barramento domótico Gateway de comunicação Saída de motor Entrada alarme (normalmente fechada) Sonda temperatura VMC/Caldeira Relé arranque-paragem AA Alimentação Módulo On/Off Importante: Para controlo das entradas do módulo, utilizar cabo blindado.
  • Seite 104: Reset Do Sistema

    Importante: Um interruptor principal ou outro meio de desconexão que tenha uma separação constante em todos os polos deverá ser incorporado aos cabos de alimentação externa do sistema, de acordo com a regulamentação local e nacional pertinente. O sistema será reiniciado automaticamente caso a alimentação principal seja desligada.
  • Seite 105 IMPORTANTE: Lembre-se de não manter mais do que um canal aberto na mesma instalação simultaneamente, pois isso pode ocasionar associações incorretas. Inicie a pesquisa de canal Rádio. Para começá-la, pressione Airzone. Confirme a associação rádio. Verifique se a cobertura é ideal (mínimo 30%) e confirme.
  • Seite 106 Think Importante: Utilize para confirmar e para voltar atrás, caso se encontre nos submenus.
  • Seite 107: Termostato Lite

    VERIFICAÇÃO DA CONFIGURAÇÃO INICIAL Verifique os seguintes itens: Comunicação equipamento-sistema: Configure o sistema Airzone em um modo de funcionamento diferente de Stop e ligue a zona, gerando demanda nela. Verifique se o modo imposto no termostato mestre aparece no termostato da...
  • Seite 108: Regulação Do Fluxo

    Abertura-Fechamento de comportas e saídas de controlo: Ligue e gere demanda em todas as zonas. A seguir, apague e acenda cada zona para verificar se as saídas de controlo associadas estão corretas. Verifique se a pressão estática no equipamento de condutas está de acordo com as condições da rede de distribuição de ar onde está...
  • Seite 109: Configuração Avançada

    CONFIGURAÇÃO AVANÇADA Para acessar o menu de configuração avançada do Blueface e do termostato Think, siga os seguintes passos: Blueface Pressão longa no botão Think Pressão longa no botão Pressão longa no botão Pressão curta no botão Neste menu, poderá atuar sobre os parâmetros de sistema e de zona. PARÂMETROS DO SISTEMA •...
  • Seite 110: Parâmetros De Zona

    Padrão: el sistema modifica la velocidad en función del número de zona. Silêncio: trabalha com uma velocidade menor que em Padrão para favorecer a redução de ruído. Mínimo: trabalha com velocidade mínima, independentemente do número de zonas. • Canal rádio. Permite ativar/desativar o canal de associação rádio do sistema. •...
  • Seite 111: Autodiagnóstico

    Receção de dados do barramento domótico Pisca Verde Transmissão de dados do barramento domótico Pisca Vermelho Atividade da central Pisca Verde Transmissão de dados do barramento de conexão Airzone Pisca Vermelho Receção de dados do barramento de conexão Airzone Pisca Verde On/Off máquina Pisca Verde...
  • Seite 112: Termostatos Blueface Y Think (Azce6Bluefacec / Azce6Thinkr)

    TERMOSTATOS BLUEFACE Y THINK (AZCE6BLUEFACEC / AZCE6THINKR) Significado Error 1 Falha de comunicação entre termostato e a central do sistema Sonda de temperatura em circuito aberto Error 5 Error 6 Sonda de temperatura em curto-circuito Error 8 Termostato Lite não encontrado Error 9 Erro de comunicação gateway - sistema Error 11...
  • Seite 113 INHALTSVERZEICHNIS Vorsichtsmaßnahmen und Umweltrichtlinie ....................................114 Vorsichtsmaßnahmen ............................................114 Umweltrichtlinie ..............................................114 Allgemeine Anforderungen ..........................................115 Systemkomponenten ............................................. 116 Systemzentrale Innobus Pro6 (AZCE6IBPRO6) ..................................116 Technische daten ............................................116 Daikin-Kommunikations-gateway (AZX6GTCDA1) ................................. 117 Technische daten ............................................117 Intelligenter Blueface-Thermostat (AZCE6BLUEFACEC) ................................ 117 Technische daten ............................................
  • Seite 114: Vorsichtsmaßnahmen Und Umweltrichtlinie

    Zuwiderhandlungen unterliegen Sanktionen und Maßnahmen, die im Umweltschutzrecht festgelegt sind. Um Zugriff auf die gesamten technischen Unterlagen, Selbstdiagnosen, häufigen Fragen, Montage- und Konfigurationsvideos zu erlangen und zertifikate Myzone-Website: myzone.airzone.es/productos/ Um Zugriff auf die Konformitätserklärung, gehen Sie zum: http://doc.airzone.es/producto/Gama_AZ6/Airzone/Certificados/Declarat ion_of_conformity_AZ6.pdf Hiermit erklärt die Corporación Empresarial Altra, S.L., dass AZEZ6DAIxxxxxxx die grundlegenden Anforderungen und...
  • Seite 115: Allgemeine Anforderungen

    Stromkreis. • Wenn Sie das Airzone-System konfiguriert haben, prüfen Sie ob der statische Druck in der Rohrleitung den Vorgaben des Luftverteilungsnetzes entspricht, in dem es installiert ist (schlagen Sie im Herstellerhandbuch des Geräts nach, wenn Sie diesen Parameter ändern möchten).
  • Seite 116: Systemkomponenten

    Betrieb V max 24 / 48 V I max Mechanische Aspekte Schutzklasse IP 20 Gewicht 616 g Abmessungen (WxHxD) 195x180x55,5 mm Type Airzone Central V1.3 Licence 215562 Variable air volume system (without h/c coil) Application Heating Cooling Control accuracy (K)
  • Seite 117: Daikin-Kommunikations-Gateway (Azx6Gtcda1)

    Steuersystems. • Automatische Steuerung bis 5 Geschwindigkeiten, wobei generell der Betrieb ohne Bypass- Ventil möglich ist. • Anpassung der Solltemperatur je nach den an den Airzone-Thermostaten eingestellten Temperaturen und des Eco-Adapt- Algorithmus. • Auslesen der Arbeitstemperatur des Geräts. • Auslesen der Meldungen und Fehler des gesteuerten Geräts.
  • Seite 118: Technische Daten

    Abmessungen (WxHxD) 92x 92x15,85 mm THINK -FUNK-THERMOSTAT (AZCE6THINKR) Grafische Schnittstelle mit energiesparendem Tintendisplay, kapazitiven Drucktasten und Ausführung aus Stahl und Glas zur Zonensteuerung in einem Airzone-System. unkverbindungen. Stromversorgung über Knopfzellenbatterie CR2450. In Weiß und Schwarz lieferbar. Funktionen: • 6 Sprachen stehen zur Verfügung (Spanisch, Englisch, Französisch, Italienisch, Deutsch und Portugiesisch).
  • Seite 119: Lite-Funk-Thermostat (Azce6Liter)

    LITE-FUNK-THERMOSTAT (AZCE6LITER) Thermostat mit kapazitiven Drucktasten und Ausführung aus Stahl und Glas zur Temperatur- Zonensteuerung in einem Airzone-System. Funkverbindungen. Stromversorgung über Knopfzellenbatterie CR2450. In Weiß und Schwarz lieferbar. Funktionen: • Ein/Aus der Zone. • Steuerung der Solltemperatur in Schritten von 1 °C, bis zu höchstens ±3 °C.
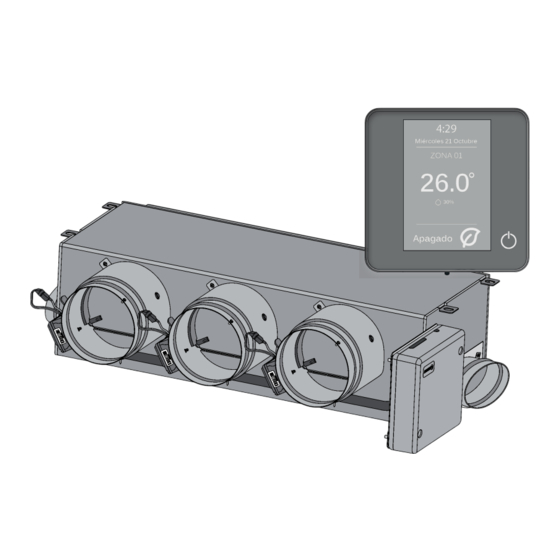
  • Seite 120: Motorisiertes Flachprofil-Plenum (Azez6Daisl)

    1140 x 210 x 444 Código de Plenum: AZEZ6DAISL01 [Größe] [Anzahl Ventile] SYSTEMINSTALLATION Beachten Sie die folgenden Schritte für eine sachgerechte Installation Ihres Airzone-Systems: Fü0hren Sie alle Anschlussarbeiten durch (siehe Abschnitt Montage und Zentralanschluss des Systems). Schließen Sie das Verbindungs-Gateway an.
  • Seite 121: Easyzone-Montage

    EASYZONE-MONTAGE EASYZONE-MONTAGE Wichtig: Es wird empfohlen, sämtliche Metallteile des Easyzone mit Außenkontakt zu isolieren, um das Auftreten von Kondensation zu vermeiden. Beachten Sie: Die Motorisierungen sind folgendermaßen nummeriert: MONTAGE AN INNENGERÄT Setzen Sie den Easyzone auf die Einlauföffnungen des Geräts und schrauben Sie ihn daran fest. Stellen Sie nach Anziehen der Schrauben sicher, dass der Anschlussstutzen zur Vermeidung von Kondensationsbildung isoliert ist.
  • Seite 122: Montage Des Bypassventils

    MONTAGE DES BYPASSVENTILS Entfernen Sie den vorgestanzten Bereich an den Seitenteilen für das Bypassventil mit einem kurzen Schlag. Entfernen Sie mit einem Messer die Isolierung, die den Bereich des Bypassventils bedeckt, und finden Sie die Befestigungsschlitze für das Bypassventil. Lassen Sie das Bypassventil in die Schlitze einrasten und drehen Sie von links nach rechts bis zum Anschlag. Befestigen Sie das Bypassventil an das Plenum mittels Blechschrauben (Ø3,9 mm).
  • Seite 123: Motorwechsel

    MOTORWECHSEL Trennen Sie den Motor ab. Lösen Sie die Befestigungsschraube mit einem Inbusschlüssel Nr. 3 und entfernen Sie den Ventilmotor. Setzen Sie den neuen Motor so ein, dass er mit dem Bolzen übereinstimmt. Drehen Sie den Motor bis der zweite Bolzen mit der Öffnung übereinstimmt, damit das Ventil in der richtigen Position platziert wird.
  • Seite 124: Montage Termostatos (Azce6Bluefacec / Azce6Thinkr / Azce6Liter)

    4) Schließen Sie die Stromversorgung des Innengeräts sowie des Airzone-Systems an. Überprüfen Sie die LEDs des Gateways (Siehe abschnitt Selbstdiagnose)). 5) Deaktivieren Sie den Rücksetzfunktion-Betrieb an den Daikin- äßen Betrieb des Airzone-Systems. Einstellungen > Settingslist IG > 1e-2-01. Bei Fragen schlagen Sie bitte in der Daikin- Anleitung BRC1E52A7 nach. P1 Rot P2 - Schwarz...
  • Seite 125: Montage Des Systems

    Wichtig: Zur Steuerung der Moduleingänge ist ein abgeschirmtes Kabel zu verwenden. 1.- Airzone-Thermostat Schließen Sie die Steuerelemente des Systems an eine der 3 Klemmen am Airzone Anschlussbus an . Der Anschluss kann sowohl im Bus-Modus als auch als Sternschaltung erfolgen. Befestigen Sie die Kabel zur Sicherheit an den Haltern der Zentrale.
  • Seite 126: System-Reset

    In die Verkabelung der externen Stromversorgung des Systems muss gemäß den entsprechenden lokalen und nationalen Vorschriften ein Hauptschalter oder sonstige Abschaltvorrichtung eingebunden werden, die eine konstante Trennung aller Pole aufweisen. Das System wird automatisch neu gestartet, wenn der Hauptstrom ausgeschaltet ist. Für die Stromversorgung des Systems nutzen Sie einen unabhängigen Stromkreis der zu steuernden Anlage.
  • Seite 127 Wählen Sie die gewünschte Sprache und den Standort. Folgende Sprachen stehen zur Verfügung: Spanisch, Englisch, Französisch, Italienisch, Deutsch, Portugiesisch. Starten Sie bei den Think-Funkthermostaten die Suche des Funkkanals: Konfiguration Funkgeräte Müssen Sie zunächst den Funkkanal öffnen. Drücken Sie dazu auf SW1; die LED D19 leuchtet dann rot ohne Unterbrechung.
  • Seite 128: Lite-Thermostate

    Think Wichtig: Verwenden Sie bitte zum Bestätigen und um zurückzugehen, falls Sie sich in Unt ermenüs befinden. LITE-THERMOSTATE Wichtig: Um den Lite-Thermostat zu konfigurieren, müssen Sie ihn von seiner Basis entfernen. Nachdem Sie die Mikroschalter konfiguriert haben, setzen Sie ihn wieder auf seine Basis. Konfiguration Funkgeräte (nur für Funk-Thermostate verfügbar) Müssen Sie zunächst den Funkkanal öffnen.
  • Seite 129: Reset Lite-Thermostat

    KONTROLLE DER ERSTKONFIGURATION Kontrollieren Sie die folgenden Punkte: Verbindung Gerät-System: Konfigurieren Sie das Airzone-System in einem anderen Betriebsmodus als Stopp und schalten Sie die Zone ein, indem Sie in ihr Bedarf erzeugen. Prüfen Sie, dass der vom Masterthermostat vorgegebene Modus auf dem Thermostat des Innengeräts erscheint und sich die Solltemperatur darin ändert.
  • Seite 130: Durchflussmengenregelung

    DURCHFLUSSMENGENREGELUNG Wichtig: Starten Sie die Durchflussmengenregelung an den zentralen Ventilen, bis Sie am Ventil Nr. 1 zum Abschluss kommen. DURCHFLUSSMENGENEINSTELLUNG (REG) Schalten Sie ein und erzeugen Sie Bedarf in allen Zonen, um alle Ventile zu öffnen. Schalten Sie die Zone/das Ventil aus, die/das Sie einstellen möchten. Stellen Sie die gewünschte maximale Öffnung mit dem Hebel REG ein (I/II/III/IV).
  • Seite 131: Erweiterte Konfiguration

    ERWEITERTE KONFIGURATION Folgen Sie diesen Schritten, um zum Menü Erweiterte Konfiguration des Blueface und des Think-Thermostats zu gelangen: Blueface Langes Drücken Think Kurzes Drücken Langes Drücken Langes Drücken In diesem Menü können Sie die System- und Zonenparameter einstellen. SYSTEMPARAMETER • Systemadresse.
  • Seite 132: Zonenparameter

    Leistung: Die Geschwindigkeit ist höher als im Standard, um die Durchflusssteigerung zu begünstigen. Standard: Voreinstellung. Das System ändert die Geschwindigkeit je nach Anzahl der Zonen. Schweigen: Die Geschwindigkeit ist niedriger als im Standard, um die Geräuschunterdrückung zu begünstigen. Minimal: Das System arbeitet mit minimaler Geschwindigkeit, unabhängig von der Anzahl der Zonen. •...
  • Seite 133: Selbstdiagnose

    SELBSTDIAGNOSE SYSTEMZENTRALE INNOBUS PRO6 (AZCE6IBPRO6) Bedeutung Datenempfang vom Haustechnikbus Blinken Grün Datenübermittlung vom Haustechnikbus Blinken Aktivität der Zentrale Blinken Grün Datenübermittlung vom Airzone Anschlussbus Blinken Datenempfang vom Airzone Anschlussbus Blinken Grün Ein/Aus Maschine Blinken Grün KWL-Kessel Blinken Grün Paketempfang über Funk Schaltet Grün...
  • Seite 134: Think- Und Blueface-Thermostate (Azce6Bluefacec / Azce6Thinkr)

    THINK- UND BLUEFACE-THERMOSTATE (AZCE6BLUEFACEC / AZCE6THINKR) Bedeutung Fehler 1 Kommunikationsstörungen zwischen Thermostat und Systemzentrale Temperatursonde in offenem Stromkreislauf Fehler 5 Fehler 6 Temperatursonde in Kurzschluss Fehler 8 Lite-Thermostat nicht gefunden Fehler 9 Kommunikationsfehler Gateway-System Fehler 11 Kommunikationsfehler Gateway-Maschine LITE-FUNK-THERMOSTAT (AZCE6LITER) Bedeutung Blinkt schnell rot Kommunikationsstörung Systemzentrale...
  • Seite 136 94573 Rungis - France Cormano Milano - Italia Teléfono: +34 902 400 445 Téléphone : +33 184 884 695 Telefono: +39 02 56814756 Fax: +34 902 400 446 Fax : +33 144 042 114 Fax: +39 02 56816158 http://www.myzone.airzone.es http://www.myzone.airzonefrance.fr http://www.myzone.airzoneitalia.it...

Inhaltsverzeichnis