Inhaltsverzeichnis
Werbung
Verfügbare Sprachen
Verfügbare Sprachen
Quicklinks
All manuals and user guides at all-guides.com
KombiSet aus schnurgebundenem Telefon und
Schnurlostelefon mit XLTasten
Kit téléphone filaire et téléphone sans fil avec grandes touches
Combinazione di telefono a cavo e telefono cordless con tasti XL
Combination set comprising cableconnected telephone and
cordless telephone with XLkeys
DCC632x
Combo
Bedienungsanleitung
Mode d'emploi
Istruzioni per l'uso
Operating Instructions
Werbung
Inhaltsverzeichnis
Fehlerbehebung

Verwandte Anleitungen für switel Combo DCC632 Serie


Inhaltszusammenfassung für switel Combo DCC632 Serie
- Seite 1 All manuals and user guides at all-guides.com KombiSet aus schnurgebundenem Telefon und Schnurlostelefon mit XLTasten Kit téléphone filaire et téléphone sans fil avec grandes touches Combinazione di telefono a cavo e telefono cordless con tasti XL Combination set comprising cableconnected telephone and cordless telephone with XLkeys DCC632x Combo...
- Seite 2 All manuals and user guides at all-guides.com Bedienungsanleitung ....Mode d'emploi ..... . . Istruzioni per l'uso .
-
Seite 3: Inhaltsverzeichnis
Inhaltsverzeichnis All manuals and user guides at all-guides.com Allgemeine Hinweise ......Sicherheitshinweise ......Erste Schritte . -
Seite 4: Allgemeine Hinweise
Allgemeine Hinweise All manuals and user guides at all-guides.com 1 Allgemeine Hinweise Vor der Erstbenutzung Danke, dass Sie sich für den Kauf dieses neuen schnurlosen Digitaltelefons entschieden haben. Bestimmungsgemäße Verwendung: Dieses Produkt dient dem Innenanschluss an eine analoge Telefonleitung. Die Ausführung dieses Produkts entspricht den Richtlinien der digitalen, verbesserten schnurlosen Telekommunikation (DECT). -
Seite 5: Signalwörter Und Symbole
Allgemeine Hinweise All manuals and user guides at all-guides.com 1.2 Signalwörter und Symbole Symbol Signalwort Bedeutung Warnung Warnung vor schweren Verletzungen oder Todesgefahren, falls die gegebenen Informationen nicht befolgt werden. Vorsicht Warnung vor leichten Verletzungsgefahren, falls die gegebenen Informationen nicht befolgt werden. Keine Vorsicht Risiko, Material zu beschädigen oder Umwelt zu belasten. -
Seite 6: Sicherheitshinweise
Sicherheitshinweise All manuals and user guides at all-guides.com 2 Sicherheitshinweise Bei der Benutzung elektrischer Geräte sind stets die folgenden grundsätzlichen Sicherheitshinweise zu berücksichtigen. Die folgenden Sicherheitshinweise zur ordnungsgemäßen Verwendung des Geräts sind genau zu beachten. Es ist sich mit allen Funktionen des Geräts vertraut zu machen. Benutzerhandbuch an einem sicheren Ort in der Nähe des Geräts aufbewahren und bei Bedarf anderen Benutzern zugänglich machen. - Seite 7 Sicherheitshinweise All manuals and user guides at all-guides.com Explosionsgefahr! Warnung: Verletzungsgefahr durch Explosion! Besondere Achtsamkeit ist bei Kindern geboten! Einwegbatterien bzw. Akkus niemals in ein Feuer werfen! Geräte nicht in einer explosionsgefährdeten Umgebung benutzen! Explosionsgefahr! Warnung: Verletzungsgefahr durch Vergiftung! Besondere Achtsamkeit ist bei Kindern geboten! Akkus für Kinder unzugänglich aufbewahren.
-
Seite 8: Erste Schritte
Erste Schritte All manuals and user guides at all-guides.com 3 Erste Schritte 3.1 Verwenden dieses Benutzerhandbuchs In diesem Benutzerhandbuch kommt bei der Erläuterung von Anweisungen die folgende Verfahrensweise zum Einsatz: Text ….. MOBILTEIL Zu betätigende Taste Auf dem Display angezeigter Text 3.2 Installieren der Basisstation Basisstation wie folgt installieren: Netzadapter zuerst an der Basisstation anschließen und erst dann in eine Netzsteckdose stecken. -
Seite 9: Wandmontage
Erste Schritte All manuals and user guides at all-guides.com 3.3 Ladestation des Mobilteils Stecker des Netzadapters in die Steckdose einführen. - 3B Ladestation - A. Netzadapter mit Kabel 3.4 Mobilteil Achtung: Verletzungsgefahr durch Explosion! Nur die mitgelieferten Akkus oder Akkus des gleichen Typs verwenden. -
Seite 10: Anzeige Des Akkuladezustands
Erste Schritte All manuals and user guides at all-guides.com 3.6 Anzeige des Akkuladezustands Das Mobilteil funktioniert bei einem niedrigen Akkuladezustand nicht mehr ordnungsgemäß. Auch wenn die Akkus vollständig entladen sind, zeigt die Akkuladeanzeige an, wenn das Mobilteil nur für eine kurze Dauer auf die Basisstation gelegt wird, dass die Akkus vollständig geladen sind. Da dies jedoch nicht zutreffend ist, verschlechtert sich die Akkuleistung sehr schnell. -
Seite 11: Display Des Mobilteils
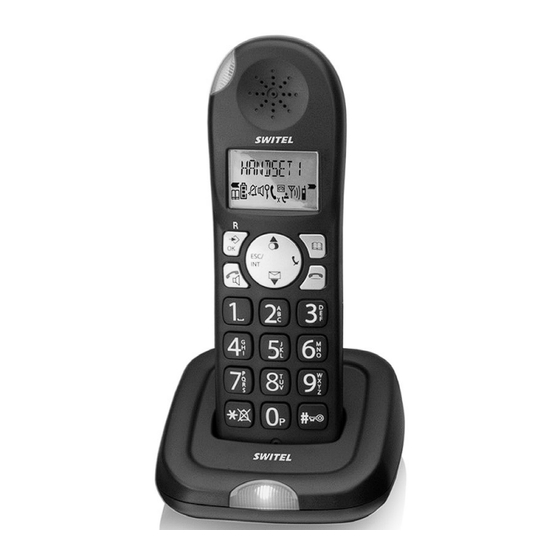
Erste Schritte All manuals and user guides at all-guides.com 31. Lautsprecher 32. Hörerhalterung für Wandmontage 33. Haltevorrichtung: zum kurzzeitigen Ablegen des Hörers während eines Anrufs, bei Wandmontage Ladestation 34. LED: Aufladevorgang des Mobilteils. 3.8 Display des Mobilteils MOBILTEIL X X = Mobilteilnummer Weitere Rufnummern oder nach Weitere Rufnummern oder nach links durch das Menü... -
Seite 12: Display Der Basisstation
Erste Schritte All manuals and user guides at all-guides.com 3.9. Display der Basisstation Weitere Rufnummern oder nach links Weitere Rufnummern oder nach rechts durch das Menü blättern durch das Menü blättern Klingelton aus Neue Sprachnachricht CLIP Neue Rufnummern in der Anrufliste Positionsnummer in der Anruferliste Telefonbucheinträge finden oder Freisprechbetrieb aktiviert... -
Seite 13: Verwenden Der Alphanummerischen Tasten
Erste Schritte All manuals and user guides at all-guides.com Basisstation TELEFONBUCH RUFTON EXTERN INTERN LAUTSTARKE TASTENTON SPRACHE BASIS ANRUF TYP FLASH PIN NUMMER DATUM/UHR FORMAT MT ABMELDEN RUCKSET 3.11 Verwenden der alphanummerischen Tasten Text kann mit den alphanummerischen Tasten eingegeben werden. Um einen Buchstaben auszuwählen, die entsprechende alphanummerische Taste betätigen. -
Seite 14: Benutzen Des Telefons
Benutzen des Telefons All manuals and user guides at all-guides.com 4 Benutzen des Telefons Information: Dieser Abschnitt beschreibt nur die Funktion der Basisstation! Informationen zur Benutzung des Mobilteils befinden sich in Abschnitt „5 Benutzen des schnurlosen Mobilteils“. 4.1 Einstellen der Display-Sprache 1 Menü/OK-Taste betätigen. -
Seite 15: Wahlwiederholung Der Zuletzt Angerufenen Rufnummer
Benutzen des Telefons All manuals and user guides at all-guides.com 3 Hörer auflegen oder erneut die Freisprechtaste betätigen, um den Anruf zu beenden. ODER 1 Rufnummer eingeben. 2 Hörer abheben oder die Freisprechtaste betätigen. 3 Hörer auflegen oder erneut die Freisprechtaste betätigen, um den Anruf zu beenden. -
Seite 16: Telefonbuch
Benutzen des Telefons All manuals and user guides at all-guides.com 4.7 Einstellen der Sprecher- und Hörerlautstärke 1 Lautstärketaste während eines Telefonats betätigen. 2 Die Lautstärke ist in 5 Stufen einstellbar. 4.8 Aktivieren und Deaktivieren der Tastentöne 1 Menü/OK-Taste betätigen. 2 „TASTENTON“ auswählen und bestätigen. 3 „EIN“... -
Seite 17: Einstellen Des Internen/Externen Klingeltons
Benutzen des Telefons All manuals and user guides at all-guides.com 5 Mit OK bestätigen oder die ESC-Taste betätigen, um zurückzugehen. 4.10 Kurzwahltasten In der Basisstation können 3 Rufnummern unter den Kurzwahltasten M1, M2 und M3 (jeweils mit bis zu 24 Zeichen ) gespeichert werden. Belegen der Kurzwahltasten (M1 - M2 - M3) 1 Eine der Kurzwahltasten betätigen. -
Seite 18: Einstellen Des Wählmodus
Benutzen des Telefons All manuals and user guides at all-guides.com 4.13 Einstellen des Wählmodus Es gibt 2 Wählmodi für die Telefonverbindung: Mehrfrequenzwahlverfahren (MFV)/Tonwahl (am häufigsten) Impulswahlverfahren (IWV) ist nur notwendig, wenn dieses Gerät mit einer älteren Telefonanalage betrieben wird. 1 Menü/OK-Taste betätigen. 2 „BASIS“... - Seite 19 Benutzen des Telefons All manuals and user guides at all-guides.com Wichtig: Die Anruferkennung (CLIP) funktioniert nur, wenn diese Funktion für die Telefonleitung aktiviert ist. Telefongesellschaft kontaktieren, um weitere Informationen zu erhalten. Rufnummer und Name des letzten Anrufers werden auf dem Display angezeigt. Falls die Rufnummer länger als 12 Zeichen ist, können mit der Taste die fehlenden Zahlen angezeigt werden.
-
Seite 20: Auffinden Des Mobilteils (Ruffunktion)
Benutzen des Telefons All manuals and user guides at all-guides.com 4.17 Tätigen eines internen Anrufs auf einem Mobilteil und Weiterleiten eines Anrufs auf ein schnurloses Mobilteil Anrufe können von der Basisstation auf ein Mobilteil weitergeleitet werden; es kann zeitgleich mit dem externen Teilnehmer und einem zweiten Teilnehmer auf dem schnurlosen Mobilteil gesprochen werden (Telefonkonferenz). -
Seite 21: Benutzen Des Schnurlosen Mobilteils
Benutzen des schnurlosen Mobilteils All manuals and user guides at all-guides.com 5 Benutzen des schnurlosen Mobilteils Information: Dieser Abschnitt beschreibt nur die Funktion des schnurlosen Mobilteils! Informationen über die Benutzung der Basisstation befinden sich in Abschnitt „4 Benutzen des Telefons“. 5.1 Ändern der Sprache 1 Menü/OK-Taste betätigen. -
Seite 22: Eingehende Anrufe
Benutzen des schnurlosen Mobilteils All manuals and user guides at all-guides.com 3 Mit der Auflegetaste den Anruf beenden. 5.3 Eingehende Anrufe Wenn ein eingehender Anruf empfangen wird, klingeln das Mobilteil und die Basisstation und die LED der „Optischen Anrufsignalisierung“ blinkt auf dem Mobilteil und der Basisstation. 1 Verbindungstaste betätigen, um den Anruf anzunehmen. -
Seite 23: Tastensperre
Benutzen des schnurlosen Mobilteils All manuals and user guides at all-guides.com 5 Klingelton (1-9) auswählen und bestätigen. Klingeltonlautstärke des Mobilteils 1 Menü/OK-Taste betätigen. 2 „MOBILTEIL“ auswählen und bestätigen. 3 „RUFTON“ auswählen und bestätigen. 4 „LAUTSTARKE“ auswählen und bestätigen. 5 Gewünschte Lautstärke auswählen (Aus, 1-5) und bestätigen. Wichtig: Die Klingeltonlautstärke jedes einzelnen Mobilteils kann mit der EIN/AUS-Taste des Klingeltons im Bereitschaftsmodus ein- oder ausgeschaltet werden. - Seite 24 Benutzen des schnurlosen Mobilteils All manuals and user guides at all-guides.com 5.12 Telefonbuch Es können 50 Einträge im Telefonbuch gespeichert werden. Namen können bis zu 16 Zeichen und Rufnummern bis zu 24 Zeichen lang sein. Hinzufügen eines neuen Telefonbucheintrags 1 Telefonbuchtaste betätigen. 2 Mit OK zweimal bestätigen.
-
Seite 25: Anruferkennung (Clip)
Benutzen des schnurlosen Mobilteils All manuals and user guides at all-guides.com 5 „LOESCHEN“ auswählen, um den aktuellen Telefonbucheintrag zu löschen und anschließend bestätigen. ODER 6 „ALLE LOESCH“ auswählen, um alle Telefonbucheinträge zu löschen und anschließend bestätigen. 7 Erneut bestätigen oder die ESC-Taste betätigen, um den Vorgang zu überspringen. -
Seite 26: Zurücksetzen Des Mobilteils Auf Werkseinstellungen
1 Menü/OK-Taste betätigen. 2 „MOBILTEIL“ auswählen und bestätigen. 3 „RESET“ auswählen und bestätigen. 4 PIN-Code der Basisstation eingeben (Werkseinstellung 0000). 5 Gerät kehrt zurück in den Bereitschaftsmodus. Werkseinstellungen: Name des Mobilteils SWITEL Hörerlautstärke Stufe 3 Tonlautstärke Stufe 3 Externer Klingelton Klingelton 8... -
Seite 27: Anmelden Und Abmelden Des Mobilteils
Anmelden und Abmelden des Mobilteils All manuals and user guides at all-guides.com 6 Anmelden und Abmelden des Mobilteils 6.1 Anmelden eines Mobilteils bei der DCC632x-Basisstation Auf einer Basisstation können 5 Mobilteile angemeldet werden. Jedes Mobilteil ist bei Lieferung bereits an der Basisstation angemeldet. Das Mobilteil muss nur angemeldet werden, wenn: das Mobilteil kürzlich von dieser Basisstation abgemeldet wurde (z. -
Seite 28: Auswählen Einer Basisstation
Anmelden und Abmelden des Mobilteils All manuals and user guides at all-guides.com 4 Interne Nummer des Mobilteils (1-5) eingeben, das abgemeldet werden soll, und bestätigen. Nachdem das Mobilteil erfolgreich abgemeldet worden ist, wechselt es zurück in den Bereitschaftsmodus. Ansonsten muss die Nummer des Mobilteils erneut eingegeben werden. -
Seite 29: Anrufweiterleitung Und Interne Anrufe
Anrufweiterleitung und interne Anrufe All manuals and user guides at all-guides.com 7 Anrufweiterleitung und interne Anrufe 7.1 Anrufweiterleitung und Telefonkonferenz während eines externen Anrufs 1 Während eines externen Anrufs INT-Taste betätigen und die Nummer des Mobilteils (1-5, "0" für die Basisstation) auswählen. Das andere Mobilteil klingelt. -
Seite 30: Abkürzungen Und Technische Begriffe
Abkürzungen und technische Begriffe All manuals and user guides at all-guides.com 8 Abkürzungen und technische Begriffe Übertragung der Rufnummern („Calling Line Identification Presentation“), CLIP Anzeige der Rufnummer des Anrufers auf dem Display des angerufenen Teilnehmers DECT Digitale, verbesserte schnurlose Telekommunikation (Digital Enhanced Cordless Telecommunication), europäischer Telekommunikationsstandard für digitale schnurlose Telefone ECO-Modus... -
Seite 31: Fehlerbehebung
Fehlerbehebung All manuals and user guides at all-guides.com 9 Fehlerbehebung Probleme Mögliche Ursache Lösung Keine Anzeige. Batterien sind nicht geladen. Überprüfen, ob beide Batterien ordnungsgemäß eingesetzt sind. Akkus aufladen. Kein Ton. Das Telefonkabel ist nicht Kabelanschluss überprüfen. ordnungsgemäß angeschlossen. Die Leitung ist von einem Warten bis das andere anderen Mobilteil belegt. -
Seite 32: Pflege
Pflege All manuals and user guides at all-guides.com 10 Pflege 10.1 Wartung Das Gerät benötigt keine Wartung. Von Zeit zu Zeit ist der Allgemeinzustand der Akkus zu überprüfen und durch neue Akkus des gleichen Typs zu ersetzen, wenn sich die Telefonleistung verschlechtert oder die Akkus auslaufen. -
Seite 33: Technische Daten
Technische All manuals and user guides at all-guides.com 11 Technische Daten Standard DECT (Digital Enhanced Cordless Telecommunications) GAP (Generic Access Profile ) Frequenzbereich 1.880 MHz bis 1.900 MHz Emissionen 10 mW (durchschnittliche Leistung pro Kanal) Reichweite Bis 300 m im Freien - bis 50 m in Gebäuden Mobilteil-Akkus: NiMh-Akkus, 2 x 1,2 V, 450 mAh Typ AAA Stromversorgung der Basisstation... -
Seite 34: Herstellergarantie
Herstellers. Sollte Ihr Gerät dennoch einen Defekt innerhalb der Garantiezeit aufweisen, wenden Sie sich bitte unter Vorlage Ihrer Kaufquittung ausschließlich an das Geschäft, in dem Sie Ihr SWITEL- Gerät gekauft haben. Alle Gewährleistungsansprüche nach diesen Bestimmungen sind ausschließlich gegenüber Ihrem Fachhändler geltend zu machen. - Seite 35 Table des matières All manuals and user guides at all-guides.com Informations générales ......Informations relatives à la sécurité .
-
Seite 36: Informations Générales
Informations générales All manuals and user guides at all-guides.com 1 Informations générales Avant la première utilisation Nous vous remercions d'avoir acheté ce nouveau téléphone numérique avec base filaire et combiné sans fil. Usage prévu : Cet appareil est prévu pour être raccordé en intérieur à une ligne téléphonique analogique. Cet appareil est fabriqué... -
Seite 37: Utilisation Prévue
Informations générales All manuals and user guides at all-guides.com 1.2 Termes et symboles de signalisation Symbole Terme de Signification signalisation Avertissement Situation éventuellement dangereuse entraînant des blessures corporelles graves ou la mort si vous ne respectez pas cette information. Attention Situation éventuellement dangereuse entraînant des blessures corporelles légères si vous ne respectez pas cette information. -
Seite 38: Informations Relatives À La Sécurité
Informations relatives à la sécurité All manuals and user guides at all-guides.com 2 Informations relatives à la sécurité Tenez compte des informations de base suivantes sur la sécurité lorsque vous utilisez des appareils électriques. Lisez attentivement les informations sur la sécurité ainsi que les renseignements concernant l'utilisation correcte du téléphone. - Seite 39 Informations relatives à la sécurité All manuals and user guides at all-guides.com Risque d'explosion : Avertissement : Risque de blessures dû à une explosion ! Soyez particulièrement prudent avec les enfants ! Ne jetez jamais des piles primaires ou rechargeables dans le feu. Ne vous servez pas de l'appareil dans un environnement explosif.
-
Seite 40: Premières Étapes
Premières étapes All manuals and user guides at all-guides.com 3 Premières étapes 3.1 Comment utiliser votre manuel de l'utilisateur La méthode suivante est utilisée dans ce manuel pour clarifier les instructions : Texte ….. COMBINE Appuyer sur la touche Texte qui s'affiche sur l'écran 3.2 Installer la base Raccorder la base comme suit : Raccordez l'adaptateur secteur premièrement à... -
Seite 41: Montage Mural
Premières étapes All manuals and user guides at all-guides.com 3.3 Chargeur du combiné Brancher l'adaptateur secteur dans la prise d'alimentation. - 3B Chargeur - A. Adaptateur secteur avec câble 3.4 Combiné Avertissement : Risque de blessures dû à une explosion ! Utilisez uniquement les piles rechargeables vendues avec ou des piles d'un type similaire. - Seite 42 Premières étapes All manuals and user guides at all-guides.com 3.6 Affichage de l'état des piles Le combiné ne marchera plus si les piles sont vides. Si vous placez brièvement le combiné sur le chargeur alors que les piles sont complètement vides l'indicateur de charge des piles affichera qu'elles sont pleines.
-
Seite 43: Écran Du Combiné
Premières étapes All manuals and user guides at all-guides.com 32. Support de l'écouteur pour montage mural 33. Ergot : pour poser un court instant l'écouteur pendant une communication dans le cas d'un montage mural Chargeur 34. LED : charge du combiné en cours. 3.8 Écran du combiné... -
Seite 44: Naviguer Dans Le Menu
Premières étapes All manuals and user guides at all-guides.com 3.9 Écran de la base Autres numéros ou défiler vers la Autres numéros ou défiler vers la droite gauche dans le menu dans le menu Sonnerie désactivée Nouveau message vocal CLIP Nouveaux numéros dans le journal des Numéro du contact dans le journal des appels... - Seite 45 Premières étapes All manuals and user guides at all-guides.com Base REPERTOIRE SONNERIE EXTERNE INTERNE VOLUME BIP TOUCHE LANGUE BASE MODE COMPOS RAPPEL PIN SYSTEME HEURE JOUR/HEURE FORMAT SUPPR CB 3.11 Utilisation des touches alphanumériques Vous pouvez utiliser les touches alphanumériques pour saisir un texte. Appuyez sur la touche adéquate pour sélectionner une lettre.
-
Seite 46: Fonctionnement Du Téléphone
Fonctionnement du téléphone All manuals and user guides at all-guides.com 4 Fonctionnement du téléphone Info : cette section décrit seulement les fonctions de la base ! Vous trouverez des informations sur la manière d'utiliser votre combiné à la section «5 Comment utiliser le combiné... -
Seite 47: Mode Muet
Fonctionnement du téléphone All manuals and user guides at all-guides.com 3 Raccrochez l'écouteur ou appuyez à nouveau sur la touche mode mains-libres pour terminer la communication. 1 Entrez le numéro de téléphone. 2 Décrochez l'écouteur ou appuyez sur la touche mode mains-libres. 3 Raccrochez l'écouteur ou appuyez à... - Seite 48 Fonctionnement du téléphone All manuals and user guides at all-guides.com 4.7 Régler le volume du haut-parleur et de l'écouteur 1 Appuyer sur la touche Volume pendant une communication. 2 Vous pouvez régler le volume sur les niveaux 1 à 5. 4.8 Activer et désactiver le bip du clavier 1 Appuyez sur la touche Menu / OK.
- Seite 49 Fonctionnement du téléphone All manuals and user guides at all-guides.com 4 Sélectionnez «EFFACE» ou «EFFACE TOUT» et validez. 5 Appuyez sur la touche OK ou sur Échappement pour retourner au niveau de menu précédent. 4.10 Touches de sélection abrégée Vous pouvez enregistrer 3 numéros à sélection abrégée M1, M2 et M3 (chacun de 24 chiffres maximum) dans la base.
-
Seite 50: Programmer Le Code Pin
Fonctionnement du téléphone All manuals and user guides at all-guides.com 4.13 Programmer le mode de numérotation Il existe deux modes de numérotation : DTMF / numérotation par tonalité ( la plus courante) Numérotation par impulsions (nécessaire uniquement si cet appareil fonctionne sur un PBX plus ancien !) 1 Appuyez sur la touche Menu / OK. - Seite 51 Fonctionnement du téléphone All manuals and user guides at all-guides.com Important : La fonction «Identification de l'appelant» (CLIP) est seulement disponible si elle est activée pour votre ligne. Contactez votre opérateur pour recevoir de plus amples informations sur cette fonction. Le numéro de téléphone et le nom du dernier appelant s'affiche à...
- Seite 52 Fonctionnement du téléphone All manuals and user guides at all-guides.com 4.17 Passer un appel interne sur un combiné et le transmettre au combiné sans fil Vous pouvez en même temps transmettre un appel de la base au combiné ou parler au correspondant externe et à...
-
Seite 53: Comment Utiliser Le Combiné Sans Fil
Comment utiliser le combiné sans fil All manuals and user guides at all-guides.com 5 Comment utiliser le combiné sans fil Info : Cette section décrit seulement les fonctions du combiné sans fil ! Vous trouverez des informations sur la manière d'utiliser votre base à la section «4 Fonctionnement du téléphone». -
Seite 54: Appels Entrants
Comment utiliser le combiné sans fil All manuals and user guides at all-guides.com 3 Appuyez sur la touche Raccrocher pour terminer la communication. 5.3 Appels entrants Lorsque vous recevez un appel, le combiné et la base sonnent et la LED de «signal visuel d'appel» clignote sur ce combiné... -
Seite 55: Verrouillage Des Touches
Comment utiliser le combiné sans fil All manuals and user guides at all-guides.com Volume de la mélodie de la sonnerie du combiné 1 Appuyez sur la touche Menu / OK. 2 Sélectionnez «COMBINE» et validez. 3 Sélectionnez «SONNERIE» et validez. 4 Selectionnez «VOLUME»... - Seite 56 Comment utiliser le combiné sans fil All manuals and user guides at all-guides.com 5 Appuyez pour valider. 6 Appuyez sur la touche Échappement pour retourner en mode veille. 5.12 Répertoire Vous pouvez enregistrer 50 contacts dans le répertoire Les noms peuvent contenir jusqu'à 16 caractères et les numéros jusqu'à...
-
Seite 57: Nouveaux Appels
Comment utiliser le combiné sans fil All manuals and user guides at all-guides.com 4 Appuyez sur la touche Menu / OK. 5 Sélectionnez «EFFACE» pour effacer le contact actuel et confirmez. 6 Sélectionnez «EFFACE TOUT» pour effacer tous les contacts et confirmez. - Seite 58 4 Entrez le code PIN de la base (par défaut 0000). 5 L'appareil retourne en mode veille. Les réglages par défaut sont les suivants : Nom du combiné SWITEL Volume de l'écouteur Niveau 3 Volume de la mélodie de la sonnerie Niveau 3 Mélodie de la sonnerie externe...
-
Seite 59: Enregistrer Et Supprimer Un Combiné
Enregistrer et supprimer un combiné All manuals and user guides at all-guides.com 5.15 Écran de la messagerie vocale Cet écran fonctionne uniquement si vous avez activé la messagerie vocale ou le service de message téléphonique et si votre opérateur transmet cette information avec l'identification de l'appelant ! Lorsque vous recevez un nouveau message dans votre messagerie vocale, l'icône s'affiche à... -
Seite 60: Sélectionner Une Base
Enregistrer et supprimer un combiné All manuals and user guides at all-guides.com 4 Entrez le numéro interne du combiné que vous voulez supprimer (1 à 5) et validez. Lorsque la suppression du combiné a réussi, il retourne en mode veille. Sinon on vous demande d'entrer à... -
Seite 61: Transfert D'appel Et Appels Internes
Transfert d'appel et appels internes All manuals and user guides at all-guides.com 7 Transfert d'appel et appels internes 7.1 Transfert d'appel et conférences pendant une communication externe 1 Pendant une communication externe, appuyez sur la touche INT et ensuite sur le numéro du combiné (1 à 5, sélectionnez «0» pour la base). -
Seite 62: Abréviations Et Termes Techniques
Abréviations et termes techniques All manuals and user guides at all-guides.com 8 Abréviations et termes techniques Calling Line Identification Presentation (affichage du numéro de l'appelant). CLIP Digital Enhanced Cordless Telecommunication; Norme européenne de DECT téléphonie numérique sans fil optimisée. Mode économique ; Le téléphone DECT offre une faible consommation Mode ECO d’énergie et une réduction des émissions. -
Seite 63: Remédier Aux Problèmes
Remédier aux problèmes All manuals and user guides at all-guides.com 9 Remédier aux problèmes Problème Cause possible : Solution Pas d'écran Les piles ne sont pas chargées Vérifiez que les deux piles ont été insérées correctement Recharger les piles Pas de son Le câble téléphonique n'est Vérifier le raccordement. -
Seite 64: Consignes Générales Concernant L'appareil
Consignes générales concernant l'appareil All manuals and user guides at all-guides.com 10 Consignes générales concernant l'appareil 10.1 Maintenance L'appareil est sans entretien. Vérifier de temps en temps l'état despiles et remplacez-les par des nouvelles du même type si leur performance diminue ou si elles commencent à fuir. Avertissement : Risque de brûlures dû... -
Seite 65: Données Techniques
Données techniques All manuals and user guides at all-guides.com 11 Données techniques Standard DECT (Digital Enhanced Cordless Telecommunications) (norme de téléphonie numérique sans-fil optimisée) GAP ( Generic Access Profile ) (facilité de l'établissement de la communication) Bande de fréquences 1,880 MHz à 1,900 MHz Émissions 10 mW (puissance de sortie moyenne par bande) -
Seite 66: Garantie
Si toutefois votre portable présentait un défaut pendant la période de garantie, veuillez vous adresser exclusivement au revendeur auprès duquel vous avez acheté votre appareil SWITEL, en n’oubliant pas de vous munir de votre bon d’achat. Vous pouvez faire valoir vos droits à la garantie selon ces dispositions exclusivement auprès de votre revendeur. - Seite 67 Contenuto All manuals and user guides at all-guides.com In generale ........Indicazioni di sicurezza .
-
Seite 68: Prima Della Messa In Funzione
In generale All manuals and user guides at all-guides.com 1 In generale Prima della messa in funzione Grazie per aver acquistato questo nuovo telefono digitale senza fili. Scopo d’impiego: Il prodotto è concepito per il collegamento ad una linea telefonica analogica in ambienti interni. Il prodotto è... -
Seite 69: Scopo D'impiego
In generale All manuals and user guides at all-guides.com 1.2 Parole chiave e simboli Simbolo Parola chiave Significato Avvertenza Segnala il subentro di possibili lesioni gravi o di pericolo di vita in caso di inosservanza delle informazioni indicate. Attenzione Segnala il subentro di possibili lesioni lievi in caso di inosservanza delle informazioni indicate. -
Seite 70: Indicazioni Di Sicurezza
Indicazioni di sicurezza All manuals and user guides at all-guides.com 2 Indicazioni di sicurezza Le seguenti indicazioni di sicurezza vanno sempre osservate quando si tratta di adoperare dispositivi elettrici. Leggere con cura le seguenti indicazioni di sicurezza e i dettagli sul corretto uso del dispositivo. - Seite 71 Indicazioni di sicurezza All manuals and user guides at all-guides.com Rischio di esplosione: Avvertenza: Pericolo di lesioni dovuto a esplosioni! Prestare particolare attenzione in presenza di bambini! Non gettare mai pile o batterie ricaricabili nel fuoco. Non utilizzare il dispositivo in un ambiente a rischio di esplosioni! Rischio di avvelenamento: Avvertenza: Pericolo di lesioni dovuto ad avvelenamento! Prestare particolare attenzione in presenza di bambini!
-
Seite 72: Primi Passi
Primi passi All manuals and user guides at all-guides.com 3 Primi passi 3.1 Uso del manuale d’uso Nel presente manuale, le istruzioni d’uso sono strutturate come segue: Testo ….. PORTATILE Tasto da premere Testo visualizzato sul display del telefono 3.2 Installazione della stazione base Procedere all’installazione della stazione base come segue: Collegare prima l’adattatore di alimentazione alla stazione base, quindi alla presa. -
Seite 73: Unità Portatile
Primi passi All manuals and user guides at all-guides.com 3.3 Caricatore dell’unità portatile Introdurre l’adattatore di alimentazione in una presa elettrica. - 3B Caricatore - A. Adattatore di alimentazione con cavo 3.4 Unità portatile Avvertenza: Pericolo di lesioni dovuto al rischio di esplosioni! Utilizzare solo le batterie ricari cabili fornite in dotazioni o batterie dello stesso tipo. - Seite 74 Primi passi All manuals and user guides at all-guides.com 3.6 Indicazione dello stato delle batterie L’unità portatile non funziona con batterie scariche. Con batterie completamente scariche, posizionando brevemente l’unità portatile sulla stazione base si otterrà l’indicazione secondo cui le batterie risultano cariche, mentre invece non lo sono e la capacità delle batterie si ridurrà rapidamente.
- Seite 75 Primi passi All manuals and user guides at all-guides.com 33. Nottolino: per fissare il ricevitore brevemente durante una chiamata con telefono montato a parete Caricatore 34. LED: caricamento dell’unità portatile in corso 3.8 Display dell’unità portatile PORTATILE X X = numero del portatile Ulteriori cifre o scorrere a sinistra Ulteriori cifre o scorrere a destra nel menu...
-
Seite 76: Navigazione Nel Menu
Primi passi All manuals and user guides at all-guides.com 3.9 Display della stazione base Ulteriori cifre o scorrere a sinistra nel Ulteriori cifre o scorrere a destra nel menu menu Suoneria OFF Nuovo messaggio nella casella vocale CLIP Nuovi numeri nella lista chiamate Numero progressivo nella lista chiamate Individuare o creare voci nella rubrica... -
Seite 77: Stazione Base
Primi passi All manuals and user guides at all-guides.com Stazione base RUBRICA SUONERIA ESTERNA INTERNA VOLUME TONI TASTI LINGUA BASE MODO SELEZ TASATO R DATA/ORE FORMATO RIMUOVI PT RESET 3.11 Uso dei tasti alfanumerici I tasti alfanumerici consentono l’immissione di testo. Premere il tasto alfanumerico corrispondente alla lettera richiesta. -
Seite 78: Uso Del Telefono
Uso del telefono All manuals and user guides at all-guides.com 4 Uso del telefono Nota: La sezione descrive soltanto le funzioni della stazione base! Informazioni sull’uso dell’unità portatile sono riportate nella sezione „5 Uso dell’unità portatile cordless”. 4.1 Impostazione della lingua di display 1 Premere il tasto Menu / OK. - Seite 79 Uso del telefono All manuals and user guides at all-guides.com 3 Riagganciare il ricevitore o premere di nuovo il tasto vivavoce per concludere la chiamata. OPPURE 1 Immettere il numero telefonico. 2 Sollevare il ricevitore o premere il tasto vivavoce. 3 Riagganciare il ricevitore o premere di nuovo il tasto vivavoce per concludere la chiamata.
-
Seite 80: Rubrica Telefonica
Uso del telefono All manuals and user guides at all-guides.com 4.7 Impostazione del volume di altoparlante e ricevitore 1 Premere con chiamata in corso il tasto volume. 2 Il volume è regolabile da 1 a 5 livelli. 4.8 Attivazione/Disattivazione del tono dei tasti 1 Premere il tasto Menu / OK. -
Seite 81: Impostazione Del Volume Della Suoneria
Uso del telefono All manuals and user guides at all-guides.com 4 Selezionare ”CANCELLA” oppure ”CANC TUTTI” e confermare. 5 Premere OK per confermare o il tasto ESC per tornare indietro. 4.10 Tasti di selezione diretta Il dispositivo prevede la memorizzazione di 3 numeri di selezione diretta M1, M2 e M3 (ognuno lungo fino a 24 cifre) sulla stazione base. -
Seite 82: Impostazione Della Modalità Di Selezione
Uso del telefono All manuals and user guides at all-guides.com 4.13 Impostazione della modalità di selezione È possibile scegliere tra due modalità di selezione per instaurare una connessione telefonica: DTMF / selezione a toni (più diffusa) Selezione a impulsi (necessaria solo se si adopera il dispositivo su un sistema telefonico PBX di vecchia data!) 1 Premere il tasto Menu / OK. - Seite 83 Uso del telefono All manuals and user guides at all-guides.com Importante: La funzione 'ID chiamante’ (CLIP) presuppone l’abilitazione della propria linea telefonica a questo servizio. Vi preghiamo di consultare il vostro provider di rete telefonica per ulteriori informazioni. Il display visualizza numero telefonico e nome dell’ultimo chiamante. Con numero telefonico più lungo di 12 cifre, le rimanenti cifre sono visualizzate premendo il tasto.
-
Seite 84: Tasto R (Flash)
Uso del telefono All manuals and user guides at all-guides.com 4.17 Chiamata interna di un’unità portatile e inoltro della chiamata ad un’unità portatile È possibile inoltrare una chiamata dalla stazione base all’unità portatile oppure condurre una conversazione contemporaneamente con un interlocutore esterno e un secondo interlocutore sull’unità... -
Seite 85: Uso Dell'unità Portatile Cordless
Uso dell’unità portatile cordless All manuals and user guides at all-guides.com 5 Uso dell’unità portatile cordless Nota: La sezione descrive unicamente le funzioni dell’unità portatile cordless! Informazioni sull’uso della stazione base sono riportate nella sezione „4 Uso del telefono”. 5.1 Impostazione della lingua 1 Premere il tasto Menu / OK. - Seite 86 Uso dell’unità portatile cordless All manuals and user guides at all-guides.com 5.3 Chiamate in arrivo Con chiamata in arrivo, unità portatile e stazione base squillano e il LED di ”segnalazione ottica di chiamata” lampeggia sia sull’unità portatile sia sulla stazione base. 1 Premere il tasto di accettazione di chiamata per rispondere alla telefonata.
-
Seite 87: Blocco Dei Tasti
Uso dell’unità portatile cordless All manuals and user guides at all-guides.com Volume della suoneria dell’unità portatile 1 Premere il tasto Menu / OK. 2 Selezionare ”PORTATILE” e confermare. 3 Selezionare ”SUONERIA” e confermare. 4 Selezionare ”VOLUME” e confermare. 5 Selezionare il livello di volume richiesto (Off, 1-5) e confermare. Importante: Il volume della suoneria si lascia attivare (ON) o disattivare (OFF) individualmente per ciascuna unità... - Seite 88 Uso dell’unità portatile cordless All manuals and user guides at all-guides.com 5.12 Rubrica telefonica La rubrica offre spazio per 50 voci. I nomi da immettere possono essere lunghi fino a 16 caratteri, i numeri telefonici possono occupare fino a 24 cifre. Aggiunta di una voce nella rubrica 1 Premere il tasto rubrica.
- Seite 89 Uso dell’unità portatile cordless All manuals and user guides at all-guides.com 5 Selezionare ”CANCELLA” per cancellare l’attuale voce della rubrica telefonica e confermare. OPPURE 6 Selezionare ”CANC TUTTI” per cancellare tutte le voci della rubrica telefonica e confermare. 7 Confermare di nuovo oppure premere il tasto ESC per uscire. 5.13 ID chiamante (CLIP) Il telefono DCC632x visualizza il numero di chiamate in arrivo.
- Seite 90 4 Immettere il codice PIN della stazione base (configurazione iniziale 0000). 5 Il dispositivo passa alla modalità di stand-by. La configurazione iniziale prevede: Nome dell’unità portatile SWITEL Volume del ricevitore Livello 3 Volume della suoneria Livello 3 Suoneria per chiamate esterne...
-
Seite 91: Registrazione E Deregistrazione Del Portatile
Registrazione e deregistrazione del portatile All manuals and user guides at all-guides.com 5.15 Visualizzazione della casella vocale Il display funziona solo con casella vocale o servizio di segreteria telefonica attivato e purché il vostro provider di rete telefonica trasmetta questa informazione assieme all’inoltro dell’ID chiamante! Quando si riceve un nuovo messaggio nella casella vocale, il simbolo è... -
Seite 92: Selezione Di Una Stazione Base
Registrazione e deregistrazione del portatile All manuals and user guides at all-guides.com 6.3 Deregistrazione di un portatile dalla stazione base DCC632x attraverso il portatile 1 Premere il tasto Menu / OK. 2 Selezionare ”DE-REGISTRA” e confermare. 3 Immettere il codice PIN della stazione base (configurazione iniziale 0000). -
Seite 93: Inoltro Di Chiamata E Chiamate Interne
Inoltro di chiamata e chiamate interne All manuals and user guides at all-guides.com 7 Inoltro di chiamata e chiamate interne 7.1 Inoltro di chiamata e chiamata in conferenza con chiamata esterna in corso 1 Con chiamata esterna in corso, premere il tasto INT e quindi il numero relativo al portatile (1-5, selezionare ”0”... -
Seite 94: Sigle E Dati Tecnici
Sigle e dati tecnici All manuals and user guides at all-guides.com 8 Sigle e dati tecnici Calling Line Identification Presentation; indica il numero telefonico del CLIP chiamante sul display dell’interlocutore chiamato. Digital Enhanced Cordless Telecommunication; standard di telecomunicazione DECT europeo per telefoni cordless digitali. Modalità... -
Seite 95: In Caso Di Guasti
In caso di guasti All manuals and user guides at all-guides.com 9 In caso di guasti Problema Possibile causa Rimedio Nessuna indicazione sul Le batterie non sono cariche Assicurarsi che entrambe le display batterie siano inserite correttamente Caricare le batterie Nessun suono Il cavo telefonico non è... -
Seite 96: Assistenza
Assistenza All manuals and user guides at all-guides.com 10 Assistenza 10.1 Manutenzione Il dispositivo è esente da manutenzione. Controllare di tanto in tanto le condizioni delle batterie e sostituirle con nuove batterie dello stesso tipo in caso di una riduzione delle prestazioni o se si riscontrano perdite di acido. -
Seite 97: Dati Tecnici
Dati tecnici All manuals and user guides at all-guides.com 11 Dati tecnici Standard DECT (Digital Enhanced Cordless Telecommunications) GAP ( Generic Access Profile ) Campo di frequenza 1,880 MHz - 1,900 MHz Emissioni 10 mW (media per canale) Portata Fino a 300 m all’aperto - fino a 50 m all’interno di edifici Batterie del portatile 2 batterie ricaricabili NiMh da 1,2 V, 450mAh... -
Seite 98: Garanzia
All manuals and user guides at all-guides.com 12 Garanzia I dispositivi SWITEL sono costruiti e collaudati in osservanza dei processi di produzione più moderni. L’impiego di materiali selezionati e tecnologie altamente sviluppate sono garanti di una perfetta funzionalità e lunga durata in vita. La garanzia non è valida in caso di un malfunzionamento dell’apparecchio dovuto ad interferenze nella rete telefonica del provider o gestore o in qualsiasi... - Seite 99 Contents All manuals and user guides at all-guides.com General information ......Safety notes .
-
Seite 100: General Information
General information All manuals and user guides at all-guides.com 1 General information Before Initial use Thank you for purchasing this new digital cordless telephone. Intended Purpose: This product is intend to be connected indoor to an analogue telephone line. This product is made in accordance with the Digital Enhanced Cordless Telecommunications (DECT). DECT technology is characterized by high-security protection against interceptions as well as high- quality digital transmission. -
Seite 101: Intended Use
General information All manuals and user guides at all-guides.com 1.2 Signal words and symbols Symbol Signal word Meaning Warning Warning of risk of potential serious injury or death if you fail to comply with this information. Caution Warning of risk of potential minor injury if you fail to comply with this information. -
Seite 102: Safety Notes
Safety notes All manuals and user guides at all-guides.com 2 Safety notes The following basic safety notes must always be taken into account when using electrical devices. Carefully read the following safety notes and details on the correct use of the device. Familiarise yourself with all the functions of the device. - Seite 103 Safety notes All manuals and user guides at all-guides.com Risk of explosion: Warning: Risk of injury due to explosion! Exercise particular caution in respect of children! Never throw disposable or rechargeable batteries into fire. Do not operate the device in an environment with a risk of explosions! Risk of poisoning: Warning: Risk of injury due to poisoning! Exercise particular caution in respect of children! Keep disposable and rechargeable batteries out of the reach of children.
-
Seite 104: First Steps
First steps All manuals and user guides at all-guides.com 3 First steps 3.1 How to use this User Guide The following method is used in this User Guide to clarify instructions: Text ….. HANDSET Key to be pressed Text that appears on the telephone display 3.2 Installing the base station Install the base station as follows: Connect the mains adapter to the base station first and then to a socket. -
Seite 105: Wall Mounting
First steps All manuals and user guides at all-guides.com 3.3 Handset charger Plug the mains adapter into a power socket. - 3B Charger - A. Mains adapter with cable 3.4 Handset Caution: Risk of injury due to explosion! Only use the supplied rechargeable batteries or batteries of a similar type. -
Seite 106: Battery Status Display
First steps All manuals and user guides at all-guides.com 3.6 Battery status display The handset will stop working when the batteries are flat. If the batteries are completely flat and you place the handset on the handset charger for just a short time, the battery charge indicator will show that they are full. -
Seite 107: Handset Display
First steps All manuals and user guides at all-guides.com Charger 34. LED: Handset charging in progress. 3.8 Handset display HANDSET X X = handset number Other numbers or scroll left through Other numbers or scroll right the menu through the menu Find or create phone book entries Battery status display Ringer off... -
Seite 108: Navigating Through The Menu
First steps All manuals and user guides at all-guides.com 3.9 Base station display Other numbers or scroll left through the Other numbers or scroll right through menu the menu Ringer off New voicemail message CLIP New numbers in the calls list Item number in the calls list Find or create phone book entries Hands free mode on... - Seite 109 First steps All manuals and user guides at all-guides.com Base station PHONEBOOK RING TONE EXTERNAL INTERNAL VOLUME KEYPAD BEEP LANGUAGE SETTINGS DIAL MODE RECALL SYSTEM PIN TIME DATE TIME FORMAT REMOVE HS RESET 3.11 Using the alphanumeric keys You can use the alphanumeric keys to enter text. Press the appropriate alphanumeric key to select a letter.
-
Seite 110: Operating The Telephone
Operating the telephone All manuals and user guides at all-guides.com 4 Operating the telephone Info: This section only describes the functions of the base station! Information on using the handset can be found in „5 Using the cordless handset“. 4.1 Setting the display language 1 Press the Menu / OK key. - Seite 111 Operating the telephone All manuals and user guides at all-guides.com 1 Enter the telephone number. 2 Lift the receiver or press the hands free key. 3 Hang up the receiver or press the hands free key again to end the call.
-
Seite 112: Phone Book
Operating the telephone All manuals and user guides at all-guides.com 4.8 Activating and deactivating the keypad beep 1 Press the Menu / OK key. 2 Select "KEYPAD BEEP" and confirm. 3 Select "ON“ or "OFF“ and confirm. 4.9 Phone book 50 telephone numbers and names can be stored in the phone book. -
Seite 113: Setting The Ring Tone Volume
Operating the telephone All manuals and user guides at all-guides.com 4.10 Abbreviated dialling keys You can store 3 direct abbreviated numbers M1, M2 and M3 (each up to 24 digits) in the base station. Saving direct abbreviated dialling numbers (M1 - M2 - M3) 1 Press one of the abbreviated dialling keys. -
Seite 114: The Call List
Operating the telephone All manuals and user guides at all-guides.com 2 Select "SETTINGS" and confirm. 3 Select "DIAL MODE" and confirm. 4 Select "TONE" or "PULSE" and confirm. 4.14 Setting the system PIN Some functions are only available if you know the PIN code for the base station. The PIN code is 4 characters long. -
Seite 115: Making An Internal Call To A Handset And Forwarding A Call To The Cordless Handset
Operating the telephone All manuals and user guides at all-guides.com 1 Press the up and down keys to scroll through the list. The position number of the call in the calls list appears next to the CLIP symbol. 2 Press the left and right keys to display the name or number. Info: The phone reverts to standby mode if neither the up or down key is pressed within 15 seconds. - Seite 116 Operating the telephone All manuals and user guides at all-guides.com 4.18 Finding the handset (paging function) You can use this function to locate your handset. 1 Press the paging key on the base station. The handset will ring for 30 seconds and the red LED on the handset will flash.
-
Seite 117: Using The Cordless Handset
Using the cordless handset All manuals and user guides at all-guides.com 5 Using the cordless handset Info: This section only describes the functions of the cordless handset! Information on using the base station can be found in „4 Operating the telephone“. 5.1 Changing the language 1 Press the Menu / OK key. - Seite 118 Using the cordless handset All manuals and user guides at all-guides.com LED flashes on the handset and base station. 1 Press the answer call key to answer the call. 2 Press the hang up key to end the call. 5.4 Activating/deactivating hands free mode You can use this function to answer a call without having to hold the handset or if the a call is already being conducted on the handset.
-
Seite 119: Handset Name
Using the cordless handset All manuals and user guides at all-guides.com Handset ring tone volume 1 Press the Menu / OK key. 2 Select "HANDSET" and confirm. 3 Select "RING TONE" and confirm. 4 Select "VOLUME" and confirm. 5 Select the required volume (Off, 1-5) and confirm. Important: You can switch the ring tone volume of any individual handset ON or OFF by simply holding the ring tone ON/OFF key in standby mode. -
Seite 120: Dialling An Abbreviated Number
Using the cordless handset All manuals and user guides at all-guides.com 5.12 Phone book You can store 50 entries in the phone book. Names may be up to 16 characters long and telephone numbers up to 24 digits long. Adding a phone book entry 1 Press the phone book key. -
Seite 121: Caller Id (Clip)
Using the cordless handset All manuals and user guides at all-guides.com 7 Confirm again or press the Esc key to skip. 5.13 Caller ID (CLIP) The DCC632x displays the telephone number of incoming calls. This function can only be used if you are registered for this service with your telephone line provider. - Seite 122 3 Select "RESET" and confirm. 4 Enter the PIN number of the base station (default 0000). 5 The device reverts to standby mode. The default settings are: Handset name SWITEL Earpiece volume Level 3 Ring tone volume Level 3 External ring tone...
-
Seite 123: Registering And De-Registering A Handset
Registering and de-registering a handset All manuals and user guides at all-guides.com 6 Registering and de-registering a handset 6.1 Registering a handset to the DCC632x base station You can register to 5 handsets onto one base station. Every handset is already registered to the base station on delivery. -
Seite 124: Selecting A Base Station
Registering and de-registering a handset All manuals and user guides at all-guides.com 4 Enter the internal number of the handset you want to de-register (1-5) and confirm. Once the handset has been successfully deregistered, it reverts to standby mode. Otherwise you will be asked to enter the handset number again. -
Seite 125: Call Forwarding And Internal Calls
Call forwarding and internal calls All manuals and user guides at all-guides.com 7 Call forwarding and internal calls 7.1 Call forwarding and conference calls during an external call 1 During an external call, press the INT key and then the number of the handset (1-5, select "0"... -
Seite 126: Abbreviations And Technical Terms
Abbreviations and technical terms All manuals and user guides at all-guides.com 8 Abbreviations and technical terms Calling Line Identification Presentation, display of the caller's telephone number CLIP on the called party's display. Digital Enhanced Cordless Telecommunication; European telecommunications DECT standard for digital cordless telephones. Economic Mode;... -
Seite 127: Troubleshooting
Troubleshooting All manuals and user guides at all-guides.com 9 Troubleshooting Problem Possible cause Solution No display The batteries are not charged Check that both batteries have been inserted correctly Charge the batteries No sound The telephone cable is not Check the cable connection. connected correctly. -
Seite 128: Servicing
Servicing All manuals and user guides at all-guides.com 10 Servicing 10.1 Maintenance The device is maintenance-free. Occasionally check the condition of the batteries and replace them with new batteries of the same type if performance is impaired or if they are beginning to leak. Warning: Danger of chemical burns! Wear protective gloves to remove flat rechargeable batteries. -
Seite 129: Technical Data
Technical data All manuals and user guides at all-guides.com 11 Technical data Standard DECT (Digital Enhanced Cordless Telecommunications) GAP ( Generic Access Profile ) Frequency range 1,880 MHz to 1,900 MHz Emissions 10 mW (average output per channel) Range Up to 300 m in open terrain - up to 50 m in buildings Handset batteries: 2 x 1.2 V, 450mAh AAA type rechargeable NiMh... -
Seite 130: Warranty
If your device does show signs of a defect within the period of guarantee, please contact the sales outlet where you purchased the SWITEL device, producing the purchase receipt as evidence. All claims under the terms of guarantee in accordance with this agreement can only be asserted at the sales outlet. - Seite 131 All manuals and user guides at all-guides.com...
-
Seite 132: Service-Hotline
Quest'apparecchiatura è conforme alla direttiva europea R&TTE. Per la dichiarazione di conformità completa si prega di voler usufruire del servizio gratuito di download dal nostro sito Internet www.switel.com. This equipment complies with the European R&TTE directive. To view the complete Declaration of Conformity, please refer to the free download available at our web site: www.switel.com.