Seite 3
Diese Bedienungsanleitung gehört zu diesem Produkt. Sie ent- hält wichtige Hinweise zur Inbetriebnahme und Handhabung. Ach- ten Sie hierauf, auch wenn Sie dieses Produkt an Dritte weiter- geben. Heben Sie deshalb diese Bedienungsanleitung zum Nachlesen auf! These Operating Instructions accompany this product. They contain important information on setting up and using your Voltage Detector.
Seite 5
Kauf eines Voltcraft ®-Produktes haben Sie eine sehr gute Entscheidung getroffen, für die wir Ihnen danken. Voltcraft® - Dieser Name steht auf dem Gebiet der Mess-, Lade- sowie Netztechnik für überdurchschnittliche Qualitätsprodukte, die sich durch fachliche Kompetenz, außergewöhnliche Leistungsfähig- keit und permanente Innovation auszeichnen.
Bedienablauf, sondern hilft Ihnen gleichzeitig, alle technischen Möglichkeiten des Systems voll auszunutzen. Bestimmungsgemäße Verwendung Der Kabeltester CT-2 dient zum schnellen und problemlosen Prüfen von Kabeln mit 4-, 6- und 8poligen Western-Steckern (RJ 11 und RJ 45), sowie für Kabel mit BNC-Anschluss-Steckern. Das Gerät ist ausschließ- lich für den Batteriebetrieb zugelassen.
Zustand auf Zimmertemperatur kommen und warten Sie, bis eventuell entstandenes Kondenswasser verdunstet ist. • Lassen Sie das Verpackungsmaterial nicht achtlos liegen. Plas- tikfolien/-tüten, Styroporteile, etc. könnten für Kinder zu einem gefährlichen Spielzeug werden. • Der Kabeltester CT-2 gehört nicht in Kinderhände. Er ist kein Spielzeug.
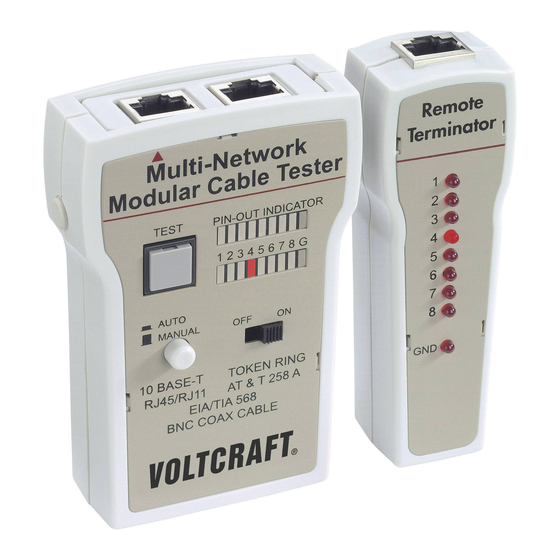
• Das Prüfen von Kabeln mit dem Kabeltester darf nur im span- nungsfreien Zustand der Kabel durchgeführt werden. Vor jeder Messung Spannungsfreiheit feststellen (Lebensgefahr)! Anschluss- und Bedienelemente Siehe Bild auf der Ausklappseite Kabeltester CT-2 TEST-Taste Remote Terminator (RT) 10. RJ45 Eingangsbuchse (RT) RJ 45 Ausgangsbuchse 11.
Produktbeschreibung Der Kabeltester CT-2 ist speziell für den schnellen Vororttest von Netzwerkkabeln entwickelt worden. Dazu verfügt das Gerät an der Stirnseite über zwei RJ 45 Steckbuchsen, mit deren Hilfe Sie die Pin-Belegung und den Leitungsdurchgang bei Kabeln mit 4-, 6- und 8-poligen Western-Steckern ermitteln und testen können.
Seite 10
Batterieeinbau/-wechsel Vor der ersten Inbetriebnahme bzw. wenn bei Gebrauch die Inten- sität der LED-Anzeige nachlässt, müssen Sie eine neue 9 V Block- batterie (am besten Alkaline) einsetzen. Dazu gehen Sie wie folgt vor: Drücken Sie auf die geriffelte Fläche des Batteriefachdeckels auf der Rückseite des Kabeltesters und schieben Sie den Deckel nach unten auf.
Seite 11
RJ 45-Kabel Bei nicht fest verlegten Kabeln, bzw. dem mitgelieferten Testka- bel RJ 45, schließen Sie einen der beiden Stecker an die linke RJ 45 Buchse an. Diese Ausgangsbuchse ist mit einem roten Pfeil auf der Geräteoberseite markiert. Den anderen Stecker der zu messenden Leitung verbinden Sie mit der rechten RJ 45 Buch- Schieben Sie den Funktionsschalter in die Stellung "ON”.
Seite 12
Leitung schließen Sie bitte den Remote-Terminator an. Die LED- Anzeige des Remote-Terminators funktioniert entsprechend der Eingangsanzeige am Kabeltester. Mögliche Kabelfehler Leitungsunterbrechungen: Die entsprechende LED auf der Ein- gangsanzeige leuchtet nicht. Leitungskurzschlüsse: Wenn 2 Adern einer Leitung miteinander elektrisch verbunden sind, so leuchten beide LEDs der entspre- chenden Adern.
Sammelstellen Ihrer Gemeinde, unseren Filialen oder überall dort abgeben, wo Batterien/Akkus verkauft werden! Sollte der Kabeltester CT-2 nicht mehr funktionstüchtig und eine Reparatur nicht mehr möglich sein, beachten Sie bitte beim Entsor- gen die allgemein geltenden gesetzlichen Bestimmungen.
Technische Daten Stromversorgung 9 V/DC Batterietyp 9 V Block Stromaufnahme ca. 10 mA Abm. Kabeltester (B x H x T) 70 x 105 x 25 mm Abm. Remote Terminator 35 x 105 x 25 mm Messbare Kabel RJ 11, RJ 45 (UTP/STP) und BNC für folgende Standards: IEA/TIA 356 A, IEA/TIA568 A/B, AT&T 258 A sowie Token Ring...
Seite 15
Important advice fort he starting and handling. Please keep in mind, also when giving the product to thirds. The cable tester CT-2 is built according to the latest stand of tech- nology And meets the requirements of the current national and European guidelines.
Use as directed The cable tester CT-2 is used fort he quick and unproblematic test- ing Of cables with 4-, 6- and 8 pole western plugs (RJ 11 and RJ 45), as well as for cables with BNC-connection plugs. The device is exclusively permitted for operation with battery.
• do not leave the packaging material lay around. Plastic foils/bags styrofoam parts, and the like can become a dangerous toy for children. • the cable tester CT-2 does not belong into children’s hands. It is no toy. • in commercial institutions the accident prevention directions of the professional trade association for electrical systems and means of operation have to be followed.
8. Scan-selection switch Product description The cable tester CT-2 has been developed especially for the quick in-place test of network cables. For this reason the device has two RJ 45 jacks at the front side with which you can determine and...
- operating manual Taking into operation Make sure by means of the safety instructions and the technical data, that the cable tester CT-2 is suitable fort he planned measur- ing tasks. Inserting / changing the battery Before the first taking into operation or when during the use the intensity of the LED-display is getting weak, you have to insert a new 9V block battery (preferably Alkaline).
Seite 20
A wrong poling of the battery can lead to the destruction of the device and a short circuit of the battery contacts can lead to the destruction of the battery! Now insert the battery with clip into the battery case and close the lid. Please take care that the battery con- nection cables are not squeezed.
Seite 21
ing voltage one after the other which is shown via the red light beam (outlet display = PIN-OUT INDICATOR). At the right jack the testing voltage is also measured at every single contact and is displayed at the lower light beam (in display). If the scan selection switch is set to manual mode, a light diode will glow at the upper and the lower light beam.
RJ 11-Kabel - to test cables with RJ 11 plug connections, please use the two reducing parts RJ 45/RJ 11. the reducing parts are simply insert- ed into the wanted RJ 45 jack of the cable tester or of the Remote-Terminators.
Batteries/accumulators which contain pollu- tants are signed With the symbols you see on the side, Which display the prohibition of the disposal into the normal house waste. The terms fort he decisive heavy metal are: Cd = cadmium, Hg = mercury, Pb = lead. You can return your used batteries/accumulators with- out any costs in the collecting points of your communities, in our stores and everywhere...
Seite 24
Voltcraft® - Ce nom est en effet garant d’une qualité au-dessus de la moyenne dans les domaines de la mesure, de la recharge ainsi que des appareils de réseau, tous se distinguant par leur compéten- ce technique, leur fiabilité, leur longévité...
Restrictions d’utilisation Le testeur de câbles CT-2 sert au contrôle rapide de câbles avec fiches plug 4, 6 et 8 contacts (RJ 11 et RJ 45), de même que celui de câbles avec prise de raccordement BNC. L’appareil n’est homologué...
à des températures trop élevées, à de fortes vibrations ou à une humidité trop élevée. Ceci pourrait endommager le testeur de câbles CT-2. • Ne mettez jamais le testeur de câbles en service immédiatement quand il vient d’être mis d’une pièce froide dans une pièce chau- de.
• Maintenez le testeur de câbles CT-2 hors de la portée des enfants. Ce n'est pas un jouet. • Dans les locaux professionnels, il faut observer les instructions relatives à la prévention des accidents émises par les caisses de prévoyance professionnelles contre les accidents exerçant dans le domaine des installations électriques et de l'outillage industriel.
Description du produit Le testeur de câble CT-2 a été spécialement conçu pour le contrôle rapide sur place de câbles réseaux. A cet effet, l’appareil dispose de deux douilles enfichables sur sa face avant, à l’aide desquelles vous pouvez déterminer et contrôler l’affectation des broches et la conti- nuité...
Seite 29
Mettre en place/changer la pile Avant la première mise en service de l’appareil ou quand l’intensité lumineuse des voyants LEDs faiblit, vous devez remplacer la pile usagée par une pile bloc neuve de 9V (au mieux alcaline). Procédez de la manière suivante Appuyez sur la surface crantée du couvercle du compartiment à...
Seite 30
Câble RJ 45 - Pour les câbles non fixés à demeure ainsi que pour le câble d’es- sai RJ 45 livré avec, connectez une des deux fiches à la douille RJ 45 de gauche. Cette douille de sortie est marquée d’une flèche rouge sur la face supérieure de l’appareil.
Seite 31
- Si le câble à tester est déjà installé à demeure, connectez alors une fiche du câble à la douille RJ 45 de gauche (douille de sortie) du testeur de câbles. Connectez le récepteur à distance à l’autre extrémité du câble. L’affichage LED du récepteur à distance fonc- tionne conformément à...
- Comme lors de ce test, l’affectation du conducteur intérieur est indiquée via la LED 1 et le blindage via la LED 2, il est recomman- dé d’effectuer ce test en mode de fonctionnement manuel. Entretien et nettoyage Sauf pour un remplacement occasionnel de la pile, le testeur de câble ne nécessite aucun entretien.
Au cas où le testeur de câbles CT-2 ne serait plus utilisable et qu’une réparation sur l’appareil ne serait plus possible, veillez alors, en jetant l’appareil à respecter les lois en vigueur. Caractéristiques techniques Alimentation en courant 9 V/DC Type de pile...