EuroLite LED KLS Scan Pro Next FX Bedienungsanleitung
Inhaltsverzeichnis
Verfügbare Sprachen
Verfügbare Sprachen
Quicklinks
LED KLS Scan
RO
Compact Light Set
Bedienungsanleitung
User Manual
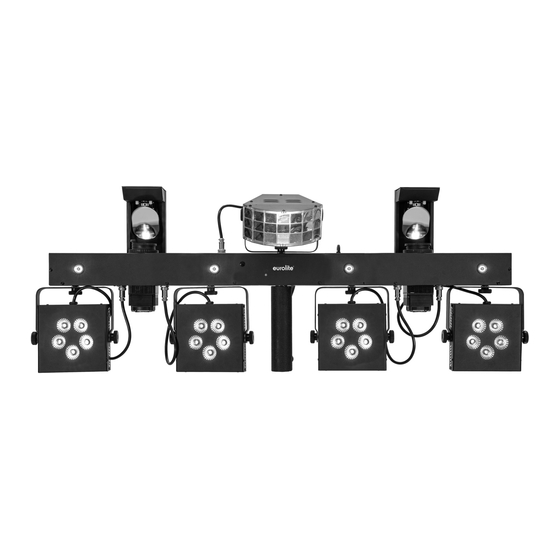
LED KLS Scan Pro Next FX Compact Light Set
Kompakte Leiste mit Derby, Spots, Scannern, UV-Effekt, QuickDMX-Buchse und Tasche
Compact bar with derby, spots, scanners, UV effect, QuickDMX port and bag
DMX
OPTIONAL
RGB
/W
W
No. 42109898
www.eurolite.de
STAND
MASTER
SLAVE
ALONE
15°
REMOTE
STROBE
CONTROL
COLD WHITE
UV
LED
FOOT
BAG
SWITCH
Inhaltsverzeichnis

Verwandte Anleitungen für EuroLite LED KLS Scan Pro Next FX


Inhaltszusammenfassung für EuroLite LED KLS Scan Pro Next FX
- Seite 1 LED KLS Scan Compact Light Set Bedienungsanleitung User Manual LED KLS Scan Pro Next FX Compact Light Set Kompakte Leiste mit Derby, Spots, Scannern, UV-Effekt, QuickDMX-Buchse und Tasche Compact bar with derby, spots, scanners, UV effect, QuickDMX port and bag FOOT...
-
Seite 2: Inhaltsverzeichnis
Diese Bedienungsanleitung gilt für die Artikelnummer / This user manual is valid for the article number: 42109898 Das neueste Update dieser Bedienungsanleitung finden Sie im Internet unter: You can find the latest update of this user manual in the Internet under: www.eurolite.de 2/60 00143808, Version 1.0... -
Seite 3: Einführung
BEDIENUNGSANLEITUNG LED KLS Scan Pro Next FX Kompakt-Lichtset GEFAHR! Elektrischer Schlag durch Kurzschluss Seien Sie besonders vorsichtig beim Umgang mit gefährlicher Netzspannung. Bei dieser Spannung können Sie einen lebensgefährlichen elektrischen Schlag erhalten. Öffnen Sie das Gerät niemals und schützen Sie es vor Feuchtigkeit und Nässe. -
Seite 4: Produktmerkmale
Produktmerkmale Kompakte Leiste mit Derby, Spots, Scannern, UV-Effekt, QuickDMX-Buchse und Tasche 1 rotierender Derby mit sechs hellen 3-W-LEDs (2xRot, 2xGrün und 2xBlau) • 4 Spots mit je fünf leistungsstarken 7-W-RGB/WW-LEDs • 2 Scanner jeweils mit einer leistungsstarke 37,5-W-LED in Kaltweiß sowie integrierten Farb- und •... -
Seite 5: Sicherheitshinweise
SICHERHEITSHINWEISE WARNUNG! Lesen Sie aufmerksam die Sicherheitshinweise und benutzen Sie das Produkt nur wie in dieser Anleitung beschrieben, damit es nicht versehentlich zu Verletzungen oder Schäden kommt. Verwendungszweck • Bei diesem Gerät handelt es sich um ein LED-Lichtset, mit dem sich dekorative Lichteffekte erzeugen lassen. - Seite 6 Warnung vor Verbrennung und Brand • Der zulässige Umgebungstemperaturbereich (Ta) beträgt -5 bis +45 °C. Verwenden Sie das Gerät niemals außerhalb dieses Temperaturbereichs. • Die Gehäusetemperatur (Tc) kann im Betrieb bis zu 65 °C betragen. Vermeiden Sie den Kontakt mit Personen oder Gegenständen.
-
Seite 7: Gerätebeschreibung
GERÄTEBESCHREIBUNG Vorderseite Feststellschrauben Fangseilöse Montagebügel UV-LEDs Scanner LED-Spot 1 - 4 Infrarotempfänger für die Fernbedienung TV-Zapfen LED-Derby Rückseite 11 12 13 14 15 MICROPHONE SENSITIVITY No. 42109898 EAN 4026397713138 ∙ LED KLS BRIGHTNESS T =45°C T =65°C AC IN 100-240V~ AC OUT 50/60Hz / MENU... -
Seite 8: Installation
INSTALLATION Überkopfmontage WARNUNG! Verletzungsgefahr durch Herabfallen Über Kopf installierte Geräte können beim Herabstürzen erhebliche Verletzungen verursachen! Stellen Sie sicher, dass das Gerät sicher installiert ist und nicht herunterfallen kann. Die Montage darf nur durch eine Fachkraft erfolgen, die mit den Gefahren und den einschlägigen Vorschriften hierfür vertraut ist. -
Seite 9: Stativmontage
Stativmontage Für den mobilen Einsatz setzen Sie das Lichtset über den TV-Zapfen auf ein Stativ auf und fixieren es mit der Feststellschraube. Passende Stative finden Sie im Abschnitt Zubehör. Hinweise: • Bitte achten Sie beim Aufbringen der Last auf eine gleichmäßige Lastverteilung und überschreiten Sie nicht die Traglast des Stativs. -
Seite 10: Dmx512-Ansteuerung
DMX512-ANSTEUERUNG Für die Ansteuerung des Geräts per DMX512 ist eine Datenverbindung notwendig. Das Gerät verfügt dazu über 3-polige XLR-Anschlüsse. Verbinden Sie den Ausgang Ihres Controllers mit dem DMX-Eingang DMX IN des Geräts über ein DMX- Kabel. Verbinden Sie den DMX-Ausgang DMX OUT des Geräts mit dem DMX-Eingang des nächsten Geräts in der Kette. -
Seite 11: Bedienung
Standalone-Modus über das Bedienfeld und die IR-Fernbedienung oder im DMX-gesteuerten Modus über einen handelsüblichen DMX-Controller, sowie drahtlos über QuickDMX mit dem optional erhältlichen EUROLITE QuickDMX USB Wireless Transmitter/Receiver betrieben werden. Mithilfe des Displays und der Bedientasten lassen sich die Betriebsarten manuell einstellen. - Seite 12 G.000–255 Grün 0-100% B.000–255 Blau 0-100% W.000–255 Weiß 0-100% R.000–255 Rot 0-100% G.000–255 Grün 0-100% PAR 4 B.000–255 Blau 0-100% W.000–255 Weiß 0-100% R.000–255 Rot 0-100% Derby G.000–255 Grün 0-100% B.000–255 Blau 0-100% 000–255 Pan-Bewegung 0 – 100% Tilt 000–255 Tilt-Bewegung 0 –...
- Seite 13 Scanner 1: Pan-Bewegung des Spiegels invertiert Pan1 Reve Scanner 1: Pan-Bewegung des Spiegels normal Scanner 1: Tilt-Bewegung des Spiegels invertiert Tilt1 Reve Scanner 1: Tilt-Bewegung des Spiegels normal Scanner 2: Pan-Bewegung des Spiegels invertiert Pan2 Reve Scanner 2: Pan-Bewegung des Spiegels normal Scanner 2: Tilt-Bewegung des Spiegels invertiert Tilt2 Reve...
-
Seite 14: Standalone-Betrieb
Standalone-Betrieb Automatikbetrieb Im Automatikbetrieb stehen 20 verschiedene Showprogramme zur Verfügung die mit einer einstellbaren Geschwindigkeit ablaufen. Drücken Sie die Taste MENU so oft, bis das Display AUTO für Automatikbetrieb anzeigt. Bestätigen Sie mit der Taste ENTER. Stellen Sie mit UP und DOWN die Nummer des gewünschten Programms ein. Bestätigen Sie mit der Taste ENTER. -
Seite 15: Master/Slave-Betrieb Mit Mehreren Lichtsets
Master/Slave-Betrieb mit mehreren Lichtsets Es lassen sich mehrere Lichtsets zusammenschalten (max. 32). Das Hauptgerät (Master) kann dann alle Nebengeräte (Slave) synchron steuern ohne die Notwendigkeit eines DMX-Controllers. Die Geräte müssen auf die jeweilige Betriebsart eingestellt werden. Konfigurieren Sie zuerst alle Slave-Geräte vor dem Anschluss an das Master-Gerät. Drücken Sie dazu die Taste MENU so oft, bis das Display SLA anzeigt. -
Seite 16: Betrieb Mit Der Fernbedienung
Betrieb mit der Fernbedienung Mit den erweiterten Einstellmöglichkeiten der Fernbedienung lassen sich die integrierten Showprogramme im Automatik- oder im musikgesteuerten Betrieb sowie der Farbmodus mit vorgegebenen Farben nicht nur anwählen sondern die individuellen Einstellungen auch speichern. Die Fernbedienung funktioniert nur im Standalone-Betrieb, sie kann nicht im DMX- oder Slave-Betrieb verwendet werden. -
Seite 17: Dmx-Betrieb
DMX-Betrieb Anzahl der DMX-Kanäle und DMX-Startadresse einstellen Für den Betrieb über einen Controller mit DMX512-Protokoll verfügt das Gerät über 39 Steuerkanäle. Es kann aber auch in einen Modus mit 3, 7, 13, 14, 15, 18, 19, 30 oder 32 Kanälen umgeschaltet werden, wenn andere Funktionen benötigt werden. - Seite 18 Funktionen im DMX-Betrieb 3-Kanal-Modus: Ideal für kleine Controller zum Abrufen der automatischen und musikgesteuerten Programme. Kanal Wert Funktion Dimmer 000-255 Gesamthelligkeit 0-100% Spots + Derby 000–005 Keine Funktion 006–017 Automatik-/Musikprogramm 1 018–030 Automatik-/Musikprogramm 2 031–042 Automatik-/Musikprogramm 3 043–056 Automatik-/Musikprogramm 4 057–069 Automatik-/Musikprogramm 5 070–082...
- Seite 19 13-Kanal-Modus: In diesem Modus werden die Spots und Derby farblich gemeinsam angesteuert, die Scanner können gemeinsam in allen Funktionen gesteuert werden Kanal Wert Funktion 000‒255 Rot 0-100% 000‒255 Grün 0-100% Spots und Derby 000‒255 Blau 0-100% 000‒255 Weiß 0-100% Stopp 001–127 Rotation im Uhrzeigersinn langsam >...
- Seite 20 14-Kanal-Modus: Jeweils zwei Spots und der Derby sind getrennt voneinander steuerbar, bei den Scannern sind verschiedene Programme abrufbar. Dieser Modus eignet sich hervorragend für den Eurolite Colorchief. Kanal Wert Funktion 000‒255 Rot 0-100% 000‒255 Grün 0-100% Spots 1 + 4 000‒255...
- Seite 21 000–015 Offen 016–031 Gobo 1 032–047 Gobo 2 048–063 Gobo 3 064–079 Gobo 4 080–095 Gobo 5 096–111 Gobo 6 112–127 Gobo 7 Scanner Gobos 128–143 Gobo offen+1 144–159 Gobo 2+3 160–175 Gobo 4+5 176–191 Gobo 6+7 192–207 Gobo offen+7 208–223 Gobo 1+6 224–239...
- Seite 22 18-Kanal-Modus: Jeweils zwei Spots und der Derby sind getrennt voneinander steuerbar; beim Scanner können verschiedene Bewegungsprogramme mit individuell einstellbaren Farben und Gobos kombiniert werden. Kanal Wert Funktion 000‒255 Rot 0-100% 000‒255 Grün 0-100% Spots 1 + 4 000‒255 Blau 0-100% 000‒255 Weiß...
- Seite 23 077–145 Pulsierender Strobe-Effekt langsam > schnell 146–215 Zufall-Strobe-Effekt langsam > schnell 216–255 000‒255 Gesamthelligkeit 0-100% UV-Dimmer 19-Kanal-Modus: jeder Kanal lässt sich einzeln einstellen, für Scanner und Derby lassen sich verschiedene Programme abrufen. Kanal Wert Funktion 000‒255 Rot 0-100% 000‒255 Grün 0-100% Spot 1 000‒255 Blau 0-100%...
- Seite 24 30-Kanal-Modus: Spots und Derby lassen sich getrennt steuern, die beiden Scanner werden gemeinsam gesteuert. Kanal Wert Funktion 000‒255 Rot 0-100% 000‒255 Grün 0-100% Spot 1 000‒255 Blau 0-100% 000‒255 Weiß 0-100% 000‒255 Rot 0-100% 000‒255 Grün 0-100% Spot 2 000‒255 Blau 0-100% 000‒255 Weiß...
- Seite 25 128–143 Gobo offen+1 144–159 Gobo 2+3 160–175 Gobo 4+5 176–191 Gobo 6+7 192–207 Gobo offen+7 208–223 Gobo 1+6 224–239 Gobo 2+5 240–255 Gobo 3+4 000‒255 Gesamthelligkeit 0-100% Scanner-Dimmer 000–003 004–007 008–076 Strobe-Effekt langsam > schnell Scanner Strobe-Effekt 077–145 Pulsierender Strobe-Effekt langsam > schnell 146–215 Zufall-Strobe-Effekt langsam >...
- Seite 26 064–079 Cyan 080–095 096–111 Orange 112–127 Blau 128–143 Offen + Violett 144–159 Grün + Gelb 160–175 Cyan + Rot 176–191 Orange + Blau 192–207 Offen + Grün 208–223 Violett + Gelb 224–239 Cyan + Orange 240–255 Rot + Blau 000–015 Offen 016–031 Gobo 1...
- Seite 27 39-Kanal-Modus: Getrennte Ansteuerung der vier Spots, des Derbys und der zwei Scanner; die automatischen und musikgesteuerten Programme können auch aufgerufen werden. Kanal Wert Funktion 000‒255 Rot 0-100% 000‒255 Grün 0-100% Spot 1 000‒255 Blau 0-100% 000‒255 Weiß 0-100% 000‒255 Rot 0-100% 000‒255 Grün 0-100% Spot 2...
- Seite 28 000–255 Pan-Bewegung Scanner Pan 000–255 Tilt-Bewegung Scanner Tilt 000–255 Offen Scanner Pan/Tilt 000–031 Violett 032–063 Grün 064–095 Gelb 096–127 Cyan Scanner Farbrad 128–159 160–191 Orange 192–223 Blau Scanner 2 224–255 Offen 000–031 Offen 032–063 Gobo 1 064–095 Gobo 2 096–127 Gobo 3 Scanner Gobos 128–159...
-
Seite 29: Reinigung Und Wartung
REINIGUNG UND WARTUNG Das Gerät sollte äußerlich in regelmäßigen Abständen von Verunreinigungen wie Staub usw. gereinigt werden. Insbesondere die Linsen sollten sauber sein, damit das Licht mit maximaler Helligkeit abgestrahlt werden kann. Trennen Sie das Gerät vom Netz und lassen Sie es abkühlen, bevor Sie mit der Reinigung beginnen. Reinigen Sie die Oberflächen mit einem fusselfreien, angefeuchteten Tuch. -
Seite 30: Technische Daten
TECHNISCHE DATEN Spannungsversorgung: 100-240 V AC, 50/60 Hz Gesamtanschlusswert: 265 W Schutzart: IP20 Schutzklasse: SK I Stromeinspeisung über P-Con (blau), Einbauversion Stromanschluss: Stromanschlusskabel mit Schutzkontaktstecker (mitgeliefert) Stromausgang: 1 x P-Con (grau), Einbauversion Sicherung: 5 x 20 mm, T 5 A Sicherung auswechselbar Ausstattung: Farbrad;... -
Seite 31: Zubehör
Best.-Nr. 51834034 EUROLITE QuickDMX Funksender/Empfänger Best.-Nr. 70064703 PSSO PowerCon Verbindungskabel 3x1,5 5m Best.-Nr. 30235040 EUROLITE DMX Kabel XLR 3pol 3m schwarz Best.-Nr. 3022785H PSSO DMX Kabel XLR 3pol 3m schwarz Neutrik Best.-Nr. 30227810 EUROLITE STV-60-WOT EU Stahlstativ schwarz Best.-Nr. 59007011 OMNITRONIC BPS-2 Boxenhochständer schwarz...