Herunterladen Inhalt Inhalt Diese Seite drucken
Kettler HOI FRAME Hinweise Zur Verwendung

Kettler HOI FRAME Hinweise Zur Verwendung

Vorschau ausblenden Andere Handbücher für HOI FRAME:

Werbung

Verfügbare Sprachen

Verfügbare Sprachen

HOI FRAME/FRAME+ COMPUTER
Hinweise zur Verwendung des Computers
DEUTSCH
Computer instructions
ENGLISH
Manuel de l'ordinateur
FRANÇAIS

Werbung

Inhaltsverzeichnis
loading

Inhaltszusammenfassung für Kettler HOI FRAME

  • Seite 1 HOI FRAME/FRAME+ COMPUTER Hinweise zur Verwendung des Computers DEUTSCH Computer instructions ENGLISH Manuel de l’ordinateur FRANÇAIS...
  • Seite 2: Inhaltsverzeichnis

    ALLGEMEINE FUNKTIONEN PROGRAM SETUP MODE (PROGRAMM-EINSTELLMODUS) PROGRAM MODE (PROGRAMM-MODUS) PAUSE MODE (PAUSE-MODUS) SUMMARY MODE (ÜBERSICHT-MODUS) CONNECTIVITY MODES (VERBINDUNGS-MODI) EINSTELLUNGSBILDSCHIRME 2 DEUTSCH...
  • Seite 3: Allgemeine Funktionen

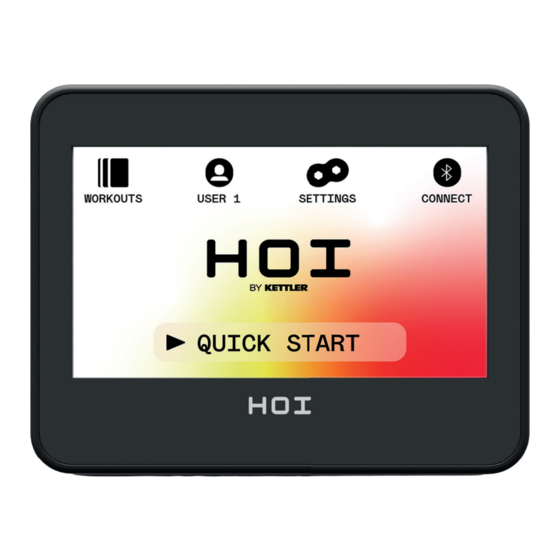
    ALLGEMEINE FUNKTIONEN Im IDLE MODE (STANDBY-MODUS) wartet das System darauf, dass die Tasten QUICK START (SCHNELLSTART), WORKOUTS, USER (BENUTZER), SETTINGS (EINSTELLUN- GEN) oder CONNECT (VERBINDEN) gedrückt werden. Die folgende Abbildung zeigt den Standardbildschirm für den IDLE MODE (STANDBY-MODUS): Auf dem Standby-Bildschirm fi nden Sie folgende Informationen: Taste QUICK START (SCHNELLSTART) Um ein Training schnell zu starten, können Sie die Taste QUICK START (SCHNELLSTART) drücken.
  • Seite 4: Program Setup Mode (Programm-Einstellmodus)

    Taste SETTINGS (EINSTELLUNGEN) Über die Taste SETTINGS (EINSTELLUNGEN) haben Sie Zugriff auf Kennzahlen und Optio- nen zur Konfiguration des Fahrrads, wie bspw. Gerätedaten, Benutzerverwaltung und Netz- werkeinrichtung. Taste CONNECT (VERBINDEN) Bei Auswahl der Taste CONNECT (VERBINDEN) haben Sie Zugriff auf die Konnektivitäts- funktionen des Produkts, um bspw.
  • Seite 5 MANUELLE Workouts Bei einem MANUELLEN Workout können Sie aus drei möglichen Zielen wählen, darunter Time (Zeit), Distance (Strecke) oder Energy (Energie), wie in der Abbildung unten gezeigt. DEUTSCH 5...
  • Seite 6 MANUELLES Workout – TIME GOAL (ZEITZIEL) Bei einem MANUELLEN Workout mit TIME GOAL (ZEITZIEL) können Sie die Dauer Ihres Workouts auswählen. Für die Zieldauer kann zwischen 1 und 99 Minuten gewählt werden. Der voreingestellte Wert beträgt 20 Minuten. Dieser Wert kann durch Betätigen der PLUS- oder MINUS-Taste nach oben bzw.
  • Seite 7 MANUELLES Workout – DISTANCE GOAL (STRECKENZIEL) Bei einem MANUELLEN Workout mit DISTANCE GOAL (STRECKENZIEL) können Sie die gewünschte Strecke für Ihr Training auswählen. Für die Trainingsstrecke kann ein Wert von 1 bis 9999 Kilometer (Einstellung „Metrische Einheiten“) oder Meilen (Einstellung „Englische Einheiten“) vorgegeben werden.
  • Seite 8 MANUELLES Workout – ENERGY GOAL (ENERGIEZIEL) Bei einem MANUELLEN Workout mit ENERGY GOAL (ENERGIEZIEL) können Sie das gewünschte Energieziel für Ihr Training auswählen. Es kann ein Ziel von 5 bis 9999 KCAL/ KJ gewählt werden. Der voreingestellte Wert beträgt 250 KCAL bzw. KJ (die Standardein- heiten werden vom ausgewählten Benutzer vorgegeben).
  • Seite 9 Workouts HILLS (HÜGEL) Die Workouts HILLS (HÜGEL) erreichen Sie über die oberste Ebene des Workout-Bild- schirms. Bei einem Workout HILLS (HÜGEL) können Sie aus sechs verschiedenen Wider- standsprofi len wählen. Diese Profi le simulieren das Fahren über welliges Gelände, Berge und Täler durch Wechsel der Widerstandsstufen im zeitlichen Verlauf.
  • Seite 10 Workouts INTERVALS (INTERVALLE) Die Workouts INTERVALS (INTERVALLE) erreichen Sie über die oberste Ebene des Workout-Bildschirms. Bei einem Workout INTERVALS (INTERVALLE) können Sie aus sechs verschiedenen vordefinierten Widerstandsprofilen wählen. Jedes dieser Profile bietet Ihnen verschiedene Möglichkeiten, um im zeitlichen Verlauf zwischen Übungen mit wahlweise hoher oder niedriger Intensität zu wechseln.
  • Seite 11 Workouts HEART RATE CONTROL (HRC) (HERZFREQUENZSTEUERUNG) Die HRC-Workouts erreichen Sie über die oberste Ebene des Workout-Bildschirms. Bei einem HRC-Workout können Sie zwischen zwei verschiedenen Betriebsmodi wählen, die den Widerstand automatisch an Ihre aktuell gemessene Herzfrequenz und die während der Programmeinrichtung festgelegten Zielherzfrequenzen anpassen. Die beiden verfügbaren HRC-Programme bieten folgende Optionen: 1.
  • Seite 12 Beispiel: Bei einer 40-jährigen Person beträgt die angestrebte ZIELHERZFREQUENZ (220- 40) x 70 % bzw. 180 x 0,7 oder 126 Herzschläge pro Minute (BPM). Zu beachten ist, dass sich bei Änderung des Eintrags für AGE (ALTER) auch die angezeigte TARGET HR (ZIELHERZ- FREQUENZ) entsprechend der oben definierten Gleichung ändert.
  • Seite 13 HRC-Workout – INTERVAL HR (HERZFREQUENZ-INTERVALL) Um ein Workout mit HERZFREQUENZ-INTERVALL zu absolvieren, müssen Sie zunächst Ihr Alter und Ihre UNTERE HERZFREQUENZ und Ihre OBERE HERZFREQUENZ eingeben, die für das Training gelten soll. Die Startwerte für die UNTERE und die OBERE HERZFRE- QUENZ werden anhand der folgenden Formeln ermittelt: UNTERE HERZFREQUENZ = (220 - ALTER) x 0,6 OBERE HERZFREQUENZ = (220 - ALTER) x 0,8...
  • Seite 14 Nachdem Sie die Werte AGE (ALTER) und LOWER HR (ZIELHERZFREQUENZ) eingegeben haben, drücken Sie die Taste NEXT (WEITER). Bestätigen Sie als Nächstes den Grenzwert für die OBERE HERZFREQUENZ, oder ändern Sie diesen Wert nach Bedarf, bevor Sie mit der Taste NEXT (WEITER) zum nächsten Schritt weitergehen.
  • Seite 15 Erstellen eines INDIVIDUELLEN Workouts Den Modus zur Erstellung eines INDIVIDUELLEN Workouts erreichen Sie über die oberste Ebene des Workout-Bildschirms. In diesem Modus können Sie ein spezielles Workout-Profi l defi nieren und wahlweise ein Zeit-, Strecken- oder Energieziel festlegen. Es gibt zwei verschiedene Möglichkeiten zur Eingabe von Profi len. Sie haben die Wahl zwi- schen einem manuellen Profi l (mit konstantem Drehmoment), bei dem Sie einen Widerstands- wert für 30 einzelne Profi lsegmente angeben können, und einem automatischen Profi l (mit konstanter Leistung), bei dem Sie für jedes einzelne Profi lsegment die Leistungsstufe in Watt...
  • Seite 16 1 und 20. Im Modus „Auto“ (Automatisch) (d. h. „Constant Power“ [Konstante Leistung]) liegt der zulässige Wertebereich zwischen 25 und 400 Watt beim Modell HOI FRAME bzw. zwischen 25 und 600 Watt beim Modell HOI FRAME+. Nachdem Sie das Profi l vollständig defi niert haben, können Sie ein Ziel auf Basis von Zeit, Strecke oder Energie auswählen.
  • Seite 17 GESPEICHERTE Workouts Auf diesem Bildschirm können Sie aus einer Liste von zuvor gespeicherten Workouts aus- wählen. Für jedes gespeicherte Workout werden das Profil, das Ziel und die Steuermethode („Manual“ [Manuell], „Constant Torque“ [Konstantes Drehmoment] oder Auto [Automatisch] sowie „Constant Power“ [Konstante Leistung]) gespeichert. Der folgende Bildschirm zeigt das Beispiel einer Liste von gespeicherten Workouts für den aktuell ausgewählten Benutzer.
  • Seite 18: Program Mode (Programm-Modus)

    PROGRAMM-MODUS Beim Wechsel in diesen Modus beginnt die Zeit zu laufen, die Strecke wird kumuliert, die Energie wird kumuliert und alle anderen Anzeigen werden aktiviert. Die Workout-Ansichten werden nachfolgend im Einzelnen beschrieben. Während eines Standard-Workouts sind die folgenden Felder jederzeit verfügbar: •...
  • Seite 19 HINWEIS: Die im Bildschirm oben dargestellten Daten sind simuliert und dienen nur zur Ver- anschaulichung. Auf dem Bildschirm oben ist RPM (Umdrehungen pro Minute) für die Key Metrics Zone (Bereich „Kennzahlen“) ausgewählt. Der Steuermodus für den Widerstand ist „Manual“ (Manuell). Alternativ dazu können Sie während eines Standard-Workouts wählen, ob RPM (Umdre- hungen pro Minute), Speed (Geschwindigkeit), Power (Leistung) (d.
  • Seite 20 Um eine Unterhaltungs-App zu starten, klicken Sie einfach auf die App, die geöffnet werden soll. Bestimmte Apps rufen Inhalte auf, für die ggf. ein Bezahlkonto beim Anbieter der App eingerichtet werden muss. Bei Auswahl dieser Apps werden Sie aufgefordert, Ihren Benut- zernamen und Ihr Passwort einzugeben, um auf die kostenpflichtigen Inhalte zuzugreifen.
  • Seite 21: Pause Mode (Pause-Modus)

    PAUSE MODE (PAUSE-MODUS) BENUTZER BEENDET DAS TRAINING Wenn Sie das Training während eines Workouts beenden (z. B. dann, wenn für die Dauer von mindestens 4 Sekunden weniger als 25 UPM erreicht wurden), wechselt das System in den PAUSE MODE (PAUSE-MODUS). Die verstrichene Zeit wird dann nicht mehr erhöht. Stre- cke und Energie (KCAL/KJ) werden nicht mehr kumuliert.
  • Seite 22: Summary Mode (Übersicht-Modus)

    SUMMARY MODE (ÜBERSICHT-MODUS) Wenn Sie Ihr ausgewähltes Workout-Ziel erreicht haben oder das Workout durch den Wechsel in den PAUSE MODE (PAUSE-MODUS) beendet wurde, schaltet das System in den SUMMARY MODE (ÜBERSICHT-MODUS). Die verstrichene Zeit wird dann nicht mehr erhöht. Die Strecke und die KCAL/KJ werden nicht mehr kumuliert, und das System beginnt mit der Anzeige der verstrichenen Zeit, der kumulierten Energie, der kumulierten Strecke, der Durchschnittswerte für Leistung, Strecke, UPM, Herzfrequenz und Stufe (siehe Bild- schirmfoto unten).
  • Seite 23: Connectivity Modes (Verbindungs-Modi)

    CONNECTVITY MODES (VERBINDUNGS-MODI) ALLGEMEINE HINWEISE An diese Konsole können sowohl ANT+- als auch BLE-fähige Herzfrequenzgurte angeschlos- sen werden. Die Konsole lässt sich außerdem über BLE mit Smartphone- oder Tablet-Apps verbinden. Ebenso ist der Anschluss der Konsole an einen Herzfrequenzgurt (ANT+- oder BLE-fähig) und die gleichzeitige Verbindung mit einer Smartphone-App möglich.
  • Seite 24 VERBINDUNG MIT EINEM BLE-FÄHIGEN HF-BRUSTGURT Drücken Sie die Taste BLUETOOTH HF, um die Kopplung zu starten. Während des Verbin- dungsvorgangs beginnt das Symbol auf der Taste zu blinken. Damit wird angezeigt, dass die Konsole nach einem verfügbaren BLE-Herzfrequenzgurt sucht, mit dem eine Verbindung hergestellt werden kann.
  • Seite 25: Einstellungsbildschirme

    EINSTELLUNGSBILDSCHIRME BILDSCHIRM „MAIN SETTINGS“ (HAUPTEINSTELLUNGEN) Um den Bildschirm MAIN SETTINGS (HAUPTEINSTELLUNGEN) aufzurufen, drücken Sie die Taste SETTINGS (EINSTELLUNGEN) auf dem Bildschirm IDLE (STANDBY). Die folgende Abbildung zeigt den Bildschirm MAIN SETTINGS (HAUPTEINSTELLUNGEN): Auf diesem Bildschirm stehen die folgenden vier Optionen zur Auswahl: •...
  • Seite 26 BILDSCHIRM „DEVICE INFORMATION“ (GERÄTEDATEN) Die folgende Abbildung zeigt den Bildschirm DEVICE INFORMATION (GERÄTEDATEN): Hier finden Sie wichtige Informationen zu Ihrem Gerät, wie bspw. die Gesamtdauer, während der das Produkt in Gebrauch war, die auf dem Fahrrad insgesamt zurückgelegte Strecke sowie die aktuelle Version von Hard- und Software: •...
  • Seite 27 BILDSCHIRM „USER MANAGEMENT - USER SELECTION (BENUTZERVERWALTUNG UND -AUSWAHL) Die folgende Abbildung zeigt den Bildschirm USER MANAGEMENT - USER SELECTION (BENUTZERVERWALTUNG UND -AUSWAHL): Auf diesem Bildschirm können Sie den Benutzer auswählen, dessen Daten Sie aktualisieren möchten. Um den Bildschirm USER MANAGEMENT - USER SELECTION (BENUTZERVERWAL- TUNG UND -AUSWAHL) zu verlassen und zum Bildschirm MAIN SETTINGS (HAUPTEIN- STELLUNGEN) zurückzukehren, drücken Sie auf die Taste BACK (ZURÜCK).
  • Seite 28 BILDSCHIRM „USER MANAGEMENT - USER CONFIGURATION“ (BENUTZERVERWAL- TUNG UND -KONFIGURATION) Die folgende Abbildung zeigt den Bildschirm USER MANAGEMENT - USER CONFIGUARION (BENUTZERVERWALTUNG UND -KONFIGURATION): Auf diesem Bildschirm können Sie das Gewicht (einschließlich Einheiten) und das Alter des ausgewählten Benutzers vorgeben und die gewünschten Einheiten für Geschwindigkeit und Entfernung sowie die gewünschte Maßeinheit für die Energie festlegen.
  • Seite 29 BILDSCHIRM „NETWORK SETUP“ (NETZWERKEINRICHTUNG) Die folgende Abbildung zeigt den Bildschirm NETWORK SETUP (NETZWERKEINRICH- TUNG): Auf diesem Bildschirm wird die WLAN-Funktion auf der Konsole aktiviert oder deaktiviert. Mit der Umschalttaste im oberen rechten Bereich des Bildschirms können Sie zwischen OFF (AUS) und ON (EIN) wechseln. Bei aktiviertem WLAN erscheint eine Liste der verfügbaren Netzwerke.
  • Seite 30 GENERAL FUNCTIONS PROGRAM SETUP MODE PROGRAM MODE PAUSE MODE SUMMARY MODE CONNECTIVITY MODES SETTINGS SCREENS 30 ENGLISH...
  • Seite 31: General Functions

    GENERAL FUNCTIONS During the IDLE MODE the system is waiting for the user to press either the QUICK START, WORKOUTS, USER, SETTINGS, or CONNECT buttons. The default screen for IDLE MODE is the Idle Screen shown below: The Idle Screen provides the following information for you: QUICK START Button To begin a workout quickly the user can press the QUICK START button.
  • Seite 32: Program Setup Mode

    CONNECT Button The CONNECT button is used to access the connectivity features of the product, including connecting to Bluetooth Smart and ANT+ HR chest straps, connecting to smartphones and tablets via Bluetooth LE, and connecting to Bluetooth headphones. PROGRAM SETUP MODE In the PROGRAM SETUP MODE the user can select from six different workout types.
  • Seite 33 MANUAL Workouts A MANUAL workout allows the user to select from three possible goals, including Time, Distance, or Energy as can be seen below. ENGLISH 33...
  • Seite 34 MANUAL Workout - TIME GOAL For a MANUAL workout with a TIME GOAL the user shall be able to choose the duration of their workout. The target duration may be from from 1 to 99 minutes. The default value shall be 20 minutes. The user can adjust the value up or down by using the PLUS and MINUS buttons respectively.
  • Seite 35 MANUAL Workout - DISTANCE GOAL For a MANUAL workout with a DISTANCE GOAL the user shall be able to choose the desired distance for their workout. The user shall be able to enter a distance from 1 to 9999 kilometers (Metric Units Setting) or miles (Imperial Units Setting). The default value shall be 30 kilometers or miles (default units is determined by the selected user).
  • Seite 36 MANUAL Workout - ENERGY GOAL For a MANUAL workout with an ENERGY GOAL the user shall be able to choose the desired energy goal for their workout. The user shall be able to enter a goal from 5 to 9999 KCAL/KJ.
  • Seite 37 HILLS Workouts The HILLS workouts are accessible from the top level workouts screen. A HILLS workout allows the user to select from six diff erent resistance profi le options. These profi les simulate riding over underlating hills, mountains, and valleys by varying resistance levels over time. The options includes are as follows: 1.
  • Seite 38 INTERVALS Workouts The INTERVALS workouts are accessible from the top level workouts screen. An INTER- VALS workout allows the user to select from six different predefined resistance profile options. These profiles provide the user with different options for alternating between high intensity and low intensity exercise over time.
  • Seite 39 HEART RATE CONTROL (HRC) Workouts The HRC workouts are accessible from the top level workouts screen. A HRC workout allows the user to select from two diff erent modes of operation that automatically adjust re- sistance based on the user’s current measured heart rate and heart rate targets established during the program setup.
  • Seite 40 Once the AGE and TARGET HR values have been entered, press the NEXT button. They will then be given the option of selecting a goal based on time, distance, or energy. Refer to the descriptions above for how time, distance, and energy goals are entered. Once the goal is entered and the user presses the START button, the system shall transition to PROGRAM MODE and the workout shall begin.
  • Seite 41 HRC Workout - INTERVAL HR For an INTERVAL HR workout the user shall first enter their Age, Lower HR limit, and UP- PER HR limit for the workout. The initial values for the Lower HR and Upper HR limits are determined based on the following formulas: LOWER HR = (220 - AGE) x 0.6 UPPER HR = (220 - AGE) x 0.8...
  • Seite 42 Next confirm the UPPER HR limit and change as desired, then press the NEXT button. Finally, the user will be given the option of selecting a goal based on time, distance, or energy. Refer to the descriptions above for how time, distance, and energy goals are entered. Once the goal is entered and the user presses the START button, the system shall transition to PROGRAM MODE and the workout shall begin.
  • Seite 43 CUSTOM Workout Creation The CUSTOM workout creation mode is accessible from the top level workouts screen. In the mode, the user can defi ne a unique workout profi le and specify either a time, distance, or energy goal. There are two types of profi le entry options. The user can select to enter a Manual (i.e. Constant Torque) profi le which allows them to specify a resistance level for 30 unique profi le segments or an Auto (i.e.
  • Seite 44 When in the Manual (i.e. Constant Torque) mode, the range of acceptable values is from 1 to 20. When in the Auto (i.e. Constant Power) mode, the range of acceptable values is from 25 to 400 watts for HOI FRAME and 25 to 600 watts for HOI FRAME+.
  • Seite 45 SAVED Workouts In this screen the user shall be able to select from a list of previously saved workouts. The workout profile, goal, and control method (i.e. Manual – Constant Torque or Auto – Contant Power) are stored for each saved workout. The screen below shows an example of a list of saved workouts for the currently selected user.
  • Seite 46: Program Mode

    PROGRAM MODE Upon transitioning to this mode, time shall begin incrementing, distance shall begin accumulat- ing, energy shall begin accumulating, and all other displays shall become active. The specifi cs of the workout views are described below. The following fi elds are available at all times during a standard workout: •...
  • Seite 47 Alternatively, during a standard workout, a user may choose whether they want to display RPM, Speed, Power (i.e. Watt), HR, Energy (KCAL or KJ), or Distance. The screen above shows RPM selected. The markers below the thick curved line signify the relative percentage of the displayed value in the Key Metrics Zone.
  • Seite 48 MEDIA - FULLSCREEN VIEW When viewing an app, you have an option of viewing the app in fullscreen mode. To enter this mode simpy press the fullscreen button. An example of the fullscreen view can be seen below: 48 ENGLISH...
  • Seite 49: Pause Mode

    PAUSE MODE USER STOPS EXERCISING If the user stops exercising (i.e. the RPM has been less than 25 for 4 or more seconds) during a workout the system shall transition to PAUSE MODE, the elapsed time shall stop incrementing, the distance and energy (i.e. KCAL/KJ) shall stop accumulating. During this mode the following screen will be displayed: Once this mode has been initiated a 30 second countdown timer shall be started and once it elapses, the system shall transition SUMMARY MODE.
  • Seite 50: Summary Mode

    SUMMARY MODE If the user reaches their chosen workout goal or the workout has been terminated through PAUSE MODE then the system shall also transition to SUMMARY MODE, the elapsed time shall stop incrementing, the distance and KCAL/KJ shall stop accumulating and the system shall start displaying the elapsed time, accumulated energy, accumulated distance, average values for power, speed, RPM, heart rate, and level as shown in the screen image below: Once this mode has been initiated a 30 second countdown timer shall be started and once it...
  • Seite 51: Connectivity Modes

    CONNECTVITY MODES GENERAL This console is capable of connecting to both ANT+ and BLE heart rate straps. In addition, the console shall be able to connect to smartphone or tablet apps via BLE. The console shall also be able to connect to both a heart rate strap (ANT+ or BLE) and simultaneously con- nect to a smartphone app.
  • Seite 52 CONNECTING TO AN ANT+ HR STRAP Press the ANT+ HR button to initiate the connection process. During the connection pro- cess, an indicator within the button shall begin to blink to indicate that the console is looking for an available ANT+ HR strap to connect to. When the console successfully connects to a ANT+ HR strap, the console will return to normal function, and the ANT+ HR indicator shall stay green and no longer blink.
  • Seite 53: Settings Screens

    SETTINGS SCREENS MAIN SETTINGS SCREEN To access the MAIN SETTINGS SCREEN the user shall press the SETTINGS button on the IDLE SCREEN. The graphic above shows the main SETTINGS SCREEN: There are four options provided on this screen and they are as follows: •...
  • Seite 54 DEVICE INFORMATION SCREEN The graphic below shows the DEVICE INFORMATION SCREEN: Provides the user with important device information, including the total amount of time that the product has been in use, how far the bike has been ridden overall, the current hardware version, and the current software version: •...
  • Seite 55 USER MANAGEMENT - USER SELECTION SCREEN The graphic below shows the USER MANAGEMENT - USER SELECTION SCREEN: This screen allows you to select the specifi c user that you would like to update the user information for. To exit the USER MANAGEMENT - USER SELECTION SCREEN and return to the MAIN SETTINGS SCREEN press the BACK button.
  • Seite 56 USER MANAGEMENT - USER CONFIGURATION SCREEN The graphic below shows the USER MANAGEMENT - USER CONFIGURATION SCREEN: This screen allows you to define the selected user’s default weight (including units) and age, desired units for speed and distance, and the desired unit of measurement for energy. To save the entered values to memory press the SAVE button.
  • Seite 57 NETWORK SETUP SCREEN The graphic below shows the NETWORK SETUP SCREEN: This screen is used to enable and disable the WI-FI network feature on the console. Use the toggle button in the upper right portion of the screen between OFF and ON. When the WI- FI is turned ON the available networks will be listed.
  • Seite 58 FONCTIONS GÉNÉRALES MODE DE PARAMÉTRAGE DU PROGRAMME MODE PROGRAMME MODE PAUSE MODE SYNTHÈSE MODES DE CONNECTIVITÉ RÉGLAGES DE L'ÉCRAN 58 FRANÇAIS...
  • Seite 59: Fonctions Générales

    FONCTIONS GÉNÉRALES En MODE VEILLE, le système attend que l'utilisateur appuie sur un bouton parmi DÉMAR- RAGE RAPIDE, EXERCICES, UTILISATEUR, PARAMÈTRES ou SE CONNECTER. L’écran par défaut en MODE VEILLE est l’écran de Veille présenté ci-dessous : L’écran de Veille vous donne les informations suivantes : Bouton DÉMARRAGE RAPIDE Pour lancer rapidement un exercice, l’utilisateur peut appuyer sur le bouton DÉMARRAGE RAPIDE.
  • Seite 60: Mode De Paramétrage Du Programme

    Bouton PARAMÈTRES Le bouton PARAMÈTRES permet d'accéder aux mesures et aux options de configuration pour le vélo, y compris les informations sur l'appareil, la gestion des utilisateurs et la configu- ration du réseau. Bouton SE CONNECTER Le bouton SE CONNECTER permet d'accéder aux fonctions de connectivité du produit, y compris la connexion aux sangles de poitrine Bluetooth Smart et ANT+ HR (FR ANT+), aux smartphones et tablettes via Bluetooth LE et aux casques Bluetooth.
  • Seite 61 Exercices en MANUEL Dans un exercice en MANUEL, l'utilisateur peut choisir entre trois objectifs (Temps, Distance et Énergie) comme représenté ci-après. FRANÇAIS 61...
  • Seite 62 Exercice en MANUEL – OBJECTIF TEMPS Pour un exercice en MANUEL avec un OBJECTIF TEMPS, l’utilisateur peut choisir la durée de l’exercice. La durée cible peut être comprise entre 1 et 99 minutes. La valeur par défaut est de 20 minutes. L’utilisateur peut ajuster la valeur dans un sens ou dans l’autre à l’aide des boutons PLUS et MOINS.
  • Seite 63 Exercice en MANUEL – OBJECTIF DISTANCE Pour un exercice en MANUEL avec un OBJECTIF DISTANCE, l’utilisateur peut choisir la distance de l’exercice. L’utilisateur peut saisir une distance de 1 à 9999 kilomètres (réglage en unités métriques) ou miles (réglage en unités impériales). La valeur par défaut est de 30 kilomètres ou miles (l’unité...
  • Seite 64 Exercice en MANUEL – OBJECTIF ÉNERGIE Pour un exercice en MANUEL avec un OBJECTIF ÉNERGIE, l’utilisateur peut choisir l'objec- tif énergétique de l’exercice. Il peut saisir un objectif allant de 5 à 9999 KCAL/KJ. La valeur par défaut est de 250 KCAL ou KJ (l’unité par défaut est déterminée par l'utilisateur sélec- tionné).
  • Seite 65 Exercices avec COLLINES Les exercices avec COLLINES sont accessibles depuis l'écran d'exercices de niveau su- périeur. Un exercice avec COLLINES permet à l'utilisateur de choisir entre six diff érentes options de profi l de résistance. Ces profi ls simulent le fait de rouler dans des collines, mon- tagnes et vallées en faisant varier les niveaux de résistance au fur et à...
  • Seite 66 Exercices avec INTERVALLES Les exercices avec INTERVALLES sont accessibles depuis l'écran d'exercices de niveau supérieur. Un exercice avec INTERVALLES permet à l'utilisateur de choisir entre six différentes options prédéfinies de profil de résistance. Ces profils fournissent à l'utilisateur diverses options pour alterner entre les exercices à haute intensité et à faible intensité. Les options proposées sont les suivantes : 1.
  • Seite 67 Exercices avec CONTRÔLE DE LA FRÉQUENCE CARDIAQUE (CFC) Les exercices avec CFC sont accessibles depuis l'écran d'exercices de niveau supérieur. Un exercice avec CFC permet à l'utilisateur de choisir entre deux modes diff érents qui ajustent automatiquement la résistance en fonction de la fréquence cardiaque actuelle de l'utilisateur et des cibles de fréquence cardiaque défi nies lors de la confi guration du programme.
  • Seite 68 Une fois les valeurs saisies pour l'ÂGE et la FC CIBLE, appuyer sur le bouton SUIVANT. L'uti- lisateur peut ensuite sélectionner un objectif en termes de temps, de distance ou d'énergie. Voir les descriptions ci-dessus pour la saisie des objectifs de temps, distance et énergie. Une fois l'objectif saisi et lorsque l'utilisateur appuie sur le bouton DÉMARRER, le système passe en MODE PROGRAMME et l’exercice peut débuter.
  • Seite 69 Par exemple, pour une personne de 40 ans, la limite FC INFÉRIEURE est de (220 - 40) x 60 % ou 180 x 0,6, soit 108 BPM et la limite FC SUPÉRIEURE est de (220 - 40) x 80 % ou 180 x 0,8, soit 144 BPM.
  • Seite 70 Une fois les valeurs saisies pour l'ÂGE et la FC INFÉRIEURE, appuyer sur le bouton SUIVANT. Confi rmer ensuite la FC SUPÉRIEURE et la modifi er si nécessaire, puis appuyer sur le bouton SUIVANT. L'utilisateur peut enfi n sélectionner un objectif en termes de temps, de distance ou d’énergie ou d'énergie.
  • Seite 71 En mode Auto (c.-à-d. à puissance constante), la plage de valeurs acceptables s'étend de 25 à 400 watts pour HOI FRAME et de 25 à 600 watts pour HOI FRAME+. Une fois le profi l complètement défi ni, l'utilisateur peut sélectionner un objectif en termes de temps, de distance ou d'énergie.
  • Seite 72 Exercices ENREGISTRÉS Sur cet écran, l'utilisateur peut choisir dans une liste d'exercices préalablement enregistrés. Le profil, l'objectif et la méthode de contrôle (c.-à-d. Manuel – à couple constant ou Auto – à puissance constante) de l'exercice sont conservés pour chaque exercice enregistré. L'écran ci-dessous montre un exemple de liste des exercices enregistrés pour l'utilisateur actuelle- ment sélectionné.
  • Seite 73: Mode Programme

    MODE PROGRAMME En arrivant dans ce mode, le temps commence à être décompté, les distances commencent à se cumuler, de même que l’énergie ; et tous les autres affi chages deviennent actifs. Les affi - chages en cours d’exercice sont décrits en détail ci-après. Les champs qui suivent sont disponibles à...
  • Seite 74 Au cours d’un exercice standard, l’utilisateur peut aussi choisir d’affi cher le nombre de tr/min (RPM), la vitesse, la puissance (watts), la FC, l'énergie (KCAL ou KJ) ou la distance. Sur l’écran ci-dessus, c’est le nombre de tr/min (RPM) qui a été sélectionné. Les pointillés sous la courbe épaisse signalent le pourcentage relatif de la valeur affi chée dans la Zone des Indicateurs Clés.
  • Seite 75 MÉDIA – VUE PLEIN ÉCRAN Pendant la visualisation d'une application, une option permet de regarder en mode plein écran. Pour accéder à ce mode, il suffit d'appuyer sur le bouton Plein écran. Un exemple de vue en plein écran est présenté ci-dessous : FRANÇAIS 75...
  • Seite 76: Mode Pause

    MODE PAUSE ARRÊT DE L’EXERCICE PAR L’UTILISATEUR Si l’utilisateur arrête de pédaler (et donc, que le RPM est inférieur à 25 depuis au moins 4 secondes) au cours d’un exercice, le système passe en MODE PAUSE, le temps écoulé ne s’incrémente plus, la distance et l’énergie (KCAL/KJ) ne se cumulent plus.
  • Seite 77: Mode Synthèse

    MODE SYNTHÈSE Si l’utilisateur atteint l’objectif choisi pour l’exercice ou si l'exercice est arrêté en utilisant le MODE PAUSE, le système passe en MODE SYNTHÈSE, le temps écoulé ne s’incrémente plus, la distance et l’énergie ne se cumulent plus et le système commence à afficher le temps écou- lé, l'énergie cumulée, les valeurs moyennes de RPM, de vitesse, de puissance, de fréquence cardiaque et de niveau, comme montré...
  • Seite 78 Bouton FC BLE – Appuyer sur ce bouton pour lancer une connexion vers Bouton FC BLE – Appuyer sur ce bouton pour lancer une connexion vers une sangle de mesure cardiaque (FC) BLE une sangle de mesure cardiaque (FC) BLE Bouton FC ANT+ –...
  • Seite 79: Réglages De L'écran

    CONNEXION À DES CASQUES BLUETOOTH Appuyer sur le bouton CASQUE BLUETOOTH pour ouvrir l'ÉCRAN DE CONNEXION BLUETOOTH. Cet écran permet d'activer la connexion BLUETOOTH et de sélectionner l'appareil auquel s'appairer. Une fois l'appairage avec un CASQUE BLUETOOTH réussi, l'utilisateur peut écouter le média qu'il visionne sur l'écran. CONNEXION À...
  • Seite 80 L’image ci-dessus présente l’ÉCRAN DES PARAMÈTRES principal : Les quatre options suivantes sont disponibles sur cet écran : • CHOIX DE LA LANGUE – Permet à l'utilisateur de sélectionner la langue de son choix pour l'interface utilisateur • INFORMATIONS SUR L'APPAREIL – Fournit à l'utilisateur des informations importantes sur l'appareil ;...
  • Seite 81 Elle fournit à l'utilisateur des informations importantes sur l'appareil, y compris la durée to- tale d'utilisation de l'appareil, la distance totale parcourue sur l'appareil, la version matérielle actuelle et la version logicielle actuelle : • TEMPS TOTAL – C’est la durée totale cumulée de tous les exercices réalisés sur cette machine, exprimée en heures, minutes et secondes •...
  • Seite 82 ÉCRAN GESTION DES UTILISATEURS – CONFIGURATION DES UTILISATEURS L’image ci-dessous présente l'ÉCRAN GESTION DES UTILISATEURS – CONFIGURATION DES UTILISATEURS : Cet écran permet de définir le poids par défaut de l'utilisateur sélectionné (y compris les uni- tés), son âge et les unités souhaitées pour la vitesse et la distance, ainsi que pour la mesure de l'énergie.
  • Seite 83 ÉCRAN CONFIGURATION RÉSEAU L’image ci-dessous présente l’ÉCRAN CONFIGURATION RÉSEAU : Cet écran permet d'activer et de désactiver la fonctionnalité de réseau wifi sur la console. Utiliser le bouton de commutation situé dans le coin supérieur droit de l'écran pour basculer entre ACTIVER et DÉSACTIVER. Lorsque le wifi est activé, les réseaux disponibles sont répertoriés.
  • Seite 84 TRISPORT AG BOESCH 67 CH-6331 HUENENBERG SWITZERLAND www.kettlersport.com @ kettlersportofficial @ kettlersportofficial...

Diese Anleitung auch für:

Hoi frame+

Inhaltsverzeichnis