Herunterladen Inhalt Inhalt Diese Seite drucken
Parkside PWD 30 A1 Originalbetriebsanleitung

Parkside PWD 30 A1 Originalbetriebsanleitung

Nass-/trockensauger
Vorschau ausblenden Andere Handbücher für PWD 30 A1:
Inhaltsverzeichnis

Werbung

Verfügbare Sprachen

Verfügbare Sprachen

Wet & Dry Vacuum Cleaner PWD 30 A1
Wet & Dry Vacuum Cleaner
Translation of the original instructions
Nass-/Trockensauger
Originalbetriebsanleitung
IAN 364420_2010
Ηλεκτρική σκούπα υγρών/στερεών
Μετάφραση των αυθεντικών οδηγιών λειτουργίας

Werbung

Inhaltsverzeichnis
loading

Inhaltszusammenfassung für Parkside PWD 30 A1

  • Seite 1 Wet & Dry Vacuum Cleaner PWD 30 A1 Ηλεκτρική σκούπα υγρών/στερεών Wet & Dry Vacuum Cleaner Translation of the original instructions Μετάφραση των αυθεντικών οδηγιών λειτουργίας Nass-/Trockensauger Originalbetriebsanleitung IAN 364420_2010...
  • Seite 2 Before reading, unfold the page containing the illustrations and familiarise yourself with all functions of the device. Πριν ξεκινήσετε την ανάγνωση, ανοίξτε τη σελίδα με τις εικόνες και εξοικειωθείτε με όλες τις λειτουργίες της συσκευής. Klappen Sie vor dem Lesen die Seite mit den Abbildungen aus und machen Sie sich anschließend mit allen Funktionen des Gerätes vertraut.
  • Seite 4  ‚...
  • Seite 5: Inhaltsverzeichnis

    Contents Introduction Congratulations on the purchase of your Introduction ......... 5 Intended purpose ......5 new device. With it, you have chosen a General description ...... 5 high quality appliance. Extent of the delivery ......6 During production, this equipment has been checked for quality and subjected to a final Overview .........
  • Seite 6: Extent Of The Delivery

    6 Container Extent of the delivery 7 Mains power cable Carefully unpack the appliance and check 8 5 castors with accessory holders (8a) that it is complete. The appliance is supplied with the motor 9 Drainage outlet head fitted ( 2).
  • Seite 7: Description Of Operation

    Wet and dry Symbols on the appliance vacuum cleaner ...... PWD 30 A1 Mains voltage (U) ..220-240 V~, 50 Hz Power consumption of motor (P) ...1500 W Electrical machines must not be disposed of with house- Max.
  • Seite 8: Pictograms Regarding The Use Of Nozzles And Filters

    knowledge, if they are super- Pictograms regarding the use of nozzles and filters vised or have been instructed regarding safe use of the device Nozzle to vacuum carpets. and understand the resulting risks. Children are not permitted to play with the device. Clean- Nozzle to vacuum smooth surfaces and hard floor sur- ing and user maintenance are...
  • Seite 9: Assembly

    • Switch the machine off and dis- • Observe the instructions for connect the mains plug: cleaning and maintenance of - when the machine is not in use, the machine. - before the machine is opened • Store the appliance in a dry place and out of reach of children.
  • Seite 10: Operation

    Airflow Control 26) or car nozzle ( 27) can be attached directly onto the han- dle with air regulation (17). The airflow can be continuously adjusted by turning the airflow controller ( Operation minimum airflow MIN: maximum airflow Fully unwind the suction hose MAX: 20) before commencing work.
  • Seite 11: Wet Vacuuming

    If the sealing lip of the folded filter ing or drilling hard wood) can pose a risk (14) does not spontaneously touch due to hazardous dust. the motor head (2), turn the cover We recommend using the following option- plate (14a) a little without force un- al filter combination, which is available, for fine dust (see “Spare parts/Accessories”): til the inside latch of the cover plate...
  • Seite 12: Blowing

    The reduction adaptor (22) also fits 4. Empty the container immediately after onto the vacuum hose (20) (dust vacuuming because it is not designed to store liquids (see “Cleaning/Mainte- vacuuming without the powertool nance”). hose). Cleaning/Maintenance Never reach into the water to be suctioned up.
  • Seite 13: Storage

    Disposal/Environmental Insert the mains plug of the device. protection 1. Move the on/off switch (13) to the “I” position. Be environmentally friendly. Return the 2. Turn the air flow control (3) to the MAX tool, accessories and packaging to a recy- cling centre when you have finished with position.
  • Seite 14: Guarantee

    Guarantee Guarantee Cover The equipment has been carefully pro- Dear Customer, duced in accordance with strict quality This equipment is provided with a 3-year guidelines and conscientiously checked guarantee from the date of purchase. prior to delivery. In case of defects, you have statutory rights against the seller of the product.
  • Seite 15: Repair Service

    Service-Center • After consultation with our customer service, a product recorded as defective can be sent postage paid to the service Service Great Britain Tel.: 0800 4047 657 address communicated to you, with the proof of purchase (receipt) and specifica- E-Mail: grizzly@lidl.co.uk IAN 364420_2010 tion of what constitutes the defect and...
  • Seite 16: Replacement Parts/Accessories

    Replacement parts/Accessories Spare parts and accessories can be obtained at www.grizzlytools-service.eu If you have issues ordering, please use the contact form. If you have any other questions, contact the ”Service-Center” (see page 15). Item Item Description Product No. Instruction Exploded Manual Drawing Sealing clips, 2 pieces...
  • Seite 17: Trouble Shooting

    Trouble shooting Problem Possible cause Fault correction Check plug socket, cable, line, Mains voltage is not plug and fuse, where appropriate, present repair through electrical specialist Defective on/off switch Device does not start Repair through customer service Worn carbon brushes Defective motor Hose system ( 20/21)
  • Seite 18: Εισαγωγή

    Περιεχόμενα Εισαγωγή Εισαγωγή ..........18 Συγχαρητήρια για την αγορά της νέας συ- Χρήση ..........18 σκευής σας. Προτιμήσατε να αγοράσετε ένα Γενική περιγραφή ....... 19 προϊόν ανώτερης ποιότητας. Η ποιότητα Παραδοτέα υλικά ....... 19 αυτής της συσκευής ελέγχθηκε κατά τη δι- Επισκόπηση ........19 άρκεια...
  • Seite 19: Γενική Περιγραφή

    Γενική περιγραφή Επισκόπηση Οι απεικονίσεις βρίσκονται  στην μπροστινή και πισινή σε- 1   λίδα-φάκελλο. 2 Κεφαλή μοτέρ με υποδοχή αξε- σουάρ (2a) Παραδοτέα υλικά 2b Υποδοχή φίλτρου 3 Ρυθμιστής ροής αέρα Βγάλτε τη συσκευή από τη συσκευασία 4 Πλήκτρο καθαρισμού φίλτρου και...
  • Seite 20: Περιγραφή Λειτουργίας

    Τεχνικά στοιχεία Συνδέστε τη συσκευή στην τάση δικτύου. κούπα υγρών Σύμβολο υπόδειξης με πλη- και σκόνης ......PWD 30 A1 ροφορίες για τον καλύτερο Τάση δικτύου (U) ..220-240 V~, 50 Hz χειρισμό της συσκευής.     (P) ........1500 W Μεγ.
  • Seite 21: Σύμβολα Πάνω Στη Συσκευή

    Σύμβολα πάνω στη συσκευή Ειδικό ακροφύσιο για τον κα- θαρισμό του αυτοκινήτου.   για την αναρρόφηση υγρών.      Το φίλτρο δεν ενδείκνυται για . την αναρρόφηση υγρών. Το φις ενδείκνυται μόνο για χρήση σε κλειστούς χώρους. για...
  • Seite 22 δεν επιτρέπεται να εκτελούνται •      από μη επιτηρούμενα παιδιά.   : -     •         , -    ,   . - ...
  • Seite 23: Οδηγίες Συναρμολόγησης

    5. Τοποθετήστε τα αξεσουάρ: •   - Ωθήστε το σωλήνα αναρρόφησης   , (20) στη σύνδεση αναρρόφησης      (10), αυτός κουμπώνει.     . Για την απομάκρυνση πιέστε το     άγκιστρο...
  • Seite 24: Ρύθμιση Ροής Αέρα

    Διαλείμματα   (Συνε- χής λειτουργία): Φέρτε τον διακόπτη ( 13) ενεργοποίη- Για τη φύλαξη του συναρμολογημένου σετ σης/απενεργοποίησης στην θέση „I“ αναρρόφησης κατά τη διάρκεια μιας παύ- σης εργασίας μπορείτε να πιέσετε μαζί τον πτυσσό-     + μενο...
  • Seite 25: Υγρή Αναρρόφηση

    2. Ασφαλίστε το πτυχωτό φίλτρο (14) με διάτρηση σε σκληρό ξύλο) μπορεί να προ- μια ελαφριά περιστροφή του ρυθμιστή κύψουν επιβλαβείς για την υγεία σκόνες. ασφάλειας (14a) δεξιόστροφα: Για αυτές τις λεπτές σκόνες συστήνουμε τη χρήση του εξής προαιρετικά διαθέσι- Ασφάλιση...
  • Seite 26: Φύσημα

    Avαρρόφηση Powertool Ασφάλιση ρυθμιστή ασφάλειας Απασφάλιση ρυθμιστή   Powertool   ασφάλειας •    . •      3. Αναρρόφηση (άντληση): Βυθίστε το   . σωλήνα αναρρόφησης ( 20) στη χειρολαβή ( 17) στο δοχείο νερού 1.
  • Seite 27: Σύστημα Καθαρισμού Φίλτρου

    • Τινάξτε το πτυχωτό φίλτρο ( 14), 2. Τυλίξτε το σωλήνα αναρρόφησης (20) πλύνετέ το με χλιαρό νερό και αφήστε γύρω από την κεφαλή μοτέρ (2). Τα το να στεγνώσει. δύο τόξα συγκράτησης (28) συγκρα- τούν το σωλήνα αναρρόφησης. • ...
  • Seite 28: Ανταλλακτικά/Αξεσουάρ

    Ανταλλακτικά/Αξεσουάρ Ανταλλακτικά και αξεσουάρ μπορείτε να βρείτε στη σελίδα www.grizzlytools-service.eu Εάν παρουσιάζονται προβλήματα κατά τη διαδικασία παραγγελίας, χρησιμοποιήστε το έντυπο επικοινωνίας. Εάν έχετε περισσότερες ερωτήσεις μπορείτε να απευθυνθείτε στο «Service-Center» (δείτε στη σελίδα 31). Αρ. Αρ. Επί Χαρακτηρισμός Χρήση Αρ. είδους Οδηγιών...
  • Seite 29: Ανίχνευση Βλαβών

    Ανίχνευση βλαβών Πρόβλημα Πιθανή αιτία Παραμερισμός βλαβών Έλεγχος πρίζας, καλωδίων, αγωγών, φις και ασφάλειας, Έλλειψη τάσης δικτύου ενδεχομένως επισκευή από εξειδικευμένο ηλεκτρολόγο Η συσκευή δεν Ο διακόπτης ON/OFF ( παίρνει μπρο- είναι ελαττωματικός στά Επισκευή μέσω της υπηρεσίας εξυπηρέτησης πελατών Φθαρμένο...
  • Seite 30: Εγγύηση

    Εγγύηση δηλωθούν αμέσως μετά το ξεπακετάρισμα. Για όλες τις επισκευές που καθίστανται απα- Αξιότιμη πελάτισσα, αξιότιμε πελάτη, ραίτητες μετά τη λήξη της εγγύησης επιβα- για τη συσκευή αυτή σας προσφέρουμε εγ- ρύνεστε με τις σχετικές δαπάνες. γύηση 3 ετών από την ημερομηνία της αγο- ράς.
  • Seite 31: Σέρβις Επισκευής

    • Εάν παρουσιαστούν σφάλματα λειτουρ- Οι συσκευές που στέλνονται χωρίς να έχουν γίας ή άλλα ελαττώματα, επικοινωνήστε πληρωθεί τα ταχυδρομικά τέλη - με εξπρές, πρώτα με το πιο κάτω αναφερόμενο σαν ογκώδη αντικείμενα, ή με άλλο ειδικό τμήμα εξυπηρέτησης πελατών τηλεφω- τρόπο...
  • Seite 32: Einleitung

    Inhalt Einleitung Herzlichen Glückwunsch zum Kauf Ihres Einleitung ........32 Bestimmungsgemäße neuen Gerätes. Sie haben sich damit für ein Verwendung ......32 hochwertiges Gerät entschieden. Allgemeine Beschreibung ... 33 Dieses Gerät wurde während der Produktion Lieferumfang/Zubehör ..... 33 auf Qualität geprüft und einer Endkontrolle Übersicht ........
  • Seite 33: Allgemeine Beschreibung

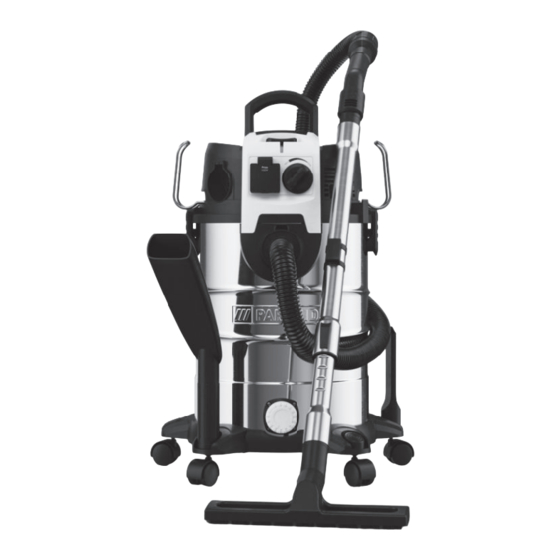
    Allgemeine Beschreibung 4 Filterreinigungstaste 5 Verschlussclip Die Abbildungen finden Sie auf 6 Behälter der vorderen und hinteren Aus- 7 Netzanschlussleitung 8 5 Lenkrollen klappseite. mit Zubehöraufnahmen (8a) Lieferumfang/Zubehör 9 Schraubdeckel zum Ablassen von Flüssigkeit Packen Sie das Gerät aus und kontrollieren 10 Sauganschluss Sie, ob es vollständig ist: 11 Gerätesteckdose...
  • Seite 34: Funktionsbeschreibung

    Informationen zum besseren bitte den nachfolgenden Beschreibungen. Umgang mit dem Gerät. Technische Daten Symbole auf dem Gerät Gerät ......PWD 30 A1 Elektrogeräte gehören nicht Netzspannung (U) ..220-240 V~; 50 Hz in den Hausmüll. Bemessungs-Aufnahme des Saugers (P) ......1500 W Umschalten Zusatzgerät +...
  • Seite 35: Bildzeichen Zum Einsatz Von Düsen Und Filtern

    So vermeiden Sie Unfälle und Bildzeichen zum Einsatz Verletzungen: von Düsen und Filtern • Dieses Gerät kann von Kindern Düse zum Saugen von Teppi- ab 8 Jahren und darüber sowie chen. von Personen mit verringerten Düse zum Saugen von glat- physischen, sensorischen oder ten Flächen und Hartböden.
  • Seite 36: Montage

    durch ziehen über scharfe Kan- • Setzen Sie das Gerät nicht dem ten, einklemmen oder ziehen Regen aus. beschädigt wird. Achtung! So vermeiden Sie • Überprüfen Sie vor jeder Benut- zung die Netzanschlussleitung Geräteschäden und eventuell daraus resultierende Perso- und das Verlängerungskabel nenschäden: auf Schäden und Alterung.
  • Seite 37: Bedienung

    3. Setzen Sie den Motorkopf (2) auf den Für die Staubabsaugung stecken Sie Behälter (6) auf und verschließen Sie den Netzstecker des Elektro-Werkzeu- ihn mit den Verschlussclips (5). ges in die Gerätesteckdose ( 11). Der Motorkopf (2) ist nur in einer Positi- on auf dem Behälter (6) aufsetzbar.
  • Seite 38: Arbeitspausen

    Saugen mit dem Papierfilter- Arbeitspausen beutel: Zur Aufbewahrung der zusammengesetz- Damit sich der Faltenfilter nicht zu ten Sauggarnitur während einer Arbeits- pause können Sie schnell zusetzt, empfehlen wir die das Teleskopsaugrohr (18) zusammen-  zusätzliche Verwendung des Pa- schieben und den Saugrohr-Halter (19) pierfilterbeutels (braun).
  • Seite 39: Nass-Saugen

    Ist der Behälter ( Nass-Saugen 6) voll, schließt ein Schwimmer die Saugöffnung, der 1. Zum Nass-Saugen oder Wasser absau- Saugvorgang wird unterbrochen. gen setzen Sie den Faltenfilter (14) auf Schalten Sie das Gerät ab, ziehen den Filterkorb (2b) am Motorkopf (2) Sie den Stecker aus der Steckdose und leeren Sie den Behälter (siehe auf.
  • Seite 40: Reinigung/Wartung

    Reinigung/Wartung Stecken Sie den Netzstecker des Gerätes ein. Ziehen Sie den Netzstecker. 1. Kippen Sie den Ein-/Ausschalter (13) Gefahr durch elektrischen Schlag. in Position „I“. 2. Drehen Sie den Luftstromregler (3) in Allgemeine Reinigungsarbeiten die Position MAX. 3. Drücken Sie die Filterreinigungstaste (4) 3-4 Mal nach unten.
  • Seite 41: Garantie

    Geben Sie das Gerät an einer Verwer- Garantiezeit und gesetzliche tungsstelle ab. Mängelansprüche Die verwendeten Kunststoff- und Metallteile Die Garantiezeit wird durch die Gewähr- können sortenrein getrennt werden und so leistung nicht verlängert. Dies gilt auch einer Wiederverwertung zugeführt werden. für ersetzte und reparierte Teile.
  • Seite 42: Reparatur-Service

    Wir können nur Geräte bearbeiten, die Abwicklung im Garantiefall Um eine schnelle Bearbeitung Ihres Anlie- ausreichend verpackt und frankiert einge- gens zu gewährleisten, folgen Sie bitte den sandt wurden. folgenden Hinweisen: Achtung: Bitte senden Sie Ihr Gerät gerei- • Bitte halten Sie für alle Anfragen den nigt und mit Hinweis auf den Defekt an Kassenbon und die Identifikationsnum- unsere Service-Niederlassung.
  • Seite 43: Ersatzteile/Zubehör

    Ersatzteile/Zubehör Ersatzteile und Zubehör erhalten Sie unter www.grizzlytools-service.eu Sollten Sie Probleme mit dem Bestellvorgang haben, verwenden Sie bitte das Kontaktformu- lar. Bei weiteren Fragen wenden Sie sich an das „Service-Center“ (siehe Seite 42). Position Position Bezeichnung Einsatz Bestell-Nr. Betriebs- Explosions- anleitung zeichnung 2 Verschlussclips...
  • Seite 44: Fehlersuche

    Fehlersuche Problem Mögliche Ursache Fehlerbehebung Steckdose, Netzanschlussleitung, Leitung, Stecker und Sicherung Netzspannung fehlt prüfen, ggf. Reparatur durch Elektro- fachmann Gerät startet nicht Ein-/Ausschalter ( defekt Reparatur durch Kundendienst Kohlebürsten abgenutzt Motor defekt Schlauchsystem ( 20/21) Verstopfungen und Blockierungen oder Düsen ( 23-27) beseitigen verstopft...
  • Seite 45: Translation Of The Original Ec Declaration Of Conformity

    Translation of the original EC declaration of conformity We hereby confirm that the Wet & Dry Vacuum Cleaner model PWD 30 A1 Serial number 000001 - 195000 conforms with the following applicable relevant version of the EU guidelines: 2014/35/EU • 2014/30/EU • 2011/65/EU & (EU)2015/863*...
  • Seite 46: Μετάφραση Της Πρωτότυπης Δήλωσης Συμμόρφωσης Ce

    Μετάφραση της πρωτότυπης Δήλωσης συμμόρφωσης CE Με το παρόν δηλώνουμε ότι το είδος κατασκευής της Ηλεκτρική σκούπα υγρών / στερεών Σειρά PWD 30 A1 Αριθμός σειράς 000001 - 195000 ανταποκρίνεται στις ακόλουθες σχετικές της ΕΕ στην εκάστοτε ισχύουσα έκδοση: 2014/35/EU • 2014/30/EU • 2011/65/EU & (EU)2015/863* Για...
  • Seite 47: Original-Eg- Konformitätserklärung

    Original-EG- Konformitätserklärung Hiermit bestätigen wir, dass der Nass- und Trockensauger Modell PWD 30 A1 Seriennummer 000001 - 195000 folgenden einschlägigen EU-Richtlinien in ihrer jeweils gültigen Fassung entspricht: 2014/35/EU • 2014/30/EU • 2011/65/EU & (EU)2015/863* Um die Übereinstimmung zu gewährleisten, wurden folgende harmonisierte Normen sowie nationale Normen und Bestimmungen angewendet: EN 60335-1:2012/A2:2019 •...
  • Seite 49: Exploded Drawing

    Explosionszeichnung • Exploded Drawing Επί μέρoυς σχεδιαγράμματα PWD 30 A1 informative ενημερωτικό informativ 20201229_rev02_ae...
  • Seite 52 GRIZZLY TOOLS GMBH & CO. KG Stockstädter Straße 20 DE-63762 Großostheim GERMANY Last Information Update · Έκδοση των πληροφοριών · Stand der Informationen: 12/2020 Ident.-No.: 72079568122020-GB/ IE/NI/CY IAN 364420_2010...

Inhaltsverzeichnis