
Verwandte Anleitungen für Klarstein Kingsville XL


Inhaltszusammenfassung für Klarstein Kingsville XL
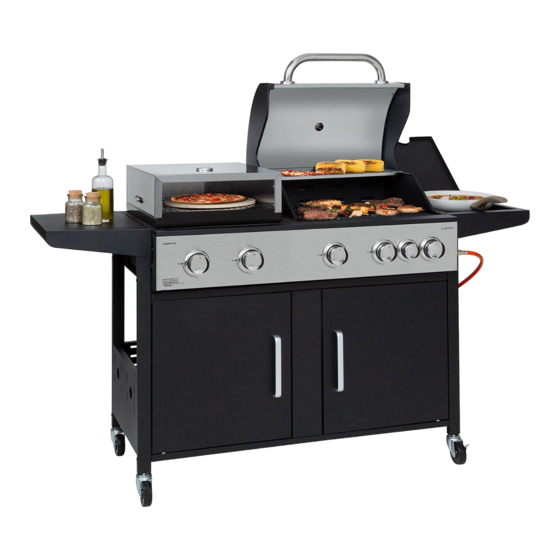
- Seite 1 Kingsville XL Kombi-Grill Combi Grill Parrilla de combinación Grille combinée 13 3 6 - 2 0 Griglia combinata 10035410...
-
Seite 3: Inhaltsverzeichnis
Sehr geehrter Kunde, wir gratulieren Ihnen zum Erwerb Ihres Gerätes. Lesen Sie die folgenden Hinweise sorgfältig durch und befolgen Sie diese, um möglichen Schäden vorzubeugen. Für Schäden, die durch Missachtung der Hinweise und unsachgemäßen Gebrauch entstehen, übernehmen wir keine Haftung. Scannen Sie den folgenden QR-Code, um Zugriff auf die aktuellste Bedienungsanleitung und weitere Informationen rund um das Produkt zu erhalten. -
Seite 4: Produktname
Produktname: Kingsville XL Kombi Grill Artikelnummer: 10035410 Pin-Code: 1336CU019 Chal-Tec GmbH, Wallstr. 16, 10179 Berlin, Deutschland WWW.KLARSTEIN.DE Bestimmungs- Geräteklasse Gasart und Hauptbrenner Seitenbrenner Gesamt- land Gasdruck wärme- Injektor größe Injektor größe leistung Ø Ø (Hs) LU, NL, DK, I3B/P(30) Propan, Butan 0,91 mm... -
Seite 5: Sicherheitshinweise
SICHERHEITSHINWEISE • Lesen Sie diese Bedienungsanleitung aufmerksam durch, bevor Sie das Gerät benutzen. Das Nichtbefolgen der Anweisungen kann zu Problemen und Gefahren bei der Benutzung führen. • Bewahren Sie diese Bedienungsanleitung zum späteren Nachschlagen auf. • Dieser Gasgrill darf nur im Freien verwendet werden. Betreiben Sie den Grill nicht innerhalb von Gebäuden, Garagen oder anderen geschlossenen Bereichen. - Seite 6 • Sollte Regen, Schnee, Hagel, Schneeregen oder andere Formen von Niederschlag in den Grill gelangen, während Sie mit Öl oder Fett kochen, decken Sie den Kochbehälter sofort ab und schalten Sie den Brenner und die Gasversorgung aus. Versuchen Sie nicht, das Gerät oder den Kochbehälter zu bewegen. •...
- Seite 7 • Vergewissern Sie sich vor dem Anschließen der Gasfl asche an den Grill, dass der Gashahn zugedreht ist, sich keine offenen Flammen in der Nähe des Geräts befi nden und dass sich der Dichtungsring in einem guten Zustand befi ndet. Verbinden Sie anschließend den Druckregler mit der Gasfl asche.
- Seite 8 Lecktest • Führen Sie den Lecktest jedes Mal durch, wenn die Gasfl asche angeschlossen oder erneut angeschlossen wird. • Verwenden Sie niemals eine offene Flamme, um zu überprüfen, ob Gas austritt. • Rauchen Sie während der Durchführung des Lecktests nie. •...
-
Seite 9: Lieferumfang
LIEFERUMFANG... -
Seite 11: Zusammenbau
ZUSAMMENBAU Stellen Sie sicher, dass Ihr Grill richtig montiert ist. Jedem Grill liegt eine detaillierte Montageanleitung bei, die für jedes Modell spezifi sche Montageverfahren enthält. Befolgen Sie diese Anweisungen sorgfältig, um den korrekten und sicheren Zusammenbau des Grills zu gewährleisten. VORSICHT Verletzungsgefahr! Trotz aller Bemühungen, den Zusammenbau so einfach wie möglich zu gestalten, kann es beim Umgang mit den... -
Seite 18: Installation
INSTALLATION Vorbereitung • Für den Betrieb dieses Gasgrills benötigen Sie eine Gasfl asche (Flüssiggas) und einen geeigneten Gasdruckregler. Die Regler sollten der Norm EN12864 (in der aktuellen Fassung) und den nationalen Vorschriften entsprechen. • Schließen Sie den Schlauch und den Regler an den Gasbehälter auf der linken Seite des Gasgrills an, wobei darauf zu achten ist, dass der Gasbehälter von Hitze ferngehalten wird und sich in einer sicheren Position befi ndet. - Seite 19 • Der fl exible Schlauch sollte alle 2 Jahre gewechselt werden. Es ist notwendig, den fl exiblen Schlauch zu wechseln, wenn die nationalen Vorschriften dies erfordern. Gasfl asche wechseln Hinweis: Drehen Sie den Gasfl aschenregler zu (es ist kein Schraubenschlüssel erforderlich!) •...
-
Seite 20: Bedienung
Gasfl asche abtrennen • Drehen Sie, außer bei Zweifl aschenanlage mit Umschaltventil, den Gashahn zu, falls das Gerät mit einem solchen ausgestattet ist. Warten Sie, bis der Brenner und die Zündfl amme erloschen sind. Bei Anlagen mit Umschaltventil muss nur die leere Gasfl asche abgeschaltet werden. - Seite 21 • Verwenden Sie Ofenhandschuhe und stabile, langstielige Gasgrillwerkzeuge, wenn Sie auf dem Grill kochen. • Gehen Sie beim Grillen immer mit größter Sorgfalt vor. • Erhitzen Sie keine ungeöffneten Glas- oder Metallbehälter mit Lebensmitteln auf dem Grill. Es kann sich Druck aufbauen und den Behälter zum Bersten bringen, was zu schweren Verletzungen oder Beschädigungen des Grills führen kann.
-
Seite 22: Lagerung
Hinweis: Wenn die automatische Zündung nicht funktioniert, entfernen Sie den Grillrost und den Wärmeverteiler (Kochplatte) und drehen Sie das Ventil gegen den Uhrzeigersinn um 90°, um den Grill mit einem Grillfeuerzeug im Abstand von 5 mm zum Brenner-Feuerloch anzuzünden. Bringen Sie den Grillrost und den Wärmeverteiler (Kochplatte) wieder an. -
Seite 23: Reinigung Und Wartung
REINIGUNG UND WARTUNG VORSICHT Verbrennungsgefahr! Alle Reinigungs- und Wartungsarbeiten dürfen nur dann durchgeführt werden, wenn sich der Gasgrill abgekühlt hat und die Verbindung zur Gasfl asche getrennt wurde. Wartung • Es wird empfohlen, den Gasgrill alle 90 Tage, aber mindestens einmal im Jahr, von einem kompetenten Techniker warten zu lassen. -
Seite 24: Fehlersuche Und Fehlerbehebung
FEHLERSUCHE UND FEHLERBEHEBUNG Problem Mögliche Ursache Vorbeugung / Lösung Gas tritt aus einem Beschädigter Schlauch Stellen Sie Gas an der gerissenen/ Gasflasche ab. Tauschen Sie zerschnittenen/ den Schlauch aus, wenn er verbrannten Schlauch zerschnitten oder gerissen aus. ist. Schließen Sie Gasflasche wieder an den Grill an und führen Sie einen Lecktest durch. - Seite 25 Problem Mögliche Ursache Vorbeugung / Lösung Fettbrand bzw. ständiges Im Brennerbereich Schließen Sie die Gazufuhr Aufflammen der hat sich zu viel Fett an der Gasflasche. Lassen Grilloberfläche. angesammelt. Sie den Deckel offen, damit die Flammen abklingen können. Entfernen Sie nach dem Abkühlen des Grills Speisereste und Fettrückstände aus der Brennkammer,...
- Seite 26 Problem Mögliche Ursache Vorbeugung / Lösung Der Brenner lässt sich Elektrische Probleme: nicht mit dem Zünder Die Elektrode ist gerissen Elektrode austauschen. anzünden. oder gebrochen; “Funken beim Riss“ Die Elektrodenspitze Die Spitze der Elektrode ist nicht in der richtigen sollte in Richtung der Öffnung Position.
- Seite 27 Problem Mögliche Ursache Vorbeugung / Lösung Plötzlicher Abfall des Fettansammlung Reinigen Sie die Brenner, Gasflusses oder niedrige das Innere des Grills/die Flamme. Brennkammer. Fettreiches Grillgut. Schneiden Sie vor dem Grillen das Fett vom Fleisch ab. Zu hohe Grilltemperatur. Drehen Sie den Einstellknopf gegen den Uhrzeigersinn auf eine niedrigere Einstellung.
- Seite 28 Problem Mögliche Ursache Vorbeugung / Lösung Aufflammen Fettrückstände. Reinigen Sie die Brenner, das Innere des Grills/die Brennkammer. Fettreiches Grillgut. Schneiden Sie vor dem Grillen das Fett vom Fleisch ab. Zu hohe Grilltemperatur. Stellen Sie eine niedrigere Grilltemperatur ein Die Gasflasche lässt sich Einige Händler haben Abgenutzte Düsen haben nicht wieder befüllen.
-
Seite 29: I3B/P
Dear Customer, Congratulations on purchasing this device. Please read the following instructions carefully and follow them to prevent possible damages. We assume no liability for damage caused by disregard of the instructions and improper use. Scan the QR code to get access to the latest user manual and more product information. - Seite 30 Product name: Kingsville XL Kombi Grill Item number: 10035410 Pin code: 1336CU019 Chal-Tec GmbH, Wallstr. 16, 10179 Berlin, Germany WWW.KLARSTEIN.CO.UK Country of Appliance Category Gas Type and Main burner Side burner Total Destination Supply Pressure Nominal Injector Injector Heat Size Ø...
-
Seite 31: Safety Instructions
SAFETY INSTRUCTIONS • Please read this manual carefully before using the appliance. Failure to follow the instructions may cause problems and danger during use. • Keep this manual for future reference. • The grill is suitable for outdoor use only. Do not operate the grill inside buildings, garages or other enclosed areas. - Seite 32 attempt to repair the appliance yourself. Repairs should only be carried out by qualified personnel. • The gas grill should be serviced at least once a year by a qualified technician. Do not attempt to service this appliance yourself. • Before each use of the appliance, check whether there are insects or insect nests in the burner, in the pipes and in the appliance openings, and remove them if they are present.
- Seite 33 Notes on Refi lling Gas Cylinders Certain Liquid gas dealers may fi ll liquid gas cylinders for use in the grill beyond cylinder fi lling capacity. This “Overfi lling” may create a dangerous condition. “Overfi lling” tanks can build up excess pressure. As a safety device, the tanks pressure relief valve will vent gas vapor to relieve this excess pressure.
- Seite 34 Instructions for Charcoal Compartment WARNING Risk of burns! This grill will become very hot, do not move it during operation. • The grill has to be installed on a secure level base prior to use. • The grill shall be heated up and the fuel kept red hot for at least 30 minutes prior to the fi rst cooking.
-
Seite 35: Scope Of Delivery
SCOPE OF DELIVERY... -
Seite 37: Assembly
ASSEMBLY Make sure your grill is assembled properly. Detailed assembly instructions are packed with each grill giving specifi c assembly procedures for each model. Follow these instructions carefully to ensure the correct and safe assembly of the grill. CAUTION Risk of injury! Although we take every effort to ensure that the assembly process is as easy as possible, it is inherent with fabricated steel parts that corners and edged can cause cuts if improperly handled during assembly procedures. -
Seite 44: Installation
INSTALLATION Preparation • You will need gas cylinder and proper regulators under the gas pressure to operate this gas grill. The regulators should be comply with EN 16129 with current version and national regulation. • Connect the hose and regulator to the gas cylinder at the left side of the gas grill. Keep in mind that the gas cylinder must be kept away from heat and in a safe position. - Seite 45 How to Change a Gas Cylinder Note: Close the gas cylinder regulator (no wrench is required!) • The gas cylinder should have the following dimensions: 80 cm height and max. 35 cm width. How to Connect a Gas Cylinder • Turn the orange cap so that the arrow is pointing to the gap in the shroud. •...
-
Seite 46: Operation
How to Disconnect a Gas Cylinder • Except for twin-cylinder installations with a changeover valve, turn off the gas tap if fi tted to the appliance. Wait until the burner and pilot light have gone out. For installations with a changeover valve, it is only necessary to switch off the empty cylinder. - Seite 47 NOTE: You can place a pot or a pan on the side burner. The diameter of the pot or pan should be max. Ø 24 cm and min. Ø 8 cm. Lighting the Gas Grill CAUTION Risk of fi re and burns! The lid must be open when lighting the burner! Do not stand with your face directly over the gas grill when lighting it.
-
Seite 48: Storage
Tips for Energy Saving Use • Reduce the opening time of the lid. • Turn the grill off as soon as cooking is completed. • Preheat the gas grill for 10 to 15 minutes only (except for the first use). •... -
Seite 49: Cleaning And Maintenance
CLEANING AND MAINTENANCE CAUTION Risk of burns! All cleaning and maintenance work may only be carried out when the gas grill has cooled down and the connection to the gas cylinder has been disconnected. Maintenance • It is recommended to have the gas grill serviced by a competent technician every 90 days, but at least once a year. -
Seite 50: Troubleshooting
TROUBLESHOOTING Problem Possible Cause Prevention / Solution Gas leaking from Damaged hose Turn off gas at the gas cracked/cut/burned cylinder, if hose is cut or hose. cracked, replace hose. Reconnect the gas cylinder to the grill and perform a leak test. - Seite 51 Problem Possible Cause Prevention / Solution Burner will not light using Gas issues: ignitor. Trying to light wrong See the instructions for lighting burner. the grill in the “Operation” section. Burner not engaged with Make sure valves are control valve. positioned inside of burner tubes.
- Seite 52 Problem Possible Cause Prevention / Solution Burner will not light using Electrical issues: ignitor. Electrode cracked or Replace electrode. broken; ”sparks at crack”. Electrode tip not in Tip of electrode should be proper position. pointing toward port hole in burner. The distance should be 1/8”...
- Seite 53 Problem Possible Cause Prevention / Solution Flames blow out. High or gusting winds. Turn the front of the grill to face wind or increase flame height. Low on LP gas. Replace the gas cylinder or have it refilled by your LP gas dealer.