RICOO RW-R48 Montageanleitung
EN DE
Installation Instructions
Montageanleitung
For model:
Für Modell:
RW-R48
2
°
±
Rotation
Drehung
Scope of delivery
Plastic bag (big) / Plastikbeutel (groß)
Lieferumfang
A
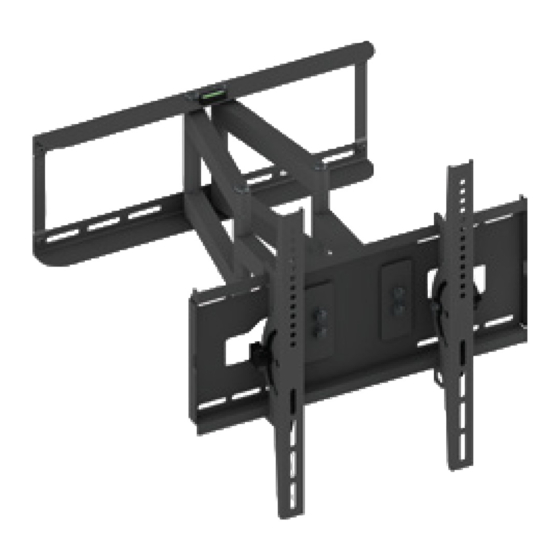
Wall mount (pre-assembled)
H
Wandhalterung (vormontiert)
Rails (pre-assembled, 2 pcs.)
Schienen (vormontiert, 2 Stk.)
Please measure distance between mounting holes!
STEP 1
Bitte den Lochabstand vor der Montage nachmessen!
SCHRITT 1
Mounting holes
Befestigungslöcher
Vertical /
Senkrecht
Horizontal / Waagerecht
TV / monitor back
TV / Monitor Rückseite
120
°
Swivel
Schwenkung
±
Tilt
Neigung
B
C
D
E
Plain washer
Metal washer
M8 x 50MM
S10 x 50MM
Unterlegscheibe
Plastic cylinder
Metallscheibe
6 pcs/Stk.
6 pcs/Stk.
4 pcs/Stk.
Plastikzylinder
4 pcs/Stk.
I
J
K
L
M4 x 16MM
M5 x 30MM
M5 x 16MM
M6 x 30MM
M6 x 16MM
4 pcs/Stk.
4 pcs/Stk.
4 pcs/Stk.
4 pcs/Stk.
4 pcs/Stk.
Plastic bag (small) / Plastikbeutel (klein)
Beachten Sie:
P
Q
R
!
Einige Elemente
können bereits ab
Plastic washer
Locking knob
Werk an den Schienen
M6 x 15MM
Plastikscheibe
Feststellknauf
4 pcs/Stk.
2 pcs/Stk.
vormontiert sein.
4 pcs/Stk.
Please note: The numbering on the plastic bag may di er!
!
Bitte beachten: die Durchnummerierung auf dem Plastikbeutel kann abweichen!
Please note: Plastik bag compartment „O" is empty
!
Bitte beachten!: Plastikbeutel-Fach „O" ist leer.
Please check BEFORE installation distance between
mounting holes on your TV / monitor!
!
Bitte überprüfen Sie VOR der Montage
den Lochabstand zwischen den Befestigungslöchern
an Ihrem TV / Monitor!
This wall mount supports the following distance between holes:
Diese Wandhalterung unterstützt folgende Lochabstände:
Vertical / Senkrecht:
min. 50 mm - max. 400 mm
Horizontal / Waagerecht:
min. 55 mm - max. 400 mm
STEP 2
SCHRITT 2
Place bubble level
central on the top
of the wall plate
15
°
Bringen Sie
die Wasserwaage
zentral oben auf
der Wandplatte an.
STEP 3
F
G
SCHRITT 3
M4 x 30MM
Toothed washer
Zahnscheiben
4 pcs/Stk.
M
N
Align the front plate making sure
that it is parallel to the wall plate.
M8 x 30MM
M8 x 16MM
To do so you have to loosen the
4 pcs/Stk.
4 pcs/Stk.
nuts in the middle.
S
T
Richten Sie die Frontplatte so aus,
Metal nut
Bubble Level
dass diese parallel zur Wandplatte ist.
Metallmutter
Wasserwaage
2 pcs/Stk.
1 pcs/Stk.
Dazu müssen Sie die Muttern
in der Mitte lockern.
STEP 4 A
SCHRITT 4 A
Drilling
Bohrung
50 mm
10
Affixing the bubble level
Anbringung der Wasserwaage
Wall plate
Wandplatte
Alignment of front panel
Ausrichtung der Frontplatte
Wall mount: front view
Wandhalterung: Frontansicht
--------------------------------------------------------------------------------
X
--------------------------------------------------------------------------------
Solid concrete mounting
Befestigung an der Massivbetonwand
2
1
T
Wall plate
Wandplatte
Y
2
°
±
Front plate
X=Y
Frontplatte
Concrete Wall
Betonwand
B
E
A

Verwandte Anleitungen für RICOO RW-R48


Inhaltszusammenfassung für RICOO RW-R48
- Seite 1 Anbringung der Wasserwaage SCHRITT 2 ° Montageanleitung Swivel For model: Schwenkung Für Modell: Place bubble level central on the top RW-R48 of the wall plate ° ± Bringen Sie Tilt die Wasserwaage Neigung zentral oben auf der Wandplatte an. Wall plate °...
- Seite 2 Wood stud STEP 6 B Attaching rails to screen STEP 4 B Holzbalken Wood stud mounting Anbringung der Schienen an den Bildschirm SCHRITT 6 B SCHRITT 4 B Befestigung an der Holzbalkenwand G I K For TVs with a curved back. Drilling Bohrung Für TV/Monitore mit...