Seite 1
Italiano, es rizione ellappare io e utilizzo, - Pre auzioni e onsi li, anutenzione e ura, es rizione te ni a ei mo elli,...
Seite 2
Installazione importante conservare uesto libretto per poterlo consultare in ogni momento In caso di vendita, di cessione o di trasloco, assicurarsi che resti insieme allapparecchio per in ormare il nuovo proprietario sul unzionamento e sui relativi avvertimenti min. 20 mm eggere attentamente le istruzioni ci sono importanti in ormazioni sullinstallazione, sulluso e sulla sicurezza CASSETTO...
Seite 3
Altri tipi di collegamento installazione dellapparecchio deve essere e ettuata Se limpianto elettrico corrisponde a una delle seguenti su un piano dappoggio per ettamente piano caratteristiche e eventuali de ormazioni provocate da un errato ensione tipo e re uenza di rete issaggio potrebbero alterare le caratteristiche e le prestazioni del piano cottura 22 24...
Descrizione dellapparecchio Pannello di controllo è ò Spia CONTAMINUTI* Tasto Display AUMENTO POTENZA TIMER DI PROGRAMMAZIONE* Tasto Spia BOOSTER* ZONA DI COTTURA PROGRAMMATA* Spia ZONA COTTURA Spia Indicatori di POTENZA Tasto SELEZIONATA BOOSTER* e di CALORE RESIDUO ON/OFF Spia ON/OFF Spia COMANDI BLOCCATI Tasto...
Seite 5
Spe nimento elle zone i ottura è Premere il tasto la potenza della zona di cottura scende progressivamente, ino allo spegnimento Pro rammazione ella urata è i una ottura È A ensione el piano ottura A ensione elle zone i ottura .
Seite 6
o alità È 0. L Il ontaminuti è onsi li prati i per luso ellappare lo o ei oman i è è è ) è Spe nimento el piano ottura è...
Seite 7
Surriscaldamento è Interruttore di sicurezza è è ò ispositi i i si urezza Tempo limite di funzionamento Livello di potenza in ore ile amento ei re ipienti è ò Indicatori di calore residuo è Segnale acustico è...
Precauzioni e consigli è N è N - 006 06 ( N è Si urezza enerale Avvertenza per i portatori di pacema er o altri dispositivi medici impiantabili attivi è è È ). È ).
Manutenzione e cura Escludere la corrente elettrica Telaio in acciaio ino ( ò Pulire lappare Smontare il piano è è é è U ò ...
Seite 11
è è Piani cottura VIA 640 C VIC 641 X VIC 641 B Zone di cottura Potenza (in W) Potenza (in W) Legenda vedi Avvio e utilizzo .
Seite 12
Mode demploi TA L UISSON Sommaire Installation, 13-14 ran ais, 2 es ription e lappareil, ise en mar e et utilisation, autions et onseils, 2 Netto a e et entretien, 2 es ription te nique es mo les, 22...
Seite 13
Installation min. 20 mm TIROIR Positionnement min. 40 mm voir Précautions et conseils . min. 20 mm CHALEUR TOURNANTE Encastrement min. 40 mm CÔTÉ AVANT DE LA TABLE DE CUISSON PLAN DE TRAVAIL TABLE DE CUISSON voir figures RETOURNÉE Aération to te Po r er ettre ne onne a ration et o r iter...
Seite 14
.i ation Autres types de ranchement l en astre ent de l a areil Il est i rati d ass rer s r n lan d a i ar aite ent lat es d or ations ro o es ar ne aise ixation ris ent d alt rer les ara t risti...
Description de lappareil Ta leau de ord Voyant MINUTEUR* Touche AUGMENTATION Afficheur DE PUISSANCE PROGRAMMATEUR* Touche Voyant BOOSTER* FOYER PROGRAMMÉ* Indicateurs de PUISSANCE et Voyant Voyant Touche de CHALEUR RÉSIDUELLE FOYER SÉLECTIONNÉ BOOSTER* ON/OFF Voyant ON/OFF Voyant COMMANDES VERROUILLÉES Touche VERROUILLAGE DES COMMANDES Touches Touche...
Seite 16
Mise en marche et utilisation xtin tion es fo ers Pro rammation e la ur e e uisson ise sous tension e la table e uisson Alluma e es fo ers A ichage en cas de programmation multiple on tion booster* Modi ier la programmation Description technique des modèles.
Seite 17
monstration Le minuteur + errouilla e es omman es onseils utilisation e lappareil ..A UTILISER NE CONVIENT PAS Fonte Cuivre xtin tion e la table e uisson Aluminium, Verre, Terre, Acier émaillé Inox spécial Céramique, Inox non magnétique...
Seite 18
Surchau e Interrupteur sécurité Les s urit s te tion e r ipient Durée limite de Puissance fonctionnement Indicateurs de chaleur résiduelle Signal sonore...
Précautions et conseils Avis à toute personne portant un pacema er ou S urit n rale autre implant médical acti ise au rebut voir Mise en marche et Utilisation .
Nettoyage et entretien Mise hors tension Cadre en acier ino Netto a e e lappareil monta e e la table...
Seite 22
Description techni ue des modèles VIA 640 C VIC 641 X Tables de cuisson VIC 641 B Foyers Puissance (en W) Puissance (en W) Arrière gauche Arrière droit Avant gauche Avant droit Puissance totale 7200 7200 Légende voir Mise en marche et Utilisation .
Seite 23
Contents Installation, 24-25 es ription of t e applian e, 2 English,23 Start-up an use, 27-3 VIA 640 C VIC 641 B VIC 641 X Pre autions an tips, 3 are an maintenan e, 32 ni al es ription of t e mo els, 33...
Seite 24
Installation min. 20 mm COMPARTMENT Positionin min. 40 mm see Precautions and tips . min. 20 mm FAN-ASSISTED Built-in appliance OVEN min. 40 mm FRONT SIDE OF HOB SUPPORTING SURFACE figure UNDERSIDE OF HOB Ventilation o allo ate entilation and to a oid o er eatin o t e s rro ndin s r a es t e o s o ld e ositioned as ollo s At a...
Seite 25
.ixing Other types o connection on a er e tl le el lian e st e installed ortin s r a e An de or ities a sed ro er ixin o ld a e t t e eat res and o eration o t e o e t i ness o t e s ortin s r a e...
Seite 26
Description o the appliance Control panel TIMER* indicator light INCREASE PROGRAMME TIMER* POWER button display COOKING ZONE PROGRAMMED* BOOSTER* button indicator light POWER and COOKING ZONE ON/OFF BOOSTER* RESIDUAL HEAT SELECTED indicator light indicator light button indicators ON/OFF indicator light CONTROLS LOCKED indicator light CONTROL PANEL...
Start-up and use S it in off t e ookin zones Pro rammin t e ookin uration S it in on t e ob S it in on t e ookin zones sing multiple programmes and the display ooster fun tion* Changing the programme Technical description of the models.
Seite 28
Timer Pra ti al a i e on usin t e applian e ontrol panel lo k SUITABLE UNSUITABLE Cast iron Copper, Enamelled steel Aluminium, Glass, Earthenware, Ceramic, non magnetic Stainless steel Special stainless steel S it in off t e ob emo mo e...
Seite 29
Sa ety switch Safet e i es Pan sensor Maximum operating Power level time in hours Residual heat indicators Overheating protection Buzzer...
Technical description of the models VIA 640 C VIC 641 X Hobs VIC 641 B Cooking zone Power (W) Power (W) Back Left Back Right Front Left Front Right Total power Start-up and use .
Seite 34
reibun er tes, 37 Inbetriebsetzun un ebrau , 3 - euts orsi tsma re eln un in eise, 2 eini un un Pfle e, 3 e es reibun o elle,...
Installation min. 20 mm WÄRMEFACH Aufstellun min. 40 mm siehe Vorsichtsmaßregeln und Hinweise . min. 20 mm HEIßLUFT E i n b a u min. 40 mm . 00 FRONTSEITE DES KOCHFELDES AUFLAGEFLÄCHE AUFLAGEFLÄCHE AUFLAGEFLÄCHE siehe KOCHFELD Abbildungen UMGEDREHT B e l t u n g r a srei enden Bel t n nd z r er eid n...
Seite 36
A n d e r e A n s c h l u s s a r t e n B e e s t i g u n g er e t e enen t tz Das o ss a einer A la e l e installiert erden e Be esti...
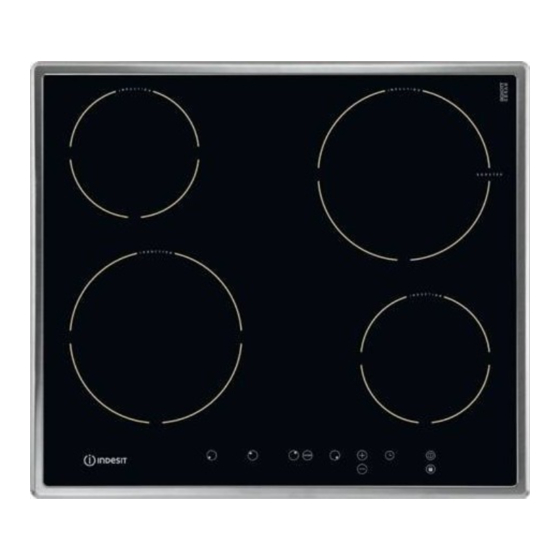
In etrie setzung und Ge rauch Auss alten er Ko zonen Pro rammierun er arzeit alten es Ko fel es alten er Ko zonen Anzeige im .alle einer Mehr achprogrammierung ooster- unktion* nderung der Programmierung Technischen Beschreibung der jeweiligen Modelle.
Seite 39
inutenu r Praktis e ats e zum insatz es er tes Sperre er S altelemente UNGEEIGNETES MATERIAL GEEIGNETES MATERIAL Gusseisen Kupfer, emaillierter Edelstahl Aluminium, Glas, Ton, magnetisierter Edelstahl Porzellan, nicht magnetisierter Edelstahl Auss alten es Ko fel es emo - o e orfü...
Seite 40
berhitzung Sicherheitsautomati er eits orri tun en Topferkennun Beschränkung der Heizleistung Funktionsdauer in Stunden Restwärmeanzeigen Tonsignal...
Technische Beschrei ung der Modelle Kochfelder VIA 640 C VIC 641 X VIC 641 B Kochzonen Leistung (W) Leistung (W) chts I 2200 I 2200 B 3000 Vorne links I 2200 I 2200 Vorne rechts I 1400 I 1400 600 se Post. Dx...
Seite 45
Manual de instrucciones Sumario Instalaci n, 46-47 é es rip ión el aparato, Puesta en fun ionamiento uso, spanol, Pre au iones onsejos, 3 antenimiento ui a os, é es rip ión t ni a e los mo elos,...
Seite 46
Instala ión min. 20 mm CAJÓN min. 40 mm olo a ión (ver Precauciones y min. 20 mm consejos). HORNO VENTILADO min. 40 mm Empotramiento 00 ; PARTE DELANTERA DE LA ENCIMERA PLANO DE APOYO ENCIMERA VOLCADA ...
Seite 47
L Tensión tipo y Cable eléctrico Conexión de los cables frecuencia de la red : amarillo/verde; 220-240V 1+N ~ N: los 2 cables azules juntos 50 Hz L: el marrón junto al negro Otros tipos de cone ión .i ación a instala ión del aparato se debe realizar sobre na é...
Descripción del aparato Panel de control Piloto CONTADOR DE MINUTOS* Botón AUMENTO Pantalla TEMPORIZADOR DE POTENCIA DE PROGRAMACIÓN* Piloto ZONA DE Botón COCCIÓN PROGRAMADA* BOOSTER* Indicadores de Piloto ZONA DE Piloto Botón POTENCIA y de COCCIÓN SELECCIONADA ON/OFF BOOSTER* CALOR RESIDUAL Piloto ON/OFF Piloto MANDOS...
Puesta en funcionamiento y uso Apa a o e las zonas e o ión é é Pro rama ión e la ura ión e una o ión n en i o e la en imera n en i o e las zonas e o ión é...
Seite 50
é é 0. L l onta or e minutos é onsejos prá ti os para el uso el aparato é loqueo e los man os U Apa a o e la en imera é U o ali a...
Seite 51
Interruptor de seguridad é é é é Límite de duración de Nivel de potencia funcionamento en horas ispositi os e se uri a ión e los re ipientes q Indicadores de calor residual Se al sonora ...
Precauciones y consejos é N N é N - 006 . .06 ( é é Se uri a eneral Advertencia para las personas que poseen marcapasos u otros dispositivos médicos activos: é é ). H é...
Mantenimiento y cuidados Interrumpir el suministro de corriente Estructura de acero ino idable ( eléctrica é Limpiar el aparato é esmontar la en imera f é éq Té U ...
Descripción técnica de los modelos é VIA 640 C VIC 641 X Encimeras VIC 641 B Zonas de cocción Potencia (en W) Potencia (en W) Posterior izquierda 00 000* Posterior derecha Delantera izquierda 00 600 Delantera derecha Potencia total Leyenda é...
Seite 56
03/2008 - 195065965 00 XEROX BUSINESS SERVICES...