Herunterladen Inhalt Inhalt Diese Seite drucken
Vetus DBPPJA Installationshandbuch

Vetus DBPPJA Installationshandbuch

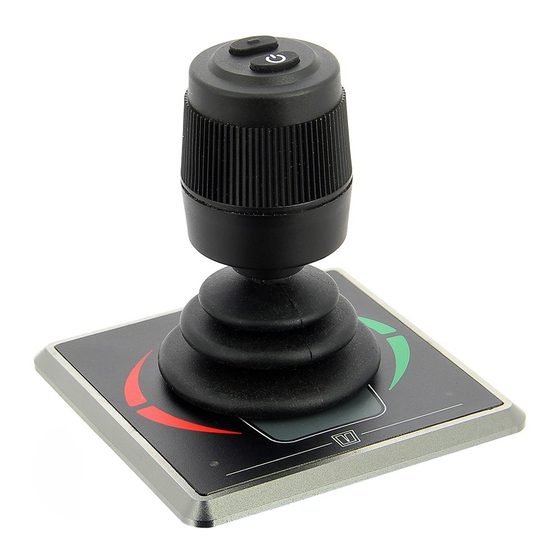
Proportionale bedientafel für bug- und heckstrahlruders
Vorschau ausblenden Andere Handbücher für DBPPJA:
Inhaltsverzeichnis

Werbung

Verfügbare Sprachen
  • DE

Verfügbare Sprachen

  • DEUTSCH, seite 16
Installatiehandleiding
Proportioneel paneel
voor boeg- en hekschroef
Installationshandbuch
Proportionale Bedientafel
für Bug- und Heckstrahlruders
Manuel d' installation
Tableau proportionnel
d'hélice d'étrave et de poupe
Manual de instalación
Panel de mando proporcional
para la hélice de proa y de popa
Manuale d'installazione
Pannello di comando proporzionale
di eliche di prua e poppa
Proportional panel for bow and stern thruster
Installation manual
DBPPJA
Copyright © 2021 Vetus b.v. Schiedam Holland
NEDERLANDS
ENGLISH
DEUTSCH
FRANÇAIS
ESPAÑOL
ITALIANO
DANSK
SVENSKA
NORSK
SUOMEKSI
POLSKI
Installationsvejledning
Proportionel panel
bov- og hækskrue
Installationsmanual
Proportionell panel
för bog- och akterpropeller
Installasjons handbook
Proporsjonalt panel
baug- og hekkpropell
Asennusopas
Proportionaalinen paneeli
för keula- ja peräpotkurin
Instrukcja instalacji
Panel proporcjonalny do pędnika
dziobowego i pędnika rufowego
6
11
16
21
26
31
36
41
46
51
56
020813.11

Werbung

Inhaltsverzeichnis
loading

Inhaltszusammenfassung für Vetus DBPPJA

  • Seite 1 Manuale d'installazione Instrukcja instalacji Pannello di comando proporzionale Panel proporcjonalny do pędnika di eliche di prua e poppa dziobowego i pędnika rufowego Installation manual Proportional panel for bow and stern thruster DBPPJA Copyright © 2021 Vetus b.v. Schiedam Holland 020813.11...
  • Seite 2 Installation manual DBPPJA - Proportional panel for bow and stern thruster 020813.11...
  • Seite 3: Inhaltsverzeichnis

    . . . . . . . . . . . . . . . . . . . . . . . . . . . . . . . . . . . . . . . . . . . . . vetus® Installation manual DBPPJA - Proportional panel for bow and stern thruster...
  • Seite 4 . . . . . . . . . . . . . . . . . . . . . . . . . . . . . . . . . . . . . . . . . . . . . . . . . . . . . . . . . . . vetus® Installation manual DBPPJA - Proportional panel for bow and stern thruster...
  • Seite 5 . . . . . . . . . . . . . . . . . . . . . . . . . . . . . . . . . . . . . . . . . . . . . . . . vetus® Installation manual DBPPJA - Proportional panel for bow and stern thruster...
  • Seite 6: Veiligheid

    . et op worden aangesloten . • Zorg tijdens gebruik voor een correcte accuspanning. Raadpleeg de betreffende boegschroef en/of hekschroef installatie- handleiding voor de uitgebreide CAN-BUS schema's. vetus® Installation manual DBPPJA - Proportional panel for bow and stern thruster 020813.11...
  • Seite 7: Controle/Proefdraaien En Configureren Van De Bedieningspanelen

    Alle LEDs zijn uit en u hoort het sig- ingedrukt. Laat nu de ‘AAN/UIT’ knop los. naal, dah ( - ). De fabrieksinstellin- gen van dit bedieningspaneel zijn hersteld. vetus® Installation manual DBPPJA - Proportional panel for bow and stern thruster 020813.11...
  • Seite 8: Configuratie Stuwkrachtrichting

    6. Druk één keer op de 5 GROEN, knipperend (blauw), (2) (rood) en (5) ‘AAN/UIT’ knop om de (groen) knipperen. instelling te bevestigen. Herhaal dit, indien nodig. vetus® Installation manual DBPPJA - Proportional panel for bow and stern thruster 020813.11...
  • Seite 9: Configuratie Van Meerdere Bedieningspanelen

    4. Beweeg de joystick naar links of rechts om de code van het bedieningspaneel in te stellen. 5. Druk één keer op de ‘AAN/ De kleur van de LED geeft de groepscode van het bedieningspaneel aan. UIT’ knop om de instelling te bevestigen. vetus® Installation manual DBPPJA - Proportional panel for bow and stern thruster 020813.11...
  • Seite 10: Betekenis Led Indicatielampjes

    Knippert Voedingsspanning paneel laag snel snel Knippert Knippert Knippert Knippert Joystick is kapot dubbel dubbel dubbel dubbel 1x (.) Joystick-knop is ingedrukt Niet verbonden met het netwerk vetus® Installation manual DBPPJA - Proportional panel for bow and stern thruster 020813.11...
  • Seite 11: Safety

    12 Volt result . Consult the relevant Bow and/or Stern Thruster installation manual • During use ensure the correct battery voltage is available. for the detailed CAN-BUS diagrams. vetus® Installation manual DBPPJA - Proportional panel for bow and stern thruster 020813.11...
  • Seite 12: Checking/Test Running And Configuring The Control Panels

    (-... -). Now release the "ON / All LEDs are off and you hear the onds. OFF" button. signal, dah (-). The factory settings of this control panel have been re- stored. vetus® Installation manual DBPPJA - Proportional panel for bow and stern thruster 020813.11...
  • Seite 13: Configuring Thrust Direction

    LEDs (1) (blue), 6. Press the "ON / OFF" 5 GREEN, ashing (2) (red) and (5) (green) button once to confirm flash. the setting. Repeat if necessary. vetus® Installation manual DBPPJA - Proportional panel for bow and stern thruster 020813.11...
  • Seite 14: Configuration Of Multiple Control Panels

    4. Move the joystick to the left or right to set the control panel code. The color of the LED indicates the control 5. Press the On/Off button panel group code. once to confirm the set- ting. vetus® Installation manual DBPPJA - Proportional panel for bow and stern thruster 020813.11...
  • Seite 15: Meaning Led Indicator Lights

    Blinks fast Panel supply is low Blinks Blinks Blinks Blinks Joystick is broken double double double double 1x (.) Joystick button is pushed Disconnected from the network vetus® Installation manual DBPPJA - Proportional panel for bow and stern thruster 020813.11...
  • Seite 16: Sicherheitsbestimmungen

    Volt angeschlossen sein . • Während des Gebrauchs für die richtige Akkuspannung sorgen. Die ausführlichen CAN-BUS-Diagramme entnehmen Sie bitte dem jeweiligen Installationshandbuch für Bug- und/oder Heckstrahlruder. vetus® Installation manual DBPPJA - Proportional panel for bow and stern thruster 020813.11...
  • Seite 17: Kontrolle/Probelauf Und Konfigurieren Der Bedientafeln 17 4.1 Allgemeines

    AUS“-Knopf. Alle LEDs sind aus und Sie diese 30 Sekunden ge- Lassen Sie nun den „EIN-/AUS“-Knopf los. Sie hören das Tonsignal dah (-). Die drückt. Werkseinstellungen dieses Bedien- pultes wurden wiederhergestellt. vetus® Installation manual DBPPJA - Proportional panel for bow and stern thruster 020813.11...
  • Seite 18: Konfigurieren Der Steuerkraftrichtung

    5. Drücken Sie einmal auf 5 GRÜN, blinkt LEDs (1) (Blau), (2) (Rot) „EIN-/AUS“-Knopf, und (5) (Grün) blinken. um die Einstellung zu Wiederholen Sie dies, bestätigen falls erforderlich. vetus® Installation manual DBPPJA - Proportional panel for bow and stern thruster 020813.11...
  • Seite 19: Konfigurieren Mehrerer Bedientafeln

    4. Bewegen Sie den Joystick nach links oder rechts, um den Code der Bedientafel einzustellen. Die Farbe der 5. Drücken Sie einmal auf LED gibt den Gruppencode der Bedientafel an. die „EIN-/AUS“-Knopf, um die Einstellung zu bestä- tigen vetus® Installation manual DBPPJA - Proportional panel for bow and stern thruster 020813.11...
  • Seite 20: Bedeutung Der Led-Anzeigen

    Blinkt Netzspannung Schalttafel niedrig schnell schnell Blinkt Blinkt Blinkt Blinkt Joystick ist defekt zweimal zweimal zweimal zweimal 1x (.) Joystick-Taste ist gedrückt Nicht mit dem Netzwerk verbunden vetus® Installation manual DBPPJA - Proportional panel for bow and stern thruster 020813.11...
  • Seite 21: Sécurité

    • Veillez à ce que la tension de batterie soit correcte pendant l’em- ploi. Consultez le manuel d'installation du propulseur d'étrave et/ou de poupe a fin d'obtenir les diagrammes CAN-BUS détaillés. vetus® Installation manual DBPPJA - Proportional panel for bow and stern thruster 020813.11...
  • Seite 22: Contrôle/Test Et Configuration Des Tableaux De Commande

    LED s'éteignent et vous entendez Relâchez à présent le bouton Marche/Arrêt. le signal, « dah » ( - ). Les paramètres d'usine de ce tableau de commande ont été restaurés. vetus® Installation manual DBPPJA - Proportional panel for bow and stern thruster 020813.11...
  • Seite 23: Configuration De La Direction De Poussée

    LED (1) 5 VERT, clignotant bouton MARCHE/ARRÊT clignotent en (bleu), en rou- pour confirmer le para- ge (2) et en (vert) (5). Répétez métrage l'opération si nécessaire. vetus® Installation manual DBPPJA - Proportional panel for bow and stern thruster 020813.11...
  • Seite 24: Configuration De Plusieurs Tableaux De Commande

    5. Appuyer une fois sur le mande. La couleur du témoin LED indique le code de groupe du tableau de commande. bouton MARCHE/ARRÊT pour confirmer le para- métrage vetus® Installation manual DBPPJA - Proportional panel for bow and stern thruster 020813.11...
  • Seite 25: Signification Des Voyants Led Lumineux

    Double Double Double Double Le joystick est cassé. clignotement clignotement clignotement clignotement 1x (.) Le bouton du joystick est enclenché. ALLUMÉ Non relié au réseau. vetus® Installation manual DBPPJA - Proportional panel for bow and stern thruster 020813.11...
  • Seite 26: Seguridad

    Consulteel manual de instalación relevante del propulsor de Popa • Asegurarse durante el uso de una tensión de batería correcta. y/o Proa para ver los diagramas detallados CAN-BUS. vetus® Installation manual DBPPJA - Proportional panel for bow and stern thruster 020813.11...
  • Seite 27: Control/Prueba De Funcionamiento Y Configuración De Los Paneles De Control

    4 .1 General mportante El panel de mando (DBPPJA) está diseñado para ser utilizado en com- Antes de utilizar el sistema por primera vez, realice las siguien- binación con una hélice de proa y popa BOWPRO. Se puede ampliar tes acciones: el número de paneles de mando hasta un máximo de cuatro.
  • Seite 28: Configuración De La Dirección De La Fuerza De Propulsión

    6. Pulse una vez el botón 5 VERDE, parpadeando luces (1) (azul), (2) (roja) y "ENCENDIDO/APAGADO" (5) (verde) parpadeen. Re- para confirmar la confi- pítalo si es necesario. guración. vetus® Installation manual DBPPJA - Proportional panel for bow and stern thruster 020813.11...
  • Seite 29: Configuración De Varios Paneles De Mando

    4. Mueva el joystick a la izquierda o a la derecha para establecer el código del panel de mando. El color de la 5. Pulse una vez el botón luz indica el código de grupo del panel de control. "ENCENDIDO/APAGADO" para confirmar la configu- ración. vetus® Installation manual DBPPJA - Proportional panel for bow and stern thruster 020813.11...
  • Seite 30: Significado De Los Pilotos Led

    Parpadea dos Parpadea dos Parpadea dos El joystick está defectuoso veces veces veces veces 1x (.) El botón del joystick está presionado ENCENDIDO No conectado con la red vetus® Installation manual DBPPJA - Proportional panel for bow and stern thruster 020813.11...
  • Seite 31: Sicurezza

    • Sincerarsi che durante l’uso la tensione della batteria sia quella giusta. Fare riferimento al rispettivo manuale di installazione dell'elica di prua e/o dell'elica di prua per i diagrammi CAN BUS. vetus® Installation manual DBPPJA - Proportional panel for bow and stern thruster 020813.11...
  • Seite 32: Controllo/Prova E Configurazione Dei Pannelli Di Comando

    ( - . . . - ). stema emette il segnale acustico Rilasciare quindi il pulsante "ON/OFF". dah ( - ). Le impostazioni di fabbrica di questo pannello di controllo sono state ripristinate. vetus® Installation manual DBPPJA - Proportional panel for bow and stern thruster 020813.11...
  • Seite 33: Configurazione Della Direzione Di Propulsione

    6. Premere una volta il pul- 5 VERDE, lampeggiante lampeggeranno i LED (1) sante "ON/OFF" per con- (blu), (2) (rosso) e (5) (ver- fermare l'impostazione. de). Se necessario, ripete- re l’operazione. vetus® Installation manual DBPPJA - Proportional panel for bow and stern thruster 020813.11...
  • Seite 34: Configurazione Di Più Pannelli Di Comando

    4. Muovere il joystick verso sinistra o destra per impostare il codice del pannello di comando. Il colore del 5. Premere una volta ilpul- LED indica il codice gruppo del pannello di comando. sante "ON/OFF" per con- fermare l'impostazione vetus® Installation manual DBPPJA - Proportional panel for bow and stern thruster 020813.11...
  • Seite 35: Significato Degli Indicatori A Led

    Lampeggia due Lampeggia due Lampeggia due Il controllo joystick è rotto volte volte volte volte 1x (.) Il pulsante del joystick è premuto ACCESO Non collegato alla rete vetus® Installation manual DBPPJA - Proportional panel for bow and stern thruster 020813.11...
  • Seite 36: Sikkerhed

    . der måtte opstå . • Sørg for en korrekt batterispænding under brug. Se den relevante installationsmanual til Bow og/eller Stern propeller for at få detaljerede CAN-BUS-diagrammer. vetus® Installation manual DBPPJA - Proportional panel for bow and stern thruster 020813.11...
  • Seite 37: Kontrol/Prøvekørsel Og Konfigurering Af Betjeningspanelerne

    Du hører signalet, dah-di-di-di-dah ( - . . . - ). Alle lysdioder er slukket og du hører 30 sekunder. Slip ”ON/OFF” knappen. signalet dah ( - ). Fabriksindstillin- gerne for dette kontrolpanel er gen- dannet. vetus® Installation manual DBPPJA - Proportional panel for bow and stern thruster 020813.11...
  • Seite 38: Konfiguration Af Drivkraftens Retning

    6. Tryk én gang på”ON/ 5 GRØN, blinker (2) (rød) og (5) (grøn) blin- OFF” knappen for at ker. Gentag fremgangs- bekræfte indstillingen måden, hvis det er nød- vendigt. vetus® Installation manual DBPPJA - Proportional panel for bow and stern thruster 020813.11...
  • Seite 39: Konfiguration Af Flere Betjeningspaneler

    4. Flyt joysticket til venstre eller højre for at indstille koden til betjeningspanelet. Farven på lysdioden angi- 5. Tryk én gang på ”ON/OFF” ver gruppekoden for betjeningspanelet knappen for at bekræfte indstillingen vetus® Installation manual DBPPJA - Proportional panel for bow and stern thruster 020813.11...
  • Seite 40: Betydning Af Led-Indikatorlamper

    Blinker med Blinker med Blinker med dobbelt dobbelt dobbelt dobbelt Joysticket er defekt hastighed hastighed hastighed hastighed 1x (.) Der er trykket på joystick-knappen Ingen forbindelse til netværket vetus® Installation manual DBPPJA - Proportional panel for bow and stern thruster 020813.11...
  • Seite 41: Säkerhet

    Bservera 12 V . • Se till att batterispänningen är rätt vid användning. Se den relevanta installationsmanualen för Bow och / eller Akterpro- peller för detaljerade CAN-BUS-diagram. vetus® Installation manual DBPPJA - Proportional panel for bow and stern thruster 020813.11...
  • Seite 42: Kontrollera/Testköra Och Konfigurera Manöverpanelerna

    Följande signal ljuder, dah-di-di-di-dah ( - . . . - ). Alla lysdioder är släckta och följande sekunder. Släpp PÅ/AV-knappen. signal ljuder, dah ( - ). Fabriksinställ- ningarna för denna kontrollpanel har återställts. vetus® Installation manual DBPPJA - Proportional panel for bow and stern thruster 020813.11...
  • Seite 43: Ställa In Drivriktning

    (5) (grön) blinkar. Det 6. Tryck en gång på PÅ/AV- 5 GRÖN, blinkande kan vara nödvändigt att knappen för att bekräfta göra detta flera gånger. inställningen. vetus® Installation manual DBPPJA - Proportional panel for bow and stern thruster 020813.11...
  • Seite 44: Konfigurering Av Flera Kontrollpaneler

    4. Rör joysticken åt vänster eller höger för att ställa in kontrollpanelens kod. Diodens färg anger kontrollpa- 5. Tryck en gång på PÅ/AV- nelens gruppkod. knappen för att bekräfta inställningen. vetus® Installation manual DBPPJA - Proportional panel for bow and stern thruster 020813.11...
  • Seite 45: Betydelse Led-Indikatorlampor

    Voedingsspanning paneel laag snabbt snabbt Blinkar Blinkar Blinkar Blinkar Joystick is kapot dubbelt dubbelt dubbelt dubbelt 1x (.) Joystick-knop is ingedrukt TILL Niet verbonden met het netwerk vetus® Installation manual DBPPJA - Proportional panel for bow and stern thruster 020813.11...
  • Seite 46: Sikkerhet

    . volt . • Sørg for riktig batterispenning under bruk. Se i den relevante installasjonshåndboken for bueog/ eller Stern Thruster for de detaljerte CAN-BUS diagrammene. vetus® Installation manual DBPPJA - Proportional panel for bow and stern thruster 020813.11...
  • Seite 47: Kontroll/Prøvekjøring Og Konfigurering Av Betjeningspanelene

    ( - . . . - ). Alle LED-ene er slukket og du hører under. Slipp nå ‘PÅ/AV’-knappen. et signal, dah ( - ). Fabrikkinnstillin- gene for dette kontrollpanelet er gjenopprettet. vetus® Installation manual DBPPJA - Proportional panel for bow and stern thruster 020813.11...
  • Seite 48: Konfigurasjon Skyvekraftretning

    (1) (blå), (2) (rød) og (5) 6. Trykk én gang på ‘PÅ/ 5 GRØNN, blinkende (grønn) blinker. Gjenta AV’-knappen for å be- dette, hvis det trengs. krefte innstillingen. vetus® Installation manual DBPPJA - Proportional panel for bow and stern thruster 020813.11...
  • Seite 49: Konfigurasjon Av Flere Kontrollpaneler

    4. Beveg styrespaken mot venstre eller høyre for å stille inn kontrollpanelets kode. LED-ens farge angir 5. Trykk én gang på ‘PÅ/AV’- kontrollpanelets gruppekode. knappen for å bekrefte innstillingen vetus® Installation manual DBPPJA - Proportional panel for bow and stern thruster 020813.11...
  • Seite 50: Led-Indikasjonslampenes Betydning

    Blinker raskt Matespenning panel lav Blinker Blinker Blinker Blinker Joysticken er ødelagt dobbelt dobbelt dobbelt dobbelt 1x (.) Joystickknappen er trykket inn PÅ Ikke forbundet med nettverket vetus® Installation manual DBPPJA - Proportional panel for bow and stern thruster 020813.11...
  • Seite 51: Turvallisuus

    . • Tarkista että akut luovuttavat oikeaa jännitettä keulapotkuria käy- CAN-väylän syöttö on aina liitettävä 12 V:iin . tettäessä. Katso yksityiskohtaiset CAN-BUS-kaaviot asianomaisesta keula- ja/tai peräsinohjaimen asennusohjeesta. vetus® Installation manual DBPPJA - Proportional panel for bow and stern thruster 020813.11...
  • Seite 52: Hallintapaneelien Tarkastus/Koekäyttö Ja Konfigurointi 52 4.1 Yleistä

    (3) on vihreä. Kuuluu signaali, dah-di-di-di-dah ( - . . . - ). Kaikki LED-valot ovat sammuneet Vapauta nyt ON/OFF-painike. ja kuuluu signaali dah ( - ). Tämän ohjauspaneelin tehdasasetukset on palautettu. vetus® Installation manual DBPPJA - Proportional panel for bow and stern thruster 020813.11...
  • Seite 53: Työntövoiman Suunnan Konfigurointi

    2 PUNAINEN, vilkkuu kunnes LED-valot (1) (sini- 6. Paina ON/OFF-painiketta 5 VIHREÄ, vilkkuu nen), (2) (punainen) ja (5) yhden kerran asetuksen (vihreä) vilkkuvat. Toista vahvistamiseksi. tämä tarvittaessa. vetus® Installation manual DBPPJA - Proportional panel for bow and stern thruster 020813.11...
  • Seite 54: Useampien Ohjauspaneelien Konfigurointi

    Ryhmä D SINIPUNAINEN, vilkkuu 4. Liikuta ohjaussauvaa vasemmalle tai oikealle, jotta voit asettaa paneelin koodin. LED-valon väri ilmaisee 5. Paina On/Off-painiketta paneelin ryhmäkoodin. yhden kerran asetuksen vahvistamiseksi. vetus® Installation manual DBPPJA - Proportional panel for bow and stern thruster 020813.11...
  • Seite 55: Led-Merkkivalojen Merkitys

    Vilkkuu Paneelin syöttöjännite alhainen nopeasti nopeasti Vilkkuu Vilkkuu Vilkkuu Vilkkuu Ohjaussauva on rikki kahdesti kahdesti kahdesti kahdesti Ohjaussauvan painiketta on 1x (.) painettu PÄÄLLÄ Ei yhteydessä verkkoon vetus® Installation manual DBPPJA - Proportional panel for bow and stern thruster 020813.11...
  • Seite 56: Bezpieczeństwo

    • Należy się upewnić, że w czasie pracy pędnik zasilany jest z aku- mulatora o prawidłowym napięciu Aby zapoznać się ze szczegółowymi schematami CAN-BUS, przejdź do odpowiedniej instrukcji dotyczącej steru strumieniowego dziobo- wego lub rufowego. vetus® Installation manual DBPPJA - Proportional panel for bow and stern thruster 020813.11...
  • Seite 57: Kontrola/Rozruch Próbny I Konfiguracja Pulpitów Operatora

    Wszystkie diody LED są wyłączone kund. ( - . . . - ). Puść wówczas przycisk On/Off. i słychać sygnał ( - ). Przywrócono ustawienia fabryczne tego panelu vetus® Installation manual DBPPJA - Proportional panel for bow and stern thruster 020813.11...
  • Seite 58: Konfiguracja Kierunku Ciągu

    6. Jeden raz naciśnij przy- 5 ZIELONY, miga (2) (czerwona) i (5) (zielona) cisk On/Off, aby potwier- zaczną migać. W razie ko- dzić ustawienia. nieczności należy powtórzyć powyższą czynność. vetus® Installation manual DBPPJA - Proportional panel for bow and stern thruster 020813.11...
  • Seite 59: Konfiguracja Kilku Paneli Operatora

    4. Przesuń joystick w lewo lub w prawo, aby ustawić kod panelu operatora. Kolor diody LED informuje o 5. Jeden raz naciśnij przycisk kodzie grupy panelu operatora. On/Off, aby potwierdzić ustawienia. vetus® Installation manual DBPPJA - Proportional panel for bow and stern thruster 020813.11...
  • Seite 60: Znaczenie Lampek Kontrolnych Led

    Niskie napięcie zasilające panel ganie ganie Podwójne Podwójne Podwójne Podwójne Drążek sterowniczy jest zepsuty mrugnięcie mrugnięcie mrugnięcie mrugnięcie Przycisk drążka sterowniczego 1x (.) jest wciśnięty WŁĄCZONY Nie podłączony do sieci vetus® Installation manual DBPPJA - Proportional panel for bow and stern thruster 020813.11...
  • Seite 61: Hoofdafmetingen

    Główne wymiary Dimensions principales Huvudmått DBPPJA 85 ( 3 ” ) 80 ( 3 ” ) 115 ( 4 ” ) 0.5 - 22 ( ” ) vetus® Installation manual DBPPJA - Proportional panel for bow and stern thruster 020813.11...
  • Seite 62: Aansluitschema's

    Magistrala CAN to łańcuch, do którego dołączony jest ster strumie- niowy i panele. Na jednym końcu łańcucha musi być podłączony zasilacz (5), a ter- minator (8) musi być podłączony na drugim końcu! vetus® Installation manual DBPPJA - Proportional panel for bow and stern thruster 020813.11...
  • Seite 64 FOKKERSTRAAT 571 - 3125 BD SCHIEDAM - HOLLAND b.v. TEL.: +31 (0)88 4884700 - sales@vetus.nl - www.vetus.com Printed in the Netherlands 020813.11 2021-09...

Inhaltsverzeichnis