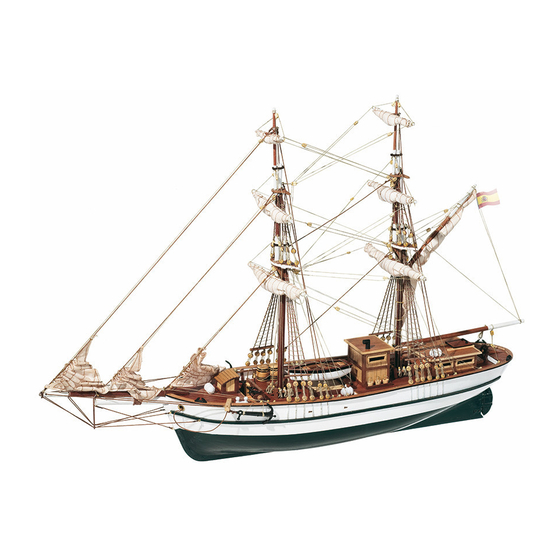
Inhaltszusammenfassung für OcCre AURORA
-
Seite 2: Instrucciones De Montaje
INSTRUCCIONES DE MONTAJE AURORA CASCO FOTO 1. Monte la estructura del casco siguiendo el orden numérico del dibujo. Antes de encolar las cuadernas, verifique que encajan correctamente en su posición haciendo “tope” en los encajes correspondientes de la falsa quilla. Es importante que las cuadernas queden completamente perpendiculares a la falsa quilla. - Seite 3 SUPERESTRUCTURA Llegada esta fase de la construcción de la maqueta, siga el orden numérico establecido y elabore las piezas representadas en este apartado. Algunas de estas piezas se deben pintar y decorar. Para ello, utilice pinturas acrílicas al agua. Una vez elaboradas, las piezas deberán pegarse en la posición que muestran las imágenes y con la distribución que facilitan los planos.
- Seite 4 ASSEMBLY INSTRUCTIONS AURORA HULL PHOTO 1: Assemble the hull structure by following the numerical order of the drawing. Before gluing the frames in place make sure that they are correctly fitted into position “abutting” up against the corresponding slots on the false keel. It is important that the frames are completely perpendicular to the false keel.
- Seite 5 PHOTO 41: Paint the rudder blade the same dark green as the hull. Adjust the size of the hinges, using cutting pliers. Make up the rudder assembly using the parts shown in the image. PHOTO 42: Make a 4 mm ø hole at the foot of the stern post, then attach the rudder blade to the hull using the hinges. PHOTO 43: Paint the rubbing strakes (no, 45) green and glue them to the hull.
-
Seite 6: Instructions De Montage
INSTRUCTIONS DE MONTAGE AURORA COQUE PHOTO 1. Monter la structure de la coque en suivant l’ordre numérique des photos. Avant de coller les couples, vérifier qu’ils s’emboîtent correctement à leur place et pénètrent « à fond » dans les emboîtures de la fausse quille. Il est important que les couples soient parfaitement perpendiculaires à... - Seite 7 Pour le placer, il faut commencer par l’adapter à la courbure de la coque. On peut ensuite le peindre en noir au pinceau sec et y appliquer la couleur dorée. Pour terminer, on collera cette pièce sur la coque et les pièces nº 49 sur le pont. SUPERSTRUCTURE À...
-
Seite 8: Istruzioni Di Montaggio
ISTRUZIONI DI MONTAGGIO AURORA SCAFO FOTO 1. Montare la struttura dello scafo seguendo l’ordine numerico del disegno. Prima di incollare le coste, verificare che si incastrino bene al loro posto andando a toccare gli incastri corrispondenti della falsa chiglia. E’ importante che le coste siano perfettamente perpendicolari alla falsa chiglia. - Seite 9 bisognerà adattarlo alla curvatura dello scafo. Pitturarlo poi in nero e poi con il pennello asciutto, applicare un colore dorato. Infine incollare allo scafo e sulla coperta i pezzi nº 49. SOVRASTRUTTURA Arrivati a questo punto della costruzione del modellino, seguire l’ordine numerico definito ed elaborare i pezzi rappresentati in questo punto.
- Seite 10 BASTELANLEITUNG AURORA Rumpf Foto 1. Die Rumpfstruktur in der auf der Zeichnung angegebenen numerischen Reihenfolge zusammenbauen. Vor dem Aufkleben der Spanten sicherstellen, dass die sie korrekt sitzen und mit den dazugehörigen Einkerbungen des falschen Kiels abschließen. Die Spanten müssen vollkommen senkrecht auf dem falschen Kiel stehen. Für diesen Schritt weißen Leim verwenden.
- Seite 11 Foto 41. Das Ruder im selben Grün wie den Rumpf lackieren. Die Scharniere mit einer Zange auf die erforderlichen Größen zurechtschneiden. Das Steuerblatt aus den angegebenen Einzelteilen wie auf der Abbildung gezeigt zusammenbauen. Foto 42. Eine Öffnung von ø 4 mm am Fuß des Achtersteven anbringen. Das Steuerblatt mit den Scharnieren am Rumpf befestigen.
- Seite 12 Lista de piezas / Parts List / Liste des pièces / Teileliste / Elenco delle parti Nº/No./ Nº / Cantidad / Quantity / Quantité / Medidas / Measurements / Dimensions /Maße / Misure Material / Material / Matériau / Material / Materiale Nr.
- Seite 13 Lista de piezas / Parts List / Liste des pièces / Teileliste / Elenco delle parti Nº/No./ Nº / Cantidad / Quantity / Quantité / Medidas / Measurements / Dimensions /Maße / Misure Material / Material / Matériau / Material / Materiale Nr.
- Seite 14 Lista de piezas / Parts List / Liste des pièces / Teileliste / Elenco delle parti Nº/No./ Nº / Cantidad / Quantity / Quantité / Medidas / Measurements / Dimensions /Maße / Misure Material / Material / Matériau / Material / Materiale Nr.
- Seite 15 Lista de piezas / Parts List / Liste des pièces / Teileliste / Elenco delle parti Nº/No./ Nº / Cantidad / Quantity / Quantité / Medidas / Measurements / Dimensions /Maße / Misure Material / Material / Matériau / Material / Materiale Nr.
- Seite 24 13001-1 13001-2 13001-3 53 95 58 81 13001-5 13001-4 13001-6...
- Seite 25 Bompresso / Bugspriet...
- Seite 26 Aurora Albero trinchetto / Fockmast...
- Seite 27 Aurora Albero trinchetto / Fockmast...
- Seite 28 Aurora Albero trinchetto / Fockmast...
- Seite 29 Aurora Albero maestro / Hauptmast...
- Seite 30 Aurora Albero maestro / Hauptmast...
- Seite 31 Aurora Albero maestro / Hauptmast...
- Seite 32 Aurora Albero maestro / Hauptmast...
- Seite 33 Aurora...
- Seite 34 Aurora...
- Seite 35 Aurora 185-189...
- Seite 36 Aurora...
- Seite 37 Aurora...
- Seite 38 Aurora...
- Seite 39 Aurora 221-233 225-237 215-228 222-234 219-231 224-236 214-227 220-232 217-229 213-226 218-230 223-235...
- Seite 40 Aurora Aparejo de velas / Sail rig / Gréement Segel takelage / Sartiame da vela...
- Seite 41 Aurora Aparejo de velas / Sail rig / Gréement Segel takelage / Sartiame da vela...
- Seite 42 Aurora...
- Seite 43 Aurora Aparejo de velas / Sail rig / Gréement Segel takelage / Sartiame da vela...
- Seite 45 Sección longitudinal / Amidship section / Coupe longitudinale Sezione longitudinale / Abschnit Mittschiffslinie...


