Herunterladen Inhalt Inhalt Diese Seite drucken
Inhaltsverzeichnis

Werbung

Verfügbare Sprachen
  • DE

Verfügbare Sprachen

  • DEUTSCH, seite 32
USER´S MANUAL
BEDIENUNGSANLEITUNG
MANUEL D´UTILISATION
MANUAL DE USUARIO
INSTRUKCJA OBSŁUGI
MANUALE D´USO
RGBW
MOVO BEAM 200
ENDLESS ROTATION BEAM MOVING HEAD WITH LED RING
CLMB200

Werbung

Inhaltsverzeichnis
loading

Inhaltszusammenfassung für Cameo MOVO BEAM 200

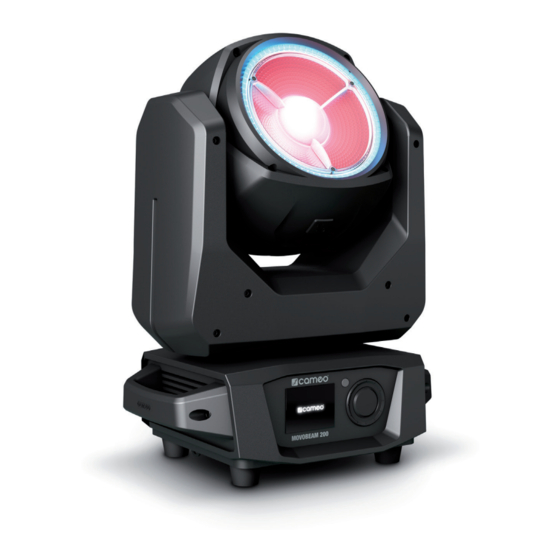
  • Seite 1 USER´S MANUAL BEDIENUNGSANLEITUNG MANUEL D´UTILISATION MANUAL DE USUARIO INSTRUKCJA OBSŁUGI MANUALE D´USO RGBW MOVO BEAM 200 ENDLESS ROTATION BEAM MOVING HEAD WITH LED RING CLMB200...
  • Seite 2 CONTENTS / INHALTSVERZEICHNIS / CONTENU / CONTENIDO / TREŚĆ / CONTENUTO ENGLISH INFORMATION ON THIS USER MANUAL PROPER USE DEFINITIONS AND SYMBOL EXPLANATIONS SAFETY INSTRUCTIONS NOTES FOR MOBILE INDOOR DEVICES INCLUDED INTRODUCTION CONNECTIONS, OPERATING AND DISPLAY ELEMENTS OPERATION SET-UP AND INSTALLATION CARE, MAINTENANCE AND REPAIR DMX TECHNOLOGY DIMENSIONS...
  • Seite 3 CONTENTS / INHALTSVERZEICHNIS / CONTENU / CONTENIDO / TREŚĆ / CONTENUTO FRANÇAIS INFORMATIONS CONCERNANT CE MANUEL D’UTILISATION UTILISATION CONFORME EXPLICATIONS DES TERMES ET DES SYMBOLES CONSIGNES DE SÉCURITÉ REMARQUES CONCERNANT LES APPAREILS INTÉRIEURS MOBILES CONTENU DE LA LIVRAISON PRÉSENTATION RACCORDEMENTS, ÉLÉMENTS DE COMMANDE ET D’AFFICHAGE UTILISATION INSTALLATION ET MONTAGE ENTRETIEN, MAINTENANCE ET RÉPARATION...
  • Seite 4 CONTENTS / INHALTSVERZEICHNIS / CONTENU / CONTENIDO / TREŚĆ / CONTENUTO POLSKI INFORMACJE DOTYCZĄCE NINIEJSZEJ INSTRUKCJI OBSŁUGI UŻYTKOWANIE ZGODNE Z PRZEZNACZENIEM ZASADY BEZPIECZEŃSTWA UWAGI DOTYCZĄCE PRZENOŚNEGO SPRZĘTU WEWNĘTRZNEGO OBJAŚNIENIA TERMINÓW I SYMBOLI ZAKRES DOSTAWY WPROWADZENIE PRZYŁĄCZA, ELEMENTY OBSŁUGI I WSKAŹNIKI OBSŁUGA USTAWIANIE I MONTAŻ...
  • Seite 5: Proper Use

    This device has been developed and manufactured to the highest quality standards to ensure many years of problem-free operation. Please read this manual carefully to be able to use your new Cameo product quickly and optimally. Further information about Cameo Light is available on our website CAMEOLIGHT.COM.
  • Seite 6: Safety Instructions

    This symbol identifies hazards that can cause electric shock. This symbol identifies hazardous areas or hazardous situations. This symbol indicates hazards caused by hot surfaces. This symbol indicates hazards caused by intense light sources. This symbol indicates a device in which there are no user-replaceable parts. This symbol indicates additional information on the operation of the product.
  • Seite 7 WARNING: 1. The device may not be operated if it shows obvious signs of damage. 2. The device may only be installed in a voltage-free state. 3. If the device's power cable is damaged, the device may not be used. 4.
  • Seite 8 WARNING: 1. Use the device in the prescribed manner only. 2. Operate the device using only accessories of the type recommended and supplied by the manufacturer. 3. Observe safety regulations applicable in your country during installation. 4. After connecting the device, ensure that all cables are routed so as to avoid dam- age or accidents, such as from tripping.
  • Seite 9 CAUTION: 1. Do not install or use the device in the vicinity of radiators, accumulators, stoves, or other heat sources Ensure that the device is always installed in such a way that it is sufficiently cooled and cannot overheat. 2. Do not place any ignition sources, such as burning candles, near the device. 3.
  • Seite 10 INCLUDED Remove the product from the packaging and remove all packaging material. Please check the completeness and integrity of the delivery and notify your distribution partner immediately after purchase if the delivery is not complete or if it is damaged. Product includes: X Device X Power cable...
  • Seite 11: Connections, Operating And Display Elements

    Blue Power Twist mains input socket. Operating voltage 100–240 V AC/50–60 Hz. A suitable power cable is included. POWER OUT White Power Twist mains output socket for supplying power to additional Cameo spotlights (for maximum output current, see label on back of housing). DMX IN Male 3-pin and 5-pin XLR sockets for connection to a DMX control device (e.g.
  • Seite 12: Lc-Display

    Control: DMX DMX Address 4 CH Mode FAN: Normal 6. LC DISPLAY The illuminated LC display shows the currently activated operating mode (main display), the menu items in the main menu and the numerical value or operational status and options in the corre- sponding menu items in the submenus.
  • Seite 13 “Software update ...Please wait” (for service purposes only), the software version, then “Welcome to Cameo” and “Reset”. After this process, the spotli- ght is ready for operation and the previously selected mode will be activated.
  • Seite 14: Slave Mode

    CONFIGURE DMX START ADDRESS Starting from the main display, press the rotary-push encoder to enter the main menu (MENU). Select the menu item Control by turning and pressing the encoder. Turn the encoder to select DMX and press the encoder again to confirm. Now select Address, confirm by pressing the encoder and then select the desired DMX start address again by turning the encoder.
  • Seite 15 STANDALONE OPERATION (SCENES) Similar to when using a DMX control unit, the standalone operating mode Scenes makes it possible to set pan, tilt, dimmer, RGBW, LED ring etc. directly on the device with values from 000 to 255. A total of 8 individual scenes (Scene 1–8) can be created, edited, saved and recalled. It is also possible to record scenes via DMX controller (Record Scene) and transfer scenes completely to a slave unit (Copy to Slave).
  • Seite 16 Scenes <= Run Scene <= (start scene) Scene 1–8 Start Scene 1–8: select and confirm scene Select and confirm scene Record Scene <= Scene 1–8 Cancel operation Set scene in control- ler, confirm with YES Edit Scene <= Scene 1–8 <= 000–255 Tilt...
  • Seite 17 DEVICE INFORMATION (INFO) Starting from the main display, press the rotary-push encoder to enter the main menu (MENU). Turn the encoder to select the Info menu for device information and press the encoder. Settings (bold = factory setting) Select by turning the encoder, confirm by pressing, change value or status by turning, confirm by pressing.
  • Seite 18 Dimmer Selects dimmer <= curve and dimmer Curve <= Linear Light intensity increases response linearly with DMX value Exponential Light intensity can be finely adjusted at lower DMX values and broadly adjusted at higher DMX values Logarithmic Light intensity can be broadly adjusted at lower DMX values and finely adjusted at higher DMX...
  • Seite 19 Pan/Tilt Device head settings <= Motors Pan/Tilt 000–255 000 = maximum, 255 = Speed minimum speed Pan Reverse <= Normal Does not reverse pan direction Reverse Reverses pan direction Tilt Reverse <= Normal Does not reverse tilt direction Reverse Reverses tilt direction Sensors <= Automatic position cor-...
  • Seite 20 In order to have the required information displayed, select the relevant menu item by turning the encoder and then press the encoder to confirm. Info <= Back Firmware Displays the firmware of the device components Temperature Displays the temperature of the device base (Base) and the LED unit (LED) in degrees Celsius and Fahrenheit Fan Speed Displays the rotational speed of the two fans in the device head in RPM...
  • Seite 21 Service Select by turning the encoder, confirm by pressing, select option by turning, confirm by pres- sing. Back with <= Reset Restart and reset <= Full Reset Do not (restart) perform reset Performing a reset P/T Reset Do not perform reset (reset of pan/tilt Perform reset motors)
  • Seite 22 Defaults <= Recall <= (restore Factory Reset Cancel restore factory settings) settings Restore factory settings Default 1 Cancel restore user settings 1 Restore user settings 1 Default 2 Cancel restore user settings 2 Restore user settings 2 Default 3 Cancel restore user settings 3 Restore user settings 3 Store...
  • Seite 23 QUICKLIGHT The Quicklight mode makes it possible to quickly and easily create a scene from the basic func- tions of the moving head without the need for a DMX controller. Starting from the main display, press the rotary-push encoder to enter the main menu (MENU). Select Quicklight by turning and pressing the encoder.
  • Seite 24: Set-Up And Installation

    SET-UP AND INSTALLATION Four rubber feet on the underside of the base of the device ensure that it can be securely placed on suitable surfaces while at the same time protecting the surface from scratches. For traverse mounting, use the two Omega brackets supplied, which you attach to mounting points A, and use optionally available and suitable traverse clamps.
  • Seite 25 CARE, MAINTENANCE AND REPAIR In order to ensure the long-term, proper functioning of the device, it must be regularly cleaned and, if necessary, maintained. The maintenance requirement depends on the intensity of use and the environment in which it is used. We generally recommend a visual inspection before each operation.
  • Seite 26: Dmx Technology

    PLEASE NOTE! For conversion or retrofit sets provided by the manufacturer, it is essential to observe the enclosed installation instructions. DMX TECHNOLOGY DMX-512 DMX (Digital Multiplex) is the name for a universal communication protocol for communication between corresponding devices and controllers.
  • Seite 27 DMX CABLE: When preparing your own leads, it is essential to follow the diagrams on this page. Do not connect the shielding of the cable to the ground pin of the connector, and make sure that the shield does not come into contact with the XLR connector housing. If the shield has contact to ground it may lead to system errors.
  • Seite 28: Technical Data

    DIMENSIONS 214 mm 206 mm 287 mm TECHNICAL DATA Product number: CLMB200 Product type: Moving Head Type: LED multi-effect washbeam Colour spectrum LED: Beam: RGBW/Ring: RGB Number of LEDs: 1 x beam LED + 24 segments with 3 x RGB LEDs LED type: 1 x Osram 60 W + 72 x 0.2 W SMD PWM frequency:...
  • Seite 29 DMX functions: Pan/tilt, pan/tilt fine, endless pan/tilt, dimmer, dimmer fine, stro- be 0–20 Hz, single pixel control, segment control, pixel macros, colour presets (LEE filter) and motion macros, device settings Standalone functions: Scene 1–8, Quicklight Control: DMX512, Master-Slave, RDM Pan angle: Endless Tilt angle: Endless...
  • Seite 30: Packaging

    DISPOSAL PACKAGING: 1. Packaging can be fed into the reusable material cycle using the usual disposal methods. 2. Please separate the packaging in accordance with the disposal laws and recy- cling regulations in your country. DEVICE: 1. This device is subject to the European Directive on Waste Electrical and Electronic Equipment, as amended.
  • Seite 31 UKCA- CONFORMITY Hereby, Adam Hall Ltd. declares that this product meets the following guidelines (where applica- ble) Electrical Equipment (Safety) Regulations 2016 Electromagnetic Compatibility Regulations 2016 (SI 2016/1091) The Restriction of the Use of Certain Hazardous Substances in Electrical and Electronic Equipment Regulation 2012 (SI 2012/3032) Radio Equipment Regulations 201 7(SI 2016/2015) UKCA- DECLARATION OF CONFORMITY...
  • Seite 32: Bestimmungsgemässer Gebrauch

    Dieses Gerät wurde unter hohen Qualitätsanforderungen entwickelt und gefertigt, um viele Jahre einen reibungslosen Betrieb zu gewährleisten. Bitte lesen Sie diese Bedienungsanleitung sorgfäl- tig, damit Sie Ihr neues Produkt von Cameo Light schnell und optimal einsetzen können. Weitere Informationen über Cameo Light erhalten Sie auf unserer Website CAMEOLIGHT.COM.
  • Seite 33: Begriffs- Und Symbolerklärungen

    BEGRIFFS- UND SYMBOLERKLÄRUNGEN 1. GEFAHR: Mit dem Wort GEFAHR, evtl. in Kombination mit einem Symbol, wird auf unmittelbar gefährliche Situationen oder Zustände für Leib und Leben hingewiesen. 2. WARNUNG: Mit dem Wort WARNUNG, evtl. in Kombination mit einem Symbol, wird auf potenti- ell gefährliche Situationen oder Zustände für Leib und Leben hingewiesen.
  • Seite 34 WARNUNG: 1. Das Gerät darf nicht in Betrieb genommen werden, wenn es offensichtliche Beschädigungen aufweist. 2. Das Gerät darf nur im spannungsfreien Zustand installiert werden. 3. Wenn das Netzkabel des Geräts beschädigt ist, darf das Gerät nicht in Betrieb genommen werden. 4.
  • Seite 35 WARNUNG: 1. Verwenden Sie das Gerät nur in der vorgesehenen Art und Weise. 2. Betreiben Sie das Gerät nur mit dem vom Hersteller empfohlenen und vorgesehe- nen Zubehör. 3. Beachten Sie bei der Installation die für Ihr Land geltenden Sicherheitsvorschrif- ten.
  • Seite 36 ACHTUNG: 1. Installieren und betreiben Sie das Gerät nicht in der Nähe von Heizkörpern, Wärme speichern, Öfen oder sonstigen Wärmequellen. Sorgen Sie dafür, dass das Gerät immer so installiert ist, dass es ausreichend gekühlt wird und nicht überhitzen kann. 2. Platzieren Sie keine Zündquellen wie z.B. brennende Kerzen in der Nähe des Geräts.
  • Seite 37: Lieferumfang

    LIEFERUMFANG Entnehmen Sie das Produkt aus der Verpackung und entfernen Sie sämtliches Verpackungsmaterial. Bitte überprüfen Sie die Vollständigkeit und Unversehrtheit der Lieferung und benachrichtigen Sie Ihren Vertriebspartner bitte unverzüglich nach dem Kauf, falls die Lieferung nicht komplett oder beschädigt ist. Im Lieferumfang des Produkts sind enthalten: X Gerät X Netzkabel...
  • Seite 38: Anschlüsse, Bedien- Und Anzeigeelemente

    Blaue Power Twist Netzeingangsbuchse. Betriebsspannung 100 - 240V AC / 50 - 60Hz. Ein geeignetes Netzkabel befindet sich im Lieferumfang. POWER OUT Weiße Power Twist Netzausgangsbuchse für die Spannungsversorgung weiterer Cameo Schein- werfer (maximaler Ausgangsstrom siehe Aufdruck auf der Gehäuserückseite). DMX IN Männliche 3-Pol und 5-Pol XLR-Buchsen zum Anschließen eines DMX-Kontrollgeräts (z.B.
  • Seite 39 Control: DMX DMX Address 4 CH Mode FAN: Normal 6. LC-DISPLAY Das beleuchtete LC-Display zeigt die aktuell aktivierte Betriebsart (Hauptanzeige), die Menüpunk- te im Hauptmenü und in den Untermenüs den Zahlenwert bzw. Betriebszustand und Optionen in den entsprechenden Menüpunkten an. Erfolgt innerhalb circa einer Minute keine Eingabe, wechselt die Anzeige im Display automatisch zur Hauptanzeige.
  • Seite 40: Bedienung

    Sobald der Scheinwerfer korrekt am Stromnetz angeschlossen ist, wird während des Startvorgan- gs nacheinander „Software update ...Please wait” (nur für Service-Zwecke), die Software-Version, dann „Welcome to Cameo” und „Reset” im Display angezeigt. Nach diesem Vorgang ist der Sche- inwerfer betriebsbereit und die Betriebsart, die zuvor angewählt war, wird aktiviert.
  • Seite 41: Dmx-Startadresse Einstellen

    DMX-STARTADRESSE EINSTELLEN Ausgehend von der Hauptanzeige gelangen Sie durch Drücken auf den Dreh-Drück-Encoder in das Hauptmenü (MENU). Wählen Sie durch Drehen des Encoders den Menüpunkt Control aus und drücken auf den Encoder. Durch Drehen des Encoders wählen Sie nun den Menüpunkt DMX aus und bestätigen abermals durch Drücken auf den Encoder.
  • Seite 42: Slave-Betrieb

    SLAVE-BETRIEB Ausgehend von der Hauptanzeige gelangen Sie durch Drücken auf den Dreh-Drück-Encoder in das Hauptmenü (MENU). Wählen Sie durch Drehen des Encoders den Menüpunkt Control aus und drücken auf den Encoder. Durch Drehen des Encoders wählen Sie nun den Menüpunkt Slave aus und bestätigen abermals durch Drücken auf den Encoder.
  • Seite 43 Scenes <= Run Scene <= (Szene starten) Scene 1 - 8 Szene 1 - 8 starten: Szene auswählen und bestätigen Szene auswählen und bestätigen Record Scene <= (Szene aufzeichnen) Scene 1 - 8 Vorgang abbrechen Szene im Controller einstellen, mit YES bestätigen Edit Scene <=...
  • Seite 44: Systemeinstellungen (Settings)

    SYSTEMEINSTELLUNGEN (SETTINGS) Ausgehend von der Hauptanzeige gelangen Sie durch Drücken auf den Dreh-Drück-Encoder in das Hauptmenü (MENU). Wählen Sie durch Drehen des Encoders das Menü für die Systemeinstel- lungen Settings aus und drücken auf den Encoder. Daraufhin gelangen Sie in das Untermenü zum Einstellen der Untermenüpunkte, siehe Tabelle: Settings (Fettdruck = Werkseinstellung) Auswahl durch Drehen des Encoders, bestätigen durch Drücken, Wert bzw.
  • Seite 45 Dimmer Auswählen von <= Dimmerkurve und Curve <= Linear Die Lichtintensität steigt Dimmverhalten linear mit dem DMX-Wert Exponential Die Lichtintensität lässt sich im unteren DMX- -Wertbereich fein und im oberen DMX-Wertbereich grob einstellen Logarithmic Die Lichtintensität lässt sich im unteren DMX- -Wertbereich grob und im oberen DMX-Wertbe- reich fein einstellen...
  • Seite 46 Pan/Tilt Einstellungen des <= Motors Gerätekopfs Pan/Tilt 000 - 255 000 = maximale, 255 Speed = minimale Geschwin- digkeit Pan Reverse <= Normal Keine Umkehrung der Pan Bewegungsrichtung Reverse Umkehrung der Pan Bewegungsrichtung Tilt Reverse <= Normal Keine Umkehrung der Tilt Bewegungsrichtung Reverse Umkehrung der Tilt...
  • Seite 47: Geräteinformationen (Info)

    GERÄTEINFORMATIONEN (INFO) Ausgehend von der Hauptanzeige gelangen Sie durch Drücken auf den Dreh-Drück-Encoder in das Hauptmenü (MENU). Wählen Sie durch Drehen des Encoders das Menü für die Geräteinforma- tionen Info aus und drücken auf den Encoder. Um die gewünschten Informationen anzeigen zu lassen, wählen Sie den entsprechenden Menüpunkt durch Drehen des Encoders aus und bestätigen durch Drücken auf den Encoder.
  • Seite 48 Service Auswahl durch Drehen des Encoders, bestätigen durch Drücken, Option auswählen durch Dre- hen, bestätigen durch Drücken. Zurück mit <= Reset Neustart und Reset <= Full Reset Neustart nicht (Neustart) durchführen Neustart durchführen P/T Reset Reset nicht durchführen (Reset der Pan / Reset durchführen Tilt Motoren) Test...
  • Seite 49 Defaults <= Recall <= (Einstellungen Factory Reset Werkseinstellungen wiederherstellen) wiederherstellen abbrechen Werkseinstellungen wiederherstellen Default 1 Benutzereinstellungen 1 wiederherstellen abbrechen Benutzereinstellungen 1 wiederherstellen Default 2 Benutzereinstellungen 2 wiederherstellen abbrechen Benutzereinstellungen 2 wiederherstellen Default 3 Benutzereinstellungen 3 wiederherstellen abbrechen Benutzereinstellungen 3 wiederherstellen Store <= (Einstellungen...
  • Seite 50 QUICKLIGHT Die Betriebsart Quicklight ermöglicht es, schnell und unkompliziert eine Szene aus den Basisfunk- tionen des Moving Heads zu erstellen, ohne dafür einen DMX-Controller zu benötigen. Ausgehend von der Hauptanzeige gelangen Sie durch Drücken auf den Dreh-Drück-Encoder in das Haupt- menü...
  • Seite 51: Aufstellung Und Montage

    AUFSTELLUNG UND MONTAGE Vier Gummifüße auf der Unterseite der Gerätebasis sorgen für das sichere Aufstellen auf geeigne- ten Flächen, gleichzeitig wird die Standfläche vor Kratzern geschützt. Verwenden Sie für die Traversenmontage die beiden mitgelieferten Omega-Bügel, die Sie an den Montagepunkten A befestigen und nutzen optional erhältliche und geeignete Traversenklemmen.
  • Seite 52: Pflege, Wartung Und Reparatur

    PFLEGE, WARTUNG UND REPARATUR Um die einwandfreie Funktion des Geräts auf Dauer zu gewährleisten, muss es regelmäßig ge- pflegt und bei Bedarf gewartet werden. Der Pflege- bzw. Wartungsbedarf steht in Abhängigkeit der Nutzungsintensität und -umgebung. Wir empfehlen generell eine Sichtprüfung vor jeder Inbetrieb- nahme.
  • Seite 53: Dmx Technik

    HINWEIS! Wartungs- und Reparaturmaßnahmen dürfen nur von ausreichend quali- fiziertem Fachpersonal durchgeführt werden. Im Zweifel wenden Sie sich an eine Fachwerkstatt. HINWEIS! Unsachgemäß ausgeführte Wartungsarbeiten können den Gewährleistung- sanspruch beeinträchtigen. HINWEIS! Bei vom Hersteller vorgesehenen Um- oder Nachrüstsets beachten Sie unbedingt die beiliegende Einbauanleitung.
  • Seite 54: Serielle Verkopplung Mehrerer Scheinwerfer

    SERIELLE VERKOPPLUNG MEHRERER SCHEINWERFER 1. Verbinden Sie den männlichen XLR-Stecker (3-Pol oder 5-Pol) des DMX-Kabels mit dem DMX-Ausgang (weibliche XLR-Buchse) des ersten DMX-Geräts (z.B. DMX-Controller). 2. Verbinden Sie den weibliche XLR-Stecker des an den ersten Scheinwerfer angeschlossenen DMX-Kabels mit dem DMX-Eingang (männliche XLR-Buchse) des nächsten DMX-Geräts. Verbinden Sie den DMX-Ausgang dieses Geräts in der gleichen Weise mit dem DMX-Eingang des nächsten Geräts und so weiter.
  • Seite 55: Abmessungen

    STECKERBELEGUNG DMX-Adapter 5-Pol XLR male auf 3-Pol XLR female: K3DGF0020 Pin 4 und 5 sind nicht belegt. STECKERBELEGUNG DMX-Adapter 3-Pol XLR male auf 5-Pol XLR female: K3DHM0020 Pin 4 und 5 sind nicht belegt. ABMESSUNGEN 214 mm 206 mm 287 mm...
  • Seite 56: Technische Daten

    TECHNISCHE DATEN Artikelnummer: CLMB200 Produktart: Moving Head Typ: LED Multieffekt Washbeam Farbspektrum LED: Beam: RGBW / Ring: RGB LED Anzahl: 1 x Beam LED + 24 Segmente a 3x RGB LED LED Typ: 1x Osram 60 W + 72 x 0.2W SMD PWM Frequenz: 1000 Hz Abstrahlwinkel:...
  • Seite 57: Entsorgung

    Umgebungstemperatur (in 0°C - 40°C Betrieb): Mindestabstand zur bele- uchteten Fläche: Mindestabstand zu normal 0,5 m entflammbaren Materialien: Gehäusematerial: Environment-friendly fire-retardant ABS Environment-friendly fire-retardant PC Gehäusefarbe: schwarz Gehäusekühlung: temperaturgesteuerte Lüfter Abmessungen (B x H x T, 287 x 410 x 206 mm ohne Montagebügel): ( Höhe Head Flach: 365 mm) Gewicht:...
  • Seite 58: Herstellergarantie & Haftungsbeschränkung

    HERSTELLERERKLÄRUNGEN HERSTELLERGARANTIE & HAFTUNGSBESCHRÄNKUNG Adam Hall GmbH, Adam-Hall-Str. 1, D-61267 Neu Anspach / E-Mail Info@adamhall.com / +49 (0)6081 / 9419-0. Unsere aktuellen Garantiebedingungen und Haftungsbeschränkung finden Sie unter: https://cdn-shop.adamhall.com/media/pdf/Manufacturers-Declarations-CAMEO_DE_EN_ES_ FR.pdf. Im Servicefall wenden Sie sich an Ihren Vertriebspartner. CE-KONFORMITÄT Hiermit erklärt die Adam Hall GmbH, dass dieses Produkt folgender Richtlinie entspricht (soweit zutreffend): Niederspannungsrichtlinie (2014/35/EU) EMV-Richtlinie (2014/30/EU)
  • Seite 59: Utilisation Conforme

    Cet appareil a été conçu et produit suivant des exigences de qualité très strictes pour fonctionner pendant de nombreuses années. Veuillez lire attentivement ce manuel d’utilisation pour pouvoir utiliser rapidement et de manière optimale votre nouveau produit Cameo Light. Vous trouverez de plus amples informations sur Cameo Light sur notre site Web CAMEOLIGHT.COM.
  • Seite 60: Consignes De Sécurité

    Ce symbole indique un danger susceptible de provoquer une décharge électrique. Ce symbole indique une zone ou une situation dangereuse. Ce symbole indique des dangers liés à des surfaces chaudes. Ce symbole signale des dangers liés à des sources lumineuses intenses. Ce symbole indique que l’appareil ne contient aucune pièce remplaçable par l’utili- sateur.
  • Seite 61 AVERTISSEMENT : 1. L’appareil ne doit pas être mis en service s’il présente des dommages apparents. 2. L’appareil ne doit être installé que lorsqu’il est hors tension. 3. Si le câble réseau de l’appareil est endommagé, l’appareil ne doit pas être mis en service.
  • Seite 62 AVERTISSEMENT : 1. Utilisez uniquement cet appareil conformément à l’usage prévu. 2. Utilisez uniquement cet appareil avec les accessoires recommandés et prévus par le fabricant. 3. Lors de l’installation, veillez à respecter les prescriptions de sécurité en vigueur dans votre pays. 4.
  • Seite 63 ATTENTION : 1. N’installez et n’utilisez pas cet appareil à proximité de radiateurs, d’accumu- lateurs thermiques, de fours ou d’autres sources de chaleur. Veillez à installer l’appareil de façon à assurer en permanence un refroidissement suffisant et à éviter une surchauffe. 2.
  • Seite 64: Contenu De La Livraison

    CONTENU DE LA LIVRAISON Retirez le produit de son emballage ainsi que tous les matériaux d’emballage. Veuillez vérifier que la livraison est complète et qu’il n’y a aucun dommage ; dans le cas contraire, informez votre revendeur immédiatement après l’achat. Contenu de la livraison : X Appareil X Câble réseau X 2 omégas de fixation...
  • Seite 65: Raccordements, Éléments De Commande Et D'affichage

    60 Hz. Un câble d’alimentation adapté est fourni. POWER OUT (SORTIE D’ALIMENTATION) Prise de sortie secteur blanche Power Twist pour l’alimentation en tension de projecteurs Cameo supplémentaires (courant de sortie maximum : voir marquage à l’arrière du boîtier). DMX IN (ENTRÉE DMX) Prises XLR mâle à...
  • Seite 66: Écran Lcd

    Control: DMX DMX Address 4 CH Mode FAN: Normal 6. ÉCRAN LCD L’écran LCD rétroéclairé affiche le mode de fonctionnement activé (écran principal), les options du menu principal, la valeur numérique ou l’état de fonctionnement des sous-menus et les options dans les options de menu correspondantes.
  • Seite 67 Dès que le projecteur est correctement raccordé à l’alimentation secteur, l’écran affiche succes- sivement « Software update...Please wait » (uniquement à des fins de maintenance), la version du logiciel, puis « Welcome to Cameo » et « Reset ». À l’issue de cette phase, le projecteur est opérationnel et le mode de fonctionnement précédemment sélectionné est activé.
  • Seite 68 RÉGLAGE DE L’ADRESSE DMX DE DÉPART À partir de l’affichage principal, appuyer sur l’encodeur rotatif à bouton poussoir pour accéder au menu principal (MENU). Tourner l’encodeur pour sélectionner l’option de menu Control, puis appuyer sur l’encodeur. Tourner l’encodeur pour sélectionner ensuite l’option de menu DMX, puis appuyer une nouvelle fois sur l’encodeur pour valider.
  • Seite 69: Mode Slave

    MODE SLAVE À partir de l’affichage principal, appuyer sur l’encodeur rotatif à bouton poussoir pour accéder au menu principal (MENU). Tourner l’encodeur pour sélectionner l’option de menu Control, puis appuyer sur l’encodeur. Tourner l’encodeur pour sélectionner ensuite l’option de menu Slave, puis appuyer une nouvelle fois sur l’encodeur pour valider.
  • Seite 70 Scenes <= Run Scene <= (démarrer la scène)) Scene 1 - 8 Démarrage de la scène 1 – 8 : sélectionner la scène et confirmer Sélectionner la scène et confirmer Record Scene <= (enregistrer la scène) Scene 1 - 8 Annuler l’opération Régler la scène dans le...
  • Seite 71 PARAMÈTRES DU SYSTÈME (SETTINGS) À partir de l’affichage principal, appuyer sur l’encodeur rotatif à bouton poussoir pour accéder au menu principal (MENU). Tourner l’encodeur pour sélectionner le menu des paramètres du système Settings, puis appuyer sur l’encodeur. Cette action permet d’accéder au sous-menu pour le réglage des options de sous-menu, voir tableau : Settings (en gras = réglage d’usine) Tourner l’encodeur pour sélectionner, appuyer pour valider, tourner pour modifier la valeur ou...
  • Seite 72 Signal État de fonction- <= Fail nement en cas Hold Value Maintien de la d’interruption dernière com- mande du signal de pilotage Run Scene 1 Active la scène 1 Black Out Active la fonction Blackout Dimmer Sélection de la <= courbe de dimmer et Curve <=...
  • Seite 73 Pan/Tilt Réglages de la tête <= Motors de l’appareil Pan/Tilt 000 - 255 000 = vitesse maximale, Speed 255 = vitesse minimale Pan Reverse <= Normal Pas d’inversion de la direction du mouvement de l’axe Pan Reverse Inversion de la direction du mouvement de l’axe Tilt Reverse <=...
  • Seite 74 Auto Blocage <= Lock automatique 60 Seconds Verrouillage automatique de l’encodeur rota- de l’encodeur tif à bouton poussoir au bout de 60 secondes d’inactivité. Déverrouillage : maintenir l’en- rotatif codeur enfoncé pendant 5 secondes environ No Lock Verrouillage automatique désactivé INFORMATIONS SUR L’APPAREIL (INFO) À...
  • Seite 75 SERVICE À partir de l’affichage principal, appuyer sur l’encodeur rotatif à bouton poussoir pour accéder au menu principal (MENU). Tourner l’encodeur pour sélectionner Service, puis appuyer sur l’en- codeur pour accéder au menu Service. Cette action permet d’accéder au sous-menu pour la modification des options de sous-menu, voir tableau : Service Tourner l’encodeur pour sélectionner, appuyer pour valider, tourner pour sélectionner l’option,...
  • Seite 76 Defaults <= Recall <= (restaurer les Factory Reset Annuler la restauration paramètres) des réglages d’usine Restaurer les réglages d’usine Default 1 Annuler la restauration des réglages utilisa- teur 1 Restaurer les réglages utilisateur 1 Default 2 Annuler la restauration des réglages utilisa- teur 2 Restaurer les réglages utilisateur 2...
  • Seite 77 QUICKLIGHT Le mode Quicklight permet de créer rapidement et facilement une scène à partir des fonctions de base de la lyre sans avoir besoin d’un contrôleur DMX. À partir de l’affichage principal, appuyer sur l’encodeur rotatif à bouton poussoir pour accéder au menu principal (MENU). Sélectionner Quicklight en tournant l’encodeur et appuyer sur l’encodeur pour valider.
  • Seite 78: Installation Et Montage

    INSTALLATION ET MONTAGE Quatre pieds en caoutchouc sous l’appareil garantissent l’installation sans danger sur des surfaces adaptées. Ils protègent également la surface d’appui des rayures. Pour le montage sur traverse, utiliser les deux omégas de fixation fournis que vous fixez aux points de montage A et utiliser les pinces de serrage sur traverse adaptées disponibles en option.
  • Seite 79 ENTRETIEN, MAINTENANCE ET RÉPARATION Pour garantir le bon fonctionnement de l’appareil à long terme, l’entretien et, si nécessaire, la maintenance doivent être effectués régulièrement. Les besoins en entretien et en maintenance dépendent de l’intensité et de l’environnement d’utilisation. Nous recommandons de procéder à un contrôle visuel avant chaque mise en service.
  • Seite 80: Technologie Dmx

    REMARQUE ! Des travaux d’entretien effectués de manière non conforme peuvent affecter le droit à la garantie. REMARQUE ! Pour les kits de transformation ou de postéquipement prévus par le fabricant, respectez impérativement la notice de montage jointe. TECHNOLOGIE DMX DMX-512 Le sigle DMX (Digital Multiplex) désigne un protocole de trans- mission universel destiné...
  • Seite 81 Vous trouverez une vaste sélection de câbles DMX adaptés dans les gammes de produits 3 STAR, 4 STAR et 5 STAR d’Adam Hall. CÂBLES DMX : Si vous confectionnez vous-même vos câbles, respectez strictement les illustrations figurant sur cette page. Ne raccordez en aucun cas le blindage du câble au plot de masse du connecteur, et veillez à...
  • Seite 82: Caractéristiques Techniques

    DIMENSIONS 214 mm 206 mm 287 mm CARACTÉRISTIQUES TECHNIQUES Référence : CLMB200 Catégorie de produit : Lyre Type : Projecteur wash multi-effets LED Spectre de couleurs des Beam : RGBW/Ring : RGB LED : Nombre de LED : 1 LED Beam + 24 segments à 3 LED RGB Type de LED : 1x Osram 60 W + 72 x 0,2 W SMD Fréquence du signal PWM :...
  • Seite 83 Mode DMX : 4 CH/15 CH/16 CH/20 CH/35 CH/42 CH/89 CH Fonctions DMX : Pan/Tilt, Pan/Tilt fin, Pan/Tilt sans fin, dimmer, dimmer fin, stroboscope 0 – 20 Hz, pilotage individuel des pixels, pilotage des segments, macros de pixels, presets de couleur (filtre LEE) et macro de mouvement, réglages de l’appareil Fonctions Stand Alone : Scene 1 –...
  • Seite 84: Mise Au Rebut

    Autres caractéristiques : Câble d’alimentation de 1 m avec connecteur Power Twist bleu (compatible PowerCon), 2 omégas de fixation et mode d’emploi fournis MISE AU REBUT EMBALLAGE : 1. Les emballages peuvent être introduits dans le circuit de recyclage par les voies de collecte habituelles. 2.
  • Seite 85: Déclaration De Conformité Ue

    CONFORMITÉ CE Par la présente, Adam Hall GmbH déclare que ce produit est conforme aux directives suivantes (si applicables) : Directive basse tension (2014/35/UE) Directive CEM (2014/30/UE) RoHS (2011/65/UE) RED (2014/53/UE) DÉCLARATION DE CONFORMITÉ UE Les déclarations de conformité pour les produits soumis aux directives LVD, EMC et RoHS peuvent être demandées à...
  • Seite 86: Uso Previsto

    Lea atentamente el presente manual de in- strucciones con el fin de poder usar rápidamente y de forma óptima su nuevo producto de Cameo Light. Puede encontrar más información sobre Cameo Light en nuestro sitio web CAMEOLIGHT.
  • Seite 87: Instrucciones De Seguridad

    TÉRMINOS Y SÍMBOLOS 1. PELIGRO: La palabra PELIGRO, que puede ir acompañada de un símbolo, se utiliza para indicar situaciones o estados de peligro inminente para la vida o la integridad física. 2. ADVERTENCIA: La palabra ADVERTENCIA, que puede ir acompañada de un símbolo, indica situaciones o estados potencialmente peligrosos para la vida o la integridad física.
  • Seite 88 ADVERTENCIA: 1. No utilizar el equipo si presenta daños evidentes. 2. El equipo solo se puede instalar estando sin tensión. 3. Si el cable de alimentación del equipo está dañado, el equipo no debe utilizarse. 4. Los cables de alimentación fijos solo pueden ser sustituidos por una persona cualificada.
  • Seite 89 ADVERTENCIA: 1. Utilizar el equipo únicamente de la forma prevista. 2. Utilizar el equipo solo con los accesorios previstos y recomendados por el fabri- cante. 3. Durante la instalación, hay que tener en cuenta los reglamentos de seguridad vigentes en su país. 4.
  • Seite 90 ATENCIÓN: 1. No instalar ni poner a funcionar el equipo cerca de radiadores, acumuladores tér- micos, hornos u otras fuentes de calor. Asegurarse de que el equipo siempre esté instalado de modo que reciba suficiente refrigeración y no pueda sobrecalentarse. 2.
  • Seite 91: Volumen De Suministro

    VOLUMEN DE SUMINISTRO Saque el producto del embalaje y retire todo el material de embalaje. Compruebe que ha recibido en perfecto estado todos los componentes del equipo e informe al distribuidor inmediatamente después de la compra si nota algún daño o la falta de algún compo- nente.
  • Seite 92 POWER OUT Toma de salida de alimentación Power Twist blanca para la alimentación eléctrica de otros focos Cameo (vea la corriente de salida máxima impresa en la parte posterior de la carcasa del equipo). DMX IN Conectores XLR macho de 3 y 5 pines para conectar un equipo de control DMX (por ejemplo, una mesa DMX).
  • Seite 93: Pantalla Lcd

    Control: DMX DMX Address 4 CH Mode FAN: Normal 6. PANTALLA LCD La pantalla LCD retroiluminada muestra el modo operativo activado actualmente (pantalla prin- cipal), las opciones del menú principal y en los submenús el valor numérico, así como el estado operativo y las opciones en determinadas opciones del menú.
  • Seite 94 (Actualización del software, espere por favor) (solo con fines de servicio técnico), la versión del software, y después «Welcome to Cameo» (Bienvenidos a Cameo) y «Reset» (Reiniciar). Tras este procedimiento, el foco estará listo para funcionar y se activará en el último modo operativo que se haya seleccionado.
  • Seite 95 Modo operativo autónomo Scene Modo operativo Modo operativo Escena Temperatura de la unidad LED Modo de ventilador Temperatura de la unidad LED Modo de ventilador CONFIGURACIÓN DE LA DIRECCIÓN INICIAL DMX Partiendo de la pantalla principal, si pulsa el mando giratorio y pulsable accederá al menú princi- pal (MENÚ).
  • Seite 96: Modo Esclavo

    MODO ESCLAVO Partiendo de la pantalla principal, si pulsa el mando giratorio y pulsable accederá al menú principal (MENÚ). Gire el mando giratorio para seleccionar el menú Control y pulse dicho mando para confirmar su selección. Girando el mando giratorio, seleccione ahora la opción de menú Slave y confirme pulsando dicho mando.
  • Seite 97 Scenes <= Run Scene <= (Iniciar escena) Scene 1 - 8 Iniciar escena 1 - 8: seleccionar y confirmar escena Seleccionar y confirmar escena Record Scene <= (Grabar escena) Scene 1 - 8 Cancelar proceso Ajustar la escena en el con- trolador y confirmar con YES...
  • Seite 98 CONFIGURACIÓN DEL SISTEMA (SETTINGS) Partiendo de la pantalla principal, si pulsa el mando giratorio y pulsable accederá al menú princi- pal (MENÚ). Gire el mando giratorio para seleccionar el menú de ajustes del sistema Settings y púlselo. Después, accederá al submenú para la configuración de las opciones del submenú, vea la tabla: Settings (se resaltan con negrita los ajustes de fábrica) Girar el mando giratorio para seleccionar y pulsarlo para confirmar la selección.
  • Seite 99 Signal Estado operativo en <= Fail caso de interrupción Hold Value Se mantendrá la de la señal última orden Run Scene 1 Activa la escena de control Black Out Activa el Blackout Dimmer Selección de la curva <= de atenuación y la Curve <= Linear...
  • Seite 100 Pan/Tilt Ajustes de la cabeza <= Motors del equipo Pan/Tilt 000 - 255 000 = velocidad máxima, Speed 255 = velocidad mínima Pan Reverse <= Normal Sin inversión del sentido de giro horizontal Reverse Inversión del sentido de giro horizontal Tilt Reverse <= Normal...
  • Seite 101 INFORMACIÓN DEL EQUIPO (INFO) Partiendo de la pantalla principal, si pulsa el mando giratorio y pulsable accederá al menú prin- cipal (MENÚ). Gire el mando giratorio para seleccionar el menú de información del equipo Info y pulse dicho mando para confirmar su selección. Para que aparezca la información deseada, gire el mando giratorio para seleccionar la opción de menú...
  • Seite 102 Service Girar el mando giratorio para seleccionar, pulsar para confirmar, girar el mando para seleccionar la opción y pulsar para confirmar. Volver con <= Reset Reiniciar y restablecer <= Full Reset No llevar a cabo (Reinicio) el reinicio Llevar a cabo el reinicio P/T Reset No llevar a cabo el (Restablecer...
  • Seite 103 Defaults <= Recall <= (Restaurar Factory Reset Cancelar el restable- ajustes) cimiento de los ajustes de fábrica Restablecer los ajustes de fábrica Default 1 Cancelar el restable- cimiento de los ajustes de usuario 1 Restablecer los ajustes de usuario 1 Default 2 Cancelar el restable- cimiento de los ajustes...
  • Seite 104 QUICKLIGHT El modo operativo Quicklight permite crear de forma rápida y sencilla una escena a partir de las funciones básicas de la cabeza móvil sin necesidad de un controlador DMX. Partiendo de la pantalla principal, si pulsa el mando giratorio y pulsable accederá al menú principal (MENÚ). Gire el mando giratorio para seleccionar el menú...
  • Seite 105: Instalación Y Montaje

    INSTALACIÓN Y MONTAJE En la parte inferior de la base del equipo hay cuatro apoyos de goma que permiten apoyar el foco de forma estable sobre superficies adecuadas y protegen la base contra arañazos. Para el montaje en travesaño, utilice las dos perchas Omega suministradas que se fijan en los puntos de montaje A junto con las abrazaderas aptas para travesaño, disponibles opcionalmente.
  • Seite 106 CUIDADO, MANTENIMIENTO Y REPARACIÓN Para garantizar el correcto funcionamiento del equipo a largo plazo, este se debe revisar perió- dicamente y reparar en caso necesario. Las necesidades de cuidado y mantenimiento dependen de la intensidad y el entorno de uso. Por lo general, recomendamos realizar una inspección visual antes de cada puesta en marcha.
  • Seite 107: Tecnología Dmx

    ¡AVISO! Los trabajos de mantenimiento realizados indebidamente pueden afectar al derecho de garantía. ¡AVISO! En el caso de los sets de conversión o reequipamiento previstos por el fabricante, hay que tener en cuenta obligatoriamente las instrucciones de montaje adjuntas. TECNOLOGÍA DMX DMX-512 DMX (Digital Multiplex) es la denominación de un protocolo de trans- ferencia universal para la comunicación entre los dispositivos y sus...
  • Seite 108 Encontrará una extensa selección de cables DMX adecuados en las líneas de productos 3 STAR, 4 STAR y 5 STAR de Adam Hall. CABLES DMX: Al confeccionar sus propios cables, es indispensable que tenga en cuenta las imágenes incluidas en esta página. En ningún caso conecte el apantallamiento del cable con el contacto de masa del conector y compruebe que el apantallamiento del cable tampoco entre en contacto con la carcasa del conector XLR.
  • Seite 109 ASIGNACIÓN DE CONECTORES Adaptador XLR macho de 5 pines con adaptador DMX en un conector XLR hembra de 3 pines: K3DGF0020 No se asignan los pines 4 y 5. ASIGNACIÓN DE CONECTORES Adaptador XLR macho de 3 pines con adaptador DMX en un conector XLR hembra de 5 pines: K3DHM0020 No se asignan los pines 4 y 5.
  • Seite 110: Datos Técnicos

    DATOS TÉCNICOS Número de artículo: CLMB200 Clase de producto: Cabeza móvil Tipo: LED WashBeam multiefecto Espectro cromático del LED: Haz: RGBW/anillo: RGB Cantidad de LED: 1 LED de haz + 24 segmentos con 3 LED RGB Tipo de LED: 1 Osram de 60 W + 72 x 0,2 W SMD Frecuencia de la modula- 1000 Hz ción por ancho de pulsos:...
  • Seite 111 Humedad relativa del aire: <85 %, sin condensación Temperatura ambiente (en de 0 °C a 40 °C funcionamiento): Distancia mínima con respecto a la superficie iluminada: Distancia mínima con 0,5 m respecto a materiales nor- malmente inflamables: Material de la carcasa: ABS pirorretardante ecológico Policarbonato pirorretardante ecológico Color de la carcasa: Negro...
  • Seite 112: Declaraciones Del Fabricante

    DECLARACIONES DEL FABRICANTE GARANTÍA DEL FABRICANTE Y EXENCIÓN DE RESPONSABILIDAD Adam Hall GmbH, Adam-Hall-Str. 1, D-61267 Neu Anspach (Alemania) / Correo electrónico: info@ adamhall.com / +49 (0)6081 / 9419-0. Encontrará las condiciones actuales de la garantía y el texto sobre la exención de responsabilidad en la siguiente página web: https://cdn-shop.adamhall.com/media/pdf/Manufacturers-Declarations-CAMEO_DE_EN_ES_ FR.pdf.
  • Seite 113: Informacje Dotyczące Niniejszej Instrukcji Obsługi

    Urządzenie to zostało zaprojektowane i wyprodukowane zgodnie z wysokimi standardami jakości, tak by działało bezawaryjnie przez wiele lat. Należy uważnie przeczytać niniejszą instrukcję obsłu- gi, aby móc jak najszybciej rozpocząć prawidłową eksploatację nowego urządzenia marki Cameo Light. Więcej informacji o marce Cameo Light można znaleźć na stronie CAMEOLIGHT.COM.
  • Seite 114: Zasady Bezpieczeństwa

    OBJAŚNIENIA TERMINÓW I SYMBOLI 1. NIEBEZPIECZEŃSTWO: Słowo NIEBEZPIECZEŃSTWO, ewentualnie w połączeniu z symbolem, wskazuje na bezpośrednie niebezpieczne sytuacje lub stany zagrażające życiu i zdrowiu. 2. OSTRZEŻENIE: Słowo OSTRZEŻENIE, ewentualnie w połączeniu z symbolem, wskazuje na potencjalnie niebezpieczne sytuacje lub stany zagrażające zdrowiu lub życiu. 3.
  • Seite 115 OSTRZEŻENIE: 1. Urządzenia nie wolno uruchamiać, gdy jest ono w widoczny sposób uszkodzone. 2. Urządzenie wolno instalować wyłącznie w stanie beznapięciowym. 3. Jeśli kabel sieciowy jest uszkodzony, nie wolno uruchamiać urządzenia. 4. Podłączone na stałe przewody zasilające mogą być wymieniane tylko przez wyk- walifikowaną...
  • Seite 116 OSTRZEŻENIE: 1. Używać urządzenia tylko zgodnie z przeznaczeniem. 2. Używać urządzenia wyłącznie z akcesoriami zalecanymi i przewidzianymi przez producenta. 3. Podczas instalacji przestrzegać krajowych przepisów bezpieczeństwa. 4. Po podłączeniu urządzenia należy sprawdzić ułożenie wszystkich kabli, aby uni- knąć szkód lub wypadków spowodowanych np. przez potknięcie. 5.
  • Seite 117 UWAGA: 1. Nie instalować ani nie eksploatować urządzenia w pobliżu grzejników, akumu- latorów ciepła, pieców ani innych źródeł ciepła. Upewnić się, że urządzenie jest zawsze instalowane w taki sposób, aby zapewnić wystarczające chłodzenie i nie dopuścić do przegrzania. 2. W pobliżu urządzenia nie umieszczać źródeł zapłonu, takich jak zapalone świece. 3.
  • Seite 118: Zakres Dostawy

    ZAKRES DOSTAWY Wyjąć produkt z opakowania i usunąć wszystkie materiały opakowaniowe. Jeśli dostawa nie jest kompletna lub jest uszkodzona, należy niezwłocznie powiadomić o tym fakcie dystrybutora. W zakres dostawy produktu wchodzą: X urządzenie X kabel sieciowy X 2 uchwyty montażowe Omega X instrukcja obsługi WPROWADZENIE CHARAKTERYSTYKA...
  • Seite 119: Przyłącza, Elementy Obsługi I Wskaźniki

    Niebieskie wejściowe gniazdo sieciowe Power Twist. Napięcie robocze 100–240 V AC / 50–60 Hz. Odpowiedni przewód zasilania znajduje się w zestawie. POWER OUT Białe wyjściowe gniazdo sieciowe Power Twist do zasilania kolejnych reflektorów Cameo (maksy- malny prąd wyjściowy — patrz nadruk z tyłu obudowy). DMX IN 3-pinowe i 5-pinowe złącza męskie XLR do podłączenia sterownika DMX (np.
  • Seite 120: Wyświetlacz Lcd

    Control: DMX DMX Address 4 CH Mode FAN: Normal 6. WYŚWIETLACZ LCD Podświetlany wyświetlacz LCD pokazuje bieżący tryb pracy (widok główny), pozycje z menu głównego i podmenu oraz wartość liczbową lub stan roboczy i opcje w poszczególnych pozycjach menu. Po ok. 1 minucie bezczynności wyświetlacz automatycznie wraca do ekranu głównego. Wskazówka dotycząca ekranu głównego w trybach pracy z zewnętrznym sterowaniem: Gdy sygnał...
  • Seite 121 Po prawidłowym podłączeniu reflektora do sieci zasilania podczas procesu uruchamiania wyświe- tlana jest następująca sekwencja komunikatów: „Software update ...Please wait” (tylko w celach serwisowych), wersja oprogramowania, a następnie „Welcome to Cameo” i „Reset”. Następnie reflektor jest gotowy do pracy w ostatnio wybranym trybie.
  • Seite 122: Ustawianie Adresu Startowego Dmx

    USTAWIANIE ADRESU STARTOWEGO DMX Jeśli wyświetlany jest ekran główny i naciśnięte zostanie pokrętło enkodera, nastąpi przejście do menu głównego. Obracając pokrętło enkodera, wybrać pozycję menu Control i nacisnąć enkoder. Przez obrócenie enkodera wybrać pozycję menu DMX i potwierdzić, naciskając enkoder. Wybrać opcję...
  • Seite 123 TRYB STANDALONE (SCENES) Tryb Standalone Scenes umożliwia, podobnie jak sterownik DMX, ustawienie funkcji Pan, Tilt, Dimmer, RGBW, LED-Ring itp. bezpośrednio na urządzeniu, w przedziale od 000 do 255. W ten sposób można tworzyć, edytować, zapisywać i uruchamiać łącznie 8 pojedynczych scen (Scene 1–8).
  • Seite 124 Scenes <= Run Scene <= (Rozpocznij scenę) Scene 1–8 Rozpoczęcie sceny 1–8: wybór i potwierdzenie sceny Wybór i potwierdzenie sceny Record Scene <= (Zapisz scenę) Scene 1–8 Przerywanie procesu Ustawić scenę w sterowniku, potwierdzić przyci- skiem YES Edit Scene <= (Edytuj scenę) Scene 1–8 <=...
  • Seite 125 INFORMACJE O URZĄDZENIU (INFO) Jeśli wyświetlany jest ekran główny i naciśnięte zostanie pokrętło enkodera, nastąpi przejście do menu głównego. Obrócić pokrętło enkodera, aby wybrać menu informacji o urządzeniu Info, a następnie nacisnąć pokrętło. Settings (pogrubiona czcionka = ustawienie fabryczne) Wybrać opcję przez obrócenie enkodera, potwierdzić przez naciśnięcie, zmienić wartość lub stan przez obrócenie oraz potwierdzić...
  • Seite 126 Signal Stan pracy w przy- <= Fail padku przerwania Hold Value Zachowuje ostat- sygnału nie polecenie Run Scene 1 Aktywuje scenę 1 sterującego Black Out Aktywuje wyga- szenie reflektora Dimmer Wybór krzywej <= ściemniania i regula- Curve <= Linear Natężenie światła cja ściemniania wzrasta liniowo wraz ze wzrostem wartości DMX...
  • Seite 127 Pan/Tilt Ustawienia głowicy <= Motors urządzenia Pan/Tilt 000–255 000 = maksymalna, 255 Speed = minimalna prędkość Pan Reverse <= Normal Bez zmiany kierunku obrotu w poziomie Reverse Zmiana kierunku obrotu w poziomie Tilt Reverse <= Normal Bez zmiany kierunku obrotu w pionie Reverse Zmiana kierunku obrotu w pionie...
  • Seite 128 Aby wyświetlić żądane informacje, należy wybrać odpowiednią pozycję menu, obracając pokrętło enkodera, a następnie potwierdzić przez jego naciśnięcie. Info <= Wstecz Firmware Wyświetlenie oprogramowania sprzętowego komponentów urządzenia Temperature Wyświetlanie temperatury podstawy urządzenia (Base) i modułu LED (LED) w stopniach Celsjusza i Fahrenheita Fan Speed Wyświetlanie prędkości obrotowej dwóch wentylatorów w głowicy urządze- nia w obr./min...
  • Seite 129 Service Wybieranie opcji przez obrócenie enkodera, potwierdzenie przez naciśnięcie, wybieranie opcji przez obrócenie oraz potwierdzenie przez naciśnięcie. Powrót za pomocą <= Reset Ponowne uruchomienie <= i reset Full Reset Nie wykonuj ponow- (Ponowne urucho- nego mienie) uruchomienia Wykonaj ponowne uruchomienie P/T Reset Nie wykonuj resetu (reset silników ob-...
  • Seite 130 Defaults <= Recall <= (Przywrócenie Factory Reset Anulowanie przywraca- ustawień) nia ustawień fabrycz- nych Przywracanie ustawień fabrycznych Default 1 Anulowanie przywraca- nia ustawień użytkow- nika 1 Przywracanie ustawień użytkownika 1 Default 2 Anulowanie przywraca- nia ustawień użytkow- nika 2 Przywracanie ustawień użytkownika 2 Default 3 Anulowanie przywraca-...
  • Seite 131 QUICKLIGHT Tryb Quicklight przyspiesza i ułatwia tworzenie sceny z podstawowych funkcji ruchomej głowicy bez potrzeby używania sterownika DMX. Jeśli wyświetlany jest ekran główny i naciśnięte zostanie pokrętło enkodera, nastąpi przejście do menu głównego. Wybrać menu Quicklight, obracając pokrętło enkodera, i nacisnąć enkoder. Następuje przejście do podmenu edycji pozycji podmenu, patrz tabela (wybór przez obrócenie enkodera, potwierdzenie przez naciśnięcie, zmiana wartości przez obrócenie, potwierdzenie przez naciśnięcie).
  • Seite 132: Ustawianie I Montaż

    USTAWIANIE I MONTAŻ Cztery gumowe nóżki na spodzie podstawy urządzenia zapewniają jego bezpieczne ustawienie na odpowiednich powierzchniach, chroniąc jednocześnie podstawę przed zadrapaniem. Do montażu na trawersie należy użyć dwóch dostarczonych w komplecie uchwytów Omega, które mocuje się w punktach montażowych A, i opcjonalnie skorzystać z dostępnych i odpowiednich zacisków trawersowych.
  • Seite 133: Czyszczenie, Konserwacja I Naprawy

    CZYSZCZENIE, KONSERWACJA I NAPRAWY Aby zapewnić bezawaryjne działanie urządzenia przez długi czas, należy je regularnie czyścić i w razie potrzeby serwisować. Konieczność czyszczenia lub konserwacji zależy od intensywn- ości użytkowania i rodzaju otoczenia. Generalnie zalecamy kontrolę wzrokową przed każdym uruchomieniem. Ponadto zalecamy przeprowadzanie wszystkich wymienionych poniżej i odpow- iednich czynności konserwacyjnych co 500 godzin pracy lub w przypadku mniejszej intensywn- ości użytkowania, najpóźniej po upływie jednego roku.
  • Seite 134: Technika Dmx

    WSKAZÓWKA! Nieprawidłowo wykonane czynności konserwacyjne mogą spowodo- wać utratę gwarancji. WSKAZÓWKA! W przypadku zestawów do przebudowy lub doposażenia dostar- czonych przez producenta należy bezwzględnie przestrzegać dołączonej instrukcji montażu. TECHNIKA DMX DMX-512 DMX (Digital Multiplex) to uniwersalny protokół transmisji umożliwi- ający komunikację między urządzeniami i sterownikami. Sterownik DMX wysyła dane w standardzie DMX do podłączonych urządzeń...
  • Seite 135 KABLE DMX: Lutując własne kable, należy bezwzględnie przestrzegać poniższych rysunków. Nigdy nie podłączaj ekranu kabla do masy wtyku i nie dopuszczaj do kontaktu ekranu z obudową wtyku XLR. W razie kontaktu ekranu z masą mogą wystąpić błędy w systemie. SCHEMAT PODŁĄCZENIA WTYKÓW: Kabel DMX z 3-pinowymi wtykami XLR: Kabel DMX z 5-pinowymi wtykami XLR (pin 4 i 5 nie są...
  • Seite 136: Dane Techniczne

    WYMIARY 214 mm 206 mm 287 mm DANE TECHNICZNE Numer artykułu: CLMB200 Rodzaj produktu: Moving Head Typ: Wielofunkcyjna lampa LED Washbeam Widmo kolorów LED: Beam: RGBW / Ring: RGB Liczba diod LED: 1 x Beam LED + 24 segmenty po 3 diody LED RGB Typ diod LED: 1x Osram 60 W + 72 x 0,2 W SMD Częstotliwość...
  • Seite 137 Wyjście DMX: 5-pinowe złącze żeńskie XLR 3-pinowe złącze żeńskie XLR Tryb DMX: 4 CH / 15 CH / 16 CH / 20 CH / 35 CH / 42 CH / 89 CH Funkcje DMX: obroty Pan/Tilt, precyzyjne obroty Pan/Tilt, nieograniczony ruch Pan/Tilt, ściemnianie, ściemnianie precyzyjne, stroboskop 0–20 Hz, sterowanie pojedynczymi pikselami, sterowanie segmentami, makra pikseli, wstępne ustawienia kolorów (filtr LEE) i makro...
  • Seite 138: Deklaracje Producenta

    Wymiary (szer. x wys. x gł., 287 x 410 x 206 mm bez uchwytu montażowego): (wysokość głowicy płaskiej: 365 mm) Masa: 8,1 kg Pozostałe parametry: W zestawie kabel sieciowy o dł. 1 m z niebieską wtyczką Power Twist (kompatybilna z PowerCon), 2 uchwyty montażowe Omega i instrukcja obsługi UTYLIZACJA OPAKOWANIE:...
  • Seite 139: Deklaracja Zgodności Ue

    ZGODNOŚĆ CE Adam Hall GmbH oświadcza niniejszym, że produkt spełnia wymogi następujących dyrektyw (o ile dotyczy): Dyrektywa niskonapięciowa (2014/35/UE) Dyrektywa EMC (2014/30/UE) RoHS (2011/65/UE) RED (2014/53/UE) DEKLARACJA ZGODNOŚCI UE Deklaracje zgodności dla produktów podlegających dyrektywom LVD, EMC i RoHS można uzyskać pod adresem info@adamhall.com.
  • Seite 140: Utilizzo Conforme

    Questo dispositivo è stato sviluppato e prodotto secondo elevati standard qualitativi per garan- tirne il regolare funzionamento per molti anni. Leggere attentamente questo manuale d'uso per utilizzare al meglio il nuovo prodotto di Cameo Light. Per maggiori informazioni su Cameo Light, consultate il nostro sito web CAMEOLIGHT.COM.
  • Seite 141: Indicazioni Sulla Sicurezza

    Questo simbolo indica pericoli che possono causare scosse elettriche. Questo simbolo indica punti di pericolo o situazioni pericolose. Questo simbolo indica pericoli dovuti a superfici calde. Questo simbolo indica pericoli dovuti a fonti di luce intense. Questo simbolo indica un dispositivo che non contiene parti sostituibili dall'utente. Questo simbolo indica informazioni complementari sull'utilizzo del prodotto.
  • Seite 142 AVVERTENZA: 1. Il dispositivo non deve essere messo in funzione se presenta evidenti danni. 2. Il dispositivo deve essere installato solo in assenza di tensione. 3. Se il cavo di alimentazione del dispositivo è danneggiato, quest'ultimo non deve essere messo in funzione. 4.
  • Seite 143 AVVERTENZA: 1. Utilizzare il dispositivo unicamente nelle modalità previste. 2. Azionare il dispositivo esclusivamente con gli accessori consigliati e previsti dal produttore. 3. Durante l'installazione, osservare le normative sulla sicurezza in vigore nel proprio Paese. 4. Una volta collegato il dispositivo, verificare tutti i cavi per evitare danni o incidenti, ad esempio per inciampo.
  • Seite 144 ATTENZIONE: 1. Non installare né azionare il dispositivo in prossimità di radiatori, accumulatori termici, stufe o altre fonti di calore. Accertarsi che il dispositivo sia sempre instal- lato in modo che venga raffreddato a sufficienza e non possa surriscaldarsi. 2. Non posizionare fonti di ignizione, come candele accese, nelle vicinanze del dispositivo.
  • Seite 145: Caratteristiche

    DOTAZIONE Estrarre il prodotto dalla confezione e rimuovere tutto il materiale di imballaggio. Si prega di verificare la completezza e l'integrità della fornitura e di informare immediatamente il proprio partner commerciale dopo l'acquisto qualora la consegna non sia completa o danneggiata. La fornitura del prodotto comprende: X Apparecchio X Cavo di alimentazione...
  • Seite 146: Connettori, Elementi Di Comando E Visualizzazione

    Presa ingresso di rete Power Twist blu. Tensione di esercizio 100 - 240 V AC / 50 - 60 Hz. In dota- zione viene fornito un cavo di alimentazione idoneo. POWER OUT Presa di uscita Power Twist per l’alimentazione elettrica di altri proiettori Cameo (corrente di uscita massima: v. incisione sul retro dell'alloggiamento). DMX IN Presa XLR maschio a 3 poli e a 5 poli per il collegamento di un apparecchio di controllo DMX (ad esempio mixer DMX).
  • Seite 147 Control: DMX DMX Address 4 CH Mode FAN: Normal 6. SCHERMO A CRISTALLI LIQUIDI Il display LCD illuminato mostra la modalità di funzionamento attualmente attivata (schermata principale), le voci di menu nel menu principale e nei sottomenu il valore numerico o lo stato di funzionamento e le opzioni nelle voci di menu corrispondenti.
  • Seite 148 "Software update...Please wait" (solo per manutenzione), la versione del software, quindi "Welcome to Cameo" e "Reset". Al termine della procedura il proiettore è pronto per l’uso e la modalità di funzionamento selezionata in preceden- za si attiva.
  • Seite 149 IMPOSTAZIONE DELL'INDIRIZZO DI AVVIO DMX Premere il codificatore rotativo/a pressione per accedere al menu principale dalla schermata prin- cipale (MENU). Selezionare il menu di controllo Control ruotando e successivamente premendo il codificatore. Ruotare il codificatore per selezionare la voce di menu DMX e confermare premen- do il codificatore.
  • Seite 150: Modalità Slave

    MODALITÀ SLAVE Premere il codificatore rotativo/a pressione per accedere al menu principale dalla schermata principale (MENU). Selezionare il menu di controllo Control ruotando e successivamente pre- mendo il codificatore. Ruotare il codificatore per selezionare la voce di menu Slave e confermare premendo il codificatore.
  • Seite 151 Scenes <= Run Scene <= (Avvio della scena) Scene 1 - 8 Avvio della scena 1 - 8: selezione e conferma della scena Selezionare e confermare la scena Record Scene <= (Registra scena) Scene 1 - 8 Annulla procedura Impo- stare la scena nel controller e...
  • Seite 152 IMPOSTAZIONI DI SISTEMA (SETTINGS) Premere il codificatore rotativo/a pressione per accedere al menu principale dalla schermata principale (MENU). Ruotando il codificatore selezionare il menu delle impostazioni di sistema Settings, quindi premere il codificatore. Si accede così al sottomenu per l'impostazione delle voci di sottomenu, v. tabella: Settings (grassetto = impostazione di fabbrica) Selezionare ruotando il codificatore, confermare premendo, modificare il valore o lo stato ruotando e confermare premendo.
  • Seite 153 Dimmer Selezione della curva <= dimmer e del com- Curve <= Linear L'intensità della luce portamento dimmer cresce in maniera lineare con il valore DMX Exponential L'intensità della luce può essere impostata in maniera più precisa nell'intervallo di valori DMX inferiore e gros- solanamente in quello superiore Logarithmic...
  • Seite 154 Pan/Tilt Impostazioni della <= Motors testa del dispositivo Pan/Tilt 000 - 255 000 = velocità massima, Speed 255 = velocità minima Pan Reverse <= Normal Nessuna inversione della direzione del movimento Reverse Inversione della direzione del movimento PAN Tilt Reverse <= Normal Nessuna inversione della...
  • Seite 155 INFORMAZIONI SUL DISPOSITIVO (INFO) Premere il codificatore rotativo/a pressione per accedere al menu principale dalla schermata principale (MENU). Ruotando il codificatore, selezionare il menu Info con le informazioni sul dispo- sitivo, quindi premere il codificatore. Per visualizzare le informazioni desiderate, selezionare la voce di menu corrispondente ruotando il codificatore, quindi confermare premendo il codificatore.
  • Seite 156 Assistenza Selezionare ruotando il codificatore, confermare premendo, modificare l'opzione ruotando e confermare premendo. Tornare indietro con <=. Reset Riavvio e ripristino <= Full Reset Non effettuare (Riavvio) riavvio Eseguire il riavvio P/T Reset non effettuare il reset (reset dei motori effettuare il reset pan/tilt) Test...
  • Seite 157 Default <= Recall <= (Ripristina Factory Reset Interrompere il ripristi- impostazioni) no delle impostazioni di fabbrica Ripristinare le imposta- zioni di fabbrica Default 1 Interrompere il ripristi- no delle impostazioni utente 1 Ripristinare le imposta- zioni utente 1 Default 2 Interrompere il ripristi- no delle impostazioni utente 2...
  • Seite 158 QUICKLIGHT La modalità di funzionamento Quicklight consente di creare in modo rapido e semplice una scena dalle funzioni di base della testa mobile, senza bisogno di un controller DMX. Premere il codifi- catore rotativo/a pressione per accedere al menu principale dalla schermata principale (MENU). Selezionare Quicklight ruotando il codificatore, quindi premere il codificatore per confermare.
  • Seite 159: Installazione E Montaggio

    INSTALLAZIONE E MONTAGGIO Quattro piedini in gomma sul lato inferiore della base dell'apparecchio assicurano il posiziona- mento sicuro su superfici adatte, proteggendo al contempo la superficie d'appoggio dai graffi. Per il montaggio su traversa utilizzare le due staffe a omega in dotazione, che vengono fissate ai punti di montaggio A, e utilizzare morsetti per traverse opzionali e adatti.
  • Seite 160: Pulizia, Manutenzione E Riparazione

    PULIZIA, MANUTENZIONE E RIPARAZIONE Per garantire il buon funzionamento del dispositivo nel tempo, è necessario sottoporlo a una pulizia regolare e, se necessario, a manutenzione. La necessità di pulizia e manutenzione dipende dall'intensità e dall'ambiente di utilizzo. In generale, si consiglia di effettuare un'ispezione visiva prima di ogni messa in servizio.
  • Seite 161: Collegamento Dmx

    NOTA! Gli interventi di manutenzione non eseguiti correttamente possono invalidare la garanzia. NOTA! Nel caso di set di conversione o retrofit forniti dal produttore, è essenziale seguire le istruzioni di installazione allegate. TECNOLOGIA DMX DMX-512 DMX (Digital Multiplex) è la sigla di un protocollo di trasmissione uni- versale per la comunicazione tra dispositivi e controller.
  • Seite 162 Nelle linee di prodotti Adam Hall 3 STAR, 4 STAR e 5 STAR è disponibile un'ampia scelta di cavi DMX. CAVO DMX: In caso di cavi di propria realizzazione, procedere secondo le figure di questa pagina. Non collegare mai la schermatura del cavo con il contatto di massa del connettore e assicurarsi che la schermatura non entri in contatto con l'involucro del connettore XLR.
  • Seite 163: Dati Tecnici

    INGOMBRO 214 mm 206 mm 287 mm DATI TECNICI Codice articolo: CLMB200 Tipologia di prodotto: Testa mobile Tipo: Washbeam a LED multieffetto Spettro cromatico LED: Fascio: RGBW / Anello: RGB Numero di LED: 1 x LED beam + 24 segmenti da 3 LED RGB Tipo di LED: 1x Osram 60 W + 72 x 0,2 W SMD Frequenza PWM:...
  • Seite 164 Modalità DMX: 4 CH / 15 CH / 16 CH / 20 CH / 35 CH / 42 CH / 89 CH Funzioni DMX: pan/tilt, pan/tilt fine, pan/tilt infinito, dimmer, dimmer fine, stro- boscopio 0 - 20 Hz, controllo pixel singolo, controllo segmenti, macro pixel, preset colore (filtro LEE) e macro di movimento, impostazioni del dispositivo Funzioni stand-alone:...
  • Seite 165: Smaltimento

    Ingombro (L x H x P, senza 287 x 410 x 206 mm staffe di montaggio): (altezza testa piatta: 365 mm) Peso: 8,1 kg Altre caratteristiche: Cavo di alimentazione da 1 m con spina Power Twist blu (compa- tibile con PowerCon), 2 staffe di montaggio a omega e manuale di istruzioni in dotazione SMALTIMENTO CONFEZIONE:...
  • Seite 166: Dichiarazione Di Conformità Eu

    CONFORMITÀ CE Con la presente Adam Hall GmbH dichiara che questo prodotto soddisfa le seguenti direttive (ove pertinente): Direttiva bassa tensione (2014/35/CE) Direttiva CEM (2014/30/UE) RoHS (2011/65/UE) RED (2014/53/UE) DICHIARAZIONE DI CONFORMITÀ EU Le dichiarazioni di conformità per i prodotti soggetti alla direttiva LVD, EMC e RoHS possono esse- re richieste all'indirizzo info@adamhall.com.
  • Seite 167 DMX CONTROL / DMX STEUERUNG / PILOTAGE DMX / CONTROL DMX / STEROWANIE DMX / CONTROLLO DMX 4 Channel Mode Function Values Dimmer 000 - 255 Dimmer 0% - 100% 000 - 005 Strobe open 006 - 010 Strobe closed 011 - 022 Ramp up/down, slow ->...
  • Seite 168 15 Channel Mode Function Values 000 - 255 0% - 100% Pan fine 000 - 255 0% - 100% 000 - 005 No Function 006 - 126 Forward Rotation fast -> slow Endless Pan 127 - 128 Stop 129 - 255 Backward Rotation slow -> fast Tilt 000 - 255 0% - 100% Tilt fine...
  • Seite 169 000 - 005 Color Off 006 - 013 Color Macro 1 014 - 021 Color Macro 2 022 - 029 Color Macro 3 030 - 037 Color Macro 4 038 - 045 Color Macro 5 046 - 053 Color Macro 6 054 - 061 Color Macro 7 062 -...
  • Seite 170 16 Channel Mode Function Values 000 - 255 0% - 100% 000 - 005 No Function 006 - 126 Forward Rotation fast -> slow Endless Pan 127 - 128 Stop 129 - 255 Backward Rotation slow -> fast Tilt 000 - 255 0% - 100% 000 - 005 No Function 006 - 126 Forward Rotation fast ->...
  • Seite 171 000 - 005 No function 006 - 007 Blackout while moving on (hold 3s) 008 - 009 Blackout while moving off (hold 3s) 010 - 041 No function 042 - 043 Invert Pan on (hold 3s) 044 - 045 Invert Pan off (hold 3s) 046 - 047 Invert Tilt on (hold 3s) 048 - 049 Invert Tilt off (hold 3s) 050 - 097 No function...
  • Seite 172 Green Color 000 - 255 0% - 100% Ring Blue Color 000 - 255 0% - 100% Ring 20 Channel Mode Function Values 000 - 255 0% - 100% Pan fine 000 - 255 0% - 100% 000 - 005 No function 006 - 126 Forward Rotation fast ->...
  • Seite 173 000 - 005 No function 006 - 032 Blackout while Moving on (hold 3 sec) 033 - 059 Blackout while Moving off (hold 3 sec) 060 - 086 Invert Pan on (hold 3 sec) Control 087 - 113 Invert Pan off (hold 3 sec) (please read 114 - 140 Invert Tilt on (hold 3 sec) remark 1*)
  • Seite 174 000 - 005 Color Off 006 - 013 Color Macro 1 014 - 021 Color Macro 2 022 - 029 Color Macro 3 030 - 037 Color Macro 4 038 - 045 Color Macro 5 046 - 053 Color Macro 6 054 - 061 Color Macro 7 062 - 069 Color Macro 8 Color Ring...
  • Seite 175 000 - 005 Strobe open 006 - 010 Strobe closed 011 - 022 Ramp up/down, slow -> fast 023 - 033 Ramp up/down random, slow->fast 034 - 045 Ramp up, slow -> fast 046 - 056 Ramp up random, slow -> fast Strobe 057 - 068 Ramp down, slow ->...
  • Seite 176 000 - 005 No function 006 - 036 Auto Program 01 037 - 067 Auto Program 02 068 - 098 Auto Program 03 Auto Pro- 099 - 129 Auto Program 04 gram 130 - 160 Auto Program 05 161 - 191 Auto Program 06 192 - 222 Auto Program 07 223 - 255 Auto Program 08 000 - 005 off...
  • Seite 177 000 - 005 Strobe open 006 - 010 Strobe closed 011 - 022 Ramp up/down, slow -> fast 023 - 033 Ramp up/down random, slow->fast 034 - 045 Ramp up, slow -> fast 046 - 056 Ramp up random, slow -> fast Strobe Color Ring 057 - 068 Ramp down, slow ->...
  • Seite 178 Color Ring 000 - 0% - 100% Blue 3 Color Ring 000 - 0% - 100% Red 4 Color Ring 000 - 0% - 100% Green 4 Color Ring 000 - 0% - 100% Blue 4 Color Ring 000 - 005 Color Off Macro 006 -...
  • Seite 179 42 Channel Mode Function Values 255 0% - 100% Pan fine 255 0% - 100% 005 No Function 126 Forward Rotation fast to slow Endless Pan 128 Stop 255 Backward Rotation slow to fast Tilt 255 0% - 100% Tilt fine 255 0% - 100% 005 No Function 126 Forward Rotation fast to slow...
  • Seite 180 005 Color off 013 Red 021 Amber 029 Yellow warm 037 Yellow 045 Green 053 Turquoise 061 Cyan 069 Blue Color Macro (Override 077 of RGBW) 085 Mauve 093 Magenta 101 Pink 109 Warm White 117 White 125 Cold White 127 Color Jumping Stop 191 Color Jumping Speed slow ->...
  • Seite 181 005 no function 007 Blackout while moving on (hold 3s) 009 Blackout while moving off (hold 3s) 041 Spare 043 Invert Pan on (hold 3s) 045 Invert Pan off (hold 3s) 047 Invert Tilt on (hold 3s) 049 Invert Tilt off (hold 3s) 097 Spare 099 Normal Fan (hold 3s) 101 Silent Fan (hold 3s)
  • Seite 182 000 Off One Color Paparazzi-Snap 001 Example Effect 002 Slow- low density 003 Slow - medium density 004 Slow - high density 005 Slow - linear 006 Medium - low density 007 Medium - medium density 008 Medium - high density 009 Medium - linear 010 Fast - low density 011 Fast- medium density...
  • Seite 183 040 Example Effect 041 Slow- low density 042 Slow - medium density 043 Slow - high density 044 Slow - linear 045 Medium - low density 046 Medium - medium density 047 Medium - high density 048 Medium - linear 049 Fast - low density Ring FX Select 050 Fast- medium density...
  • Seite 184 059 Medium - long tail 060 Fast - short tail 061 Fast - medium tail 062 Fast - long tail Trace 2-Uniform Decay (Color mix) 063 Example Effect 064 Slow - short tail 065 Slow - medium tail 066 Slow- long tail 067 Medium -short tail 068 Medium - medium tail 069 Medium - long tail...
  • Seite 185 Smallest Biggest Checkers 103 Exam pie effects 104 l/2‘s 105 1/4‘s 106 1/8‘s 107 1/16‘s 108 1/32‘s 109 1/64‘s 110 Rotating 1/4‘s 111 Rotating 1/16‘s Ring FX Select 112 Rotating 1/32‘s Color Merge 113 Example Effect 114 Full 115 Three Quarter 116 Half 117 Quarter Color Wave...
  • Seite 186 128 Example Effect 129 V. Slow 130 Slow 131 Medium 132 Fast Sweep Random 133 V. Slow Ring FX Select 134 Slow 135 Medium 136 Fast 240 Off Pixel Map 245 Mix with other Layer 250 Underneath other Layer 255 Above other Layer 127 Forward Rotation fast to slow Ring Effect 128 Pause...
  • Seite 187 000 Off One Color Paparazzi-Snap 001 Example Effect 002 Slow- low density 003 Slow - medium density 004 Slow - high density 005 Slow - linear 006 Medium - low density 007 Medium - medium density 008 Medium - high density Medium - linear Fast - low density Fast- medium density...
  • Seite 188 Example Effect Slow- low density Slow - medium density Slow - high density Slow - linear 045 Medium - low density 046 Medium - medium density 047 Medium - high density 048 Medium - linear 049 Fast - low density Ring FX Select 050 Fast- medium density 051 Fast - high density...
  • Seite 189 059 Medium - long tail 060 Fast - short tail 061 Fast - medium tail 062 Fast - long tail Trace 2-Uniform Decay (Color mix) 063 Example Effect 064 Slow - short tail 065 Slow - medium tail 066 Slow- long tail 067 Medium -short tail 068 Medium - medium tail 069 Medium - long tail...
  • Seite 190 094 Smallest 095 .. 096 .. 097 .. 098 .. 099 .. 100 .. 101 .. 102 Biggest Checkers 103 Exam pie effects 104 l/2‘s 105 1/4‘s 106 1/8‘s 107 1/16‘s 108 1/32‘s 109 1/64‘s 110 Rotating 1/4‘s 111 Rotating 1/16‘s Ring FX Select 112 Rotating 1/32‘s Color Merge...
  • Seite 191 128 Example Effect 129 V. Slow 130 Slow 131 Medium 132 Fast Sweep Random 133 V. Slow Ring FX Select 134 Slow 135 Medium 136 Fast 240 Off Pixel Map 245 Mix with other Layer 250 Underneath other Layer 255 Above other Layer 127 Forward Rotation fast to slow Ring Effect 128 Pause...
  • Seite 192 89 Channel Mode Function Values 000 - 255 0% - 100% Pan fine 000 - 255 0% - 100% 000 - 005 No function 006 - 126 Forward Rotation fast -> slow Endless Pan 127 - 128 Stop 129 - 255 Backward Rotation slow -> fast Tilt 000 - 255 0% - 100% Tilt fine...
  • Seite 193 000 - 005 Color off 006 - 013 Red 014 - 021 Amber 022 - 029 Yellow warm 030 - 037 Yellow 038 - 045 Green 046 - 053 Turquoise 054 - 061 Cyan 062 - 069 Blue Color Macro (Override 070 - 077 Lavender RGBW)
  • Seite 194 000 - 005 No function 006 - 007 Blackout while moving on (hold 3s) 008 - 009 Blackout while moving off (hold 3s) 010 - 041 No function 042 - 043 Invert Pan on (hold 3s) 044 - 045 Invert Pan off (hold 3s) 046 - 047 Invert Tilt on (hold 3s) 048 - 049 Invert Tilt off (hold 3s) 050 - 097 No function...
  • Seite 195 Red 6 000 - 255 0% - 100% Green 6 000 - 255 0% - 100% Blue 6 000 - 255 0% - 100% Red 7 000 - 255 0% - 100% Green 7 000 - 255 0% - 100% Blue 7 000 - 255 0% - 100% Red 8...
  • Seite 196 Red 20 000 - 255 0% - 100% Green 20 000 - 255 0% - 100% Blue 20 000 - 255 0% - 100% Red 21 000 - 255 0% - 100% Green 21 000 - 255 0% - 100% Blue 21 000 - 255 0% - 100% Red 22...
  • Seite 200 CAMEOLIGHT.COM Adam Hall GmbH | Adam-Hall-Str. 1 | 61267 Neu-Anspach | Germany Phone: +49 6081 9419-0 | adamhall.com REV: 01...

Diese Anleitung auch für:

Clmb200

Inhaltsverzeichnis