Weh TW17 Betriebsanleitung
Adapter zur druck- und funktionsprüfung an bauteilen mit innengewinde

Verwandte Anleitungen für Weh TW17


Inhaltszusammenfassung für Weh TW17
- Seite 1 Operating instructions ⋅ Betriebsanleitung Type TW17 Connector for pressure and function testing on components ® with female threads Adapter zur Druck- und Funktionsprüfung an Bauteilen mit ® Innengewinde - We Engineer Hightech ®...
- Seite 38 Betriebsanleitung Typ TW17 Adapter zur Druck- und Funktionsprüfung an Bauteilen mit ® Innengewinde INHALT EINLEITUNG Zu Ihrer Orientierung Allgemeine Angaben Gewährleistung und Haftung Allgemeine Sicherheitshinweise Definition von Fachpersonal BESTIMMUNGSGEMÄSSE VERWENDUNG PRODUKTÜBERSICHT / PRODUKTBESCHREIBUNG TECHNISCHE DATEN LAGERN Sicherheitshinweise zum sachgerechten Lagern Lagern BENÖTIGTE HILFSMITTEL...
- Seite 39 Übersicht Mindestintervalle für Inspektion und Wartung Warten 10. SCHMIEREN 10.1 Sicherheitshinweise zum Schmieren 10.2 Schmieren 11. FEHLERBEHEBEN 12. ENTSORGUNG 13. ZUBEHÖR | ERSATZTEILE Die deutsche Version ist das Original. Hersteller: WEH GmbH Verbindungstechnik - im Nachfolgenden „WEH“ genannt. Seite 39 MD-10193-L51-R1.2.0-03...
-
Seite 40: Einleitung
Sehr geehrter Kunde! Wir freuen uns, dass Sie sich für den Einsatz unseres Produktes entschieden haben. Der WEH Adapter TW17 wurde zur Druck- und Funktionsprüfung von Bauteilen mit ® Innengewinde entwickelt. Beachten und befolgen Sie sämtliche Hinweise und Warnungen in dieser Betriebs- anleitung�... -
Seite 41: Allgemeine Angaben
- ein Lieferschein - ein Original WEH Prüfprotokoll (nicht bei Ersatzteilen) - eine WEH Betriebsanleitung Î Wenden Sie sich umgehend an WEH oder den entsprechenden Vertriebspartner, falls Ihnen Unterlagen fehlen. 1�3 Gewährleistung und Haftung - Es gelten unsere allgemeinen Geschäftsbedingungen. -
Seite 42: Allgemeine Sicherheitshinweise
- der Adapter oder Teile des Adapters lösen sich unter Druck - Medien, die unter Druck stehen, heiß oder giftig sein können, treten aus - Anschlussschläuche vibrieren gefährlich Î Wenden Sie sich an WEH bevor Sie das WEH Produkt einsetzen, sollten Anweisun- ® gen in dieser Betriebsanleitung unklar sein. -
Seite 43: Definition Von Fachpersonal
Lage sind, etwaige Gefahren frühzeitig zu erkennen und zu vermeiden. 2. BESTIMMUNGSGEMÄSSE VERWENDUNG - Der WEH Adapter TW17 wurde zur Druck- und Funktionsprüfung von Bauteilen mit ® Innengewinde entwickelt. - Der WEH Adapter ist nicht für das Entleeren von Behältern unter Druck geeignet. -
Seite 44: Produktübersicht / Produktbeschreibung
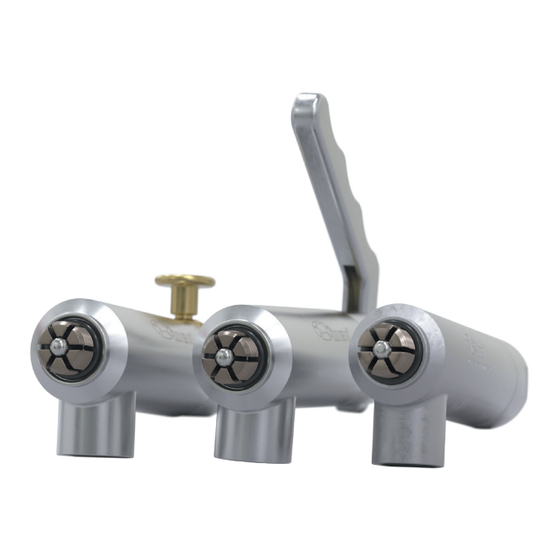
Betriebsanleitung 3. PRODUKTÜBERSICHT / PRODUKTBESCHREIBUNG Adapter TW17H ® Pos� Bezeichnung Grundgerät Handhebel Gabelkopfstift Frontdichtung Begriffserklärung Anschlüsse Betriebsmedienzuleitung Seite 44 MD-10193-L51-R1.2.0-03... - Seite 45 Betriebsanleitung Adapter TW17V ® Pos� Bezeichnung Grundgerät Ventilknopf Madenschraube Frontdichtung Begriffserklärung Anschlüsse Betriebsmedienzuleitung Steuerdruckanschluss Seite 45 MD-10193-L51-R1.2.0-03...
- Seite 46 Betriebsanleitung Adapter TW17P ® Pos� Bezeichnung Grundgerät Pneumatik-Betätigung Frontdichtung Begriffserklärung Anschlüsse Betriebsmedienzuleitung Steuerdruckanschluss Seite 46 MD-10193-L51-R1.2.0-03...
-
Seite 47: Technische Daten
Betriebsanleitung 4. TECHNISCHE DATEN Bitte beachten: Abhängig vom Anwendungsfall können die technischen Daten Ihres Produkts von dieser Betriebsanleitung abweichen. Beachten Sie daher stets die ® Kennzeichnung auf dem WEH Produkt selbst. ® Eigenschaften Standardausführung Max. zulässiger Vakuum bis 350 bar *... -
Seite 48: Lagern
5. LAGERN 5�1 Sicherheitshinweise zum sachgerechten Lagern Î Stellen Sie sicher, dass die folgenden Sicherheitshinweise und Lagerzeiten stets ein- gehalten werden. Achtung: Eine nicht sachgerechte Lagerung des WEH Produktes kann die maximale ® Lebensdauer erheblich reduzieren. Î Schützen Sie das WEH Produkt grundsätzlich vor Beschädigungen, Verschmutz-... -
Seite 49: Lagern
Beachten Sie die Sicherheitshinweise unter Kapitel 5.1 und halten Sie die nach- folgenden Lagerzeiten ein. Die zulässige Lagerzeit gilt ab dem Auslieferungsdatum (Rechnungs-/Warenausgangsdatum seitens WEH oder dem Vertriebspartner). Sollte das WEH Produkt in einem Komplettsystem verbaut sein, so ist die Lagerzeit von ®... -
Seite 50: Installieren
Überprüfen Sie vor der Installation, ob die Gegenstücke für die Montagedaten (siehe Kapitel 7.2 Medienleitung installieren), welche WEH für das WEH Produkt vorgibt, aus- ® gelegt sind. Hinweis: Diese Montagedaten (Drehmomente, Montagedrehungen etc.) sind Werte, die ausschließlich für die Komponenten gelten, die im Lieferumfang von WEH enthalten sind. Seite 50 MD-10193-L51-R1.2.0-03... -
Seite 51: Medienleitung Installieren
Bitte beachten: Nachfolgende Erwähnungen von Bezeichnungen und Positionsnummern beziehen sich auf das Kapitel 3. Produktübersicht / Produktbeschreibung auf Seite 44. Î Schrauben Sie die Schutzkappen von den Anschlüssen ab. Î Spannen Sie den WEH Adapter zum Montieren der ® Medien- und Steuerdruckleitung in einen Schraubstock mit Aluminiumspannbacken. -
Seite 52: Dichtheit Der Verbindung Prüfen
Betriebsanleitung 7�3 Dichtheit der Verbindung prüfen Î Schließen Sie den Adapter an einen geschlossenen Prüfling an. Î Beaufschlagen Sie den Adapter und die Medienleitung langsam mit dem Betriebsdruck. Vorsicht: Der Prüfling muss verschlossen sein. Î Überprüfen Sie den Adapter, die Verbindung zur Medien- und Steuerdruckleitung und die Verbindung zum Prüfling auf Dichtheit. -
Seite 53: Bedienen
Adapter gerade an, dadurch wird einer Beschädigung der ® Frontdichtung durch eventuell scharfe Kanten am Prüfling vorgebeugt. Î Ziehen Sie nach dem Anschließen immer am WEH Adapter, um sicherzustellen, ® dass er richtig angeschlossen ist und dass die Spannzangen greifen, bevor Sie das unter Druck stehende Medium zuführen. -
Seite 54: Anschließen
Betriebsanleitung 8�2 Anschließen Anschließen eines TW17H Î Betätigen Sie den Handhebel (Pos. 2) (Abbildung 4). Die Spannzangen fallen zusammen. Î Stecken Sie den Adapter mit gedrückten Handhebel (Pos. 2) gerade und soweit in den Prüfling ein, bis die Frontdichtung (Pos. 7) den Prüfling berührt (Abbildung 5). Dadurch wird eine Beschädigung der Frontdichtung durch eventuell scharfe Kanten am Prüfling vorgebeugt und das richtige Anschließen gewährleistet. - Seite 55 Betriebsanleitung Anschließen eines TW17V Î Drücken Sie den Ventilknopf (Pos. 4) (Abbildung 7). Die Spannzangen fallen zusammen. Î Stecken Sie den Adapter mit gedrücktem Ventilknopf (Pos. 4) gerade und soweit in den Prüfling ein, bis die Frontdichtung (Pos. 7) den Prüfling berührt (Abbildung 8). Dadurch wird eine Beschädigung der Frontdichtung durch eventuell scharfe Kanten am Prüfling vorgebeugt und das richtige Anschließen gewährleistet.
- Seite 56 Betriebsanleitung Anschließen eines TW17P Î Beaufschlagen Sie den Adapter mit pneumatischem Steuerdruck. Die Spannzangen fallen zusammen. Î Stecken Sie den Adapter mit angelegtem Steuerdruck gerade und soweit in den Prüfling ein, bis die Frontdich- tung (Pos. 7) den Prüfling berührt (Abbildung 10). Dadurch wird eine Beschädigung der Frontdichtung durch eventuell scharfe Kanten am Prüfling vorgebeugt und das richtige Anschließen gewährleistet.
-
Seite 57: Abschließen
Betriebsanleitung 8�3 Abschließen Î Nach Beendigung des Prüfvorganges entlüften Sie die Medienleitung vollständig. Vorsicht: Stellen Sie zuerst den druckfreien Zustand her, bevor Sie die Verbindung lösen. Abschließen eines TW17H Î Betätigen Sie den Handhebel (Pos. 2). Die Spannzangen fallen durch das Betätigen zusammen. -
Seite 58: Inspizieren | Warten
Überprüfen Sie das WEH Produkt nach den Wartungsarbeiten auf Leckage. Beachten ® Sie hierzu das Kapitel 7. Installieren auf Seite 50. - Zum Zweck der Inspektion ist es nicht notwendig, dass das WEH Produkt abgebaut ® wird, es muss allerdings drucklos sein. -
Seite 59: Wartungsintervalle
® Inspektion – umgehend zur Wartung an WEH. Sollten Sie das WEH Produkt nicht ® regelmäßig inspizieren und zur Wartung an WEH schicken, kann es insbesondere zu Undichtigkeiten und damit unter Umständen auch zu Ausfällen und/oder Unfällen kommen. 9�3 Übersicht Mindestintervalle für Inspektion und Wartung Erstmalig Nr�... -
Seite 60: Warten
Kapitel 3. Produktübersicht / Produktbeschreibung auf Seite 44. Î Tauschen Sie das WEH Produkt aus oder schicken Sie es zur Wartung an WEH ein, ® falls Sie Undichtigkeiten oder Fehlfunktionen feststellen. Das Produkt darf nicht mehr verwendet werden. - Seite 61 Sie ihn aus dem Einstich (Abbildung 12). Achtung: Beim Entfernen der Frontdichtung darf die Oberfläche des Einstiches für die Frontdichtung nicht Abbildung 12 beschädigt werden. Es darf nur das von WEH empfohlene Werkzeug verwendet werden. Î Säubern Sie den Einstich von Schmutz oder sonstigen Rückständen.
- Seite 62 (Pos. 7) mit dem O-Ring-Picker ® und entnehmen Sie ihn aus dem Einstich. Î Spannen Sie den Adapter in einen Schraubstock mit Aluminiumspannbacken. Achtung: Der WEH Adapter darf beim Einspannen nicht beschädigt werden. ® Î Schrauben Sie die Ventil-Be- tätigung mit dem Montagewerkzeug ®...
- Seite 63 O-Ring-Picker ® und entnehmen Sie ihn aus dem Einstich. Î Spannen Sie den Adapter in einen Schraubstock mit Aluminiumspannbacken. Achtung: Der WEH Adapter darf beim Einspannen nicht beschädigt werden. ® Î Schrauben Sie die Ventil-Be- tätigung mit einem passenden Gabelschlüssel aus dem Grundgerät (Pos.
- Seite 64 Betriebsanleitung Montage der Handhebel-Betätigung Î Schmieren Sie die Lauffläche des Pins der neuen Betäti- gung leicht mit dem Schmiermittel ® Art. Nr. E99-40. Î Stecken Sie die neue Handhebel-Betätigung in das Grundgerät (Pos. 1) ein. Î Schrauben Sie die Hand- hebel-Betätigung handfest in das Grundgerät (Pos.
- Seite 65 Schmiermittel ® Art. Nr. E99-40. Î Spannen Sie den Adapter in einen Schraubstock mit Aluminiumspannbacken. Achtung: Der WEH Adapter darf beim Einspannen nicht beschädigt werden. ® Î Stecken Sie die neue Ventil-Betätigung in das Grundgerät (Pos. 1) ein.
- Seite 66 Schmiermittel ® Art. Nr. E99-40. Î Spannen Sie den Adapter in einen Schraubstock mit Aluminiumspannbacken. Achtung: Der WEH Adapter darf beim Einspannen nicht beschädigt werden. ® Î Stecken Sie die neue Pneumatik-Betätigung in das Grundgerät (Pos. 1) ein.
-
Seite 67: Schmieren
Kapitel 3. Produktübersicht / Produktbeschreibung auf Seite 44. 10�1 Sicherheitshinweise zum Schmieren Î Achten Sie darauf, dass Sie keine Dichtflächen oder Dichtungskomponenten während des Schmierens beschädigen. Î Verwenden Sie zur Schmierung ausschließlich den WEH Wartungsspray ® Art. Nr. E99-44923. 10�2 Schmieren Î... -
Seite 68: Fehlerbeheben
Handhebel oder Ventilbetätigung ist stark beschädigt Adapter zur Wartung an WEH spruchung durch unsach- oder gebrochen schicken gemäßen Umgang Defekte Leckage am Adapter Adapter zur Wartung an WEH senden. Dichtungskomponenten Ausblasgeräusche Leckage an der Betriebs- Verschraubungen sind Festziehen der Verschraubungen, medienzuleitung oder dem undicht siehe Kapitel 7. - Seite 69 WEH Spannzangen fallen nicht Adapter lässt sich nicht zusammen mehr anschließen Innenliegender An- Adapter zur Wartung an WEH schlussmechanismus ist schicken defekt Anliegender Steuerdruck Steuerdruck erhöhen ist nicht ausreichend Bei sonstigen Problemen kontaktieren Sie bitte WEH oder Ihren zuständigen Vertriebspartner.
-
Seite 70: Entsorgung
Pos. 6 Pneumatik-Betätigung auf Anfrage Handhebel-Betätigung auf Anfrage Ventil-Betätigung Î Geben Sie bei der Bestellung die auf Ihrem WEH Produkt gekennzeichnete ® Artikelnummer an. Bitte beachten: Beachten Sie zur richtigen Verwendung von WEH Ersatzteilen das ® Kapitel 9. Inspizieren | Warten auf Seite 58. - Seite 71 NOTES...
- Seite 72 89257 Illertissen / Germany Phone: +49 7303 9609-0 Email: sales@weh.com www.weh.com © All rights reserved, WEH GmbH. Any unauthorised use is strictly forbidden. Subject to alteration. No liability will be assumed for any content. This document invalidates all previous versions. Kontakt Sie haben Fragen oder benötigen weitere Informationen?