Weh TW01 Betriebsanleitung
Adapter zur druck- und vakuumprüfung in glattrohren, bohrungen und bauteilen mit innengewinde

Verwandte Anleitungen für Weh TW01


Inhaltszusammenfassung für Weh TW01
- Seite 1 Operating instructions ⋅ Betriebsanleitung Type TW01 Connector for pressure and vacuum tests in straight tubes, ® bores and components with female threads Adapter zur Druck- und Vakuumprüfung in Glattrohren, ® Bohrungen und Bauteilen mit Innengewinde - We Engineer Hightech ®...
- Seite 3 TYPE TW01 � � � � � � � � � � � � � � � � � � � � � � � � � � � � � � � � � � � � � � �...
- Seite 38 Betriebsanleitung Typ TW01 Adapter zur Druck- und Vakuumprüfung in Glattrohren, ® Bohrungen und Bauteilen mit Innengewinde INHALT EINLEITUNG Zu Ihrer Orientierung Allgemeine Angaben Gewährleistung und Haftung Allgemeine Sicherheitshinweise Definition von Fachpersonal BESTIMMUNGSGEMÄSSE VERWENDUNG PRODUKTÜBERSICHT / PRODUKTBESCHREIBUNG TECHNISCHE DATEN LAGERN Sicherheitshinweise zum sachgerechten Lagern Lagern BENÖTIGTE HILFSMITTEL...
- Seite 39 INSPIZIEREN | WARTEN Sicherheitshinweise zum Inspizieren und Warten Wartungsintervalle Übersicht Mindestintervalle für Inspektion und Wartung Warten 10. FEHLERBEHEBUNG 11. ENTSORGUNG 12. ZUBEHÖR | ERSATZTEILE Die deutsche Version ist das Original. Hersteller: WEH GmbH Verbindungstechnik - im Nachfolgenden „WEH“ genannt. Seite 39 MD-10187-L51-R1.2.0-03...
-
Seite 40: Einleitung
Sehr geehrter Kunde! Wir freuen uns, dass Sie sich für den Einsatz unserer Produkte entschieden haben. Der WEH Adapter TW01 wurde ausschließlich zur Druck- und Vakuumprüfung in Glatt- ® rohren, Bohrungen und Bauteilen mit Innengewinde entwickelt. Beachten und befolgen Sie sämtliche Hinweise und Warnungen in dieser Betriebs- anleitung�... -
Seite 41: Allgemeine Angaben
- ein Lieferschein - ein Original WEH Prüfprotokoll (nicht bei Ersatzteilen) - eine WEH Betriebsanleitung Î Wenden Sie sich umgehend an WEH oder den entsprechenden Vertriebspartner, falls Ihnen Unterlagen fehlen. 1�3 Gewährleistung und Haftung - Es gelten unsere allgemeinen Geschäftsbedingungen. -
Seite 42: Allgemeine Sicherheitshinweise
Stellen Sie diese Betriebsanleitung insbesondere jedem zur Verfügung, der für die Installation, Bedienung und Wartung dieses WEH Produktes zuständig ist. ® Î Wenden Sie sich an WEH bevor Sie das WEH Produkt einsetzen, sollten Anweisun- ® gen in dieser Betriebsanleitung unklar sein. Î... -
Seite 43: Bestimmungsgemässe Verwendung
® Glattrohren, Bohrungen und Bauteilen mit Innengewinde entwickelt. - Der WEH Adapter TW01 stellt schnell eine leckfreie Verbindung zur Druck- und Va- ® kuumprüfung her und ermöglicht so, dass flüssiges oder gasförmiges Medium durch den Adapter zugeführt werden kann und der Prüfling getestet, gefüllt oder gespült werden kann. -
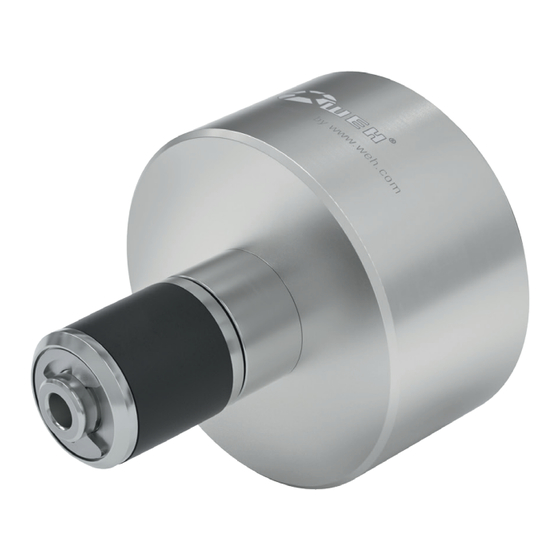
Seite 44: Produktübersicht / Produktbeschreibung
Betriebsanleitung 3. PRODUKTÜBERSICHT / PRODUKTBESCHREIBUNG Produktbeschreibung TW01 für Nicht-Gewindeanwendung Pos� Bezeichnung Gehäuse Abstandshalter Frontdichtung Begriffserklärung Anschlüsse Betriebsmedienzuleitung Steuerdruckanschluss - Zuleitung Befestigungsbohrung Seite 44 MD-10187-L51-R1.2.0-03... - Seite 45 Betriebsanleitung TW01 für Gewindeanwendung Pos� Bezeichnung Gehäuse Abstandshalter Frontdichtung Hauptdichtung Begriffserklärung Anschlüsse Betriebsmedienzuleitung Steuerdruckanschluss - Zuleitung Befestigungsbohrung Seite 45 MD-10187-L51-R1.2.0-03...
- Seite 46 Betriebsanleitung TW01 Doppeladapter für Nicht-Gewindeanwendung Pos� Bezeichnung Gehäuse Abstandshalter Frontdichtung Begriffserklärung Anschlüsse Betriebsmedienzuleitung Steuerdruckanschluss - Zuleitung Befestigungsbohrung Seite 46 MD-10187-L51-R1.2.0-03...
-
Seite 47: Produktbeschreibung Zubehörteile
Betriebsanleitung Produktbeschreibung Zubehörteile Pneumatikkupplung und Steuer-/ Entlüftungsventil Pos� Bezeichnung Steuer- / Entlüftungsventil Pneumatikkupplung Begriffserklärung Anschlüsse Steuerdruckanschluss - Zuleitung Steuerdruckanschluss - Ableitung Handschiebeventil und Gewindeverlängerung Pos� Bezeichnung Gewindeverlängerung Handschiebeventil Begriffserklärung Anschlüsse Steuerdruckanschluss - Zuleitung Steuerdruckanschluss - Ableitung Winkelstück 90° Begriffserklärung Anschlüsse Steuerdruckanschluss - Zuleitung Steuerdruckanschluss - Ableitung Seite 47... -
Seite 48: Technische Daten
Betriebsanleitung 4. TECHNISCHE DATEN Eigenschaften Standardausführung Max. zulässiger Vakuum bis 9 bar Betriebsdruck PS TW01 BG01 6 - 9 bar Druckluft Steuer- TW01 druck 6 - 12 bar Druckluft allgemein Temperaturbereich +5 °C bis +80 °C Leckrate 1 x 10... -
Seite 49: Lagern
5. LAGERN 5�1 Sicherheitshinweise zum sachgerechten Lagern Î Stellen Sie sicher, dass die folgenden Sicherheitshinweise und Lagerzeiten stets ein- gehalten werden. Achtung: Eine nicht sachgerechte Lagerung des WEH Produktes kann die maximale ® Lebensdauer erheblich reduzieren. Î Schützen Sie das WEH Produkt grundsätzlich vor Beschädigungen, Verschmutz-... -
Seite 50: Lagern
Beachten Sie die Sicherheitshinweise unter Kapitel 5.1 und halten Sie die nach- folgenden Lagerzeiten ein. Die zulässige Lagerzeit gilt ab dem Auslieferungsdatum (Rechnungs-/Warenausgangsdatum seitens WEH oder dem Vertriebspartner). Sollte das WEH Produkt in einem Komplettsystem verbaut sein, so ist die Lagerzeit von ®... -
Seite 51: Installieren
Überprüfen Sie vor der Installation, ob die Gegenstücke für die Montagedaten (siehe Kapitel 7.2 Medienleitung und Steuerdruckleitung installieren), welche WEH für das Produkt vorgibt, ausgelegt sind. ® Hinweis: Diese Montagedaten (Drehmomente, Montagedrehungen etc.) sind Werte, die ausschließlich für die Komponenten gelten, die im Lieferumfang von WEH enthalten sind. Seite 51 MD-10187-L51-R1.2.0-03... -
Seite 52: Medienleitung Und Steuerdruckleitung Installieren
Betriebsanleitung Î Verbinden Sie den WEH Adapter mit einer geeigneten Sicherungseinrichtung ® (mechanische Verbindung über einen Zylinder, eine starre Befestigung oder anderer Mittel) an den Befestigungsbohrungen „G" auf der Rückseite des Adapters (oder eine andere sichere Halterung), sodass der Adapter beim Druckbeaufschlagen sicher mit dem Prüfling verbunden ist und sich nicht lösen kann. -
Seite 53: Zubehörteile Zur Manuellen Beaufschlagung Des Steuerdrucks Installieren
Zubehörteile zur manuellen Beaufschlagung des Steuerdrucks installieren Pneumatikkupplung (Pos� 4) und Steuer- / Entlüftungsventil (Pos� 3) installieren Î Verschrauben Sie den Steuerdruckanschluss „P2“ des Steuer- / Entlüftungsventils (Pos. 3) druckdicht mit dem Steuerdruckanschluss „P1" des WEH Adapters. ® Anzugsdrehmoment siehe Tabelle Seite 52. -
Seite 54: Bedienen
Adapter besitzt kein integriertes Absperrventil und verhindert daher nicht, ® dass beim Abschließen Prüfmedium austritt. Schließen Sie deshalb den Adapter nur bei absolut sicheren Verhältnissen ab. Î Führen Sie keinen Prüfdruck oder Steuerdruck zu, wenn der WEH Adapter nicht an ® einem Prüfling angeschlossen ist. Achtung: Der WEH Adapter wird durch Druckluft betätigt. -
Seite 55: Anschließen
Sie den Prüfdruck zugeben. Hinweis: Bei Vakuumanwendung kann auf eine Haltevorrichtung verzichtet werden. 8�2 Anschließen Anschließen eines TW01 Adapters / TW01 Doppel- adapters für Nicht-Gewindeanwendung Î Stecken Sie den Adapter gerade in den Prüfling ein (Abbildung 1). Die Frontdichtung (Pos. 7) darf nicht mehr sichtbar sein (Abbildung 2 und Abbildung 3). - Seite 56 Betriebsanleitung Anschließen eines TW01 Adapters für Gewindeanwendung Î Stecken Sie den Adapter gerade in den Prüfling ein, bis die Frontdichtung (Pos. 7) den Prüfling berührt (Abbildung 4). Dadurch wird eine Beschädigung der Frontdichtung durch eventuell scharfe Kanten am Prüfling vorgebeugt und das richtige Anschließen gewährleistet.
- Seite 57 Betriebsanleitung Anschließen eines Adapters mit Pneumatikkupplung (Pos� 4) und Steuer- / Entlüf- tungsventil (Pos� 3) Î Stecken Sie den Adapter, entsprechend der Bauweise wie auf Seite 55 und Seite 56 beschrieben, in den Prüfling ein. Hinweis: Stellen Sie sicher, dass der Adapter mittels einer mechanischen Verbindung sicher in den Prüfling gesteckt wird bevor Sie fortfahren.
-
Seite 58: Abschließen
Beaufschlagen Sie, um die Prüfung zu beginnen, die Betriebsmedienzuleitung „B1" mit Druck. 8�3 Abschließen Abschließen eines TW01 Adapters ohne Zubehör Î Nach Beendigung der Prüfung und vollständiger Entlüftung der Medienleitung, schlie- ßen Sie die den Adapter ab. Vorsicht: Stellen Sie zuerst den druckfreien Zustand her, bevor Sie die Verbindung lösen. - Seite 59 Betriebsanleitung Abschließen eines Adapters mit Pneumatikkupplung (Pos� 4) und Steuer- / Entlüf- tungsventil (Pos� 3) Î Nach Beendigung der Prüfung und vollständiger Entlüftung der Medienleitung, schließen Sie die den Adapter ab. Ventilstößel Vorsicht: Stellen Sie zuerst den druckfreien Zustand her, bevor Sie die Verbindung lösen.
-
Seite 60: Inspizieren | Warten
Überprüfen Sie das WEH Produkt nach den Wartungsarbeiten auf Leckage. Beachten ® Sie hierzu das Kapitel 7. Installieren auf Seite 51. - Zum Zweck der Inspektion ist es nicht notwendig, dass das WEH Produkt abgebaut ® wird, es muss allerdings drucklos sein. -
Seite 61: Wartungsintervalle
® Inspektion – umgehend zur Wartung an WEH. Sollten Sie das WEH Produkt nicht ® regelmäßig inspizieren und zur Wartung an WEH schicken, kann es insbesondere zu Undichtigkeiten und damit unter Umständen auch zu Ausfällen und/oder Unfällen kommen. 9�3 Übersicht Mindestintervalle für Inspektion und Wartung Erstmalig Nr�... -
Seite 62: Warten
Kapitel 3. Produktübersicht / Produktbeschreibung auf Seite 44. Î Tauschen Sie das WEH Produkt aus oder schicken Sie es zur Wartung an WEH ein, ® falls Sie Undichtigkeiten oder Fehlfunktionen feststellen. Das Produkt darf nicht mehr verwendet werden. -
Seite 63: Explosionszeichnung Vom Aufbau
Betriebsanleitung Explosionszeichnung vom Aufbau Baugröße 01 - 4 TW01 Hauptdichtungssatz Achse Sicherungsring Unterlegscheibe Hauptdichtung Unterlegscheibe Abstandshalter mit Eindrehung inkl. integrierter Adaptergehäuse Hubbegrenzung Baugröße 5 - 8 TW01 Hauptdichtungssatz Achse Sicherungsring Unterlegscheibe Hauptdichtung Unterlegscheibe Abstandshalter mit Eindrehung Adaptergehäuse inkl. integrierter Hubbegrenzung Warten Î... - Seite 64 Î Ersetzen Sie immer den Sicherungsring, wenn Sie die Hauptdichtung wechseln. - Der TW01 Hauptdichtungssatz für Gewindeanwendungen enthält die Polyuret- han-Hauptdichtung(en) (Pos. 8), Unterlegscheibe(n), einen Sicherungsring, eine NBR-Frontdichtung (Pos. 7) und einen Dichtungsträger für die Frontdichtung.
- Seite 65 Betriebsanleitung Explosionszeichnung vom Aufbau Baugröße 01 - 4 TW01 Gewinde-Hauptdichtungssatz Achse Sicherungsring Dichtungsträger Hauptdichtung Frontdichtung Hubbegrenzung Unterlegscheibe Unterlegscheibe mit Eindrehung Adaptergehäuse Baugröße 5 - 6 TW01 Gewinde-Hauptdichtungssatz Achse Dichtungsträger Sicherungsring Hauptdichtung Frontdichtung Hubbegrenzung Adaptergehäuse Unterlegscheibe Unterlegscheibe mit Eindrehung Warten Î...
-
Seite 66: Fehlerbehebung
Mechanische Überbean- Adapter zur Wartung an WEH Adaptergehäuse ist stark beschädigt oder gebrochen spruchung durch unsach- schicken gemäßen Umgang Defekte Leckage am Adapter Adapter zur Wartung an WEH senden. Dichtungskomponenten Ausblasgeräusche Leckage an der Verschraubungen sind Festziehen der Verschraubungen, Betriebsmedienzuleitung undicht... - Seite 67 Adapter wackelt trotz richti- am Prüfling ist nicht in Abnutzung an den gem Anschließen im Prüfling Ordnung Frontdichtung(en) / Dichtungen austauschen, siehe Kapitel Hauptdichtung(en) des 9. Inspizieren | Warten Adapters Bei sonstigen Problemen kontaktieren Sie bitte WEH oder Ihren zuständigen Vertriebspartner.
-
Seite 68: Entsorgung
Betriebsanleitung 11. ENTSORGUNG Î Entsorgen Sie das WEH Produkt fachgerecht, wenn Sie es nicht mehr benötigen. ® Beachten Sie die zum Zeitpunkt der Entsorgung gültigen nationalen und örtlichen Bestimmungen zur Entsorgung. 12. ZUBEHÖR | ERSATZTEILE Verschlussschraube für Stopfenversion Sollte der WEH Adapter als Stopfen eingesetzt werden, wird der Anschluss „B1“... - Seite 69 (enthalten die Elastomer-Hauptdichtung(en), zwei Unterlegscheiben und einen Sicherungsring) Ersatzdichtungssätze auf Anfrage (enthalten fünf komplette Hauptdichtungen mit Sicherungsringen) Î Geben Sie bei der Bestellung die auf Ihrem WEH Produkt gekennzeichnete ® Artikelnummer an. Bitte beachten: Beachten Sie zur richtigen Verwendung von WEH Ersatzteilen das ®...
- Seite 70 NOTES...
- Seite 71 NOTES...
- Seite 72 89257 Illertissen / Germany Phone: +49 7303 9609-0 Email: sales@weh.com www.weh.com © All rights reserved, WEH GmbH. Any unauthorised use is strictly forbidden. Subject to alteration. No liability will be assumed for any content. This document invalidates all previous versions. Kontakt Sie haben Fragen oder benötigen weitere Informationen?